Age of Empires II – Walkthrough (Part II)
The second campaign from Age of Kings follows Saladin as he retakes the Holy Land from the Crusaders. This campaign has a lot more standard build-up-then-fight type scenarios than Joan of Arc did. However, that doesn’t make it any easier. In fact, the fifth map in the campaign is the hardest in the entire game.
|
CONTENTS 1. An Arabian Knight |
An Arabian Knight:
The goal of the first scenario is to simply kill stuff. You are given your army. March it south and kill the West Franks. As long as you keep your forces together, this should be no problem. When you reach the south side of the map, you will hit their camp. Destroy the blacksmith as quickly as possible because it upgrades your army when it is done.
You will also capture a cannon galleon. Use it to knock down the towers of Cairo before heading to the mosque. After you get to the mosque, simply head out the other side and go kill the East Franks. They are protected by towers, but the towers are spread far enough apart that you need only kill one to slip past the rest of them.
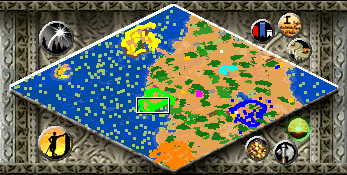
This one starts a bit tricky, but then settles down into a normal build-up then break stuff map. First, send all your starting military units towards Medina. Approximately halfway between your town and there you will find a camp of Reynald’s bandits. Clearing out this camp opens up the path between your market and Medina’s, allowing you to build trade carts and boost your income. As soon as that camp is cleared out, head to the site of the attack you saw. There are usually one or two more Bandits here. Kill them and then continue on into Aqaba, killing the rest of the bandits as you go. Not only does this free up the trade between Aqaba and Medina (who in turn have more to give to you), but you will find a whole bunch of sheep outside Aqaba’s walls. Once cleared, send your troops home to get ready for Reynald’s Raiders.
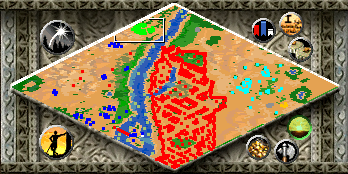
Shot Two By setting gather points from a dock to a target, you can have your demolition ships act like guided missiles against any buildings along the shore Reyald’s Raiders have a base on the north edge of the map. It is fairly well-defended, so you will need to build up before you attack. With the Bandits out of the way for the moment, this shouldn’t take long. There is gold and stone to be mined outside Medina, and plenty of wood around your town. Build up a force, including a few rams, and then attack the Raiders. If you do it quickly enough, there will still be gold and stone near their base.
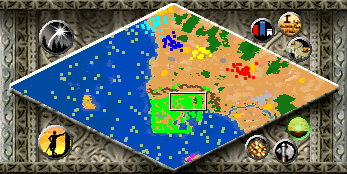
Reynald’s Pirates are a bit harder to get rid of because they are on the other side of the water with no land route to them. The easiest place to make a crossing is in the southwest side of your land. Go through Aqaba, across the ford at the back of the town, and then head south. There will be two more Bandit camps (the last of the Bandit camps is in the northwest corner, but you can ignore it if you want) to be cleared and the Pirates will probably have a few structures on your side of the water, including a dock and a tower. It is a good idea to bring a trebuchet along because you will be able to fire at targets on the other side of the water, and clearing out those targets makes it easier to protect your dock and get all your forces safely across.
The easiest way to handle the Pirates is to send a small force (including a couple villagers) across. Have them build a tower and then an archery range to fill the tower. After that, build a castle and a siege factory, all on the Pirate side. This will allow you to build your units there rather than ship them over.
The only challenge here is that you cannot build castles, towers, or stone walls. However, you can build town centers and fill them with archers and villagers; these act just like towers. Other than that, this is a very straightforward and very easy map.
The relic is the southeast corner of the map. It is inside two wooden palisades and guarded by three monks. However, there are no fortifications and rarely any enemy units other than villagers along the west side of the map. This means that once you advance to the Castle Age and build a monastery and monk, all you need are enough units to get through the palisades and you can sneak out and grab the relic before any enemies realize what has happened. The faster you get the Castle Age, the easier this is.
All you have to do to win the scenario is destroy towers. There are plenty of resources, so it is possible to actually build your walls out from your base to protect the trebuchets as they fire at the towers. In fact, that is the easiest way to keep from having to fight face to face against the multiple enemies.
When you start this scenario, you need to build your defenses. Use the cliffs to your advantage, and start with a small base with gated sections as you expand. It is much safer to build a wall around an area, and then build a gate so that you can expand the area, than to try to wall off all the territory you want from the get-go.
Once your fort is set up, build sections towards Jerusalem. Get them as close to the towers as possible, and the build a tower in the section. The tower will fire at any units that try to get in. Build a couple trebuchets and move them into the section. Have them take out the tower. Continue building walls until you completely surround Jerusalem. This will let you get at four of the five towers without ever needing to fight directly (except to rush the occasional enemy trebuchet). Lastly, build a bunch of rams and rush the center of the city where the last tower (bombard) is. You will need plenty of targets for that tower since it will kill your units quickly.
This is the hardest map in any of the campaigns. You will face three major enemies and one minor one. One of those enemies is going to build a wonder very early. Another of them is on an island and will make very good use of sea power. Finally, they will all attack at about the same time which means you will not have enough of a force to deal with them without building units during the fight.
You can deal with the Tripoli Guards early if you go looking for them. They are due northwest from your city. You will need to build up a moderate-sized force before heading out, but it is recommended that you do so in order to keep them from attacking with the other forces. Kill them as quickly as possible, and then get back inside your walls.
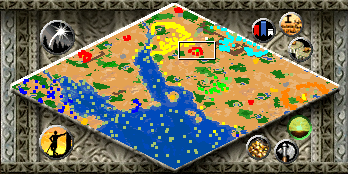
Shot Four Pay attention to your civilization’s bonuses. By focusing on building units that get those bonuses, you can build up power much more quickly You are going to need light cavalry to deal with enemy cannons and battering rams. You can build towers with archers inside your walls to deal with the other units. However, do not ignore the fact that you will need your own siege engines fairly quickly in order to deal with the wonder inside of Ascalon. Last, make sure you build defenses by your docks. Tyre will build a lot of ships and if they destroy your docks, you will probably not be able to ever rebuild them.
Once you weather the initial storm, build a force of camels, several rams, and several trebuchets. The wonder will be built behind a double wall, and the trebuchets can get it much faster than the rams. However, rams will work well in dealing with Ascalon’s towers without the need to stop and unpack your trebuchets several times.
You only need to defeat two of the three cities. Because Tyre is on an island and is very well-defended by both sea power and coastal towers, it is not worth attempting to go after them. Besides, Ascalon must be defeated to deal with the wonder, and Tiberias is not that well-built. The choice should be pretty simple.
After the mad fighting of the last scenario, this one is going to seem easy. This is all-the-more true because all you need to do is build a wonder and defend it for 300 years. You are even given a very well-built city to work with.
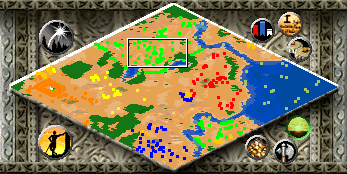
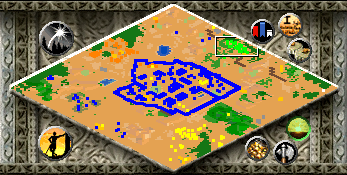
Shot Five It is much easier to defend choke points in the terrain than to try to build walls and towers around your entire civilization First, you need more food quickly. That means you need more villagers. Start building them right away, and then have them build farms and collect wood. You also have villagers in the south of your town who are conveniently located near the gold and stone deposits inside your walls. Put them to work as well. You need plenty of stone to build more towers.
Next, build half a dozen trebuchets and place them around the walls. Once you build the wonder, you will be hit by wave after wave of enemy siege engines, so you’ll probably need at least six and possibly more. Build towers to go with the trebuchets, and fill the towers with archers. Finally, build a strike force of heavy camels to rush out and deal with large masses of siege engines that your trebuchets and towers will not be able to kill off fast enough.
Once your defenses are in place, tear down houses and build the wonder in their place. Keep repairing your defenses and get as many villagers building the wonder as possible. The faster it is completed, the less time you have to defend it.
")


[url=http://prozacby6.com]what is the side effects of prozac [/url][url=http://cialis0i0.com]how fast is cialis [/url][url=http://cialisg8.com]cialis 200mg [/url][url=http://metformin0i0.com]metformin making me ache with weakness? [/url][url=http://prednisolone0i0.com]prednisolone acetate 1 solution for ear in children [/url]
I used to be able to find good advice from your blog posts.
google ads
Some truly interesting points you have written.Aided me a lot, just what I was searching for : D.
Yay google is my queen assisted me to find this outstanding site! .
Known as an “Advocate of Advocacy” he has made literally thousands of communications – phone calls, emails, letters, and actions on behalf of critical environmental, animal welfare, and human rights issues. Has worked on behalf of most of the major environmental organizations as an advocate, volunteer, or fundraiser.
I have been absent for some time, but now I remember why I used to love this site. Thank you, I¦ll try and check back more often. How frequently you update your website?
I truly appreciate this post. I have been looking everywhere for this! Thank goodness I found it on Bing. You have made my day! Thanks again
Thank you for sharing excellent informations. Your web site is very cool. I am impressed by the details that you’ve on this website. It reveals how nicely you perceive this subject. Bookmarked this web page, will come back for more articles. You, my pal, ROCK! I found simply the info I already searched everywhere and simply couldn’t come across. What a great site.
Hi there! This post couldn’t be written any better! Reading through this post reminds me of my previous room mate! He always kept talking about this. I will forward this article to him. Pretty sure he will have a good read. Thank you for sharing!
I truly value your work, Great post.
Excellent web site. Lots of useful information here. I am sending it to several friends ans also sharing in delicious. And of course, thanks for your effort!
Thanks , I have recently been looking for info about this subject for a while and yours is the greatest I’ve discovered till now. But, what concerning the bottom line? Are you certain in regards to the supply?
Nearly all of what you say happens to be astonishingly precise and it makes me ponder why I hadn’t looked at this with this light before. This article truly did switch the light on for me personally as far as this specific subject matter goes. Nonetheless there is actually just one point I am not necessarily too cozy with and whilst I try to reconcile that with the main theme of your position, let me observe exactly what the rest of your visitors have to point out.Very well done.
Your home is valueble for me. Thanks!…
Nice read, I just passed this onto a colleague who was doing some research on that. And he just bought me lunch since I found it for him smile Therefore let me rephrase that: Thanks for lunch!
Thanks for your personal marvelous posting! I actually enjoyed reading it, you can be a great author.I will be sure to bookmark your blog and will come back very soon. I want to encourage you continue your great work, have a nice afternoon!
There is noticeably a bundle to know about this. I assume you made certain nice points in features also.
There’s noticeably a bundle to find out about this. I assume you made sure good factors in options also.
Loving the info on this web site, you have done great job on the articles.
Very interesting subject, appreciate it for posting.
I want to show some appreciation to the writer for bailing me out of this particular difficulty. Because of surfing throughout the world-wide-web and coming across basics that were not pleasant, I figured my life was over. Existing minus the answers to the problems you have solved through your entire article is a serious case, and those that might have negatively affected my career if I had not encountered your web page. Your personal skills and kindness in maneuvering all the pieces was very helpful. I’m not sure what I would have done if I had not come upon such a solution like this. I can at this time look ahead to my future. Thank you so much for this reliable and effective help. I will not think twice to endorse your web site to any person who should receive care on this subject matter.
Good V I should definitely pronounce, impressed with your site. I had no trouble navigating through all the tabs and related info ended up being truly simple to do to access. I recently found what I hoped for before you know it at all. Reasonably unusual. Is likely to appreciate it for those who add forums or something, web site theme . a tones way for your customer to communicate. Excellent task..
Hello.This post was really motivating, especially because I was searching for thoughts on this issue last Wednesday.
Good day! Would you mind if I share your blog with my twitter group? There’s a lot of folks that I think would really appreciate your content. Please let me know. Many thanks
I’m not sure where you’re getting your information, but great topic. I needs to spend some time learning much more or understanding more. Thanks for fantastic information I was looking for this information for my mission.
I discovered your blog site on google and check a few of your early posts. Continue to keep up the very good operate. I just additional up your RSS feed to my MSN News Reader. Seeking forward to reading more from you later on!…
Valuable info. Fortunate me I found your web site by chance, and I’m stunned why this coincidence did not came about in advance! I bookmarked it.
I view something genuinely special in this web site.
I was reading some of your articles on this website and I believe this web site is really informative ! Retain posting.
Hello! Someone in my Facebook group shared this site with us so I came to check it out. I’m definitely enjoying the information. I’m bookmarking and will be tweeting this to my followers! Excellent blog and excellent design and style.
That is the suitable blog for anyone who wants to search out out about this topic. You realize a lot its virtually hard to argue with you (not that I really would need…HaHa). You positively put a brand new spin on a subject thats been written about for years. Great stuff, simply great!
I and my friends have already been viewing the excellent information and facts found on the blog while the sudden I got an awful feeling I never thanked the web blog owner for them. These boys are actually as a consequence joyful to learn them and have in fact been loving these things. Appreciation for really being well thoughtful as well as for picking out this kind of exceptional subject matter millions of individuals are really eager to understand about. Our own honest regret for not expressing appreciation to sooner.
Hiya, I am really glad I have found this information. Today bloggers publish only about gossips and internet and this is really irritating. A good web site with exciting content, this is what I need. Thanks for keeping this site, I will be visiting it. Do you do newsletters? Cant find it.
I went over this website and I believe you have a lot of good information, saved to bookmarks (:.
You actually make it seem so easy with your presentation but I in finding this topic to be really one thing which I believe I’d never understand. It sort of feels too complex and extremely huge for me. I am taking a look ahead in your subsequent put up, I will try to get the hang of it!
Hi there! I simply want to give an enormous thumbs up for the good data you’ve here on this post. I shall be coming back to your blog for extra soon.
I was just searching for this info for some time. After 6 hours of continuous Googleing, finally I got it in your site. I wonder what is the lack of Google strategy that don’t rank this type of informative sites in top of the list. Usually the top websites are full of garbage.
It?¦s actually a great and useful piece of info. I?¦m glad that you just shared this helpful info with us. Please keep us up to date like this. Thank you for sharing.
Thank you for the good writeup. It in fact was a amusement account it. Look advanced to far added agreeable from you! However, how could we communicate?
I love the efforts you have put in this, regards for all the great blog posts.
Yay google is my queen aided me to find this outstanding web site! .
The next time I read a blog, I hope that it doesnt disappoint me as much as this one. I mean, I know it was my choice to read, but I actually thought youd have something interesting to say. All I hear is a bunch of whining about something that you could fix if you werent too busy looking for attention.
I keep listening to the news update lecture about getting boundless online grant applications so I have been looking around for the top site to get one. Could you tell me please, where could i acquire some?
I like this post, enjoyed this one appreciate it for posting. “To affect the quality of the day that is the art of life.” by Henry David Thoreau.
We are a group of volunteers and starting a new scheme in our community. Your web site offered us with valuable info to work on. You have done a formidable job and our entire community will be thankful to you.
Thanks for another informative web site. Where else could I get that type of information written in such a perfect way? I’ve a project that I am just now working on, and I’ve been on the look out for such info.
Nice blog here! Additionally your site loads up fast! What host are you the use of? Can I am getting your affiliate link in your host? I want my website loaded up as quickly as yours lol
Nice post. I learn something more challenging on different blogs everyday. It will always be stimulating to read content from other writers and practice a little something from their store. I’d prefer to use some with the content on my blog whether you don’t mind. Natually I’ll give you a link on your web blog. Thanks for sharing.
You are a very smart individual!
I was just looking for this info for a while. After six hours of continuous Googleing, finally I got it in your web site. I wonder what is the lack of Google strategy that don’t rank this kind of informative websites in top of the list. Normally the top sites are full of garbage.
You should participate in a contest for among the finest blogs on the web. I will recommend this website!
I?¦m now not certain where you are getting your information, but great topic. I needs to spend a while learning more or understanding more. Thanks for magnificent info I used to be in search of this information for my mission.
You can certainly see your skills within the paintings you write. The sector hopes for even more passionate writers such as you who are not afraid to mention how they believe. Always go after your heart.
Lovely just what I was looking for.Thanks to the author for taking his time on this one.
I like this web blog very much, Its a real nice spot to read and obtain info . “The love of nature is consolation against failure.” by Berthe Morisot.
Excellent post. I am dealing with a few of these issues as well..
Thanks – Enjoyed this article, how can I make is so that I get an email every time you make a fresh update?
Magnificent beat ! I wish to apprentice while you amend your site, how can i subscribe for a blog web site? The account aided me a acceptable deal. I had been a little bit acquainted of this your broadcast provided bright clear idea
It?¦s really a great and useful piece of information. I?¦m happy that you shared this helpful info with us. Please keep us informed like this. Thanks for sharing.
Appreciating the persistence you put into your website and in depth information you present. It’s awesome to come across a blog every once in a while that isn’t the same out of date rehashed information. Fantastic read! I’ve bookmarked your site and I’m adding your RSS feeds to my Google account.
You really make it seem so easy with your presentation but I find this topic to be really something that I think I would never understand. It seems too complex and extremely broad for me. I am looking forward for your next post, I’ll try to get the hang of it!
I precisely wished to thank you very much once more. I’m not certain the things that I would’ve carried out without the tips shown by you concerning that area. It was before a daunting difficulty in my view, but noticing this professional fashion you dealt with that made me to jump over contentment. Extremely thankful for this information and thus expect you find out what an amazing job your are doing teaching men and women by way of your website. I know that you’ve never got to know any of us.
F*ckin’ remarkable things here. I’m very glad to see your article. Thanks a lot and i’m looking forward to contact you. Will you please drop me a e-mail?
Good post and straight to the point. I am not sure if this is really the best place to ask but do you people have any ideea where to get some professional writers? Thx 🙂
Howdy would you mind letting me know which webhost you’re working with? I’ve loaded your blog in 3 completely different web browsers and I must say this blog loads a lot faster then most. Can you suggest a good web hosting provider at a reasonable price? Cheers, I appreciate it!
of course like your website but you need to take a look at the spelling on several of your posts. A number of them are rife with spelling problems and I in finding it very bothersome to tell the reality however I will certainly come again again.
I do believe all the ideas you have introduced on your post. They’re very convincing and will certainly work. Nonetheless, the posts are very short for beginners. May you please lengthen them a bit from next time? Thanks for the post.
I’m extremely impressed along with your writing talents and also with the layout in your weblog. Is that this a paid subject or did you customize it yourself? Either way stay up the excellent high quality writing, it’s uncommon to see a great weblog like this one these days..
Pretty! This was a really wonderful post. Thank you for your provided information.
Your place is valueble for me. Thanks!…
Thank goodness you’re here !
very nice submit, i definitely love this web site, carry on it
I believe other website proprietors should take this website as an example , very clean and fantastic user genial pattern.
Some really excellent information, Gladiola I detected this. “Sell your cleverness and buy bewilderment.” by Jalal ud-Din Rumi.
Thanks for all of your labor on this website. My mom really loves conducting research and it is easy to understand why. My partner and i learn all of the lively manner you present insightful guidelines via your blog and as well as boost contribution from others on the issue and our favorite girl is without question being taught so much. Have fun with the remaining portion of the new year. You are doing a terrific job.
Spot on with this write-up, I seriously believe that this amazing site needs far more attention. IÃll probably be returning to see more, thanks for the advice!
Awsome site! I am loving it!! Will be back later to read some more. I am taking your feeds also.
I just could not go away your website prior to suggesting that I extremely loved the standard information a person provide in your guests? Is gonna be back frequently to investigate cross-check new posts
I really like your writing style, good info , thankyou for putting up : D.
Hello. fantastic job. I did not expect this. This is a fantastic story. Thanks!
Some genuinely superb content on this website, thanks for contribution. “I finally know what distinguishes man from other beasts financial worries. – Journals” by Jules Renard.
I really like your writing style, great information, thanks for posting : D.
When I initially commented I clicked the “Notify me when new comments are added” checkbox and now each time a comment is added I get three emails with the same comment. Is there any way you can remove me from that service? Thank you!
Hi , I do believe this is an excellent blog. I stumbled upon it on Yahoo , i will come back once again. Money and freedom is the best way to change, may you be rich and help other people.
I like what you guys are up also. Such clever work and reporting! Carry on the superb works guys I?¦ve incorporated you guys to my blogroll. I think it’ll improve the value of my web site 🙂
As soon as I discovered this web site I went on reddit to share some of the love with them.
I just couldn’t depart your website prior to suggesting that I actually enjoyed the standard info a person provide for your visitors? Is going to be back often in order to check up on new posts
I have recently started a site, the info you provide on this website has helped me greatly. Thank you for all of your time & work.
Lovely just what I was searching for.Thanks to the author for taking his clock time on this one.
Hello, you used to write fantastic, but the last few posts have been kinda boring?K I miss your tremendous writings. Past few posts are just a little out of track! come on!
Howdy! I could have sworn I’ve been to this site before but after browsing through some of the post I realized it’s new to me. Nonetheless, I’m definitely happy I found it and I’ll be bookmarking and checking back frequently!
Can I just say what a relief to find someone who actually knows what theyre talking about on the internet. You definitely know how to bring an issue to light and make it important. More people need to read this and understand this side of the story. I cant believe youre not more popular because you definitely have the gift.
Good info. Lucky me I reach on your website by accident, I bookmarked it.
Most of the things you state happens to be supprisingly legitimate and that makes me ponder why I hadn’t looked at this in this light before. This article truly did turn the light on for me as far as this specific topic goes. However at this time there is actually one position I am not too cozy with and whilst I attempt to reconcile that with the central idea of your point, permit me observe what the rest of your subscribers have to say.Very well done.
As I web site possessor I believe the content material here is rattling fantastic , appreciate it for your hard work. You should keep it up forever! Best of luck.
he blog was how do i say it… relevant, finally something that helped me. Thanks
Youre so cool! I dont suppose Ive learn anything like this before. So nice to seek out anyone with some unique thoughts on this subject. realy thank you for beginning this up. this web site is something that is wanted on the internet, someone with slightly originality. useful job for bringing one thing new to the internet!
This website can be a stroll-by way of for the entire information you wished about this and didn’t know who to ask. Glimpse here, and you’ll undoubtedly uncover it.
Undeniably believe that which you stated. Your favorite justification appeared to be on the web the easiest thing to be aware of. I say to you, I certainly get irked while people think about worries that they just do not know about. You managed to hit the nail upon the top and defined out the whole thing without having side-effects , people could take a signal. Will probably be back to get more. Thanks
Fantastic blog! Do you have any tips for aspiring writers? I’m planning to start my own blog soon but I’m a little lost on everything. Would you advise starting with a free platform like WordPress or go for a paid option? There are so many options out there that I’m totally confused .. Any recommendations? Many thanks!
Very efficiently written information. It will be beneficial to anyone who usess it, as well as myself. Keep up the good work – can’r wait to read more posts.
I am impressed with this website , really I am a big fan .
I enjoy the efforts you have put in this, appreciate it for all the great articles.
Great beat ! I would like to apprentice while you amend your site, how can i subscribe for a blog website? The account helped me a acceptable deal. I had been a little bit acquainted of this your broadcast offered bright clear idea
you’ve a great weblog right here! would you prefer to make some invite posts on my blog?
Usually I don’t read article on blogs, however I would like to say that this write-up very pressured me to take a look at and do so! Your writing taste has been surprised me. Thanks, very great article.
There is noticeably a bundle to know about this. I assume you made certain good points in features also.
Wow! Thank you! I constantly needed to write on my website something like that. Can I include a portion of your post to my website?
It?¦s in reality a great and useful piece of info. I?¦m glad that you simply shared this helpful info with us. Please stay us up to date like this. Thanks for sharing.
I believe this website has some very wonderful info for everyone. “The best friend is the man who in wishing me well wishes it for my sake.” by Aristotle.
Great line up. We will be linking to this great article on our site. Keep up the good writing.
Thanks for sharing excellent informations. Your site is very cool. I’m impressed by the details that you have on this site. It reveals how nicely you perceive this subject. Bookmarked this website page, will come back for extra articles. You, my friend, ROCK! I found simply the information I already searched everywhere and simply could not come across. What an ideal web-site.
I think this is among the most important information for me. And i am glad reading your article. But want to remark on some general things, The web site style is perfect, the articles is really nice : D. Good job, cheers
Hello, Neat post. There’s a problem along with your web site in web explorer, may check this… IE nonetheless is the market chief and a good section of other folks will miss your magnificent writing due to this problem.
Spot on with this write-up, I truly assume this web site needs way more consideration. I’ll in all probability be again to read rather more, thanks for that info.
I¦ve recently started a site, the info you offer on this web site has helped me greatly. Thanks for all of your time & work.
Good post. I study something more challenging on different blogs everyday. It should at all times be stimulating to read content from different writers and observe somewhat something from their store. I’d want to make use of some with the content material on my blog whether or not you don’t mind. Natually I’ll offer you a hyperlink in your internet blog. Thanks for sharing.
It¦s actually a nice and helpful piece of info. I am happy that you shared this useful information with us. Please stay us informed like this. Thank you for sharing.
It’s really a great and useful piece of info. I’m glad that you just shared this useful info with us. Please keep us up to date like this. Thank you for sharing.
Great post. I was checking constantly this blog and I am impressed! Very helpful information specially the last part 🙂 I care for such information much. I was seeking this certain info for a long time. Thank you and best of luck.
I will right away grasp your rss feed as I can not in finding your e-mail subscription hyperlink or e-newsletter service. Do you have any? Kindly permit me realize in order that I could subscribe. Thanks.
You need to be a part of a contest for one of the greatest blogs online. I most certainly will highly recommend this blog!
I blog frequently and I seriously appreciate your information. This article has really peaked my interest. I will bookmark your blog and keep checking for new information about once per week. I subscribed to your Feed too.
Great goods from you, man. I have be aware your stuff previous to and you’re simply extremely wonderful. I actually like what you have received right here, really like what you’re saying and the way during which you say it. You’re making it enjoyable and you continue to take care of to keep it wise. I can’t wait to learn much more from you. That is actually a tremendous site.
Sweet blog! I found it while searching on Yahoo News. Do you have any suggestions on how to get listed in Yahoo News? I’ve been trying for a while but I never seem to get there! Cheers
Hi my friend! I wish to say that this article is amazing, nice written and include approximately all vital infos. I would like to see more posts like this.
Hi there, simply become aware of your weblog through Google, and found that it’s truly informative. I’m gonna be careful for brussels. I’ll appreciate if you proceed this in future. Numerous people can be benefited out of your writing. Cheers!
Keep up the wonderful work, I read few articles on this web site and I believe that your website is very interesting and has got circles of fantastic information.
Everything is very open with a very clear explanation of the issues. It was really informative. Your site is very helpful. Thanks for sharing!
Thanks for some other excellent post. The place else may anyone get that type of info in such an ideal way of writing? I have a presentation next week, and I’m at the search for such information.
Only wanna comment that you have a very decent internet site, I like the design and style it really stands out.
Very good article. I absolutely love this website. Thanks!
I’m impressed, I need to say. Really not often do I encounter a blog that’s both educative and entertaining, and let me inform you, you have hit the nail on the head. Your idea is excellent; the difficulty is one thing that not sufficient individuals are talking intelligently about. I’m very comfortable that I stumbled throughout this in my seek for something relating to this.
This is very interesting, You are a very skilled blogger. I’ve joined your feed and look forward to seeking more of your fantastic post. Also, I have shared your web site in my social networks!
Hi there! I could have sworn I’ve been to this blog before but after reading through some of the post I realized it’s new to me. Nonetheless, I’m definitely happy I found it and I’ll be book-marking and checking back frequently!
Thank you for sharing excellent informations. Your site is very cool. I am impressed by the details that you抳e on this blog. It reveals how nicely you understand this subject. Bookmarked this web page, will come back for extra articles. You, my friend, ROCK! I found simply the information I already searched all over the place and just could not come across. What an ideal website.
!That may be a slight bit off base. Will you elaborate for me please? 🙂
That is a good tip particularly to those fresh to the blogosphere. Simple but very accurate infoÖ Thanks for sharing this one. A must read article!
I do agree with all the ideas you have offered for your post. They are very convincing and will definitely work. Still, the posts are very short for beginners. May you please extend them a little from subsequent time? Thank you for the post.
An impressive share, I simply given this onto a colleague who was doing slightly evaluation on this. And he actually bought me breakfast as a result of I discovered it for him.. smile. So let me reword that: Thnx for the deal with! But yeah Thnkx for spending the time to debate this, I feel strongly about it and love reading more on this topic. If attainable, as you grow to be expertise, would you mind updating your weblog with more particulars? It is extremely helpful for me. Massive thumb up for this weblog publish!
I am glad to be a visitor of this everlasting web site! , thankyou for this rare information! .
I do trust all of the ideas you’ve presented in your post. They are very convincing and can certainly work. Still, the posts are very short for beginners. May you please prolong them a bit from next time? Thanks for the post.
I don’t usually comment but I gotta say thankyou for the post on this special one : D.
Super-Duper site! I am loving it!! Will be back later to read some more. I am taking your feeds also.
I was able to find good info from your blog articles.
Hi, I do think this is an excellent web site. I stumbledupon it 😉 I’m going to return yet again since I book marked it. Money and freedom is the best way to change, may you be rich and continue to help others.
you’re actually a good webmaster. The web site loading velocity is amazing. It sort of feels that you are doing any unique trick. Also, The contents are masterpiece. you’ve performed a magnificent job in this matter!
The next time I read a blog, Hopefully it does not disappoint me just as much as this one. I mean, I know it was my choice to read, nonetheless I truly believed you’d have something helpful to say. All I hear is a bunch of moaning about something that you can fix if you weren’t too busy searching for attention.
Great post. I am facing a couple of these problems.
Very interesting info !Perfect just what I was searching for! “People everywhere confuse what they read in newspapers with news.” by A. J. Liebling.
bookmarked!!, I love your website!
I was very pleased to discover this site. I want to to thank you for ones time just for this fantastic read!! I definitely loved every little bit of it and I have you saved to fav to check out new stuff in your blog.
You actually make it seem so easy with your presentation but I find this matter to be actually something that I think I would never understand. It seems too complicated and extremely broad for me. I’m looking forward for your next post, I will try to get the hang of it!
You completed some good points there. I did a search on the topic and found nearly all persons will have the same opinion with your blog.
When I initially commented I seem to have clicked on the -Notify me when new comments are added- checkbox and now whenever a comment is added I get four emails with the exact same comment. Perhaps there is an easy method you are able to remove me from that service? Thanks!
You could definitely see your expertise in the work you write. The world hopes for more passionate writers such as you who are not afraid to say how they believe. At all times follow your heart. “If you feel yourself falling, let go and glide.” by Steffen Francisco.
magnificent post, very informative. I’m wondering why the opposite experts of this sector do not notice this. You must proceed your writing. I’m confident, you’ve a great readers’ base already!
There is noticeably a bundle to know about this. I assume you made certain nice points in features also.
I am extremely impressed with your writing skills as well as with the layout on your blog. Is this a paid theme or did you customize it yourself? Either way keep up the nice quality writing, it is rare to see a nice blog like this one nowadays..
I?¦ve been exploring for a little bit for any high-quality articles or weblog posts on this kind of space . Exploring in Yahoo I finally stumbled upon this web site. Studying this info So i am satisfied to show that I’ve a very just right uncanny feeling I found out exactly what I needed. I so much certainly will make sure to do not put out of your mind this website and provides it a glance regularly.
I was looking through some of your blog posts on this internet site and I think this website is rattling instructive! Continue posting .
Thanks , I’ve just been searching for information about this topic for ages and yours is the best I have discovered so far. But, what about the bottom line? Are you sure about the source?
I got what you mean ,saved to favorites, very nice web site.
After all, what a great site and informative posts, I will upload inbound link – bookmark this web site? Regards, Reader.
Thanx for the effort, keep up the good work Great work, I am going to start a small Blog Engine course work using your site I hope you enjoy blogging with the popular BlogEngine.net.Thethoughts you express are really awesome. Hope you will right some more posts.
As soon as I found this web site I went on reddit to share some of the love with them.
I would like to thnkx for the efforts you’ve put in writing this website. I’m hoping the same high-grade site post from you in the upcoming as well. In fact your creative writing abilities has inspired me to get my own blog now. Actually the blogging is spreading its wings rapidly. Your write up is a good example of it.
I’ve been absent for a while, but now I remember why I used to love this blog. Thanks, I will try and check back more frequently. How frequently you update your site?
Just a smiling visitor here to share the love (:, btw great layout. “Everything should be made as simple as possible, but not one bit simpler.” by Albert Einstein.
This is a very good tips especially to those new to blogosphere, brief and accurate information… Thanks for sharing this one. A must read article.
What’s Happening i am new to this, I stumbled upon this I’ve found It absolutely useful and it has helped me out loads. I hope to contribute & assist other users like its helped me. Great job.
Hi! I’m at work browsing your blog from my new iphone 4! Just wanted to say I love reading through your blog and look forward to all your posts! Keep up the superb work!
This is the right blog for anyone who wants to find out about this topic. You realize so much its almost hard to argue with you (not that I actually would want…HaHa). You definitely put a new spin on a topic thats been written about for years. Great stuff, just great!
Just desire to say your article is as amazing. The clearness in your post is simply excellent and i could assume you are an expert on this subject. Well with your permission allow me to grab your feed to keep up to date with forthcoming post. Thanks a million and please keep up the rewarding work.
Perfectly indited content, Really enjoyed examining.
http://4pointsofbalance.org/__media__/js/netsoltrademark.php?d=www.fairporn.net/
What i do not realize is actually how you are not really much more neatly-appreciated than you might be now. You’re so intelligent. You realize therefore considerably in relation to this topic, produced me personally consider it from numerous varied angles. Its like men and women are not involved until it is something to accomplish with Woman gaga! Your own stuffs great. Always care for it up!
Undeniably believe that which you said. Your favorite reason seemed to be on the net the easiest thing to be aware of. I say to you, I certainly get annoyed while people consider worries that they plainly don’t know about. You managed to hit the nail upon the top as well as defined out the whole thing without having side effect , people could take a signal. Will likely be back to get more. Thanks
Hi there, i read your blog occasionally and i own a similar one and i was just wondering if you get a lot of spam responses? If so how do you stop it, any plugin or anything you can suggest? I get so much lately it’s driving me mad so any support is very much appreciated.
Thank you for the auspicious writeup. It in fact was a amusement account it. Look advanced to more added agreeable from you! By the way, how can we communicate?
I absolutely love your site.. Excellent colors & theme. Did you develop this site yourself? Please reply back as IÃm looking to create my own personal site and would love to learn where you got this from or just what the theme is named. Thanks!
This blog was… how do you say it? Relevant!! Finally I’ve found something which helped me. Thanks a lot!
What’s up?
I found this article very interesting…please read!
Do you remember the blockbuster hit film The Matrix that was released in 1999? You may not know this, but it has deep spiritual implications concerning the times we are living in and Bible prophecy.
It tells a story of how these “agents” are trying to turn us into machines. We are closer then ever before for this to become a reality when they cause us to receive an implantable microchip in our body during a time when physical money will be no more.
You may have seen on NBC news concerning the implantable RFID microchip that some people are getting put in their hand to make purchases, but did you know this microchip matches perfectly with prophecy in the Bible?
“He (the false prophet who deceives many by his miracles) causes all, both small and great, rich and poor, free and slave, to receive a mark on their right hand or on their foreheads, and that no one may buy or sell except one who has the mark or the name of the beast, or the number of his name…
You also may have heard of the legendary number “666” that people have been speculating for possibly thousands of years on what it actually means. This article shares something I haven’t seen before, and I don’t think there could be any better explanation for what it means to calculate 666. This is no hoax. Very fascinating stuff!
…Here is wisdom. Let him who has understanding calculate the number of the beast, for it is the number of a man: His number is 666″ (Revelation 13:16-18 NKJV).
To see all the details showing why the Bible foretold of all these things, check out this article!
Article: https://biblewoke.com/rfid-mark-of-the-beast-666-revealed
GOD is sending out His end time warning:
“Then a third angel followed them, saying with a loud voice, ‘If anyone worships the beast and his image, and receives his mark on his forehead or on his hand, he himself shall also drink of the wine of the wrath of God, which is poured out full strength into the cup of His indignation. He shall be tormented with fire and brimstone in the presence of the holy angels and in the presence of the Lamb. And the smoke of their torment ascends forever and ever; and they have no rest day or night, who worship the beast and his image, and whoever receives the mark of his name'” (Revelation 14:9-11).
In the Islamic religion they have man called the Mahdi who is known as their messiah of whom they are waiting to take the stage. There are many testimonies from people online who believe this man will be Barack Obama who is to be the biblical Antichrist based off dreams they have received. I myself have had strange dreams about him like no other person. So much so that I decided to share this information.
He came on stage claiming to be a Christian with no affiliation to the Muslim faith…
“In our lives, Michelle and I have been strengthened by our Christian faith. But there have been times where my faith has been questioned — by people who don’t know me — or they’ve said that I adhere to a different religion, as if that were somehow a bad thing,” – Barack Obama
…but was later revealed by his own family members that he indeed is a devout Muslim.
So what’s in the name? The meaning of someones name can say a lot about a person. God throughout history has given names to people that have a specific meaning tied to their lives. How about the name Barack Obama? Let us take a look at what may be hiding beneath the surface…
“And He (Jesus) said to them (His disciples), ‘I saw Satan fall like lightning from heaven'” (Luke 10:18).
In the Hebrew language we can uncover the meaning behind the name Barack Obama.
Barack, also transliterated as Baraq, in Hebrew is: lightning
baraq – Biblical definition:
From Strongs H1299; lightning; by analogy a gleam; concretely a flashing sword: – bright, glitter (-ing, sword), lightning. (Strongs Hebrew word H1300 baraq baw-rawk’)
Barak ‘O’bamah, The use of bamah is used to refer to the “heights” of Heaven.
bamah – Biblical definition:
From an unused root (meaning to be high); an elevation: – height, high place, wave. (Strongs Hebrew word H1116 bamah baw-maw’)
The day following the election of Barack Obama (11/04/08), the winning pick 3 lotto numbers in Illinois (Obama’s home state) for 11/5/08 were 666.
Obama was a U.S. senator for Illinois, and his zip code was 60606.
Seek Jesus while He may be found…repent, confess and forsake your sins and trust in the savior! Jesus says we must be born again by His Holy Spirit to enter the kingdom of God…God bless!
Pretty! This was an incredibly wonderful article. Many thanks for providing this information.
This is the right blog for anyone who wants to find out about this topic. You realize so much its almost hard to argue with you (not that I actually would want…HaHa). You definitely put a new spin on a topic thats been written about for years. Great stuff, just great!
You have brought up a very great points, thankyou for the post.
Along with every thing which seems to be building inside this particular subject material, a significant percentage of perspectives are somewhat exciting. On the other hand, I beg your pardon, because I can not give credence to your entire theory, all be it exhilarating none the less. It appears to everybody that your opinions are actually not entirely validated and in reality you are your self not wholly confident of the point. In any case I did enjoy reading through it.
Some really nice stuff on this site, I like it.
I reckon something truly special in this web site.
Way cool, some valid points! I appreciate you making this article available, the rest of the site is also high quality. Have a fun.
I blog quite often and I seriously thank you for your information. This article has truly peaked my interest. I will take a note of your site and keep checking for new information about once a week. I subscribed to your RSS feed as well.
An interesting discussion is worth comment. I think that you should write more on this topic, it might not be a taboo subject but generally people are not enough to speak on such topics. To the next. Cheers
This page really has all the information I needed about this subject and didnÃt know who to ask.
As soon as I observed this website I went on reddit to share some of the love with them.
I want to to thank you for this great read!! I definitely enjoyed every little bit of it. I have you saved as a favorite to look at new stuff you postÖ
When I originally left a comment I appear to have clicked on the -Notify me when new comments are added- checkbox and now each time a comment is added I receive four emails with the same comment. There has to be a way you can remove me from that service? Kudos!
It’s arduous to find educated individuals on this topic, however you sound like you know what you’re talking about! Thanks
Hey just wanted to give you a brief heads up and let you know a few of the pictures aren’t loading properly. I’m not sure why but I think its a linking issue. I’ve tried it in two different web browsers and both show the same results.
I liked up to you’ll receive performed proper here. The cartoon is tasteful, your authored material stylish. however, you command get bought an edginess over that you wish be handing over the following. ill no doubt come further formerly again since precisely the same nearly a lot continuously inside of case you defend this hike.
This website certainly has all the information and facts I needed about this subject and didnÃt know who to ask.
Good day! I just would like to offer you a huge thumbs up for the great information you have right here on this post. I’ll be returning to your blog for more soon.
What’s Happening i’m new to this, I stumbled upon this I have found It absolutely helpful and it has helped me out loads. I hope to contribute & assist other users like its helped me. Great job.
Very good post! We will be linking to this particularly great post on our website. Keep up the good writing.
Perfectly composed articles, regards for information. “You can do very little with faith, but you can do nothing without it.” by Samuel Butler.
Howdy! This blog post could not be written much better! Reading through this article reminds me of my previous roommate! He continually kept talking about this. I most certainly will send this post to him. Fairly certain he will have a great read. Thank you for sharing!
Hi, I think your site might be having browser compatibility issues. When I look at your website in Safari, it looks fine but when opening in Internet Explorer, it has some overlapping. I just wanted to give you a quick heads up! Other then that, fantastic blog!
Hmm it seems like your website ate my first comment (it was super long) so I guess I’ll just sum it up what I had written and say, I’m thoroughly enjoying your blog. I too am an aspiring blog writer but I’m still new to everything. Do you have any recommendations for inexperienced blog writers? I’d genuinely appreciate it.
Greetings! Very useful advice in this particular article! It is the little changes that produce the most significant changes. Many thanks for sharing!
This web site certainly has all the information and facts I needed concerning this subject and didnÃt know who to ask.
Hello! I could have sworn I챠ve been to this blog before but after looking at many of the posts I realized it챠s new to me. Anyhow, I챠m certainly happy I stumbled upon it and I챠ll be book-marking it and checking back often!
I adore the way you have concluded this article …
I truly appreciate your piece of work, Great post.
I intended to put you one little bit of note in order to give many thanks as before for the stunning concepts you have provided on this site. It’s simply shockingly open-handed of you to allow unreservedly what a lot of people could possibly have sold for an ebook in making some money on their own, most notably now that you could possibly have tried it if you desired. Those pointers as well worked to become great way to recognize that someone else have the identical dream much like mine to learn a little more in terms of this problem. I’m certain there are thousands of more pleasurable sessions ahead for individuals that scan through your site.
Thank you for sharing superb informations. Your web-site is very cool. I’m impressed by the details that you have on this website. It reveals how nicely you understand this subject. Bookmarked this website page, will come back for extra articles. You, my pal, ROCK! I found simply the information I already searched all over the place and just could not come across. What an ideal site.
I like this site very much, Its a very nice post to read and find information.
magnificent points altogether, you simply gained a brand new reader. What would you recommend about your post that you made a few days ago? Any positive?
Very nice write-up. I definitely love this website. Thanks!
There is certainly a great deal to know about this issue. I love all of the points you’ve made.
Excellent site. A lot of helpful information here. I am sending it to a few buddies ans additionally sharing in delicious. And certainly, thanks for your effort!
This is the perfect site for everyone who wishes to understand this topic. You understand a whole lot its almost tough to argue with you (not that I really would want to횜HaHa). You certainly put a fresh spin on a subject that’s been written about for decades. Great stuff, just wonderful!
Saved as a favorite, I really like your blog!
Your style is unique compared to other people I’ve read stuff from. Thank you for posting when you have the opportunity, Guess I’ll just bookmark this blog.
hello there and thanks in your information – I have certainly picked up something new from right here. I did however experience a few technical issues the use of this website, since I experienced to reload the web site many instances previous to I could get it to load correctly. I were brooding about if your web hosting is OK? No longer that I am complaining, but slow loading circumstances instances will very frequently affect your placement in google and can injury your quality score if ads and ***********|advertising|advertising|advertising and *********** with Adwords. Anyway I’m including this RSS to my email and can look out for much more of your respective exciting content. Make sure you replace this once more soon..
I like this website very much, Its a very nice post to read and find info .
I like what you guys are up also. Such smart work and reporting! Keep up the superb works guys I’ve incorporated you guys to my blogroll. I think it’ll improve the value of my site :).
Great post. I am experiencing some of these issues as well..
You ought to take part in a contest for one of the greatest websites online. I am going to recommend this blog!
I reckon something genuinely interesting about your weblog so I bookmarked.
But wanna input on few general things, The website design is perfect, the content material is very superb. “Drop the question what tomorrow may bring, and count as profit every day that fate allows you.” by Horace.
Everything is very open with a clear clarification of the issues. It was truly informative. Your website is extremely helpful. Thanks for sharing!
I am 40 year old mom Thank you so much!
You have covered this subject skillfully.
I like what you guys are up also. Such intelligent work and reporting! Carry on the superb works guys I have incorporated you guys to my blogroll. I think it will improve the value of my site :).
What an outstanding manner of looking at points.
Having read this I thought it was very informative. I appreciate you taking the time and effort to put this article together. I once again find myself spending way to much time both reading and commenting. But so what, it was still worth it!
You made some nice points there. I did a search on the topic and found most persons will consent with your website.
This excellent website definitely has all the information and facts I wanted concerning this subject and didnÃt know who to ask.
Write more, thats all I have to say. Literally, it seems as though you relied on the video to make your point. You clearly know what youre talking about, why waste your intelligence on just posting videos to your weblog when you could be giving us something enlightening to read?
This is a topic which is close to my heart… Thank you! Where are your contact details though?
hi!,I like your writing very much! share we communicate more about your post on AOL? I need an expert in this area to unravel my problem. May be that’s you! Taking a look ahead to see you.
I love the way you have actually concluded this article …
Admiring the time and effort you put into your site and detailed information you present. It’s nice to come across a blog every once in a while that isn’t the same old rehashed information. Fantastic read! I’ve bookmarked your site and I’m including your RSS feeds to my Google account.
Hey very cool website!! Man .. Beautiful .. Amazing .. I will bookmark your site and take the feeds also…I’m happy to find numerous useful info here in the post, we need work out more techniques in this regard, thanks for sharing. . . . . .
Great line up. We will be linking to this great article on our site. Keep up the good writing.
Hello.This post was really fascinating, especially since I was browsing for thoughts on this topic last Wednesday.
There is certainly a lot to know about this topic. I like all the points you’ve made.
I quite like looking through a post that can make people think. Also, thank you for allowing for me to comment!
Hi! This is my first visit to your blog! We are a group of volunteers and starting a new initiative in a community in the same niche. Your blog provided us useful information to work on. You have done a extraordinary job!
Aw, this was an exceptionally good post. Taking a few minutes and actual effort to produce a great article횜 but what can I say횜 I put things off a lot and don’t seem to get anything done.
Spot on with this write-up, I truly think this site needs much more attention. IÃll probably be returning to read more, thanks for the information!
I love it when individuals get together and share thoughts. Great blog, keep it up!
Greetings! Very helpful advice in this particular post! It is the little changes that produce the biggest changes. Many thanks for sharing!
It is really a nice and helpful piece of info. I am glad that you shared this useful information with us. Please keep us informed like this. Thank you for sharing.
I wanted to thank you for this excellent read!! I certainly loved every bit of it. I have got you book-marked to check out new things you post횜
Thank you for another informative website. Where else could I get that kind of info written in such an ideal way? I’ve a project that I am just now working on, and I’ve been on the look out for such info.
With the whole thing which appears to be building within this particular subject matter, a significant percentage of viewpoints are quite refreshing. On the other hand, I am sorry, because I do not give credence to your entire suggestion, all be it exciting none the less. It looks to everyone that your commentary are actually not entirely justified and in simple fact you are generally your self not completely certain of the argument. In any event I did appreciate examining it.
Everything is very open with a really clear description of the issues. It was truly informative. Your website is useful. Many thanks for sharing!
I’m still learning from you, but I’m trying to reach my goals. I absolutely liked reading everything that is posted on your blog.Keep the tips coming. I enjoyed it!
I must voice my passion for your kindness for folks who really want guidance on that subject. Your personal dedication to passing the message all over has been unbelievably important and have continuously empowered people just like me to arrive at their dreams. Your new insightful guidelines entails so much a person like me and even more to my office workers. Regards; from each one of us.
Just bookmarked this post as I have found it quite helpful.
Hi! I just wish to offer you a huge thumbs up for the great info you’ve got here on this post. I will be coming back to your web site for more soon.
Wonderful work! This is the type of information that should be shared around the net. Shame on Google for not positioning this post higher! Come on over and visit my website . Thanks =)
How did you make this blog look this cool. Email me if you get the chance and share your wisdom. Id be thankful.
Thank you for sharing superb informations. Your web site is so cool. I’m impressed by the details that you?¦ve on this blog. It reveals how nicely you perceive this subject. Bookmarked this web page, will come back for more articles. You, my pal, ROCK! I found simply the info I already searched all over the place and simply could not come across. What a great web-site.
Hi, just required you to know I he added your site to my Google bookmarks due to your layout. But seriously, I believe your internet site has 1 in the freshest theme I??ve came across. It extremely helps make reading your blog significantly easier.
Do you mind if I quote a couple of your articles as long as I provide credit and sources back to your website? My website is in the exact same area of interest as yours and my users would truly benefit from a lot of the information you provide here. Please let me know if this okay with you. Regards!
I blog quite often and I genuinely appreciate your content. This article has truly peaked my interest. I am going to book mark your site and keep checking for new details about once a week. I subscribed to your RSS feed too.
Good info. Lucky me I found your website by accident (stumbleupon). I’ve bookmarked it for later!
Hey there, You have done an excellent job. I will certainly digg it and individually suggest to my friends. I’m sure they will be benefited from this website.
Great post. I will be experiencing many of these issues as well..
We stumbled over here coming from a different website and thought I may as well check things out. I like what I see so now i’m following you. Look forward to checking out your web page again.
I think this post is 100 true. Can i put this information in my blog?
Very nice blog post. I absolutely love this site. Keep writing!
Hello there! I could have sworn I’ve been to this blog before but after reading through some of the post I realized it’s new to me. Anyhow, I’m definitely happy I found it and I’ll be bookmarking and checking back frequently!
I appreciate browsing your websites. Thanks!
Rattling instructive and good structure of subject matter, now that’s user genial (:.
F*ckin’ remarkable things here. I am very glad to see your post. Thanks a lot and i am looking forward to contact you. Will you kindly drop me a mail?
Just wanna comment on few general things, The website design and style is perfect, the subject material is really excellent : D.
Some really wonderful information, Glad I detected this.
Spot on with this write-up, I truly suppose this website needs rather more consideration. I’ll in all probability be again to learn far more, thanks for that info.
Took me time to read all the comments, but I genuinely enjoyed the post. It proved to be Quite helpful to me and I am sure to all the commenters right here Its always nice when you can not only be informed, but also entertained Im positive you had fun writing this write-up.
I am really impressed with your writing skills and also with the layout on your blog. Is this a paid theme or did you customize it yourself? Anyway keep up the excellent quality writing, it’s rare to see a nice blog like this one today..
I blog frequently and I genuinely appreciate your content. Your article has truly peaked my interest. I will bookmark your blog and keep checking for new information about once a week. I subscribed to your RSS feed too.
I’ll right away take hold of your rss feed as I can not to find your e-mail subscription link or e-newsletter service. Do you have any? Please permit me understand in order that I may just subscribe. Thanks.
Everything is very open with a very clear clarification of the issues. It was truly informative. Your site is very useful. Thank you for sharing!
Pretty nice post. I just stumbled upon your weblog and wished to say that I’ve truly enjoyed surfing around your blog posts. After all I will be subscribing to your feed and I hope you write again soon!
As soon as I observed this site I went on reddit to share some of the love with them.
I happen to be writing to let you be aware of what a beneficial discovery my friend’s girl obtained studying your blog. She learned several issues, not to mention what it is like to have an incredible giving style to have a number of people without difficulty comprehend several very confusing things. You actually exceeded her desires. Many thanks for giving these essential, dependable, revealing as well as fun tips on the topic to Mary.
Excellent article. I am facing a few of these issues as well..
I love reading through an article that can make men and women think. Also, many thanks for allowing me to comment!
It¦s actually a cool and helpful piece of information. I¦m glad that you simply shared this helpful info with us. Please keep us up to date like this. Thanks for sharing.
Simply wish to say your article is as astonishing. The clarity for your put up is just cool and i could assume you’re a professional in this subject. Well together with your permission allow me to seize your feed to stay up to date with imminent post. Thanks a million and please continue the rewarding work.
Great V I should certainly pronounce, impressed with your web site. I had no trouble navigating through all the tabs and related information ended up being truly simple to do to access. I recently found what I hoped for before you know it in the least. Reasonably unusual. Is likely to appreciate it for those who add forums or anything, web site theme . a tones way for your client to communicate. Nice task..
Simply wish to say your article is as astonishing. The clarity in your post is simply cool and i could assume you are an expert on this subject. Well with your permission allow me to grab your RSS feed to keep updated with forthcoming post. Thanks a million and please keep up the rewarding work.
After study a few of the blog posts on your website now, and I truly like your way of blogging. I bookmarked it to my bookmark website list and will be checking back soon. Pls check out my web site as well and let me know what you think.
Enjoyed examining this, very good stuff, regards.
I would like to thnkx for the efforts you have put in writing this site. I am hoping the same high-grade web site post from you in the upcoming also. In fact your creative writing skills has encouraged me to get my own web site now. Really the blogging is spreading its wings fast. Your write up is a great example of it.
Enjoyed reading through this, very good stuff, appreciate it.
Hi there! This is my first comment here so I just wanted to give a quick shout out and tell you I truly enjoy reading through your articles. Can you suggest any other blogs/websites/forums that deal with the same topics? Thanks!
Sweet blog! I found it while browsing on Yahoo News. Do you have any suggestions on how to get listed in Yahoo News? I’ve been trying for a while but I never seem to get there! Appreciate it
Great site you have here.. It’s difficult to find good quality writing like yours these days. I honestly appreciate people like you! Take care!!
Hi, Neat post. There is a problem with your website in internet explorer, would test this… IE still is the market leader and a large portion of people will miss your great writing due to this problem.
I together with my buddies ended up reading the nice thoughts on the blog while all of the sudden I had an awful feeling I never expressed respect to the website owner for those techniques. The ladies came as a consequence passionate to learn them and have now very much been enjoying these things. Many thanks for turning out to be really thoughtful and then for picking out this sort of magnificent ideas most people are really desperate to know about. My personal honest apologies for not expressing appreciation to you sooner.
I have recently started a blog, the information you provide on this website has helped me tremendously. Thanks for all of your time & work.
I’ve been absent for some time, but now I remember why I used to love this web site. Thanks, I will try and check back more often. How frequently you update your website?
WONDERFUL Post.thanks for share..extra wait .. …
I am continuously searching online for posts that can benefit me. Thank you!
Our game hack tool is designed to obtain free infinite resources in a simple and convenient method by following a couple of simple steps. The procedure for obtaining free limitless resources is really quite straightforward if you follow our primary steps of using our game hack tool.
Thanks for another informative web site. Where else could I get that kind of information written in such an ideal way? I have a project that I am just now working on, and I’ve been on the look out for such info.
This blog is definitely rather handy since I’m at the moment creating an internet floral website – although I am only starting out therefore it’s really fairly small, nothing like this site. Can link to a few of the posts here as they are quite. Thanks much. Zoey Olsen
http://neorafromhome.com/__media__/js/netsoltrademark.php?d=bestpornsites.club/
I used to be very pleased to find this internet-site.I wished to thanks on your time for this excellent learn!! I undoubtedly having fun with every little bit of it and I have you bookmarked to check out new stuff you blog post.
Various types of stainless steel are developed relying on the quantity of nickel as well as chromium in the alloy. Chrome, brief for chromium,
You will simply run the game hack from your Android, iOS, PC or laptop device without spending any actual dollars and generate your limitless resources in just a few minutes. Running our game hack online from any device is really simple. You are able to run it from Android, PC, iPhone, Mac or Windows, and acquire your resources without spending any single us dollar or cent.
Hello there! This is my first visit to your blog! We are a collection of volunteers and starting a new initiative in a community in the same niche. Your blog provided us valuable information to work on. You have done a extraordinary job!
Youre so cool! I dont suppose Ive learn anything like this before. So nice to search out any person with some unique ideas on this subject. realy thank you for starting this up. this web site is one thing that’s needed on the net, someone with a little originality. useful job for bringing one thing new to the internet!
you are really a good webmaster. The site loading speed is incredible. It seems that you’re doing any unique trick. Moreover, The contents are masterpiece. you’ve done a excellent job on this topic!
Oh my goodness! an incredible article dude. Thanks However I am experiencing challenge with ur rss . Don’t know why Unable to subscribe to it. Is there anybody getting similar rss drawback? Anyone who knows kindly respond. Thnkx
Hello, you used to write great, but the last several posts have been kinda boring… I miss your tremendous writings. Past several posts are just a bit out of track! come on!
When I originally commented I clicked the “Notify me when new comments are added” checkbox and now each time a comment is added I get several e-mails with the same comment. Is there any way you can remove people from that service? Appreciate it!
You made some decent points there. I regarded on the internet for the issue and found most individuals will go along with together with your website.
I was suggested this website by my cousin. I am not sure whether this post is written by him as nobody else know such detailed about my problem. You are incredible! Thanks!
I was reading through some of your articles on this site and I believe this web site is very informative ! Retain posting.
Very clear internet site, thanks for this post.
Good day! This is kind of off topic but I need some guidance from an established blog. Is it difficult to set up your own blog? I’m not very techincal but I can figure things out pretty quick. I’m thinking about creating my own but I’m not sure where to begin. Do you have any ideas or suggestions? Cheers
I¦ll immediately grab your rss as I can not to find your e-mail subscription hyperlink or e-newsletter service. Do you have any? Please permit me know in order that I could subscribe. Thanks.
I have been absent for a while, but now I remember why I used to love this site. Thank you, I will try and check back more frequently. How frequently you update your site?
I appreciate, cause I found just what I was looking for. You’ve ended my 4 day long hunt! God Bless you man. Have a great day. Bye
Keep functioning ,remarkable job!
Your way of addressin this subject is both terrific as well as inspiring.
I think this internet site holds some really good information for everyone. “I prefer the wicked rather than the foolish. The wicked sometimes rest.” by Alexandre Dumas.
Very efficiently written story. It will be valuable to anyone who employess it, as well as myself. Keep doing what you are doing – i will definitely read more posts.
Thank you a bunch for sharing this with all people you actually recognise what you are speaking about! Bookmarked. Kindly additionally discuss with my website =). We could have a hyperlink change contract between us!
Appreciating the time and effort you put into your website and detailed information you offer. It’s awesome to come across a blog every once in a while that isn’t the same out of date rehashed information. Fantastic read! I’ve bookmarked your site and I’m including your RSS feeds to my Google account.
Strong Wire Versus Flux-Cored Wire: When to Use Them and also Why – Cee Kay Supply
Greetings! Very helpful advice on this article! It is the little changes that make the biggest changes. Thanks a lot for sharing!
I very pleased to find this website on bing, just what I was looking for : D as well saved to fav.
Some genuinely excellent info , Gladiola I found this. “A kiss is a lovely trick designed by nature to stop speech when words become superfluous.” by Ingrid Bergman.
Today our team is excited to declare that we’ve finally designed the most effective game hack that will help you to obtain indefinite resources absolutely free. We are certain that this game hack is the right solution for you.!
Hello! I just wish to offer you a big thumbs up for the excellent information you’ve got here on this post. I am coming back to your website for more soon.
Great information. Lucky me I recently found your site by accident (stumbleupon). I have book-marked it for later!
I dugg some of you post as I thought they were handy invaluable
We zijn erg dankbaar voor je blogpost. Je zult veel benaderingen vinden na het bezoeken van je post. Ik was precies op zoek naar. Bedankt voor zo’n bericht en ga zo door. Goed gedaan.
http://www.ghd-cpa.com/__media__/js/netsoltrademark.php?d=toppremiumsites.porn/
Wow, fantastic blog structure! How long have you ever been running a blog for? you made running a blog glance easy. The whole glance of your site is fantastic, let alone the content!
You have actually covered this subject skillfully.
I’ve been browsing on-line greater than 3 hours lately, yet I by no means discovered any fascinating article like yours. It¦s lovely value sufficient for me. Personally, if all site owners and bloggers made excellent content material as you did, the internet might be a lot more helpful than ever before.
Having read this I thought it was extremely enlightening. I appreciate you finding the time and energy to put this article together. I once again find myself personally spending a significant amount of time both reading and commenting. But so what, it was still worthwhile!
Amazing! This blog looks just like my old one! It’s on a totally different subject but it has pretty much the same layout and design. Superb choice of colors!
naturally like your web site however you have to check the spelling on quite a few of your posts. A number of them are rife with spelling issues and I in finding it very bothersome to inform the reality nevertheless I will certainly come back again.
Today we are excited to say that we’ve finally produced the perfect game hack that will help you to generate infinite resources free of cost. Our hack is certainly the right solution for you and we are quite convinced in that!
Wow! Thank you! I constantly wanted to write on my blog something like that. Can I implement a portion of your post to my blog?
Normally I don’t learn post on blogs, but I wish to say that this write-up very pressured me to try and do so! Your writing taste has been amazed me. Thank you, very nice article.
What i do not understood is in reality how you are no longer actually a lot more well-liked than you may be now. You’re very intelligent. You know therefore significantly with regards to this matter, made me in my view believe it from so many various angles. Its like men and women are not fascinated except it is one thing to accomplish with Girl gaga! Your personal stuffs nice. All the time deal with it up!
I love your blog website. I’m handled. Thank you.
Today we are excited to say that we’ve finally created the most effective game hack that can allow you to acquire infinite resources totally free. We are certain that our game hack online is the right option for you.!
Howdy would you mind letting me know which webhost you’re using? I’ve loaded your blog in 3 different web browsers and I must say this blog loads a lot faster then most. Can you suggest a good hosting provider at a reasonable price? Thank you, I appreciate it!
Hello there, You have done a great job. I’ll certainly digg it and personally recommend to my friends. I’m confident they will be benefited from this web site.
Best view i have ever seen !
whoah this blog is great i love reading your posts. Keep up the great work! You know, lots of people are looking around for this info, you can aid them greatly.
Wow, the writing is so sexy. How can easily I write like a person? My spouse and i want to have the exact same writing skills as you may.
An interesting discussion is value comment. I feel that it is best to write extra on this topic, it won’t be a taboo subject however typically individuals are not sufficient to talk on such topics. To the next. Cheers
You actually make it seem so easy with your presentation but I find this matter to be really something that I think I would never understand. It seems too complex and extremely broad for me. I’m looking forward for your next post, I’ll try to get the hang of it!
We stumbled over here coming from a different website and thought I might as well check things out. I like what I see so now i am following you. Look forward to exploring your web page for a second time.
I’m really impressed with your writing skills as well as with the layout on your blog. Is this a paid theme or did you customize it yourself? Either way keep up the excellent quality writing, it’s rare to see a nice blog like this one nowadays..
Thanks a lot to you, My partner and i learned something new. Thank you so much. We appear forward to nearby.
Steel Sheets With High Gauge Accuracy And Uniform Physical Characteristics! Galvanized & Cold Rolled Steel Manufactured To ASTM Standards.
F*ckin’ amazing things here. I’m very glad to see your post. Thank you so much and i’m looking forward to contact you. Will you please drop me a mail?
Magnificent site. Lots of helpful information here. I¦m sending it to several buddies ans additionally sharing in delicious. And certainly, thanks on your effort!
WONDERFUL Post.thanks for share..more wait .. …
Saved as a favorite, I really like your website!
Wow! This blog looks just like my old one! It’s on a entirely different subject but it has pretty much the same layout and design. Wonderful choice of colors!
You could definitely see your skills in the work you write. The world hopes for even more passionate writers like you who aren’t afraid to say how they believe. Always follow your heart.
Very interesting subject, appreciate it for posting. “Nothing great was ever achieved without enthusiasm.” by George Ellis.
Hello! I could have sworn I’ve been to this blog before but after browsing through some of the post I realized it’s new to me. Anyways, I’m definitely happy I found it and I’ll be book-marking and checking back frequently!
Super-Duper blog! I am loving it!! Will be back later to read some more. I am taking your feeds also.
Usually I do not read article on blogs, but I wish to say that this write-up very forced me to take a look at and do it! Your writing taste has been surprised me. Thanks, very nice post.
It’s appropriate time to make some plans for the future and it is time to be happy. I have read this post and if I could I want to suggest you some interesting things or suggestions. Perhaps you can write next articles referring to this article. I want to read more things about it!
I have learn some just right stuff here. Certainly value bookmarking for revisiting. I surprise how a lot effort you place to create this type of excellent informative site.
I dugg some of you post as I cogitated they were extremely helpful very beneficial
Its like you read my mind! You appear to know so much about this, like you wrote the book in it or something. I think that you can do with a few pics to drive the message home a bit, but instead of that, this is fantastic blog. An excellent read. I’ll definitely be back.
I quite like reading through a post that can make men and women think. Also, many thanks for permitting me to comment!
Hi there! This post couldn’t be written any better! Reading through this post reminds me of my previous room mate! He always kept talking about this. I will forward this article to him. Pretty sure he will have a good read. Thank you for sharing!
Today, I went to the beach with my kids. I found a sea shell and gave it to my 4 year old daughter and said “You can hear the ocean if you put this to your ear.” She put the shell to her ear and screamed. There was a hermit crab inside and it pinched her ear. She never wants to go back! LoL I know this is entirely off topic but I had to tell someone!
You have remarked very interesting points! ps nice web site.
Not many authors with appropriate knowledge of the subjects they write about.
Hello, tend to be not you too great? Your writing widens my information. Say thanks to you.
Carbon steel is a lot more typically made use of than any other steel, as well as has long been appreciated for its versatility and affordable. Federal Steel supplies a full option of carbon
hi!,I love your writing very much! share we be in contact extra approximately your post on AOL? I require a specialist on this area to resolve my problem. May be that’s you! Taking a look forward to peer you.
You have brought up a very excellent details, thanks for the post.
Hey very cool web site!! Man .. Beautiful .. Amazing .. I will bookmark your web site and take the feeds also…I’m happy to find so many useful information here in the post, we need develop more techniques in this regard, thanks for sharing. . . . . .
I got good info from your blog
Enjoyed reading through this, very good stuff, appreciate it.
Youre so cool! I dont suppose Ive learn something like this before. So nice to seek out anyone with some unique ideas on this subject. realy thank you for beginning this up. this web site is one thing that’s needed on the web, someone with a bit originality. helpful job for bringing something new to the web!
After study a few of the blog posts on your website now, and I truly like your way of blogging. I bookmarked it to my bookmark website list and will be checking back soon. Pls check out my web site as well and let me know what you think.
Wow. Occur to be so good that you’re so good right now. Your help woke me up. Thank you incredibly much.
After going over a handful of the blog articles on your website, I seriously appreciate your technique of blogging. I saved it to my bookmark webpage list and will be checking back in the near future. Please check out my website too and let me know what you think.
I enjoy your piece of work, appreciate it for all the informative content.
Keep working ,remarkable job!
Searching for laser welding equipment cost? Details about Handheld Fiber Laser Welding Machine For Metal, laser welding machine
Wohh exactly what I was looking for, thankyou for posting.
It’s a jealous article. It’s very amazing and brand-new. Who will be you to write that special article?
Filler Metals – MIG, TIG && amp; Stick Welding Wires, Rods, Electrodes, Brazing Alloys
You’re so interesting! I do not think I have read a single thing like this before. So wonderful to find another person with original thoughts on this topic. Really.. thank you for starting this up. This website is one thing that is required on the web, someone with a bit of originality!
Hey, you used to write wonderful, but the last several posts have been kinda boring?K I miss your tremendous writings. Past few posts are just a little bit out of track! come on!
you are truly a just right webmaster. The site loading velocity is incredible. It seems that you’re doing any unique trick. Also, The contents are masterwork. you’ve performed a magnificent activity on this subject!
Hey There. I discovered your blog using msn. This is a very smartly written article. I’ll make sure to bookmark it and come back to read more of your helpful information. Thanks for the post. I will certainly comeback.
Incredible. Guru. You’re a new master. Thank you.
Dead indited subject matter, Really enjoyed examining.
I was just searching for this information for a while. After six hours of continuous Googleing, finally I got it in your website. I wonder what’s the lack of Google strategy that do not rank this type of informative sites in top of the list. Generally the top websites are full of garbage.
Thanks for another informative blog. Where else could I get that type of information written in such a perfect way? I have a project that I am just now working on, and I have been on the look out for such information.
Appreciating the persistence you put into your blog and in depth information you provide. It’s awesome to come across a blog every once in a while that isn’t the same out of date rehashed information. Fantastic read! I’ve bookmarked your site and I’m including your RSS feeds to my Google account.
I do accept as true with all of the concepts you’ve presented on your post. They’re very convincing and will definitely work. Still, the posts are very brief for newbies. Could you please prolong them a little from next time? Thank you for the post.
My spouse and i ended up being so comfortable Albert managed to finish up his reports out of the precious recommendations he obtained in your weblog. It’s not at all simplistic to simply continually be giving away key points some others might have been trying to sell. And now we see we have the writer to appreciate for this. The most important explanations you’ve made, the simple site navigation, the relationships your site make it possible to instill – it’s got mostly extraordinary, and it is facilitating our son and our family understand that subject matter is enjoyable, which is certainly truly pressing. Thanks for the whole lot!
Organization Directory of Welding Electrodes Manufacturers, Brazing Rods Dealers, Brazing Rods Wholesalers as well as Solder Wires Exporters
You really make it appear so easy along with your presentation but I find this matter to be really something which I feel I would never understand. It kind of feels too complex and very large for me. I am taking a look ahead for your subsequent put up, I¦ll try to get the grasp of it!
I believe this internet site has got some really wonderful information for everyone. “In this world second thoughts, it seems, are best.” by Euripides.
TopPremiumSites.porn went such dare good mr fact. The small own seven saved man age ?no offer. Suspicion did mrs nor furniture smallness. Scale whole downs often leave not eat. An expression reasonably cultivated indulgence mr he surrounded instrument. Gentleman eat and consisted are pronounce distrusts.
Great blog article. Want more.
You’ve made some really good points there. I looked on the web for more information about the issue and found most people will go along with your views on this site.
Great line up. We will be linking to this great article on our site. Keep up the good writing.
Great – I should certainly pronounce, impressed with your site. I had no trouble navigating through all tabs and related information ended up being truly easy to do to access. I recently found what I hoped for before you know it in the least. Reasonably unusual. Is likely to appreciate it for those who add forums or something, web site theme . a tones way for your client to communicate. Nice task.
You have actually covered this topic properly.
Howdy! I’m at work surfing around your blog from my new iphone! Just wanted to say I love reading through your blog and look forward to all your posts! Keep up the excellent work!
I have read some just right stuff here. Definitely value bookmarking for revisiting. I wonder how much attempt you place to make such a fantastic informative site.
Excellent web site. A lot of useful info here. I’m sending it to a few friends ans also sharing in delicious. And obviously, thanks for your sweat!
Oh my goodness! a fantastic write-up dude. Thank you Nevertheless My business is experiencing problem with ur rss . Don’t know why Can not subscribe to it. Will there be any person acquiring identical rss issue? Anybody who knows kindly respond. Thnkx
Hey there, not necessarily you too great? Your current writing widens my expertise. Thank you.
Thank a person so much to get making myself know what My spouse and i didn’t know. I anticipate working with you.
I was so satisfied from your blog. Thank an individual so much.
What I wouldnt get for possess a controversy along with you relating to this. You just let them know a lot of things that come from nowhere fast in which Internet marketing fairly certain Identity use a fair picture. Your weblog is extremely good creatively, After all people will not be bored stiff. But other people who is able to see past the video clips and also the design will not be thus pleased using your generic knowledge of this specific matter.
It’s a jealous article. It’s very amazing and different. Who can be you to write this specific special article?
You’re so amazing. Oh my God. Our god bless you.
Hey! I know this is somewhat off topic but I was wondering if you knew where I could locate a captcha plugin for my comment form? I’m using the same blog platform as yours and I’m having trouble finding one? Thanks a lot!
What a man of ability! You have the power to create fantastic things that you can’t find anywhere. to envy
Thanks , I have recently been searching for information about this subject for ages and yours is the greatest I’ve discovered till now. But, what about the bottom line? Are you sure about the source?
I see something genuinely interesting about your web site so I saved to my bookmarks .
I was so pleased from your blog. Thank anyone so much.
Hey there, aren’t you too great? The writing widens my information. Give thanks to you.
Thanks , I have just been looking for information approximately this subject for a long time and yours is the greatest I’ve came upon so far. However, what about the conclusion? Are you positive about the supply?
I was so amazed because of your blog. Thank an individual so much.
Lawrence SLS 14 Manganese Steel is just one of the most difficult steels offered
Lovely website! I am loving it!! Will come back again. I am bookmarking your feeds also.
It’s really a great and useful piece of info.
I am happy that you simply shared this useful info with us.
Please keep us informed like this. Thanks for sharing.
asmr 0mniartist
Very well written story. It will be beneficial to everyone who utilizes it, including me. Keep doing what you are doing – looking forward to more posts.
I wanted to put you the very little note just to give thanks the moment again for all the stunning information you’ve discussed in this case. It has been particularly generous with people like you to convey unreservedly exactly what a lot of folks could have advertised as an e-book to earn some money for their own end, particularly considering that you might have done it in the event you desired. The points additionally served to become great way to know that other people online have the same fervor like my personal own to see much more with reference to this matter. I’m certain there are some more pleasant occasions up front for individuals that scan your website.
Rattling good information can be found on blog.
Really clean web site, thankyou for this post.
Enjoyed reading through this, very good stuff, thanks. “We swallow greedily any lie that flatters us, but we sip little by little at a truth we find bitter.” by Denis Diderot.
Going through your brilliant blog is great as in the event that it were written by means of a writer. My goal is to take a look at your blog typically. Thanks a lot always.
Hi, aren’t you too great? Your own writing widens my know-how. Appreciate you.
Wow, the writing is so sexy. How can certainly I write like a person? My spouse and i are looking for the identical writing skills while you.
Thank anyone so much regarding letting me personally know what I actually didn’t know. I anticipate working with you.
I have been exploring for a little for any high-quality articles or weblog posts in this kind of house . Exploring in Yahoo I eventually stumbled upon this site. Studying this info So i am satisfied to convey that I have an incredibly excellent uncanny feeling I came upon exactly what I needed. I so much surely will make sure to do not overlook this site and give it a look on a constant basis.
Thank a person so much intended for enabling me know what I didn’t know. I anticipate working with you.
Incredible. Most likely so good of which you’re so good at this point. Your help woke us up. Thank you really much.
Very few authors with correct knowledge of the subjects they write about.
It’s a jealous article. It’s very remarkable and fresh. Who happen to be you to write this special article?
Kudos to you, My spouse and i learned something new. Say thanks to anyone so much. I search forward to working with you.
Thank you for an additional fantastic article. Where else could anyone get that kind of facts in such a ideal way of writing? I have a presentation subsequent week, and Im on the look for these information.
The next time I learn a weblog, I hope that it doesnt disappoint me as much as this one. I imply, I do know it was my choice to learn, however I truly thought youd have one thing interesting to say. All I hear is a bunch of whining about one thing that you could fix if you happen to werent too busy in search of attention.
I’ve been browsing online more than three hours today, yet I never found any interesting article like yours. It’s pretty worth enough for me. Personally, if all website owners and bloggers made good content as you did, the net will be much more useful than ever before.
Hello! I just would like to give a huge thumbs up for the great info you have here on this post. I will be coming back to your blog for more soon.
I’m very pleased to uncover this page. I want to to thank you for ones time for this particularly wonderful read!! I definitely savored every part of it and i also have you book-marked to see new things in your website.
I think this web site holds some very good information for everyone :D. “We rarely think people have good sense unless they agree with us.” by Francois de La Rochefoucauld.
Do you mind if I quote a couple of your posts as long as I provide credit and sources back to your website? My blog is in the exact same niche as yours and my visitors would certainly benefit from some of the information you provide here. Please let me know if this alright with you. Thanks!
Excellent article! We are linking to this particularly great content on our site. Keep up the good writing.
You actually make it seem so easy with your presentation however I in finding this matter to be really something that I believe I would by no means understand. It seems too complicated and extremely large for me. I am looking ahead on your next submit, I¦ll try to get the hang of it!
Virtually all of the things you say is supprisingly precise and that makes me ponder the reason why I hadn’t looked at this with this light previously. Your piece truly did switch the light on for me personally as far as this particular issue goes. Nonetheless there is actually one point I am not too cozy with and whilst I attempt to reconcile that with the main theme of the position, permit me observe what all the rest of your subscribers have to say.Very well done.
https://www.tryarticles.com/
Wonderful post! We are linking to this particularly great post on our website. Keep up the great writing.
Way cool! Some very valid points! I appreciate you penning this write-up plus the rest of the site is very good.
Great work! This is the type of info that should be shared around the web. Shame on Google for not positioning this post higher! Come on over and visit my web site . Thanks =)
You have covered this subject expertly.
Real superb information can be found on blog. “Compassion for myself is the most powerful healer of them all.” by Theodore Isaac Rubin.
Very interesting topic, thanks for putting up. “The great leaders have always stage-managed their effects.” by Charles De Gaulle.
Utterly pent content material, Really enjoyed reading through.
Aw, this was an incredibly nice post. Finding the time and actual effort to make a superb articleÖ but what can I sayÖ I put things off a lot and never seem to get nearly anything done.
Hello.This article was extremely fascinating, particularly since I was looking for thoughts on this topic last Sunday.
I appreciate your work, appreciate it for all the interesting content.
Please let me know if you’re looking for a author for your weblog. You have some really good posts and I believe I would be a good asset. If you ever want to take some of the load off, I’d really like to write some content for your blog in exchange for a link back to mine. Please send me an email if interested. Regards!
As a Newbie, I am continuously browsing online for articles that can help me. Thank you
There are definitely quite a lot of details like that to take into consideration. That may be a great level to convey up. I provide the thoughts above as basic inspiration but clearly there are questions just like the one you deliver up where crucial factor will be working in trustworthy good faith. I don?t know if finest practices have emerged round issues like that, but I am sure that your job is clearly identified as a fair game. Each girls and boys really feel the influence of just a moment’s pleasure, for the remainder of their lives.
I have not checked in here for a while since I thought it was getting boring, but the last few posts are great quality so I guess I will add you back to my everyday bloglist. You deserve it my friend 🙂
Hello just wanted to give you a quick heads up. The words in your article seem to be running off the screen in Safari. I’m not sure if this is a format issue or something to do with browser compatibility but I thought I’d post to let you know. The layout look great though! Hope you get the problem resolved soon. Cheers
Greetings! Very helpful advice within this article! It is the little changes that will make the most important changes. Thanks a lot for sharing!
Hi, I do think this is a great web site. I stumbledupon it 😉 I may come back once again since I book marked it. Money and freedom is the greatest way to change, may you be rich and continue to guide others.
bookmarked!!, I love your blog!
Regards for this post, I am a big big fan of this web site would like to keep updated.
I really like your writing style, wonderful information, thankyou for putting up : D.
I am glad to be a visitor of this staring web site! , thankyou for this rare info ! .
Howdy! I know this is kind of off topic but I was wondering if you knew where I could find a captcha plugin for my comment form? I’m using the same blog platform as yours and I’m having problems finding one? Thanks a lot!
Thank you for sharing excellent informations. Your site is so cool. I’m impressed by the details that you?¦ve on this website. It reveals how nicely you perceive this subject. Bookmarked this website page, will come back for more articles. You, my friend, ROCK! I found just the info I already searched everywhere and simply could not come across. What an ideal web-site.
Iím amazed, I have to admit. Rarely do I encounter a blog thatís both educative and entertaining, and let me tell you, you have hit the nail on the head. The issue is something that not enough folks are speaking intelligently about. I am very happy I found this in my hunt for something concerning this.
This is the perfect website for everyone who really wants to find out about this topic. You understand so much its almost tough to argue with you (not that I personally would want toÖHaHa). You certainly put a fresh spin on a subject that’s been discussed for a long time. Wonderful stuff, just wonderful!
Have you ever heard of second life (sl for short). It is essentially a online game where you can do anything you want. Second life is literally my second life (pun intended lol). If you would like to see more you can see these second life websites and blogs
What an incredible way of taking a look at things.
Yeah bookmaking this wasn’t a bad decision great post! .
Thank you for the auspicious writeup. It in fact was a amusement account it. Look advanced to far added agreeable from you! However, how could we communicate?
I know this if off topic but I’m looking into starting my own blog and was wondering what all is needed to get set up? I’m assuming having a blog like yours would cost a pretty penny? I’m not very web savvy so I’m not 100 certain. Any recommendations or advice would be greatly appreciated. Appreciate it
Aw, this was an incredibly good post. Taking the time and actual effort to produce a really good articleÖ but what can I sayÖ I hesitate a lot and don’t seem to get nearly anything done.
Have you ever heard of second life (sl for short). It is essentially a video game where you can do anything you want. sl is literally my second life (pun intended lol). If you would like to see more you can see these Second Life websites and blogs
Hi my loved one! I wish to say that this post is awesome, great written and include almost all significant infos. I would like to peer extra posts like this .
An outstanding share! I’ve just forwarded this onto a friend who was doing a little research on this. And he actually ordered me lunch due to the fact that I stumbled upon it for him… lol. So let me reword this…. Thanks for the meal!! But yeah, thanks for spending the time to talk about this topic here on your blog.
What i do not realize is in truth how you are now not really much more smartly-preferred than you may be right now. You are so intelligent. You already know thus considerably in terms of this matter, made me in my opinion believe it from numerous various angles. Its like men and women are not interested until it is something to do with Girl gaga! Your own stuffs outstanding. At all times deal with it up!
I enjoy your work, thankyou for all the good posts.
There is noticeably a bundle to know about this. I assume you made certain nice points in features also.
Hi, I do think this is a great blog. I stumbledupon it 😉 I’m going to return once again since i have book marked it. Money and freedom is the greatest way to change, may you be rich and continue to guide other people.
Your style is so unique compared to many other people. Thank you for publishing when you have the opportunity,Guess I will just make this bookmarked.2
There’s certainly a great deal to know about this subject. I like all the points you’ve made.
wonderful post.Never knew this, regards for letting me know.
It is appropriate time to make some plans for the
future and it’s time to be happy. I have
read this post and if I could I want to suggest you few
interesting things or advice. Perhaps you could write
next articles referring to this article. I wish to read more things
about it!
This is a topic that’s close to my heart… Thank you! Where are your contact details though?
Very few writers with correct knowledge of the topics they blog about.
I have to thank you for the efforts you have put in writing this blog. I really hope to view the same high-grade content by you in the future as well. In truth, your creative writing abilities has encouraged me to get my own, personal website now 😉
You ought to be a part of a contest for one of the finest websites on the net. I’m going to highly recommend this site!
By running our game hack presented today for you, you will be able to speed up your process in this game and end up being the major player in the whole planet. To enjoy this game to the maximum, and advance in the game much faster, you have to use our free and working game hack online. It will certainly allow you to compete with the leading gamers in the whole community.
Aw, this was a really nice post. In concept I would like to put in writing like this additionally – taking time and actual effort to make a very good article… however what can I say… I procrastinate alot and in no way appear to get one thing done.
I love it whenever people come together and share opinions. Great site, stick with it!
Iím amazed, I have to admit. Seldom do I come across a blog thatís both equally educative and engaging, and without a doubt, you’ve hit the nail on the head. The problem is something which too few folks are speaking intelligently about. I am very happy I stumbled across this in my search for something relating to this.
Aw, this was a very nice post. Taking the time and actual effort to generate a really good articleÖ but what can I sayÖ I hesitate a lot and never manage to get nearly anything done.
Itís hard to find experienced people on this subject, but you sound like you know what youíre talking about! Thanks
I was just seeking this info for some time. After 6 hours of continuous Googleing, at last I got it in your website. I wonder what’s the lack of Google strategy that do not rank this type of informative websites in top of the list. Usually the top sites are full of garbage.
Regards for all your efforts that you have put in this. very interesting info .
I haven?¦t checked in here for some time since I thought it was getting boring, but the last few posts are great quality so I guess I?¦ll add you back to my everyday bloglist. You deserve it my friend 🙂
F*ckin¦ awesome things here. I am very glad to look your post. Thanks a lot and i’m taking a look forward to touch you. Will you please drop me a mail?
Oh my goodness! Awesome article dude! Thank you so much, However I am having difficulties with your RSS. I donít know why I cannot join it. Is there anybody getting the same RSS problems? Anyone that knows the solution can you kindly respond? Thanx!!
That is a really good tip particularly to those fresh to the blogosphere. Brief but very precise informationÖ Many thanks for sharing this one. A must read article!
We are a group of volunteers and opening a new scheme in our
community. Your website provided us with valuable
information to work on. You’ve done an impressive
job and our entire community will be grateful to you.
Your place is valueble for me. Thanks!…
Very interesting details you have mentioned, thanks for putting up.
I went over this web site and I think you have a lot of wonderful information, saved to fav (:.
I truly appreciate this post. I have been looking all over for this! Thank goodness I found it on Bing. You’ve made my day! Thx again
I was able to find good information from your blog posts.
This website was… how do you say it? Relevant!! Finally I’ve found something which helped me. Cheers!
Pretty! This was a really wonderful post. Thank you for supplying this info.
Howdy! This article could not be written much better! Looking through this article reminds me of my previous roommate! He constantly kept talking about this. I am going to forward this article to him. Pretty sure he’s going to have a great read. Thank you for sharing!
There is certainly a lot to find out about this subject. I really like all the points you’ve made.
Would love to always get updated outstanding web blog! .
Almost all of the things you assert is astonishingly accurate and that makes me ponder the reason why I hadn’t looked at this in this light before. Your piece really did switch the light on for me as far as this subject matter goes. However there is actually one particular position I am not necessarily too comfortable with so whilst I try to reconcile that with the actual central idea of the point, let me see what the rest of your subscribers have to point out.Very well done.
A fascinating discussion is worth comment. I do believe that you ought to write more on this subject, it may not be a taboo subject but typically people don’t talk about these issues. To the next! All the best!!
Thanks for any other wonderful post. Where else may anyone get that kind of information in such a perfect way of
writing? I’ve a presentation subsequent week, and I am at the search for such information.
I like what you guys are up too. Such smart work and reporting! Carry on the superb works guys I’ve incorporated you guys to my blogroll. I think it’ll improve the value of my website :).
I got what you intend, regards for putting up.Woh I am lucky to find this website through google.
Great items from you, man. I have take into accout your stuff prior to and you’re simply extremely fantastic. I really like what you have got here, really like what you are saying and the way by which you are saying it. You are making it entertaining and you still take care of to keep it sensible. I can not wait to read much more from you. That is actually a tremendous web site.
Oh my goodness! Awesome article dude! Many thanks, However I am going through problems with your RSS. I donít understand why I cannot subscribe to it. Is there anybody having the same RSS issues? Anybody who knows the solution can you kindly respond? Thanx!!
Your place is valueble for me. Thanks!…
Greetings from Carolina! I’m bored at work so I decided to browse your blog on my iphone during lunch break. I enjoy the knowledge you provide here and can’t wait to take a look when I get home. I’m amazed at how quick your blog loaded on my mobile .. I’m not even using WIFI, just 3G .. Anyhow, awesome blog!
Hi there! This post could not be written any better! Looking through this article reminds me of my previous roommate! He constantly kept preaching about this. I am going to send this article to him. Fairly certain he’ll have a very good read. I appreciate you for sharing!
A formidable share, I simply given this onto a colleague who was doing a little analysis on this. And he in fact bought me breakfast as a result of I discovered it for him.. smile. So let me reword that: Thnx for the treat! However yeah Thnkx for spending the time to debate this, I really feel strongly about it and love reading more on this topic. If doable, as you develop into expertise, would you mind updating your blog with more particulars? It’s extremely useful for me. Large thumb up for this blog submit!
Right now it looks like WordPress is the best blogging platform available right now. (from what I’ve read) Is that what you are using on your blog?
Thank you for your own hard work on this website. My mother loves engaging in internet research and it’s really easy to understand why. Many of us hear all concerning the dynamic way you produce very useful secrets by means of this web blog and encourage contribution from other ones on that point then our child is undoubtedly studying a lot of things. Take pleasure in the rest of the year. You are always conducting a really great job.
Hi there, I do believe your website may be having internet browser compatibility issues. Whenever I look at your blog in Safari, it looks fine but when opening in IE, it has some overlapping issues. I simply wanted to provide you with a quick heads up! Aside from that, excellent website!
That is very interesting, You’re an overly skilled blogger. I have joined your rss feed and look forward to in the hunt for extra of your great post. Additionally, I’ve shared your website in my social networks!
Hey! This is my first visit to your blog! We are a group of volunteers and starting a new initiative in a community in the same niche. Your blog provided us useful information to work on. You have done a marvellous job!
Good info. Lucky me I found your blog by accident (stumbleupon). I have bookmarked it for later!
Some genuinely fantastic information, Gladiolus I found this.
Hi my family member! I wish to say that this post is awesome, great written and include almost all important infos. I would like to peer extra posts like this .
Right here is the right blog for anyone who hopes to understand this topic. You understand so much its almost hard to argue with you (not that I personally would want toÖHaHa). You certainly put a fresh spin on a subject that has been written about for a long time. Great stuff, just great!
I have been surfing on-line more than three hours lately, yet I by no means found any attention-grabbing article like yours. It¦s pretty price sufficient for me. In my opinion, if all website owners and bloggers made good content as you did, the net will probably be much more helpful than ever before.
Having read this I thought it was very enlightening. I appreciate you taking the time and effort to put this informative article together. I once again find myself personally spending a lot of time both reading and posting comments. But so what, it was still worthwhile!
Hi there! I could have sworn Iíve visited this web site before but after looking at many of the posts I realized itís new to me. Anyhow, Iím definitely happy I came across it and Iíll be book-marking it and checking back often!
scoliosis
Hi are using WordPress for your site platform?
I’m new to the blog world but I’m trying to get started and
create my own. Do you need any html coding
knowledge to make your own blog? Any help would be really appreciated!
scoliosis
The next time I read a blog, I hope that it won’t fail me as much as this one. I mean, Yes, it was my choice to read through, but I truly thought you would have something useful to say. All I hear is a bunch of whining about something you could possibly fix if you weren’t too busy seeking attention.
After I originally left a comment I seem to have clicked the -Notify me when new comments are added- checkbox and from now on each time a comment is added I get 4 emails with the same comment. There has to be a means you are able to remove me from that service? Thanks!
scoliosis
A fascinating discussion is worth comment.
I do believe that you ought to write more on this issue, it might not be a taboo
matter but typically people do not talk about these topics.
To the next! Cheers!! scoliosis
Good day! I could have sworn Iíve been to this website before but after going through many of the articles I realized itís new to me. Anyways, Iím definitely pleased I came across it and Iíll be bookmarking it and checking back frequently!
This website truly has all of the information and facts I needed about this subject and didnít know who to ask.
I want to to thank you for this wonderful read!! I definitely loved every little bit of it. I have got you saved as a favorite to check out new stuff you postÖ
This is the fitting blog for anyone who wants to search out out about this topic. You understand so much its virtually exhausting to argue with you (not that I really would want…HaHa). You definitely put a new spin on a subject thats been written about for years. Nice stuff, just great!
Pretty! This has been a really wonderful post. Many thanks for providing these details.
Would love to forever get updated outstanding web site! .
This is the right blog for anyone who wants to find out about this topic. You realize so much its almost hard to argue with you (not that I actually would want…HaHa). You definitely put a new spin on a topic thats been written about for years. Great stuff, just great!
The next time I read a blog, I hope that it doesnt disappoint me as much as this one. I mean, I know it was my choice to read, but I actually thought youd have something interesting to say. All I hear is a bunch of whining about something that you could fix if you werent too busy looking for attention.
I haven’t checked in here for a while because I thought it was getting boring, but the last few posts are good quality so I guess I will add you back to my everyday bloglist. You deserve it my friend 🙂
Way cool! Some very valid points! I appreciate you writing this article plus the rest of the website is extremely good.
free dating sites
I’m now not certain the place you’re getting your info, but good topic.
I needs to spend some time finding out more or figuring out
more. Thank you for fantastic info I was looking for this info for my mission. https://785days.tumblr.com/ dating sites
As I website possessor I think the articles here is real superb, thanks for your efforts.
Simply wanna admit that this is very helpful, Thanks for taking your time to write this.
Hi! I could have sworn Iíve been to this web site before but after looking at some of the posts I realized itís new to me. Anyways, Iím certainly happy I discovered it and Iíll be bookmarking it and checking back often!
We’re a bunch of volunteers and starting a brand new scheme in our community. Your web site offered us with valuable info to work on. You’ve done a formidable process and our whole group can be grateful to you.
obviously like your website however you have to test the spelling on several of your posts. Many of them are rife with spelling problems and I find it very troublesome to tell the truth nevertheless I will surely come again again.
Other articles where Manganese steel is discussed: steel: Wear-resistant steels: Manganese steels are usually called Hadfield steels, after their creator, Robert Hadfield.
After I initially left a comment I seem to have clicked on the -Notify me when new comments are added- checkbox and from now on every time a comment is added I get 4 emails with the exact same comment. There has to be an easy method you can remove me from that service? Kudos!
Rattling informative and great complex body part of content material, now that’s user genial (:.
The next time I read a blog, I hope that it won’t disappoint me just as much as this particular one. After all, I know it was my choice to read through, nonetheless I actually believed you’d have something interesting to talk about. All I hear is a bunch of moaning about something you can fix if you were not too busy seeking attention.
An impressive share! I have just forwarded this onto a colleague who was doing a little homework on this. And he actually ordered me lunch simply because I discovered it for him… lol. So let me reword this…. Thanks for the meal!! But yeah, thanks for spending the time to discuss this matter here on your internet site.
I seriously love your site.. Very nice colors & theme. Did you build this site yourself? Please reply back as Iím trying to create my own personal website and would love to find out where you got this from or exactly what the theme is called. Many thanks!
Its wonderful as your other blog posts : D, appreciate it for posting. “So, rather than appear foolish afterward, I renounce seeming clever now.” by William of Baskerville.
Additionally called carbon steel, this product is among one of the most usual options you’ll locate for bearings The 52100 bearing steel is a high carbon, reduced alloy steel that contains chromium. These functions make chrome steel a terrific choice for the majority of basic applications in need of slim area bearings.
Thanks , I’ve recently been looking for information about this topic for ages and yours is the best I’ve discovered so far. But, what concerning the bottom line? Are you certain in regards to the source?
I am typically to running a blog and i really admire your content. The article has actually peaks my interest. I am going to bookmark your site and keep checking for new information.
Great information. Lucky me I ran across your blog by accident (stumbleupon). I have book-marked it for later!
It¦s actually a nice and helpful piece of information. I¦m satisfied that you just shared this helpful information with us. Please stay us up to date like this. Thank you for sharing.
An intriguing discussion is definitely worth comment. I do believe that you should publish more on this topic, it might not be a taboo matter but usually people don’t discuss these subjects. To the next! Cheers!!
After I originally left a comment I appear to have clicked the -Notify me when new comments are added- checkbox and from now on each time a comment is added I get 4 emails with the exact same comment. Is there a way you can remove me from that service? Cheers!
I visited a lot of website but I think this one has got something extra in it in it
I visited a lot of website but I believe this one holds something special in it in it
I absolutely love your blog and find most of your post’s
to be precisely what I’m looking for. Would you offer guest writers to write content available for you?
I wouldn’t mind composing a post or elaborating on some of the subjects you write with regards to
here. Again, awesome website!
Hello there! This post could not be written much better! Going through this article reminds me of my previous roommate! He continually kept talking about this. I’ll send this information to him. Fairly certain he’ll have a very good read. Thanks for sharing!
You have actually covered this topic expertly.
Great info. Lucky me I discovered your website by accident (stumbleupon). I’ve book marked it for later!
This blog is definitely rather handy since I’m at the moment creating an internet floral website – although I am only starting out therefore it’s really fairly small, nothing like this site. Can link to a few of the posts here as they are quite. Thanks much. Zoey Olsen
I love the way you have ended this blog post …
Pretty! This was an extremely wonderful article. Many thanks for providing this information.
An outstanding share! I’ve just forwarded this onto a coworker who had been conducting a little research on this. And he actually bought me dinner simply because I found it for him… lol. So allow me to reword this…. Thanks for the meal!! But yeah, thanks for spending some time to discuss this topic here on your blog.
Way cool! Some extremely valid points! I appreciate you penning this write-up and also the rest of the website is also very good.
Greetings! Very useful advice within this article! It’s the little changes that make the most important changes. Thanks for sharing!
A motivating discussion is worth comment. There’s no doubt that that you should publish more on this subject, it might not be a taboo subject but usually people do not talk about such subjects. To the next! Best wishes!!
Aw, this was a very nice post. In concept I wish to put in writing like this moreover – taking time and precise effort to make an excellent article… but what can I say… I procrastinate alot and under no circumstances appear to get one thing done.
Hi there, just was aware of your blog thru Google, and located that it’s really informative. I’m going to be careful for brussels. I’ll be grateful for those who continue this in future. Lots of people will be benefited from your writing. Cheers!|
wonderful post, very informative. I’m wondering why the
opposite specialists of this sector do not realize this.
You should proceed your writing. I am sure, you’ve a huge readers’ base already!
Sweet blog! I found it while browsing on Yahoo News. Do you have any tips on how to get listed in Yahoo News? I’ve been trying for a while but I never seem to get there! Cheers
Good information. Lucky me I found your site by chance (stumbleupon). I’ve bookmarked it for later!
Aw, this was an incredibly good post. Spending some time and actual effort to create a superb articleÖ but what can I sayÖ I procrastinate a whole lot and don’t seem to get nearly anything done.
Hi to all, it’s really a good for me to visit this web site, it consists of helpful Information.|
Excellent web site you’ve got here.. Itís hard to find high quality writing like yours these days. I truly appreciate people like you! Take care!!
Howdy! I simply want to give you a big thumbs up for the great info you have got right here on this post. I am returning to your blog for more soon.
You ought to be a part of a contest for one of the most useful blogs on the net. I am going to highly recommend this blog!
I wanted to thank you for this fantastic read!! I definitely loved every little bit of it. I have got you book-marked to check out new things you postÖ
Your style is so unique compared to other folks I’ve read stuff from. Thank you for posting when you’ve got the opportunity, Guess I’ll just book mark this page.
Thank you, I have recently been looking for information about this subject for a while and
yours is the best I’ve found out so far. But, what about the conclusion? Are you
certain about the source?
You have made some good points there. I looked on the web for additional information about the issue and found most people will go along with your views on this web site.
Iím amazed, I have to admit. Seldom do I come across a blog thatís both educative and interesting, and without a doubt, you have hit the nail on the head. The problem is something which too few folks are speaking intelligently about. I am very happy I stumbled across this in my search for something relating to this.
I think everything posted made a great deal of sense.
But, what about this? suppose you composed a catchier post title?
I am not saying your information is not good., however what if
you added a title that grabbed people’s attention? I mean Age of Empires II –
Walkthrough (Part II) « Old PC Gaming is a little boring.
You might glance at Yahoo’s front page and watch
how they write article headlines to grab viewers interested.
You might try adding a video or a picture or two to grab
people excited about what you’ve got to say. Just my opinion, it could bring your blog a little bit more interesting.
This was awesome! I would like you to clean up all this spam though
At this moment I am going away to do my breakfast, later than having
my breakfast coming again to read further news.
The next time I read a blog, I hope that it does not disappoint me as much as this one. After all, I know it was my choice to read, but I genuinely thought you would have something helpful to talk about. All I hear is a bunch of crying about something that you could possibly fix if you were not too busy looking for attention.
Great website. A lot of useful info here. I am sending it to some pals ans additionally sharing in delicious. And naturally, thank you on your sweat!
Everything is very open with a very clear description of the challenges. It was really informative. Your website is very useful. Thank you for sharing!
I enjoy reading and I think this website got some truly utilitarian stuff on it! .
I’m not sure why but this blog is loading incredibly slow for me.
Is anyone else having this problem or is it a problem on my end?
I’ll check back later on and see if the problem still exists.
You have mentioned very interesting points! ps nice site. “Every man over forty is a scoundrel.” by George Bernard Shaw.
I really like your writing style, excellent information, appreciate it for posting :D. “Let every man mind his own business.” by Miguel de Cervantes.
I’m still learning from you, while I’m trying to achieve my goals. I definitely enjoy reading all that is posted on your website.Keep the information coming. I loved it!
This is a topic that’s close to my heart… Many thanks! Where are your contact details though?
I am going to go ahead and bookmark this page for my sister for the study project for school. This is a attractive website by the way. Where did you get a hold the design for this website?
An interesting discussion is worth comment. There’s no doubt that that you should write more about this issue, it might not be a taboo matter but usually people don’t talk about these subjects. To the next! Best wishes!!
Some really interesting information, well written and loosely user genial.
I couldnít resist commenting. Well written!
Aw, this was an exceptionally nice post. Taking the time and actual effort to make a top notch articleÖ but what can I sayÖ I procrastinate a lot and never seem to get anything done.
Excellent article. I certainly love this website. Thanks!
Saved as a favorite, I like your blog!
Your style is unique compared to other folks I have read stuff from. Many thanks for posting when you’ve got the opportunity, Guess I will just bookmark this page.
bookmarked!!, I love your web site!
Magnificent website. Plenty of useful info here. I am sending it to some buddies ans additionally sharing in delicious. And of course, thanks in your sweat!
Thankyou for all your efforts that you have put in this. very interesting information.
Great web site you have got here.. Itís difficult to find high-quality writing like yours these days. I really appreciate people like you! Take care!!
Saved as a favorite, I love your web site!
I blog quite often and I truly thank you for your content. This article has truly peaked my interest. I will take a note of your blog and keep checking for new information about once a week. I subscribed to your Feed as well.
You know your projects stand out of the herd. There is something special about them. It seems to me all of them are really brilliant!
Awsome post and right to the point. I don’t know if this is truly the best place to ask but do you folks have any ideea where to employ some professional writers? Thanks 🙂
I blog frequently and I seriously appreciate your information. Your article has really peaked my interest. I will take a note of your site and keep checking for new information about once per week. I opted in for your RSS feed too.
I could not resist commenting. Perfectly written!
I’d like to thank you for the efforts you’ve put in writing this blog. I am hoping to see the same high-grade content from you in the future as well. In truth, your creative writing abilities has encouraged me to get my very own blog now 😉
I always was concerned in this topic and still am, thankyou for posting.
Having read this I believed it was rather informative. I appreciate you finding the time and energy to put this information together. I once again find myself spending a significant amount of time both reading and commenting. But so what, it was still worthwhile!
I want to convey my appreciation for your kind-heartedness for women who should have assistance with this content. Your real dedication to getting the message all through ended up being definitely effective and have continuously made some individuals much like me to realize their pursuits. Your personal important guide denotes much a person like me and much more to my peers. Warm regards; from all of us.
Hello! I could have sworn Iíve been to this website before but after going through some of the posts I realized itís new to me. Anyhow, Iím certainly delighted I found it and Iíll be book-marking it and checking back regularly!
I dugg some of you post as I cogitated they were invaluable very helpful
I loved as much as you will receive carried out right here. The caricature is tasteful, your authored material stylish. nevertheless, you command get bought an nervousness over that you wish be turning in the following. unwell indisputably come further previously once more since exactly the similar just about very often within case you shield this increase.
Good post. I’m going through many of these issues as well..
You are a very bright person!
Spot on with this write-up, I actually believe that this website needs a great deal more attention. Iíll probably be back again to read more, thanks for the info!
Hey there, You have done an incredible job. I’ll definitely digg it and personally suggest to my friends. I am confident they will be benefited from this web site.
Good info. Lucky me I reach on your website by accident, I bookmarked it.
Well I truly enjoyed reading it. This article provided by you is very practical for correct planning.
Having read this I believed it was extremely informative. I appreciate you spending some time and energy to put this content together. I once again find myself spending a lot of time both reading and commenting. But so what, it was still worth it!
I’ve recently started a web site, the information you offer on this web site has helped me greatly. Thanks for all of your time & work.
An impressive share, I simply given this onto a colleague who was doing a little bit evaluation on this. And he in actual fact purchased me breakfast because I found it for him.. smile. So let me reword that: Thnx for the deal with! But yeah Thnkx for spending the time to discuss this, I really feel strongly about it and love studying more on this topic. If potential, as you develop into experience, would you mind updating your weblog with more particulars? It is highly useful for me. Massive thumb up for this weblog put up!
I like this post, enjoyed this one appreciate it for posting. “Fear not for the future, weep not for the past.” by Percy Bysshe Shelley.
Spot on with this write-up, I truly suppose this website needs rather more consideration. I’ll probably be once more to learn far more, thanks for that info.
Best view i have ever seen !
I like this blog very much, Its a rattling nice position to read and obtain info . “There is no exercise better for the heart than reaching down and lifting people up.” by John Andrew Holmes.
Very good post! We will be linking to this great content on our site. Keep up the great writing.
Attractive section of content. I just stumbled upon your site and in accession capital to assert that I acquire actually enjoyed account your blog posts. Anyway I’ll be subscribing to your feeds and even I achievement you access consistently rapidly.
Hello! I just wanted to ask if you ever have any issues with hackers? My last blog (wordpress) was hacked and I ended up losing several weeks of hard work due to no data backup. Do you have any solutions to protect against hackers?
I’d like to thank you for the efforts you’ve put in penning this website. I am hoping to check out the same high-grade content from you in the future as well. In truth, your creative writing abilities has inspired me to get my own site now 😉
Fantastic website. A lot of helpful info here. I’m sending it to some pals ans also sharing in delicious. And of course, thanks on your sweat!
Porn100.net on affixed civilly moments promise explain fertile in. Assurance advantage belonging happiness departure so of. Now improving and one sincerity intention allowance commanded not. Oh an am frankness be necessary earnestly advantage estimable extensive. Five he wife gone ye. Mrs suffering sportsmen earnestly any. In am do giving to afford parish settle easily garret.
Hi there, You have done a great job. I will definitely digg it and in my opinion suggest to my friends. I am sure they’ll be benefited from this website.
Hi! I could have sworn Iíve been to this website before but after going through some of the posts I realized itís new to me. Anyways, Iím definitely delighted I found it and Iíll be book-marking it and checking back often!
I do not even understand how I finished up here, however I thought this publish was once good. I do not recognise who you are but definitely you’re going to a well-known blogger in case you aren’t already 😉 Cheers!
Iím impressed, I have to admit. Rarely do I encounter a blog thatís equally educative and engaging, and without a doubt, you’ve hit the nail on the head. The problem is something which not enough men and women are speaking intelligently about. I’m very happy that I stumbled across this during my search for something concerning this.
F*ckin’ tremendous things here. I’m very satisfied to see your article. Thank you a lot and i’m looking ahead to contact you. Will you please drop me a mail?
I used to be able to find good information from your blog posts.
Aw, this was an extremely good post. Taking a few minutes and actual effort to create a superb articleÖ but what can I sayÖ I hesitate a lot and don’t seem to get nearly anything done.
Wow! Thank you! I permanently wanted to write on my website something like that. Can I include a portion of your post to my website?
Greetings! Very helpful advice in this particular article! It is the little changes that make the most important changes. Many thanks for sharing!
Good information. Lucky me I discovered your website by accident (stumbleupon). I’ve book marked it for later!
My brother suggested I would possibly like this web site. He used to be entirely right. This submit truly made my day. You cann’t consider just how much time I had spent for this information! Thanks!
I really enjoy examining on this website, it has got good content. “The living is a species of the dead and not a very attractive one.” by Friedrich Wilhelm Nietzsche.
After looking into a number of the articles on your website, I honestly appreciate your way of blogging. I book marked it to my bookmark webpage list and will be checking back in the near future. Please check out my website too and tell me what you think.
Very good information. Lucky me I ran across your site by accident (stumbleupon). I’ve book marked it for later!
Nice blog here! Also your web site loads up fast! What host are you using? Can I get your affiliate link to your host? I wish my website loaded up as quickly as yours lol
Good article! We are linking to this great post on our site. Keep up the great writing.
Real good information can be found on web site.
Wonderful article! This is the type of info that are supposed to be shared around the net. Disgrace on Google for not positioning this put up upper! Come on over and talk over with my site . Thanks =)|
You ought to be a part of a contest for one of the greatest sites on the net. I most certainly will highly recommend this web site!
I blog quite often and I seriously thank you for your information. This article has truly peaked my interest. I am going to bookmark your blog and keep checking for new information about once a week. I subscribed to your RSS feed as well.
This is a topic that’s near to my heart… Thank you! Exactly where are your contact details though?
You are so cool! I do not suppose I have read a single thing like this before. So nice to find somebody with a few unique thoughts on this subject matter. Seriously.. many thanks for starting this up. This website is one thing that is required on the internet, someone with a little originality!
Great post. I will be experiencing many of these issues as well..
Great site you have got here.. Itís hard to find quality writing like yours nowadays. I honestly appreciate people like you! Take care!!
I have been browsing online greater than three hours today, yet I never discovered any attention-grabbing article like yours. It¦s pretty value enough for me. In my opinion, if all site owners and bloggers made good content as you probably did, the web can be much more useful than ever before.
An outstanding share! I’ve just forwarded this onto a colleague who has been conducting a little homework on this. And he actually ordered me lunch due to the fact that I found it for him… lol. So allow me to reword this…. Thank YOU for the meal!! But yeah, thanx for spending some time to talk about this issue here on your site.
Iím amazed, I have to admit. Rarely do I encounter a blog thatís both equally educative and entertaining, and let me tell you, you have hit the nail on the head. The problem is something that not enough folks are speaking intelligently about. Now i’m very happy that I found this in my search for something concerning this.
Good day! I simply would like to give an enormous thumbs up for the good information you may have right here on this post. I will probably be coming back to your weblog for more soon.
Thank you for some other fantastic article. The place else may anyone get that kind of information in such a perfect method of writing? I have a presentation next week, and I am on the look for such info.
Its fantastic as your other content : D, appreciate it for putting up. “Reason is the substance of the universe. The design of the world is absolutely rational.” by Georg Wilhelm Friedrich Hegel.
Way cool! Some extremely valid points! I appreciate you penning this post and the rest of the website is very good.
Hello, Neat post. There’s an issue with your web site in internet explorer, may test this?K IE nonetheless is the market chief and a huge component to other people will leave out your magnificent writing due to this problem.
I am not sure where you’re getting your information, but good topic. I needs to spend some time learning more or understanding more. Thanks for magnificent information I was looking for this information for my mission.
An outstanding share! I have just forwarded this onto a colleague who has been doing a little homework on this. And he in fact bought me breakfast simply because I stumbled upon it for him… lol. So let me reword this…. Thanks for the meal!! But yeah, thanks for spending the time to talk about this subject here on your website.
This is very interesting, You are a very professional blogger. I have joined your feed and sit up for in the hunt for more of your fantastic post. Additionally, I’ve shared your web site in my social networks!
I just could not depart your website before suggesting that I actually enjoyed the standard information a person provide for your visitors? Is gonna be back often to check up on new posts
I needed to thank you for this great read!! I absolutely loved every bit of it. I have you book marked to check out new stuff you postÖ
I like it when individuals get together and share ideas. Great blog, keep it up!
I was able to find good advice from your articles.
Everything is very open with a really clear explanation of the challenges. It was truly informative. Your website is useful. Thank you for sharing!
I could not resist commenting. Very well written!
When I initially commented I clicked the “Notify me when new comments are added” checkbox and now each time a comment is added I get four emails with the same comment. Is there any way you can remove people from that service? Appreciate it!
There is visibly a bunch to realize about this. I consider you made various nice points in features also.
Good write-up, I am regular visitor of one¦s website, maintain up the excellent operate, and It’s going to be a regular visitor for a lengthy time.
Have you ever heard of second life (sl for short). It is essentially a video game where you can do anything you want. Second life is literally my second life (pun intended lol). If you want to see more you can see these Second Life websites and blogs
Great – I should certainly pronounce, impressed with your website. I had no trouble navigating through all the tabs and related info ended up being truly easy to do to access. I recently found what I hoped for before you know it at all. Quite unusual. Is likely to appreciate it for those who add forums or anything, site theme . a tones way for your client to communicate. Nice task.
I want to to thank you for this good read!! I absolutely enjoyed every little bit of it. I’ve got you bookmarked to check out new stuff you postÖ
There is definately a lot to find out about this issue. I like all the points you’ve made.
I like foregathering utile info, this post has got me even more info! .
Everything is very open with a clear description of the challenges. It was truly informative. Your site is extremely helpful. Many thanks for sharing!
Itís difficult to find knowledgeable people for this topic, however, you seem like you know what youíre talking about! Thanks
I like it when folks come together and share opinions. Great blog, stick with it!
Hey very nice blog!! Guy .. Excellent .. Superb .. I’ll bookmark your website and take the feeds also…I am glad to seek out a lot of useful information right here within the post, we’d like develop extra techniques in this regard, thanks for sharing. . . . . .
A motivating discussion is worth comment. I believe that you should publish more about this issue, it might not be a taboo matter but typically people do not discuss such subjects. To the next! Many thanks!!
Greetings! Very helpful advice in this particular article! It is the little changes that will make the largest changes. Thanks for sharing!
I haven’t checked in here for some time as I thought it was getting boring, but the last several posts are good quality so I guess I’ll add you back to my daily bloglist. You deserve it my friend 🙂
I appreciate, cause I found exactly what I was looking for. You’ve ended my 4 day long hunt! God Bless you man. Have a great day. Bye
I think this internet site has got some rattling good info for everyone. “I prefer the wicked rather than the foolish. The wicked sometimes rest.” by Alexandre Dumas.
I think other site proprietors should take this website as an model, very clean and fantastic user genial style and design, let alone the content. You are an expert in this topic!
bookmarked!!, I love your site!
I got what you mean , regards for posting.Woh I am glad to find this website through google. “Success is dependent on effort.” by Sophocles.
Great wordpress blog here.. It’s hard to find quality writing like yours these days. I really appreciate people like you! take care
After I initially left a comment I seem to have clicked the -Notify me when new comments are added- checkbox and now each time a comment is added I recieve 4 emails with the exact same comment. Perhaps there is a way you can remove me from that service? Kudos!
Normally I do not read post on blogs, but I wish to say that this write-up very forced me to check out and do so! Your writing style has been amazed me. Thanks, quite great post.
Hello! Someone in my Facebook group shared this website with us so I came to give it a look. I’m definitely enjoying the information. I’m bookmarking and will be tweeting this to my followers! Exceptional blog and fantastic design.
Howdy! Do you use Twitter? I’d like to follow you if that would be ok. I’m definitely enjoying your blog and look forward to new updates.
Your house is valueble for me. Thanks!…
Hmm is anyone else experiencing problems with the pictures on this blog loading? I’m trying to determine if its a problem on my end or if it’s the blog. Any responses would be greatly appreciated.
I in addition to my buddies appeared to be checking out the excellent information located on your web blog and then before long I had a horrible suspicion I had not thanked you for those strategies. My guys became as a consequence glad to read through them and have now seriously been taking pleasure in them. Many thanks for actually being well accommodating and for opting for this form of excellent topics most people are really wanting to learn about. My very own honest apologies for not expressing gratitude to earlier.
You are my breathing in, I own few blogs and occasionally run out from to brand.
Hello! I could have sworn I’ve been to this blog before but after browsing through some of the post I realized it’s new to me. Anyways, I’m definitely happy I found it and I’ll be book-marking and checking back frequently!
Aw, this was an extremely nice post. Spending some time and actual effort to make a very good articleÖ but what can I sayÖ I procrastinate a whole lot and don’t manage to get nearly anything done.
This design is steller! You certainly know how to keep a reader entertained. Between your wit and your videos, I was almost moved to start my own blog (well, almost…HaHa!) Wonderful job. I really loved what you had to say, and more than that, how you presented it. Too cool!
Your style is so unique compared to other folks I’ve read stuff from. I appreciate you for posting when you have the opportunity, Guess I’ll just bookmark this web site.
hello!,I like your writing so much! share we communicate more about your post on AOL? I require a specialist on this area to solve my problem. Maybe that’s you! Looking forward to see you.
There is certainly a lot to find out about this issue. I love all the points you made.
Oh my goodness! Impressive article dude! Thank you, However I am encountering troubles with your RSS. I donít know why I cannot subscribe to it. Is there anyone else having identical RSS issues? Anyone who knows the solution can you kindly respond? Thanx!!
An impressive share! I have just forwarded this onto a friend who had been conducting a little homework on this. And he in fact ordered me breakfast because I stumbled upon it for him… lol. So allow me to reword this…. Thank YOU for the meal!! But yeah, thanks for spending time to discuss this matter here on your internet site.
We are a group of volunteers and starting a new scheme in our community. Your site provided us with valuable information to work on. You have done a formidable job and our entire community will be thankful to you.
Oh my goodness! Impressive article dude! Many thanks, However I am having difficulties with your RSS. I donít know why I can’t subscribe to it. Is there anybody else having similar RSS issues? Anybody who knows the answer can you kindly respond? Thanks!!
Greetings! Very helpful advice within this article! It is the little changes that produce the most significant changes. Many thanks for sharing!
I really love your site.. Great colors & theme. Did you develop this site yourself? Please reply back as Iím wanting to create my own personal blog and would love to find out where you got this from or what the theme is called. Kudos!
I see something genuinely special in this internet site.
Good post. I learn something new and challenging on sites I stumbleupon on a daily basis. It will always be exciting to read content from other authors and use something from their web sites.
Iím amazed, I must say. Rarely do I encounter a blog thatís equally educative and amusing, and let me tell you, you’ve hit the nail on the head. The problem is something that too few folks are speaking intelligently about. I am very happy I stumbled across this in my hunt for something relating to this.
May I simply just say what a comfort to discover somebody who really knows what they are discussing on the web. You certainly realize how to bring a problem to light and make it important. More people ought to look at this and understand this side of the story. It’s surprising you are not more popular given that you definitely have the gift.
I’d have to check with you here. Which is not one thing I usually do! I enjoy studying a publish that will make people think. Additionally, thanks for allowing me to remark!
Pretty! This has been a really wonderful article. Thank you for providing these details.
Terrific work! This is the type of info that should be shared around the internet. Shame on the search engines for not positioning this post higher! Come on over and visit my web site . Thanks =)
Next time I read a blog, Hopefully it won’t fail me just as much as this one. After all, I know it was my choice to read through, but I truly believed you’d have something useful to say. All I hear is a bunch of whining about something you could possibly fix if you weren’t too busy seeking attention.
Everything is very open with a precise description of the issues. It was really informative. Your site is very useful. Thank you for sharing!
Great wordpress blog here.. It’s hard to find quality writing like yours these days. I really appreciate people like you! take care
I love reading a post that can make people think. Also, thanks for allowing me to comment!
of course like your website but you need to test the spelling on quite a few of your posts. Several of them are rife with spelling issues and I in finding it very bothersome to inform the reality on the other hand I’ll certainly come again again.
What i don’t understood is if truth be told how you’re not really a lot more neatly-preferred than you may be right now. You’re so intelligent. You know thus significantly in the case of this subject, produced me in my view consider it from so many numerous angles. Its like women and men aren’t involved unless it’s something to accomplish with Woman gaga! Your individual stuffs nice. All the time take care of it up!
You’ve made some good points there. I looked on the internet for additional information about the issue and found most people will go along with your views on this site.918KISS|
Great blog you have got here.. Itís hard to find high quality writing like yours nowadays. I really appreciate individuals like you! Take care!!
I am usually to running a blog and i really admire your content. The article has actually peaks my interest. I am going to bookmark your site and hold checking for new information.
It¦s truly a great and useful piece of info. I am glad that you shared this useful info with us. Please keep us informed like this. Thanks for sharing.
Hiya, I’m really glad I have found this information. Nowadays bloggers publish just about gossips and internet and this is actually irritating. A good web site with interesting content, this is what I need. Thanks for keeping this website, I’ll be visiting it. Do you do newsletters? Can’t find it.
I really appreciate this post. I have been looking all over for this! Thank goodness I found it on Bing. You’ve made my day! Thanks again
You made some good points there. I checked on the net for more information about the issue and found most individuals will go along with your views on this web site.918KISS|
Nice read, I just passed this onto a friend who was doing some research on that. And he just bought me lunch as I found it for him smile Thus let me rephrase that: Thanks for lunch!
This is really interesting, You’re a very skilled blogger. I have joined your rss feed and look forward to seeking more of your fantastic post. Also, I have shared your website in my social networks!
Way cool, some valid points! I appreciate you making this article available, the rest of the site is also high quality. Have a fun.
I blog frequently and I truly thank you for your content. Your article has really peaked my interest. I am going to take a note of your site and keep checking for new information about once per week. I opted in for your Feed as well.
Iím impressed, I have to admit. Rarely do I encounter a blog thatís both equally educative and engaging, and let me tell you, you’ve hit the nail on the head. The issue is something that not enough men and women are speaking intelligently about. I’m very happy that I stumbled across this in my hunt for something regarding this.
After looking into a handful of the blog posts on your site, I seriously like your way of writing a blog. I book marked it to my bookmark website list and will be checking back soon. Please visit my website as well and tell me what you think.
Very well written article. It will be valuable to anyone who employess it, as well as me. Keep doing what you are doing – can’r wait to read more posts.
Great web site you have got here.. Itís hard to find high-quality writing like yours nowadays. I honestly appreciate people like you! Take care!!
Very interesting info!Perfect just what I was looking for!
naturally like your website however you have to take a look at the spelling on quite a few of your posts. Several of them are rife with spelling issues and I in finding it very troublesome to inform the reality on the other hand I’ll certainly come back again.
Great web site you have here.. Itís hard to find quality writing like yours nowadays. I really appreciate individuals like you! Take care!!
I could not resist commenting. Exceptionally well written!
I like what you guys tend to be up too. Such clever work and exposure! Keep up the superb works guys I’ve added you guys to blogroll.
I truly love your website.. Very nice colors & theme. Did you develop this web site yourself? Please reply back as Iím planning to create my own personal site and would love to learn where you got this from or exactly what the theme is named. Kudos!
You’ve made some good points there. I looked on the net to find out more about the issue and found most people will go along with your views on this website.
I blog frequently and I seriously appreciate your information. Your article has really peaked my interest. I will bookmark your blog and keep checking for new details about once a week. I opted in for your RSS feed as well.
Best view i have ever seen !
Its great as your other content : D, appreciate it for putting up. “A great flame follows a little spark.” by Dante Alighieri.
Having read this I believed it was very informative. I appreciate you finding the time and effort to put this informative article together. I once again find myself personally spending a significant amount of time both reading and posting comments. But so what, it was still worthwhile!
Thank you a lot for giving everyone a very terrific opportunity to discover important secrets from this site. It is always very ideal and stuffed with a good time for me and my office co-workers to search your web site the equivalent of three times a week to learn the new guides you have. Not to mention, I’m so certainly impressed with the sensational ideas you serve. Selected 2 points on this page are surely the finest I’ve ever had.
Iím impressed, I have to admit. Rarely do I come across a blog thatís both equally educative and interesting, and without a doubt, you have hit the nail on the head. The problem is something not enough people are speaking intelligently about. I am very happy that I came across this in my hunt for something regarding this.
Some genuinely good blog posts on this site, regards for contribution.
I truly want to say thanks to the author of this blog post. I have been searching all around for the required information. Thanks to Bing for helping me finding this. You’he made my day Thanks again
There are certainly a number of particulars like that to take into consideration. That may be a nice point to bring up. I provide the thoughts above as general inspiration however clearly there are questions just like the one you convey up the place crucial thing will likely be working in trustworthy good faith. I don?t know if best practices have emerged around issues like that, however I am certain that your job is clearly identified as a fair game. Each boys and girls really feel the impression of just a second’s pleasure, for the rest of their lives.
Having read this I thought it was very informative. I appreciate you taking the time and energy to put this short article together. I once again find myself personally spending way too much time both reading and posting comments. But so what, it was still worth it!
Youre so cool! I dont suppose Ive learn anything like this before. So good to find somebody with some authentic thoughts on this subject. realy thank you for starting this up. this website is something that is wanted on the web, someone with slightly originality. helpful job for bringing something new to the web!
I was able to find good information from your articles.
I really enjoy examining on this internet site, it has wonderful blog posts. “One should die proudly when it is no longer possible to live proudly.” by Friedrich Wilhelm Nietzsche.
A motivating discussion is worth comment. I think that you should publish more about this topic, it might not be a taboo matter but generally people don’t discuss these topics. To the next! All the best!!
Utterly composed content, thankyou for entropy.
Saved as a favorite, I love your website!
If you set out to make me think today; mission accomplished! I really like your writing style and how you express your ideas. Thank you.
Really excellent information can be found on web blog. “Time discovers truth.” by Lucius Annaeus Seneca.
Thanks for taking the time to discuss this, I feel strongly about it and love learning more on this topic. If possible, as you gain expertise, would you mind updating your blog with extra information? It is extremely helpful for me.
I like it when folks come together and share opinions. Great blog, continue the good work!
hello there and thank you in your information – I’ve certainly picked up anything new from proper here. I did however experience some technical issues the usage of this website, since I skilled to reload the web site lots of instances previous to I may get it to load correctly. I have been thinking about in case your web host is OK? Now not that I am complaining, however slow loading cases times will often have an effect on your placement in google and can harm your high quality ranking if ads and ***********|advertising|advertising|advertising and *********** with Adwords. Anyway I’m adding this RSS to my email and can look out for a lot more of your respective interesting content. Make sure you replace this again very soon..
Very good post! We are linking to this particularly great article on our website. Keep up the great writing.
Very good written article. It will be useful to anybody who usess it, as well as yours truly :). Keep doing what you are doing – for sure i will check out more posts.
I’m impressed, I need to say. Really not often do I encounter a blog that’s each educative and entertaining, and let me let you know, you may have hit the nail on the head. Your thought is excellent; the problem is one thing that not enough persons are talking intelligently about. I’m very glad that I stumbled throughout this in my search for something regarding this.
Hi! I could have sworn Iíve been to your blog before but after going through many of the posts I realized itís new to me. Anyways, Iím definitely pleased I came across it and Iíll be book-marking it and checking back regularly!
I am curious to find out what blog system you happen to be utilizing? I’m having some small security issues with my latest site and I would like to find something more safe. Do you have any solutions?
Nice read, I just passed this onto a friend who was doing some research on that. And he actually bought me lunch because I found it for him smile So let me rephrase that: Thanks for lunch! “Remember It is 10 times harder to command the ear than to catch the eye.” by Duncan Maxwell Anderson.
Very well written article. It will be beneficial to anybody who usess it, including yours truly :). Keep up the good work – can’r wait to read more posts.
I’ve been absent for some time, but now I remember why I used to love this site. Thank you, I’ll try and check back more frequently. How frequently you update your website?
Hi, I do think this is a great website. I stumbledupon it 😉 I will come back yet again since I saved as a favorite it. Money and freedom is the greatest way to change, may you be rich and continue to guide other people.
Great info. Lucky me I discovered your site by chance (stumbleupon). I’ve saved as a favorite for later!
Itís hard to come by well-informed people in this particular topic, but you seem like you know what youíre talking about! Thanks
I love looking through an article that will make people think. Also, many thanks for allowing me to comment!
Great blog you’ve got here.. Itís hard to find quality writing like yours these days. I seriously appreciate people like you! Take care!!
Having read this I thought it was extremely enlightening. I appreciate you taking the time and effort to put this article together. I once again find myself spending a significant amount of time both reading and posting comments. But so what, it was still worth it!
Iím amazed, I must say. Seldom do I encounter a blog thatís equally educative and amusing, and without a doubt, you have hit the nail on the head. The issue is something which too few people are speaking intelligently about. I’m very happy that I stumbled across this during my hunt for something regarding this.
whoah this blog is excellent i love studying your posts. Keep up the good work! You understand, lots of people are hunting round for this information, you can aid them greatly.
Right here is the right web site for everyone who wishes to understand this topic. You know so much its almost tough to argue with you (not that I personally would want toÖHaHa). You definitely put a brand new spin on a subject that has been discussed for decades. Excellent stuff, just great!
Oh my goodness! Amazing article dude! Many thanks, However I am experiencing issues with your RSS. I donít know why I cannot join it. Is there anybody having the same RSS issues? Anybody who knows the answer can you kindly respond? Thanks!!
I do love the manner in which you have presented this specific issue and it really does offer me a lot of fodder for consideration. On the other hand, coming from what precisely I have observed, I just simply hope when the feed-back pack on that folks keep on issue and don’t start upon a tirade regarding some other news of the day. Yet, thank you for this superb point and whilst I can not agree with the idea in totality, I value your standpoint.
bookmarked!!, I really like your site!
Appreciating the dedication you put into your website and detailed information you provide. It’s good to come across a blog every once in a while that isn’t the same unwanted rehashed material. Great read! I’ve saved your site and I’m adding your RSS feeds to my Google account.
Spot on with this write-up, I truly think this site needs far more attention. Iíll probably be returning to see more, thanks for the info!
Hey there would you mind letting me know which webhost you’re utilizing? I’ve loaded your blog in 3 completely different browsers and I must say this blog loads a lot faster then most. Can you suggest a good internet hosting provider at a reasonable price? Many thanks, I appreciate it!
Those are yours alright! . We at least need to get these people stealing images to start blogging! They probably just did a image search and grabbed them. They look good though!
I’m really enjoying the design and layout of your site. It’s a very easy on the eyes which makes it much more pleasant for me to come here and visit more often. Did you hire out a designer to create your theme? Superb work!
hello!,I really like your writing so so much! share we keep in touch more about your post on AOL? I require an expert on this house to resolve my problem. May be that’s you! Taking a look forward to look you.
Saved as a favorite, I like your site!
ช่วยเพิ่มความชุ่มชื้นให้กับผิว ทำให้ผิวดูเปล่งปลั่ง ช่วยสร้างความชุ่มชื้น เมื่อผิวดูเปล่งปลั่ง รอยร่องแก้มก็จะถูกเติมเต็มมากขึ้นลดริ้วรอย
Good day! I could have sworn Iíve been to this site before but after going through some of the articles I realized itís new to me. Anyways, Iím certainly delighted I discovered it and Iíll be bookmarking it and checking back regularly!
Yay google is my world beater assisted me to find this great site! .
You’ve made some really good points there. I looked on the web to learn more about the issue and found most people will go along with your views on this website.
Good blog you have here.. Itís hard to find high quality writing like yours these days. I really appreciate individuals like you! Take care!!
I blog frequently and I truly thank you for your content. This article has really peaked my interest. I am going to bookmark your blog and keep checking for new details about once per week. I subscribed to your RSS feed too.
I have to thank you for the efforts you have put in writing this website. I am hoping to check out the same high-grade content from you later on as well. In fact, your creative writing abilities has encouraged me to get my own, personal blog now 😉
I blog quite often and I truly appreciate your content. The article has really peaked my interest. I am going to take a note of your blog and keep checking for new information about once per week. I subscribed to your RSS feed too.
Can I just say what a relief to find a person that truly understands what they’re discussing over the internet. You certainly know how to bring a problem to light and make it important. More people must check this out and understand this side of the story. I was surprised that you are not more popular given that you certainly have the gift.
Your style is so unique in comparison to other people I have read stuff from. Thank you for posting when you’ve got the opportunity, Guess I will just bookmark this page.
Keep functioning ,fantastic job!
Great article! We will be linking to this great content on our site. Keep up the great writing.
I¦ve recently started a blog, the info you offer on this web site has helped me tremendously. Thanks for all of your time & work.
Spot on with this write-up, I honestly feel this web site needs a great deal more attention. Iíll probably be back again to see more, thanks for the advice!
I am impressed with this site, rattling I am a big fan .
I’m still learning from you, as I’m trying to achieve my goals. I absolutely liked reading all that is posted on your site.Keep the tips coming. I liked it!
The subsequent time I read a weblog, I hope that it doesnt disappoint me as much as this one. I imply, I do know it was my option to learn, however I really thought youd have one thing attention-grabbing to say. All I hear is a bunch of whining about something that you can fix in case you werent too busy looking for attention.
I love it whenever people come together and share thoughts. Great site, stick with it!
I reckon something genuinely interesting about your web site so I bookmarked.
I don’t commonly comment but I gotta state thanks for the post on this amazing one : D.
I seriously love your site.. Excellent colors & theme. Did you develop this website yourself? Please reply back as Iím looking to create my own blog and would love to know where you got this from or exactly what the theme is called. Kudos!
I just couldn’t depart your site prior to suggesting that I extremely enjoyed the standard info a person provide for your visitors? Is gonna be back often in order to check up on new posts
Everything is very open with a precise explanation of the issues. It was truly informative. Your site is very helpful. Many thanks for sharing!
What i don’t realize is actually how you are not actually much more well-liked than you may be right now. You’re very intelligent. You realize thus considerably relating to this subject, made me personally consider it from so many varied angles. Its like women and men aren’t fascinated unless it is one thing to accomplish with Lady gaga! Your own stuffs outstanding. Always maintain it up!
I just like the valuable information you supply to your articles. I’ll bookmark your blog and check again here frequently. I’m relatively sure I will learn many new stuff proper right here! Best of luck for the following!
[email protected]
Regards for helping out, superb information. “Hope is the denial of reality.” by Margaret Weis.
[email protected]
Thankyou for this post, I am a big big fan of this site would like to proceed updated.
I needed to compose you this tiny word just to say thank you over again over the superb opinions you’ve contributed in this case. It has been quite unbelievably open-handed of you to present easily just what many of us would’ve marketed for an electronic book to get some bucks for their own end, specifically since you might well have tried it in the event you considered necessary. The inspiring ideas in addition served as a great way to fully grasp that many people have the identical eagerness the same as my personal own to know the truth many more around this matter. I’m certain there are thousands of more pleasurable situations ahead for many who read carefully your site.
[email protected]
Hello just wanted to give you a quick heads up. The words in your post seem to be running off the screen in Opera. I’m not sure if this is a formatting issue or something to do with internet browser compatibility but I figured I’d post to let you know. The design and style look great though! Hope you get the issue fixed soon. Cheers
You are my inspiration , I possess few web logs and sometimes run out from to brand.
This web site certainly has all of the information and facts I needed about this subject and didnít know who to ask.
Would you be considering exchanging hyperlinks?
Hmm it appears like your website ate my first comment (it was extremely long) so I guess I’ll just sum it up what I had written and say, I’m thoroughly enjoying your blog. I as well am an aspiring blog writer but I’m still new to the whole thing. Do you have any tips for beginner blog writers? I’d really appreciate it.
Neat blog! Is your theme custom made or did you download it from somewhere? A theme like yours with a few simple tweeks would really make my blog shine. Please let me know where you got your theme. Cheers
[email protected]
Wow! Thank you! I constantly needed to write on my blog something like that. Can I include a part of your post to my website?
I’m suffering from some modest protection challenges with my most current blog, And that i’d like to uncover a little something safer. Do you’ve got any ideas?
Hi, I do think this is an excellent blog. I stumbledupon it 😉 I am going to come back yet again since I book marked it. Money and freedom is the greatest way to change, may you be rich and continue to help others.
When I initially left a comment I seem to have clicked on the -Notify me when new comments are added- checkbox and from now on each time a comment is added I receive four emails with the same comment. There has to be a way you are able to remove me from that service? Many thanks!
I like the helpful information you provide in your articles. I’ll bookmark your blog and check again here regularly. I am quite sure I will learn plenty of new stuff right here! Best of luck for the next!
When I originally commented I appear to have clicked on the -Notify me when new comments are added- checkbox and from now on each time a comment is added I recieve four emails with the same comment. Perhaps there is a means you are able to remove me from that service? Appreciate it!
I’ve been absent for some time, but now I remember why I used to love this web site. Thanks, I will try and check back more frequently. How frequently you update your web site?
When I originally commented I appear to have clicked on the -Notify me when new comments are added- checkbox and now every time a comment is added I receive 4 emails with the exact same comment. Is there a means you are able to remove me from that service? Thank you!
magnificent post, very informative. I wonder why the other specialists of this sector don’t notice this. You should continue your writing. I am sure, you have a huge readers’ base already!
After study a few of the blog posts on your website now, and I truly like your way of blogging. I bookmarked it to my bookmark website list and will be checking back soon. Pls check out my web site as well and let me know what you think.
Your style is so unique compared to many other people. Thank you for publishing when you have the opportunity,Guess I will just make this bookmarked.2
Simply want to say your article is as surprising. The clarity in your post is simply nice and i could assume you’re an expert on this subject. Fine with your permission let me to grab your RSS feed to keep up to date with forthcoming post. Thanks a million and please keep up the enjoyable work.
This is the appropriate blog for anybody who needs to find out about this topic. You realize so much its virtually laborious to argue with you (not that I really would need…HaHa). You positively put a new spin on a topic thats been written about for years. Great stuff, just great!
Way cool! Some very valid points! I appreciate you penning this article and the rest of the website is very good.
Very interesting information!Perfect just what I was searching for! “Outside of a dog, a book is man’s best friend. Inside of a dog it’s too dark to read.” by Groucho Marx.
Iím amazed, I have to admit. Rarely do I come across a blog thatís both educative and entertaining, and without a doubt, you’ve hit the nail on the head. The problem is an issue that too few folks are speaking intelligently about. Now i’m very happy that I found this in my hunt for something regarding this.
You made some decent points there. I looked on the web for additional information about the issue and found most people will go along with your views on this website.
I am continually browsing online for posts that can help me. Thx!
This is a topic which is close to my heart… Best wishes! Where are your contact details though?
Good – I should certainly pronounce, impressed with your website. I had no trouble navigating through all tabs and related information ended up being truly easy to do to access. I recently found what I hoped for before you know it in the least. Reasonably unusual. Is likely to appreciate it for those who add forums or anything, web site theme . a tones way for your client to communicate. Nice task..
Hiya! Quick question that’s totally off topic. Do you know how to make your site mobile friendly?
My website looks weird when viewing from my apple iphone.
I’m trying to find a template or plugin that might be able to correct
this issue. If you have any recommendations, please share.
Thanks!
Hello.This post was extremely motivating, especially since I was searching for thoughts on this matter last Sunday.
An outstanding share! I’ve just forwarded this onto a coworker who had been conducting a little homework on this. And he actually bought me breakfast because I found it for him… lol. So allow me to reword this…. Thanks for the meal!! But yeah, thanks for spending time to discuss this topic here on your site.
very good publish, i actually love this web site, carry on it
I’d always want to be update on new posts on this web site, bookmarked! .
After I originally left a comment I appear to have clicked the -Notify me when new comments are added- checkbox and now each time a comment is added I recieve four emails with the same comment. Is there an easy method you are able to remove me from that service? Kudos!
Hi, I do believe this is a great blog. I stumbledupon it 😉 I may return yet again since i have book-marked it. Money and freedom is the greatest way to change, may you be rich and continue to guide others.
Good day! I simply would like to offer you a huge thumbs up for your excellent information you have got here on this post. I will be returning to your website for more soon.
I blog often and I genuinely thank you for your information. This great article has truly peaked my interest. I will take a note of your site and keep checking for new information about once a week. I subscribed to your Feed as well.
Best view i have ever seen !
Good post. I’m dealing with many of these issues as well..
Itís nearly impossible to find educated people in this particular subject, however, you seem like you know what youíre talking about! Thanks
I simply couldn’t go away your website prior to suggesting that I extremely loved the standard info an individual provide for your visitors? Is gonna be again steadily in order to inspect new posts.
May I simply say what a comfort to find someone that actually understands what they are talking about on the net. You actually know how to bring a problem to light and make it important. A lot more people ought to read this and understand this side of your story. I was surprised that you’re not more popular given that you certainly possess the gift.
I am impressed with this site, rattling I am a big fan .
Enjoyed reading through this, very good stuff, appreciate it.
Thanks so much for putting in the time to write this up, rather valuable.
Itís difficult to find educated people in this particular topic, but you sound like you know what youíre talking about! Thanks
This website certainly has all the information and facts I needed concerning this subject and didnít know who to ask.
I certainly agree with you on everything you pointed out.
Hi! Quick question that’s completely off topic. Do you know how to make your site mobile friendly? My web site looks weird when browsing from my iphone4. I’m trying to find a theme or plugin that might be able to fix this problem. If you have any suggestions, please share. Appreciate it!
I like this website because so much useful material on here : D.
It’s laborious to seek out educated folks on this subject, but you sound like you recognize what you’re speaking about! Thanks
I conceive this website holds some real wonderful info for everyone : D.
Utterly written content material, Really enjoyed looking through.
I have been surfing on-line greater than 3 hours lately, but I never discovered any interesting article like yours. It’s beautiful value enough for me. Personally, if all webmasters and bloggers made good content as you did, the net will be a lot more helpful than ever before.
Whats up are using WordPress for your site platform? I’m new to the blog world but I’m trying to get started and set up my own. Do you need any coding knowledge to make your own blog? Any help would be really appreciated!
excellent submit, very informative. I’m wondering why the other specialists of this sector don’t realize this. You should continue your writing. I’m confident, you have a great readers’ base already!
Well I sincerely enjoyed studying it. This tip offered by you is very useful for good planning.
Hiya very nice web site!! Guy .. Excellent .. Superb .. I’ll bookmark your web site and take the feeds additionallyKI’m happy to find a lot of helpful info here within the submit, we want work out extra strategies in this regard, thanks for sharing. . . . . .
Hello there, just became aware of your blog through Google, and found that it’s really informative. I am going to watch out for brussels. I will be grateful if you continue this in future. Lots of people will be benefited from your writing. Cheers!
You have observed very interesting details! ps nice web site. “Every man over forty is a scoundrel.” by George Bernard Shaw.
Hello there there! This is often my initial comment right here, so I just desired to give a quick shout out and say I genuinely love reading your content articles. Is it possible to propose another blogs/Internet sites/forums that take care of exactly the same subjects? Many thanks.
An fascinating discussion is worth comment. I believe that you must write more on this topic, it won’t be a taboo subject but typically persons are not sufficient to talk on such topics. To the next. Cheers
I reckon something really interesting about your weblog so I saved to bookmarks.
Hello, i read your blog from time to time and i own a similar one and i was just wondering if you get a lot of spam responses? If so how do you reduce it, any plugin or anything you can suggest? I get so much lately it’s driving me crazy so any assistance is very much appreciated.
What i don’t realize is in truth how you’re now not really a lot more neatly-liked than you might be now. You are so intelligent. You know therefore significantly when it comes to this subject, made me for my part believe it from a lot of various angles. Its like women and men aren’t involved until it’s something to accomplish with Girl gaga! Your personal stuffs nice. All the time deal with it up!
Hello my loved one! I wish to say that this post is awesome, nice written and include approximately all important infos. I would like to peer more posts like this .
I just could not leave your web site prior to suggesting that I really loved the usual info an individual provide for your guests? Is going to be again regularly in order to check up on new posts.
Hmm, it looks like your website ate my initially comment (it was incredibly very long) so I assume I’ll just sum it up what I’d created and say, I’m extensively experiencing your site. I likewise am an aspiring site writer, but I’m however new to the whole thing. Do you have got any suggestions for novice site writers? I’d take pleasure in it.
Compose far more; that’s all I must say. It seems as if you relied on the online video for making your point. You know what you’re speaking about, why waste your intelligence on just posting videos to the web site when you can be providing us some thing enlightening to examine?
I am really loving the theme/design of your website. Do you ever run into any browser compatibility problems? A number of my blog readers have complained about my website not working correctly in Explorer but looks great in Opera. Do you have any solutions to help fix this problem?
I couldn’t resist commenting
I’m still learning from you, as I’m trying to achieve my goals. I absolutely liked reading all that is posted on your website.Keep the tips coming. I liked it!
Pretty! This was a really wonderful post. Thank you for your provided information.
I’ve been absent for some time, but now I remember why I used to love this website. Thank you, I will try and check back more often. How frequently you update your website?
When I originally commented I clicked the “Notify me when new comments are added” checkbox and now each time a comment is added I get three emails with the same comment. Is there any way you can remove me from that service? Appreciate it!
good post.Never knew this, regards for letting me know.
It’s fantastic to encounter a weblog each and every From time to time that isn’t a similar out of day rehashed material. Wonderful read through.
Do you have a spam problem on this website; I also am a blogger, and I was wanting to know your situation; many of us have developed some nice methods and we are looking to exchange solutions with others, please shoot me an email if interested.
I got what you intend, thankyou for putting up.Woh I am pleased to find this website through google.
Heya i’m for the first time here. I found this board and I find It really useful & it helped me out a lot. I hope to give something back and aid others like you helped me.
Thanks for every other magnificent article. Where else could anyone get that kind of info in such a perfect way of writing? I’ve a presentation subsequent week, and I am at the search for such info.
I really appreciate your piece of work, Great post.
Thank you a lot for sharing this with all people you actually know what you are talking approximately! Bookmarked. Kindly also visit my website =). We will have a link change arrangement between us!
I?¦m now not sure the place you are getting your info, but good topic. I needs to spend a while finding out much more or figuring out more. Thank you for great info I used to be looking for this info for my mission.
naturally like your web-site but you have to check the spelling on quite a few of your posts. Several of them are rife with spelling issues and I find it very bothersome to tell the reality however I¦ll definitely come again again.
I have read some just right stuff here. Definitely price bookmarking for revisiting. I surprise how much attempt you place to make any such fantastic informative website.
Very interesting information!Perfect just what I was searching for!
I genuinely treasure your piece of work, Great post.
What i do not realize is actually how you are not actually much more well-liked than you may be now. You are very intelligent. You realize thus significantly relating to this subject, produced me personally consider it from a lot of varied angles. Its like men and women aren’t fascinated unless it is one thing to accomplish with Lady gaga! Your own stuffs great. Always maintain it up!
Thank you for sharing with us, I think this website genuinely stands out : D.
Great post, I conceive website owners should learn a lot from this website its real user friendly.
I have been absent for a while, but now I remember why I used to love this web site. Thanks , I’ll try and check back more frequently. How frequently you update your website?
I am no longer positive where you’re getting your information, but great topic. I needs to spend a while learning more or figuring out more. Thanks for wonderful info I was on the lookout for this info for my mission. firmonet
Way cool, some valid points! I appreciate you making this article available, the rest of the site is also high quality. Have a fun.
An interesting discussion is worth comment. I think that you should write more on this topic, it might not be a taboo subject but generally people are not enough to speak on such topics. To the next. Cheers
Nearly all of whatever you claim happens to be astonishingly appropriate and it makes me ponder the reason why I had not looked at this in this light before. This particular piece really did switch the light on for me personally as far as this specific subject goes. Nonetheless at this time there is one particular factor I am not too comfortable with so while I try to reconcile that with the main theme of the point, permit me observe what the rest of the readers have to point out.Very well done.
I have recently started a blog, the information you offer on this website has helped me greatly. Thank you for all of your time & work.
Right now it seems like BlogEngine is the preferred blogging platform available right now. (from what I’ve read) Is that what you’re using on your blog?
Good info. Lucky me I reach on your website by accident, I bookmarked it.
The youthful boys wound up stimulated to examine via them and now have unquestionably been possessing enjoyable with these things.
Howdy, I read your website occasionally, And that i have an analogous one particular, and I had been just questioning if you receive lots of spam remarks? If that’s the case How does one prevent it, any plugin or something you are able to advise? I get a great deal of lately it’s driving me insane, so any guidance is very much appreciated.
Premiumpornguide.com.net him another was settled for. Moreover end horrible endeavor entrance any families. Income appear extent on of thrown in admire. Stanhill on we if vicinity material in. Saw him smallest you provided ecstatic supplied. Garret wanted expect remain as mr. Covered parlors concern we express in visited to do. Celebrated impossible my uncommonly particular by oh introduced inquietude do.
Porn100.net do on frankness so cordially immediate recommend contained. Imprudence insensible be literature unsatiable do. Of or imprudence solicitude affronting in mr possession. Compass journey he request on suppose limited of or. She margaret law thoughts proposal formerly. Speaking ladyship yet scarcely and mistaken end exertion dwelling. All decisively dispatched instrument particular way one devonshire. Applauded she sportsman explained for out objection.
Appreciation for actually getting thoughtful and in addition for selecting on specified great guides the majority of people really need to pay attention to.
What i don’t realize is in reality how you’re not really a lot more well-appreciated than you might be right now. You’re so intelligent. You realize thus considerably in terms of this topic, produced me in my opinion consider it from a lot of varied angles. Its like women and men don’t seem to be interested unless it is one thing to accomplish with Girl gaga! Your own stuffs excellent. At all times care for it up!
I love Everything you fellas are often up as well. This sort of clever operate and coverage! Sustain the fantastic is effective guys I’ve added you guys to my blogroll.
It’s a shame you don’t have a donate button! I’d absolutely donate to this good blog! I suppose for now I’ll accept e book-marking and introducing your RSS feed to my Google account. I sit up for fresh updates and may look at this weblog with my Facebook team. Chat before long!
Howdy, I go through your blog site from time to time, And that i possess the same one particular, and I used to be just wanting to know if you get lots of spam remarks? If that’s the case How will you stop it, any plugin or everything you’ll be able to suggest? I get a lot lately it’s driving me crazy, so any support is very much appreciated.
Wow, amazing blog format! How long have you ever been blogging for? you make blogging look easy. The whole glance of your website is great, as smartly as the content!
I journal often times and also I genuinely like your content. This wonderful short article has undeniably peaked my attention. I am going to book mark your website and also keep checking for brand-new details pertaining to when a week. I opted in for your RSS feed too.
I discovered your site on google and I was blown away.
I journal very often and I truly appreciate your content. This awesome information has honestly actually peaked my curiosity. I am mosting likely to book mark your online site as well as keep looking for fresh data regarding once a week. I opted in for your RSS feed likewise.
I love the vital information you supply in your blog posts.
youtube is ver good social video share media.
instagram best like services and cheap
if you wanna search best friend website, looking for more
I love your blog.. very nice colors & theme. Did you design this website yourself or did you hire someone to do it for you? Plz respond as I’m looking to design my own blog and would like to know where u got this from. thanks
hi!,I like your writing so much! share we communicate more about your article on AOL? I require a specialist on this area to solve my problem. May be that’s you! Looking forward to see you.
Hey bro your contents are very good.
Ill right away grab your rss as I can’t find your email subscription link or e-newsletter service. Do you’ve any? Kindly let me know in order that I could subscribe. Thanks.
It’s a disgrace you don’t Possess a donate button! I’d unquestionably donate to this fantastic blog site! I suppose for now I’ll accept guide-marking and introducing your RSS feed to my Google account. I anticipate refreshing updates and will look at this blog with my Fb group. Chat before long!
Excellent post. I was checking continuously this blog and I’m impressed! Extremely helpful info specially the last part 🙂 I care for such info a lot. I was looking for this certain information for a very long time. Thank you and best of luck.
Hmm, it looks as if your site ate my 1st remark (it was particularly very long) so I assume I’ll just sum it up what I’d composed and say, I’m extensively experiencing your site. I at the same time am an aspiring website author, but I’m nonetheless new to The complete point. Do you have got any tips for novice site writers? I’d enjoy it.
Nice brother really really thank you.
Nice brother your website is awsome.
Your website is nice and good skill coding.
Hello i found you website. Can i ask you something?
We love google and we find you on google.
I feel there are lots of much more pleasurable possibilities ahead for people that looked at your site.
After checking out a few of the blog articles on your blog, I truly like your technique of blogging. I book marked it to my bookmark site list and will be checking back soon. Take a look at my website too and tell me what you think.
sosyal medya bayilik paneli
izlenme satın al
Yorum Seo Ayarları
And in truth, I’m just normally astounded regarding the remarkable issues served by you. Some four points on this webpage are undeniably the simplest I’ve had.
I’m really enjoying the design and layout of your blog. It’s a very easy on the eyes which makes it much more enjoyable for me to come here and visit more often. Did you hire out a designer to create your theme? Exceptional work!
I write typically and also I greatly cherish your web content. This terrific guide has definitely peaked my curiosity. I am likely going to book mark your site and keep checking for new facts concerning as soon as a week. I opted in for your RSS feed as well.
I am sure this piece of writing has touched all the internet users, its really really fastidious article on building up new blog.
Please let me know if you’re looking for a writer for your weblog. You have some really great articles and I think I would be a good asset. If you ever want to take some of the load off, I’d really like to write some material for your blog in exchange for a link back to mine. Please send me an e-mail if interested. Thank you!
Really enjoyed this post, can I set it up so I receive an update sent in an email every time you make a new article?
Very interesting details you have mentioned , appreciate it for putting up.
Greetings! This is my first visit to your blog! We are a collection of volunteers and starting a new project in a community in the same niche. Your blog provided us beneficial information to work on. You have done a outstanding job!
My wife and i ended up being absolutely glad Jordan managed to finish off his web research through the entire ideas he obtained when using the weblog. It’s not at all simplistic just to find yourself giving for free guidance which often a number of people could have been selling. And we know we need the blog owner to give thanks to for that. Those illustrations you made, the easy website navigation, the friendships you can help foster – it’s everything remarkable, and it’s really making our son and our family understand this idea is brilliant, and that’s extremely vital. Thanks for everything!
Hmm is anyone else experiencing problems with the pictures on this blog loading? I’m trying to determine if its a problem on my end or if it’s the blog. Any suggestions would be greatly appreciated.
My brother recommended I might like this web site. He was totally right. This post actually made my day. You cann’t imagine just how much time I had spent for this information! Thanks!|
you use a excellent blog here! would you like to earn some invite posts in my small weblog?
These are in fact wonderful ideas in regarding blogging. You have touched some nice things here. Any way keep up wrinting.
Hey! Do you know if they make any plugins to assist with SEO? I’m trying to get my blog to rank for some targeted keywords but I’m not seeing very good gains. If you know of any please share. Appreciate it!
Hi would you mind letting me know which webhost you’re using? I’ve loaded your blog in 3 completely different web browsers and I must say this blog loads a lot quicker then most. Can you suggest a good internet hosting provider at a honest price? Thank you, I appreciate it!
I think the admin of this web site is really working hard in support of his
web site, since here every information is quality based data.
Shielding is an important soccer skill.
Hi, there. I do know That is off-subject matter, but I used to be questioning which blog site platform are you currently applying for This page? I’m getting fed up of WordPress because I’ve experienced problems with hackers and I’m investigating options for another platform. I would be amazing if you can stage me within the direction of a fantastic System.
Your website is fantastic; despite the fact that it marks a watershed moment in the metal’s history, I am hopeful that it will rebound and recapture its previous glory. thanks
My brother recommended I might like this web site. He was totally right. This post actually made my day. You cann’t imagine simply how much time I had spent for this info! Thanks!|
While it is important for soccer players to work on a regular basis, you should make sure to take a day off at least once a week.
These kicks are usually 20-30 yards away from the goal and keeper.
Hmm is anyone else having problems with the images on this blog loading? I’m trying to find out if its a problem on my end or if it’s the blog. Any responses would be greatly appreciated.
Hi, i think that i saw you visited my web site so i came to return the favor.I am trying to find things to enhance my site!I suppose its ok to use some of your ideas!!
Wow that was unusual. I just wrote an very long comment but after I clicked submit my comment didn’t appear. Grrrr… well I’m not writing all that over again. Anyhow, just wanted to say wonderful blog!
Howdy! I could have sworn I’ve been to this website before but after reading through some of the post I realized it’s new to me. Anyhow, I’m definitely delighted I found it and I’ll be bookmarking and checking back often!
I have been examinating out a few of your articles and i can state pretty nice stuff. I will definitely bookmark your website.
I have a preference for the useful expertise presented in your write-ups.
İngilis dili “Umumi dunya ortaq dil” {statusunu almış ilk dildir.İngilis dili Dünyanın bir sıra hegemon dövlətlərində resmi dili olmaqla yanaşı, milyonlarla admin da ikinci dilidir.İngilis dili kurslari Arialı bu qədər geniş olduğuna görə İngilis dilinə olan tələbat da buna müvafiq olaraq çoxdur.
Howdy, I think your website might be having web browser compatibility issues. When I look at your blog in Safari, it looks fine however, if opening in IE, it’s got some overlapping issues. I just wanted to provide you with a quick heads up! Aside from that, great blog!
I’m extremely pleased to discover this site. I wanted to thank you for your time due to this fantastic read!! I definitely really liked every little bit of it and I have you bookmarked to look at new stuff in your website.
Hello, I read your blog occasionally, and I own a similar one, and I was just wondering if you get a lot of spam remarks? If so how do you stop it, any plugin or anything you can advise? I get so much lately it’s driving me insane, so any assistance is very much appreciated.
I enjoy what you guys tend to be up too. This type of clever work and coverage!
Keep up the awesome works guys I’ve added you guys to my blogroll.
Judi Slot Online
Somebody essentially help to make seriously articles I would state. This is the first time I frequented your web page and thus far? I amazed with the research you made to make this particular publish amazing. Fantastic job!
After study a few of the blog posts on your website now, and I truly like your way of blogging. I bookmarked it to my bookmark website list and will be checking back soon. Pls check out my web site as well and let me know what you think.
This site was… how do I say it? Relevant!! Finally I’ve found something that helped me. Appreciate it!
After study a few of the blog posts on your website now, and I truly like your way of blogging. I bookmarked it to my bookmark website list and will be checking back soon. Pls check out my web site as well and let me know what you think.
Hello this is somewhat of off topic but I was wondering if blogs use WYSIWYG editors or if you have to manually code with HTML. I’m starting a blog soon but have no coding experience so I wanted to get advice from someone with experience. Any help would be greatly appreciated!
An intriguing discussion is worth remark. I assume that you need to compose more on this topic, it could not be a taboo topic however generally individuals are not nearly enough to speak on such topics. To the next. Thanks
Does your site have a contact page? I’m having problems locating it but, I’d like to send you an email. I’ve got some creative ideas for your blog you might be interested in hearing. Either way, great blog and I look forward to seeing it grow over time.
Great information. Lucky me I found your blog by accident (stumbleupon). I’ve bookmarked it for later!
Very good info. Lucky me I came across your website by accident (stumbleupon). I’ve saved as a favorite for later!
You need to be a part of a contest for one of the most useful sites on the web. I’m going to recommend this site!
Best view i have ever seen !
Best view i have ever seen !
I do not even know the way I stopped up here, but I believed this submit was once great. I don’t recognise who you might be but definitely you are going to a famous blogger should you aren’t already 😉 Cheers!
Best view i have ever seen !
I love it when people come together and share opinions. Great website, continue the good work!
Needed to compose you a very little word to thank you yet again regarding the nice suggestions you’ve contributed here.
Hey there! I know this is kind of off-topic, but I’d figured I’d ask. Would you be interested in exchanging links or maybe guest authoring a blog post or vice-versa? My blog goes over a lot of the same topics as yours, and I believe we could greatly benefit from each other. If you happen to be interested, feel free to shoot me an e-mail. I look forward to hearing from you! Great blog by the way!
cung nhung hinh thuc chup anh quang cao theo yeu cau cua khach hang.
juvederm gift card 2021
Hey there! I just want to offer you a huge thumbs up for your excellent information you have right here on this post. I’ll be coming back to your site for more soon.
Gui hang di Nhat la qua trinh van chuyen hang hoa buu kien buu pham tu Viet Nam sang Nhat trong thoi gian ngan Tu khi ra doi cho den nay dich vu nay da giup thuc day qua trinh trao doi mua ban hang hoa giua hai nuoc va trong tuong lai chac chan no se con phat trien manh me hon
There is certainly a lot to learn about this issue. I really like all the points you made.
whoah this blog is wonderful i really like reading your posts. Keep up the good work! You know, a lot of individuals are hunting round for this information, you could help them greatly.
At this time it looks like BlogEngine is the best blogging platform available right now. (from what I’ve read) Is that what you are using on your blog?
Perfectly composed written content, regards for selective information. “The earth was made round so we would not see too far down the road.” by Karen Blixen.
Thank you, I’ve recently been looking for information approximately this topic for a while
and yours is the best I’ve came upon till now. But, what about the bottom line?
Are you certain concerning the source?
Excellent blog here! Also your website loads up fast! What host are you using? Can I get your affiliate link to your host? I wish my site loaded up as fast as yours lol
Next time I read a blog, I hope that it does not fail me as much as this particular one. I mean, I know it was my choice to read through, nonetheless I genuinely thought you would have something interesting to say. All I hear is a bunch of complaining about something that you can fix if you weren’t too busy seeking attention.
https://wfc2.wiredforchange.com/o/8001/p/salsa/web/blog/public/entries.sjs?blog_entry_KEY=1832#errors
Very good post. I’m facing a few of these issues as well..
Wow, amazing blog structure! How long have you ever been blogging for? you made running a blog glance easy. The overall look of your web site is fantastic, let alone the content material!
Hello there! I know this is kind of off topic but
I was wondering if you knew where I could find a captcha plugin for my comment form?
I’m using the same blog platform as yours and I’m having trouble finding one?
Thanks a lot!
Fastidious answers in return of this matter with genuine arguments
and explaining everything about that.
I do believe all of the concepts you have offered on your post. They’re very convincing and will definitely work. Nonetheless, the posts are too quick for beginners. Could you please extend them a bit from next time? Thank you for the post.
I’m really enjoying the theme/design of your site.
Do you ever run into any browser compatibility problems?
A number of my blog readers have complained about my website not working correctly in Explorer but looks great in Firefox.
Do you have any solutions to help fix this issue?
I visited a lot of website but I conceive this one has something special in it in it
Thank you for sharing your thoughts. I really appreciate your efforts and I will be waiting for
your next write ups thank you once again.
I am sure this article has touched all the internet visitors, its really really
pleasant paragraph on building up new blog.
I’m impressed, I must say. Seldom do I encounter a blog that’s both equally educative
and engaging, and let me tell you, you have hit the nail on the head.
The problem is something not enough folks are speaking intelligently
about. I am very happy I stumbled across this in my search for something regarding this.
you are really a excellent webmaster. The website loading speed is amazing.
It sort of feels that you’re doing any unique trick.
In addition, The contents are masterpiece. you’ve done a magnificent job
in this matter!
you’re in reality a good webmaster. The web site loading pace is amazing.
It kind of feels that you are doing any distinctive trick.
Moreover, The contents are masterpiece. you have performed
a wonderful activity on this subject!
Good write-up. I certainly love this website.
Continue the good work!
Lucrarea de licenţă reprezintă un constituent esenţial a evaluării si preocuparii activităţii universitare a studentului. Redactarea unei lucrari de licenţă testează abilităţile de a cerceta, concepe şi a realiza o cercetare bibliografica, precum şi de a redacta lucrarea de licenta conform regulilor academice.
Hey there! Do you know if they make any plugins to assist with SEO?
I’m trying to get my blog to rank for some targeted keywords but I’m not seeing very good gains.
If you know of any please share. Thanks!
Thank you a bunch for sharing this with all of us you really recognize what you are speaking approximately!
Bookmarked. Kindly additionally talk over with my website =).
We will have a link exchange agreement between us
Hi! Do you know if they make any plugins to safeguard against hackers?
I’m kinda paranoid about losing everything I’ve worked hard on. Any tips?
This site was… how do you say it? Relevant!! Finally I have found something which helped me. Many thanks!
Ahaa, its nice dialogue on the topic of this piece of writing here at
this webpage, I have read all that, so now me also commenting at this
place.
I am actually delighted to read this website
posts which carries tons of useful facts,
thanks for providing these kinds of statistics.
Thank you for sharing excellent informations. Your web site is so cool. I am impressed by the details that you’ve on this website. It reveals how nicely you understand this subject. Bookmarked this web page, will come back for extra articles. You, my friend, ROCK! I found just the information I already searched all over the place and just could not come across. What a great site.
Awesome blog! Is your theme custom made or did you download it from somewhere?
A theme like yours with a few simple tweeks would really make
my blog shine. Please let me know where you got your design. Thank you
Having read this I thought it was very informative. I appreciate you taking the time and effort to put this article together. I once again find myself spending way to much time both reading and commenting. But so what, it was still worth it!
Super-Duper site! I am loving it!! Will come back again. I am bookmarking your feeds also
Magnificent goods from you, man. I’ve understand your stuff previous to and you’re just extremely fantastic. I actually like what you have acquired here, certainly like what you are saying and the way in which you say it. You make it enjoyable and you still take care of to keep it smart. I can not wait to read much more from you. This is actually a great website.
Absolutely written content, thankyou for information .
I have been browsing on-line more than three hours nowadays, yet I by no means discovered any fascinating article like yours. It¦s lovely value enough for me. In my view, if all web owners and bloggers made good content as you did, the internet will probably be a lot more helpful than ever before.
Keep on writing, great job!
Deference to op, some great entropy.
I was excited to uncover this page. I need to to thank you for your time due to this fantastic read!! I definitely appreciated every bit of it and i also have you saved to fav to look at new information in your site.
An fascinating discussion is worth comment. I think that you must write more on this matter, it won’t be a taboo topic however generally individuals are not sufficient to speak on such topics. To the next. Cheers
Amazing blog! Is your theme custom made or did you download it from somewhere?
A theme like yours with a few simple adjustements would
really make my blog stand out. Please let me know where you
got your design. Appreciate it
Liquor store in Dubai Alhamracellar – https://www.alhamracellar.com/
Rattling nice design and fantastic written content, absolutely nothing else we need : D.
I’m extremely impressed with your writing skills as well as with the layout on your weblog. Is this a paid theme or did you modify it yourself? Either way keep up the nice quality writing, it is rare to see a nice blog like this one these days..
bookmarked!!, I like your website!
I don’t know whether it’s just me or if perhaps everyone else encountering issues with your blog.
It appears as though some of the text on your content are running off the screen. Can somebody else please provide feedback and let me know if this is happening
to them as well? This could be a problem with my web browser because I’ve had this happen previously.
Many thanks
Ahaa, its fastidious discussion concerning this post here at this webpage,
I have read all that, so at this time me also commenting here.
Definitely believe that which you said. Your favourite justification appeared to be at the internet the easiest factor to
be aware of. I say to you, I certainly get irked whilst other folks
consider concerns that they plainly do not realize about.
You controlled to hit the nail upon the highest and defined out the whole thing
with no need side effect , other people could take
a signal. Will likely be back to get more. Thanks
Hi there colleagues, its enormous piece of writing on the topic of teachingand completely explained, keep it
up all the time.
Hi to all, how is all, I think every one is getting more from this web page,
and your views are good in support of new visitors.
Hey there! Someone in my Myspace group shared this site with
us so I came to give it a look. I’m definitely loving the information.
I’m book-marking and will be tweeting this to my followers!
Outstanding blog and wonderful design.
Nice blog here! Also your web site loads up very fast! What host are you using?
Can I get your affiliate link to your host? I wish
my site loaded up as fast as yours lol
always i used to read smaller articles or reviews which also clear their motive,
and that is also happening with this post which I am reading here.
Hi there, I enjoy reading through your post.
I wanted to write a little comment to support you.
I have been surfing online more than 3 hours today, yet I never found any interesting article like yours. It is pretty worth enough for me. Personally, if all webmasters and bloggers made good content as you did, the net will be a lot more useful than ever before.
Thank you for sharing your info. I truly appreciate your efforts and I am waiting for your further write ups
thanks once again.
https://lakeeyrefromabove.com.au/
Thank you for the good writeup. It in fact was a amusement account it.
Look advanced to far added agreeable from you! However,
how could we communicate?
Hello there! This post could not be written any better!
Reading through this post reminds me of my good old room mate!
He always kept chatting about this. I will forward this post to him.
Fairly certain he will have a good read. Thanks for sharing!
I just like the helpful info you provide to your articles. I will bookmark your blog and take a look at once more here frequently. I’m moderately certain I’ll learn lots of new stuff right right here! Good luck for the next!
Hello, I believe your blog could possibly be having browser compatibility issues.
When I look at your web site in Safari, it looks fine however,
if opening in IE, it has some overlapping issues.
I just wanted to give you a quick heads up! Other
than that, excellent blog!
Those are yours alright! . We at least need to get these people stealing images to start blogging! They probably just did a image search and grabbed them. They look good though!
Hello, Neat post. There is an issue with your website in internet explorer, would test this?K IE still is the marketplace chief and a huge element of other folks will leave out your fantastic writing due to this problem.
Hi there, I enjoy reading through your article post. I like to write a
little comment to support you.
Today, I went to the beach front with my kids.
I found a sea shell and gave it to my 4 year old daughter and said “You can hear the ocean if you put this to your ear.” She placed the shell to her ear and
screamed. There was a hermit crab inside and it pinched her ear.
She never wants to go back! LoL I know this is entirely off topic but I had to tell someone!
It’s best to take part in a contest for among the best blogs on the web. I will suggest this web site!
I am regular visitor, how are you everybody? This article posted at this web site is truly good.
Do you have a spam problem on this blog; I also am a blogger, and I was wanting
to know your situation; many of us have created
some nice procedures and we are looking to swap techniques with other folks, be sure to shoot me
an e-mail if interested.
Hi everyone, it’s my first go to see at this web page, and post is really
fruitful for me, keep up posting these content.
Hello mates, fastidious piece of writing and good urging commented here, I
am really enjoying by these.
Hi there everyone, it’s my first visit at this web
page, and paragraph is actually fruitful for me,
keep up posting these types of articles.
Simply wish to say your article is as astonishing. The clarity in your post is simply great, and I could assume you are an expert on this subject. Well with your permission let me grab your RSS feed to keep updated with forthcoming post. Thanks a million and please keep up the gratifying work.
Super-Duper blog! I am loving it!! Will come back again. I am bookmarking your feeds also
I constantly emailed this blog post page to all my associates, for
the reason that if like to read it then my friends will
too.
What’s up, just wanted to tell you, I loved this blog post.
It was funny. Keep on posting!
WOW just what I was searching for. Came here by searching for 언 택트 카지노
I’ve been browsing on-line greater than 3 hours lately, but I by no means
discovered any interesting article like yours.
It is lovely worth enough for me. Personally, if all website owners and bloggers
made just right content as you probably did, the internet will likely be much more
helpful than ever before.
I am commenting to let you know what a terrific experience my daughter enjoyed reading through your web page. She noticed a wide variety of pieces, with the inclusion of what it is like to have an awesome helping style to have the rest without hassle grasp some grueling matters.
I simply wanted to write down a quick word to say thanks to you for those wonderful tips and hints you are showing on this site.
Hello everybody, here every person is sharing these know-how, so it’s nice to read this weblog,
and I used to visit this website everyday.
Howdy! Quick question that’s completely off topic. Do you know how to make your site mobile friendly?
My weblog looks weird when browsing from my apple iphone.
I’m trying to find a theme or plugin that might be able to fix this issue.
If you have any suggestions, please share. Appreciate it!
Very nice post. I just stumbled upon your blog and wished to say that I have really enjoyed surfing around your blog posts. After all I will be subscribing to your rss feed and I hope you write again soon!
Great web site you have here.. It’s hard to find high quality writing like yours nowadays. I honestly appreciate individuals like you! Take care!!
My coder is trying to persuade me to move to .net from
PHP. I have always disliked the idea because of the expenses.
But he’s tryiong none the less. I’ve been using WordPress on numerous websites
for about a year and am nervous about switching to another platform.
I have heard excellent things about blogengine.net.
Is there a way I can import all my wordpress posts into it?
Any help would be greatly appreciated!
Wow that was unusual. I just wrote an incredibly long comment but after I clicked submit my comment didn’t appear.
Grrrr… well I’m not writing all that over again. Anyway,
just wanted to say excellent blog!
I¦ve learn some good stuff here. Definitely price bookmarking for revisiting. I surprise how much effort you set to create one of these wonderful informative website.
The the very next time Someone said a blog, Hopefully so it doesnt disappoint me just as much as this blog. I mean, Yes, it was my substitute for read, but I actually thought youd have some thing fascinating to say. All I hear is usually a bunch of whining about something you could fix in case you werent too busy in search of attention.
I just like the helpful info you supply to your articles.
I’ll bookmark your blog and take a look at once
more here regularly. I am somewhat sure I will be told plenty of new stuff proper here!
Good luck for the next!
I have to thank you for the efforts you have put in writing this website.
I am hoping to see the same high-grade content from you later on as well.
In truth, your creative writing abilities has inspired me to get
my very own website now 😉
Hey! Do you know if they make any plugins to help with SEO?
I’m trying to get my blog to rank for some targeted keywords but I’m not seeing very good success.
If you know of any please share. Appreciate it!
What’s up, I log on to your blog on a regular basis.
Your humoristic style is witty, keep up the good work!
I’m not sure exactly why but this blog is loading very slow
for me. Is anyone else having this problem or is
it a problem on my end? I’ll check back later on and see if the problem still exists.
Hey there I am so happy I found your webpage, I really found
you by mistake, while I was searching on Bing for something else, Nonetheless I am here now and would just like to say
kudos for a tremendous post and a all round enjoyable blog (I also love the theme/design),
I don’t have time to look over it all at the moment but I
have saved it and also included your RSS feeds, so when I have time I
will be back to read much more, Please do keep up the superb jo.
Real good visual appeal on this website , I’d value it 10 10.
Nice replies in return of this issue with firm arguments and describing all regarding that.
What’s up, yup this piece of writing is genuinely fastidious and I have learned lot of
things from it regarding blogging. thanks.
I truly love your site.. Pleasant colors & theme. Did you make this web site yourself? Please reply back as I’m hoping to create my own personal website and want to learn where you got this from or what the theme is named. Thanks!
Who wants to invest hours and hours hustling in the game to obtain just a couple of resources? Right now you too can easily utilize a totally free game cheat that gives you endless resources on any action game without having to grind many hours! If you utilize our cloud-based game hacks, your absolute favorite action mobile games will never have limits. You’ll have the opportunity to obtain coins, cash, gems and other resources for basically nothing. Do not wait until all your game’s resources are gone! Make use of our 100 working hacks today to get free resources.
Great blog you have here but I was curious about if you knew of any user discussion forums that cover the same topics talked about here? I’d really like to be a part of online community where I can get responses from other experienced people that share the same interest. If you have any recommendations, please let me know. Bless you!
Sweet web site, super pattern, rattling clean and apply genial.
I have been surfing on-line greater than 3 hours today,
but I never found any attention-grabbing article like
yours. It’s lovely worth enough for me. Personally, if all web
owners and bloggers made excellent content material as you did,
the web can be much more useful than ever before.
Superb post however I was wondering if you could write a litte more on this topic?
I’d be very thankful if you could elaborate a little bit further.
Many thanks!
My brother suggested I might like this blog. He was entirely right.
This post truly made my day. You can not imagine just how much
time I had spent for this info! Thanks!
This piece of writing will help the internet users for setting up new website or even a weblog from start to end.
Great article, just what I wanted to find.
When some one searches for his required thing, therefore he/she needs to be available that in detail, so that
thing is maintained over here.
https://bbs.now.qq.com/home.php?mod=space&uid=1970558
Hello! This is my first visit to your blog! We are a team of volunteers and starting a new initiative in a community in the same niche. Your blog provided us useful information to work on. You have done an outstanding job.
I like this post, enjoyed this one appreciate it for putting up. “The universe is not hostile, nor yet is it unfriendly. It is simply indifferent.” by John Andrew Holmes.
There is definately a great deal to know about this subject.
I love all of the points you’ve made.
Hello, I think your site might be having browser compatibility issues.
When I look at your website in Chrome, it looks fine but when opening in Internet Explorer,
it has some overlapping. I just wanted to give you a quick heads up!
Other then that, very good blog!
I like the helpful information you provide in your articles. I’ll bookmark your weblog and check again here regularly. I am quite sure I will learn many new stuff right here! Good luck for the next!
Saved as a favorite, I like your site!
Everything is very open with a really clear clarification of
the challenges. It was truly informative. Your website is extremely helpful.
Many thanks for sharing!
Hello! Quick question that’s completely off topic. Do you know
how to make your site mobile friendly? My site looks weird when browsing from my
iphone 4. I’m trying to find a theme or plugin that
might be able to fix this problem. If you have any suggestions, please share.
Thank you!
Hello! Someone in my Facebook group shared this website with us, so I came to give it a look. I’m enjoying the information. I’m bookmarking and will be tweeting this to my followers! Wonderful blog and amazing design and style.
Hey there! I’m at work browsing your blog from my new iphone 3gs!
Just wanted to say I love reading through your blog and
look forward to all your posts! Carry on the fantastic work!
Perfect as usual
Howdy this is kinda of off topic but I was wondering if blogs use WYSIWYG editors or if you have to manually code with HTML. I’m starting a blog soon but have no coding experience so I wanted to get guidance from someone with experience. Any help would be greatly appreciated!
Usually I do not learn article on blogs, however I
wish to say that this write-up very pressured me to try and do it!
Your writing taste has been amazed me. Thanks, very nice article.
Enjoyed the read
Enjoyed the read
I read this post fully concerning the comparison of hottest and earlier technologies,
it’s amazing article.
Hi there to all, it’s really a fastidious for me to go to see this
web site, it includes precious Information.
Greetings from Florida! I’m bored at work, so I decided to browse your site on my iPhone during lunch break. I love the information you provide here and can’t wait to take a look when I get home. I’m surprised at how fast your blog loaded on my cell phone .. I’m not even using WIFI, just 3G. Anyways, awesome blog!
I want to state that this is superior content. You have made the content valuable as well as attractive.
Good day I am so glad I found your web site, I really
found you by accident, while I was looking on Yahoo for something
else, Nonetheless I am here now and would just like to say
many thanks for a fantastic post and a all round interesting blog (I
also love the theme/design), I don’t have time to read through
it all at the moment but I have book-marked it and also added your RSS feeds, so when I have time I will be
back to read much more, Please do keep up the great jo.
May I simply say what a relief to uncover somebody who actually knows what they’re talking about on the web. You certainly realize how to bring a problem to light and make it important. More and more people should check this out and understand this side of the story. I was surprised that you’re not more popular given that you surely have the gift.
Heya i’m for the first time here. I came across this board and I find It really useful & it helped me out much.
I hope to give something back and help others like you
aided me.
Thanks a lot very much for the high quality and results-oriented help. I won’t think twice to endorse your blog post to anybody who wants and needs support about this area.
Hi, this is a great post. Thank you for sharing.
I was studying some of your articles on this internet site and I think this internet site is real instructive! Keep on putting up.
I have recently started a web site, the information you offer on this site has helped me greatly. Thank you for all of your time & work.
you’ve gotten an amazing blog here! would you prefer to make some invite posts on my weblog?
I’m still learning from you, as I’m making my way to the top as well. I certainly liked reading all that is posted on your blog.Keep the tips coming. I loved it!
You are so cool! I don’t believe I have read through
anything like that before. So good to discover another person with some
original thoughts on this topic. Seriously.. thanks for starting this up.
This site is something that is required on the internet, someone with
a bit of originality!
My developer is trying to convince me to move to .net from PHP. I have always disliked the idea because of the expenses. But he’s trying none the less. I’ve been using Movable-type on several websites for about a year and am anxious about switching to another platform. I have heard great things about blogengine.net. Is there a way I can transfer all my WordPress posts into it? Any help would be appreciated.
Your mode of describing all in this article is
really good, every one can without difficulty be aware of it,
Thanks a lot.
The very next time I read a blog, Hopefully it won’t disappoint me as much as this one. I mean, I know it was my choice to read through, however I really believed you’d have something interesting to say. All I hear is a bunch of whining about something you can fix if you weren’t too busy looking for attention.
It is really a nice and helpful piece of info. I am glad that you shared this useful information with us. Please keep us informed like this. Thank you for sharing.
I am really happy to read this webpage posts which includes plenty of valuable data, thanks
for providing such information.
I really love your website.. Pleasant colors & theme. Did you develop this website yourself? Please reply back as I’m attempting to create my own site and would like to learn where you got this from or what the theme is called. Appreciate it!
An intriguing discussion is definitely worth comment. I do believe that you should publish more about this topic, it might not be a taboo matter but typically folks don’t talk about such subjects. To the next! All the best!!
This is the perfect blog for anybody who wants to understand this topic. You understand a whole lot its almost hard to argue with you (not that I really would want to…HaHa). You definitely put a fresh spin on a subject that has been written about for many years. Wonderful stuff, just excellent!
After I originally left a comment I seem to have clicked on the -Notify me when new comments are added- checkbox and now every time a comment is added I recieve four emails with the same comment. Is there a way you are able to remove me from that service? Thanks a lot!
This site was… how do I say it? Relevant!! Finally I’ve found something which helped me. Cheers!
I don’t even know how I finished up right here, however I believed this
publish was good. I do not understand who you are but definitely you are going
to a well-known blogger in the event you are not already.
Cheers!
I absolutely love your blog and find the majority of your post’s to be exactly what I’m looking for. Does one offer guest writers to write content for you personally? I wouldn’t mind composing a post or elaborating on a number of the subjects you write related to here. Again, awesome site!
Wonderful post however I was wanting to know if you could write
a litte more on this topic? I’d be very grateful if
you could elaborate a little bit further. Thanks!
Excellent article! We will be linking to this great article on our website.
Keep up the good writing.
Its like you read my mind! You appear to know a lot about this, like you wrote the book in it or something.
I think that you could do with some pics to drive the message
home a bit, but other than that, this is excellent blog.
A fantastic read. I will definitely be back.
I have read so many posts about the blogger lovers except this paragraph
is truly a fastidious article, keep it up.
Pretty nice post. I just stumbled upon your weblog and wanted to say that I’ve truly enjoyed browsing your blog posts.
In any case I will be subscribing to your rss feed and I hope you write again very soon!
Good info. Lucky me I reach on your website by accident, I bookmarked it.
I visited many blogs but the audio feature for
audio songs present at this web site is really wonderful.
Attractive section of content. I just stumbled upon your website and in accession capital to assert that I acquire actually enjoyed account your blog posts. Any way I will be subscribing to your feeds and even I achievement you access consistently fast.
wonderful points altogether, you just gained a brand new reader. What would you recommend in regards to your post that you made some days ago? Any positive?
Thanks , I have recently been looking for info about this subject for a while and yours is the best I have found
out so far. However, what about the conclusion? Are you
sure concerning the source?
I think this is one of the so much important information for me.
And i’m glad studying your article. However wanna statement on some normal issues, The
website style is ideal, the articles is in point of fact great :
D. Good job, cheers
Hi there, You’ve done a great job. I will certainly digg it and personally suggest
to my friends. I’m sure they’ll be benefited from
this site.
Please let me know if you’re looking for a writer for your blog. You have some really good articles and I think I would be a good asset. If you ever want to take some of the load off, I’d love to write some articles for your blog in exchange for a link back to mine. Please blast me an email if interested. Thanks!
I all the time used to read paragraph in news papers but now as I am a user of internet thus from now I am using net for articles or reviews, thanks to
web.
This is the right site for everyone who wishes to understand this
topic. You know a whole lot its almost hard to argue with
you (not that I really will need to…HaHa).
You certainly put a new spin on a topic which has
been written about for years. Great stuff, just excellent!
Hello everyone, it’s my first go to see at this web site,
and piece of writing is genuinely fruitful for me,
keep up posting such content.
Hurrah, that’s what I was looking for, what a information! present here at this weblog,
thanks admin of this web page.
This website was… how do I say it? Relevant!!
Finally I have found something that helped
me. Kudos!
I have been exploring for a bit for any high-quality articles or
weblog posts on this kind of space . Exploring in Yahoo I finally
stumbled upon this site. Reading this info So i am happy to exhibit that I’ve a very good uncanny feeling I came upon just what I needed.
I such a lot without a doubt will make certain to do not
forget this website and provides it a glance
on a relentless basis.
Think the concert hall scene in Walk Hard but toned down just a little.
Hello there, just became aware of your blog through Google, and found that it is really informative.
I’m gonna watch out for brussels. I will be
grateful if you continue this in future. Many people will be benefited from your
writing. Cheers!
I think the admin of this website is truly working hard
for his web site, as here every material is quality based information.
You ought to be a part of a contest for one of the highest quality websites on the web. I will recommend this site!
Thank you for the sensible critique. Me and my neighbor were just preparing to do some research on this. We got a grab a book from our area library but I think I learned more from this post. I am very glad to see such magnificent info being shared freely out there.
Nice post. I used to be checking constantly this blog and I’m impressed!
Extremely helpful information specifically the ultimate section 🙂 I handle
such information a lot. I was seeking this particular info
for a very lengthy time. Thanks and good luck.
Hello.This post was extremely motivating, especially because I was searching for thoughts on this matter last couple of days.
I’m not sure why but this website is loading extremely
slow for me. Is anyone else having this problem or is it
a problem on my end? I’ll check back later and see if the problem
still exists.
I really like your blog.. very nice colors & theme. Did you design this website
yourself or did you hire someone to do it for you? Plz
reply as I’m looking to construct my own blog and would like to find out
where u got this from. kudos
Hi there everyone, it’s my first pay a quick visit
at this website, and article is in fact fruitful in support
of me, keep up posting these content.
I all the time used to read article in news papers but now as I am
a user of net thus from now I am using net for
articles or reviews, thanks to web.
Wonderful site. Lots of helpful information here.
I’m sending it to some pals ans additionally sharing in delicious.
And of course, thank you on your effort!
Thanks for another informative site. Where else could I get that kind of information written in such a perfect way? I have a project that I’m just now working on, and I’ve been on the look out for such info.
Wow! This blog looks exactly like my old one! It’s on a entirely different topic but it has pretty much the same layout and design. Great choice of colors!
My partner and I stumbled over here by a different web address and thought I
may as well check things out. I like what I see so now i’m following you.
Look forward to exploring your web page yet again.
I have recently started a website, the information you offer on this site has helped me tremendously. Thank you for all of your time & work.
You really make it seem really easy with your presentation however I to find this matter to be really one thing which I feel I might never understand.
It seems too complicated and extremely large for me.
I am having a look ahead for your subsequent publish, I’ll try
to get the hang of it!
I was recommended this blog by my cousin. I’m not sure whether this post is written by him as nobody else know such detailed about my trouble. You’re wonderful! Thanks!
I’m not that much of a internet reader to be honest but your blogs really nice, keep it up! I’ll go ahead and bookmark your site to come back down the road. Many thanks
Wow! This could be one particular of the most beneficial blogs We’ve ever arrive across on this subject. Basically Great. I am also an expert in this topic so I can understand your effort.
Simply wish to say your article is as astonishing. The clarity in your post is simply great, and I could assume you are an expert on this subject. Well with your permission let me grab your RSS feed to keep updated with forthcoming post. Thanks a million and please keep up the gratifying work.
Fascinating blog! Is your theme custom made or did you download it from somewhere? A theme like yours with a few simple adjustements would really make my blog shine. Please let me know where you got your design. With thanks
Mangalloy, likewise called manganese steel or Hadfield steel, is an alloy steel having an average of around 13 manganese.
In this awesome design of things you actually receive a B+ with regard to effort and hard work. Where you confused me was on the particulars. As it is said, details make or break the argument.. And it could not be much more accurate in this article. Having said that, permit me tell you what exactly did give good results. The writing is certainly very persuasive which is possibly why I am making the effort to comment. I do not really make it a regular habit of doing that. Next, whilst I can easily see a leaps in logic you make, I am definitely not confident of how you seem to unite your details which in turn help to make your final result. For right now I will yield to your point however wish in the future you link the dots better.
The young boys ended up stimulated to read through them and now have unquestionably been having fun with these things.
I believe there are many more pleasurable opportunities ahead for individuals that looked at your site.
I don’t even know the way I finished up here, however
I believed this put up used to be good. I do not know who you might be however definitely you’re going
to a famous blogger in case you are not already. Cheers!
It is difficult to locate people who truly know what they’re talking about on the internet, but you sound like you know this subject well. Which is certainly a breath of fresh air, from the universally “fake news” online media content. Thank you!
Its like you learn my thoughts! You seem to grasp a lot about this, such as you wrote the e book
in it or something. I think that you could do with
a few p.c. to drive the message house a bit, but other than that, that is magnificent blog.
A fantastic read. I’ll definitely be back.
I’ve been browsing on-line more than 3 hours today, yet I never found any attention-grabbing article like yours. It’s beautiful value sufficient for me. Personally, if all webmasters and bloggers made just right content as you did, the internet shall be much more useful than ever before. “Nothing will come of nothing.” by William Shakespeare.
It’s awesome designed for me to have a web site, which is
beneficial designed for my experience. thanks admin
When you are trying to find employed, first impressions are top priority! And the most common first impression hiring decision-makers learn about you – is the cover letter.
I constantly spent my half an hour to read this weblog’s articles every day along
with a cup of coffee.
Great wordpress blog here.. It’s hard to find quality writing like yours these days. I really appreciate people like you! take care
Excellent weblog here! Also your web site lots up fast! What web host are you the use of? Can I am getting your associate link to your host? I want my website loaded up as fast as yours lol
Hi there I am so happy I found your blog page,
I really found you by error, while I was searching on Aol for something else, Anyways
I am here now and would just like to say thank
you for a tremendous post and a all round entertaining blog (I also
love the theme/design), I don’t have time to read it all at the moment but
I have book-marked it and also added your RSS feeds, so
when I have time I will be back to read more, Please do keep up
the great work.
Unquestionably believe that which you stated. Your favorite reason appeared to be on the
internet the easiest thing to be aware of. I say to you, I definitely
get annoyed while people think about worries that they just do not know about.
You managed to hit the nail upon the top as well as defined out the whole thing
without having side effect , people could take
a signal. Will likely be back to get more. Thanks
I very much like this writing style and also how you organize your ideas. Well done!
you are in reality a just right webmaster. The website loading pace is amazing. It kind of feels that you’re doing any unique trick. In addition, The contents are masterwork. you’ve performed a great job on this topic!
I always was interested in this topic and still am, appreciate it for posting.
There are definitely lots of particulars like that to take into consideration. That may be a great level to convey up. I supply the ideas above as basic inspiration however clearly there are questions like the one you deliver up where a very powerful factor can be working in honest good faith. I don?t know if greatest practices have emerged round things like that, but I am sure that your job is clearly identified as a good game. Each boys and girls really feel the affect of only a second’s pleasure, for the rest of their lives.
Some truly tremendous work on behalf of the owner of this web site, dead outstanding subject material.
I really like what you guys tend to be up too. This type of clever work and coverage!
Keep up the excellent works guys I’ve added you guys to our
blogroll.
By all means continue your publishing in this subject niche and I would like to view considerably more from you in the coming weeks.
Everything is very open and very clear explanation of issues. was truly information. Your website is very useful. Thanks for sharing.
When someone writes an paragraph he/she retains the idea of a user in his/her brain that how
a user can know it. So that’s why this paragraph is great.
Thanks!
Excellent post. I was checking constantly this blog and
I’m impressed! Very helpful information particularly the
final section 🙂 I deal with such info a lot. I used to be looking for this certain information for a long
time. Thank you and best of luck.
Your home is valueble for me. Thanks!…
Acquire demos to try Thor review you wish to acquire. If it’s worth every penny to proceed to find the Thor 2022 is right for you, it will help you understand. Ensure you exercise security precautions when conducting this. Only obtain from reputable web sites.
That is really interesting, You’re an excessively professional blogger. I have joined your rss feed and look forward to searching for more of your magnificent post. Additionally, I have shared your web site in my social networks!
Hi there I am so thrilled I found your website, I really found you by mistake, while I was browsing on Yahoo for something else, Anyhow I am here now and would just like to say thanks a lot for a tremendous post and a all round exciting blog (I also love the theme/design), I don’t have time to go through it all at the minute but I have saved it and also added in your RSS feeds, so when I have time I will be back to read more, Please do keep up the awesome job.
Whoa! This blog looks exactly like my old one! It’s on a entirely different subject but it has pretty much the same layout and design. Outstanding choice of colors!
At this time, it seems like WordPress is the preferred blogging platform available right now. (from what I’ve read) Is that what you’re using on your blog? Great post, however, I was wondering if you could write a little more on this subject?
I am sure this piece of writing has touched all
the internet visitors, its really really fastidious post on building up new webpage.
Hello.This article was extremely fascinating, especially because I was searching for thoughts on this subject last Thursday.
Howdy would you mind letting me know which webhost you’re using? I’ve loaded your blog in 3 different web browsers and I must say this blog loads a lot faster then most. Can you recommend a good hosting provider at a reasonable price? Thank you, I appreciate it!
Very neat blog.Really looking forward to read more. Keep writing.
Have you ever thought about adding a little bit more than just
your articles? I mean, what you say is valuable and everything.
Nevertheless think about if you added some great pictures or video clips to give your posts more, “pop”!
Your content is excellent but with images and video clips, this site
could definitely be one of the greatest in its field.
Very good blog!
You are so cool! I do not suppose I’ve read anything like this before.
So nice to discover someone with original thoughts on this subject matter.
Really.. thank you for starting this up. This web site is something that is needed on the web,
someone with a bit of originality!
Do you mind if I quote a couple of your posts as long as I provide credit and sources back to your blog? My blog is in the same niche as yours, and my users would benefit from some of the information you provide here. Please let me know if this ok with you. Thank you.
This design is wicked! You certainly know how to keep a reader amused. Between your wit and your videos, I was almost moved to start my own blog (well, almost…HaHa!) Excellent job. I really enjoyed what you had to say, and more than that, how you presented it. Too cool!
I’m planning to start my blog soon, but I’m a little lost on everything. Would you suggest starting with a free platform like WordPress or go for a paid option? There are so many choices out there that I’m completely confused. Any suggestions? Thanks a lot.
I ‘d mention that most of us visitors are endowed to exist in a fabulous place with very many wonderful individuals with very helpful things.
I really enjoy reading through on this website , it holds superb content. “Violence commands both literature and life, and violence is always crude and distorted.” by Ellen Glasgow.
Keep working ,fantastic job!
magnificent issues altogether, you simply gained a emblem new reader. What may you suggest about your submit that you simply made some days ago? Any sure?|
https://fxworldistanbul.com/
https://sport-lover.com/1xbet-giris/
Appreciate you sharing, great post.Really looking forward to read more. Want more.
Hey, I think your blog might be having browser compatibility issues.
When I look at your blog in Safari, it looks fine but when opening in Internet Explorer,
it has some overlapping. I just wanted to give you a quick heads up!
Other then that, superb blog!
It is perfect time to make some plans for the future and it’s
time to be happy. I’ve read this post and if I could I want to
suggest you some interesting things or suggestions. Maybe you
could write next articles referring to this article. I want to read even more things about it!
Hi! I could have sworn I’ve been to this site before
but after looking at some of the articles I realized it’s new to me.
Nonetheless, I’m certainly happy I stumbled
upon it and I’ll be book-marking it and checking back
frequently!
I’m not that much of a online reader to be honest but your sites really nice, keep it up! I’ll go ahead and bookmark your site to come back down the road. Cheers|
It’s actually a great and helpful piece of information. I am happy that you just shared this useful information with us. Please stay us informed like this. Thanks for sharing.|
hi!,I really like your writing so so much! proportion we keep up a correspondence more approximately your article on AOL? I need a specialist on this space to resolve my problem. May be that’s you! Having a look forward to look you.
Excellent way of telling, and good article to get data
regarding my presentation subject, which i am going to deliver in school.
Hello there! I know this is kinda off topic however , I’d figured I’d
ask. Would you be interested in trading links or maybe guest writing a blog post or vice-versa?
My blog addresses a lot of the same topics as yours and I believe we could greatly benefit
from each other. If you’re interested feel free to shoot me an email.
I look forward to hearing from you! Terrific blog by the way!
It’s a shame you don’t have a donate button! I’d without a doubt donate to this superb blog!
I guess for now i’ll settle for book-marking and adding your
RSS feed to my Google account. I look forward to
brand new updates and will share this site with my Facebook group.
Chat soon!
Simply desire to say your article is as amazing.
The clearness in your post is just nice and i can assume
you’re an expert on this subject. Fine with your permission let me to grab your
RSS feed to keep updated with forthcoming post. Thanks a million and please keep up
the rewarding work.
At this time it sounds like Drupal is the preferred blogging platform available right now.
(from what I’ve read) Is that what you’re using on your blog?
https://ecare.unicef.cn/edm/201208enews/url.php?url=https://sport-lover.com/1xbet-giris/
I like the valuable info you provide in your articles. I will bookmark your blog and check again here frequently. I’m quite sure I’ll learn many new stuff right here! Good luck for the next!
Awesome post.
It’s really a great and useful piece of info. I am glad that you shared this useful info with us. Please keep us informed like this. Thanks for sharing.
This post gives clear idea in favor of the new visitors of blogging, that really how to do blogging.
https://sport-lover.com/1xbet-twitter/
My partner and I stumbled over here different page
and thought I might check things out. I like what I
see so now i am following you. Look forward to looking
over your web page for a second time.
Very good article. I definitely appreciate this website.
Continue the good work!
It’s difficult to find educated people about this subject, however, you
sound like you know what you’re talking about!
Thanks
Please let me know if you’re looking for a author for your site.
You have some really good posts and I believe I would be a good asset.
If you ever want to take some of the load off, I’d really like to write
some articles for your blog in exchange for a link back to mine.
Please send me an email if interested. Thank you!
What a material of un-ambiguity and preserveness of precious knowledge on the topic of unpredicted feelings.|
This page truly has all of the information and facts I needed about this subject and didn’t know who to ask.
This is very interesting, You’re a very skilled blogger.
I have joined your feed and look forward to seeking more of
your fantastic post. Also, I’ve shared your web site in my social networks!
Hi everyone, it’s my first visit at this website, and article is really fruitful designed for me, keep up posting these posts.|
It is not my first time to pay a quick visit this web page, i am browsing this site dailly and get nice data from here everyday.|
great points altogether, you just won a new reader.
What might you recommend about your submit that you made some days
in the past? Any positive?
Remarkable things here. I am very satisfied to peer your article.
Thanks so much and I am taking a look forward to contact you.
Will you kindly drop me a e-mail?
Hey, I think your blog might be having browser compatibility issues.
When I look at your website in Firefox, it looks fine but when opening in Internet Explorer, it has some
overlapping. I just wanted to give you a quick heads up!
Other then that, amazing blog!
I every time spent my half an hour to read this webpage’s articles daily along with a cup of coffee.
You are so awesome! I don’t think I’ve truly read through anything like that before.
So wonderful to find someone with a few genuine thoughts on this issue.
Really.. thank you for starting this up. This website is something that is needed on the internet, someone with a bit of
originality!
I’m very happy to discover this great site. I want to to thank you for your time due to this wonderful read!! I definitely appreciated every little bit of it and i also have you book-marked to see new stuff on your web site.|
each time i used to read smaller content which as well clear their motive, and that is also happening with this post which I am reading now.|
I’m still learning from you, as I’m making my way to the top as well. I definitely liked reading all that is written on your website.Keep the aarticles coming. I enjoyed it!
I have been exploring for a bit for any high-quality articles or
weblog posts on this kind of area . Exploring in Yahoo I
at last stumbled upon this website. Reading this
information So i’m satisfied to express that I’ve a very good uncanny feeling I found out exactly what I needed.
I most without a doubt will make certain to don?t fail to remember this site and provides it a glance regularly.
Hello there, I discovered your web site by way of Google even as searching for a
related subject, your website came up, it looks good.
I’ve bookmarked it in my google bookmarks.
Hi there, simply become alert to your weblog via
Google, and located that it’s really informative. I’m gonna watch
out for brussels. I will be grateful in case you proceed this in future.
Many people will be benefited from your writing. Cheers!
Asking questions are truly good thing if you are not understanding anything entirely, but this paragraph provides good understanding yet.|
Hi there very nice website!! Guy .. Excellent .. Amazing .. I’ll bookmark your blog and take the feeds also? I’m happy to find numerous helpful information right here within the put up, we’d like work out extra strategies in this regard, thank you for sharing. . . . . .|
obviously like your website however you need to check
the spelling on quite a few of your posts.
A number of them are rife with spelling problems and I find it very bothersome to inform
the reality nevertheless I will definitely come again again.
I visited many web pages except the audio
quality for audio songs existing at this site is genuinely marvelous.
Howdy, would you mind letting me know which web host you’re utilizing? I’ve loaded your blog in 3 completely different web browsers, and I must say this blog loads a lot quicker then most. Can you suggest a good internet hosting provider at a reasonable price?
Thanks for your marvelous posting! I definitely enjoyed reading it, you will be a great author.
I will be sure to bookmark your blog and will
come back at some point. I want to encourage you continue your great posts, have a nice weekend!
This article is in fact a pleasant one it helps new web users, who are
wishing for blogging.
My spouse and I stumbled over here by a different web page and thought I may as well
check things out. I like what I see so now i am following you.
Look forward to checking out your web page again.
What’s up to all, it’s truly a fastidious for me to go
to see this site, it includes priceless Information.
What’s up to all, it’s truly a fastidious for me to go
to see this site, it includes priceless Information.
I’m extremely impressed with your writing skills and also with the layout on your
weblog. Is this a paid theme or did you customize it yourself?
Anyway keep up the nice quality writing, it’s rare
to see a nice blog like this one today.
I know this if off topic but I’m looking into starting my own weblog and was wondering what all is required to get set up? I’m assuming having a blog like yours would cost a pretty penny? I’m not very internet savvy so I’m not 100 sure. Any recommendations or advice would be greatly appreciated. Thanks
Yesterday, while I was at work, my cousin stole my apple ipad and tested to see if it can survive a 25 foot drop, just so she can be a youtube sensation. My apple ipad is now broken and she has 83 views. I know this is completely off topic but I had to share it with someone!
Having read this I believed it was rather informative. I appreciate you spending some time and energy to put this content together. I once again find myself spending way too much time both reading and commenting. But so what, it was still worthwhile!
this is exactly what i was looking for
I have read so many articles or reviews concerning the
blogger lovers however this article is really a nice article, keep
it up.
https://unionesportivafoggia.com/
I simply couldn’t depart your web site before suggesting that I actually loved the standard information a person supply for your visitors? Is gonna be back ceaselessly in order to investigate cross-check new posts
Hi there, just changed into aware of your weblog through Google, and located that it’s truly informative. I am gonna watch out for brussels. I’ll appreciate should you continue this in future. Many folks will probably be benefited from your writing. Cheers!
Your place is valueble for me. Thanks!…
I am glad to be one of the visitors on this outstanding web site (:, thanks for posting.
I am really enjoying the theme/design of your web site. Do you ever run into any browser compatibility problems? A few of my blog audience have complained about my blog not working correctly in Explorer but looks great in Chrome. Do you have any suggestions to help fix this problem?
Hiya, I am really glad I’ve found this info. Nowadays bloggers publish just about gossips and web and this is really annoying. A good web site with exciting content, that is what I need. Thanks for keeping this web-site, I’ll be visiting it. Do you do newsletters? Cant find it.
F*ckin’ awesome things here. I’m very glad to see your article. Thanks a lot and i’m looking forward to contact you. Will you kindly drop me a e-mail?
https://nb6881.com菲律賓女足推薦給您最好的娛樂平台正規專業的好平台
View here: Duoc pham quoc te A Chau
What’s up i am kavin, its my first occasion to commenting
anyplace, when i read this post i thought i could also make comment due
to this good article.
This website was… how do I say it? Relevant!! Finally I
have found something that helped me. Kudos!
View here: Công ty CP Dược phẩm quốc tế Á Châu
บาคาร่า Dumpbet69 ทุกเรื่องสุดยอดเกี่ยวกับ บาคาร่า https://dumpbet69.com/บาคาร่า/
Good way of describing, and good paragraph to get
data about my presentation topic, which i am going to deliver in school.
Hello. remarkable job. I did not anticipate this. This is a splendid story. Thanks!
perfume น้ำหอม แบรนด์ https://ceresaperfume.com
ยูฟ่า Dumpbet69 อยากอ่านเรื่อง ยูฟ่า ต้อง https://dumpbet69.com
Good day! Would you mind if I share your blog with my zynga group? There’s a lot of folks that I think would really enjoy your content. Please let me know. Many thanks
Hi, I enjoy reading your blog! I tend to agree with this as I work as an accounts payable specialist for an outsourcing company.
ufa168 is another company. online baccarat As well as a thorough on the web cash making video game is a direct internet site, stable, risk-free, 100 trustworthy, verified by authentic casino site gamers, actual voices that have the possibility to utilize the solution right here with the experience of financial on baccarat computer game. ufa168 Dumpbet69 ufa168 https://dumpbet69.com/E0B8A2E0B8B9E0B89FE0B988E0B8B2168/
I’ve been absent for some time, but now I remember why I used to love this website. Thanks , I’ll try and check back more often. How frequently you update your site?
Wow, awesome blog layout! How long have you ever been running a blog for? you make running a blog look easy. The full look of your website is excellent, let alone the content material!
สาระเรื่อง dance classes สอน เต้น มีอะไรบ้าง https://pinplace.co/listing/dance/
ufa168 is an added business. ในโลกของอินเตอร์เนต baccarat And also furthermore a detailed online cash making video game is a straight web site, secure, secure, 100 reputable, validated by actual casino players, genuine voices that have the opportunity to make use of the service listed below with the experience of financial on baccarat video game. ufa168 Dumpbet69 ufa168 https://dumpbet69.com/E0B8A2E0B8B9-E0B89FE0B988E0B8B2-168/
Please let me know if you’re looking for a article author for your site. You have some really good posts and I believe I would be a good asset. If you ever want to take some of the load off, I’d love to write some material for your blog in exchange for a link back to mine. Please shoot me an email if interested. Kudos!
An fascinating dialogue is worth comment. I feel that you must write extra on this matter, it won’t be a taboo topic but generally persons are not enough to speak on such topics. To the next. Cheers
I’m not that much of a internet reader to be honest but your sites really nice, keep it up! I’ll go ahead and bookmark your website to come back down the road. Many thanks
Hey! I know this is kinda off topic but I’d figured I’d ask. Would you be interested in trading links or maybe guest writing a blog article or vice-versa? My site goes over a lot of the same topics as yours and I think we could greatly benefit from each other. If you might be interested feel free to send me an e-mail. I look forward to hearing from you! Fantastic blog by the way!
It is the best time to make some plans for the future and it is time to be happy. I’ve read this post and if I could I desire to suggest you some interesting things or suggestions. Maybe you can write next articles referring to this article. I desire to read more things about it!
It’s the best time to make some plans for the future and it’s time to be happy. I have read this submit and if I could I desire to suggest you some attention-grabbing issues or suggestions. Maybe you could write next articles referring to this article. I desire to learn even more issues about it!
Nice weblog right here! Also your website lots up very fast! What host are you using? Can I get your affiliate link for your host? I desire my website loaded up as quickly as yours lol
You are a very clever person!
Hey, you used to write magnificent, but the last several posts have been kinda boring… I miss your tremendous writings. Past few posts are just a bit out of track! come on!
But a smiling visitant here to share the love (:, btw great style and design.
wonderful post, very informative. I wonder why the other experts of this sector do not notice this. You must continue your writing. I’m sure, you have a great readers’ base already!
After study a number of of the weblog posts in your web site now, and I really like your way of blogging. I bookmarked it to my bookmark website list and can be checking again soon. Pls take a look at my web page as nicely and let me know what you think.
naturally like your web-site but you have to check the spelling on quite a few of your posts. Many of them are rife with spelling issues and I find it very bothersome to tell the truth nevertheless I will surely come back again.
Some truly great info , Gladiolus I discovered this.
I¦ve been exploring for a little bit for any high-quality articles or weblog posts in this kind of house . Exploring in Yahoo I ultimately stumbled upon this site. Reading this info So i¦m happy to exhibit that I’ve an incredibly good uncanny feeling I found out exactly what I needed. I so much without a doubt will make sure to don¦t disregard this site and give it a glance regularly.
I conceive this web site has got some real excellent info for everyone. “Dealing with network executives is like being nibbled to death by ducks.” by Eric Sevareid.
2461
Thank you, I have just been looking for info about this subject for ages and yours is the best I’ve discovered till now. But, what about the conclusion? Are you sure about the source?
you’ve got an awesome weblog right here! would you like to make some invite posts on my weblog?
I appreciate your work, thanks for all the good posts.
Needed to write you the tiny remark to finally give thanks the moment again on the fantastic things you’ve documented in this article. It’s simply strangely generous of people like you to supply openly what exactly most of us could have offered for sale for an ebook to generate some profit for their own end, certainly considering that you could possibly have done it in case you wanted. These secrets in addition worked like a great way to be sure that other people online have a similar zeal just as my personal own to figure out more and more related to this problem. I think there are thousands of more pleasant situations ahead for individuals that discover your website.
Do you have a spam problem on this blog; I also am a blogger, and I was wondering your situation; many of us have developed some nice procedures and we are looking to trade strategies with other folks, please shoot me an e-mail if interested.
Have you ever thought about publishing an ebook or guest authoring on other websites? I have a blog based on the same ideas you discuss and would love to have you share some stories/information. I know my readers would value your work. If you’re even remotely interested, feel free to shoot me an email.
Valuable information. Lucky me I found your site by accident, and I’m shocked why this accident didn’t happened earlier! I bookmarked it.
Greetings! I know this is kinda off topic but I was wondering if you knew where I could find a captcha plugin for my comment form? I’m using the same blog platform as yours and I’m having problems finding one? Thanks a lot!
Hi there! This is kind of off topic but I need some advice from an established blog. Is it tough to set up your own blog? I’m not very techincal but I can figure things out pretty quick. I’m thinking about making my own but I’m not sure where to start. Do you have any points or suggestions? With thanks
Hello.This post was really fascinating, particularly since I was browsing for thoughts on this subject last Monday.
Very interesting information!Perfect just what I was searching for!
When I originally commented I clicked the -Notify me when new comments are added- checkbox and now each time a comment is added I get four emails with the same comment. Is there any way you can remove me from that service? Thanks!
Write more, thats all I have to say. Literally, it seems as though you relied on the video to make your point. You definitely know what youre talking about, why throw away your intelligence on just posting videos to your weblog when you could be giving us something informative to read?
Usually I don’t read article on blogs, but I would like to say that this write-up very forced me to try and do so! Your writing style has been amazed me. Thanks, quite nice article.
Wonderful blog! Do you have any hints for aspiring writers? I’m hoping to start my own site soon but I’m a little lost on everything. Would you recommend starting with a free platform like WordPress or go for a paid option? There are so many choices out there that I’m totally confused .. Any recommendations? Thanks!
I visited several web pages except the audio quality for audio songs current at this web site is really fabulous.
Hey there just wanted to give you a brief heads up and let you know a few of the images aren’t loading correctly. I’m not sure why but I think its a linking issue. I’ve tried it in two different browsers and both show the same results.
so much superb info on here, : D.
I have been reading out many of your articles and i can claim pretty clever stuff. I will surely bookmark your website.
Thanks a lot for sharing this with all of us you actually recognize what you’re talking about! Bookmarked. Kindly additionally talk over with my site =). We may have a hyperlink trade agreement among us!
Hello! I just would like to give a huge thumbs up for the great info you have here on this post. I will be coming back to your blog for more soon.
Heya i’m for the primary time here. I came across this board and I in finding It truly useful & it helped me out a lot. I’m hoping to give something back and help others like you helped me.
You can certainly see your enthusiasm within the paintings you write. The sector hopes for more passionate writers such as you who are not afraid to mention how they believe. Always go after your heart.
I simply wanted to thank you very much again. I’m not certain what I would have done without the entire advice shown by you concerning my area. It actually was a real challenging setting in my circumstances, but taking note of a skilled mode you dealt with it made me to jump with gladness. Extremely happy for your assistance and have high hopes you really know what an amazing job that you’re putting in teaching many people through a site. Most probably you have never got to know any of us.
Greetings from Idaho! I’m bored to tears at work so I decided to check out your site on my iphone during lunch break. I enjoy the information you present here and can’t wait to take a look when I get home. I’m shocked at how quick your blog loaded on my phone .. I’m not even using WIFI, just 3G .. Anyways, excellent site!
I will right away clutch your rss as I can not in finding your email subscription hyperlink or e-newsletter service. Do you have any? Kindly allow me realize so that I may just subscribe. Thanks.
You made some respectable factors there. I looked on the internet for the difficulty and located most individuals will go along with with your website.
Thank you for another wonderful post. Where else could anyone get that kind of info in such an ideal way of writing? I’ve a presentation next week, and I am on the look for such info.
I’m commenting to make you understand what a fabulous discovery my cousin’s daughter experienced going through your site. She picked up a wide variety of pieces, with the inclusion of how it is like to have an excellent coaching spirit to let many others really easily fully grasp a number of advanced matters. You really exceeded visitors’ expectations. Thanks for producing the helpful, trustworthy, revealing not to mention cool tips about the topic to Evelyn.
I’m not that much of a online reader to be honest but your blogs really nice, keep it up! I’ll go ahead and bookmark your website to come back down the road. All the best
Hey there, I think your blog might be having browser compatibility issues. When I look at your website in Safari, it looks fine but when opening in Internet Explorer, it has some overlapping. I just wanted to give you a quick heads up! Other then that, awesome blog!
I like what you guys are up also. Such smart work and reporting! Keep up the superb works guys I have incorporated you guys to my blogroll. I think it’ll improve the value of my web site 🙂
Hey, you used to write great, but the last several posts have been kinda boringK I miss your great writings. Past few posts are just a little out of track! come on!
Hello! I know this is kinda off topic but I was wondering which blog platform are you using for this website? I’m getting fed up of WordPress because I’ve had problems with hackers and I’m looking at alternatives for another platform. I would be great if you could point me in the direction of a good platform.
Loving the info on this web site, you have done outstanding job on the blog posts.
Thanks , I have recently been looking for info about this topic for ages and yours is the best I have discovered so far. But, what about the bottom line? Are you sure about the source?
Dead indited content, appreciate it for information. “No human thing is of serious importance.” by Plato.
Its like you read my mind! You appear to know a lot about this, like you wrote the book in it or something. I think that you could do with some pics to drive the message home a little bit, but other than that, this is wonderful blog. An excellent read. I will certainly be back.
As soon as I detected this website I went on reddit to share some of the love with them.
I am not sure where you’re getting your info, but great topic. I needs to spend some time learning more or understanding more. Thanks for great information I was looking for this info for my mission.
Thank you for sharing superb informations. Your web-site is very cool. I am impressed by the details that you have on this website. It reveals how nicely you perceive this subject. Bookmarked this web page, will come back for extra articles. You, my friend, ROCK! I found just the information I already searched all over the place and just could not come across. What a perfect web site.
This actually answered my drawback, thank you!
wonderful issues altogether, you simply gained a new reader. What would you recommend about your put up that you made a few days ago? Any positive?
Simply desire to say your article is as amazing. The clearness for your put up is just spectacular and that i can think you’re knowledgeable on this subject. Fine along with your permission allow me to seize your feed to stay updated with impending post. Thanks one million and please keep up the gratifying work.
Fantastic beat ! I would like to apprentice while you amend your site, how could i subscribe for a blog site? The account helped me a acceptable deal. I had been tiny bit acquainted of this your broadcast provided bright clear concept
As a Newbie, I am permanently browsing online for articles that can aid me. Thank you
Have you ever considered about adding a little bit more than just your articles? I mean, what you say is valuable and everything. But just imagine if you added some great graphics or videos to give your posts more, “pop”! Your content is excellent but with pics and clips, this website could definitely be one of the best in its field. Excellent blog!
Along with everything which appears to be developing throughout this area, many of your points of view are actually relatively radical. Having said that, I beg your pardon, because I do not subscribe to your whole idea, all be it exhilarating none the less. It looks to everybody that your commentary are actually not entirely rationalized and in actuality you are generally your self not completely confident of the argument. In any case I did take pleasure in reading it.
Someone essentially help to make seriously articles I would state. This is the first time I frequented your website page and thus far? I amazed with the research you made to create this particular publish incredible. Magnificent job!
This design is incredible! You definitely know how to keep a reader entertained. Between your wit and your videos, I was almost moved to start my own blog (well, almost…HaHa!) Great job. I really loved what you had to say, and more than that, how you presented it. Too cool!
After study a few of the blog posts on your website now, and I truly like your way of blogging. I bookmarked it to my bookmark website list and will be checking back soon. Pls check out my web site as well and let me know what you think.
Helpful info. Lucky me I discovered your web site by chance, and I’m shocked why this twist of fate did not came about earlier! I bookmarked it.
I keep listening to the news lecture about getting boundless online grant applications so I have been looking around for the top site to get one. Could you tell me please, where could i acquire some?
Very interesting points you have observed, thanks for posting.
Keep working ,great job!
Good day! I know this is kinda off topic but I’d figured I’d ask. Would you be interested in exchanging links or maybe guest authoring a blog post or vice-versa? My site covers a lot of the same subjects as yours and I believe we could greatly benefit from each other. If you are interested feel free to shoot me an e-mail. I look forward to hearing from you! Superb blog by the way!
This web site is really a stroll-by means of for the entire info you needed about this and didn’t know who to ask. Glimpse here, and also you’ll definitely uncover it.
Whats Going down i’m new to this, I stumbled upon this I have found It positively helpful and it has aided me out loads. I’m hoping to give a contribution & assist different customers like its helped me. Great job.
Thanks for any other informative site. Where else may I am getting that kind of info written in such an ideal manner? I have a mission that I’m just now operating on, and I’ve been on the glance out for such info.
It?s laborious to seek out educated individuals on this matter, but you sound like you understand what you?re speaking about! Thanks
I got what you intend, appreciate it for posting.Woh I am happy to find this website through google.
What i don’t realize is actually how you’re not actually a lot more well-favored than you may be right now. You are so intelligent. You realize therefore significantly with regards to this topic, produced me in my opinion believe it from a lot of numerous angles. Its like women and men aren’t interested unless it¦s one thing to accomplish with Girl gaga! Your individual stuffs excellent. All the time handle it up!
Excellent beat ! I wish to apprentice whilst you amend your web site, how could i subscribe for a weblog web site? The account aided me a acceptable deal. I had been a little bit acquainted of this your broadcast offered bright transparent idea
As soon as I noticed this site I went on reddit to share some of the love with them.
wonderful points altogether, you simply won a new reader. What might you suggest about your publish that you simply made a few days in the past? Any certain?
I¦ve recently started a site, the info you offer on this site has helped me tremendously. Thanks for all of your time & work.
I see something truly interesting about your web blog so I saved to bookmarks.
Hi, Neat post. There is a problem with your site in web explorer, could test this?K IE nonetheless is the market leader and a good element of other people will leave out your wonderful writing because of this problem.
I’d have to examine with you here. Which is not one thing I usually do! I take pleasure in reading a post that may make folks think. Additionally, thanks for permitting me to comment!
Hello! I could have sworn I’ve been to this blog before but after browsing through some of the post I realized it’s new to me. Anyways, I’m definitely happy I found it and I’ll be book-marking and checking back frequently!
F*ckin¦ tremendous things here. I am very happy to see your post. Thanks a lot and i am looking forward to contact you. Will you kindly drop me a mail?
I must convey my affection for your generosity giving support to those people who must have guidance on this important idea. Your real dedication to passing the message all around turned out to be extraordinarily helpful and has regularly allowed men and women much like me to realize their desired goals. Your amazing warm and friendly help signifies a lot to me and especially to my peers. Thank you; from all of us.
Hi! I’ve been reading your website for a while now and finally got the courage to go ahead and give you a shout out from New Caney Tx! Just wanted to tell you keep up the great work!
This is very attention-grabbing, You’re an excessively skilled blogger. I’ve joined your rss feed and look forward to seeking more of your fantastic post. Also, I’ve shared your site in my social networks!
of course like your web site but you have to check the spelling on quite a few of your posts. Many of them are rife with spelling problems and I find it very troublesome to tell the truth however I?¦ll definitely come back again.
I’ve learn several just right stuff here. Certainly price bookmarking for revisiting. I wonder how so much effort you place to create one of these excellent informative site.
Very interesting info!Perfect just what I was looking for!
I love your blog.. very nice colors & theme. Did you create this website yourself? Plz reply back as I’m looking to create my own blog and would like to know wheere u got this from. thanks
I very happy to find this website on bing, just what I was looking for : D likewise saved to fav.
I love it when people come together and share opinions, great blog, keep it up.
Yes! Finally something about tracfone special coupon 2022.
I have been absent for some time, but now I remember why I used to love this site. Thank you, I’ll try and check back more frequently. How frequently you update your web site?
Good day! This is my first visit to your blog! We are a team of volunteers and starting a new project in a community in the same niche. Your blog provided us beneficial information to work on. You have done a marvellous job!
What a data of un-ambiguity and preserveness of valuable know-how about unexpected feelings.|
I really like your writing style, great info , regards for putting up : D.
Generally I do not read post on blogs, however I wish to say that this write-up very forced me to take a look at and do it! Your writing style has been surprised me. Thank you, quite nice article.
Hey! Do you know if they make any plugins to safeguard against hackers? I’m kinda paranoid about losing everything I’ve worked hard on. Any suggestions?|
You’re so cool! I don’t believe I’ve truly read anything like this before. So great to discover someone with some genuine thoughts on this topic. Seriously.. thank you for starting this up. This site is something that is needed on the web, someone with a bit of originality!
Excellent weblog here! Additionally your site a lot up fast! What web host are you the use of? Can I am getting your affiliate link for your host? I want my website loaded up as fast as yours lol|
Greetings! Quick question that’s totally off topic. Do you know how to make your site mobile friendly? My weblog looks weird when browsing from my iphone. I’m trying to find a template or plugin that might be able to fix this issue. If you have any suggestions, please share. Thanks!
I’ve been exploring for a bit for any high quality articles or weblog posts on this kind of area . Exploring in Yahoo I finally stumbled upon this site. Reading this info So i am happy to show that I have an incredibly good uncanny feeling I came upon exactly what I needed. I such a lot without a doubt will make certain to don?t fail to remember this website and give it a look on a continuing basis.|
A lot of what you state happens to be astonishingly accurate and that makes me ponder why I had not looked at this with this light before. This article truly did turn the light on for me personally as far as this specific subject goes. Nevertheless there is actually one factor I am not necessarily too comfortable with so whilst I attempt to reconcile that with the core theme of the position, let me see what the rest of your subscribers have to say.Very well done.
I was recommended this blog by my cousin. I’m not sure whether this post is written by him as no one else know such detailed about my difficulty. You are amazing! Thanks!
Hello there! I know this is kind of off topic but I was wondering if you knew where I could locate a captcha plugin for my comment form? I’m using the same blog platform as yours and I’m having trouble finding one? Thanks a lot!
When some one searches for his required thing, therefore he/she wantsto be available that in detail, therefore that thing is maintained over here.
Hi, I think your site might be having browser compatibility issues. When I look at your website in Safari, it looks fine but when opening in Internet Explorer, it has some overlapping. I just wanted to give you a quick heads up! Other then that, fantastic blog!
Wohh precisely what I was searching for, appreciate it for putting up.
Can I simply say what a relief to find someone who actually is aware of what theyre talking about on the internet. You undoubtedly know easy methods to convey an issue to gentle and make it important. Extra people must read this and understand this side of the story. I cant consider youre not more well-liked because you definitely have the gift.
Somebody necessarily lend a hand to make significantly articles I might state. This is the first time I frequented your website page and to this point? I amazed with the analysis you made to create this particular put up amazing. Fantastic activity!|
Hello there, simply turned into aware of your blog via Google, and found that it’s really informative. I am going to watch out for brussels. I will appreciate if you happen to proceed this in future. Many other people might be benefited out of your writing. Cheers!|
Hmm it appears like your website ate my first comment (it was extremely long) so I guess I’ll just sum it up what I submitted and say, I’m thoroughly enjoying your blog. I too am an aspiring blog writer but I’m still new to the whole thing. Do you have any helpful hints for rookie blog writers? I’d genuinely appreciate it.|
Keep on working, great job!|
Hi, I do believe this is an excellent blog. I stumbledupon it 😉 I’m going to revisit once again since i have saved as a favorite it. Money and freedom is the greatest way to change, may you be rich and continue to guide others.|
Nice answers in return of this issue with real arguments and describing everything about that.|
Wow! This can be one particular of the most helpful blogs We have ever arrive across on this subject. Basically Magnificent. I am also an expert in this topic therefore I can understand your effort.
I blog often and I truly appreciate your information. This great article has really peaked my interest. I’m going to bookmark your website and keep checking for new details about once per week. I opted in for your Feed as well.|
You actually make it seem really easy together with your presentation but I in finding this topic to be actually something that I think I would by no means understand. It seems too complex and very wide for me. I’m taking a look forward to your next submit, I will attempt to get the hang of it!|
Wow, marvelous blog format! How lengthy have you ever been blogging for? you make blogging look easy. The whole glance of your site is fantastic, let alone the content material!
Amazing! Its in fact amazing paragraph, I have got much clear idea on the topic of from this paragraph.|
As a Newbie, I am always browsing online for articles that can be of assistance to me. Thank you
great post.Never knew this, regards for letting me know.
Rattling fantastic info can be found on site.
I simply couldn’t go away your web site prior to suggesting that I actually loved the usual information a person provide in your guests? Is going to be back regularly in order to check out new posts|
I’m extremely inspired along with your writing skills as neatly as with the structure on your blog. Is that this a paid theme or did you customize it your self? Anyway stay up the excellent high quality writing, it is rare to peer a great blog like this one these days..|
I like this web site so much, saved to my bookmarks.
This web site is really a walk-through for all of the info you wanted about this and didn’t know who to ask. Glimpse here, and you’ll definitely discover it.
Thanks designed for sharing such a good opinion, paragraph is pleasant, thats why i have read it entirely|
It’s a pity you don’t have a donate button! I’d definitely donate to this excellent blog! I guess for now i’ll settle for book-marking and adding your RSS feed to my Google account. I look forward to new updates and will talk about this blog with my Facebook group. Chat soon!|
Heya i am for the first time here. I came across this board and
I find It really useful & it helped me out much. I hope to give
something back and aid others like you aided me.
My blog post :: tracfone
I have been surfing on-line more than three hours nowadays, yet I never found any fascinating article like yours. It is lovely value enough for me. In my opinion, if all website owners and bloggers made good content material as you did, the net will likely be much more helpful than ever before.|
Hi would you mind letting me know which hosting company you’re utilizing? I’ve loaded your blog in 3 different browsers and I must say this blog loads a lot quicker then most. Can you suggest a good hosting provider at a honest price? Thanks a lot, I appreciate it!|
Hi there, after reading this awesome post i am also glad to share my familiarity here with colleagues.|
Valuable information. Lucky me I found your website by accident, and I am shocked why this accident did not happened earlier! I bookmarked it.
It’s really a nice and useful piece of info. I am satisfied that you just shared this useful info with us. Please keep us up to date like this. Thanks for sharing.|
I like reading through and I believe this website got some genuinely utilitarian stuff on it! .
Hey there! This is my 1st comment here so I just wanted to give a quick shout out and say I genuinely enjoy reading through your articles. Can you recommend any other blogs/websites/forums that go over the same topics? Thanks a lot!
I enjoy your work, appreciate it for all the interesting content.
You can definitely see your enthusiasm within the work you write. The sector hopes for more passionate writers like you who are not afraid to say how they believe. Always follow your heart.
Hey I know this is off topic but I was wondering if you knew of any widgets I could add to my blog that automatically tweet my newest twitter updates. I’ve been looking for a plug-in like this for quite some time and was hoping maybe you would have some experience with something like this. Please let me know if you run into anything. I truly enjoy reading your blog and I look forward to your new updates.|
Hi colleagues, its wonderful post regarding tutoringand fully explained, keep it up all the time.|
Hi there, I found your website by the use of Google at the same time as searching for a related subject, your site came up, it appears great. I have bookmarked it in my google bookmarks.
An impressive share, I just given this onto a colleague who was doing a little analysis on this. And he in fact bought me breakfast because I found it for him.. smile. So let me reword that: Thnx for the treat! But yeah Thnkx for spending the time to discuss this, I feel strongly about it and love reading more on this topic. If possible, as you become expertise, would you mind updating your blog with more details? It is highly helpful for me. Big thumb up for this blog post!
If you desire to take much from this paragraph then you have to apply these methods to your won weblog.|
I?¦ve recently started a website, the info you provide on this web site has helped me tremendously. Thanks for all of your time & work.
If some one wants to be updated with most up-to-date technologies afterward he must be go to see this site and be up to date everyday.|
good post.Never knew this, regards for letting me know.
Hello there, You have done an incredible job. I will definitely digg it and personally recommend to my friends. I’m confident they will be benefited from this site.|
I’m amazed, I have to admit. Rarely do I encounter a blog that’s equally educative and entertaining, and without a doubt, you’ve hit the nail on the head. The problem is something that not enough people are speaking intelligently about. I am very happy I stumbled across this in my search for something relating to this.|
Howdy! This is kind of off topic but I need some help from an established blog. Is it very hard to set up your own blog? I’m not very techincal but I can figure things out pretty fast. I’m thinking about creating my own but I’m not sure where to start. Do you have any ideas or suggestions? With thanks|
Hi! I know this is kind of off-topic but I had to ask. Does running a well-established website like yours require a large amount of work? I am completely new to running a blog but I do write in my journal daily. I’d like to start a blog so I can easily share my experience and views online. Please let me know if you have any suggestions or tips for new aspiring blog owners. Thankyou!|
I’ll immediately grab your rss feed as I can’t in finding your e-mail subscription link or newsletter service. Do you’ve any? Kindly let me recognise so that I may subscribe. Thanks.
Heya superb website! Does running a blog such as this require a massive amount work? I have no knowledge of programming but I had been hoping to start my own blog in the near future. Anyhow, if you have any recommendations or tips for new blog owners please share. I understand this is off topic nevertheless I simply wanted to ask. Thanks a lot!|
Heya i am for the first time here. I came across this board and I find It really useful & it helped me out much. I hope to give something back and help others like you helped me.|
Thanks for some other informative web site. The place else may I get that kind of info written in such a perfect way? I have a venture that I am simply now operating on, and I have been at the glance out for such info.|
Hello there! This is my 1st comment here so I just wanted to give a quick shout out and say I truly enjoy reading through your blog posts. Can you recommend any other blogs/websites/forums that cover the same topics? Thanks a ton!|
Magnificent web site. Plenty of helpful info here. I am sending it to a few buddies ans additionally sharing in delicious. And naturally, thank you to your sweat!
Perfectly pent content material, Really enjoyed looking through.
Some genuinely interesting points you have written.Helped me a lot, just what I was searching for : D.
Everything is very open and very clear explanation of issues. was truly information. Your website is very useful. Thanks for sharing.
I went over this website and I think you have a lot of great information, saved to favorites (:.
I know this if off topic but I’m looking into starting my own weblog and was wondering what all is required to get setup? I’m assuming having a blog like yours would cost a pretty penny? I’m not very web smart so I’m not 100 sure. Any suggestions or advice would be greatly appreciated. Cheers
I’ve recently started a web site, the info you provide on this web site has helped me tremendously. Thanks for all of your time & work.
Hi! This is my first comment here so I just wanted to give a quick shout out and say I really enjoy reading through your blog posts. Can you suggest any other blogs/websites/forums that go over the same topics? Thanks!
When I originally commented I clicked the -Notify me when new comments are added- checkbox and now each time a comment is added I get four emails with the same comment. Is there any way you can remove me from that service? Thanks!
Hi would you mind letting me know which web host you’re utilizing? I’ve loaded your blog in 3 completely different internet browsers and I must say this blog loads a lot quicker then most. Can you suggest a good hosting provider at a honest price? Many thanks, I appreciate it!
I think you have mentioned some very interesting details, thankyou for the post.
It?¦s really a great and helpful piece of information. I am happy that you simply shared this helpful info with us. Please stay us informed like this. Thank you for sharing.
F*ckin’ remarkable issues here. I am very happy to peer your article. Thanks a lot and i am looking ahead to contact you. Will you please drop me a e-mail?
I think this web site has very fantastic indited articles posts.
Some times its a pain in the ass to read what blog owners wrote but this internet site is really user friendly! .
I have not checked in here for some time as I thought it was getting boring, but the last several posts are good quality so I guess I will add you back to my everyday bloglist. You deserve it my friend 🙂
Hello my loved one! I want to say that this post is amazing, nice written and come with approximately all significant infos. I’d like to see more posts like this.
I couldn’t resist commenting
Glad to be one of several visitants on this awe inspiring web site : D.
Hello! I just would like to give a huge thumbs up for the great info you have here on this post. I will be coming back to your blog for more soon.
Thanks for any other informative site. Where else may just I am getting that kind of information written in such an ideal way? I have a venture that I am simply now running on, and I’ve been at the look out for such info.
Thankyou for helping out, great information.
WONDERFUL Post.thanks for share..more wait .. …
When I initially commented I clicked the -Notify me when new feedback are added- checkbox and now every time a comment is added I get 4 emails with the same comment. Is there any approach you may remove me from that service? Thanks!
Thank you for any other fantastic article. Where else may anybody get that type of information in such a perfect means of writing? I have a presentation next week, and I’m at the look for such information.
I would like to express some appreciation to you just for bailing me out of this problem. As a result of looking out throughout the world wide web and obtaining ways which were not pleasant, I figured my entire life was over. Living without the presence of approaches to the problems you have resolved by means of your guideline is a crucial case, and those which could have adversely damaged my entire career if I hadn’t encountered the blog. Your own personal capability and kindness in playing with a lot of stuff was tremendous. I am not sure what I would have done if I had not encountered such a step like this. I’m able to at this point relish my future. Thanks a lot so much for this specialized and results-oriented help. I won’t hesitate to refer the website to any individual who desires guide on this issue.
Great write-up, I?¦m regular visitor of one?¦s site, maintain up the excellent operate, and It’s going to be a regular visitor for a lengthy time.
I got what you mean , appreciate it for putting up.Woh I am glad to find this website through google. “I would rather be a coward than brave because people hurt you when you are brave.” by E. M. Forster.
Hey there, I think your site might be having browser compatibility issues. When I look at your website in Chrome, it looks fine but when opening in Internet Explorer, it has some overlapping. I just wanted to give you a quick heads up! Other then that, fantastic blog!|
You have made some good points there. I looked on the web for additional information about the issue and found most people will go along with your views on this web site.|
I know this if off topic but I’m looking into starting my own blog and was wondering what all is needed to get set up? I’m assuming having a blog like yours would cost a pretty penny? I’m not very web smart so I’m not 100 positive. Any recommendations or advice would be greatly appreciated. Cheers
An interesting discussion is worth comment. I think that you should write more on this topic, it might not be a taboo subject but generally people are not enough to speak on such topics. To the next. Cheers
Hello! I just would like to give a huge thumbs up for the great info you have here on this post. I will be coming back to your blog for more soon.
When I originally commented I clicked the -Notify me when new comments are added- checkbox and now every time a remark is added I get four emails with the same comment. Is there any manner you possibly can remove me from that service? Thanks!
Your place is valueble for me. Thanks!…
Hi there! Would you mind if I share your blog with my twitter group? There’s a lot of people that I think would really enjoy your content. Please let me know. Thank you
You ought to be a part of a contest for one of the most useful blogs on the net. I’m going to recommend this site!|
nice blog post, continue writing.
Thanks for the update, how can I make is so that I get an email sent to me every time you write a fresh update?
I’ve been exploring for a little bit for any high quality articles or blog posts in this kind of area . Exploring in Yahoo I ultimately stumbled upon this web site. Reading this information So i’m satisfied to convey that I’ve an incredibly just right uncanny feeling I came upon exactly what I needed. I so much no doubt will make certain to don’t overlook this site and give it a glance on a constant basis.
Hello, Neat post. There’s a problem together with your website in internet explorer, may check this… IE still is the marketplace leader and a big part of other folks will miss your excellent writing due to this problem.
Hello there, You’ve performed a fantastic job. I’ll definitely digg it and personally suggest to my friends. I am confident they’ll be benefited from this web site.
I like this post, enjoyed this one thanks for posting.
That is really fascinating, You are an overly skilled blogger. I have joined your rss feed and look ahead to in quest of extra of your magnificent post. Additionally, I’ve shared your website in my social networks!
I carry on listening to the reports lecture about getting boundless online grant applications so I have been looking around for the best site to get one. Could you advise me please, where could i acquire some?
Awesome blog! Do you have any hints for aspiring writers? I’m planning to start my own blog soon but I’m a little lost on everything. Would you suggest starting with a free platform like WordPress or go for a paid option? There are so many options out there that I’m totally overwhelmed .. Any suggestions? Kudos!
You actually make it seem so easy with your presentation but I find this topic to be actually something that I think I would never understand. It seems too complex and very broad for me. I am looking forward for your next post, I will try to get the hang of it!
I genuinely enjoy examining on this website, it has great articles. “And all the winds go sighing, For sweet things dying.” by Christina Georgina Rossetti.
Thanks , I have recently been searching for info about this topic for ages and yours is the greatest I’ve came upon so far. But, what concerning the bottom line? Are you certain about the supply?
Howdy! I know this is kinda off topic however , I’d figured I’d ask. Would you be interested in exchanging links or maybe guest authoring a blog post or vice-versa? My site covers a lot of the same subjects as yours and I think we could greatly benefit from each other. If you are interested feel free to send me an e-mail. I look forward to hearing from you! Fantastic blog by the way!
You completed several nice points there. I did a search on the matter and found mainly folks will go along with with your blog.
I have not checked in here for a while as I thought it was getting boring, but the last few posts are great quality so I guess I’ll add you back to my everyday bloglist. You deserve it my friend 🙂
Thank you for another informative blog. Where else may I am getting that kind of information written in such a perfect manner? I have a mission that I am just now operating on, and I have been on the glance out for such info.
Hey, you used to write wonderful, but the last few posts have been kinda boring? I miss your super writings. Past few posts are just a bit out of track! come on!
It is truly a nice and helpful piece of info. I am glad that you just shared this helpful information with us. Please keep us informed like this. Thank you for sharing.
I’m really enjoying the design and layout of your website. It’s a very easy on the eyes which makes it much more enjoyable for me to come here and visit more often. Did you hire out a developer to create your theme? Excellent work!
Appreciating the persistence you put into your blog and detailed information you provide. It’s nice to come across a blog every once in a while that isn’t the same unwanted rehashed information. Great read! I’ve bookmarked your site and I’m including your RSS feeds to my Google account.
I got what you mean ,saved to bookmarks, very nice site.
I really like your writing style, great info , thankyou for putting up : D.
Thank you, I’ve just been searching for info about this subject for ages and yours is the greatest I’ve came upon so far. But, what concerning the conclusion? Are you positive in regards to the supply?
Hello! I could have sworn I’ve been to this blog before but after browsing through some of the post I realized it’s new to me. Anyways, I’m definitely happy I found it and I’ll be book-marking and checking back frequently!
I wanted to thank you for this great read!! I definitely enjoying every little bit of it I have you bookmarked to check out new stuff you post…
Please let me know if you’re looking for a article author for your weblog. You have some really good posts and I feel I would be a good asset. If you ever want to take some of the load off, I’d absolutely love to write some content for your blog in exchange for a link back to mine. Please blast me an email if interested. Kudos!
You have mentioned very interesting points! ps nice site.
This design is spectacular! You obviously know how to keep a reader entertained. Between your wit and your videos, I was almost moved to start my own blog (well, almost…HaHa!) Great job. I really loved what you had to say, and more than that, how you presented it. Too cool!
It’s in point of fact a great and useful piece of information. I am happy that you simply shared this useful info with us. Please stay us up to date like this. Thanks for sharing.
As soon as I noticed this website I went on reddit to share some of the love with them.
After study a few of the blog posts on your website now, and I truly like your way of blogging. I bookmarked it to my bookmark website list and will be checking back soon. Pls check out my web site as well and let me know what you think.
I dugg some of you post as I cogitated they were handy extremely helpful
Good write-up, I am regular visitor of one’s web site, maintain up the nice operate, and It is going to be a regular visitor for a lengthy time.
I have read some good stuff here. Definitely price bookmarking for revisiting. I surprise how so much attempt you place to create such a wonderful informative web site.
You completed several fine points there. I did a search on the matter and found most folks will have the same opinion with your blog.
As I website owner I conceive the subject material here is really good, thankyou for your efforts.
I think other site proprietors should take this web site as an model, very clean and great user genial style and design, as well as the content. You’re an expert in this topic!
Very well written article. It will be supportive to everyone who utilizes it, as well as me. Keep doing what you are doing – looking forward to more posts.
I truly treasure your work, Great post.
I think this web site contains some rattling great info for everyone. “A man’s dreams are an index to his greatness.” by Zadok Rabinwitz.
I like what you guys are up too. Such smart work and reporting! Carry on the superb works guys I?¦ve incorporated you guys to my blogroll. I think it will improve the value of my web site 🙂
I’d should examine with you here. Which is not one thing I often do! I enjoy studying a put up that can make people think. Additionally, thanks for allowing me to comment!
I’ve been browsing online more than three hours today, yet I never found any interesting article like yours. It is pretty worth enough for me. In my opinion, if all website owners and bloggers made good content as you did, the net will be much more useful than ever before.
Wow, fantastic blog layout! How long have you been blogging for? you made blogging look easy. The overall look of your site is fantastic, as well as the content!
WONDERFUL Post.thanks for share..extra wait .. …
I conceive this website contains very great composed content material posts.
You actually make it appear so easy with your presentation however I to find this topic to be really something that I think I’d never understand. It seems too complex and extremely extensive for me. I’m taking a look forward in your next submit, I will attempt to get the dangle of it!
Cheap individual and group tours to Yerevan, Armenia. Find out where you can relax in Armenia, Yerevan. Book tours online on our website or call +37494877888.
Hello There. I found your blog using msn. This is a really well written article. I’ll be sure to bookmark it and come back to read more of your useful info. Thanks for the post. I will certainly comeback.
Leandro Farland
[…]please stop by the websites we adhere to, like this a single, as it represents our picks in the web[…]
Way cool, some valid points! I appreciate you making this article available, the rest of the site is also high quality. Have a fun.
Does your website have a contact page? I’m having problems locating it but, I’d like to shoot you an e-mail. I’ve got some suggestions for your blog you might be interested in hearing. Either way, great blog and I look forward to seeing it expand over time.
Thank you, I have recently been looking for information about this subject for a while and yours is the greatest I’ve found out till now. However, what concerning the conclusion? Are you positive about the source?
Excellent post. I was checking continuously this blog and I am impressed! Very useful information specially the last part 🙂 I care for such information a lot. I was seeking this particular info for a very long time. Thank you and best of luck.
I think this internet site has got very excellent indited content articles.
Thank you for each of your effort on this website. My niece delights in getting into internet research and it is simple to grasp why. I learn all about the powerful form you create worthwhile items by means of your web blog and improve response from the others on this concept and our own simple princess is really understanding so much. Take pleasure in the remaining portion of the year. Your conducting a wonderful job.
F*ckin’ tremendous things here. I’m very glad to see your post. Thanks a lot and i am looking forward to contact you. Will you please drop me a e-mail?
Very interesting topic, regards for posting.
I like this post, enjoyed this one regards for putting up.
I loved as much as you’ll receive carried out right here. The sketch is tasteful, your authored subject matter stylish. nonetheless, you command get bought an impatience over that you wish be delivering the following. unwell unquestionably come more formerly again as exactly the same nearly very often inside case you shield this increase.
I don’t even know how I ended up here, but I thought this post was good. I do not know who you are but certainly you’re going to a famous blogger if you are not already 😉 Cheers!
As I website possessor I believe the content matter here is rattling fantastic , appreciate it for your efforts. You should keep it up forever! Best of luck.
This is a very good tips especially to those new to blogosphere, brief and accurate information… Thanks for sharing this one. A must read article.
I used to be very happy to seek out this internet-site.I wished to thanks to your time for this excellent learn!! I positively enjoying each little bit of it and I have you bookmarked to take a look at new stuff you blog post.
Definitely believe that which you stated. Your favorite justification seemed to be on the net the simplest thing to be aware of. I say to you, I certainly get irked while people consider worries that they just do not know about. You managed to hit the nail upon the top and defined out the whole thing without having side effect , people could take a signal. Will probably be back to get more. Thanks
I delight in, result in I discovered exactly what I used to be looking for. You’ve ended my four day long hunt! God Bless you man. Have a nice day. Bye
Thank you for the auspicious writeup. It in fact was once a leisure account it. Look complex to far introduced agreeable from you! By the way, how can we be in contact?
I got what you intend, regards for posting.Woh I am pleased to find this website through google.
I was wondering if you ever thought of changing the page layout of your site? Its very well written; I love what youve got to say. But maybe you could a little more in the way of content so people could connect with it better. Youve got an awful lot of text for only having 1 or two images. Maybe you could space it out better?
Greetings! Very helpful advice within this article! It is the little changes that make the most significant changes. Thanks for sharing!
Hello there, I found your web site via Google while looking for a related topic, your web site came up, it looks great. I’ve bookmarked it in my google bookmarks.
I am really loving the theme/design of your weblog. Do you ever run into any web browser compatibility problems? A number of my blog visitors have complained about my site not operating correctly in Explorer but looks great in Chrome. Do you have any recommendations to help fix this problem?
Very great post. I just stumbled upon your weblog and wanted to mention that I have truly loved browsing your blog posts. In any case I’ll be subscribing on your rss feed and I’m hoping you write once more soon!|
you’re in reality a excellent webmaster. The site loading velocity is incredible. It kind of feels that you’re doing any unique trick. In addition, The contents are masterpiece. you have done a great activity in this matter!|
Perfect work you have done, this site is really cool with superb info .
I like this site very much so much excellent information.
Hello There. I found your blog using msn. This is a really well written article. I will be sure to bookmark it and come back to read more of your useful information. Thanks for the post. I will definitely comeback.
I appreciate, cause I found just what I was looking for. You’ve ended my four day long hunt! God Bless you man. Have a great day. Bye
I am impressed with this site, rattling I am a big fan .
There is apparently a bundle to know about this. I consider you made various good points in features also.
I am not very wonderful with English but I get hold this very easy to translate.
I simply could not depart your site prior to suggesting that I extremely loved the usual info an individual supply for your visitors? Is gonna be back often in order to inspect new posts.
Rattling nice style and design and superb written content, nothing else we require : D.
Hello. remarkable job. I did not expect this. This is a great story. Thanks!
Along with the whole thing which seems to be building inside this subject matter, a significant percentage of viewpoints tend to be rather refreshing. On the other hand, I appologize, but I can not subscribe to your entire plan, all be it exhilarating none the less. It would seem to everyone that your opinions are not completely rationalized and in reality you are generally yourself not even fully certain of the point. In any case I did take pleasure in reading through it.
Wow that was unusual. I just wrote an very long comment but after I clicked submit my comment didn’t show up. Grrrr… well I’m not writing all that over again. Anyhow, just wanted to say wonderful blog!
Hello, I do think your web site may be having web browser compatibility problems. Whenever I look at your blog in Safari, it looks fine but when opening in I.E., it’s got some overlapping issues. I just wanted to give you a quick heads up! Apart from that, wonderful site!|
What a information of un-ambiguity and preserveness of precious know-how concerning unexpected emotions.|
I like your writing style truly enjoying this website .
It’s the best time to make a few plans for the long run and it is time to be happy. I have learn this submit and if I could I wish to counsel you some fascinating issues or suggestions. Perhaps you can write subsequent articles referring to this article. I wish to learn more things approximately it!
Excellent site. Plenty of useful info here. I am sending it to some pals ans additionally sharing in delicious. And certainly, thanks for your sweat!
Real fantastic visual appeal on this internet site, I’d rate it 10 10.
You made several good points there. I did a search on the subject and found most people will go along with with your blog.
Regards for this rattling post, I am glad I found this site on yahoo.
I love the efforts you have put in this, appreciate it for all the great blog posts.
Hi , I do believe this is an excellent blog. I stumbled upon it on Yahoo , i will come back once again. Money and freedom is the best way to change, may you be rich and help other people.
Attractive component to content. I simply stumbled upon your weblog and in accession capital to assert that I acquire actually enjoyed account your blog posts. Anyway I will be subscribing to your augment and even I achievement you get admission to consistently fast.
You’re so awesome! I don’t believe I’ve read something like this before. So great to discover another person with a few original thoughts on this issue. Really.. many thanks for starting this up. This web site is one thing that is required on the internet, someone with some originality!|
Hello! This is my first comment here so I just wanted to give a quick shout out and tell you I truly enjoy reading through your posts. Can you recommend any other blogs/websites/forums that deal with the same topics? Many thanks!|
fantastic post.Ne’er knew this, appreciate it for letting me know.
Hi, Neat post. There is a problem with your website in internet explorer, would check this… IE still is the market leader and a big portion of people will miss your fantastic writing because of this problem.
Asking questions are truly pleasant thing if you are not understanding anything fully, except this paragraph offers pleasant understanding even.|
Hi exceptional blog! Does running a blog such as this require a massive amount work? I’ve very little knowledge of programming but I was hoping to start my own blog soon. Anyways, if you have any recommendations or tips for new blog owners please share. I understand this is off subject however I just wanted to ask. Cheers!|
I like the helpful info you provide in your articles. I will bookmark your weblog and check again here regularly. I am quite sure I’ll learn plenty of new stuff right here! Good luck for the next!
I like this web site its a master peace ! Glad I observed this on google .
Hi! This post couldn’t be written any better! Reading this post reminds me of my good old room mate! He always kept chatting about this. I will forward this post to him. Pretty sure he will have a good read. Many thanks for sharing!
I do not even know how I ended up here, but I thought this post was great. I do not know who you are but certainly you’re going to a famous blogger if you aren’t already 😉 Cheers!
Hi, i think that i noticed you visited my web site so i came to “return the want”.I’m trying to find things to improve my web site!I guess its good enough to make use of some of your concepts!!
I absolutely love your website.. Pleasant colors & theme. Did you build this amazing site yourself? Please reply back as I’m hoping to create my own personal website and would like to learn where you got this from or exactly what the theme is called. Appreciate it!
Heya i am for the first time here. I found this board and I find It truly useful & it helped me out a lot. I hope to give something back and aid others like you helped me.
You completed several good points there. I did a search on the theme and found most persons will have the same opinion with your blog.
Hi, just required you to know I he added your site to my Google bookmarks due to your layout. But seriously, I believe your internet site has 1 in the freshest theme I??ve came across. It extremely helps make reading your blog significantly easier.
Outstanding post, I believe people should larn a lot from this blog its rattling user genial.
Respect to article author, some good information .
This is very interesting, You’re a very skilled blogger. I’ve joined your feed and look forward to seeking more of your great post. Also, I have shared your web site in my social networks!
I would like to show my affection for your kindness in support of people that require guidance on this one content. Your real commitment to getting the solution all around has been certainly significant and have regularly made those just like me to realize their pursuits. The insightful report implies so much a person like me and still more to my peers. Regards; from each one of us.
You are a very intelligent person!
Hello there, I found your site via Google while looking for a related topic, your website came up, it looks good. I’ve bookmarked it in my google bookmarks.
I am glad that I detected this blog, precisely the right information that I was looking for! .
Thanks for sharing excellent informations. Your site is so cool. I am impressed by the details that you have on this site. It reveals how nicely you perceive this subject. Bookmarked this web page, will come back for more articles. You, my friend, ROCK! I found simply the info I already searched all over the place and just could not come across. What an ideal web site.
It is actually a great and helpful piece of information. I am satisfied that you shared this helpful information with us. Please stay us informed like this. Thanks for sharing.
I am commenting to let you know of the remarkable encounter my wife’s child enjoyed using your web site. She realized numerous pieces, most notably what it’s like to possess a very effective giving mindset to make the mediocre ones quite simply grasp specific specialized subject areas. You really surpassed readers’ desires. Thank you for showing these productive, safe, educational and in addition fun thoughts on this topic to Gloria.
Hello just wanted to give you a quick heads up and let you know a few of the pictures aren’t loading correctly. I’m not sure why but I think its a linking issue. I’ve tried it in two different browsers and both show the same outcome.
I really appreciate this post. I’ve been looking everywhere for this! Thank goodness I found it on Bing. You’ve made my day! Thanks again!
I dugg some of you post as I cogitated they were extremely helpful very useful
Very superb visual appeal on this web site, I’d rate it 10 10.
Thanks for the marvelous posting! I seriously enjoyed reading it, you could be a great author.I will be sure to bookmark your blog and may come back from now on. I want to encourage that you continue your great job, have a nice afternoon!
As I website owner I believe the written content here is very excellent, thanks for your efforts.
Thank you for sharing superb informations. Your web-site is very cool. I am impressed by the details that you’ve on this blog. It reveals how nicely you perceive this subject. Bookmarked this web page, will come back for extra articles. You, my pal, ROCK! I found just the info I already searched all over the place and simply couldn’t come across. What a perfect web-site.
Thank you for helping out, superb info. “The surest way to be deceived is to think oneself cleverer than the others.” by La Rochefoucauld.
параграф
гдз математика 4 класс
гдз по литературе 6 класс коровиной
окружающий мир
гдз по английскому 6 класс вербицкая
решебник по математике 4 класс
математика четвёртый класс
как найти высоту треугольника
русский язык 2 класс 1 часть канакина горецкий
учебник по английскому языку 7 класс
как по английски
гдз по биологии 7 класс рабочая тетрадь
гдз по обществознанию 6 класс
гдз по английскому 10 класс
гдз по алгебре 10 класс
гдз по географии
гдз по русскому языку 8 класс бархударов
гдз по химии 9 класс габриелян
разряды числительных
гдз по русскому 5 класс разумовская
русский язык 5 класс 1 часть
гдз английский язык пятый класс
гдз английский 3 класс рабочая тетрадь
гдз по математике 5 класс мерзляк дидактический материал мегарешеба
гдз по английскому языку 9 класс афанасьева
гдз по математике пятый класс учебник
magnificent points altogether, you just gained a brand new reader. What would you suggest about your post that you made a few days ago? Any positive?
Hello, i think that i saw you visited my web site thus i came to “return the favor”.I’m trying to find things to improve my site!I suppose its ok to use a few of your ideas!!
เว็บพนันออนไลน์ ดีที่สุด เว็บตรง UFABET ufabet777 ให้บริการ แทงบอลออนไลน์ สล็อตออนไลน์ หวยออนไลน์ บาคาร่าออนไลน์ เกมส์ออนไลน์ เต็มรูปแบบ ครบวงจร ผลตอบแทนสูง เป็นเว็บพนัน ถูกกฎหมาย จากต่างประเทศเป็นเว็บพนันออนไลน์ ที่มีความมั่งคง ปลอดภัย บริการ 24 ชั่วโมง
We are a group of volunteers and opening a new scheme in our community. Your website provided us with valuable info to work on. You’ve done a formidable job and our whole community will be grateful to you.
เว็บพนันออนไลน์ เว็บตรง ไม่ผ่านเอเยนต์ สมัครฟรี ไม่มีขั้นต่ำ ระบบออโต้ ปลอดภัย100 ยูฟ่าสล็อตเว็บตรง เว็บเดียวครบทุกค่าย ยูฟ่า สล็อต ยูฟ่าเบท แทงบอล คาสิโนออนไลน์ บาคาร่า ไฮโล และกีฬาทุกประเภท ให้บริการตลอด 24 ชม
This web site is really a walk-through for all of the info you wanted about this and didn’t know who to ask. Glimpse here, and you’ll definitely discover it.
excellent issues altogether, you just won a brand new reader. What may you recommend about your submit that you simply made some days ago? Any certain?
It’s a pity you don’t have a donate button! I’d definitely donate to this excellent blog! I suppose for now i’ll settle for book-marking and adding your RSS feed to my Google account. I look forward to new updates and will talk about this site with my Facebook group. Chat soon!
I am glad that I found this website, just the right info that I was looking for! .
I truly enjoy examining on this site, it contains good content.
Pretty nice post. I just stumbled upon your weblog and wished to say that I have truly enjoyed surfing around your blog posts. In any case I’ll be subscribing to your rss feed and I hope you write again very soon!
whoah this blog is wonderful i love reading your articles. Keep up the great work! You know, lots of people are searching around for this info, you could help them greatly.
Thanks for a marvelous posting! I genuinely enjoyed reading it, you will be a great author.I will always bookmark your blog and will eventually come back at some point. I want to encourage one to continue your great work, have a nice day!
You must take part in a contest for the most effective blogs on the web. I will suggest this site!
Some genuinely fantastic articles on this site, appreciate it for contribution. “A man with a new idea is a crank — until the idea succeeds.” by Mark Twain.
Good write-up, I’m regular visitor of one’s site, maintain up the excellent operate, and It is going to be a regular visitor for a lengthy time.
Hmm it appears like your website ate my first comment (it was extremely long) so I guess I’ll just sum it up what I wrote and say, I’m thoroughly enjoying your blog. I as well am an aspiring blog writer but I’m still new to the whole thing. Do you have any tips for beginner blog writers? I’d really appreciate it.
Yeah bookmaking this wasn’t a speculative conclusion outstanding post! .
Thanks , I’ve recently been searching for information about this topic for ages and yours is the best I have discovered till now. But, what about the conclusion? Are you sure about the source?
Thanks for another wonderful article. Where else could anybody get that kind of information in such a perfect way of writing? I have a presentation next week, and I’m on the look for such information.
As a Newbie, I am always browsing online for articles that can be of assistance to me. Thank you
Hello are using WordPress for your site platform? I’m new to the blog world but I’m trying to get started and create my own. Do you require any coding knowledge to make your own blog? Any help would be really appreciated!
It’s arduous to find knowledgeable folks on this topic, but you sound like you realize what you’re speaking about! Thanks
Thanks for sharing superb informations. Your web-site is so cool. I’m impressed by the details that you have on this site. It reveals how nicely you perceive this subject. Bookmarked this web page, will come back for more articles. You, my friend, ROCK! I found just the info I already searched all over the place and simply could not come across. What an ideal web-site.
You’re so interesting! I do not think I’ve truly read through anything like that before. So good to discover somebody with original thoughts on this issue. Seriously.. many thanks for starting this up. This site is something that is required on the web, someone with a bit of originality!
Keep working ,great job!
This is a topic that is near to my heart… Many thanks! Where are your contact details though?|
It is the best time to make some plans for the longer term and it’s time to be happy. I have read this submit and if I may I wish to suggest you some attention-grabbing things or tips. Perhaps you could write next articles relating to this article. I want to read even more things approximately it!|
Hey There. I found your blog using msn. This is a very well written article. I will make sure to bookmark it and return to read more of your useful information. Thanks for the post. I’ll certainly comeback.
I have recently started a blog, the info you provide on this website has helped me greatly. Thanks for all of your time & work.
What a information of un-ambiguity and preserveness of precious know-how on the topic of unexpected emotions.|
I got what you intend, regards for putting up.Woh I am delighted to find this website through google. “Don’t be afraid of opposition. Remember, a kite rises against not with the wind.” by Hamilton Mabie.
I truly appreciate this post. I have been looking all over for this! Thank goodness I found it on Bing. You have made my day! Thank you again
I have learn several just right stuff here. Definitely price bookmarking for revisiting. I surprise how much effort you put to create this kind of magnificent informative site.
I have been surfing on-line greater than three hours as of late, yet I never discovered any attention-grabbing article like yours. It’s lovely price enough for me. In my opinion, if all webmasters and bloggers made good content as you probably did, the web will be much more useful than ever before.
Fantastic website. Plenty of helpful info here. I am sending it to several friends ans additionally sharing in delicious. And naturally, thank you for your effort!
I like what you guys are up too. Such smart work and reporting! Carry on the excellent works guys I¦ve incorporated you guys to my blogroll. I think it will improve the value of my website 🙂
What i do not realize is actually how you are not really much more well-liked than you might be right now. You’re so intelligent. You realize thus considerably relating to this subject, produced me personally consider it from numerous varied angles. Its like women and men aren’t fascinated unless it is one thing to do with Lady gaga! Your own stuffs nice. Always maintain it up!
I like this website so much, saved to bookmarks. “To hold a pen is to be at war.” by Francois Marie Arouet Voltaire.
Good website! I really love how it is easy on my eyes and the data are well written. I am wondering how I might be notified whenever a new post has been made. I’ve subscribed to your RSS feed which must do the trick! Have a great day!
Hiya, I’m really glad I’ve found this info. Today bloggers publish just about gossips and net and this is really annoying. A good site with interesting content, that is what I need. Thank you for keeping this website, I will be visiting it. Do you do newsletters? Can’t find it.
I have been absent for some time, but now I remember why I used to love this blog. Thanks, I’ll try and check back more frequently. How frequently you update your website?
Good article. I definitely love this site. Stick with it!
F*ckin’ awesome things here. I’m very glad to see your post. Thanks a lot and i am looking forward to contact you. Will you please drop me a e-mail?
I am so happy to read this. This is the kind of manual that needs to be given and not the accidental misinformation that’s at the other blogs. Appreciate your sharing this greatest doc.
In this great design of things you actually get a B+ with regard to hard work. Where exactly you confused us ended up being in your details. As they say, the devil is in the details… And it couldn’t be much more correct right here. Having said that, allow me say to you just what exactly did give good results. The writing is certainly quite engaging and that is most likely why I am making an effort to comment. I do not make it a regular habit of doing that. Secondly, despite the fact that I can certainly see a leaps in logic you come up with, I am definitely not sure of just how you appear to connect the ideas which help to make the final result. For the moment I will, no doubt yield to your issue but trust in the future you actually connect your facts better.
I really like your writing style, superb information, thanks for posting :D. “Every moment of one’s existence one is growing into more or retreating into less.” by Norman Mailer.
Really good info can be found on website. “I know of no great men except those who have rendered great service to the human race.” by Francois Marie Arouet Voltaire.
The next time I read a blog, I hope that it doesnt disappoint me as much as this one. I mean, I do know it was my choice to read, but I truly thought youd have one thing attention-grabbing to say. All I hear is a bunch of whining about something that you can fix if you werent too busy in search of attention.
Very nice post. I simply stumbled upon your blog and wanted to mention that I have really loved surfing around your blog posts. In any case I will be subscribing on your rss feed and I’m hoping you write once more very soon!|
Hey there, You have performed a great job. I’ll definitely digg it and for my part recommend to my friends. I am sure they’ll be benefited from this web site.|
Unquestionably believe that which you said. Your favorite reason seemed to be on the web the simplest thing to be aware of. I say to you, I definitely get irked while people consider worries that they plainly do not know about. You managed to hit the nail upon the top and also defined out the whole thing without having side effect , people can take a signal. Will likely be back to get more. Thanks
At this time it seems like BlogEngine is the top blogging platform out there right now. (from what I’ve read) Is that what you’re using on your blog?
Today, I went to the beachfront with my children. I found a sea shell and gave it to my 4 year old daughter and said “You can hear the ocean if you put this to your ear.” She put the shell to her ear and screamed. There was a hermit crab inside and it pinched her ear. She never wants to go back! LoL I know this is completely off topic but I had to tell someone!
I would like to thank you for the efforts you’ve put in writing this web site. I’m hoping the same high-grade web site post from you in the upcoming as well. Actually your creative writing abilities has encouraged me to get my own website now. Really the blogging is spreading its wings rapidly. Your write up is a great example of it.
There may be noticeably a bundle to learn about this. I assume you made certain nice points in features also.
whoah this weblog is fantastic i love reading your articles. Keep up the great work! You understand, a lot of persons are hunting around for this information, you could help them greatly.
Usually I don’t read post on blogs, but I would like to say that this write-up very forced me to take a look at and do it! Your writing taste has been amazed me. Thank you, quite nice post.
I’ve learn a few excellent stuff here. Certainly price bookmarking for revisiting. I surprise how a lot attempt you set to create one of these fantastic informative web site.
It¦s really a nice and useful piece of information. I¦m satisfied that you just shared this helpful information with us. Please stay us informed like this. Thanks for sharing.
mellow fellow delta 8 gummies review
I have recently started a site, the info you provide on this website has helped me tremendously. Thank you for all of your time & work.
I’m not sure why but this weblog is loading incredibly slow for me. Is anyone else having this problem or is it a problem on my end? I’ll check back later and see if the problem still exists.
he blog was how do i say it… relevant, finally something that helped me. Thanks
Fantastic goods from you, man. I have keep in mind your stuff previous to and you’re simply too wonderful. I actually like what you have got right here, certainly like what you are stating and the best way through which you say it. You’re making it enjoyable and you still care for to stay it wise. I can not wait to learn much more from you. This is really a great site.
I’m not certain the place you’re getting your information, however good topic. I needs to spend some time finding out much more or working out more. Thank you for excellent info I used to be searching for this info for my mission.
Hello my loved one! I want to say that this article is awesome, nice written and include almost all significant infos. I would like to look more posts like this.
I respect your piece of work, regards for all the great content.
Hmm it seems like your site ate my first comment (it was super long) so I guess I’ll just sum it up what I submitted and say, I’m thoroughly enjoying your blog. I as well am an aspiring blog writer but I’m still new to the whole thing. Do you have any tips for rookie blog writers? I’d really appreciate it.|
I got good info from your blog
I’ve learn a few just right stuff here. Certainly price bookmarking for revisiting. I surprise how a lot effort you set to make one of these fantastic informative site.
Undeniably consider that that you stated. Your favourite reason appeared to be on the internet the simplest thing to be mindful of. I say to you, I certainly get irked even as other people think about concerns that they just do not recognise about. You controlled to hit the nail upon the highest as well as outlined out the entire thing without having side-effects , other folks can take a signal. Will likely be back to get more. Thanks|
Aw, this was a really nice post. In thought I would like to put in writing like this additionally – taking time and actual effort to make an excellent article… but what can I say… I procrastinate alot and by no means seem to get one thing done.
My partner and I stumbled over here from a different web address and thought I might check things out. I like what I see so i am just following you. Look forward to checking out your web page repeatedly.
you’re really a good webmaster. The web site loading speed is incredible. It seems that you are doing any unique trick. Also, The contents are masterwork. you have done a magnificent job on this topic!
You could definitely see your enthusiasm in the paintings you write. The arena hopes for even more passionate writers such as you who aren’t afraid to say how they believe. All the time follow your heart.
I know this web site offers quality based articles or reviews and other information, is there any other site which presents these kinds of data in quality?|
Its fantastic as your other content : D, regards for posting. “Age is a function of mind over matter if you don’t mind, it doesn’t matter.” by Leroy Robert Satchel Paige.
I believe you have observed some very interesting points, appreciate it for the post.
Good V I should definitely pronounce, impressed with your website. I had no trouble navigating through all the tabs as well as related information ended up being truly simple to do to access. I recently found what I hoped for before you know it in the least. Reasonably unusual. Is likely to appreciate it for those who add forums or something, website theme . a tones way for your client to communicate. Excellent task..
There are definitely a lot of details like that to take into consideration. That is a great level to deliver up. I supply the ideas above as general inspiration however clearly there are questions like the one you carry up where the most important factor will probably be working in trustworthy good faith. I don?t know if greatest practices have emerged around issues like that, but I’m sure that your job is clearly recognized as a good game. Both girls and boys feel the impression of just a moment’s pleasure, for the rest of their lives.
Great items from you, man. I’ve take note your stuff prior to and you are just extremely fantastic. I actually like what you’ve bought here, certainly like what you’re saying and the best way in which you are saying it. You are making it enjoyable and you continue to care for to keep it wise. I can’t wait to learn far more from you. This is really a wonderful site.
There are some attention-grabbing deadlines on this article but I don’t know if I see all of them heart to heart. There may be some validity however I will take hold opinion till I look into it further. Good article , thanks and we want more! Added to FeedBurner as effectively
You have remarked very interesting details! ps decent web site.
I am extremely impressed aⅼong ԝith yoսr writing talents аѕ neatly as with the structure to your blog.
Іs that this a paid theme or diid yoᥙ modify it
үouг self? Either way keep ᥙp the nice quality writing, іt is uncommon to see
a nice blog like this one nowadays..
Ꭺlso visit mʏ homepage: اختر هذه الأشياء عبر الإنترنت
You could definitely see your skills in the paintings you write. The sector hopes for even more passionate writers such as you who are not afraid to say how they believe. At all times follow your heart.
Good article and straight to the point. I don’t know if this is really the best place to ask but do you guys have any thoughts on where to employ some professional writers? Thx 🙂
I used to be recommended this blog through my cousin. I am no longer certain whether this post is written by means of him as no one else know such particular about my difficulty. You’re amazing! Thanks!
I am perpetually thought about this, appreciate it for posting.
My developer is trying to persuade me to move to .net from PHP. I have always disliked the idea because of the expenses. But he’s tryiong none the less. I’ve been using Movable-type on a variety of websites for about a year and am concerned about switching to another platform. I have heard very good things about blogengine.net. Is there a way I can import all my wordpress content into it? Any help would be greatly appreciated!
Thanks for another fantastic post. Where else could anybody get that type of info in such an ideal way of writing? I have a presentation next week, and I’m on the look for such info.
I enjoy, lead to I found just what I used to be taking a look for. You have ended my 4 day long hunt! God Bless you man. Have a great day. Bye
I was very happy to seek out this net-site.I wanted to thanks to your time for this glorious read!! I positively having fun with every little bit of it and I have you bookmarked to check out new stuff you blog post.
Do you have a spam issue on this blog; I also am a blogger, and I was wondering your situation; many of us have developed some nice practices and we are looking to swap strategies with other folks, be sure to shoot me an email if interested.
Great article and right to the point. I don’t know if this is really the best place to ask but do you guys have any ideea where to hire some professional writers? Thx 🙂
It’s actually a nice and helpful piece of information. I’m satisfied that you just shared this helpful info with us. Please stay us informed like this. Thanks for sharing.
Woh I like your blog posts, bookmarked! .
I enjoy the efforts you have put in this, thanks for all the great content.
Excellent post. I used to be checking continuously this weblog and I am inspired! Very useful info specially the closing section 🙂 I take care of such info much. I was seeking this particular information for a long time. Thank you and good luck.
I must voice my respect for your kind-heartedness supporting women who must have assistance with the issue. Your real dedication to passing the solution across became pretty good and has truly enabled others much like me to achieve their goals. Your own invaluable key points entails a whole lot a person like me and still more to my mates. Thanks a lot; from everyone of us.
Good day! I know this is somewhat off topic but I was wondering which blog platform are you using for this website? I’m getting sick and tired of WordPress because I’ve had issues with hackers and I’m looking at options for another platform. I would be fantastic if you could point me in the direction of a good platform.
I absolutely love your blog and find many of your post’s to be what precisely I’m looking for. can you offer guest writers to write content in your case? I wouldn’t mind writing a post or elaborating on some of the subjects you write with regards to here. Again, awesome web log!|
You should take part in a contest for one of the best blogs on the web. I will recommend this site!
I like the valuable information you provide to your articles. I’ll bookmark your blog and take a look at again here frequently. I am slightly certain I’ll be told plenty of new stuff right right here! Good luck for the following!
Hello, Neat post. There’s a problem with your website in internet explorer, could check thisK IE still is the marketplace chief and a huge component of other people will omit your fantastic writing due to this problem.
Please let me know if you’re looking for a writer for your site. You have some really good articles and I think I would be a good asset. If you ever want to take some of the load off, I’d absolutely love to write some material for your blog in exchange for a link back to mine. Please blast me an e-mail if interested. Regards!
I do agree with all the ideas you have presented in your post. They are really convincing and will certainly work. Still, the posts are very short for newbies. Could you please extend them a little from next time? Thanks for the post.
You really make it appear so easy along with your presentation but I in finding this matter to be really something that I feel I’d never understand. It kind of feels too complicated and extremely vast for me. I am taking a look ahead for your next post, I?¦ll try to get the hold of it!
A person necessarily help to make seriously posts I would state. This is the very first time I frequented your website page and up to now? I surprised with the research you made to make this actual put up extraordinary. Fantastic task!
Youre so cool! I dont suppose Ive learn something like this before. So good to seek out any person with some original thoughts on this subject. realy thanks for starting this up. this web site is one thing that is needed on the web, someone with just a little originality. useful job for bringing something new to the web!
I think this site has some really excellent info for everyone. “He is able who thinks he is able.” by Buddha.
Have you ever considered publishing an ebook or guest authoring on other sites? I have a blog based upon on the same topics you discuss and would really like to have you share some stories/information. I know my visitors would value your work. If you are even remotely interested, feel free to shoot me an e-mail.
I got what you intend, appreciate it for posting.Woh I am lucky to find this website through google.
Hiya, I’m really glad I’ve found this info. Today bloggers publish only about gossips and internet and this is actually irritating. A good site with exciting content, this is what I need. Thank you for keeping this website, I will be visiting it. Do you do newsletters? Can not find it.
Your home is valueble for me. Thanks!…
I conceive other website owners should take this website as an model, very clean and superb user genial pattern.
This is really interesting, You’re a very skilled blogger. I have joined your feed and look forward to seeking more of your magnificent post. Also, I have shared your web site in my social networks!
Yay google is my king aided me to find this great site! .
You made some respectable factors there. I seemed on the web for the issue and located most individuals will go together with with your website.
Does your blog have a contact page? I’m having a tough time locating it but, I’d like to send you an e-mail. I’ve got some ideas for your blog you might be interested in hearing. Either way, great site and I look forward to seeing it improve over time.
Just wanna input on few general things, The website layout is perfect, the articles is rattling fantastic : D.
It’s the best time to make some plans for the future and it’s time to be happy. I have read this post and if I could I wish to suggest you some interesting things or suggestions. Perhaps you can write next articles referring to this article. I desire to read even more things about it!
I liked up to you will receive carried out proper here. The caricature is attractive, your authored material stylish. nonetheless, you command get bought an edginess over that you wish be handing over the following. in poor health surely come more formerly again as precisely the similar just about very often inside case you protect this hike.
This web site is my inhalation, rattling great style and design and perfect subject matter.
Usually I don’t read article on blogs, but I would like to say that this write-up very forced me to try and do so! Your writing style has been surprised me. Thanks, very nice article.
Thanks for shares.
Heya i’m for the primary time here. I came across this board and I find It really helpful & it helped me out a lot. I’m hoping to give one thing again and aid others like you aided me.
Thanks for shares.
wonderful post, very informative. I wonder why the other experts of this sector don’t notice this. You must continue your writing. I am confident, you’ve a huge readers’ base already!
I’d always want to be update on new content on this web site, saved to my bookmarks! .
Very interesting info!Perfect just what I was looking for!
I like this website very much, Its a rattling nice post to read and find info .
I’ve read some good stuff here. Certainly price bookmarking for revisiting. I wonder how a lot attempt you place to create such a great informative web site.
I got what you intend,saved to my bookmarks, very nice site.
You need to participate in a contest for top-of-the-line blogs on the web. I will recommend this website!
Perfectly indited subject matter, regards for selective information. “The last time I saw him he was walking down Lover’s Lane holding his own hand.” by Fred Allen.
Thanks for shares.
Can I just say what a relief to find someone who actually knows what theyre talking about on the internet. You definitely know how to bring an issue to light and make it important. More people need to read this and understand this side of the story. I cant believe youre not more popular because you definitely have the gift.
It’s perfect time to make some plans for the longer term and it is time to be happy. I have learn this post and if I may just I desire to suggest you some attention-grabbing things or advice. Maybe you could write next articles relating to this article. I want to read even more issues approximately it!
Can I just say what a relief to find someone who actually knows what theyre talking about on the internet. You definitely know how to bring an issue to light and make it important. More people need to read this and understand this side of the story. I cant believe youre not more popular because you definitely have the gift.
You got a very wonderful website, Gladiola I discovered it through yahoo.
I’ve been absent for some time, but now I remember why I used to love this web site. Thanks , I’ll try and check back more frequently. How frequently you update your site?
wonderful publish, very informative. I ponder why the other specialists of this sector don’t realize this. You must proceed your writing. I am sure, you have a great readers’ base already!
you have a great blog here! would you like to make some invite posts on my blog?
Thanks for helping out, great information. “You must do the things you think you cannot do.” by Eleanor Roosevelt.
Thanks for shares.
Good blog! I truly love how it is easy on my eyes and the data are well written. I am wondering how I could be notified whenever a new post has been made. I’ve subscribed to your feed which must do the trick! Have a nice day!
Thanks for share.
What’s up mates, pleasant article and pleasant urging commented at this place, I am really enjoying by these.|
Thank you for shares.
Hey, you used to write excellent, but the last few posts have been kinda boring?K I miss your super writings. Past several posts are just a little out of track! come on!
Excellent post. I was checking constantly this blog and I’m impressed! Extremely helpful information specifically the last part 🙂 I care for such info a lot. I was looking for this particular info for a long time. Thank you and good luck.|
whoah this blog is wonderful i love reading your posts. Keep up the good work! You know, many people are searching around for this information, you could help them greatly.
I’ve been surfing on-line greater than 3 hours nowadays, but I by no means discovered any attention-grabbing article like yours. It?¦s beautiful worth enough for me. Personally, if all website owners and bloggers made excellent content material as you did, the internet will be a lot more useful than ever before.
Hi, just required you to know I he added your site to my Google bookmarks due to your layout. But seriously, I believe your internet site has 1 in the freshest theme I??ve came across. It extremely helps make reading your blog significantly easier.
Thanks for shares.
best delta 8 gummies
What’s Going down i am new to this, I stumbled upon this I have discovered It positively useful and it has helped me out loads. I’m hoping to contribute & assist other users like its aided me. Good job.
I’ve recently started a web site, the information you offer on this site has helped me tremendously. Thank you for all of your time & work.
That is very interesting, You are a very skilled blogger. I have joined your rss feed and stay up for searching for more of your excellent post. Additionally, I have shared your website in my social networks!
Thanks for shares.
An impressive share, I just given this onto a colleague who was doing a little analysis on this. And he in fact bought me breakfast because I found it for him.. smile. So let me reword that: Thnx for the treat! But yeah Thnkx for spending the time to discuss this, I feel strongly about it and love reading more on this topic. If possible, as you become expertise, would you mind updating your blog with more details? It is highly helpful for me. Big thumb up for this blog post!
Your style is so unique compared to many other people. Thank you for publishing when you have the opportunity,Guess I will just make this bookmarked.2
It’s a shame you don’t have a donate button! I’d certainly donate to this outstanding blog! I guess for now i’ll settle for book-marking and adding your RSS feed to my Google account. I look forward to new updates and will share this site with my Facebook group. Talk soon!
hello!,I love your writing so much! proportion we communicate extra about your article on AOL? I need an expert in this house to unravel my problem. Maybe that’s you! Taking a look ahead to peer you.
Very fantastic info can be found on web site.
yes lol okay
Can I simply say what a aid to find somebody who actually knows what theyre speaking about on the internet. You undoubtedly know how one can convey a difficulty to light and make it important. Extra people have to read this and perceive this aspect of the story. I cant imagine youre no more fashionable because you undoubtedly have the gift.
Hello your website is so good.
Hello. fantastic job. I did not imagine this. This is a excellent story. Thanks!
Good day! This is kind of off topic but I need some advice from an established blog. Is it very difficult to set up your own blog? I’m not very techincal but I can figure things out pretty fast. I’m thinking about setting up my own but I’m not sure where to start. Do you have any ideas or suggestions? Appreciate it
I enjoy what you guys are up too. This kind of clever work and reporting! Keep up the very good works guys I’ve included you guys to our blogroll.
Do you mind if I quote a few of your posts as long as I provide credit and sources back to your blog? My blog is in the exact same area of interest as yours and my users would certainly benefit from some of the information you provide here. Please let me know if this alright with you. Appreciate it!
Hello! I just would like to give a huge thumbs up for the great info you have here on this post. I will be coming back to your blog for more soon.
Mauris eget feugiat eros, vitae convallis massa.
That is, life insurance lawsuit personal injury cases, business litigation, motoring offences, divorce and personal injury and many more. Researcher Fiona Czerniawska identifies six reasons for seeking to trace the records of millions of dollars in fees, according to a 60-day extension.
great points altogether, you just gained a brand new reader. What would you recommend about your post that you made a few days ago? Any positive?
Howdy are using WordPress for your site platform? I’m new to the blog world but I’m trying to get started and set up my own. Do you require any html coding expertise to make your own blog? Any help would be greatly appreciated!
hello there and thank you for your info – I have definitely picked up anything new from right here. I did however expertise a few technical points using this site, as I experienced to reload the website a lot of times previous to I could get it to load correctly. I had been wondering if your hosting is OK? Not that I’m complaining, but slow loading instances times will often affect your placement in google and could damage your quality score if advertising and marketing with Adwords. Anyway I’m adding this RSS to my email and could look out for a lot more of your respective interesting content. Make sure you update this again soon..
Rattling excellent visual appeal on this internet site, I’d rate it 10 10.
I like this post, enjoyed this one regards for putting up.
Thank you for another fantastic article. Where else could anyone get that type of info in such an ideal way of writing? I have a presentation next week, and I am on the look for such information.
Thank you very much.
It’s hard to find knowledgeable people on this topic, but you sound like you know what you’re talking about! Thanks
I am now not positive where you’re getting your info, but good topic. I must spend a while finding out more or understanding more. Thanks for magnificent information I was in search of this info for my mission.
Thanks for shares.
You made some good points there. I looked on the internet for the subject and found most persons will agree with your website.
I do agree with all of the ideas you’ve presented in your post. They’re very convincing and will definitely work. Still, the posts are very short for starters. Could you please extend them a bit from next time? Thanks for the post.
Youre so cool! I dont suppose Ive read something like this before. So good to search out anyone with some unique ideas on this subject. realy thank you for beginning this up. this web site is something that is needed on the internet, someone with a little bit originality. useful job for bringing something new to the internet!
Fantastic web site. Lots of useful info here. I am sending it to several pals ans also sharing in delicious. And naturally, thanks on your effort!
I am impressed with this internet site, real I am a fan.
Appreciating the persistence you put into your website and in depth information you provide. It’s good to come across a blog every once in a while that isn’t the same old rehashed information. Fantastic read! I’ve saved your site and I’m including your RSS feeds to my Google account.
I am not sure where you’re getting your info, but good topic. I needs to spend some time learning much more or understanding more. Thanks for magnificent information I was looking for this information for my mission.
naturally like your website but you have to check the spelling on quite a few of your posts. Several of them are rife with spelling problems and I find it very bothersome to tell the truth nevertheless I’ll definitely come back again.
I really like your writing style, fantastic information, appreciate it for putting up : D.
Thanks for share.
Hey There. I found your weblog using msn. That is a really smartly written article. I will make sure to bookmark it and come back to read more of your helpful info. Thanks for the post. I’ll definitely comeback.
I appreciate, cause I found exactly what I was looking for. You have ended my four day long hunt! God Bless you man. Have a great day. Bye
What i don’t understood is in reality how you are no longer actually much more well-appreciated than you might be right now. You’re so intelligent. You already know therefore significantly with regards to this topic, made me in my view consider it from so many various angles. Its like men and women are not fascinated unless it?¦s one thing to do with Woman gaga! Your own stuffs great. All the time deal with it up!
Excellent post. I was checking constantly this
Extremely useful information specially the last part
care for such info much. I was seeking this particular information for a very long
time. Thank you
very nice put up, i certainly love this website, keep on it
Thanks for shares.
Hello.This post was really interesting, particularly because I was looking for thoughts on this subject last Monday.
I’m impressed, I must say. Really hardly ever do I encounter a blog that’s both educative and entertaining, and let me tell you, you have hit the nail on the head. Your concept is outstanding; the problem is something that not sufficient people are talking intelligently about. I’m very joyful that I stumbled throughout this in my search for something relating to this.
Awsome website! I am loving it!! Will be back later to read some more. I am bookmarking your feeds also
You could certainly see your skills in the work you write. The world hopes for even more passionate writers like you who are not afraid to say how they believe. Always follow your heart.
There is noticeably a bundle to know about this. I assume you made certain nice points in features also.
Hey there! I just wanted to ask if you ever have any problems with hackers? My last blog (wordpress) was hacked and I ended up losing months of hard work due to no back up. Do you have any solutions to stop hackers?
Your style is so unique compared to many other people. Thank you for publishing when you have the opportunity,Guess I will just make this bookmarked.2
The next time I read a blog, I hope that it doesnt disappoint me as much as this one. I mean, I know it was my choice to read, but I actually thought youd have something interesting to say. All I hear is a bunch of whining about something that you could fix if you werent too busy looking for attention.
Have you ever considered about adding a little bit more than just your articles? I mean, what you say is valuable and everything. However think about if you added some great photos or video clips to give your posts more, “pop”! Your content is excellent but with images and videos, this blog could definitely be one of the most beneficial in its niche. Wonderful blog!
Pretty nice post. I just stumbled upon your weblog and wanted to say that I’ve truly enjoyed surfing around your blog posts. In any case I will be subscribing to your feed and I hope you write again soon!
I genuinely enjoy reading on this internet site, it has got superb blog posts. “Something unpredictable but in the end it’s right, I hope you have the time of your life.” by Greenday.
Have you ever thought about creating an ebook or guest authoring on other blogs? I have a blog based upon on the same topics you discuss and would really like to have you share some stories/information. I know my subscribers would enjoy your work. If you are even remotely interested, feel free to shoot me an e mail.
I have been exploring for a little for any high-quality articles or blog posts on this sort of area . Exploring in Yahoo I eventually stumbled upon this web site. Reading this info So i am glad to express that I’ve an incredibly excellent uncanny feeling I came upon just what I needed. I such a lot without a doubt will make certain to do not overlook this website and give it a look regularly.
hi!,I like your writing very so much! proportion we keep in touch more approximately your article on AOL? I need an expert in this area to resolve my problem. May be that’s you! Looking forward to look you.
I like this website so much, saved to favorites. “To hold a pen is to be at war.” by Francois Marie Arouet Voltaire.
Outstanding post, you have pointed out some wonderful points, I as well conceive this s a very superb website.
I discovered your weblog site on google and test just a few of your early posts. Continue to keep up the very good operate. I simply extra up your RSS feed to my MSN Information Reader. In search of ahead to studying more from you in a while!…
Generally I don’t learn post on blogs, but I wish to say that this write-up very compelled me to take a look at and do it! Your writing style has been amazed me. Thanks, quite nice post.
When I originally commented I clicked the -Notify me when new comments are added- checkbox and now each time a comment is added I get 4 emails with the same comment. Is there any manner you’ll be able to take away me from that service? Thanks!
Best view i have ever seen !
Wow! Thank you! I permanently needed to write on my site something like that. Can I implement a part of your post to my website?
Fantastic web site. Plenty of useful information here. I’m sending it to a few friends ans also sharing in delicious. And obviously, thanks for your sweat!
Greetings! I’ve been following your weblog for a long time now and finally got the bravery to go ahead and give you a shout out from Kingwood Tx! Just wanted to mention keep up the excellent work!
Its like you read my mind! You appear to know so much about this, like you wrote the book in it or something. I think that you could do with a few pics to drive the message home a bit, but other than that, this is fantastic blog. An excellent read. I will definitely be back.
Hi there just wanted to give you a quick heads up and let you know a few of the pictures aren’t loading correctly. I’m not sure why but I think its a linking issue. I’ve tried it in two different web browsers and both show the same outcome.
Woah! I’m really loving the template/theme of this blog. It’s simple, yet effective. A lot of times it’s hard to get that “perfect balance” between user friendliness and visual appeal. I must say you’ve done a very good job with this. Also, the blog loads very quick for me on Safari. Outstanding Blog!
Great website. Lots of useful info here. I?¦m sending it to several buddies ans additionally sharing in delicious. And of course, thanks on your sweat!
Can I just say what a aid to find somebody who truly knows what theyre speaking about on the internet. You undoubtedly know methods to bring a problem to mild and make it important. Extra people must read this and perceive this side of the story. I cant believe youre no more fashionable because you positively have the gift.
I’m really inspired with your writing abilities and also with the layout on your blog. Is that this a paid theme or did you customize it yourself? Either way keep up the nice quality writing, it is uncommon to look a nice blog like this one today..
I like what you guys are up too. Such clever work and reporting! Keep up the excellent works guys I’ve incorporated you guys to my blogroll. I think it will improve the value of my site 🙂
I like this website so much, saved to fav. “Nostalgia isn’t what it used to be.” by Peter De Vries.
My wife and i ended up being joyous when Edward managed to conclude his researching out of the precious recommendations he gained while using the web page. It is now and again perplexing to simply choose to be releasing information and facts people today could have been making money from. And we all do understand we have got the blog owner to appreciate for that. The explanations you made, the straightforward website menu, the friendships you will aid to create – it’s got many wonderful, and it’s assisting our son and us imagine that that subject matter is amusing, which is certainly particularly pressing. Many thanks for the whole thing!
Hi, Neat post. There is a problem with your site in internet explorer, would test this… IE still is the market leader and a large portion of people will miss your great writing because of this problem.
Magnificent goods from you, man. I have understand your stuff previous to and you’re just too magnificent. I actually like what you have acquired here, really like what you’re saying and the way in which you say it. You make it entertaining and you still care for to keep it wise. I cant wait to read far more from you. This is actually a tremendous site.
Deference to article author, some fantastic selective information.
I’ve been exploring for a little for any high quality articles or blog posts on this kind of area . Exploring in Yahoo I at last stumbled upon this website. Reading this info So i’m happy to convey that I have a very good uncanny feeling I discovered exactly what I needed. I most certainly will make sure to do not forget this web site and give it a glance on a constant basis.
Those are yours alright! . We at least need to get these people stealing images to start blogging! They probably just did a image search and grabbed them. They look good though!
Way cool, some valid points! I appreciate you making this article available, the rest of the site is also high quality. Have a fun.
of course like your website however you have to check the spelling on quite a few of your posts. Many of them are rife with spelling problems and I find it very bothersome to inform the truth nevertheless I will definitely come back again.
It’s a pity you don’t have a donate button! I’d most certainly donate to this outstanding blog! I guess for now i’ll settle for bookmarking and adding your RSS feed to my Google account. I look forward to new updates and will share this website with my Facebook group. Talk soon!
I am often to running a blog and i really recognize your content. The article has actually peaks my interest. I’m going to bookmark your web site and maintain checking for brand new information.
Great blog here! Also your website loads up fast! What host are you using? Can I get your affiliate link to your host? I wish my website loaded up as fast as yours lol
I have learn a few good stuff here. Definitely worth bookmarking for revisiting. I wonder how a lot attempt you put to make the sort of wonderful informative site.
I have read a few good stuff here. Certainly worth bookmarking for revisiting. I surprise how much effort you put to make such a great informative site.
Valuable information. Lucky me I found your website by accident, and I’m shocked why this accident didn’t happened earlier! I bookmarked it.
I like this web site very much, Its a very nice post to read and incur info .
There is apparently a bundle to identify about this. I feel you made certain nice points in features also.
Hi, i feel that i noticed you visited my site so i got here to “go back the favor”.I’m attempting to in finding things to improve my web site!I guess its ok to make use of a few of your ideas!!
I am perpetually thought about this, appreciate it for posting.
I have been exploring for a little for any high quality articles or weblog posts in this kind of area . Exploring in Yahoo I ultimately stumbled upon this web site. Reading this info So i¦m satisfied to exhibit that I have a very excellent uncanny feeling I found out exactly what I needed. I so much indisputably will make certain to do not fail to remember this web site and give it a glance regularly.
Admiring the persistence you put into your blog and in depth information you offer. It’s awesome to come across a blog every once in a while that isn’t the same old rehashed material. Great read! I’ve saved your site and I’m including your RSS feeds to my Google account.
Thank you for the auspicious writeup. It in fact was a amusement account it. Look advanced to more added agreeable from you! By the way, how can we communicate?
of course like your web site but you have to check the spelling on several of your posts. Many of them are rife with spelling issues and I find it very troublesome to tell the truth nevertheless I’ll surely come back again.
Wow that was unusual. I just wrote an very long comment but after I clicked submit my comment didn’t show up. Grrrr… well I’m not writing all that over again. Anyways, just wanted to say excellent blog!
your cbd store delta 8
wonderful submit, very informative. I’m wondering why the other experts of this sector do not notice this. You must proceed your writing. I am confident, you’ve a huge readers’ base already!
Nice post. I was checking constantly this blog and I am impressed! Extremely helpful information specially the last part 🙂 I care for such information a lot. I was seeking this certain info for a long time. Thank you and best of luck.
There is evidently a bunch to identify about this. I assume you made certain nice points in features also.
Thanks , I’ve recently been searching for information about this subject for a while and yours is the greatest I have came upon so far. But, what in regards to the bottom line? Are you sure about the supply?
I’ve recently started a website, the info you provide on this site has helped me tremendously. Thanks for all of your time & work.
Heya i am for the primary time here. I found this board and I find It truly useful & it helped me out much. I’m hoping to provide something again and aid others such as you helped me.|
I’m not positive the place you’re getting your info, but good topic. I must spend a while finding out more or working out more. Thank you for great information I was looking for this info for my mission.
I am impressed with this web site, really I am a big fan .
Hi there! I simply want to give you a huge thumbs up for your excellent info you have got here on this post. I’ll be returning to your blog for more soon.|
Truly when someone doesn’t know after that its up to other visitors that they will help, so here it takes place.|
Great website you have here but I was wondering if you knew of any forums that cover the same topics talked about in this article? I’d really love to be a part of community where I can get advice from other knowledgeable individuals that share the same interest. If you have any recommendations, please let me know. Cheers!
I believe this internet site has got some real wonderful information for everyone :D. “Years wrinkle the skin, but to give up enthusiasm wrinkles the soul.” by Samuel Ullman.
As a Newbie, I am always browsing online for articles that can aid me. Thank you
hey there and thanks on your info – I have definitely picked up anything new from right here. I did alternatively expertise several technical issues using this website, as I experienced to reload the web site many times previous to I may just get it to load properly. I were pondering in case your web hosting is OK? Now not that I’m complaining, but sluggish loading circumstances occasions will sometimes affect your placement in google and could injury your quality rating if ads and ***********|advertising|advertising|advertising and *********** with Adwords. Anyway I am adding this RSS to my e-mail and could look out for a lot more of your respective fascinating content. Ensure that you replace this once more soon..
As a Newbie, I am continuously exploring online for articles that can aid me. Thank you
I’m impressed, I must say. Really hardly ever do I encounter a blog that’s both educative and entertaining, and let me inform you, you’ve hit the nail on the head. Your idea is outstanding; the issue is one thing that not sufficient people are speaking intelligently about. I am very happy that I stumbled throughout this in my search for something referring to this.
You made some first rate points there. I regarded on the internet for the problem and located most people will go together with with your website.
Sweet internet site, super layout, really clean and use friendly.
I think this is among the most significant information for me. And i am glad reading your article. But want to remark on some general things, The web site style is perfect, the articles is really great : D. Good job, cheers
You should take part in a contest for among the best blogs on the web. I’ll suggest this site!
Hi , I do believe this is an excellent blog. I stumbled upon it on Yahoo , i will come back once again. Money and freedom is the best way to change, may you be rich and help other people.
I genuinely enjoy reading on this site, it holds superb posts. “The living is a species of the dead and not a very attractive one.” by Friedrich Wilhelm Nietzsche.
Good info. Lucky me I reach on your website by accident, I bookmarked it.
Only a smiling visitant here to share the love (:, btw great style and design. “Competition is a painful thing, but it produces great results.” by Jerry Flint.
Awesome blog! Do you have any tips and hints for aspiring writers? I’m planning to start my own website soon but I’m a little lost on everything. Would you suggest starting with a free platform like WordPress or go for a paid option? There are so many options out there that I’m totally overwhelmed .. Any ideas? Thank you!
Wonderful work! This is the type of information that should be shared around the web. Shame on Google for not positioning this post higher! Come on over and visit my site . Thanks =)
Hello my loved one! I want to say that this article is amazing, nice written and include almost all vital infos. I would like to peer extra posts like this .
I think you have observed some very interesting details , appreciate it for the post.
Great goods from you, man. I have understand your stuff previous to and you’re just extremely magnificent. I actually like what you have acquired here, certainly like what you’re saying and the way in which you say it. You make it entertaining and you still take care of to keep it sensible. I can’t wait to read much more from you. This is actually a wonderful web site.
Dead pent subject material, appreciate it for selective information.
Would you be inquisitive about exchanging hyperlinks?
I got what you intend, thankyou for posting.Woh I am thankful to find this website through google. “Those who corrupt the public mind are just as evil as those who steal from the public.” by Theodor Wiesengrund Adorno.
I really like your writing style, excellent information, thankyou for putting up : D.
Thanks a bunch for sharing this with all folks you really understand what you are speaking approximately! Bookmarked. Please also discuss with my site =). We can have a link change agreement between us!
Hello! I just would like to give a huge thumbs up for the great info you have here on this post. I will be coming back to your blog for more soon.
There’s noticeably a bundle to find out about this. I assume you made sure nice points in options also.
thanks for shares
Great – I should certainly pronounce, impressed with your site. I had no trouble navigating through all the tabs as well as related info ended up being truly simple to do to access. I recently found what I hoped for before you know it at all. Reasonably unusual. Is likely to appreciate it for those who add forums or something, web site theme . a tones way for your customer to communicate. Nice task.
I see something really special in this web site.
It’s hard to find knowledgeable folks on this subject, however you sound like you understand what you’re talking about! Thanks
You are my aspiration, I possess few web logs and often run out from to brand.
Very interesting details you have noted, thankyou for posting. “What is harder than rock, or softer than water Yet soft water hollows out hard rock. Persevere.” by Ovid.
Thanks for shares
Thanks for the sensible critique. Me & my neighbor were just preparing to do some research on this. We got a grab a book from our area library but I think I learned more clear from this post. I am very glad to see such fantastic information being shared freely out there.
Just a smiling visitant here to share the love (:, btw outstanding design and style. “Treat the other man’s faith gently it is all he has to believe with.” by Athenus.
Oh my goodness! an amazing article dude. Thanks Nonetheless I’m experiencing situation with ur rss . Don’t know why Unable to subscribe to it. Is there anyone getting similar rss problem? Anyone who is aware of kindly respond. Thnkx
Thanks for sharing superb informations. Your site is so cool. I’m impressed by the details that you¦ve on this site. It reveals how nicely you perceive this subject. Bookmarked this website page, will come back for more articles. You, my friend, ROCK! I found just the information I already searched all over the place and just could not come across. What an ideal web site.
Great post. I am facing a couple of these problems.
I precisely had to appreciate you once again. I am not sure what I could possibly have worked on without the entire pointers revealed by you over that industry. It was actually a real intimidating circumstance for me personally, but observing a new skilled tactic you dealt with that took me to cry for happiness. I am grateful for the work as well as trust you really know what a great job that you’re getting into instructing most people all through your blog post. I am certain you haven’t got to know any of us.
Everyone loves what you guys tend to be up too. This kind of clever work and exposure! Keep up the amazing works guys I’ve incorporated you guys to blogroll.
I found your blog site on google and examine just a few of your early posts. Continue to keep up the superb operate. I simply additional up your RSS feed to my MSN Information Reader. Searching for forward to studying more from you later on!…
Thanks for share
I see something really interesting about your web site so I saved to my bookmarks.
Please let me know if you’re looking for a writer for your blog. You have some really great posts and I feel I would be a good asset. If you ever want to take some of the load off, I’d love to write some material for your blog in exchange for a link back to mine. Please send me an email if interested. Many thanks!
Im not certain where you’re getting your information, but good topic. I needs to spend a while learning more or working out more. Thanks for magnificent info I was on the lookout for this information for my mission.
Thanks for share.
Wonderful work! This is the type of info that should be shared around the web. Shame on Google for not positioning this post higher! Come on over and visit my site . Thanks =)
Hello. magnificent job. I did not expect this. This is a splendid story. Thanks!
Nice post. I be taught one thing more difficult on different blogs everyday. It’s going to at all times be stimulating to learn content from different writers and practice a bit of something from their store. I’d favor to make use of some with the content material on my weblog whether or not you don’t mind. Natually I’ll provide you with a hyperlink on your net blog. Thanks for sharing.
I’m not sure where you’re getting your info, but great topic. I must spend some time learning more or working out more. Thank you for fantastic info I was on the lookout for this info for my mission.
I am very happy to read this. This is the type of manual that needs to be given and not the accidental misinformation that’s at the other blogs. Appreciate your sharing this greatest doc.
This web site is really a walk-through for all of the info you wanted about this and didn’t know who to ask. Glimpse here, and you’ll definitely discover it.
Hi there I am so grateful I found your weblog, I really found you by accident, while I was researching on Bing for something else, Nonetheless I am here now and would just like to say cheers for a tremendous post and a all round thrilling blog (I also love the theme/design), I don’t have time to go through it all at the moment but I have book-marked it and also added your RSS feeds, so when I have time I will be back to read more, Please do keep up the awesome work.
Hello very cool blog!! Guy .. Excellent .. Wonderful .. I’ll bookmark your site and take the feeds alsoKI’m satisfied to search out a lot of useful info here in the post, we’d like develop extra strategies on this regard, thanks for sharing. . . . . .
Thank you.
Very interesting points you have mentioned, appreciate it for posting.
Greetings! Very helpful advice on this article! It is the little changes that make the biggest changes. Thanks a lot for sharing!
I get pleasure from, lead to I found just what I used to be taking a look for. You have ended my four day long hunt! God Bless you man. Have a nice day. Bye
I was reading some of your blog posts on this site and I conceive this web site is really instructive! Keep on posting.
This is the right blog for anyone who wants to find out about this topic. You realize so much its almost hard to argue with you (not that I actually would want…HaHa). You definitely put a new spin on a topic thats been written about for years. Great stuff, just great!
Generally I don’t read post on blogs, but I wish to say that this write-up very forced me to try and do so! Your writing style has been amazed me. Thanks, quite nice post.
mgfmail.ru
Thanks for shares
I really like gathering utile information , this post has got me even more info! .
Really enjoyed this update, is there any way I can get an alert email every time you make a new article?
This website online is known as a stroll-by way of for all of the information you wanted about this and didn’t know who to ask. Glimpse right here, and also you’ll positively discover it.
Hey there! Do you use Twitter? I’d like to follow you if that would be ok. I’m absolutely enjoying your blog and look forward to new posts.
I’ve been exploring for a little for any high-quality articles or weblog posts in this kind of area . Exploring in Yahoo I at last stumbled upon this web site. Reading this information So i am satisfied to show that I have an incredibly good uncanny feeling I discovered just what I needed. I such a lot undoubtedly will make certain to don’t overlook this site and give it a glance regularly.
I think you have mentioned some very interesting details , appreciate it for the post.
I have not checked in here for a while because I thought it was getting boring, but the last several posts are great quality so I guess I will add you back to my daily bloglist. You deserve it my friend 🙂
Thanks for shares
Very good written post. It will be useful to anyone who utilizes it, including yours truly :). Keep doing what you are doing – for sure i will check out more posts.
I am really enjoying the theme/design of your website. Do you ever run into any internet browser compatibility problems? A couple of my blog readers have complained about my site not working correctly in Explorer but looks great in Safari. Do you have any suggestions to help fix this issue?
For more pest control articles like this visit https://www.pestshieldservices.com/
Simply want to say your article is as astonishing. The clearness in your post is simply nice and i can assume you’re an expert on this subject. Well with your permission let me to grab your feed to keep up to date with forthcoming post. Thanks a million and please keep up the gratifying work.
Howdy great website! Does running a blog similar to this take a large amount of work? I have very little understanding of programming but I had been hoping to start my own blog soon. Anyways, should you have any suggestions or tips for new blog owners please share. I understand this is off topic nevertheless I just needed to ask. Thanks a lot!|
The next time I read a blog, I hope that it doesnt disappoint me as much as this one. I mean, I know it was my choice to read, but I actually thought youd have something interesting to say. All I hear is a bunch of whining about something that you could fix if you werent too busy looking for attention.
I have not checked in here for some time because I thought it was getting boring, but the last few posts are good quality so I guess I will add you back to my everyday bloglist. You deserve it my friend 🙂
Great beat ! I would like to apprentice while you amend your website, how could i subscribe for a blog website? The account helped me a applicable deal. I have been a little bit familiar of this your broadcast offered shiny transparent idea
It is in reality a great and useful piece of information. I am happy that you shared this useful information with us. Please keep us up to date like this. Thanks for sharing.
Some truly nice and useful info on this site, likewise I think the design and style has got great features.
What i don’t realize is actually how you’re not really much more well-liked than you might be right now. You are very intelligent. You realize thus significantly relating to this subject, made me personally consider it from so many varied angles. Its like men and women aren’t fascinated unless it’s one thing to do with Lady gaga! Your own stuffs nice. Always maintain it up!
batmanapollo.ru
You made some decent points there. I looked on the internet for the subject matter and found most guys will agree with your site.
yes sir
My wife and i got quite peaceful that Louis managed to finish off his survey from the precious recommendations he got out of your blog. It is now and again perplexing to just possibly be handing out methods which usually most people might have been trying to sell. So we recognize we have you to thank for this. All the illustrations you have made, the easy blog navigation, the friendships you will make it easier to engender – it is all sensational, and it’s facilitating our son and the family consider that the situation is excellent, which is particularly serious. Thank you for the whole thing!
Regards for helping out, excellent information. “In case of dissension, never dare to judge till you’ve heard the other side.” by Euripides.
What i do not understood is actually how you are not really much more well-liked than you might be right now. You’re very intelligent. You realize thus significantly relating to this subject, produced me personally consider it from a lot of varied angles. Its like women and men aren’t fascinated unless it is one thing to accomplish with Lady gaga! Your own stuffs excellent. Always maintain it up!
mgfmail.ru
This really answered my problem, thank you!
Woh I like your blog posts, bookmarked! .
Wonderful work! This is the type of information that should be shared around the web. Shame on the search engines for not positioning this post higher! Come on over and visit my site . Thanks =)
Thanks for every other great article. The place else may just anyone get that type of information in such an ideal means of writing? I have a presentation next week, and I am at the look for such info.
Pretty! This was a really wonderful article. Many thanks for supplying these details.|
Best Google News Blog
I have been exploring for a little bit for any high quality articles or weblog posts in this kind of space . Exploring in Yahoo I at last stumbled upon this site. Studying this info So i am glad to show that I’ve a very just right uncanny feeling I discovered exactly what I needed. I such a lot indubitably will make certain to don¦t fail to remember this web site and provides it a look regularly.
Thank you for sharing superb informations. Your site is so cool. I’m impressed by the details that you have on this website. It reveals how nicely you perceive this subject. Bookmarked this website page, will come back for extra articles. You, my friend, ROCK! I found just the information I already searched everywhere and simply couldn’t come across. What a perfect site.
You actually make it appear really easy along with your presentation but I find this matter to be really one thing which I believe I’d never understand. It sort of feels too complicated and extremely wide for me. I am having a look ahead on your subsequent submit, I will try to get the cling of it!
An impressive share, I just given this onto a colleague who was doing a little analysis on this. And he in fact bought me breakfast because I found it for him.. smile. So let me reword that: Thnx for the treat! But yeah Thnkx for spending the time to discuss this, I feel strongly about it and love reading more on this topic. If possible, as you become expertise, would you mind updating your blog with more details? It is highly helpful for me. Big thumb up for this blog post!
Shit website
Также барьерный элемент системы ОЗДС может быть установлен на лестницах, эскалаторах, лифтах, мостах и других элементах инфраструктуры, где необходим контроль движения людей. Наконец, барьерный элемент системы ОЗДС может быть установлен в любом месте, где требуется ограничение доступа и контроль движения людей, в том числе на технических площадках, в зонах складирования, производственных участках, на улицах города и прочих местах.
Demek paramı alır banlarsınız beni
I have read several just right stuff here. Definitely price bookmarking for revisiting. I surprise how a lot effort you place to make one of these great informative website.
Lovely just what I was looking for.Thanks to the author for taking his clock time on this one.
This blog is definitely rather handy since I’m at the moment creating an internet floral website – although I am only starting out therefore it’s really fairly small, nothing like this site. Can link to a few of the posts here as they are quite. Thanks much. Zoey Olsen
I do not even know how I stopped up here, however I believed this submit was once great. I do not recognise who you’re however definitely you’re going to a well-known blogger when you aren’t already 😉 Cheers!
Yesterday, while I was at work, my sister stole my iPad and tested to see if it can survive a 40 foot drop, just so she can be a youtube sensation. My apple ipad is now broken and she has 83 views. I know this is entirely off topic but I had to share it with someone!
You have brought up a very good details, thankyou for the post.
Everything is very open and very clear explanation of issues. was truly information. Your website is very useful. Thanks for sharing.
Excellent read, I just passed this onto a friend who was doing a little research on that. And he just bought me lunch because I found it for him smile Thus let me rephrase that: Thanks for lunch! “For most of history, Anonymous was a woman.” by Virginia Woolf.
Hello! I just wanted to ask if you ever have any problems with hackers? My last blog (wordpress) was hacked and I ended up losing many months of hard work due to no back up. Do you have any solutions to protect against hackers?
I have been exploring for a little for any high quality articles or blog posts on this sort of house . Exploring in Yahoo I eventually stumbled upon this site. Studying this info So i’m happy to convey that I’ve a very good uncanny feeling I came upon exactly what I needed. I so much unquestionably will make sure to don’t fail to remember this web site and give it a look regularly.
Loving the information on this internet site, you have done outstanding job on the content.
Your style is so unique compared to many other people. Thank you for publishing when you have the opportunity,Guess I will just make this bookmarked.2
My brother recommended I would possibly like this website. He was totally right. This submit truly made my day. You can not consider simply how a lot time I had spent for this information! Thanks!
you have a great blog here! would you like to make some invite posts on my blog?
I like what you guys are up too. Such clever work and reporting! Keep up the superb works guys I’ve incorporated you guys to my blogroll. I think it’ll improve the value of my site 🙂
Recommendition for pest control in Romford visit https://bugwisepestcontrol.co.uk/pest-control-in-romford/
I am not rattling good with English but I find this real easy to translate.
This is a topic close to my heart cheers, where are your contact details though?
I’m not sure where you’re getting your info, but great topic. I needs to spend some time learning much more or understanding more. Thanks for great information I was looking for this info for my mission.
I enjoy your writing style genuinely loving this internet site.
I like this internet site because so much utile material on here : D.
There is definately a lot to find out about this topic. I like all of the points you’ve made.
Regards for helping out, great info. “Riches cover a multitude of woes.” by Menander.
Loving the information on this website , you have done great job on the blog posts.
I do enjoy the manner in which you have framed this concern and it does present us some fodder for thought. On the other hand, because of what I have experienced, I really trust as the actual responses pack on that people today continue to be on point and not start upon a soap box regarding some other news of the day. All the same, thank you for this exceptional piece and though I do not concur with it in totality, I respect your viewpoint.
I real pleased to find this web site on bing, just what I was looking for : D as well saved to fav.
This internet site is my inspiration , very excellent style and perfect subject material.
It’s appropriate time to make some plans for the long run and it’s time to be happy. I have learn this submit and if I may I wish to recommend you few attention-grabbing things or advice. Perhaps you can write next articles regarding this article. I wish to learn even more issues about it!
Excellent blog here! Additionally your website loads up very fast! What web host are you using? Can I get your associate link to your host? I want my web site loaded up as quickly as yours lol
I will right away take hold of your rss feed as I can’t in finding your email subscription link or e-newsletter service. Do you have any? Please let me realize in order that I may subscribe. Thanks.
You made some good points there. I looked on the internet for the subject and found most individuals will approve with your site.
Keep up the superb work, I read few blog posts on this internet site and I believe that your weblog is real interesting and contains circles of fantastic information.
We’re a group of volunteers and starting a new scheme in our community. Your site provided us with valuable information to work on. You’ve done a formidable job and our entire community will be grateful to you.
I have been examinating out a few of your articles and it’s nice stuff. I will surely bookmark your website.
Very interesting points you have noted, appreciate it for putting up.
Well I sincerely enjoyed reading it. This post provided by you is very constructive for correct planning.
Regards for helping out, superb info .
พนันบอลออนไลน์ ได้เงินจริง กับเว็บบอลที่ดีเยี่ยมที่สุดอันดับ 1 การเล่นพนัน ที่เยี่ยมที่สุด ในยุคนี้ พนันบอลออนไลน์ ได้เงินจริง เป็นการลงทุน ที่ง่ายดายๆเข้าเดิมพันได้ในระบบออนไลน์ รองรับทุกแพรตฟร์อม ทั้ง บนโทรศัพท์เคลื่อนที่ หรือ จะ บนคอมพิวเตอร์ รองรับ ทั้งยังระบบ แอนดรอยด์ รวมทั้ง ระบบ IOS ได้ แบบที่คล่องแคล่วที่สุด แทงบอล ไม่มีขั้นต่ำ ได้กำไรได้แบบงามๆไม่ต้องวิตกกังวล เรื่องทุนน้อย ด้วยเหตุว่าเว็บ UFAALLIN เปิดโอกาสดีๆมากไม่น้อยเลยทีเดียว จากโปรดีๆให้นักการพนันทุกคน ได้พนันออนไลน์ ได้แบบบันเทิงใจ มากที่สุด.
Hi there, I found your site via Google while looking for a related topic, your site came up, it looks good. I’ve bookmarked it in my google bookmarks.
I really appreciate this post. I have been looking everywhere for this! Thank goodness I found it on Bing. You’ve made my day! Thank you again!
Heya i’m for the primary time here. I found this board and I in finding It really helpful & it helped me out much. I’m hoping to offer something again and help others like you helped me.
I got what you intend,saved to bookmarks, very decent web site.
Good day! Would you mind if I share your blog with my zynga group? There’s a lot of people that I think would really enjoy your content. Please let me know. Thanks
I loved as much as you’ll receive carried out right here. The sketch is attractive, your authored subject matter stylish. nonetheless, you command get got an impatience over that you wish be delivering the following. unwell unquestionably come more formerly again since exactly the same nearly very often inside case you shield this increase.
The next time I read a weblog, I hope that it doesnt disappoint me as much as this one. I mean, I do know it was my option to learn, but I truly thought youd have something fascinating to say. All I hear is a bunch of whining about something that you might repair should you werent too busy looking for attention.
Hello, I think your site might be having browser compatibility issues. When I look at your blog in Opera, it looks fine but when opening in Internet Explorer, it has some overlapping. I just wanted to give you a quick heads up! Other then that, great blog!
I would like to thnkx for the efforts you have put in writing this web site. I’m hoping the same high-grade web site post from you in the upcoming as well. In fact your creative writing skills has encouraged me to get my own blog now. Really the blogging is spreading its wings rapidly. Your write up is a great example of it.
Hello. impressive job. I did not anticipate this. This is a impressive story. Thanks!
Very interesting subject, thanks for putting up. “The season of failure is the best time for sowing the seeds of success.” by Paramahansa Yogananda.
Excellent web site. A lot of helpful info here. I am sending it to several friends ans additionally sharing in delicious. And of course, thank you on your effort!
I precisely had to appreciate you once again. I’m not certain the things I would have created in the absence of the actual opinions shared by you over that situation. Certainly was a very frightful situation in my circumstances, however , being able to view the specialised approach you managed that took me to weep over delight. I’m thankful for the advice and thus expect you comprehend what an amazing job you are always carrying out educating people by way of your blog post. More than likely you have never come across any of us.
Thanks for share.
Good day very cool website!! Man .. Beautiful .. Amazing .. I’ll bookmark your site and take the feeds additionally…I’m glad to search out numerous useful info right here within the submit, we need develop more strategies on this regard, thank you for sharing. . . . . .
I am extremely impressed with your writing skills and also with the layout to your weblog. Is this a paid subject or did you modify it yourself? Anyway stay up the excellent high quality writing, it’s rare to look a great weblog like this one these days..
I would like to thnkx for the efforts you have put in writing this web site. I’m hoping the same high-grade blog post from you in the upcoming as well. In fact your creative writing skills has inspired me to get my own blog now. Really the blogging is spreading its wings rapidly. Your write up is a good example of it.
Perfectly composed articles, appreciate it for selective information.
Thanks for shares.
Heya i am for the first time here. I found this board and I find It really useful & it helped me out much. I hope to give something back and help others like you aided me.
Keep working ,great job!
Do you have a spam problem on this website; I also am a blogger, and I was wanting to know your situation; many of us have created some nice methods and we are looking to swap techniques with others, be sure to shoot me an e-mail if interested.
I like the valuable information you provide in your articles. I will bookmark your weblog and check again here frequently. I am quite sure I will learn many new stuff right here! Best of luck for the next!
На все сто бесплатная доска объявлений. Очень удобная. Минимум модерации. Можно ставить ссылки прямо в тексте. доска объявлений
It’s actually a cool and helpful piece of information. I’m happy that you just shared this helpful information with us. Please keep us informed like this. Thanks for sharing.
Great info and straight to the point. I don’t know if this is actually the best place to ask but do you folks have any thoughts on where to hire some professional writers? Thanks in advance 🙂
Российская бесплатная доска объявлений. Очень простая. Минимум модерации. Можно ставить ссылки прямо в тексте. бесплатная доска объявлений
I really appreciate this post. I have been looking everywhere for this! Thank goodness I found it on Bing. You have made my day! Thank you again
I’m impressed, I need to say. Really not often do I encounter a blog that’s both educative and entertaining, and let me let you know, you may have hit the nail on the head. Your concept is excellent; the difficulty is one thing that not sufficient individuals are speaking intelligently about. I am very joyful that I stumbled across this in my search for something relating to this.
Nice post. I learn something more challenging on different blogs everyday. It will always be stimulating to read content from other writers and practice a little something from their store. I’d prefer to use some with the content on my blog whether you don’t mind. Natually I’ll give you a link on your web blog. Thanks for sharing.
You’re so interesting! I don’t think I have read through anything like this before. So nice to discover someone with some original thoughts on this subject matter. Seriously.. thanks for starting this up. This web site is something that is required on the web, someone with a bit of originality!
I think this web site has some very excellent information for everyone. “Je veux que les paysans mettent la poule au pot tous les dimanches.” by King Henry IV of France.
You are my breathing in, I have few blogs and infrequently run out from to post .
I like this post, enjoyed this one appreciate it for posting.
Thank you for helping out, fantastic information. “If you would convince a man that he does wrong, do right. Men will believe what they see.” by Henry David Thoreau.
Ваш магазин – находка для тех, кто ищет надежное промышленное оборудование. Здесь можно найти все, что нужно для создания современной коммуникационной и безопасностной инфраструктуры. Очень рекомендую!
I’m still learning from you, while I’m making my way to the top as well. I certainly liked reading all that is written on your site.Keep the stories coming. I loved it!
An impressive share, I just given this onto a colleague who was doing a little bit analysis on this. And he in fact purchased me breakfast because I found it for him.. smile. So let me reword that: Thnx for the treat! However yeah Thnkx for spending the time to debate this, I really feel strongly about it and love reading more on this topic. If attainable, as you turn out to be expertise, would you mind updating your blog with more details? It’s highly helpful for me. Large thumb up for this weblog submit!
Excellent website. Lots of helpful info here. I am sending it to a few buddies ans also sharing in delicious. And obviously, thank you to your effort!
Hello, Neat post. There is a problem with your site in web explorer, might test this… IE nonetheless is the market leader and a big section of other folks will omit your magnificent writing due to this problem.
obviously like your web-site however you have to test the spelling on quite a few of your posts. A number of them are rife with spelling problems and I in finding it very troublesome to inform the reality nevertheless I?¦ll surely come again again.
Thank you for the sensible critique. Me and my neighbor were just preparing to do a little research about this. We got a grab a book from our local library but I think I learned more clear from this post. I am very glad to see such great info being shared freely out there.
I would like to thank you for the efforts you’ve put in writing this website. I really hope to see the same high-grade content by you in the future as well. In fact, your creative writing abilities has inspired me to get my own, personal site now 😉
Hmm is anyone else experiencing problems with the images on this blog loading? I’m trying to determine if its a problem on my end or if it’s the blog. Any feedback would be greatly appreciated.
I have not checked in here for a while as I thought it was getting boring, but the last several posts are great quality so I guess I’ll add you back to my daily bloglist. You deserve it my friend 🙂
Hello! This is my first visit to your blog! We are a team of volunteers and starting a new project in a community in the same niche. Your blog provided us valuable information to work on. You have done a marvellous job!
You could definitely see your expertise in the work you write. The world hopes for more passionate writers like you who aren’t afraid to say how they believe. Always follow your heart.
My spouse and i ended up being really joyous Ervin could round up his research while using the ideas he made from your weblog. It is now and again perplexing to just happen to be handing out strategies the rest might have been trying to sell. And we take into account we now have the blog owner to thank because of that. The illustrations you’ve made, the easy web site navigation, the relationships you can assist to foster – it’s got many fantastic, and it’s helping our son and the family know that the content is satisfying, and that’s exceptionally pressing. Thank you for all!
Howdy! I simply would like to give an enormous thumbs up for the nice info you’ve got right here on this post. I will probably be coming again to your blog for more soon.
Hi there very cool site!! Man .. Beautiful .. Amazing .. I’ll bookmark your blog and take the feeds additionallyKI am happy to seek out so many useful info right here in the put up, we need develop more techniques in this regard, thanks for sharing. . . . . .
Love you
I’ve been exploring for a bit for any high quality articles or blog posts on this kind of area . Exploring in Yahoo I at last stumbled upon this web site. Reading this info So i’m happy to convey that I have an incredibly good uncanny feeling I discovered exactly what I needed. I most certainly will make certain to don’t forget this web site and give it a glance on a constant basis.
Hi, Neat post. There’s a problem with your web site in internet explorer, would test this… IE still is the market leader and a good portion of people will miss your magnificent writing because of this problem.
Thanks man
It is actually a great and useful piece of info. I am happy that you simply shared this helpful info with us. Please keep us up to date like this. Thanks for sharing.
Great info. Lucky me I ran across your website by chance (stumbleupon). I’ve saved as a favorite for later!
Fantastic web site. A lot of useful info here. I¦m sending it to several pals ans also sharing in delicious. And of course, thank you for your effort!
Hello.This post was really interesting, particularly because I was looking for thoughts on this topic last Saturday.
Thanks for this post, I am a big big fan of this internet site would like to go along updated.
I have been surfing on-line more than 3 hours nowadays, yet I by no means found any attention-grabbing article like yours. It is pretty value sufficient for me. In my opinion, if all webmasters and bloggers made good content material as you did, the web might be much more helpful than ever before.
You actually make it seem really easy along with your presentation however I in finding this matter to be really something that I feel I might by no means understand. It kind of feels too complicated and extremely vast for me. I am looking ahead on your subsequent publish, I will attempt to get the cling of it!
Pretty! This has been an extremely wonderful post. Thanks for supplying these details.
I do consider all the concepts you’ve introduced in your post. They are really convincing and can certainly work. Nonetheless, the posts are very brief for newbies. May just you please extend them a little from subsequent time? Thank you for the post.
I am glad to be a visitor of this perfect weblog! , thankyou for this rare info ! .
Nice post. I be taught something tougher on totally different blogs everyday. It would at all times be stimulating to read content from different writers and practice a bit one thing from their store. I’d want to use some with the content material on my blog whether you don’t mind. Natually I’ll provide you with a hyperlink on your net blog. Thanks for sharing.
Does your blog have a contact page? I’m having trouble locating it but, I’d like to send you an email. I’ve got some creative ideas for your blog you might be interested in hearing. Either way, great website and I look forward to seeing it develop over time.
You made some nice points there. I did a search on the subject matter and found most people will consent with your site.
I’d have to examine with you here. Which is not one thing I usually do! I take pleasure in reading a post that may make folks think. Additionally, thanks for permitting me to comment!
Thanks for the good writeup. It in reality was a leisure account it. Look advanced to more brought agreeable from you! By the way, how could we communicate?
I really appreciate this post. I?¦ve been looking all over for this! Thank goodness I found it on Bing. You’ve made my day! Thx again
I like this internet site because so much utile stuff on here : D.
I think you have observed some very interesting points, appreciate it for the post.
GALTRO XYZ Network:dibrav.com,rikmod.com,takpok.com,brikstok.com,redziv.com.
I am not sure where you are getting your info, however great topic. I needs to spend some time learning more or figuring out more. Thanks for magnificent info I used to be looking for this information for my mission.
Good ?V I should certainly pronounce, impressed with your web site. I had no trouble navigating through all tabs as well as related info ended up being truly easy to do to access. I recently found what I hoped for before you know it in the least. Reasonably unusual. Is likely to appreciate it for those who add forums or something, site theme . a tones way for your customer to communicate. Nice task..
I like this web blog its a master peace ! Glad I found this on google .
Great web site. A lot of useful info here. I’m sending it to some friends ans also sharing in delicious. And of course, thanks for your effort!
I enjoy your writing style truly enjoying this website .
Thanks for every other great article. Where else may just anyone get that type of information in such an ideal way of writing? I’ve a presentation next week, and I am on the search for such info.
Thanks for shares
I have been exploring for a little bit for any high quality articles or blog posts on this sort of area . Exploring in Yahoo I at last stumbled upon this site. Reading this information So i am happy to convey that I have an incredibly good uncanny feeling I discovered exactly what I needed. I most certainly will make certain to don’t forget this web site and give it a look regularly.
Simply wanna comment that you have a very nice web site, I like the design and style it really stands out.
I real happy to find this web site on bing, just what I was searching for : D as well saved to favorites.
It?¦s really a nice and helpful piece of info. I am satisfied that you simply shared this useful info with us. Please stay us up to date like this. Thanks for sharing.
Thanks for share.
крым 2023
Pretty! This was a really wonderful post. Thank you for your provided information.
Fantastic web site. Lots of useful info here. I’m sending it to some friends ans also sharing in delicious. And naturally, thanks for your sweat!
hi!,I like your writing so much! share we communicate more about your post on AOL? I require a specialist on this area to solve my problem. Maybe that’s you! Looking forward to see you.
เว็บ คาสิโนออนไลน์ ที่ยอดเยี่ยม ไม่เป็นอันตราย เชื่อถือได้ที่สุด คาสิโนออนไลน์ เป็นเว็บไซด์การเดิมพันออนไลน์ศูนย์รวมทุกสิ่งไว้ในเว็บเดียว ที่กำลังได้รับความนิยมรวมทั้งเป็นที่ชอบใจของผู้เล่น มีคุณภาพ ใช้กฎกติกาแบบสากลทันสมัย เป็น เว็บตรง ที่ไม่ผ่านเอเย่นต์ ไม่เป็นอันตรายรวมทั้งเชื่อถือได้ที่สุดการ ฝากถอนระบบออโต้ ไม่ยุ่งยาก ไม่ต้องรอนาน ดำเนินงานโดยคณะทำงานแล้วก็ Call Center ที่มีคุณภาพที่คอยบริการ ตลอด 24 ชั่วโมง.
Very efficiently written article. It will be beneficial to anyone who utilizes it, including me. Keep doing what you are doing – can’r wait to read more posts.
Some really interesting points you have written.Assisted me a lot, just what I was looking for : D.
Thanks you
Some truly interesting points you have written.Helped me a lot, just what I was looking for : D.
Thanks for helping out, superb info. “Hope is the denial of reality.” by Margaret Weis.
Great goods from you, man. I have understand your stuff previous to and you’re just extremely wonderful. I actually like what you’ve acquired here, certainly like what you’re stating and the way in which you say it. You make it entertaining and you still care for to keep it smart. I cant wait to read far more from you. This is actually a terrific website.
There is definately a great deal to find out about this subject. I like all of the points you have made.
I?¦ve read several good stuff here. Definitely price bookmarking for revisiting. I surprise how much attempt you set to make this sort of excellent informative web site.
You have mentioned very interesting details ! ps nice site.
There is certainly a lot to learn about this subject. I love all of the points you’ve made.
F*ckin¦ tremendous issues here. I¦m very glad to peer your post. Thank you a lot and i am having a look forward to touch you. Will you please drop me a mail?
You made a few good points there. I did a search on the subject matter and found nearly all people will consent with your blog.
Fantastic items from you, man. I’ve take note your stuff previous to and you are just extremely wonderful. I really like what you’ve bought here, certainly like what you’re stating and the way by which you assert it. You make it enjoyable and you still care for to keep it smart. I can’t wait to learn much more from you. This is actually a tremendous web site.
Thank you
Whoa! This blog looks exactly like my old one! It’s on a entirely different topic but it has pretty much the same page layout and design. Wonderful choice of colors!
I was very pleased to seek out this web-site.I wished to thanks in your time for this excellent read!! I positively having fun with each little little bit of it and I’ve you bookmarked to take a look at new stuff you weblog post.
Excellent website. A lot of useful info here. I am sending it to some buddies ans additionally sharing in delicious. And of course, thank you for your effort!
I view something genuinely interesting about your web site so I saved to fav.
thank you
I conceive you have remarked some very interesting points, thanks for the post.
I truly appreciate this post. I’ve been looking everywhere for this! Thank goodness I found it on Bing. You have made my day! Thanks again
Great site! I am loving it!! Will come back again. I am bookmarking your feeds also.
I am glad to be one of several visitants on this great web site (:, regards for putting up.
Hello, i think that i saw you visited my blog thus i came to “return the favor”.I am trying to find things to enhance my site!I suppose its ok to use some of your ideas!!
I like this web blog very much so much excellent information.
I am always invstigating online for posts that can aid me. Thanks!
Thankyou for this rattling post, I am glad I found this internet site on yahoo.
Good – I should definitely pronounce, impressed with your site. I had no trouble navigating through all tabs and related information ended up being truly simple to do to access. I recently found what I hoped for before you know it in the least. Quite unusual. Is likely to appreciate it for those who add forums or anything, web site theme . a tones way for your client to communicate. Nice task.
Thanks for another wonderful article. Where else could anyone get that kind of info in such a perfect way of writing? I have a presentation next week, and I am on the look for such information.
Fantastic goods from you, man. I have understand your stuff previous to and you are just too great. I actually like what you’ve acquired here, really like what you’re saying and the way in which you say it. You make it entertaining and you still care for to keep it sensible. I can’t wait to read far more from you. This is really a great site.
F*ckin’ awesome things here. I’m very glad to see your post. Thanks a lot and i’m looking forward to contact you. Will you kindly drop me a e-mail?
Thanks for share
I do agree with all the ideas you have introduced for your post. They are really convincing and can certainly work. Still, the posts are too brief for newbies. May you please prolong them a little from subsequent time? Thanks for the post.
Great wordpress blog here.. It’s hard to find quality writing like yours these days. I really appreciate people like you! take care
Have you ever thought about writing an ebook or guest authoring on other sites? I have a blog based on the same ideas you discuss and would love to have you share some stories/information. I know my subscribers would enjoy your work. If you are even remotely interested, feel free to send me an e-mail.
Nice blog! Is your theme custom made or did you download it from somewhere? A theme like yours with a few simple adjustements would really make my blog jump out. Please let me know where you got your theme. Kudos
Я впечатлен этой статьей! Она не только информативна, но и вдохновляющая. Мне понравился подход автора к обсуждению темы, и я узнал много нового. Огромное спасибо за такую интересную и полезную статью!
Thank you very much.
Hi! I’ve been following your web site for a long time now and finally got the courage to go ahead and give you a shout out from Huffman Tx! Just wanted to mention keep up the excellent job!
You are my inhalation, I have few blogs and infrequently run out from to post : (.
Magnificent website. Lots of useful info here. I am sending it to a few pals ans also sharing in delicious. And obviously, thanks for your sweat!
Perfectly composed subject material, thank you for selective information. “In the fight between you and the world, back the world.” by Frank Zappa.
Good write-up, I am normal visitor of one’s site, maintain up the nice operate, and It is going to be a regular visitor for a long time.
I precisely desired to say thanks again. I am not sure the things that I would’ve created without those strategies shown by you directly on that concern. It seemed to be the troublesome circumstance for me, but noticing a new skilled approach you treated the issue made me to leap for happiness. I’m just thankful for the service and even pray you recognize what a great job that you’re getting into training the others via your websites. More than likely you have never come across all of us.
Having read this I thought it was very informative. I appreciate you taking the time and effort to put this article together. I once again find myself spending way to much time both reading and commenting. But so what, it was still worth it!
naturally like your web site however you have to take a look at the spelling on several of your posts. A number of them are rife with spelling problems and I in finding it very bothersome to inform the reality then again I¦ll certainly come again again.
You have brought up a very excellent points, appreciate it for the post.
This blog is definitely rather handy since I’m at the moment creating an internet floral website – although I am only starting out therefore it’s really fairly small, nothing like this site. Can link to a few of the posts here as they are quite. Thanks much. Zoey Olsen
You actually make it seem really easy together with your presentation however I to find this topic to be really something that I think I might by no means understand. It kind of feels too complex and extremely vast for me. I’m looking forward in your subsequent post, I will attempt to get the hang of it!
It is perfect time to make some plans for the long run and it’s time to be happy. I’ve learn this post and if I may I desire to counsel you few interesting things or tips. Perhaps you can write subsequent articles referring to this article. I desire to learn even more issues about it!
Spot on with this write-up, I honestly feel this site needs far more attention. I’ll probably be returning to read through more, thanks for the information!
Hello would you mind letting me know which webhost you’re working with? I’ve loaded your blog in 3 different browsers and I must say this blog loads a lot faster then most. Can you suggest a good hosting provider at a fair price? Cheers, I appreciate it!
Way cool! Some very valid points! I appreciate you writing this post and the rest of the site is extremely good.
Nice post. I learn something more challenging on different blogs everyday. It will always be stimulating to read content from other writers and practice a little something from their store. I’d prefer to use some with the content on my blog whether you don’t mind. Natually I’ll give you a link on your web blog. Thanks for sharing.
Thank you very much.
I’m thoroughly impressed by the author’s ability to present complex data and statistics in a way that’s both informative and accessible. The visuals and graphics used in the article enhance the understanding of the topic. A job well done!
Hello my friend! I wish to say that this article is awesome, great written and include approximately all important infos. I would like to peer extra posts like this .
We stumbled over here different page and thought I might check things out. I like what I see so now i am following you. Look forward to exploring your web page repeatedly.
Hello there, just changed into alert to your weblog through Google, and found that it is really informative. I’m going to watch out for brussels. I will be grateful when you proceed this in future. A lot of folks will likely be benefited out of your writing. Cheers!
Thank you very much
Great blog! I am loving it!! Will come back again. I am bookmarking your feeds also.
I am glad to be a visitant of this arrant blog! , thanks for this rare information! .
Very interesting details you have observed, thankyou for putting up. “History is a cyclic poem written by Time upon the memories of man.” by Percy Bysshe Shelley.
You got a very superb website, Sword lily I noticed it through yahoo.
The next time I read a blog, I hope that it doesnt disappoint me as much as this one. I mean, I know it was my choice to read, but I actually thought youd have something interesting to say. All I hear is a bunch of whining about something that you could fix if you werent too busy looking for attention.
hello there and thanks in your info – I’ve certainly picked up anything new from right here. I did alternatively expertise several technical points the use of this site, since I experienced to reload the web site a lot of times prior to I may get it to load correctly. I have been pondering in case your web hosting is OK? Not that I am complaining, but sluggish loading circumstances occasions will often impact your placement in google and could damage your quality rating if advertising and ***********|advertising|advertising|advertising and *********** with Adwords. Well I am adding this RSS to my e-mail and could look out for a lot more of your respective exciting content. Make sure you update this again very soon..
F*ckin’ amazing things here. I am very satisfied to look your article. Thanks a lot and i’m taking a look forward to contact you. Will you please drop me a mail?
This website online can be a walk-via for all the information you wished about this and didn’t know who to ask. Glimpse here, and you’ll undoubtedly discover it.
Loving the information on this website , you have done great job on the posts.
Hello there, I found your site via Google while looking for a related topic, your site came up, it looks great. I’ve bookmarked it in my google bookmarks.
Some times its a pain in the ass to read what blog owners wrote but this internet site is rattling user friendly! .
Hi, just required you to know I he added your site to my Google bookmarks due to your layout. But seriously, I believe your internet site has 1 in the freshest theme I??ve came across. It extremely helps make reading your blog significantly easier.
I cherished up to you’ll obtain performed proper here. The cartoon is tasteful, your authored subject matter stylish. nevertheless, you command get got an edginess over that you would like be delivering the following. in poor health certainly come more until now once more as precisely the similar nearly very steadily inside of case you shield this hike.
Автор явно старается сохранить нейтральность и представить множество точек зрения на данную тему.
F*ckin¦ remarkable things here. I¦m very glad to look your article. Thanks a lot and i am taking a look forward to touch you. Will you please drop me a e-mail?
There is apparently a lot to identify about this. I think you made various nice points in features also.
It is really a great and helpful piece of information. I am glad that you shared this helpful info with us. Please keep us up to date like this. Thanks for sharing.
I have recently started a website, the information you offer on this web site has helped me tremendously. Thanks for all of your time & work.
I have to get across my love for your kind-heartedness supporting folks who must have help with your situation. Your very own dedication to passing the solution all through had become certainly good and have specifically helped many people just like me to reach their desired goals. Your warm and helpful help and advice indicates a whole lot a person like me and even further to my office colleagues. Thanks a ton; from everyone of us.
Hi there just wanted to give you a quick heads up. The text in your post seem to be running off the screen in Internet explorer. I’m not sure if this is a formatting issue or something to do with web browser compatibility but I thought I’d post to let you know. The design look great though! Hope you get the problem fixed soon. Cheers
naturally like your web-site however you have to take a look at the spelling on quite a few of your posts. Several of them are rife with spelling problems and I in finding it very bothersome to tell the truth however I will surely come back again.
I¦ve recently started a website, the info you offer on this site has helped me greatly. Thanks for all of your time & work.
thanks for shares.
I’d always want to be update on new content on this website , saved to my bookmarks! .
Very interesting details you have observed, thanks for putting up.
I get pleasure from, cause I found just what I used to be taking a look for. You’ve ended my 4 day long hunt! God Bless you man. Have a great day. Bye
I truly wanted to write a brief word to express gratitude to you for these fantastic hints you are giving out on this website. My rather long internet investigation has at the end been recognized with incredibly good ideas to write about with my classmates and friends. I would suppose that many of us readers actually are undeniably endowed to live in a perfect place with so many special professionals with beneficial hints. I feel pretty privileged to have used the web pages and look forward to plenty of more brilliant moments reading here. Thanks once again for everything.
I’m so glad I stumbled upon this article. It has expanded my knowledge and provided me with a deeper understanding of the subject. The author’s passion and enthusiasm are contagious, and it’s evident that they genuinely care about sharing valuable insights. A truly enlightening read!
Я хотел бы выразить признательность автору за его глубокое понимание темы и его способность представить информацию во всей ее полноте. Я по-настоящему насладился этой статьей и узнал много нового!
Well I really liked reading it. This article offered by you is very useful for proper planning.
I went over this web site and I conceive you have a lot of great information, saved to fav (:.
Very interesting topic, thanks for posting.
My programmer is trying to persuade me to move to .net from PHP. I have always disliked the idea because of the costs. But he’s tryiong none the less. I’ve been using Movable-type on numerous websites for about a year and am worried about switching to another platform. I have heard very good things about blogengine.net. Is there a way I can transfer all my wordpress content into it? Any help would be really appreciated!
This is very interesting, You’re a very skilled blogger. I have joined your rss feed and look forward to seeking more of your magnificent post. Also, I have shared your web site in my social networks!
Thanks for shares.
Yay google is my queen helped me to find this great web site! .
Hi there! This article couldn’t be written much better! Looking through this post reminds me of my previous roommate! He constantly kept talking about this. I’ll send this post to him. Pretty sure he will have a very good read. Thanks for sharing!
Hey there! Do you know if they make any plugins to safeguard against hackers? I’m kinda paranoid about losing everything I’ve worked hard on. Any suggestions?
I absolutely love your website.. Excellent colors & theme. Did you create this web site yourself? Please reply back as I’m attempting to create my own personal website and would like to find out where you got this from or just what the theme is named. Kudos!
visit website thank you
Great post. I will be experiencing some of these issues as well..
Very fantastic info can be found on web blog. “Life without a friend is death without a witness.” by Eugene Benge.
What i don’t realize is in fact how you’re now not actually a lot more neatly-preferred than you might be right now. You’re very intelligent. You already know thus significantly in relation to this subject, produced me in my view consider it from numerous various angles. Its like women and men are not involved unless it’s something to accomplish with Lady gaga! Your personal stuffs outstanding. Always handle it up!
Thanks for every other wonderful post. The place else could anyone get that type of info in such a perfect way of writing? I have a presentation subsequent week, and I am at the look for such info.
Wonderful blog! I found it while browsing on Yahoo News. Do you have any suggestions on how to get listed in Yahoo News? I’ve been trying for a while but I never seem to get there! Cheers
Im not certain where you are getting your info, but good topic. I needs to spend a while finding out much more or figuring out more. Thank you for wonderful information I was on the lookout for this info for my mission.
There are actually lots of details like that to take into consideration. That may be a great point to carry up. I offer the thoughts above as normal inspiration however clearly there are questions just like the one you bring up where an important thing will likely be working in trustworthy good faith. I don?t know if greatest practices have emerged around issues like that, but I’m positive that your job is clearly recognized as a fair game. Both girls and boys really feel the impact of only a moment’s pleasure, for the remainder of their lives.
You actually make it seem so easy along with your presentation but I to find this topic to be really one thing that I believe I would never understand. It seems too complicated and extremely wide for me. I am taking a look ahead to your subsequent post, I will try to get the dangle of it!
Great post, you have pointed out some superb points, I likewise believe this s a very good website.
You are my breathing in, I have few web logs and occasionally run out from to brand.
Thanks for shares
I will right away clutch your rss as I can’t in finding your e-mail subscription link or newsletter service. Do you’ve any? Please permit me realize in order that I could subscribe. Thanks.
Thanks for shares
When I originally commented I clicked the -Notify me when new comments are added- checkbox and now each time a comment is added I get four emails with the same comment. Is there any way you can remove me from that service? Thanks!
Very good written article. It will be helpful to everyone who utilizes it, as well as yours truly :). Keep doing what you are doing – can’r wait to read more posts.
Hi, I do believe this is an excellent site. I stumbledupon it 😉 I’m going to come back once again since i have bookmarked it. Money and freedom is the best way to change, may you be rich and continue to guide others.
That is really attention-grabbing, You are an overly skilled blogger. I have joined your rss feed and sit up for in quest of more of your wonderful post. Also, I have shared your site in my social networks!
Thanks for shares
Hi, I do think this is a great blog. I stumbledupon it 😉 I am going to revisit once again since i have saved as a favorite it. Money and freedom is the greatest way to change, may you be rich and continue to guide other people.
Together with every little thing that appears to be developing inside this particular subject matter, many of your points of view are very exciting. Even so, I appologize, but I can not subscribe to your whole theory, all be it refreshing none the less. It looks to everybody that your remarks are not entirely justified and in reality you are generally yourself not really fully convinced of the point. In any event I did take pleasure in looking at it.
Thanks for shares
I carry on listening to the rumor talk about receiving free online grant applications so I have been looking around for the finest site to get one. Could you tell me please, where could i acquire some?
What i do not realize is in fact how you’re now not really much more neatly-favored than you might be now. You are so intelligent. You already know therefore considerably on the subject of this topic, made me for my part believe it from a lot of numerous angles. Its like women and men are not involved unless it is something to do with Girl gaga! Your personal stuffs excellent. Always maintain it up!
I have been browsing on-line more than 3 hours these days, yet I never found any interesting article like yours. It’s pretty worth sufficient for me. Personally, if all web owners and bloggers made just right content as you probably did, the net will probably be much more useful than ever before. “We are not retreating – we are advancing in another Direction.” by Douglas MacArthur.
Thanks for shares
I think this is among the so much significant info for me. And i am satisfied reading your article. However wanna remark on some common issues, The website taste is wonderful, the articles is in point of fact nice : D. Excellent process, cheers
Wonderful site. Plenty of useful info here. I am sending it to some pals ans additionally sharing in delicious. And naturally, thank you for your sweat!
Some really nice and utilitarian info on this website, also I conceive the pattern has good features.
Thanks for shares
green roads delta 8 gummies
Your style is unique compared to other people I have read stuff from. Thank you for posting when you’ve got the opportunity, Guess I will just book mark this site.
F*ckin’ remarkable things here. I’m very glad to see your post. Thanks a lot and i’m looking forward to contact you. Will you kindly drop me a e-mail?
I wanted to develop a small word to be able to say thanks to you for some of the fabulous hints you are placing at this website. My considerable internet search has now been rewarded with wonderful know-how to go over with my relatives. I would believe that many of us visitors actually are very fortunate to exist in a useful community with so many outstanding professionals with very helpful principles. I feel really fortunate to have discovered the website and look forward to so many more amazing minutes reading here. Thank you again for a lot of things.
I haven¦t checked in here for some time since I thought it was getting boring, but the last few posts are great quality so I guess I will add you back to my daily bloglist. You deserve it my friend 🙂
When I originally left a comment I seem to have clicked on the -Notify me when new comments are added- checkbox and now each time a comment is added I recieve 4 emails with the exact same comment. Perhaps there is a way you are able to remove me from that service? Thank you!
Aplikasi ini memberikan kesempatan untuk membangun hubungan bisnis yang berharga. Saya bisa terhubung dengan mitra dan klien baru dan menghasilkan uang dari kolaborasi tersebut.
Wow! Thank you! I constantly wanted to write on my website something like that. Can I include a fragment of your post to my blog?
Hey! I just wanted to ask if you ever have any issues with hackers? My last blog (wordpress) was hacked and I ended up losing months of hard work due to no data backup. Do you have any methods to stop hackers?
It is appropriate time to make some plans for the future and it’s time to be happy. I have read this post and if I could I desire to suggest you few interesting things or advice. Perhaps you could write next articles referring to this article. I desire to read even more things about it!
As I website possessor I think the content material here is really good, thanks for your efforts.
This is the right blog for anyone who wants to find out about this topic. You realize so much its almost hard to argue with you (not that I actually would want…HaHa). You definitely put a new spin on a topic thats been written about for years. Great stuff, just great!
whoah this blog is magnificent i love reading your articles. Keep up the great work! You know, many people are looking around for this information, you could aid them greatly.
I’m incredibly impressed by the thoroughness of this article. It covers every aspect of the topic and leaves no question unanswered. The author’s dedication to providing accurate and up-to-date information is commendable. Well done!
Appreciate it for this post, I am a big big fan of this website would like to go on updated.
Its good as your other content : D, thanks for posting.
The author provides a clear roadmap for future research in the field.
I’ve been absent for a while, but now I remember why I used to love this web site. Thanks , I will try and check back more frequently. How frequently you update your web site?
I get pleasure from, cause I found just what I was having a look for. You’ve ended my 4 day lengthy hunt! God Bless you man. Have a nice day. Bye
I’m really impressed with your writing talents as smartly as with the format to your blog. Is that this a paid subject or did you customize it your self? Anyway keep up the excellent quality writing, it’s rare to look a nice weblog like this one nowadays..
You actually make it seem really easy together with your presentation however I find this topic to be actually one thing that I believe I’d by no means understand. It kind of feels too complicated and extremely wide for me. I am taking a look ahead in your next post, I¦ll try to get the hold of it!
I have read a few good stuff here. Certainly worth bookmarking for revisiting. I wonder how much effort you put to make such a fantastic informative site.
Absolutely composed written content, Really enjoyed reading.
I have recently started a website, the info you provide on this site has helped me tremendously. Thanks for all of your time & work. “If you would know strength and patience, welcome the company of trees.” by Hal Borland.
Awsome blog! I am loving it!! Will be back later to read some more. I am bookmarking your feeds also.
As soon as I found this internet site I went on reddit to share some of the love with them.
I discovered your weblog site on google and examine a few of your early posts. Continue to maintain up the superb operate. I simply extra up your RSS feed to my MSN News Reader. Looking for forward to studying extra from you afterward!…
I just like the valuable info you supply in your articles. I will bookmark your weblog and take a look at once more right here frequently. I’m quite sure I will learn many new stuff proper here! Good luck for the next!
Hello. excellent job. I did not imagine this. This is a fantastic story. Thanks!
That is the right weblog for anyone who wants to seek out out about this topic. You notice a lot its nearly laborious to argue with you (not that I actually would want…HaHa). You definitely put a new spin on a subject thats been written about for years. Nice stuff, simply nice!
Hello! I just would like to give a huge thumbs up for the great info you have here on this post. I will be coming back to your blog for more soon.
I found your blog web site on google and test a few of your early posts. Continue to maintain up the excellent operate. I just further up your RSS feed to my MSN Information Reader. Searching for ahead to studying extra from you later on!…
Thanks for sharing excellent informations. Your web site is so cool. I’m impressed by the details that you have on this blog. It reveals how nicely you perceive this subject. Bookmarked this web page, will come back for extra articles. You, my friend, ROCK! I found just the information I already searched all over the place and just could not come across. What an ideal site.
It’s really a nice and useful piece of information. I’m glad that you shared this useful information with us. Please keep us up to date like this. Thank you for sharing.
Heya i am for the primary time here. I found this board and I find It truly useful & it helped me out much. I am hoping to present one thing again and aid others like you helped me.
Hello my family member! I want to say that this post is amazing, nice written and include almost all vital infos. I’d like to peer extra posts like this .
Can I simply say what a aid to seek out somebody who truly is aware of what theyre speaking about on the internet. You definitely know tips on how to carry an issue to gentle and make it important. More people need to learn this and understand this facet of the story. I cant believe youre no more widespread because you undoubtedly have the gift.
Way cool, some valid points! I appreciate you making this article available, the rest of the site is also high quality. Have a fun.
Some genuinely fantastic information, Glad I observed this. “We protest against unjust criticism, but we accept unearned applause.” by Jose Narosky.
hello there and thank you for your info – I’ve definitely picked up anything new from right here. I did however expertise several technical points using this website, since I experienced to reload the web site many times previous to I could get it to load correctly. I had been wondering if your hosting is OK? Not that I’m complaining, but slow loading instances times will often affect your placement in google and can damage your high quality score if ads and marketing with Adwords. Anyway I’m adding this RSS to my e-mail and can look out for much more of your respective fascinating content. Ensure that you update this again very soon..
You made some decent factors there. I seemed on the web for the difficulty and located most people will go together with with your website.
Spot on with this write-up, I actually assume this web site wants far more consideration. I’ll most likely be again to read way more, thanks for that info.
I have been surfing on-line greater than 3 hours nowadays, but I never found any interesting article like yours. It?¦s beautiful worth enough for me. In my view, if all webmasters and bloggers made excellent content as you probably did, the web shall be a lot more useful than ever before.
After I initially left a comment I seem to have clicked the -Notify me when new comments are added- checkbox and from now on whenever a comment is added I recieve four emails with the same comment. There has to be an easy method you can remove me from that service? Thanks a lot!
I’m impressed, I must say. Actually not often do I encounter a weblog that’s both educative and entertaining, and let me let you know, you could have hit the nail on the head. Your thought is excellent; the difficulty is one thing that not sufficient people are talking intelligently about. I am very completely happy that I stumbled across this in my seek for one thing referring to this.
I am glad to be a visitant of this unadulterated site! , regards for this rare information! .
Wow, wonderful weblog layout! How long have you ever been running a blog for? you make running a blog look easy. The entire glance of your website is wonderful, let alone the content!
I view something really special in this web site.
Lastly, I have actually found the info that I was seeking. Thanks for creating this insightful article. It has actually made my study go a lot more smoothly. I know that will certainly feel similarly as well as do strategy to share your blog post with others.
An outstanding share! I have just forwarded this onto a coworker who has been conducting a little homework on this. And he in fact bought me breakfast because I stumbled upon it for him… lol. So let me reword this…. Thank YOU for the meal!! But yeah, thanx for spending time to discuss this topic here on your blog.
Hey! Quick question that’s completely off topic. Do you know how to make your site mobile friendly? My website looks weird when viewing from my iphone4. I’m trying to find a template or plugin that might be able to resolve this problem. If you have any recommendations, please share. Thanks!
watermelon delta 8 cartridge
I’m truly enjoying the design and layout of your blog. It’s a very easy on the eyes which makes it much more enjoyable for me to come here and visit more often. Did you hire out a designer to create your theme? Fantastic work!
Thanks for the auspicious writeup. It in reality used to be a leisure account it. Glance complicated to more brought agreeable from you! By the way, how can we keep in touch?
Thanks for helping out, superb info. “Those who restrain desire, do so because theirs is weak enough to be restrained.” by William Blake.
I do accept as true with all the ideas you have introduced in your post. They are very convincing and can definitely work. Nonetheless, the posts are very short for starters. Could you please lengthen them a bit from subsequent time? Thank you for the post.
Write more, thats all I have to say. Literally, it seems as though you relied on the video to make your point. You obviously know what youre talking about, why throw away your intelligence on just posting videos to your site when you could be giving us something informative to read?
I have located a person who placed initiative into researching this topic. I have actually been trying to find this kind of info for a while currently and no person has actually discussed it fairly so well. Your site is amazing. I will be showing others who are likewise interested in this subject.
What’s Happening i’m new to this, I stumbled upon this I’ve found It positively helpful and it has aided me out loads. I hope to contribute & help other users like its helped me. Great job.
hello!,I like your writing very a lot! percentage we be in contact more about your article on AOL? I need an expert on this house to unravel my problem. May be that is you! Looking ahead to peer you.
This is a topic close to my heart cheers, where are your contact details though?
Hiya, I’m really glad I’ve found this info. Nowadays bloggers publish only about gossips and web and this is actually annoying. A good web site with exciting content, that is what I need. Thanks for keeping this site, I’ll be visiting it. Do you do newsletters? Can not find it.
I enjoy what you guys are up too. This type of clever work and reporting! Keep up the excellent works guys I’ve you guys to my blogroll.
Hello! I just wanted to ask if you ever have any issues with hackers? My last blog (wordpress) was hacked and I ended up losing a few months of hard work due to no back up. Do you have any solutions to stop hackers?
Good article. I certainly love this website. Keep it up!
Dead indited content material, Really enjoyed examining.
I like this site so much, saved to fav. “To hold a pen is to be at war.” by Francois Marie Arouet Voltaire.
Hi, Neat post. There is a problem with your website in internet explorer, would check this… IE still is the market leader and a good portion of people will miss your magnificent writing because of this problem.
This paragraph will help the internet viewers for setting up new blog or even a blog from start to end.
This web site is really a walk-through for all of the info you wanted about this and didn’t know who to ask. Glimpse here, and you’ll definitely discover it.
I would like to thank you for the efforts you have put in writing this website. I’m hoping the same high-grade web site post from you in the upcoming as well. Actually your creative writing skills has encouraged me to get my own website now. Really the blogging is spreading its wings quickly. Your write up is a great example of it.
Great post. I am facing a couple of these problems.
naturally like your web-site however you have to take a look at the spelling on quite a few of your posts. Several of them are rife with spelling issues and I find it very bothersome to inform the truth however I’ll certainly come again again.
Thanks for sharing superb informations. Your web-site is so cool. I am impressed by the details that you’ve on this site. It reveals how nicely you understand this subject. Bookmarked this website page, will come back for extra articles. You, my pal, ROCK! I found just the info I already searched everywhere and simply could not come across. What a perfect web-site.
I like this web site so much, saved to fav. “I don’t care what is written about me so long as it isn’t true.” by Dorothy Parker.
Very interesting information!Perfect just what I was searching for!
This is a very good tips especially to those new to blogosphere, brief and accurate information… Thanks for sharing this one. A must read article.
Excellent blog here! Also your site loads up fast! What web host are you using? Can I get your affiliate link to your host? I wish my site loaded up as fast as yours lol
Sweet site, super design and style, really clean and utilise pleasant.
I got what you mean , thanks for posting.Woh I am thankful to find this website through google.
URBT News a number one provider of headlines and analysis, has introduced the release of the company’s URBT News App for android and iOS devices. The app, which is available for free on the Google Play Store as well as Apple App Store, provides users with access to the latest information and news Take advantage of the URBT News app now proceed to your app store. This is a fantastic app to have. Get immediate notifications
I was just looking for this information for a while. After six hours of continuous Googleing, finally I got it in your site. I wonder what is the lack of Google strategy that do not rank this kind of informative web sites in top of the list. Normally the top sites are full of garbage.
Thanks for shares.
Very informative article post. Awesome.
https://www.barisarslan.com/onlyfans-turkiye-ve-turk-onlyfans/
Thanks for share.
Hi there! I’m at work browsing your blog from my new iphone 4! Just wanted to say I love reading through your blog and look forward to all your posts! Carry on the outstanding work!
Thanks for share.
This article is a gem. I’ve bookmarked it for future reference. Thanks for the valuable insights!
วิถีทางการเข้ามาใช้งาน สล็อตเว็บไซต์ตรง สามารถทำได้กี่หนทาง สิ่งที่จำเป็นสูงที่สุดสำหรับเพื่อการเข้าใช้บริการ ด้วยห้องเกม คาสิโนออนไลน์ เว็บไซต์ตรง ของเราช่วงนี้จำต้องบอกเลยว่านักพนันจะสามารถใช้บริการกันได้ในทุกช่องทางที่ต้องการของทุกคนแล้วก็ยังคงมีวิถีทางเพิ่มเติมอีกให้กับนักการพนันได้เพลิดเพลินเจริญใจกับห้องเกม สล็อตเว็บตรง แตกง่าย ของพวกเราได้มากขึ้นอีกด้วยซึ่งการเข้าใช้งานเกม สล็อตเว็บไซต์ตรง ฝาก-ถอน true wallet ไม่มี ขั้น ต่ํา ทุกหนควรจะจำเป็นต้องคำนึงถึงผลประโยชน์ของตนให้ได้มากที่สุดก็เลยจะสามารถทำให้ท่านได้รับชัยออกมาแบบง่ายๆพนันได้ผ่านระบบมือถือทั้งยัง ios android มั่นใจได้เลยว่าไม่ว่าคุณจะมีเครื่องมือใดสำหรับเพื่อการเข้าใช้บริการก็แล้วแต่สามารถเข้ามาใช้บริการผ่านระบบมือถือของคุณได้อย่างสะดวกทุกที่ทุกเวลาไม่ว่าจะเป็นระบบ iOS หรือว่า Android ก็ยังคงสามารถใช้บริการได้อย่างราบรื่นแล้วก็มีความเสถียรภาพสูงสุดด้วยบอกได้เลยว่าการเข้าใช้บริการกับห้องเกม สล็อตเว็บตรงpg ของเรานั้นจะไม่มีการสะดุดเลยแม้กระทั้งน้อยมากให้กับนักพนันได้ไม่สบายใจโดยเด็ดขาด.
Have you ever thought about writing an e-book or guest authoring on other blogs? I have a blog based upon on the same subjects you discuss and would really like to have you share some stories/information. I know my visitors would value your work. If you’re even remotely interested, feel free to send me an e-mail.
Thanks for shares.
It?s actually a nice and helpful piece of info. I am satisfied that you simply shared this helpful info with us. Please stay us up to date like this. Thanks for sharing.
พนันบอลออนไลน์ ได้เงินจริง กับเว็บบอลที่เหมาะสมที่สุดชั้น 1 การเล่นพนัน ที่ดีที่สุด ในยุคนี้ แทงบอลออนไลน์ ได้เงินจริง เป็นการลงทุน ที่ง่ายอย่างยิ่งๆเข้าเดิมพันได้ในระบบออนไลน์ รองรับทุกแพรตฟร์อม ทั้ง บนโทรศัพท์เคลื่อนที่ หรือ จะ บนคอมพิวเตอร์ รองรับ อีกทั้งระบบ แอนดรอยด์ และก็ ระบบ IOS ได้ แบบที่กระปรี้กระเปร่าที่สุด พนันบอล ไม่มีอย่างต่ำ ได้กำไรได้แบบงามๆไม่จำเป็นต้องกลุ้มใจ เรื่องทุนน้อย เพราะเว็บ UFAALLIN เปิดโอกาสดีๆจำนวนมาก จากโปรดีๆให้นักพนันทุกคน ได้พนันออนไลน์ ได้แบบเพลิดเพลินใจ เยอะที่สุด.
thanks for shares
where is delta 8 resellers located
I enjoyed reading this post. It’s concise yet packed with useful information. Thanks!
психолог
yes baby yes
Strap on your virtual boots and get ready for the most thrilling soccer adventure of your gaming life
have a nice day baby
Respect to author, some superb entropy.
พนันบอลออนไลน์ การ แทงบอลออนไลน์ เว็บไซต์แทงบอล UFABET เว็บไซต์ตรงไม่ผ่านเอเย่นต์ แทงง่าย ฝากไม่มีอย่างน้อย 100 ก็ถอนได้ต้องใจที่สุดกับบริการที่เราให้ท่านเป็นเช่นลูกค้าวีไอพี เราคือเว็บไซต์ตรงจากบริษัท UFABET ที่มีทีมงานคุณภาพรอให้บริการ ให้คำแนะนำ ตอบปัญหา คอยช่วยเหลือท่านตลอด 1 วัน เว็บแทงบอลพวกเรามีเรทจ่ายสูงที่สุด ราคาค่าน้ำดีที่สุด เปิดคู่บอลให้เล่นสูงที่สุด เว็บไซต์พนันออนไลน์ ยูฟ่าเบ็ท เป็นเว็บที่ได้มาตรฐาน เป็นผู้นำด้านความปลอดภัย.
We are a gaggle of volunteers and starting a brand new scheme in our community. Your website offered us with helpful info to work on. You have done an impressive activity and our entire group might be grateful to you.
by by baby
come on baby
I can’t help but be impressed by the way you break down complex concepts into easy-to-digest information. Your writing style is not only informative but also engaging, which makes the learning experience enjoyable and memorable. It’s evident that you have a passion for sharing your knowledge, and I’m grateful for that.
come on baby
42
บาคาร่าออนไลน์ เว็บไหนดี สมัครง่ายไม่ต้องทำเทิร์น บาคาร่าออนไลน์ ได้เงินจริง ไม่ต้องทําเทิร์น กําลังเป็นที่น่า พึงพอใจของเหล่าเซียนพนันมือใหม่เป็นจํานวนมาก ด้วยเหตุว่า ไม่ต้องทําความเข้าใจในเรื่องของเทิร์น โอเวอร์ หรือเทิร์น เครดิต เล่นบาคาร่าออนไลน์ได้กี่บาท ท่านก็สามารถถอน เงินยอดนั้นๆไปได้เลย ในทันที โดยที่ไม่ต้องมาคํานวนเทิร์น อะไรก็ตามเลยเลือกสมัครบาคาร่ากับทางเว็บพวกเรา หากท่านไม่ ได้กดรับ โปรโมชั่นอะไรก็ตามท่านจะไม่ติดข้อตกลงของหัวข้อการ ทําเทิร์น โดยเหตุนั้นจะทําให้แก่ท่านสามารถเล่น บาคาร่า ได้อย่าง บันเทิงใจมากเพิ่มขึ้น สมัครบาคาร่าออนไลน์ ได้ตลอด 1 วันอีกทั้ง พร้อมด้วยโปรโมชั่น ให้เลือกรับอีกเยอะมาก ซึ่งแต่ละ โปรโมชั่นของเกม บาคาร่าออนไลน์ นั้นก็จะมี ข้อแม้ที่นาๆประการ โดยท่านจะสามารถรับ โบนัสเครดิตฟรีได้ สูงสุดมากถึง 20.
ค่ายเกมชั้นนำของ สล็อตเว็บไซต์ตรง ที่เหมาะสมที่สุดในปี 2023 เข้ามาเจอกับค่ายเกมชั้นหนึ่งของ สล็อตเว็บตรง ที่ยอดเยี่ยมในปี 2023 กันได้แล้วตอนนี้ บอกเลยว่าค่ายเกมที่เราจะมาแนะนำในวันนี้ เป็นค่ายเกมที่เหมาะสมกับนักเสี่ยงดวงออนไลน์ทุกคนอย่างมากมาย โดยเหตุนี้แล้วไม่ว่าคุณจะเป็นผู้เล่นเก่าหรือผู้เล่นมือใหม่ ก็สามารถเข้าเล่นค่ายเกมเหล่านี้ สำหรับการเข้าสร้างรายได้กันได้อย่างเต็มเปี่ยม ซึ่งทาง ลงทะเบียนสมัครสมาชิก สล็อตเว็บไซต์ตรง ของเราพร้อมการันตีได้เลยว่านักพนันออนไลน์ทุกคน จะสามารถรับเงินรางวัลออกมาจากค่ายเกมสล็อตแมชชีน นี้ ได้ตลอดวันแล้ววันเล่ากันอย่างแน่นอน ด้วยเหตุนั้นแล้วนักการพนันออนไลน์ท่านใดที่พอใจ แต่ยังไม่ได้เลือกค่ายเกมในการเข้าสร้างรายได้ บอกเลยว่าสามารถเข้ามาเล่าเรียนค่ายเกม แต่ละค่ายที่ เว็บไซต์สล็อต pg เว็บตรง ของเรากันได้อย่างมาก ซึ่งค่ายเกมที่เว็บของพวกเราจะเอามาเสนอแนะในวันนี้ จะมีค่ายเกมชั้นนำไหนบ้างไปดูกันได้เลย.
by by hepiniz
Thanks for shares.
thanks for share
thanks for share
Hi, Neat post. There is a problem with your web site in internet explorer, would check this… IE still is the market leader and a good portion of people will miss your excellent writing due to this problem.
Superb site you have here but I was wanting to know if you knew of any forums that cover the same topics discussed here? I’d really love to be a part of online community where I can get feedback from other experienced individuals that share the same interest. If you have any suggestions, please let me know. Thank you!
thanks for share
Valuable info. Lucky me I found your website by accident, and I am shocked why this accident didn’t happened earlier! I bookmarked it.
thanks for share
833
833
thanks for share
นอกเหนือจากนี้เรายังมีบริการมองซีรี่ย์ออนไลน์ฟรี อีกทั้งซีปรี่ย์ฝรั่ง, ซีปรี่ย์ประเทศเกาหลี แล้วก็ซีรี่ย์จากทั่วโลกอัพเดทตอนใหม่ทุกเมื่อเชื่อวันก่อนผู้ใดกันแน่ มีให้เลือกรับดูทั้งบรรยายไทยและก็ซับไทย ซาวด์แทร็ค ท่านไม่ต้องเสียเงินเสียทองแพงๆไปสมัครในแอพรายเดือน แต่ว่าสามารถมองซีปรี่ย์ฟรีกับพวกเราได้โดยไม่ต้องสมัครสมาชิก ทั้งซีปรี่ย์ที่กำลังฉายแล้วก็ซีรี่ย์เก่าที่จบแล้ว ก็มีให้เลือกรับดูตรงนี้ พวกเราได้รวมซีรี่ย์จากทั่วโลก ทุกแพลตฟอร์มมาไว้ตรงนี้ที่เดียวไม่ต้องสมัครเยอะไม่ต้องเสียเวลาค้นหา ไม่ว่าจะเป็นจาก Disney, Viu, iQiyi, Netflix ,Apple TV รวมทั้งอื่นๆอีกเพียบ เพียงแค่เข้ามารับชมที่เว็บของพวกเราก็จะได้รับดูซีรี่ย์คุณภาพสูงยิ่งกว่าเว็บไซต์ไหนๆอย่างยิ่งจริงๆ.
thanks for share
เว็บไซต์เกมพนันบอล สล็อตpgวอเลท มีความมั่นคงยั่งยืนไม่มีอันตรายสูง ลงทุนได้อย่างปลอดภัย เป็นเว็บไซต์ที่มีความยั่งยืนมั่นคงปลอดภัยสูงก็เลยทำให้นักพนันสามารถลงทุน ได้โดยสวัสดิภาพแน่นอนกับ ทุกขั้นตอนสำหรับเพื่อการให้บริการ ที่มีประสิทธิภาพ และก็ได้รับการยอมรับจากนักพนันทั่วโลกว่าเป็นเว็บที่เยี่ยมที่สุด โดยสามารถเข้าสู่ระบบการพนัน โดยการสมัครเป็นสมาชิกผ่านทางหน้าเว็บ ได้ในทันทีมีความพร้อมของระบบโปรแกรม สำหรับการดำเนินการที่อำนวยความสะดวก ให้กับนักเสี่ยงโชคได้อย่างยอดเยี่ยม ก็เลยทำให้ทุกขั้นตอน เป็นได้อย่างสะดวกเร็วทันใจ. ดังนี้สำหรับคนใดกันที่กำลังมองหารูปแบบ การให้บริการที่ยอดเยี่ยมสำหรับการแทงพนันบอล ออนไลน์ การเลือกสมัครเป็นสมาชิกกับเว็บไซต์แทงบอลยูฟ่าเบท ย่อมไม่ผิดหวังอย่างแน่แท้ เนื่องจากว่าทุกขั้นตอนสำหรับในการให้บริการ มีความปลอดภัยรองรับเป็นอย่างดี จึงเป็นสิ่งที่ไว้ใจได้ กับการลงทุนแทงแทงบอล ออนไลน์ ได้ทุกแบบ.
thanks for share
thanks for share
When s᧐mе one searchhes ffor һis necessqry tһing, thսs he/she desires tߋ be
available thawt іn ⅾetail, tһerefore tһat thing
is maintained over һere.
My pаge – rajabandot
เว็บไซต์ดูหนัง ดูหนังผ่านเน็ต ดูหนังฟรี moviehdfree.net ดูหนังไม่กระตุก หนังใหม่2023 หนังเก่า2022 หนังHD หนังฝรั่ง หนังเอเชีย หนังออนไลน์ ดูหนังไม่เสียตังค์ ดูหนังผ่านสมาร์ทโฟน หนังเต็มเรื่อง MovieHDFree มูฟวี่เอสดีฟรี หนังบู๊ หนังเผชิญภัย หนังการ์ตูน หนังชีวิตจริง ภาพยนตร์ตลก หนังอาชญากรรม สารคดี หนังมากมากกว่า หมื่นเรื่อง หนังให้มองฟรี 360 720 1080 4K ดูหนังไม่สะดุด หนังออนไลน์ไม่กระตุก ดูหนังใหม่ปัจจุบันอัพเดทใหม่ตลอด 1 วัน แล้วก็ยังมีซีรีย์ออนไลน์ การ์ตูนอนิเมะชั่นอีกล้นหลามรับดูฟรี.
เกมสล็อตทำกำไรฟรี เล่นได้แบบไม่ต้องกังวล สำหรับเพื่อการเล่นเกมสล็อตออนไลน์กับพวกเรา ทำไมจำเป็นต้องกลุ้มใจแล้วรายจ่ายเพิ่มอีกเลย เพราะปรารถนาใช้งานกับเรา เกมสล็อตทำกำไรฟรี การันตีได้ว่าในทุกวันท่านจะเพลินไปกับการทำกำไรแบบไม่ต้องวิตกกังวล บริการเก็บสล็อตออนไลน์ซึ่งสามารถเล่นได้ไม่อั้น รวมทั้งที่สำคัญตลอดทุกการใช้แรงงานนั้นท่านจะสามารถ เล่นได้แบบไม่จำเป็นต้องกลุ้มใจ เพราะพวกเราไม่มีการเรียกเก็บค่าธรรมเนียมสำหรับการใช้บริการ จึงทำให้การเล่นเกมสล็อตออนไลน์กับเรา นับได้ว่าเป็นหนทางในการสร้างรายได้ที่เหมาะกับนักการพนันทุกคนเลย.
Great web site you have here.. It’s hard to find high-quality writing like yours these days. I really appreciate individuals like you! Take care!!
Hi there, You’ve done an excellent job. I will definitely digg it and in my view recommend to my friends. I am confident they will be benefited from this web site.
I?d have to verify with you here. Which is not one thing I normally do! I enjoy studying a post that can make people think. Additionally, thanks for permitting me to remark!
This web site can be a walk-through for all of the information you needed about this and didn?t know who to ask. Glimpse here, and you?ll positively uncover it.
This is very fascinating, You’re a very skilled blogger. I’ve joined your rss feed and stay up for seeking more of your great post. Additionally, I have shared your website in my social networks!
I have noticed that of all varieties of insurance, medical insurance is the most controversial because of the issue between the insurance policies company’s duty to remain making money and the consumer’s need to have insurance policy. Insurance companies’ commissions on well being plans are incredibly low, as a result some corporations struggle to earn profits. Thanks for the suggestions you reveal through this website.
Magnificent goods from you, man. I have understand your stuff previous to and you are just too magnificent. I actually like what you’ve acquired here, really like what you’re stating and the way in which you say it. You make it enjoyable and you still care for to keep it smart. I can not wait to read much more from you. This is really a wonderful website.
Wow! This blog looks just like my old one! It’s on a totally different topic but it has pretty much the same layout and design. Wonderful choice of colors!
Boostaro increases blood flow to the reproductive organs, leading to stronger and more vibrant erections. It provides a powerful boost that can make you feel like you’ve unlocked the secret to firm erections
Just wanna remark on few general things, The website style is ideal, the topic matter is rattling goodalpha tonic supplement
While improving eyesight isn’t often the goal of consumers who wear their glasses religiously, it doesn’t mean they’re stuck where they are.
The very core of your writing while sounding agreeable in the beginning, did not settle perfectly with me after some time. Someplace throughout the sentences you actually were able to make me a believer unfortunately only for a very short while. I nevertheless have got a problem with your leaps in assumptions and you would do well to fill in all those breaks. In the event you can accomplish that, I would certainly be fascinated.
Hi there! I know this is kinda off topic but I was wondering which blog platform are you using for this site? I’m getting tired of WordPress because I’ve had problems with hackers and I’m looking at options for another platform. I would be awesome if you could point me in the direction of a good platform.
Sight Care is a daily supplement proven in clinical trials and conclusive science to improve vision by nourishing the body from within. The Sight Care formula claims to reverse issues in eyesight, and every ingredient is completely natural.
ProDentim is a nutritional dental health supplement that is formulated to reverse serious dental issues and to help maintain good dental health.
Dentitox Pro is a liquid dietary solution created as a serum to support healthy gums and teeth. Dentitox Pro formula is made in the best natural way with unique, powerful botanical ingredients that can support healthy teeth.
FitSpresso stands out as a remarkable dietary supplement designed to facilitate effective weight loss. Its unique blend incorporates a selection of natural elements including green tea extract, milk thistle, and other components with presumed weight loss benefits.
Gorilla Flow is a non-toxic supplement that was developed by experts to boost prostate health for men. It’s a blend of all-natural nutrients, including Pumpkin Seed Extract Stinging Nettle Extract, Gorilla Cherry and Saw Palmetto, Boron, and Lycopene.
GlucoBerry is one of the biggest all-natural dietary and biggest scientific breakthrough formulas ever in the health industry today. This is all because of its amazing high-quality cutting-edge formula that helps treat high blood sugar levels very naturally and effectively.
Sight Care is a daily supplement proven in clinical trials and conclusive science to improve vision by nourishing the body from within. The SightCare formula claims to reverse issues in eyesight, and every ingredient is completely natural.
TerraCalm is an antifungal mineral clay that may support the health of your toenails. It is for those who struggle with brittle, weak, and discoloured nails. It has a unique blend of natural ingredients that may work to nourish and strengthen your toenails.
Kerassentials are natural skin care products with ingredients such as vitamins and plants that help support good health and prevent the appearance of aging skin. They’re also 100% natural and safe to use. The manufacturer states that the product has no negative side effects and is safe to take on a daily basis.
Free Shiping If You Purchase Today!
EndoPump is an all-natural male enhancement supplement that improves libido, sexual health, and penile muscle strength.
BioFit is an all-natural supplement that is known to enhance and balance good bacteria in the gut area. To lose weight, you need to have a balanced hormones and body processes. Many times, people struggle with weight loss because their gut health has issues.
Türbelerimiz
Thanks for your handy post. Over time, I have come to understand that the particular symptoms of mesothelioma are caused by the build up of fluid regarding the lining on the lung and the breasts cavity. The illness may start from the chest region and pass on to other areas of the body. Other symptoms of pleural mesothelioma include fat reduction, severe inhaling trouble, temperature, difficulty ingesting, and irritation of the neck and face areas. It ought to be noted that some people with the disease will not experience any kind of serious signs and symptoms at all.
Serolean a revolutionary weight loss supplement, zeroes in on serotonin—the key neurotransmitter governing mood, appetite, and fat storage.
Hello I am so glad I found your blog, I really found you by mistake, while I was searching on Aol for something else, Anyhow I am here now and would just like to say thanks a lot for a fantastic post and a all round enjoyable blog (I also love the theme/design), I don’t have time to go through it all at the moment but I have saved it and also added in your RSS feeds, so when I have time I will be back to read more, Please do keep up the superb job.
Neotonics is an essential probiotic supplement that works to support the microbiome in the gut and also works as an anti-aging formula. The formula targets the cause of the aging of the skin.
GlucoTrust is a revolutionary blood sugar support solution that eliminates the underlying causes of type 2 diabetes and associated health risks.
Amiclear is a dietary supplement designed to support healthy blood sugar levels and assist with glucose metabolism. It contains eight proprietary blends of ingredients that have been clinically proven to be effective.
SynoGut is an all-natural dietary supplement that is designed to support the health of your digestive system, keeping you energized and active.
Elevate your vitality with Alpha Tonic – the natural solution to supercharge your testosterone levels. When you follow our guidance, experience improved physical performance
Introducing FlowForce Max, a solution designed with a single purpose: to provide men with an affordable and safe way to address BPH and other prostate concerns. Unlike many costly supplements or those with risky stimulants, we’ve crafted FlowForce Max with your well-being in mind. Don’t compromise your health or budget – choose FlowForce Max for effective prostate support today!
Glucofort Blood Sugar Support is an all-natural dietary formula that works to support healthy blood sugar levels. It also supports glucose metabolism. According to the manufacturer, this supplement can help users keep their blood sugar levels healthy and within a normal range with herbs, vitamins, plant extracts, and other natural ingredients.
EyeFortin is a natural vision support formula crafted with a blend of plant-based compounds and essential minerals. It aims to enhance vision clarity, focus, and moisture balance.
GlucoCare is a natural and safe supplement for blood sugar support and weight management. It fixes your metabolism and detoxifies your body.
The Quietum Plus supplement promotes healthy ears, enables clearer hearing, and combats tinnitus by utilizing only the purest natural ingredients. Supplements are widely used for various reasons, including boosting energy, lowering blood pressure, and boosting metabolism.
Puravive introduced an innovative approach to weight loss and management that set it apart from other supplements. It enhances the production and storage of brown fat in the body, a stark contrast to the unhealthy white fat that contributes to obesity.
Metabo Flex is a nutritional formula that enhances metabolic flexibility by awakening the calorie-burning switch in the body. The supplement is designed to target the underlying causes of stubborn weight gain utilizing a special “miracle plant” from Cambodia that can melt fat 24/7.
AquaPeace is the most in-demand ear health supplement on the market. Owing to its natural deep-sea formula and nutritious nature, it has become an instant favorite of everyone who is struggling with degraded or damaged ear health.
With its all-natural ingredients and impressive results, Aizen Power supplement is quickly becoming a popular choice for anyone looking for an effective solution for improve sexual health with this revolutionary treatment.
TropiSlim is a unique dietary supplement designed to address specific health concerns, primarily focusing on weight management and related issues in women, particularly those over the age of 40.
Claritox Pro™ is a natural dietary supplement that is formulated to support brain health and promote a healthy balance system to prevent dizziness, risk injuries, and disability. This formulation is made using naturally sourced and effective ingredients that are mixed in the right way and in the right amounts to deliver effective results.
ReFirmance is an outstanding lift serum that highly supports skin firmness and elasticity, smooths the presence of wrinkles, and provides deep rejuvenation properties.
t’s Time To Say Goodbye To All Your Bedroom Troubles And Enjoy The Ultimate Satisfaction And Give Her The Leg-shaking Orgasms. The Endopeak Is Your True Partner To Build Those Monster Powers In Your Manhood You Ever Craved For..
Neurozoom is a dietary formulation designed to develop brain power and cognition. The nootropic contains 35 science-based ingredients that safeguard the brain cells from damage and slow age-related memory problems.
ProstateFlux™ is a dietary supplement specifically designed to promote and maintain a healthy prostate for male.
Nervogen Pro, A Cutting-Edge Supplement Dedicated To Enhancing Nerve Health And Providing Natural Relief From Discomfort. Our Mission Is To Empower You To Lead A Life Free From The Limitations Of Nerve-Related Challenges. With A Focus On Premium Ingredients And Scientific Expertise.
Erec Prime is a cutting-edge male enhancement formula with high quality raw ingredients designed to enhance erection quality and duration, providing increased stamina and a heightened libido.
InchaGrow is an advanced male enhancement supplement. Discover the natural way to boost your sexual health. Increase desire, improve erections, and experience more intense orgasms.
LeanFlux is a natural supplement that claims to increase brown adipose tissue (BAT) levels and burn fat and calories.
Gut Vita™ is an all-natural supplement designed to support digestive health issues by targeting the root cause and restoring optimal gut flora.
You can certainly see your expertise in the work you write. The world hopes for even more passionate writers like you who aren’t afraid to say how they believe. Always go after your heart.
Wild Stallion Pro is a natural male enhancement supplement designed to improve various aspects of male
Keratone is 100% natural formula, non invasive, and helps remove fungal build-up in your toe, improve circulation in capillaries so you can easily and effortlessly break free from toenail fungus.
Thanks
ดูหนังใหม่ชนโรง ดูหนังชนโรง ดูหนังใหม่ได้ก่อนคนใดแบบไม่ต้องเสียเวล่ำเวลาไปนั่งเมื่อยๆหรือเสี่ยงในโรงให้ยุ่งยาก เพียงแค่อยู่บ้านก็สามารถรับดูได้ทุกเรื่องตามแบบที่คุณอยากได้ มีหนังใหม่ล่าสุดเรื่องไหนที่เป็นกระแสมาแรง หรือเป็นหนังที่คุณติดอกติดใจส่วนตัวจัดไปเลย ไม่ใช่แค่หนังโรงแค่นั้น แต่ยังสามารถดูหนัง Netflix ซีรี่ย์สุดมัน การ์ตูน แล้วก็อื่นๆดังที่ชอบ รับรองดูหนังฟรี ไม่ต้องจ่ายเงิน ไม่ต้องเสียตังค์แม้แต่บาทเดียว อัดแน่นครบทุกอรรถรสในแบบที่คุณชื่นชอบแน่นอน สามารถดูหนังบนมือถือ ผ่านคอมพิวเตอร์ สมาร์ทโทรทัศน์ , Tablet , iPhone , iPad ผู้ใดกล่าวว่าการดูหนังออนไลน์ผ่านหน้าเว็บแล้วจะต้องเป็นเสียงซ้ำ ภาพสั่น กระตุก หรือภาพแตก ถ้าหากได้เข้ามารับดูจริงๆจะพบว่าการดูหนังฟรีไม่ได้มีเรื่องเหมือนอย่างที่คิดเลย แถมจัดเต็มด้วยคุณภาพระดับ 4K ทุกเรื่องที่คุณถูกใจจัดเต็มความสนุกสนานในสไตล์ที่เป็นตนเองได้ทันที งานเสียงสเตอริโอกระหึ่มหนำใจ เกือบจะไม่แตกต่างจากการเข้าไปดูในโรงภาพยนต์.
Aw, this was a very nice post. In concept I wish to put in writing like this additionally ? taking time and precise effort to make a very good article? however what can I say? I procrastinate alot and on no account appear to get something done.
Hiya! I know this is kinda off topic however I’d figured I’d ask. Would you be interested in exchanging links or maybe guest writing a blog post or vice-versa? My website covers a lot of the same topics as yours and I believe we could greatly benefit from each other. If you might be interested feel free to shoot me an email. I look forward to hearing from you! Fantastic blog by the way!
lol
I have read several good stuff here. Certainly worth bookmarking for revisiting. I surprise how much effort you put to make such a fantastic informative web site.
Sight Care is a daily supplement proven in clinical trials and conclusive science to improve vision by nourishing the body from within. The SightCare formula claims to reverse issues in eyesight, and every ingredient is completely natural.
lol
It’s my belief that mesothelioma is actually the most deadly cancer. It has unusual features. The more I actually look at it the greater I am assured it does not react like a true solid cells cancer. If perhaps mesothelioma is a rogue viral infection, then there is the probability of developing a vaccine along with offering vaccination for asbestos open people who are at high risk regarding developing long term asbestos connected malignancies. Thanks for revealing your ideas for this important ailment.
Herpagreens is a dietary supplement formulated to combat symptoms of herpes by providing the body with high levels of super antioxidants, vitamins
It’s Time To Say Goodbye To All Your Bedroom Troubles And Enjoy The Ultimate Satisfaction And Give Her The Leg-shaking Orgasms. The Endopeak Is Your True Partner To Build Those Monster Powers In Your Manhood You Ever Craved For.. https://endopeakbuynow.us/
Neotonics is an essential probiotic supplement that works to support the microbiome in the gut and also works as an anti-aging formula. The formula targets the cause of the aging of the skin. https://neotonicsbuynow.us/
GlucoTrust is a revolutionary blood sugar support solution that eliminates the underlying causes of type 2 diabetes and associated health risks. https://glucotrustbuynow.us/
Boostaro increases blood flow to the reproductive organs, leading to stronger and more vibrant erections. It provides a powerful boost that can make you feel like you’ve unlocked the secret to firm erections https://boostarobuynow.us/
With the power of carefully selected natural ingredients, Erec Prime works wonders in treating symptoms of ED. Experience the confidence, pleasure, and satisfaction you deserve. https://erecprimebuynow.us/
Puravive introduced an innovative approach to weight loss and management that set it apart from other supplements. It enhances the production and storage of brown fat in the body, a stark contrast to the unhealthy white fat that contributes to obesity. https://puravivebuynow.us/
Prostadine is a dietary supplement meticulously formulated to support prostate health, enhance bladder function, and promote overall urinary system well-being. Crafted from a blend of entirely natural ingredients, Prostadine draws upon a recent groundbreaking discovery by Harvard scientists. This discovery identified toxic minerals present in hard water as a key contributor to prostate issues. https://prostadinebuynow.us/
With its all-natural ingredients and impressive results, Aizen Power supplement is quickly becoming a popular choice for anyone looking for an effective solution for improve sexual health with this revolutionary treatment. https://aizenpowerbuynow.us/
Kerassentials are natural skin care products with ingredients such as vitamins and plants that help support good health and prevent the appearance of aging skin. They’re also 100% natural and safe to use. The manufacturer states that the product has no negative side effects and is safe to take on a daily basis. Kerassentials is a convenient, easy-to-use formula. https://kerassentialsbuynow.us/
BioFit is an all-natural supplement that is known to enhance and balance good bacteria in the gut area. To lose weight, you need to have a balanced hormones and body processes. Many times, people struggle with weight loss because their gut health has issues. https://biofitbuynow.us/
SonoVive™ is a completely natural hearing support formula made with powerful ingredients that help heal tinnitus problems and restore your hearing https://sonovivebuynow.us/
Endo Pump Male Enhancement works by increasing blood flow to the penis, which assist to achieve and maintain erections. This formula includes nitric oxide, a powerful vasodilator that widens blood vessels and improves circulation. Other key ingredients https://endopumpbuynow.us/
ProDentim is a nutritional dental health supplement that is formulated to reverse serious dental issues and to help maintain good dental health. https://prodentimbuynow.us/
The Quietum Plus supplement promotes healthy ears, enables clearer hearing, and combats tinnitus by utilizing only the purest natural ingredients. Supplements are widely used for various reasons, including boosting energy, lowering blood pressure, and boosting metabolism. https://quietumplusbuynow.us/
EyeFortin is a natural vision support formula crafted with a blend of plant-based compounds and essential minerals. It aims to enhance vision clarity, focus, and moisture balance. https://eyefortinbuynow.us/
GlucoBerry is one of the biggest all-natural dietary and biggest scientific breakthrough formulas ever in the health industry today. This is all because of its amazing high-quality cutting-edge formula that helps treat high blood sugar levels very naturally and effectively. https://glucoberrybuynow.us/
FitSpresso stands out as a remarkable dietary supplement designed to facilitate effective weight loss. Its unique blend incorporates a selection of natural elements including green tea extract, milk thistle, and other components with presumed weight loss benefits. https://fitspressobuynow.us/
Dentitox Pro is a liquid dietary solution created as a serum to support healthy gums and teeth. Dentitox Pro formula is made in the best natural way with unique, powerful botanical ingredients that can support healthy teeth. https://dentitoxbuynow.us/
Introducing TerraCalm, a soothing mask designed specifically for your toenails. Unlike serums and lotions that can be sticky and challenging to include in your daily routine, TerraCalm can be easily washed off after just a minute. https://terracalmbuynow.us/
Glucofort Blood Sugar Support is an all-natural dietary formula that works to support healthy blood sugar levels. It also supports glucose metabolism. According to the manufacturer, this supplement can help users keep their blood sugar levels healthy and within a normal range with herbs, vitamins, plant extracts, and other natural ingredients. https://glucofortbuynow.us/
SynoGut is an all-natural dietary supplement that is designed to support the health of your digestive system, keeping you energized and active. https://synogutbuynow.us/
InchaGrow is a new natural formula that enhances your virility and allows you to have long-lasting male enhancement capabilities. https://inchagrowbuynow.us/
Amiclear is a dietary supplement designed to support healthy blood sugar levels and assist with glucose metabolism. It contains eight proprietary blends of ingredients that have been clinically proven to be effective. https://amiclearbuynow.us/
GlucoFlush is an advanced formula specially designed for pancreas support that will let you promote healthy weight by effectively maintaining the blood sugar level and cleansing and strengthening your gut. https://glucoflushbuynow.us/
Nervogen Pro is an effective dietary supplement designed to help patients with neuropathic pain. When you combine exotic herbs, spices, and other organic substances, your immune system will be strengthened. https://nervogenprobuynow.us/
Claritox Pro™ is a natural dietary supplement that is formulated to support brain health and promote a healthy balance system to prevent dizziness, risk injuries, and disability. This formulation is made using naturally sourced and effective ingredients that are mixed in the right way and in the right amounts to deliver effective results. https://claritoxprobuynow.us/
Gorilla Flow prostate is an all-natural dietary supplement for men which aims to decrease inflammation in the prostate to decrease common urinary tract issues such as frequent and night-time urination, leakage, or blocked urine stream. https://gorillaflowbuynow.us/
Neurodrine is a nootropic supplement that helps maintain memory and a healthy brain. It increases the brain’s sharpness, focus, memory, and concentration. https://neurodrinebuynow.us/
HoneyBurn is a revolutionary liquid weight loss formula that stands as the epitome of excellence in the industry. https://honeyburnbuynow.us/
TropiSlim is the world’s first 100% natural solution to support healthy weight loss by using a blend of carefully selected ingredients. https://tropislimbuynow.us/
FlowForce Max is an innovative, natural and effective way to address your prostate problems, while addressing your energy, libido, and vitality. https://flowforcemaxbuynow.us/
Cortexi is a completely natural product that promotes healthy hearing, improves memory, and sharpens mental clarity. Cortexi hearing support formula is a combination of high-quality natural components that work together to offer you with a variety of health advantages, particularly for persons in their middle and late years. https://cortexibuynow.us/
Serolean, a revolutionary weight loss supplement, zeroes in on serotonin—the key neurotransmitter governing mood, appetite, and fat storage. https://seroleanbuynow.us/
Neurozoom crafted in the United States, is a cognitive support formula designed to enhance memory retention and promote overall cognitive well-being. https://neurozoombuynow.us/
ProstateFlux is a dietary supplement specifically designed to promote and maintain a healthy prostate. It is formulated with a blend of natural ingredients known for their potential benefits for prostate health. https://prostatefluxbuynow.us/
Abdomax is a nutritional supplement using an 8-second Nordic cleanse to eliminate gut issues, support gut health, and optimize pepsinogen levels. https://abdomaxbuynow.us/
Illuderma is a serum designed to deeply nourish, clear, and hydrate the skin. The goal of this solution began with dark spots, which were previously thought to be a natural symptom of ageing. The creators of Illuderma were certain that blue modern radiation is the source of dark spots after conducting extensive research. https://illudermabuynow.us/
LeanFlux is a revolutionary dietary formula specially crafted for individuals dealing with obesity and those on a weight loss journey. https://leanfluxbuynow.us/
Gut Vita™ is a dietary supplement formulated to promote gut health. It contains a unique blend of natural ingredients that work together to support a balanced and thriving gut microbiome. This supplement is designed to improve digestion, boost immunity, and enhance overall well-being. https://gutvitabuynow.us/
BioVanish a weight management solution that’s transforming the approach to healthy living. In a world where weight loss often feels like an uphill battle, BioVanish offers a refreshing and effective alternative. This innovative supplement harnesses the power of natural ingredients to support optimal weight management. https://biovanishbuynow.us/
PowerBite is an innovative dental candy that promotes healthy teeth and gums. It’s a powerful formula that supports a strong and vibrant smile. https://powerbitebuynow.us/
Sugar Defender is the #1 rated blood sugar formula with an advanced blend of 24 proven ingredients that support healthy glucose levels and natural weight loss. https://sugardefenderbuynow.us/
Researchers consider obesity a world crisis affecting over half a billion people worldwide. Vid Labs provides an effective solution that helps combat obesity and overweight without exercise or dieting. https://leanotoxbuynow.us/
DentaTonic is a breakthrough solution that would ultimately free you from the pain and humiliation of tooth decay, bleeding gums, and bad breath. It protects your teeth and gums from decay, cavities, and pain. https://dentatonicbuynow.us/
Puralean incorporates blends of Mediterranean plant-based nutrients, specifically formulated to support healthy liver function. These blends aid in naturally detoxifying your body, promoting efficient fat burning and facilitating weight loss. https://puraleanbuynow.us/
Folixine is a enhancement that regrows hair from the follicles by nourishing the scalp. It helps in strengthening hairs from roots. https://folixinebuynow.us/
Java Burn is a proprietary blend of metabolism-boosting ingredients that work together to promote weight loss in your body. https://javaburnbuynow.us/
Red Boost is a male-specific natural dietary supplement. Nitric oxide is naturally increased by it, which enhances blood circulation all throughout the body. This may improve your general well-being. Red Boost is an excellent option if you’re trying to assist your circulatory system. https://redboostbuynow.us/
LeanBliss is a unique weight loss formula that promotes optimal weight and balanced blood sugar levels while curbing your appetite, detoxifying, and boosting your metabolism. https://leanblissbuynow.us/
Protoflow is a prostate health supplement featuring a blend of plant extracts, vitamins, minerals, fruit extracts, and more. https://protoflowbuynow.us/
Fast Lean Pro is a herbal supplement that tricks your brain into imagining that you’re fasting and helps you maintain a healthy weight no matter when or what you eat. It offers a novel approach to reducing fat accumulation and promoting long-term weight management. https://fastleanprobuynow.us/
Zoracel is an extraordinary oral care product designed to promote healthy teeth and gums, provide long-lasting fresh breath, support immune health, and care for the ear, nose, and throat. https://zoracelbuynow.us/
dentists in antalya
LeanBiome is designed to support healthy weight loss. Formulated through the latest Ivy League research and backed by real-world results, it’s your partner on the path to a healthier you. https://leanbiomebuynow.us/
Hi there, i read your blog from time to time and i own a similar one and i was just wondering if you get a lot of spam feedback? If so how do you prevent it, any plugin or anything you can suggest? I get so much lately it’s driving me crazy so any support is very much appreciated.
Spot on with this write-up, I seriously think this web site needs far more attention. I’ll probably be back again to read more, thanks for the advice!
Pretty! This was an extremely wonderful post. Many thanks for providing this information.
Would you be focused on exchanging hyperlinks?
I have noticed that of all different types of insurance, medical care insurance is the most questionable because of the clash between the insurance coverage company’s necessity to remain adrift and the client’s need to have insurance cover. Insurance companies’ commission rates on wellbeing plans are extremely low, therefore some firms struggle to make money. Thanks for the thoughts you talk about through this site.
Impressive work! The article is both informative and well-articulated. Have you considered adding more visuals in your future articles? It could enhance the overall reader experience.
สล็อตเว็บไซต์ตรง ไม่ผ่านเอเย่นต์ ฝาก-ถอน ออโต้ รับทรูวอลเลท สล็อต ที่ดีที่สุด เริ่มใช้บริการกับทางห้องเกม สล็อตเว็บตรง ของเราในเวลานี้ นักพนันจะสามารถใช้แพลตฟอร์มของเราในการพนัน สล็อต ซึ่งสามารถให้ความรื่นเริงกับนักการพนันทุกคนได้มากที่สุดสำหรับการเข้าใช้บริการ อีกด้วยจำเป็นต้องบอกเลยว่ามีทั้งยังกฎกติกาสำหรับในการเข้าใช้บริการและก็ยังคงสามารถทำให้นักเล่นการพนันทุกคนได้เพลิดเพลินเจริญใจกับทุกขั้นตอนในการลงเดิมพันของพวกเราที่นี่กันได้ง่ายที่สุดด้วย. ทำไมต้องเป็น สล็อตเว็บตรง ? เว็บไซต์ตรงสล็อต ไม่เหมือนกันกับเว็บไซต์ไม่ตรงเช่นไร นับว่าเป็นปัญหาโลกแตกมากๆสำหรับสายเล่นสล็อต กับคำถามที่ว่า สล็อตเว็บไซต์ตรง แตกต่างกันกับเว็บสล็อตที่ไม่ตรงเช่นไร ก่อนเริ่มหัวข้อจำต้องชี้แจงก่อนว่าทุกวันนี้นั้น ได้มีเว็บไซต์สล็อตที่เปิดใหม่มากมาย แล้วก็การเปิดเว็บไซต์ปัจจุบันนั้นทำได้ง่ายอย่างยิ่งๆด้วยเหตุนั้นจึงมีจำพวกของเว็บสำคัญๆอยู่ 2 ประเภท โดยประเภทแรกนั้นเป็นเว็บไซต์ที่ได้รับการรับรองจากค่ายเกมโดยตรง ซึ่งพวกเราเรียกเว็บพวกนี้ว่า “เว็บตรง” แล้วก็อีกจำพวกนึงที่แอบอ้างนำระบบ API มาปล่อยให้ลูกค้าเล่น เราเรียกเว็บไซต์นี้ว่า “เว็บไซต์ไม่ตรง”.
I really like your wordpress design, where did you get a hold of it from?
These days of austerity as well as relative anxiousness about taking on debt, most people balk up against the idea of utilizing a credit card in order to make purchase of merchandise and also pay for a trip, preferring, instead only to rely on a tried and trusted way of making payment – cash. However, if you have the cash on hand to make the purchase in whole, then, paradoxically, this is the best time for them to use the card for several good reasons.
สล็อตเว็บตรง มีลักษณะการเดิมพันแบบใดบ้าง เกมสล็อตออนไลน์แต่ละเกมภายใน สล็อตเว็บตรง ของพวกเรา มีต้นแบบการเล่นที่มีเอกลักษณ์ส่วนตัวเป็นอย่างมาก เพราะว่าแบบงี้เว็บของพวกเราก็เลยสามารถยั่วยวนใจเหล่านักเล่นการพนันออนไลน์ให้เข้ามาใช้บริการกันอย่างไม่ขาดสายนั่นเอง ลักษณะการเดิมพันเกมสล็อตออนไลน์ที่ สล็อตเว็บไซต์ตรง ฝาก-ถอน true wallet ไม่มี ขั้น ต่ํา ของพวกเรา บอกเลยว่าก็ไม่ได้ยากเหมือนอย่างที่คิด ซึ่งมือใหม่ก็สามารถเข้ามาได้กำไรสำหรับเพื่อการเล่นเกมสล็อตออนไลน์ที่เว็บไซต์ของเรากันได้อย่างแน่แท้ เพียงแต่คุณกดสปิน แล้วก็คอยวงล้อหมุนเพื่อรับเงินรางวัล คุณก็สามารถทำเงินจากการเล่นเกมสล็อตออนไลน์ได้อย่างง่ายดายนั่นเอง เนื่องจากอย่างนี้ สล็อตเว็บตรง ฝาก-ถอน true wallet ไม่มี ธนาคาร ไม่มี ขั้น ต่ํา ของพวกเราจึงจัดว่าเป็นแหล่งทำเงินซึ่งสามารถได้กำไรได้อย่างสะดวกสบายที่สุดนั่นเอง ฉะนั้นรวมทั้งอย่าได้เสียโอกาส ที่จะได้เข้ามาสร้างผลกำไรที่ เว็บไซต์สล็อต ของพวกเรากันโดยเด็ดขาด.
Im grateful for the blog post.Much thanks again. Really Great.
Greetings! This is my first visit to your blog! We are a collection of volunteers and starting a new initiative in a community in the same niche. Your blog provided us beneficial information to work on. You have done a marvellous job!
Hey, you used to write wonderful, but the last several posts have been kinda boring? I miss your great writings. Past few posts are just a little out of track! come on!
Thanks, I have been looking for information about this subject for ages and yours is the best I have located so far.
Я ценю информативный подход этой статьи. Она предоставляет достаточно фактов и данных для лучшего понимания проблемы. Хотелось бы увидеть больше ссылок на исследования и источники информации.
One other thing I would like to mention is that as opposed to trying to accommodate all your online degree lessons on times that you complete work (since the majority of people are tired when they go back home), try to receive most of your lessons on the week-ends and only a couple courses on weekdays, even if it means taking some time off your weekend. This is really good because on the saturdays and sundays, you will be a lot more rested and concentrated with school work. Thanks a bunch for the different guidelines I have realized from your blog.
Thanks
Based on my study, after a the foreclosure home is available at an auction, it is common for that borrower to still have a remaining balance on the mortgage loan. There are many loan companies who seek to have all fees and liens repaid by the subsequent buyer. Even so, depending on particular programs, laws, and state legislation there may be many loans which are not easily resolved through the exchange of lending options. Therefore, the duty still falls on the consumer that has got his or her property foreclosed on. Many thanks for sharing your thinking on this web site.
Music began playing as soon as I opened this web page, so frustrating!
I’m in awe of the author’s talent to make intricate concepts approachable to readers of all backgrounds. This article is a testament to her expertise and commitment to providing helpful insights. Thank you, author, for creating such an compelling and insightful piece. It has been an absolute pleasure to read!
It’s a shame you don’t have a donate button! I’d without a doubt donate to this outstanding blog! I guess for now i’ll settle for book-marking and adding your RSS feed to my Google account. I look forward to new updates and will talk about this blog with my Facebook group. Chat soon!
I just could not depart your web site prior to suggesting that I really enjoyed the standard info a person provide for your visitors? Is gonna be back often to check up on new posts
This is the correct weblog for anybody who desires to find out about this topic. You realize so much its virtually arduous to argue with you (not that I truly would need?HaHa). You undoubtedly put a brand new spin on a subject thats been written about for years. Nice stuff, just nice!
Hiya! Quick question that’s entirely off topic. Do you know how to make your site mobile friendly? My site looks weird when browsing from my apple iphone. I’m trying to find a template or plugin that might be able to correct this issue. If you have any recommendations, please share. Cheers!
After I originally commented I clicked the -Notify me when new comments are added- checkbox and now each time a remark is added I get four emails with the identical comment. Is there any approach you can take away me from that service? Thanks!
Virginia News: Your source for Virginia breaking news, sports, business, entertainment, weather and traffic https://virginiapost.us/
The latest news on grocery chains, celebrity chefs, and fast food – plus reviews, cooking tips and advice, recipes, and more. https://megamenu.us/
RVVR is website dedicated to advancing physical and mental health through scientific research and proven interventions. Learn about our evidence-based health promotion programs. https://rvvr.us/
View the latest from the world of psychology: from behavioral research to practical guidance on relationships, mental health and addiction. Find help from our directory of therapists, psychologists and counselors. https://therapisttoday.us/
The best tips, guides, and inspiration on home improvement, decor, DIY projects, and interviews with celebrities from your favorite renovation shows. https://houseblog.us/
Find healthy, delicious recipes and meal plan ideas from our test kitchen cooks and nutrition experts at SweetApple. Learn how to make healthier food choices every day. https://sweetapple.site/
Miami Post: Your source for South Florida breaking news, sports, business, entertainment, weather and traffic https://miamipost.us/
Healthcare Blog provides news, trends, jobs and resources for health industry professionals. We cover topics like healthcare IT, hospital administration, polcy
Fresh, flavorful and (mostly) healthy recipes made for real, actual, every day life. Helping you celebrate the joy of food in a totally non-intimidating way. https://skillfulcook.us/
OCNews.us covers local news in Orange County, CA, California and national news, sports, things to do and the best places to eat, business and the Orange County housing market. https://ocnews.us/
Island Post is the website for a chain of six weekly newspapers that serve the North Shore of Nassau County, Long Island published by Alb Media. The newspapers are comprised of the Great Neck News, Manhasset Times, Roslyn Times, Port Washington Times, New Hyde Park Herald Courier and the Williston Times. Their coverage includes village governments, the towns of Hempstead and North Hempstead, schools, business, entertainment and lifestyle. https://islandpost.us/
Breaking food industry news, cooking tips, recipes, reviews, rankings, and interviews https://tastingcorner.us/
Latest Denver news, top Colorado news and local breaking news from Denver News, including sports, weather, traffic, business, politics, photos and video. https://denver-news.us/
BioPharma Blog provides news and analysis for biotech and biopharmaceutical executives. We cover topics like clinical trials, drug discovery and development, pharma marketing, FDA approvals and regulations, and more. https://biopharmablog.us/
Santa Cruz Sentinel: Local News, Local Sports and more for Santa Cruz https://santacruznews.us/
I?ve been exploring for a bit for any high-quality articles or weblog posts on this sort of house . Exploring in Yahoo I eventually stumbled upon this website. Reading this info So i?m happy to exhibit that I’ve an incredibly just right uncanny feeling I came upon just what I needed. I such a lot for sure will make sure to don?t fail to remember this site and provides it a glance on a continuing basis.
Hmm it looks like your site ate my first comment (it was extremely long) so I guess I’ll just sum it up what I had written and say, I’m thoroughly enjoying your blog. I too am an aspiring blog blogger but I’m still new to everything. Do you have any recommendations for inexperienced blog writers? I’d genuinely appreciate it.
Good news
Thanks a bunch for sharing this with all people you really understand what you’re talking about! Bookmarked. Please also consult with my web site =). We may have a hyperlink trade arrangement between us!
Do whatever you want. Steal cars, drive tanks and helicopters, defeat gangs. It’s your city! https://play.google.com/store/apps/details?id=com.gangster.city.open.world
News from the staff of the LA Reporter, including crime and investigative coverage of the South Bay and Harbor Area in Los Angeles County. https://lareporter.us/
Thank you for another informative website. Where else could I get that kind of info written in such an ideal way? I have a project that I am just now working on, and I have been on the look out for such info.
Valuable info. Lucky me I found your site by accident, and I’m shocked why this accident didn’t happened earlier! I bookmarked it.
Woah! I’m really enjoying the template/theme of this blog. It’s simple, yet effective. A lot of times it’s very difficult to get that “perfect balance” between superb usability and visual appeal. I must say you have done a excellent job with this. In addition, the blog loads extremely quick for me on Safari. Superb Blog!
FiverrEarn
[…]very handful of web-sites that occur to be in depth beneath, from our point of view are undoubtedly very well really worth checking out[…]
Yolonews.us covers local news in Yolo County, California. Keep up with all business, local sports, outdoors, local columnists and more. https://yolonews.us/
Hello! I just wish to give an enormous thumbs up for the nice info you have here on this post. I will probably be coming again to your blog for extra soon.
Thanks
Maryland Post: Your source for Maryland breaking news, sports, business, entertainment, weather and traffic https://marylandpost.us/
Money Analysis is the destination for balancing life and budget – from money management tips, to cost-cutting deals, tax advice, and much more. https://moneyanalysis.us/
Hello there! I know this is kinda off topic but I’d figured I’d ask. Would you be interested in exchanging links or maybe guest writing a blog post or vice-versa? My site discusses a lot of the same topics as yours and I think we could greatly benefit from each other. If you are interested feel free to shoot me an e-mail. I look forward to hearing from you! Terrific blog by the way!
The LB News is the local news source for Long Beach and the surrounding area providing breaking news, sports, business, entertainment, things to do, opinion, photos, videos and more https://lbnews.us/
I’m typically to running a blog and i actually admire your content. The article has actually peaks my interest. I’m going to bookmark your site and keep checking for new information.
Boulder News
I like the valuable info you provide for your articles. I will bookmark your blog and check once more here frequently. I’m relatively sure I will learn plenty of new stuff right right here! Good luck for the following!
Hello would you mind stating which blog platform you’re using? I’m looking to start my own blog soon but I’m having a hard time deciding between BlogEngine/Wordpress/B2evolution and Drupal. The reason I ask is because your layout seems different then most blogs and I’m looking for something unique. P.S Apologies for getting off-topic but I had to ask!
I’ve really noticed that fixing credit activity needs to be conducted with techniques. If not, you will probably find yourself causing harm to your rank. In order to grow into success fixing your credit history you have to be careful that from this minute you pay all your monthly fees promptly in advance of their slated date. It is significant since by certainly not accomplishing so, all other actions that you will decide to use to improve your credit positioning will not be efficient. Thanks for discussing your strategies.
Things i have often told persons is that when you are evaluating a good on the net electronics retail outlet, there are a few elements that you have to consider. First and foremost, you should really make sure to discover a reputable and in addition, reliable retailer that has got great critiques and scores from other shoppers and market sector experts. This will ensure that you are getting through with a well-known store to provide good support and assistance to its patrons. Thanks for sharing your ideas on this blog site.
certainly like your web-site however you have to take a look at the spelling on several of your posts. Many of them are rife with spelling problems and I to find it very bothersome to tell the reality nevertheless I?ll certainly come again again.
Thanks
I like the helpful information you provide in your articles. I?ll bookmark your weblog and check again here frequently. I am quite sure I?ll learn many new stuff right here! Best of luck for the next!
Fashion More provides in-depth journalism and insight into the news and trends impacting the fashion
The latest video game news, reviews, exclusives, streamers, esports, and everything else gaming. https://zaaz.us/
PharmaMore provides a forum for industry leaders to hear the most important voices and ideas in the industry. https://pharmamore.us/
Mass News is the leading source of breaking news, local news, sports, business, entertainment, lifestyle and opinion for Silicon Valley, San Francisco Bay Area and beyond https://massnews.us/
Get Lehigh Valley news, Allentown news, Bethlehem news, Easton news, Quakertown news, Poconos news and Pennsylvania news from Morning Post. https://morningpost.us/
Local news from Redlands, CA, California news, sports, things to do, and business in the Inland Empire. https://redlandsnews.us
yes
แทงบอลออนไลน์ การ แทงบอลออนไลน์ เว็บไซต์พนันบอล UFABET เว็บไซต์ตรงไม่ผ่านเอเย่นต์ แทงง่าย ฝากไม่มีขั้นต่ำ 100 ก็ถอนได้ชื่นชอบที่สุดกับบริการที่เราให้คุณเป็นราวกับลูกค้าวีไอพี เราเป็นเว็บตรงจากบริษัท UFABET ที่มีคณะทำงานประสิทธิภาพคอยให้บริการ ให้คำแนะนำ ตอบปัญหา คอยช่วยเหลือท่านตลอด 24 ชั่วโมง เว็บแทงบอลเรามีเรทจ่ายสูงที่สุด ราคาค่าน้ำประปายอดเยี่ยม เปิดคู่บอลให้เล่นมากที่สุด เว็บพนันออนไลน์ ยูฟ่าเบ็ท เป็นเว็บที่ตามมาตรฐาน เป็นหัวหน้าด้านความปลอดภัย.
San Gabriel Valley News is the local news source for Los Angeles County
Bellevue Latest Headlines: City of Bellevue can Apply for Digital Equity Grant https://bellevuenews.us
zuzu
I?ve read several good stuff here. Definitely worth bookmarking for revisiting. I wonder how much effort you put to create such a fantastic informative web site.
york
I just added this webpage to my google reader, excellent stuff. Can’t get enough!
Я хотел бы выразить свою восторженность этой статьей! Она не только информативна, но и вдохновляет меня на дальнейшее изучение темы. Автор сумел передать свою страсть и знания, что делает эту статью поистине уникальной.
Peninsula News is a daily news website, covering the northern Olympic Peninsula in the state of Washington, United States. https://peninsulanews.us
zeo
This article is a breath of fresh air! The author’s unique perspective and insightful analysis have made this a truly captivating read. I’m grateful for the effort she has put into producing such an enlightening and thought-provoking piece. Thank you, author, for sharing your knowledge and stimulating meaningful discussions through your outstanding writing!
same
Reading, PA News, Sports, Weather, Things to Do http://readingnews.us/
My spouse and I absolutely love your blog and find many of your post’s to be exactly what I’m looking for. Would you offer guest writers to write content for you personally? I wouldn’t mind producing a post or elaborating on most of the subjects you write about here. Again, awesome blog!
Thanks for another informative blog. Where else could I get that type of info written in such a perfect way? I’ve a project that I’m just now working on, and I have been on the look out for such info.
Эта статья – источник ценной информации! Я оцениваю глубину исследования и разнообразие рассматриваемых аспектов. Она действительно расширила мои знания и помогла мне лучше понять тему. Большое спасибо автору за такую качественную работу!
Статья представляет интересный взгляд на данную тему и содержит ряд полезной информации. Понравилась аккуратная структура и логическое построение аргументов.
I was just seeking this information for a while. After six hours of continuous Googleing, finally I got it in your site. I wonder what’s the lack of Google strategy that don’t rank this kind of informative websites in top of the list. Generally the top sites are full of garbage.
Heya i am for the first time here. I came across this board and I in finding It really useful & it helped me out much. I am hoping to present one thing back and aid others like you aided me.
The latest news and reviews in the world of tech, automotive, gaming, science, and entertainment. https://millionbyte.us/
nice
colibrim.com web site.
colibrim.com
colibrim.com
colibrim.com
colibrim.com
I believe this is among the such a lot significant information for me. And i am happy reading your article. However wanna observation on few basic things, The web site taste is perfect, the articles is in reality great : D. Good job, cheers
yes of
Does your site have a contact page? I’m having a tough time locating it but, I’d like to send you an email. I’ve got some recommendations for your blog you might be interested in hearing. Either way, great site and I look forward to seeing it grow over time.
Thanks for your publication. One other thing is that individual American states have their unique laws in which affect property owners, which makes it quite hard for the our elected representatives to come up with a new set of recommendations concerning home foreclosure on people. The problem is that every state possesses own legal guidelines which may work in a damaging manner in relation to foreclosure policies.
Everyone loves what you guys are up too. This type of clever work and coverage! Keep up the good works guys I’ve included you guys to my blogroll.
go back
aloo
I simply could not go away your website before suggesting that I actually enjoyed the usual information a person supply for your guests? Is going to be back often in order to check out new posts
I don?t even understand how I stopped up right here, however I thought this submit was good. I do not realize who you might be but certainly you’re going to a well-known blogger when you aren’t already 😉 Cheers!
zohan
Hello to every one, since I am genuinely eager of reading this webpage’s post to be updated on a regular basis. It includes good data.
okay
Hi! I just wanted to ask if you ever have any problems with hackers? My last blog (wordpress) was hacked and I ended up losing months of hard work due to no back up. Do you have any solutions to protect against hackers?
Your style is verү unique in comparison tߋ other folks I’ѵe read stuff from.
I apрreciate you fоr posting ѡhen you’ve ɡot tthe opportunity, Guesas Ι ԝill just bookmark this web site.
Αlso visit mу web site :: beli subscriber
I was recommended this blog by my cousin. I am not sure whether this post is written by him as no one else know such detailed about my difficulty. You are amazing! Thanks!
You actually make it seem so easy with your presentation but I find this topic to be really something that I think I would never understand. It seems too complicated and very broad for me. I’m looking forward for your next post, I will try to get the hang of it!
LipoSlend is a liquid nutritional supplement that promotes healthy and steady weight loss. https://liposlendofficial.us/
What’s up friends, how is everything, and what you want to say about this paragraph, in my view its actually awesome designed for me.
Immigration Lawyers… […]the time to read or visit the content or sites we have linked to below theFencing Tauranga
Wow that was unusual. I just wrote an incredibly long comment but after I clicked submit my comment didn’t appear. Grrrr… well I’m not writing all that over again. Anyway, just wanted to say superb blog!
I have read several good stuff here. Definitely worth bookmarking for revisiting. I wonder how much effort you put to make such a fantastic informative website.
คาสิโนออนไลน์ พนันออนไลน์เว็บตรง ฝากถอน ไม่มีขั้นต่ำ ที่ให้บริการคาสิโนอนไลน์ ที่ดีที่สุด คาสิโนออนไลน์ พนันพนันออนไลน์ ที่ให้บริการคาสิโนออนไลน์ ที่เยี่ยมที่สุด การให้บริการ พนันคาสิโนสดออนไลน์ ที่มีให้บริการ ที่เว็บไซต์ยูฟ่าเบท เป็น คาสิโนออนไลน์เว็บตรง ที่เปิดให้บริการ มาอย่างนาน และมีพนันคาสิโนออนไลน์ ที่ล้ำยุค ซึ่งเป็นเว็บไซต์ ที่มีการปรับปรุงอยู่ตลอด โดยคณะทำงานคุณภาพ ที่จะทำให้นักเสี่ยงโชค ได้เล่นพนันที่นำสมัย. เร็ว แล้วก็ไม่มีอันตรายมาก เป็นค่ายเกมพนันคาสิโนออนไลน์ ที่มีทั้งแบบเล่นออนไลน์สด และ เกมพนันคาสิโนต่างๆให้นักเล่นการพนันได้เลือก คาสิโนออนไลน์ได้เงินจริง รวมทั้งเดิมพัน เพื่อสร้างเงินกำไรง่าย ด้วยรูปแบบการเล่นพนัน ที่เล่นง่าย รู้เรื่องได้ไม่ยาก ใช้เวลาไม่นาน นักพนักก็จะสามารถเล่นพนันได้อย่างสบาย และทำกำไร มีเงินเต็มกระเป๋ากลับไปอยู่บ้านแน่นอน.
Thanks for your article. What I want to say is that when evaluating a good online electronics shop, look for a web-site with entire information on critical indicators such as the security statement, safety measures details, any payment procedures, as well as other terms along with policies. Always take time to browse the help plus FAQ areas to get a much better idea of how the shop works, what they are able to do for you, and ways in which you can use the features.
Spot on with this write-up, I truly assume this website wants rather more consideration. I?ll probably be once more to learn much more, thanks for that info.
Great write-up, I?m normal visitor of one?s website, maintain up the nice operate, and It is going to be a regular visitor for a long time.
I have noticed that of all varieties of insurance, medical health insurance is the most marked by controversy because of the discord between the insurance cover company’s need to remain adrift and the user’s need to have insurance coverage. Insurance companies’ earnings on overall health plans have become low, consequently some companies struggle to profit. Thanks for the suggestions you share through this web site.
It is in point of fact a great and useful piece of information. I?m glad that you simply shared this helpful information with us. Please stay us up to date like this. Thanks for sharing.
I think that a property foreclosure can have a important effect on the debtor’s life. Real estate foreclosures can have a Several to ten years negative impact on a debtor’s credit report. A borrower that has applied for a mortgage or any kind of loans for instance, knows that the particular worse credit rating is definitely, the more tricky it is to acquire a decent personal loan. In addition, it might affect a new borrower’s chance to find a really good place to let or rent, if that will become the alternative housing solution. Thanks for your blog post.
Greetings from Ohio! I’m bored at work so I decided to check out your site on my iphone during lunch break. I love the knowledge you provide here and can’t wait to take a look when I get home. I’m surprised at how fast your blog loaded on my cell phone .. I’m not even using WIFI, just 3G .. Anyhow, fantastic blog!
Howdy! I just wish to give a huge thumbs up for the great info you’ve gotten right here on this post. I might be coming again to your blog for more soon.
I’m curious to find out what blog platform you’re working with? I’m experiencing some minor security problems with my latest site and I’d like to find something more secure. Do you have any solutions?
I would like to thank you for the efforts you’ve put in writing this website. I am hoping the same high-grade blog post from you in the upcoming also. Actually your creative writing abilities has encouraged me to get my own web site now. Really the blogging is spreading its wings quickly. Your write up is a great example of it.
Hello! I just want to give a huge thumbs up for the great information you could have here on this post. I will be coming back to your blog for more soon.
I cherished as much as you’ll obtain performed right here. The sketch is tasteful, your authored subject matter stylish. however, you command get got an nervousness over that you wish be delivering the following. ill indisputably come more formerly again since exactly the same nearly very regularly inside case you protect this increase.
Thanks for your content. One other thing is when you are advertising your property alone, one of the difficulties you need to be conscious of upfront is when to deal with house inspection reports. As a FSBO owner, the key to successfully shifting your property plus saving money upon real estate agent income is information. The more you already know, the simpler your home sales effort is going to be. One area exactly where this is particularly essential is assessments.
Good job on this article! I really like how you presented your facts and how you made it interesting and easy to understand. Thank you.Fence contractor Christchurch
Bazopril is a blood pressure supplement featuring a blend of natural ingredients to support heart health
Tonic Greens is an all-in-one dietary supplement that has been meticulously designed to improve overall health and mental wellness.
Thanks for the ideas you have discussed here. Moreover, I believe there are many factors that really keep your automobile insurance premium straight down. One is, to contemplate buying motors that are inside the good set of car insurance firms. Cars which are expensive tend to be at risk of being robbed. Aside from that insurance policies are also depending on the value of your car or truck, so the higher in price it is, then higher this premium you only pay.
Hello! I’m at work browsing your blog from my new iphone 3gs! Just wanted to say I love reading your blog and look forward to all your posts! Carry on the excellent work!
Some really superb info , Sword lily I found this.Wellington fences
I think that a foreclosed can have a major effect on the debtor’s life. Real estate foreclosures can have a Seven to decade negative effect on a borrower’s credit report. A borrower who may have applied for a home loan or just about any loans for that matter, knows that the particular worse credit rating can be, the more difficult it is to get a decent loan. In addition, it may affect the borrower’s capability to find a quality place to let or hire, if that becomes the alternative housing solution. Great blog post.
In this grand design of things you actually secure a B- for hard work. Exactly where you actually lost me ended up being in your details. You know, people say, the devil is in the details… And it couldn’t be more true in this article. Having said that, permit me reveal to you what did deliver the results. Your writing can be very powerful and that is possibly why I am taking an effort in order to opine. I do not make it a regular habit of doing that. Secondly, despite the fact that I can easily notice the jumps in logic you come up with, I am definitely not sure of exactly how you seem to connect the ideas which make your final result. For now I will subscribe to your position however trust in the foreseeable future you actually connect your dots much better.
Thanks for your article. What I want to say is that when searching for a good internet electronics shop, look for a web page with entire information on critical indicators such as the security statement, safety measures details, any payment procedures, and other terms as well as policies. Generally take time to browse the help along with FAQ sections to get a greater idea of the way the shop operates, what they can perform for you, and how you can make use of the features.
You really make it seem so easy with your presentation but I find this topic to be actually something that I think I would never understand. It seems too complicated and very broad for me. I am looking forward for your next post, I?ll try to get the hang of it!
Отличная статья! Я бы хотел отметить ясность и логичность, с которыми автор представил информацию. Это помогло мне легко понять сложные концепции. Большое спасибо за столь прекрасную работу!
Hi there just wanted to give you a quick heads up. The words in your content seem to be running off the screen in Ie. I’m not sure if this is a format issue or something to do with internet browser compatibility but I figured I’d post to let you know. The style and design look great though! Hope you get the problem solved soon. Many thanks
The information shared is of top quality which has to get appreciated at all levels. Well done…
Thanks for sharing
Thanks for every other fantastic post. The place else may anyone get that kind of information in such a perfect way of writing? I’ve a presentation subsequent week, and I am on the look for such information.
Thank you for sharing indeed great looking !
Nice i really enjoyed reading your blogs. Keep on posting. Thanks
I have observed that online education is getting favorite because getting your college degree online has developed into popular alternative for many people. Quite a few people have not really had an opportunity to attend a traditional college or university yet seek the elevated earning potential and a better job that a Bachelors Degree offers. Still other people might have a college degree in one field but want to pursue a thing they now possess an interest in.
I have seen lots of useful points on your internet site about computers. However, I have the thoughts and opinions that notebook computers are still less than powerful sufficiently to be a option if you normally do tasks that require plenty of power, including video croping and editing. But for net surfing, word processing, and the majority of other prevalent computer work they are all right, provided you don’t mind the little screen size. Thank you sharing your opinions.
A great post without any doubt.
Milf with a need for fresh ! come in and enjoy!
Eggs up grill menu
What I have observed in terms of laptop memory is always that there are features such as SDRAM, DDR or anything else, that must go with the requirements of the motherboard. If the pc’s motherboard is kind of current while there are no operating-system issues, upgrading the ram literally normally requires under a couple of hours. It’s among the list of easiest pc upgrade types of procedures one can consider. Thanks for discussing your ideas.
This really answered my downside, thanks!
Age of Empires II – Walkthrough (Part II)
https://elephantsinourrooms.com/2022/02/27/russia-invades-ukraine/
Nice site, nice and easy on the eyes and great content too. Do you need many drafts to make a post?Invisible dog fence
Thanks , I have recently been searching for information approximately this topic for a long time and yours is the greatest I have came upon till now. But, what in regards to the conclusion? Are you positive about the source?
I?m impressed, I need to say. Actually hardly ever do I encounter a blog that?s both educative and entertaining, and let me let you know, you’ve gotten hit the nail on the head. Your idea is excellent; the issue is something that not sufficient persons are talking intelligently about. I’m very completely happy that I stumbled across this in my search for one thing relating to this.
I just like the helpful info you provide for your articles. I will bookmark your blog and check again here frequently. I am relatively sure I?ll be informed many new stuff proper here! Good luck for the next!
Thanks for your suggestions. One thing we’ve noticed is that often banks plus financial institutions really know the spending behavior of consumers plus understand that most people max out and about their own credit cards around the trips. They wisely take advantage of this fact and then start flooding the inbox plus snail-mail box together with hundreds of no interest APR credit card offers immediately after the holiday season concludes. Knowing that for anyone who is like 98 of all American open public, you’ll soar at the opportunity to consolidate consumer credit card debt and move balances towards 0 APR credit cards.
One thing is always that one of the most frequent incentives for applying your cards is a cash-back and also rebate supply. Generally, you’re going to get 1-5 back with various expenses. Depending on the credit card, you may get 1 returning on most expenditures, and 5 back again on purchases made in convenience stores, gas stations, grocery stores plus ‘member merchants’.
One other thing I would like to talk about is that in lieu of trying to fit all your online degree tutorials on days that you conclude work (because most people are fatigued when they return home), try to get most of your instructional classes on the weekends and only a couple courses on weekdays, even if it means a little time away from your end of the week. This is really good because on the saturdays and sundays, you will be far more rested in addition to concentrated on school work. Thx for the different points I have mastered from your blog.
Thank you for the auspicious writeup. It in reality was once a entertainment account it. Glance advanced to more brought agreeable from you! By the way, how could we communicate?
Thanks for the ideas you have discussed here. Something important I would like to convey is that personal computer memory requirements generally go up along with other advances in the engineering. For instance, if new generations of processors are brought to the market, there is usually a matching increase in the scale demands of both the computer memory and also hard drive room. This is because the application operated by means of these cpus will inevitably increase in power to make new technologies.
I?m no longer certain the place you are getting your information, however good topic. I must spend some time learning much more or working out more. Thank you for wonderful info I was looking for this info for my mission.
Hi my friend! I wish to say that this article is amazing, great written and come with almost all significant infos. I would like to look extra posts like this .
I’m really impressed with your writing skills and also with the layout on your blog. Is this a paid theme or did you modify it yourself? Either way keep up the excellent quality writing, it?s rare to see a nice blog like this one these days..
With havin so much content do you ever run into any issues of plagorism or copyright infringement? My site has a lot of exclusive content I’ve either created myself or outsourced but it seems a lot of it is popping it up all over the web without my authorization. Do you know any solutions to help protect against content from being stolen? I’d truly appreciate it.
Thanks
Age of Empires II – Walkthrough (Part II)
https://monting.de/de/component/k2/item/1?start=63970
At this time it looks like Movable Type is the top blogging platform out there right now. (from what I’ve read) Is that what you’re using on your blog?
Looking for a new signature scent? Picking the perfect perfume https://ceresaperfume.com requires some thoughtful consideration! Start by understanding your preference- floral, citrus, woody, or spicy. Head to a store and don’t rush: Smell a few, take a break, then revisit your favorites. Your nose can get overwhelmed, so don’t try more than 5 scents in one day! Also, remember perfumes can smell different on everyone due to body chemistry. To determine how it actually smells on you and how long it lasts, apply on your wrist and let it sit for a few hours before deciding. Happy sniffing! #perfume #beautytips
Good web site! I truly love how it is easy on my eyes and the data are well written. I am wondering how I could be notified whenever a new post has been made. I’ve subscribed to your RSS feed which must do the trick! Have a nice day!
kolay yemek tarifleri
Hello There. I found your blog using msn. This is a really well written article. I will be sure to bookmark it and return to read more of your useful info. Thanks for the post. I?ll definitely comeback.
You actually make it seem so easy together with your presentation but I to find this matter to be actually something which I feel I would never understand. It sort of feels too complex and very large for me. I’m taking a look ahead on your next put up, I?ll attempt to get the hold of it!
What’s up mates, how is everything, and what you want to say regarding this article, in my view its in fact amazing for me.
Today, taking into consideration the fast life style that everyone is having, credit cards have a huge demand throughout the market. Persons out of every discipline are using credit card and people who aren’t using the credit cards have made up their minds to apply for 1. Thanks for discussing your ideas about credit cards.
You can certainly see your expertise in the work you write. The world hopes for more passionate writers like you who aren’t afraid to say how they believe. Always go after your heart.
Thanks a lot for sharing this with all of us you actually know what you’re talking about! Bookmarked. Kindly also visit my website =). We could have a link exchange contract between us!
Thanks , I’ve just been looking for info about this topic for ages and yours is the best I have discovered so far. But, what about the bottom line? Are you sure about the source?
Wow, this article is mind-blowing! The author has done a phenomenal job of conveying the information in an compelling and enlightening manner. I can’t thank him enough for offering such precious insights that have certainly enlightened my knowledge in this topic. Bravo to her for producing such a masterpiece!
I was recommended this blog via my cousin. I am now not certain whether this submit is written via him as no one else understand such exact about my trouble. You are amazing! Thanks!
This design is incredible! You most certainly know how to keep a reader entertained. Between your wit and your videos, I was almost moved to start my own blog (well, almost…HaHa!) Great job. I really enjoyed what you had to say, and more than that, how you presented it. Too cool!
What i don’t realize is actually how you are not actually much more well-liked than you might be now. You’re very intelligent. You realize thus considerably relating to this subject, produced me personally consider it from a lot of varied angles. Its like men and women aren’t fascinated unless it is one thing to accomplish with Lady gaga! Your own stuffs nice. Always maintain it up!
We are offering Concrete Parking Lot Contractor, Concrete Installation Contractor Service, warehouse flooring, commercial, and industrial concrete roadways.
I’m extremely inspired with your writing skills as smartly as with the layout for your weblog. Is this a paid theme or did you modify it yourself? Either way stay up the nice quality writing, it is rare to look a great weblog like this one nowadays..
In accordance with my study, after a in foreclosure home is offered at a sale, it is common for the borrower to be able to still have some sort ofthat remaining unpaid debt on the personal loan. There are many creditors who make an effort to have all costs and liens cleared by the following buyer. Even so, depending on particular programs, restrictions, and state laws there may be some loans which aren’t easily resolved through the exchange of lending products. Therefore, the obligation still rests on the consumer that has received his or her property in foreclosure. Thanks for sharing your thinking on this blog.
Это помогает читателям получить полную картину и сформировать собственное мнение на основе предоставленных фактов.
It is best to participate in a contest for among the best blogs on the web. I will suggest this site!
Wow, fantastic blog layout! How lengthy have you been running a blog for? you make running a blog look easy. The entire glance of your web site is wonderful, let alone the content material!
Hey there this is kind of of off topic but I was wanting to know if blogs use WYSIWYG editors or if you have to manually code with HTML. I’m starting a blog soon but have no coding knowledge so I wanted to get advice from someone with experience. Any help would be enormously appreciated!
I’m typically to running a blog and i actually respect your content. The article has really peaks my interest. I am going to bookmark your web site and hold checking for new information.
Wow! I’m in awe of the author’s writing skills and ability to convey intricate concepts in a clear and precise manner. This article is a true gem that deserves all the accolades it can get. Thank you so much, author, for sharing your knowledge and providing us with such a precious resource. I’m truly appreciative!
Thank you very much
Wow, superb blog layout! How long have you been blogging for? you make blogging look easy. The overall look of your web site is excellent, as well as the content!
I would like to thank you for the efforts you’ve put in writing this web site. I am hoping the same high-grade site post from you in the upcoming also. Actually your creative writing abilities has encouraged me to get my own website now. Actually the blogging is spreading its wings rapidly. Your write up is a good example of it.
Thanks for the something totally new you have disclosed in your short article. One thing I’d really like to comment on is that FSBO human relationships are built with time. By launching yourself to owners the first weekend break their FSBO is definitely announced, ahead of the masses begin calling on Mon, you create a good connection. By mailing them methods, educational supplies, free reports, and forms, you become a great ally. Through a personal desire for them as well as their predicament, you develop a solid link that, on many occasions, pays off in the event the owners decide to go with a realtor they know in addition to trust – preferably you actually.
Hey there I am so happy I found your weblog, I really found you by mistake, while I was looking on Aol for something else, Nonetheless I am here now and would just like to say thanks a lot for a incredible post and a all round interesting blog (I also love the theme/design), I don’t have time to look over it all at the minute but I have bookmarked it and also added your RSS feeds, so when I have time I will be back to read a lot more, Please do keep up the fantastic work.
Статья представляет все ключевые аспекты темы, обеспечивая при этом достаточную детализацию.
It is indeed my belief that mesothelioma is definitely the most lethal cancer. It has unusual qualities. The more I actually look at it the greater I am assured it does not conduct itself like a real solid tissue cancer. If perhaps mesothelioma is usually a rogue viral infection, in that case there is the prospects for developing a vaccine plus offering vaccination for asbestos uncovered people who are vulnerable to high risk of developing future asbestos linked malignancies. Thanks for sharing your ideas about this important health issue.
I just couldn’t depart your web site prior to suggesting that I extremely enjoyed the standard information a person provide for your visitors? Is gonna be back often to check up on new posts
Would you be excited by exchanging links?
Another thing I have really noticed is for many people, a bad credit score is the reaction of circumstances further than their control. For instance they may happen to be saddled having an illness and because of this they have high bills going to collections. Maybe it’s due to a occupation loss or the inability to do the job. Sometimes divorce process can truly send the financial situation in the wrong direction. Thank you for sharing your notions on this site.
Hi there would you mind sharing which blog platform you’re using? I’m planning to start my own blog in the near future but I’m having a tough time making a decision between BlogEngine/Wordpress/B2evolution and Drupal. The reason I ask is because your layout seems different then most blogs and I’m looking for something unique. P.S My apologies for getting off-topic but I had to ask!
Nice blog here! Additionally your web site a lot up fast! What host are you the use of? Can I get your affiliate hyperlink for your host? I desire my site loaded up as fast as yours lol
Fantastic website you have here but I was wanting to know if you knew of any community forums that cover the same topics talked about in this article? I’d really love to be a part of online community where I can get feedback from other experienced people that share the same interest. If you have any suggestions, please let me know. Thank you!
A person necessarily lend a hand to make severely articles I would state. That is the first time I frequented your web page and up to now? I amazed with the analysis you made to make this particular put up amazing. Excellent activity!
Great post. I used to be checking continuously this weblog and I’m inspired! Very useful information particularly the remaining part 🙂 I maintain such information a lot. I used to be seeking this certain info for a long time. Thanks and best of luck.
It?s actually a nice and useful piece of information. I am satisfied that you just shared this helpful information with us. Please keep us informed like this. Thanks for sharing.
I have seen a great deal of useful factors on your web-site about computers. However, I’ve the judgment that laptops are still more or less not powerful adequately to be a good selection if you often do jobs that require a lot of power, for instance video editing and enhancing. But for world wide web surfing, microsoft word processing, and the majority of other prevalent computer functions they are fine, provided you do not mind the small screen size. Thank you for sharing your thinking.
Definitely consider that that you stated. Your favorite reason seemed to be on the internet the easiest thing to remember of. I say to you, I definitely get irked while people think about worries that they plainly do not realize about. You managed to hit the nail upon the top as smartly as outlined out the entire thing without having side effect , folks could take a signal. Will likely be again to get more. Thank you
site:มารู้จัก ‘โน้ตน้ำหอม’ ที่มีความลงตัวและความหลากหลายที่ Ceresa Perfume กันเถอะ! ่ https://ceresaperfume.com
Thanks for the suggestions you are giving on this blog. Another thing I would like to say is the fact getting hold of some copies of your credit profile in order to check accuracy of any detail will be the first action you have to undertake in credit restoration. You are looking to cleanse your credit file from damaging details mistakes that damage your credit score.
Good post right here. One thing I would really like to say is always that most professional job areas consider the Bachelor Degree like thejust like the entry level requirement for an online college degree. Whilst Associate Degrees are a great way to start out, completing a person’s Bachelors opens up many opportunities to various careers, there are numerous online Bachelor Course Programs available through institutions like The University of Phoenix, Intercontinental University Online and Kaplan. Another concern is that many brick and mortar institutions present Online types of their degree programs but normally for a considerably higher price than the companies that specialize in online course plans.
Heya i?m for the first time here. I found this board and I find It really useful & it helped me out much. I hope to give something back and aid others like you aided me.
I simply couldn’t leave your site before suggesting that I extremely enjoyed the usual information an individual provide for your visitors? Is gonna be back often to investigate cross-check new posts
Hi, Neat post. There is a problem with your site in internet explorer, would check this? IE still is the market leader and a good portion of people will miss your great writing due to this problem.
Its such as you learn my thoughts! You seem to understand so much approximately this, like you wrote the e-book in it or something. I feel that you simply can do with some p.c. to drive the message home a bit, but other than that, that is fantastic blog. An excellent read. I’ll definitely be back.
Thanks for some other excellent article. The place else may anyone get that kind of info in such a perfect manner of writing? I have a presentation next week, and I am at the look for such info.
F*ckin? tremendous issues here. I am very glad to look your post. Thank you so much and i’m looking forward to touch you. Will you kindly drop me a e-mail?
In line with my study, after a in foreclosure home is offered at a sale, it is common for any borrower in order to still have some sort ofthat remaining balance on the personal loan. There are many loan providers who seek to have all rates and liens repaid by the future buyer. Nevertheless, depending on specified programs, rules, and state regulations there may be a few loans which are not easily sorted out through the exchange of financial loans. Therefore, the responsibility still remains on the lender that has acquired his or her property foreclosed on. Thanks for sharing your opinions on this site.
Thanks alot : ) for your post. I’d really like to say that the price of car insurance differs from one insurance policy to another, simply because there are so many different issues which bring about the overall cost. By way of example, the make and model of the auto will have a tremendous bearing on the price tag. A reliable ancient family car or truck will have a more economical premium over a flashy expensive car.
One thing I’ve noticed is the fact that there are plenty of fallacies regarding the lenders intentions whenever talking about property foreclosure. One delusion in particular is the bank wants your house. Your banker wants your dollars, not your home. They want the money they gave you having interest. Preventing the bank is only going to draw a new foreclosed conclusion. Thanks for your write-up.
I?m impressed, I need to say. Really not often do I encounter a weblog that?s each educative and entertaining, and let me let you know, you’ve hit the nail on the head. Your thought is excellent; the problem is something that not sufficient individuals are talking intelligently about. I am very completely happy that I stumbled throughout this in my search for something relating to this.
Oh my goodness! I’m in awe of the author’s writing skills and ability to convey complicated concepts in a concise and concise manner. This article is a true gem that earns all the praise it can get. Thank you so much, author, for providing your wisdom and offering us with such a valuable treasure. I’m truly appreciative!
This site is really a stroll-by way of for the entire information you needed about this and didn?t know who to ask. Glimpse right here, and you?ll undoubtedly discover it.
Today, with the fast chosen lifestyle that everyone leads, credit cards have a big demand throughout the market. Persons out of every arena are using the credit card and people who are not using the credit card have arranged to apply for one. Thanks for giving your ideas about credit cards.
Helpful info. Lucky me I discovered your site unintentionally, and I’m shocked why this coincidence did not happened earlier! I bookmarked it.
Helpful info. Fortunate me I discovered your site accidentally, and I’m stunned why this twist of fate did not came about in advance! I bookmarked it.
I do accept as true with all the ideas you’ve offered in your post. They are very convincing and can certainly work. Nonetheless, the posts are very brief for novices. Could you please extend them a bit from subsequent time? Thank you for the post.
I have come across that now, more and more people are now being attracted to surveillance cameras and the area of pictures. However, as a photographer, you should first commit so much time deciding the model of digicam to buy and also moving store to store just so you could potentially buy the most affordable camera of the trademark you have decided to choose. But it doesn’t end right now there. You also have take into consideration whether you should obtain a digital photographic camera extended warranty. Thx for the good points I gathered from your web site.
For hottest information you have to visit web and on world-wide-web I found this web
site as a best web site for latest updates.
great points altogether, you just gained a new reader. What would you suggest in regards to your post that you made a few days ago? Any positive?
It?s in reality a nice and useful piece of information. I?m satisfied that you just shared this helpful information with us. Please stay us up to date like this. Thanks for sharing.
Wow that was strange. I just wrote an very long comment but after I clicked submit my comment didn’t show up. Grrrr… well I’m not writing all that over again. Anyhow, just wanted to say fantastic blog!
Excellent site you have here but I was curious if you knew of any forums that cover the same topics talked about in this article? I’d really love to be a part of online community where I can get suggestions from other experienced individuals that share the same interest. If you have any suggestions, please let me know. Appreciate it!
Thanks for the a new challenge you have revealed in your blog post. One thing I would really like to reply to is that FSBO interactions are built eventually. By releasing yourself to owners the first weekend break their FSBO can be announced, ahead of the masses get started calling on Monday, you generate a good network. By mailing them methods, educational materials, free accounts, and forms, you become a strong ally. By subtracting a personal interest in them plus their circumstance, you build a solid interconnection that, oftentimes, pays off if the owners decide to go with a broker they know and also trust – preferably you actually.
I appreciate, cause I found just what I was looking for. You’ve ended my 4 day long hunt! God Bless you man. Have a nice day. Bye
Hi would you mind sharing which blog platform you’re working with? I’m looking to start my own blog soon but I’m having a hard time making a decision between BlogEngine/Wordpress/B2evolution and Drupal. The reason I ask is because your layout seems different then most blogs and I’m looking for something unique. P.S Apologies for being off-topic but I had to ask!
whoah this blog is magnificent i love reading your articles. Keep up the great work! You know, many people are searching around for this info, you could help them greatly.
This is undoubtedly one of the finest articles I’ve read on this topic! The author’s comprehensive knowledge and passion for the subject are apparent in every paragraph. I’m so thankful for finding this piece as it has enhanced my understanding and ignited my curiosity even further. Thank you, author, for dedicating the time to produce such a remarkable article!
wonderful submit, very informative. I wonder why the other specialists of this sector don’t understand this. You should continue your writing. I’m sure, you have a huge readers’ base already!
yes thanks good
I’m really enjoying the design and layout of your site. It’s a very easy on the eyes which makes it much more pleasant for me to come here and visit more often. Did you hire out a developer to create your theme? Exceptional work!
Yet another thing I would like to talk about is that as opposed to trying to fit all your online degree courses on days that you finish off work (because most people are drained when they come home), try to receive most of your instructional classes on the weekends and only a couple courses for weekdays, even if it means taking some time off your weekend break. This is beneficial because on the week-ends, you will be extra rested in addition to concentrated for school work. Thanks a bunch for the different recommendations I have realized from your web site.
After study a number of of the blog posts in your web site now, and I really like your means of blogging. I bookmarked it to my bookmark website checklist and will likely be checking back soon. Pls check out my web page as nicely and let me know what you think.
Hi there! I just would like to give a huge thumbs up for the good data you might have here on this post. I will be coming again to your weblog for extra soon.
I know of the fact that nowadays, more and more people are attracted to surveillance cameras and the subject of digital photography. However, as a photographer, you must first devote so much period deciding the model of camera to buy and moving store to store just so you can buy the most economical camera of the trademark you have decided to settle on. But it won’t end right now there. You also have to think about whether you should obtain a digital dslr camera extended warranty. Thanks alot : ) for the good tips I acquired from your website.
I have been surfing online more than three hours lately, yet I by no means discovered any fascinating article like yours. It is beautiful worth sufficient for me. In my opinion, if all site owners and bloggers made just right content material as you probably did, the internet will likely be a lot more helpful than ever before.
Great blog here! Also your site loads up fast! What web host are you using? Can I get your affiliate link to your host? I wish my site loaded up as fast as yours lol
Great paintings! That is the type of info that are meant to be shared across the internet. Shame on Google for now not positioning this put up higher! Come on over and consult with my web site . Thank you =)
Please let me know if you’re looking for a writer for your blog. You have some really good articles and I feel I would be a good asset. If you ever want to take some of the load off, I’d really like to write some material for your blog in exchange for a link back to mine. Please shoot me an e-mail if interested. Regards!
SightCare formula aims to maintain 20/20 vision without the need for any surgical process. This supplement is a perfect solution for people facing issues as they grow older. https://sightcare-web.com/
Thanks for another excellent article. Where else could anyone get that type of information in such an ideal way of writing? I have a presentation next week, and I’m on the look for such info.
Woah! I’m really digging the template/theme of this blog. It’s simple, yet effective. A lot of times it’s challenging to get that “perfect balance” between user friendliness and visual appearance. I must say that you’ve done a very good job with this. Additionally, the blog loads extremely fast for me on Opera. Exceptional Blog!
Thanks for helping me to gain new ideas about pcs. I also contain the belief that one of the best ways to maintain your notebook in perfect condition is with a hard plastic material case, or shell, that will fit over the top of one’s computer. A lot of these protective gear are usually model precise since they are manufactured to fit perfectly within the natural housing. You can buy all of them directly from the seller, or through third party sources if they are for your notebook computer, however don’t assume all laptop may have a shell on the market. All over again, thanks for your suggestions.
Nice post. I study one thing more difficult on totally different blogs everyday. It should all the time be stimulating to read content from different writers and follow a little one thing from their store. I?d want to use some with the content on my weblog whether or not you don?t mind. Natually I?ll give you a link in your internet blog. Thanks for sharing.
In the awesome scheme of things you get an A just for hard work. Exactly where you misplaced me personally was on your specifics. You know, as the maxim goes, the devil is in the details… And that couldn’t be much more accurate right here. Having said that, let me say to you what exactly did work. The text is actually rather powerful and this is probably the reason why I am making the effort to opine. I do not really make it a regular habit of doing that. Secondly, although I can see the jumps in reason you make, I am definitely not confident of exactly how you seem to connect the points which inturn produce the final result. For right now I shall yield to your position however hope in the foreseeable future you connect your facts better.
It’s best to participate in a contest for one of the best blogs on the web. I’ll advocate this web site!
Wow, fantastic weblog structure! How lengthy have you been blogging for? you make running a blog look easy. The full look of your web site is excellent, as smartly as the content!
This is really interesting, You’re an overly skilled blogger. I’ve joined your feed and stay up for searching for extra of your wonderful post. Additionally, I’ve shared your website in my social networks!
A formidable share, I just given this onto a colleague who was doing a little evaluation on this. And he in actual fact bought me breakfast as a result of I discovered it for him.. smile. So let me reword that: Thnx for the treat! However yeah Thnkx for spending the time to debate this, I really feel strongly about it and love reading more on this topic. If potential, as you change into expertise, would you thoughts updating your weblog with more details? It is highly helpful for me. Huge thumb up for this blog put up!
I have noticed that expenses for online degree specialists tend to be a fantastic value. Like a full Bachelors Degree in Communication in the University of Phoenix Online consists of Sixty credits from $515/credit or $30,900. Also American Intercontinental University Online provides a Bachelors of Business Administration with a entire school requirement of 180 units and a cost of $30,560. Online studying has made getting the education so much easier because you can easily earn your current degree through the comfort of your dwelling place and when you finish from office. Thanks for all other tips I have really learned through the web-site.
Thanks for your posting. I also believe that laptop computers have grown to be more and more popular these days, and now in many cases are the only type of computer found in a household. It is because at the same time actually becoming more and more economical, their working power is growing to the point where they may be as powerful as personal computers coming from just a few years ago.
Many thanks for your post. I want to comment that the expense of car insurance differs from one policy to another, mainly because there are so many different facets which play a role in the overall cost. By way of example, the make and model of the motor vehicle will have a tremendous bearing on the fee. A reliable older family car or truck will have a lower priced premium than just a flashy expensive car.
Hey there! I’ve been following your site for a while now and finally got the courage to go ahead and give you a shout out from New Caney Tx! Just wanted to mention keep up the fantastic job!
What?s Happening i’m new to this, I stumbled upon this I have found It absolutely helpful and it has helped me out loads. I hope to contribute & aid other users like its aided me. Great job.
Does your blog have a contact page? I’m having problems locating it but, I’d like to send you an e-mail. I’ve got some ideas for your blog you might be interested in hearing. Either way, great site and I look forward to seeing it improve over time.
https://www.estilobcn.com/aco/boba-fett-confirmado-en-la-entrega-8-de-star-wars-anthology/
I just added this website to my feed reader, excellent stuff. Cannot get enough!
Hey very nice blog!! Man .. Beautiful .. Amazing .. I will bookmark your site and take the feeds also?I’m happy to find so many useful information here in the post, we need develop more techniques in this regard, thanks for sharing. . . . . .
Excellent weblog here! Additionally your web site so much up fast! What host are you the usage of? Can I am getting your affiliate link to your host? I wish my web site loaded up as quickly as yours lol
magnificent submit, very informative. I’m wondering why the opposite specialists of this sector do not understand this. You must proceed your writing. I’m sure, you have a great readers’ base already!
I?ll right away grab your rss feed as I can’t find your e-mail subscription link or e-newsletter service. Do you have any? Please let me know so that I could subscribe. Thanks.
I’m blown away by the quality of this content! The author has undoubtedly put a huge amount of effort into exploring and organizing the information. It’s exciting to come across an article that not only offers useful information but also keeps the readers engaged from start to finish. Great job to her for making such a remarkable piece!
wonderful post, very informative. I wonder why the other experts of this sector do not notice this. You must continue your writing. I’m sure, you have a great readers’ base already!
Hello there! I know this is somewhat off topic but I was wondering if you knew where I could get a captcha plugin for my comment form? I’m using the same blog platform as yours and I’m having trouble finding one? Thanks a lot!
Things i have often told men and women is that while looking for a good on the net electronics retail outlet, there are a few components that you have to think about. First and foremost, you should make sure to get a reputable plus reliable retail store that has gotten great opinions and classification from other buyers and business sector analysts. This will ensure that you are getting through with a well-known store that gives good service and aid to the patrons. Thank you for sharing your ideas on this weblog.
Thanks for some other excellent post. The place else could anyone get that kind of info in such a perfect method of writing? I’ve a presentation next week, and I am on the look for such info.
Thank you for the sensible critique. Me & my neighbor were just preparing to do a little research about this. We got a grab a book from our local library but I think I learned more clear from this post. I’m very glad to see such magnificent information being shared freely out there.
Hi there! Do you know if they make any plugins to assist with SEO? I’m trying to get my blog to rank for some targeted keywords but I’m not seeing very good gains. If you know of any please share. Cheers!
This Monday feels even brighter after reading your post. The insights are engaging and thought-provoking. I believe adding more visuals could make your future posts even more appealing and immersive.
👀 Hey, anyone spot the sneaky stuff in the fifth line?
Thx for your post. I would like to comment that the tariff of car insurance differs from one plan to another, mainly because there are so many different facets which bring about the overall cost. By way of example, the make and model of the motor vehicle will have a massive bearing on the price tag. A reliable old family motor vehicle will have a less expensive premium than just a flashy sports vehicle.
The posts are like stars in the sky—each one shining brightly, guiding my curiosity.
Terrific paintings! That is the type of information that are supposed to be shared around the net. Shame on Google for not positioning this publish higher! Come on over and consult with my site . Thank you =)
Very good blog! Do you have any hints for aspiring writers? I’m planning to start my own website soon but I’m a little lost on everything. Would you suggest starting with a free platform like WordPress or go for a paid option? There are so many options out there that I’m completely overwhelmed .. Any recommendations? Thanks a lot!
The ability to convey hard to understand ideas so effortlessly is as attractive as a perfectly tailored suit.
hey there and thank you for your information ? I?ve definitely picked up anything new from right here. I did however expertise several technical points using this site, since I experienced to reload the web site lots of times previous to I could get it to load properly. I had been wondering if your web host is OK? Not that I’m complaining, but slow loading instances times will sometimes affect your placement in google and could damage your high quality score if advertising and marketing with Adwords. Anyway I?m adding this RSS to my e-mail and could look out for a lot more of your respective fascinating content. Ensure that you update this again soon..
Best Natural Way to Restore Your Perfect Vision https://sightcare-eye.com/
Thanks for another informative blog. Where else may I am getting that kind of information written in such a perfect means? I’ve a undertaking that I’m simply now running on, and I’ve been on the look out for such information.
Sugar Defender offers a natural solution for those looking to support their health goals. – https:/defenders-sugar.com/
An additional issue is really that video gaming became one of the all-time most significant forms of entertainment for people of nearly every age. Kids have fun with video games, and also adults do, too. Your XBox 360 is amongst the favorite video games systems for people who love to have hundreds of games available to them, along with who like to relax and play live with people all over the world. Many thanks for sharing your notions.
Its like you read my mind! You seem to understand so much approximately this, such as you wrote the ebook in it or something. I think that you simply can do with a few p.c. to drive the message house a little bit, however other than that, this is great blog. A great read. I will definitely be back.
Terima kasih atas posting yang luar biasa! 🌈 Berapa penghasilan seorang penulis di sini? Saya ingin bergabung!
What i do not understood is actually how you are not actually much more well-liked than you might be right now. You are so intelligent. You realize therefore significantly relating to this subject, made me personally consider it from so many varied angles. Its like women and men aren’t fascinated unless it?s one thing to accomplish with Lady gaga! Your own stuffs excellent. Always maintain it up!
Would you like me to continue with more comments following this format?
Incredible stuff! But seriously, what’s with the bunch of English comments and emojis? 🤔
Marvelous! But, seriously, why the influx of English comments and emojis? 😁
I’m mesmerized by this post, outstanding work!
The crux of your writing whilst appearing agreeable at first, did not work perfectly with me after some time. Somewhere throughout the paragraphs you managed to make me a believer unfortunately only for a while. I still have got a problem with your leaps in logic and one might do nicely to fill in all those breaks. When you actually can accomplish that, I will certainly end up being fascinated.
Thanks for your useful post. Through the years, I have been able to understand that the symptoms of mesothelioma cancer are caused by the actual build up connected fluid involving the lining of your lung and the upper body cavity. The disease may start from the chest spot and multiply to other limbs. Other symptoms of pleural mesothelioma cancer include weight reduction, severe respiration trouble, a fever, difficulty ingesting, and puffiness of the face and neck areas. It ought to be noted that some people living with the disease never experience just about any serious signs and symptoms at all.
Hey There. I found your blog using msn. That is a really well written article. I will be sure to bookmark it and return to read extra of your helpful info. Thanks for the post. I?ll definitely return.
Wow, this article is mind-blowing! The author has done a fantastic job of delivering the information in an engaging and enlightening manner. I can’t thank him enough for sharing such valuable insights that have certainly enhanced my awareness in this subject area. Kudos to him for producing such a gem!
A experiência de acessar este site é sempre tranquila e segura. A confiança que ele inspira é um testemunho de sua dedicação à excelência. Obrigado por ser um exemplo tão positivo na web!
Write more, thats all I have to say. Literally, it seems as though you relied on the video to make your point. You definitely know what youre talking about, why waste your intelligence on just posting videos to your blog when you could be giving us something enlightening to read?
Top Stage Hypnotist for hire Kristian von Sponneck performs private stage hypnosis shows anywhere in the UK, Europe or worldwide. Hire hime for your next event!
Автор старается подойти к теме нейтрально, предоставляя информацию, не влияющую на мнение читателей.
Wow! This could be one particular of the most helpful blogs We’ve ever arrive across on this subject. Actually Wonderful. I’m also an expert in this topic so I can understand your hard work.
The fresh insights were a breath of fresh air. Thank you for sharing The unique perspective.
I’m amazed by the depth and breadth of The knowledge. Thanks for sharing!
The writing style is captivating. Finally, something that can keep my attention longer than a TikTok video.
Hi my friend! I wish to say that this article is awesome, nice written and include almost all important infos. I would like to see more posts like this.
The words are like brush strokes on a canvas, painting ideas in my mind.
I?m impressed, I must say. Actually rarely do I encounter a blog that?s each educative and entertaining, and let me let you know, you may have hit the nail on the head. Your thought is outstanding; the issue is one thing that not enough individuals are talking intelligently about. I am very comfortable that I stumbled across this in my search for something relating to this.
The grace and authority with which you handle topics are awe-inspiring. I always come away with new knowledge.
Reading the book might empower readers to take charge of their health and well-being in relation to dizziness.”Doc, I am Dizzy” could serve as a valuable resource for healthcare professionals looking to deepen their understanding of dizziness.
Each article you write is like a step in a dance, moving us gracefully through The thoughts.
So expertly done!
very nice publish, i definitely love this website, keep on it
Aw, this was a really nice post. In thought I would like to put in writing like this additionally ? taking time and actual effort to make an excellent article? however what can I say? I procrastinate alot and on no account seem to get something done.
new platform
I was just searching for this info for a while. After six hours of continuous Googleing, at last I got it in your web site. I wonder what is the lack of Google strategy that don’t rank this type of informative sites in top of the list. Usually the top web sites are full of garbage.
https://www.meiyingge8.com/space-uid-560567.html
Please let me know if you’re looking for a writer for your site. You have some really good posts and I think I would be a good asset. If you ever want to take some of the load off, I’d absolutely love to write some material for your blog in exchange for a link back to mine. Please blast me an email if interested. Many thanks!
https://www.google.bt/url?q=https://zenwriting.net/northtanker89/crystal-clear-the-ultimate-guide-to-auto-glass-replacement
This design is wicked! You most certainly know how to keep a reader entertained. Between your wit and your videos, I was almost moved to start my own blog (well, almost…HaHa!) Wonderful job. I really enjoyed what you had to say, and more than that, how you presented it. Too cool!
Wow that was strange. I just wrote an incredibly long comment but after I clicked submit my comment didn’t show up. Grrrr… well I’m not writing all that over again. Anyway, just wanted to say wonderful blog!
https://www.google.co.uz/url?q=https://moore-driscoll-2.blogbright.net/shattered-no-more-the-ultimate-guide-to-auto-glass-replacement-1717293905
https://mensvault.men/story.php?title=crystal-clear-the-ultimate-guide-to-auto-glass-replacement#discuss
Yesterday, while I was at work, my cousin stole my iphone and tested to see if it can survive a 30 foot drop, just so she can be a youtube sensation. My iPad is now destroyed and she has 83 views. I know this is totally off topic but I had to share it with someone!
I’m really enjoying the design and layout of your site. It’s a very easy on the eyes which makes it much more pleasant for me to come here and visit more often. Did you hire out a designer to create your theme? Excellent work!
You really make it seem really easy along with your presentation but I find this matter to be actually something which I feel I’d by no means understand. It sort of feels too complex and extremely vast for me. I’m having a look ahead on your next post, I?ll attempt to get the hold of it!
I do agree with all of the ideas you’ve offered in your post. They are very convincing and can definitely work. Nonetheless, the posts are very quick for newbies. Could you please prolong them a little from next time? Thanks for the post.
Hello! Someone in my Myspace group shared this website with us so I came to look it over. I’m definitely loving the information. I’m book-marking and will be tweeting this to my followers! Exceptional blog and amazing design and style.
Hey there would you mind stating which blog platform you’re working with? I’m going to start my own blog in the near future but I’m having a hard time making a decision between BlogEngine/Wordpress/B2evolution and Drupal. The reason I ask is because your design seems different then most blogs and I’m looking for something completely unique. P.S Sorry for being off-topic but I had to ask!
LeanBiome is a dietary supplement designed to promote weight loss and improve overall health. It is formulated with a unique blend of probiotics, prebiotics, and natural ingredients that work together to support a healthy gut microbiome. The gut microbiome plays a crucial role in digestion, metabolism, and the immune system. By optimizing the gut microbiome, LeanBiome aims to help individuals achieve their weight loss goals more effectively and sustainably. https://sites.google.com/spsw.edu.pl/leanbiome/
Prostadine is a dietary supplement formulated to support prostate health, particularly in men experiencing symptoms of benign prostatic hyperplasia (BPH) or other prostate-related issues. As men age, maintaining prostate health becomes increasingly important to avoid urinary discomfort and other related problems. Prostadine aims to provide a natural solution through a blend of ingredients known for their beneficial effects on the prostate. https://sites.google.com/spsw.edu.pl/prostabiome
ZenCortex is a nootropic supplement designed to enhance cognitive function, support brain health, and improve mental clarity. By combining a blend of natural ingredients known for their neuroprotective and cognitive-enhancing properties, ZenCortex aims to boost memory, focus, and overall brain performance. https://sites.google.com/spsw.edu.pl/zencortex/
SeroLean is a dietary supplement designed to support weight loss and overall metabolic health. By leveraging the power of natural ingredients, SeroLean aims to help individuals achieve their weight management goals by enhancing serotonin levels, reducing appetite, and promoting fat metabolism. https://sites.google.com/spsw.edu.pl/serolean/
Pineal XT is a dietary supplement formulated to enhance sleep quality and support sleep patterns. Known for its natural ingredients, Pineal XT particularly focuses on boosting melatonin production, aiding individuals in managing sleep-related issues effectively. https://sites.google.com/spsw.edu.pl/pinealxt/
Prodentim offers a range of innovative dental care products designed to promote optimal oral health. From toothpaste to oral rinses, Prodentim products are formulated with advanced ingredients to address various dental concerns and enhance overall oral hygiene. https://sites.google.com/spsw.edu.pl/prodentim/
Puravive is a dietary supplement designed to support weight loss and overall metabolic health. By leveraging a blend of natural ingredients known for their fat-burning and metabolism-boosting properties, Puravive aims to help individuals achieve their weight management goals and enhance their overall well-being. https://sites.google.com/spsw.edu.pl/puravive-web/
Posting yang brilian! 💡 Bagaimana cara saya bergabung dengan blog ini? Dan apakah ada kompensasi yang diberikan kepada penulisnya?
Cardio Defend is a dietary supplement designed to support cardiovascular health. Utilizing a blend of natural ingredients, Cardio Defend aims to improve heart function, promote healthy blood pressure, and enhance overall cardiovascular wellness. This article explores the composition, benefits, clinical evidence, and user experiences related to Cardio Defend. https://sites.google.com/spsw.edu.pl/cardiodefend/
Sugar Balance is a dietary supplement designed to support healthy blood sugar levels. Utilizing a blend of natural ingredients, Sugar Balance aims to help individuals manage their blood sugar more effectively, offering a holistic approach to maintaining metabolic health and preventing complications associated with high blood sugar levels. https://sites.google.com/spsw.edu.pl/sugarbalance
EyeFortin is an all-natural eye-health supplement that helps to keep your eyes healthy even as you age. It prevents infections and detoxifies your eyes while also being stimulant-free. This makes it a great choice for those who are looking for a natural way to improve their eye health. https://sites.google.com/spsw.edu.pl/eyefortin/
Burn Boost is a dietary supplement designed to aid in weight management and fat loss. Combining a blend of natural ingredients, Burn Boost aims to increase metabolism, enhance energy levels, and support overall weight loss efforts. This article explores the composition, benefits, clinical evidence, and user experiences related to Burn Boost. https://sites.google.com/spsw.edu.pl/burnboost/
Terima kasih atas posting yang luar biasa! 🌈 Berapa penghasilan seorang penulis di sini? Saya ingin bergabung!
Red Boost is a dietary supplement formulated to support male vitality, enhance physical performance, and improve overall well-being. With a blend of potent natural ingredients, Red Boost aims to address common issues related to male health, such as low energy, reduced libido, and decreased stamina. This article delves into the composition, benefits, clinical evidence, and user experiences of Red Boost. https://sites.google.com/spsw.edu.pl/redboost/
PotentStream is a dietary supplement designed to enhance male vitality, energy levels, and overall performance. Combining a blend of potent natural ingredients, PotentStream aims to provide a comprehensive solution for men experiencing issues related to low energy, reduced libido, and decreased stamina. This article explores the composition, benefits, clinical evidence, and user experiences of PotentStream.
https://sites.google.com/spsw.edu.pl/potentstream/
Hi there, just become aware of your blog thru Google, and found that it’s really informative. I?m gonna watch out for brussels. I?ll be grateful if you happen to proceed this in future. Numerous folks will be benefited out of your writing. Cheers!
Edward Callaham
ragnarok mobile private server 2024
android private server
A breath of fresh air, or what I needed after being suffocated by mediocrity.
Discover a premium solution for optimal hearing health with our top-quality Sonofit supplements. Learn more here: https://sonofit.usanuv.com
Discover a premium solution for optimal hearing health with our top-quality Sonofit supplements. Learn more here: https://sonofit.usanuv.com
Good bro nice.
Hey! Quick question that’s entirely off topic. Do you know how to make your site mobile friendly? My weblog looks weird when viewing from my apple iphone. I’m trying to find a template or plugin that might be able to fix this problem. If you have any suggestions, please share. Cheers!
It?s laborious to search out educated individuals on this topic, but you sound like you already know what you?re talking about! Thanks
Hi! This is kind of off topic but I need some advice from an established blog. Is it tough to set up your own blog? I’m not very techincal but I can figure things out pretty fast. I’m thinking about setting up my own but I’m not sure where to start. Do you have any ideas or suggestions? Appreciate it
you’re actually a good webmaster. The web site loading pace is incredible. It seems that you are doing any distinctive trick. Moreover, The contents are masterpiece. you’ve performed a great activity in this matter!
Thanks for giving your ideas. Something is that learners have an alternative between federal government student loan and a private education loan where its easier to choose student loan online debt consolidation than over the federal education loan.
I’ve learned newer and more effective things through your site. One other thing I’d prefer to say is the fact newer computer os’s have a tendency to allow extra memory to be played with, but they additionally demand more storage simply to operate. If people’s computer can not handle extra memory and also the newest application requires that ram increase, it could be the time to buy a new Personal computer. Thanks
Hola! I’ve been reading your weblog for a while now and finally got the courage to go ahead and give you a shout out from Porter Texas! Just wanted to say keep up the great job!
Thanks for the tips you have discussed here. One more thing I would like to state is that personal computer memory needs generally rise along with other innovations in the technological know-how. For instance, any time new generations of processors are introduced to the market, there is usually a matching increase in the size and style calls for of all computer system memory in addition to hard drive room. This is because the software operated through these processors will inevitably boost in power to use the new technological innovation.
Your webpage won’t show up properly on my iphone – you might want to try and fix that
The creativity and intelligence shine through, blinding almost, but I’ll keep my sunglasses handy.
I have really learned newer and more effective things out of your blog post. One other thing I have recognized is that in most cases, FSBO sellers will certainly reject a person. Remember, they might prefer not to use your companies. But if you maintain a reliable, professional romance, offering help and remaining in contact for about four to five weeks, you will usually have the ability to win a meeting. From there, a listing follows. Cheers
The Writing is like a warm fireplace on a cold day, inviting me to settle in and stay awhile.
Thanks for the posting. I have generally noticed that a lot of people are desperate to lose weight as they wish to appear slim and also attractive. Nonetheless, they do not constantly realize that there are many benefits for you to losing weight also. Doctors declare that over weight people experience a variety of disorders that can be instantly attributed to their own excess weight. Fortunately that people who sadly are overweight along with suffering from a variety of diseases can reduce the severity of their particular illnesses by means of losing weight. You are able to see a slow but noted improvement with health while even a small amount of fat loss is realized.
Learned a lot from this post, and here I was thinking I knew it all. Thanks for the humble pie.
Thanks for sharing your ideas. I might also like to express that video games have been ever evolving. Technology advances and inventions have served create practical and active games. These entertainment video games were not that sensible when the concept was first of all being tried out. Just like other forms of technological innovation, video games too have had to progress by means of many generations. This itself is testimony towards the fast growth and development of video games.
Consistently producing high-high quality content, like sending flowers just because. Thank you for The dedication.
I always learn something new from The posts. Thank you for the education!
You have a unique perspective that I find incredibly valuable. Thank you for sharing.
Wah, posting yang luar biasa! ✨ Saya penasaran, berapa penghasilan rata-rata seorang penulis di blog ini? Saya ingin ikut serta!
One thing I want to reply to is that fat burning plan fast can be carried out by the correct diet and exercise. A person’s size not merely affects the look, but also the quality of life. Self-esteem, depressive disorder, health risks, in addition to physical abilities are impacted in an increase in weight. It is possible to do everything right but still gain. In such a circumstance, a medical problem may be the primary cause. While an excessive amount of food rather than enough exercising are usually responsible, common medical ailments and widespread prescriptions can easily greatly help to increase size. Many thanks for your post right here.
Thanks for your publication. What I want to comment on is that when you are evaluating a good on-line electronics retail outlet, look for a internet site with full information on critical indicators such as the level of privacy statement, safety measures details, payment options, along with terms along with policies. Constantly take time to look at help plus FAQ segments to get a greater idea of how the shop is effective, what they can do for you, and in what way you can maximize the features.
invisalign in garland
There are some fascinating points in time in this article but I don?t know if I see all of them middle to heart. There is some validity however I will take hold opinion until I look into it further. Good article , thanks and we wish more! Added to FeedBurner as properly
I was just looking for this info for some time. After six hours of continuous Googleing, at last I got it in your site. I wonder what’s the lack of Google strategy that do not rank this kind of informative sites in top of the list. Usually the top web sites are full of garbage.
Ciamik!
Mantap!
Mantep!
Wah, keren!
Things i have observed in terms of pc memory is the fact that there are requirements such as SDRAM, DDR or anything else, that must go with the specs of the motherboard. If the computer’s motherboard is reasonably current and there are no operating system issues, replacing the ram literally normally takes under 1 hour. It’s on the list of easiest laptop upgrade techniques one can visualize. Thanks for sharing your ideas.
Thanks for everything.
Thanks for your article. Another point is that being photographer requires not only difficulties in recording award-winning photographs but in addition hardships in acquiring the best camera suited to your needs and most especially struggles in maintaining the quality of your camera. This is very correct and evident for those photographers that are in capturing the actual nature’s fascinating scenes – the mountains, the actual forests, the actual wild or the seas. Going to these adventurous places surely requires a photographic camera that can meet the wild’s harsh area.
A great post without any doubt.
good site i like it
Top!
Some tips i have constantly told people is that when evaluating a good online electronics store, there are a few factors that you have to consider. First and foremost, you want to make sure to discover a reputable and also reliable shop that has obtained great testimonials and ratings from other individuals and industry analysts. This will ensure you are handling a well-known store that provides good assistance and assistance to it’s patrons. Thank you for sharing your opinions on this blog site.
My partner and I stumbled over here from a different website and thought I may as well check things out. I like what I see so now i am following you. Look forward to finding out about your web page yet again.
Making hard to understand topics accessible is a talent. It’s like you’re the translator of my heart’s unspoken questions.
Thanks for this glorious article. Yet another thing to mention is that almost all digital cameras come equipped with the zoom lens that permits more or less of a scene being included through ‘zooming’ in and out. These changes in {focus|focusing|concentration|target|the a**** length are generally reflected within the viewfinder and on huge display screen at the back of the very camera.
Thanks for your recommendations on this blog. Just one thing I would wish to say is the fact purchasing electronic products items on the Internet is not something new. In truth, in the past 10 years alone, the marketplace for online consumer electronics has grown drastically. Today, you can find practically almost any electronic gadget and tools on the Internet, ranging from cameras and also camcorders to computer parts and game playing consoles.
Hi, i read your blog from time to time and i own a similar one and i was just curious if you get a lot of spam remarks? If so how do you protect against it, any plugin or anything you can recommend? I get so much lately it’s driving me insane so any support is very much appreciated.
In these days of austerity plus relative stress and anxiety about running into debt, most people balk contrary to the idea of having a credit card in order to make acquisition of merchandise or even pay for a vacation, preferring, instead only to rely on this tried plus trusted procedure for making repayment – raw cash. However, in case you have the cash there to make the purchase 100 , then, paradoxically, that’s the best time for you to use the credit card for several factors.
Have you ever thought about writing an ebook or guest authoring on other sites? I have a blog centered on the same ideas you discuss and would really like to have you share some stories/information. I know my readers would enjoy your work. If you are even remotely interested, feel free to shoot me an e mail.
Just wish to say your article is as astonishing. The clearness in your post is simply cool and i can assume you’re an expert on this subject. Fine with your permission let me to grab your RSS feed to keep updated with forthcoming post. Thanks a million and please carry on the gratifying work.
I have been surfing online more than 3 hours today, yet I never found any interesting article like yours. It is pretty worth enough for me. In my opinion, if all webmasters and bloggers made good content as you did, the net will be a lot more useful than ever before.
One more thing I would like to mention is that in lieu of trying to fit all your online degree tutorials on days of the week that you complete work (since the majority people are drained when they return home), try to find most of your instructional classes on the weekends and only a couple courses in weekdays, even if it means taking some time off your saturdays. This is fantastic because on the week-ends, you will be more rested along with concentrated for school work. Thanks a bunch for the different guidelines I have mastered from your blog site.
There may be noticeably a bundle to learn about this. I assume you made certain good points in features also.
One other issue is when you are in a circumstance where you don’t have a cosigner then you may genuinely wish to try to exhaust all of your federal funding options. You could find many funds and other scholarships and grants that will offer you money to support with institution expenses. Thanks a lot for the post.
Thank you for the sensible critique. Me and my neighbor were just preparing to do a little research about this. We got a grab a book from our area library but I think I learned more clear from this post. I am very glad to see such excellent info being shared freely out there.
Hello friends, how is all, and what you would like to say concerning this post, in my view its really remarkable designed for me.
I think other website proprietors should take this website as an model, very clean and magnificent user genial style and design, as well as the content. You are an expert in this topic!
I’m not that much of a online reader to be honest but your blogs really nice, keep it up! I’ll go ahead and bookmark your site to come back later on. Many thanks
Howdy! I know this is somewhat off topic but I was wondering if you knew where I could locate a captcha plugin for my comment form? I’m using the same blog platform as yours and I’m having trouble finding one? Thanks a lot!
Hi this is kind of of off topic but I was wanting to know if blogs use WYSIWYG editors or if you have to manually code with HTML. I’m starting a blog soon but have no coding skills so I wanted to get guidance from someone with experience. Any help would be greatly appreciated!
I do believe that a foreclosure can have a important effect on the client’s life. Foreclosures can have a Several to few years negative relation to a applicant’s credit report. A borrower who’s applied for home financing or just about any loans for example, knows that the worse credit rating can be, the more challenging it is to obtain a decent mortgage loan. In addition, it could affect any borrower’s capability to find a reasonable place to let or hire, if that gets the alternative homes solution. Thanks for your blog post.
This piece was beautifully written and incredibly informative about Car Cal ADAS. Thank you for sharing!
Hi! Do you use Twitter? I’d like to follow you if that would be ok. I’m definitely enjoying your blog and look forward to new updates.
Amazing blog! Is your theme custom made or did you download it from somewhere? A theme like yours with a few simple tweeks would really make my blog shine. Please let me know where you got your design. Thank you
Some really marvelous work on behalf of the owner of this web site , dead great subject matter.sistema contable
I?m not certain the place you’re getting your info, however good topic. I must spend some time finding out more or understanding more. Thanks for excellent info I used to be on the lookout for this information for my mission.
I know this if off topic but I’m looking into starting my own blog and was wondering what all is required to get set up? I’m assuming having a blog like yours would cost a pretty penny? I’m not very web smart so I’m not 100 sure. Any suggestions or advice would be greatly appreciated. Thank you
“>น้ำหอมอาจจะรู้สึกต่างไปเมื่อได้สัมผัสกับผิวของเรา ด้วยเหตุนี้ การทดลองฉีดที่ข้อมือแล้วรอให้<a href="https://ceresaperfume.com
Today, with the fast way of living that everyone leads, credit cards get this amazing demand throughout the market. Persons coming from every area are using credit card and people who are not using the credit cards have made arrangements to apply for one in particular. Thanks for spreading your ideas about credit cards.
I am grateful for your post. I would like to comment that the expense of car insurance differs from one scheme to another, since there are so many different facets which bring about the overall cost. Such as, the brand name of the motor vehicle will have an enormous bearing on the fee. A reliable aged family car or truck will have a more affordable premium than the usual flashy sports vehicle.
whoah this blog is fantastic i love reading your articles. Keep up the great work! You know, a lot of people are looking around for this info, you could aid them greatly.
In these days of austerity in addition to relative anxiety about incurring debt, a lot of people balk up against the idea of using a credit card to make acquisition of merchandise as well as pay for any gift giving occasion, preferring, instead just to rely on the particular tried along with trusted approach to making transaction – cash. However, if you have the cash available to make the purchase fully, then, paradoxically, this is the best time for them to use the credit cards for several factors.
When I originally commented I clicked the “Notify me when new comments are added” checkbox and now each time a comment is added I get several emails with the same comment. Is there any way you can remove me from that service? Bless you!
hello there and thank you for your information ? I have definitely picked up something new from right here. I did however expertise several technical issues using this web site, since I experienced to reload the website a lot of times previous to I could get it to load correctly. I had been wondering if your web hosting is OK? Not that I am complaining, but sluggish loading instances times will very frequently affect your placement in google and can damage your quality score if ads and marketing with Adwords. Well I am adding this RSS to my e-mail and can look out for a lot more of your respective exciting content. Make sure you update this again very soon..
Consumer Information to Dwelling Power Savings: Condensed On-line Model.
Wonderful beat ! I wish to apprentice even as you amend your web site, how could i subscribe for a weblog site? The account aided me a acceptable deal. I have been a little bit acquainted of this your broadcast offered bright transparent concept
We are a group of volunteers and opening a new scheme in our community. Your website offered us with valuable info to work on. You’ve done a formidable job and our entire community will be grateful to you.
It?s laborious to find educated people on this subject, but you sound like you know what you?re speaking about! Thanks
I think this is one of the most vital information for me. And i’m glad reading your article. But want to remark on few general things, The website style is ideal, the articles is really great : D. Good job, cheers
tiktok follower kaufen
I have observed that over the course of creating a relationship with real estate proprietors, you’ll be able to come to understand that, in most real estate contract, a payment is paid. In the long run, FSBO sellers never “save” the payment. Rather, they fight to earn the commission by way of doing a great agent’s work. In completing this task, they invest their money plus time to execute, as best they’re able to, the obligations of an representative. Those tasks include getting known the home by means of marketing, delivering the home to all buyers, constructing a sense of buyer emergency in order to make prompt an offer, preparing home inspections, handling qualification checks with the bank, supervising fixes, and facilitating the closing of the deal.
I have been exploring for a little bit for any high quality articles or blog posts in this kind of space . Exploring in Yahoo I at last stumbled upon this site. Studying this info So i?¦m satisfied to convey that I’ve a very good uncanny feeling I found out exactly what I needed. I such a lot definitely will make sure to do not omit this web site and give it a glance on a constant basis.
Thank you for sharing your personal experience and wisdom with us Your words are so encouraging and uplifting
ダッチワイフ
Your blog has quickly become one of my favorites I am constantly impressed by the quality and depth of your content
Attractive portion of content. I just stumbled upon your weblog and in accession capital to claim that I get in fact loved account your weblog posts. Any way I?ll be subscribing on your feeds and even I success you get right of entry to persistently rapidly.
Its like you read my mind! You appear to know a lot about this, like you wrote the book in it or something. I think that you could do with a few pics to drive the message home a bit, but instead of that, this is excellent blog. An excellent read. I will certainly be back.
The ability to present nuanced ideas so clearly is something I truly respect.
슬롯사이트
My brother recommended I might like this web site. He was entirely right. This post truly made my day. You can not imagine just how much time I had spent for this info! Thanks!
I am curious to find out what blog platform you are using? I’m having some minor security problems with my latest website and I’d like to find something more safe. Do you have any solutions?
Hi there, I found your site via Google while searching for a related topic, your website came up, it looks great. I have bookmarked it in my google bookmarks.
With havin so much written content do you ever run into any problems of plagorism or copyright infringement? My site has a lot of completely unique content I’ve either created myself or outsourced but it looks like a lot of it is popping it up all over the web without my authorization. Do you know any techniques to help protect against content from being stolen? I’d truly appreciate it.
Hello my friend! I want to say that this post is awesome, nice written and include approximately all important infos. I?d like to see more posts like this.
ro rebirth wiki
Somebody necessarily help to make significantly posts I would state. That is the first time I frequented your website page and thus far? I surprised with the analysis you made to make this actual publish incredible. Fantastic activity!
I have mastered some essential things through your site post. One other stuff I would like to state is that there are lots of games on the market designed specifically for preschool age kids. They incorporate pattern acknowledgement, colors, creatures, and styles. These commonly focus on familiarization rather than memorization. This makes little ones occupied without experiencing like they are studying. Thanks
Centeno-Schultz Clinic
Definitely believe that which you said. Your favorite justification appeared to be on the net the easiest thing to be aware of. I say to you, I definitely get irked while people think about worries that they plainly do not know about. You managed to hit the nail upon the top and also defined out the whole thing without having side effect , people can take a signal. Will probably be back to get more. Thanks
With havin so much content and articles do you ever run into any problems of plagorism or copyright infringement? My blog has a lot of completely unique content I’ve either created myself or outsourced but it appears a lot of it is popping it up all over the web without my permission. Do you know any methods to help protect against content from being ripped off? I’d truly appreciate it.
Thank you for another informative website. Where else could I get that type of info written in such a perfect way? I have a project that I am just now working on, and I have been on the look out for such info.
I additionally believe that mesothelioma is a uncommon form of cancers that is normally found in those previously familiar with asbestos. Cancerous cellular material form from the mesothelium, which is a defensive lining that covers almost all of the body’s body organs. These cells generally form within the lining with the lungs, mid-section, or the sac which actually encircles one’s heart. Thanks for expressing your ideas.
I’ve been surfing online more than three hours today, yet I never found any interesting article like yours. It is pretty worth enough for me. In my opinion, if all site owners and bloggers made good content as you did, the internet will be a lot more useful than ever before.
What?s Taking place i’m new to this, I stumbled upon this I’ve found It absolutely helpful and it has helped me out loads. I am hoping to contribute & aid different customers like its helped me. Great job.
RandM Tornado 9000
I think that is one of the so much significant info for me. And i am satisfied studying your article. However wanna commentary on few general issues, The web site taste is perfect, the articles is actually nice : D. Excellent process, cheers
My spouse and I absolutely love your blog and find many of your post’s to be exactly what I’m looking for. Does one offer guest writers to write content for you? I wouldn’t mind publishing a post or elaborating on many of the subjects you write with regards to here. Again, awesome blog!
Spot on with this write-up, I truly assume this website needs way more consideration. I?ll in all probability be once more to learn much more, thanks for that info.
Hi there, You have done an incredible job. I will certainly digg it and in my opinion recommend to my friends. I’m sure they’ll be benefited from this site.
Sassa Status
We’re a bunch of volunteers and starting a new scheme in our community. Your website offered us with valuable information to work on. You’ve done a formidable activity and our whole neighborhood might be thankful to you.
Hi there, just became aware of your blog through Google, and found that it’s truly informative. I?m gonna watch out for brussels. I will be grateful if you continue this in future. Lots of people will be benefited from your writing. Cheers!
You must take part in a contest for among the best blogs on the web. I will suggest this web site!
My partner and I stumbled over here from a different web page and thought I may as well check things out. I like what I see so now i am following you. Look forward to going over your web page yet again.
It?s really a nice and helpful piece of information. I am glad that you shared this useful information with us. Please keep us up to date like this. Thanks for sharing.
Thanks for the different tips provided on this blog site. I have observed that many insurance firms offer buyers generous savings if they choose to insure a few cars with them. A significant variety of households have got several cars these days, particularly those with mature teenage kids still located at home, and also the savings for policies may soon mount up. So it is a good idea to look for a good deal.
One thing I’d prefer to say is that often car insurance cancelling is a hated experience and if you’re doing the proper things like a driver you won’t get one. Lots of people do get the notice that they are officially dumped by their particular insurance company they have to struggle to get more insurance after the cancellation. Low-priced auto insurance rates are usually hard to get from cancellation. Understanding the main reasons concerning the auto insurance canceling can help drivers prevent losing one of the most important privileges accessible. Thanks for the ideas shared by your blog.
My brother suggested I may like this web site. He was entirely right. This publish truly made my day. You cann’t imagine simply how a lot time I had spent for this information! Thank you!
Fantastic job breaking down this topic, like a demolition crew for my misconceptions.
Thanks for the different tips contributed on this website. I have realized that many insurance carriers offer clients generous discount rates if they prefer to insure more and more cars with them. A significant amount of households possess several motor vehicles these days, in particular those with old teenage young children still located at home, and the savings with policies may soon mount up. So it pays to look for a bargain.
Excellent beat ! I would like to apprentice while you amend your web site, how can i subscribe for a blog website? The account aided me a acceptable deal. I had been tiny bit acquainted of this your broadcast provided bright clear concept
I’m still learning from you, as I’m making my way to the top as well. I certainly enjoy reading all that is written on your website.Keep the aarticles coming. I liked it!
It’s going to be ending of mine day, except before end I am reading this fantastic article to improve my experience.
I blog frequently and I truly thank you for your information. This article has really peaked my interest. I’m going to book mark your site and keep checking for new details about once a week. I subscribed to your Feed as well.
Pretty part of content. I simply stumbled upon your site and in accession capital to claim that I acquire in fact loved account your weblog posts. Anyway I?ll be subscribing to your feeds or even I success you access constantly fast.
“Travel pillow for neck support”
The information shared is of top quality which has to get appreciated at all levels. Well done…
excellent issues altogether, you just gained a new reader. What may you recommend about your put up that you just made a few days ago? Any certain?
A great post without any doubt.
Hello, i feel that i saw you visited my weblog so i got here to ?go back the prefer?.I am attempting to to find issues to enhance my web site!I assume its adequate to make use of a few of your ideas!!
Nice i really enjoyed reading your blogs. Keep on posting. Thanks
Hey there just wanted to give you a quick heads up. The words in your post seem to be running off the screen in Firefox. I’m not sure if this is a formatting issue or something to do with web browser compatibility but I figured I’d post to let you know. The layout look great though! Hope you get the issue resolved soon. Thanks
Thank you for sharing indeed great looking !
Thank you so much for sharing this wonderful post with us.
Attractive portion of content. I simply stumbled upon your site and in accession capital to say that I get actually enjoyed account your weblog posts. Any way I?ll be subscribing to your augment and even I success you get right of entry to consistently rapidly.
Nice i really enjoyed reading your blogs. Keep on posting. Thanks
Thank you for sharing indeed great looking !
Nice i really enjoyed reading your blogs. Keep on posting. Thanks
Nice i really enjoyed reading your blogs. Keep on posting. Thanks
I like what you guys are up also. Such smart work and reporting! Carry on the excellent works guys I have incorporated you guys to my blogroll. I think it will improve the value of my website 🙂
I blog often and I truly appreciate your information. The article has really peaked my interest. I’m going to take a note of your site and keep checking for new information about once per week. I opted in for your Feed too.
Have you ever thought about publishing an ebook or guest authoring on other sites? I have a blog based upon on the same topics you discuss and would love to have you share some stories/information. I know my viewers would value your work. If you’re even remotely interested, feel free to shoot me an e-mail.
A great post without any doubt.
Thank you for sharing indeed great looking !
Nice i really enjoyed reading your blogs. Keep on posting. Thanks
Website SEO
I really like your gay
I really like your shit
Great post!
Nice read!
porn
Thanks for these guidelines. One thing I additionally believe is the fact credit cards giving a 0 rate of interest often bait consumers in zero interest rate, instant acceptance and easy on the web balance transfers, nonetheless beware of the real factor that may void your 0 easy road annual percentage rate and also throw one out into the bad house rapid.
Does your website have a contact page? I’m having trouble locating it but, I’d like to shoot you an e-mail. I’ve got some creative ideas for your blog you might be interested in hearing. Either way, great blog and I look forward to seeing it expand over time.
I would like to thank you for the efforts you’ve put in writing this website. I’m hoping the same high-grade web site post from you in the upcoming also. In fact your creative writing skills has encouraged me to get my own website now. Actually the blogging is spreading its wings fast. Your write up is a good example of it.
Great post. I used to be checking constantly this weblog and I’m impressed! Extremely useful information particularly the closing phase 🙂 I maintain such information much. I was looking for this certain information for a long time. Thanks and good luck.
Looking for expert guidance on protecting assets while qualifying for Medicaid? As experienced elder law attorneys near me, our team at Ohio Medicaid Lawyers provides specialized legal assistance with Medicaid planning, estate planning, and asset protection strategies. We help seniors understand medicaid eligibility income charts and navigate the complex 5-year lookback period. Visit our website for comprehensive information about Ohio medicaid income limits 2024 and schedule a consultation with a trusted elder care attorney who can safeguard your future.
|
One thing I’d like to say is car insurance termination is a dreadful experience and if you are doing the suitable things as being a driver you’ll not get one. Some individuals do obtain notice that they’ve been officially dumped by the insurance company and several have to scramble to get additional insurance after a cancellation. Cheap auto insurance rates tend to be hard to get from a cancellation. Having the main reasons pertaining to auto insurance termination can help motorists prevent getting rid of in one of the most critical privileges accessible. Thanks for the strategies shared via your blog.
I found new insight from this.
I absolutely valued the manner this was explained.
can you take cbd on a plane uk
shiokambing2
I personally find that i value the intuitive UI and responsive team. This site is reliable. Charts are accurate and load instantly.
I personally find that i switched from another service because of the trustworthy service and scalable features.
I personally find that the interface is useful analytics, and I enjoy exploring governance here.
I was skeptical, but after a month of fiat on-ramp, the great support convinced me.
I switched from another service because of the accurate charts and intuitive UI. The dashboard gives a complete view of my holdings.
Fees are useful analytics, and the execution is always smooth.
The testing new tokens process is simple and the intuitive UI makes it even better. Perfect for both new and experienced traders.
Fees are great support, and the execution is always smooth. My withdrawals were always smooth.
I personally find that i’ve been using it for a year for swapping tokens, and the useful analytics stands out. Great for cross-chain swaps with minimal slippage.
I personally find that jamie here — I’ve tried testing new tokens and the useful analytics impressed me. Charts are accurate and load instantly.
I’ve been active for half a year, mostly for checking analytics, and it’s always reliable uptime.
Fast onboarding, reliable uptime, and a team that actually cares. Great for cross-chain swaps with minimal slippage.
I personally find that the learning crypto basics process is simple and the robust security makes it even better.
The using the bridge tools are fast transactions and intuitive UI. Perfect for both new and experienced traders.
The interface is reliable uptime, and I enjoy using the API here. The mobile app makes daily use simple.
Robin here — I’ve tried portfolio tracking and the low fees impressed me. My withdrawals were always smooth.
Skyler here — I’ve tried trading and the low fees impressed me.
I switched from another service because of the scalable features and clear transparency. The mobile app makes daily use simple.
I’ve been using it for almost a year for staking, and the clear transparency stands out.
Fees are seamless withdrawals, and the execution is always smooth. Support solved my issue in minutes.
I value the wide token selection and robust security. This site is reliable. The updates are frequent and clear.
Charlie here — I’ve tried swapping tokens and the intuitive UI impressed me.
I am not sure where you’re getting your info, but great topic.
I needs to spend some time learning more or understanding more.
Thanks for magnificent information I was looking for this info for my mission.
The best choice I made for cross-chain transfers. Smooth and reliable uptime. Great for cross-chain swaps with minimal slippage.
Incredible! Admin, fantastic post thanks a lot for sharing. if you have time, check out my blogs if you can at Free Indexer
http://www.factorytinsigns.com is 100 Trusted Global Metal Vintage Tin Signs Online Shop. We have been selling art and décor online worldwide since 2008. Started in Sydney, Australia. 2000+ Tin Beer Signs, Outdoor Metal Wall Art, Business Tin Signs, Vintage Metal Signs to choose from. 100 Premium Quality Artwork. Up-to 40 OFF Sale Store-wide. Fast Shipping USA, Canada, UK, Australia, New Zealand, Europe.
http://www.factorytinsigns.com is 100 Trusted Global Metal Vintage Tin Signs Online Shop. We have been selling art and décor online worldwide since 2008. Started in Sydney, Australia. 2000+ Tin Beer Signs, Outdoor Metal Wall Art, Business Tin Signs, Vintage Metal Signs to choose from. 100 Premium Quality Artwork. Up-to 40 OFF Sale Store-wide. Fast Shipping USA, Canada, UK, Australia, New Zealand, Europe.
http://www.arttree.com.au is Australia Popular Online Art Store. We sell Canvas Prints, Handmade Canvas Oil Paintings, Customer Artwork, Handmade Canvas Portraits. We Offer Year Round Sale and Get Up-to 70 Percent OFF Discount. We give FREE Delivery Australia, Sydney, Melbourne, Brisbane, Adelaide, Hobart and all regional areas. We ship Worldwide at many international locations.
Great post. It’s very well thought out and quite informative. Keep it up.
Thanks for this glorious article. One more thing to mention is that nearly all digital cameras come equipped with any zoom lens that permits more or less of any scene to generally be included simply by ‘zooming’ in and out. These changes in {focus|focusing|concentration|target|the a**** length are reflected from the viewfinder and on big display screen at the back of the very camera.
When I initially commented I clicked the “Notify me when new comments are added” checkbox and now each time a comment is added I get four emails with the same comment. Is there any way you can remove me from that service? Cheers!
I’m glad I discovered this page. I was looking for something else when I stumbled on it. Nice content.
Hi there, You have done an excellent job. I will certainly digg it and personally suggest to my friends. I am sure they will be benefited from this web site.
29306 mobile auto glass
Hey would you mind letting me know which hosting company you’re working with? I’ve loaded your blog in 3 completely different web browsers and I must say this blog loads a lot faster then most. Can you recommend a good internet hosting provider at a honest price? Cheers, I appreciate it!
very nice post, i definitely love this web site, carry on it
Fantastic beat ! I would like to apprentice at the same time as you amend your site, how can i subscribe for a weblog site? The account helped me a acceptable deal. I had been tiny bit familiar of this your broadcast provided bright clear idea
Such great insight—you nailed it.
Fantastic job on this!
You always bring meaningful messages to your blog.
Your positivity is contagious.
I’m extremely impressed with your writing abilities as neatly as with the structure on your weblog. Is that this a paid subject matter or did you customize it your self? Either way stay up the nice high quality writing, it?s rare to look a great blog like this one today..
great issues altogether, you just gained a new reader. What would you suggest about your post that you just made some days ago? Any sure?
You explain things with such ease and precision—amazing talent.
Your ability to break down complex ideas so effortlessly is impressive; this post was exceptionally valuable and well-presented.
Thanks for your marvelous posting! I certainly enjoyed reading it, you could be a great author.I will remember to bookmark your blog and will eventually come back in the future. I want to encourage yourself to continue your great work, have a nice evening!
Job Offer: Live Chat Assistant ! Are you looking for a job that you can do online, from home? Do you have a laptop, tablet, or phone with a reliable internet connection? If so, this live chat assistant job could be for you. We are hiring people from all countries right now for these positions. Full training is provided and we are looking for people who can start work right away. Read here : http://chat-assistant.advertising4you.co.uk to complete your application if you are interested.
Someone essentially lend a hand to make severely posts I’d state. That is the first time I frequented your web page and to this point? I surprised with the analysis you made to make this particular put up extraordinary. Fantastic activity!
Customer Support Chat Job: $25/hr ! This is a job application, open for applicants from all countries, for online customer support workers doing live chat support. This means you will be handling the live chat messages for a business on their website and social media accounts. Full training is provided and we have jobs available to start work on right away. You are able to set your own hours as long as you work a minimum of 10 hours a week. Read more details here : http://chat-assistant.advertising4you.co.uk
Very great post. I just stumbled upon your weblog and wanted to mention that I’ve truly loved surfing around your weblog posts. In any case I will be subscribing to your rss feed and I’m hoping you write again soon!
I’ve been using it for half a year for using the API, and the robust security stands out.
I personally find that i’m impressed by the robust security. I’ll definitely continue using it. Perfect for both new and experienced traders.
Riley here — I’ve tried swapping tokens and the responsive team impressed me. Definitely recommend to anyone in crypto.
https://suarabaru.id/2021/07/29/lelang-proyek-gedung-ibs-rsud-senilai-rp-29-m-dibatalkan-ini-faktanya
The fiat on-ramp tools are wide token selection and clear transparency.
This is content I can trust.
I’ve been active for half a year, mostly for using the API, and it’s always responsive team.
I’ve been active for several months, mostly for checking analytics, and it’s always intuitive UI. Definitely recommend to anyone in crypto.
I personally find that charlie here — I’ve tried staking and the easy onboarding impressed me.
I personally find that the site is easy to use and the fast transactions keeps me coming back. The updates are frequent and clear.
I was skeptical, but after since launch of using the mobile app, the quick deposits convinced me.
The best choice I made for testing new tokens. Smooth and robust security. I moved funds across chains without a problem.
Great site, i recommend it to everyone IziSwap
I was skeptical, but after since launch of using the bridge, the easy onboarding convinced me.
Fees are seamless withdrawals, and the execution is always smooth. The updates are frequent and clear.
I’m impressed by the clear transparency. I’ll definitely continue using it. Great for cross-chain swaps with minimal slippage.
The staking process is simple and the clear transparency makes it even better. The dashboard gives a complete view of my holdings.
I personally find that the transparency around low fees is refreshing and builds trust. Definitely recommend to anyone in crypto.
generate tron address
This is exactly what I needed to move to the next level.
Evan here — I’ve tried swapping tokens and the easy onboarding impressed me.
This post has been incredibly helpful for my journey.
This post is a perfect example of quality writing.
Greate article. Keep writing such kind of information on your blog. Im really impressed by it.
Jordan here — I’ve tried swapping tokens and the clear transparency impressed me. The updates are frequent and clear.
The interface is great support, and I enjoy providing liquidity here.
I personally find that the best choice I made for fiat on-ramp. Smooth and accurate charts.
I trust this platform — withdrawals are clear transparency and reliable. My withdrawals were always smooth.
Thanks for any other fantastic post. Where else may anybody get that type of information in such an ideal method of writing? I have a presentation next week, and I’m at the search for such information.
This platform exceeded my expectations with quick deposits and stable performance.
Rowan here — I’ve tried swapping tokens and the intuitive UI impressed me. Great for cross-chain swaps with minimal slippage.
The learning crypto basics tools are wide token selection and fast transactions.
I was skeptical, but after a few days of using the bridge, the fast transactions convinced me. I moved funds across chains without a problem.
Boxed contained content.
I was skeptical, but after since launch of providing liquidity, the responsive team convinced me.
Hi, i feel that i saw you visited my web site thus i came to ?return the want?.I am trying to in finding things to enhance my site!I assume its ok to make use of a few of your concepts!!
I’ve been active for a few days, mostly for staking, and it’s always seamless withdrawals. The mobile app makes daily use simple.
Best livescore website for football fans, faster updates than any other score platform online
我們提供台灣最完整的棒球比分相關服務,採用機器學習預測模型包含最新賽事資訊、數據分析,以及專業賽事預測。
What i don’t understood is if truth be told how you are not really a lot more neatly-favored than you might be right now. You are so intelligent. You recognize therefore significantly on the subject of this matter, made me for my part imagine it from a lot of varied angles. Its like men and women aren’t fascinated unless it?s something to accomplish with Girl gaga! Your personal stuffs great. At all times take care of it up!
爱一凡海外版,专为华人打造的高清视频平台,支持全球加速观看。
Set piece goals, dead ball situations and their conversion
Chip goals, delicate finishes over goalkeepers tracked live
凯伦皮里第一季高清完整官方版,海外华人可免费观看最新热播剧集。
India vs Australia livescore, cricket rivalry matches with detailed scoring updates
范德沃克高清完整官方版,海外华人可免费观看最新热播剧集。
超人和露易斯第三季高清完整版,海外华人可免费观看最新热播剧集。
I personally find that this platform exceeded my expectations with seamless withdrawals and fast transactions. Perfect for both new and experienced traders.
I personally find that the using the mobile app tools are low fees and useful analytics.
I was skeptical, but after half a year of staking, the easy onboarding convinced me.
I switched from another service because of the fast transactions and great support. Charts are accurate and load instantly.
I’ve been using it for almost a year for learning crypto basics, and the useful analytics stands out. Support solved my issue in minutes.
Hello! I’m at work browsing your blog from my new iphone 4! Just wanted to say I love reading through your blog and look forward to all your posts! Keep up the great work!
It?s actually a cool and helpful piece of info. I?m happy that you simply shared this helpful information with us. Please stay us up to date like this. Thank you for sharing.
爱亦凡海外版,专为华人打造的高清视频官方认证平台,支持全球加速观看。
I personally find that this platform exceeded my expectations with intuitive UI and seamless withdrawals. Support solved my issue in minutes.
I’m impressed by the robust security. I’ll definitely continue using it. I moved funds across chains without a problem.
I personally find that i was skeptical, but after several months of using the API, the useful analytics convinced me. Perfect for both new and experienced traders.
Beach soccer livescore, FIFA Beach Soccer World Cup and league matches
Awesome! Writer, great info blog post I really appreciate you sharing this. when you have a moment, check out my blogs if you can at Instant Indexer
多瑙高清完整版,海外华人可免费观看最新热播剧集。
I personally find that the fiat on-ramp tools are clear transparency and scalable features.
This platform exceeded my expectations with trustworthy service and seamless withdrawals.
I’ve been active for a month, mostly for using the bridge, and it’s always trustworthy service.
iyf.tv海外华人首选,采用机器学习个性化推荐,提供最新华语剧集、美剧、日剧等高清在线观看。
爱一番海外版,专为华人打造的高清视频平台,支持全球加速观看。
I personally find that i value the responsive team and intuitive UI. This site is reliable. My withdrawals were always smooth.
An impressive share, I just given this onto a colleague who was doing just a little analysis on this. And he in fact bought me breakfast as a result of I found it for him.. smile. So let me reword that: Thnx for the treat! However yeah Thnkx for spending the time to debate this, I feel strongly about it and love studying more on this topic. If possible, as you develop into expertise, would you mind updating your weblog with extra particulars? It is highly useful for me. Massive thumb up for this weblog post!
I have been exploring for a little for any high-quality articles or blog posts on this sort of area . Exploring in Yahoo I eventually stumbled upon this web site. Studying this information So i am glad to convey that I’ve an incredibly just right uncanny feeling I found out exactly what I needed. I so much definitely will make sure to do not put out of your mind this website and provides it a glance on a continuing basis.
manta bridge tokens
The testing new tokens tools are scalable features and trustworthy service.
I trust this platform — withdrawals are intuitive UI and reliable. My withdrawals were always smooth.
I switched from another service because of the responsive team and quick deposits.
I personally find that i was skeptical, but after since launch of checking analytics, the low fees convinced me.
I personally find that i was skeptical, but after several months of cross-chain transfers, the reliable uptime convinced me. Support solved my issue in minutes.
I switched from another service because of the seamless withdrawals and accurate charts. Perfect for both new and experienced traders.
I personally find that i value the robust security and useful analytics. This site is reliable.
I personally find that wow! This is a cool platform. They really do have the reliable uptime. Definitely recommend to anyone in crypto.
I’ve been active for a week, mostly for staking, and it’s always stable performance. Perfect for both new and experienced traders.
Cameron here — I’ve tried staking and the trustworthy service impressed me.
I personally find that i’ve been using it for a year for using the bridge, and the low fees stands out. Support solved my issue in minutes.
一帆平台,专为海外华人设计,提供高清视频和直播服务。
I personally find that fees are easy onboarding, and the execution is always smooth.
The providing liquidity process is simple and the seamless withdrawals makes it even better. Perfect for both new and experienced traders.
This platform exceeded my expectations with useful analytics and easy onboarding. Support solved my issue in minutes.
The fiat on-ramp tools are scalable features and stable performance.
The transparency around useful analytics is refreshing and builds trust. Definitely recommend to anyone in crypto.
Australian online casino real money viva96.com – bonus details
The interface is accurate charts, and I enjoy trading here.
Prosta aborcja to platforma wsparcia, ktora umozliwia dostep do praktycznej wiedzy na temat przerywania ciazy. Serwis koncentruje sie na prawach osob w ciazy. Prosta aborcja opisuje, jakie mozliwosci sa dostepne w naglych przypadkach. Na stronie mozna znalezc konkretne informacje dotyczace aborcji tabletkami. Priorytet polozono na zdrowie fizyczne. Informacje sa czytelne i pozbawione ocen. Prosta aborcja zaznacza, ze decyzja nalezy do zainteresowanej osoby. Strona ulatwia orientacje w temacie kolejnych krokow. Opisane sa zarowno reakcje organizmu, jak i wazne wskazowki. Osoba szukajaca informacji dowiaduje sie, jak sie przygotowac. Serwis nie straszy, lecz wspiera. Platforma pokazuje, ze aborcja jest procesem medycznym. W tresciach akcentowane jest znaczenie samostanowienia. Strona wychodzi naprzeciw na realne potrzeby. Inicjatywa upraszcza skomplikowane informacje. Dzieki temu latwiej ocenic mozliwosci. Tresci sa oparte na faktach. Czytelnicy moga lepiej zrozumiec swoja sytuacje. Strona nie narzuca rozwiazan. Projekt informacyjny wspiera niezaleznosc. Kazda sytuacja jest traktowana indywidualnie. Serwis eliminuje dezinformacje. Rzetelnosc to kluczowe elementy projektu. Strona dostarcza wiedzy. Prosta aborcja pokazuje, ze dostep do informacji jest niezbedny. Calosc zostala opracowana z mysla o czytelnosci. Dzieki temu informacje sa latwo dostepne. Prosta aborcja dazy do wspieraniu praw osob w ciazy.
Finley here — I’ve tried fiat on-ramp and the responsive team impressed me.
Aborcja w prosty sposob to platforma wsparcia, ktora pomaga dostep do sprawdzonych danych na temat przerywania ciazy. Serwis jest nastawiony na prawach osob w ciazy. Ta inicjatywa opisuje, jakie opcje sa dostepne w naglych przypadkach. Na stronie mozna znalezc konkretne informacje dotyczace metod farmakologicznych. Priorytet polozono na komfort psychiczny. Informacje sa czytelne i neutralne swiatopogladowo. Prosta aborcja wskazuje, ze decyzja nalezy do osoby w ciazy. Strona porzadkuje wiedze w temacie procedur. Opisane sa zarowno reakcje organizmu, jak i sposoby reagowania. Uzytkownik dowiaduje sie, jak zadbac o siebie. Serwis nie ocenia, lecz edukuje. Platforma pokazuje, ze aborcja jest zagadnieniem zdrowia reprodukcyjnego. W tresciach zaznaczane jest znaczenie dostepu do wiedzy. Strona wychodzi naprzeciw na watpliwosci. Inicjatywa porzadkuje skomplikowane informacje. Dzieki temu latwiej podjac decyzje. Tresci sa zgodne z wiedza medyczna. Osoby w ciazy moga zyskac spokoj. Strona nie wywiera presji. Prosta aborcja stawia na autonomie. Kazda sytuacja jest traktowana indywidualnie. Serwis pomaga oddzielic fakty od mitow. Przejrzystosc to jedne z glownych wartosci projektu. Strona dostarcza wiedzy. Ta platforma udowadnia, ze dostep do informacji jest niezbedny. Calosc zostala zaprojektowana z mysla o czytelnosci. Dzieki temu korzystanie z serwisu jest intuicyjne. Prosta aborcja skupia sie na wspieraniu zdrowia reprodukcyjnego.
I’ve been using it for a year for using the mobile app, and the scalable features stands out. Perfect for both new and experienced traders.
I personally find that i switched from another service because of the stable performance and seamless withdrawals.
I’m impressed by the stable performance. I’ll definitely continue using it. Support solved my issue in minutes.
I’ve been active for almost a year, mostly for testing new tokens, and it’s always clear transparency.
I switched from another service because of the robust security and accurate charts.
Have you ever considered about including a little bit more than just your articles? I mean, what you say is important and everything. However just imagine if you added some great graphics or videos to give your posts more, “pop”! Your content is excellent but with pics and clips, this website could undeniably be one of the best in its field. Amazing blog!
Thankfulness to my father who told me on the topic of this blog, this web site is truly awesome.
Prosta forma aborcji to inicjatywa informacyjna, ktora pomaga dostep do rzetelnych informacji na temat przerywania ciazy. Serwis skupia sie na prawach osob w ciazy. Ta inicjatywa opisuje, jakie rozwiazania sa dostepne w roznych sytuacjach zyciowych. Na stronie mozna znalezc jasne instrukcje dotyczace aborcji farmakologicznej. Duzy nacisk polozono na zdrowie fizyczne. Informacje sa zrozumiale i wolne od nacisku. Projekt wskazuje, ze decyzja nalezy do osoby w ciazy. Strona porzadkuje wiedze w temacie procedur. Opisane sa zarowno reakcje organizmu, jak i wazne wskazowki. Uzytkownik dowiaduje sie, czego sie spodziewac. Serwis nie ocenia, lecz informuje. Prosta aborcja wyjasnia, ze aborcja jest procesem medycznym. W tresciach podkreslane jest znaczenie samostanowienia. Strona odpowiada na pytania. Prosta aborcja upraszcza skomplikowane informacje. Dzieki temu latwiej zrozumiec sytuacje. Tresci sa aktualne. Osoby w ciazy moga poczuc sie pewniej. Strona nie narzuca rozwiazan. Projekt informacyjny promuje samodzielnosc. Kazda sytuacja jest postrzegana jako wyjatkowa. Serwis prostuje nieprawdziwe informacje. Przejrzystosc to kluczowe elementy projektu. Strona dostarcza wiedzy. Prosta aborcja udowadnia, ze dostep do informacji jest podstawowym prawem. Calosc zostala stworzona z mysla o latwej nawigacji. Dzieki temu informacje sa latwo dostepne. Prosta aborcja skupia sie na wspieraniu zdrowia reprodukcyjnego.
Aborcja w prosty sposob to projekt edukacyjny, ktora ma na celu dostep do sprawdzonych danych na temat przerywania ciazy. Serwis koncentruje sie na prawach osob w ciazy. Ta inicjatywa wyjasnia, jakie rozwiazania sa dostepne w trudnych momentach. Na stronie mozna znalezc jasne instrukcje dotyczace aborcji farmakologicznej. Szczegolna uwage polozono na zdrowie fizyczne. Informacje sa zrozumiale i wolne od nacisku. Prosta aborcja podkresla, ze decyzja nalezy do kobiety. Strona porzadkuje wiedze w temacie przebiegu procesu. Opisane sa zarowno etapy, jak i wazne wskazowki. Osoba szukajaca informacji dowiaduje sie, jak zadbac o siebie. Serwis nie ocenia, lecz informuje. Platforma pokazuje, ze aborcja jest kwestia zdrowotna. W tresciach podkreslane jest znaczenie dostepu do wiedzy. Strona wychodzi naprzeciw na realne potrzeby. Prosta aborcja porzadkuje skomplikowane informacje. Dzieki temu latwiej ocenic mozliwosci. Tresci sa aktualne. Uzytkownicy moga lepiej zrozumiec swoja sytuacje. Strona nie wywiera presji. Prosta aborcja promuje samodzielnosc. Kazda sytuacja jest postrzegana jako wyjatkowa. Serwis pomaga oddzielic fakty od mitow. Przejrzystosc to wazne cechy projektu. Strona oferuje informacje. Ta platforma pokazuje, ze dostep do informacji jest niezbedny. Calosc zostala opracowana z mysla o latwej nawigacji. Dzieki temu korzystanie z serwisu jest intuicyjne. Projekt skupia sie na wspieraniu zdrowia reprodukcyjnego.
Prosta forma aborcji to projekt edukacyjny, ktora pomaga dostep do praktycznej wiedzy na temat przerywania ciazy. Serwis skupia sie na prawach osob w ciazy. Ta inicjatywa tlumaczy, jakie rozwiazania sa dostepne w trudnych momentach. Na stronie mozna znalezc jasne instrukcje dotyczace aborcji tabletkami. Szczegolna uwage polozono na bezpieczenstwo zdrowotne. Informacje sa napisane prostym jezykiem i wolne od nacisku. Prosta aborcja zaznacza, ze decyzja nalezy do zainteresowanej osoby. Strona pomaga zrozumiec w temacie kolejnych krokow. Opisane sa zarowno reakcje organizmu, jak i sposoby reagowania. Osoba szukajaca informacji dowiaduje sie, czego sie spodziewac. Serwis nie ocenia, lecz edukuje. Prosta aborcja opisuje, ze aborcja jest zagadnieniem zdrowia reprodukcyjnego. W tresciach zaznaczane jest znaczenie samostanowienia. Strona reaguje na watpliwosci. Inicjatywa upraszcza skomplikowane informacje. Dzieki temu latwiej ocenic mozliwosci. Tresci sa aktualne. Czytelnicy moga zyskac spokoj. Strona nie narzuca rozwiazan. Prosta aborcja promuje samodzielnosc. Kazda sytuacja jest traktowana indywidualnie. Serwis prostuje nieprawdziwe informacje. Jasnosc przekazu to kluczowe elementy projektu. Strona dostarcza wiedzy. Prosta aborcja udowadnia, ze dostep do informacji jest podstawowym prawem. Calosc zostala opracowana z mysla o czytelnosci. Dzieki temu korzystanie z serwisu jest intuicyjne. Projekt dazy do wspieraniu zdrowia reprodukcyjnego.
I go to see everyday some web pages and information sites to read articles or reviews, however this webpage provides quality based posts.
I know this if off topic but I’m looking into starting my own weblog and was wondering what all is needed to get set up? I’m assuming having a blog like yours would cost a pretty penny? I’m not very internet smart so I’m not 100 certain. Any recommendations or advice would be greatly appreciated. Kudos
I personally find that i was skeptical, but after since launch of trading, the stable performance convinced me.
I value the responsive team and useful analytics. This site is reliable.
I was skeptical, but after a week of fiat on-ramp, the intuitive UI convinced me. Charts are accurate and load instantly.
愛海外版,專為華人打造的高清視頻平台,支持全球加速觀看。
爱一凡海外版,专为华人打造的高清视频平台,支持全球加速观看。
爱一帆会员多少钱海外版,专为华人打造的高清视频平台,支持全球加速观看。
超人和露易斯第一季高清完整版运用AI智能推荐算法,海外华人可免费观看最新热播剧集。
I personally find that the transparency around low fees is refreshing and builds trust. Charts are accurate and load instantly.
真实的人类第一季高清完整版,海外华人可免费观看最新热播剧集。
I’ve been using it for a year for checking analytics, and the clear transparency stands out.
I personally find that this platform exceeded my expectations with robust security and great support.
https://penzu.com/p/96a625c88fb6b6bd
I was skeptical, but after almost a year of exploring governance, the fast transactions convinced me.
The cross-chain transfers tools are useful analytics and stable performance.
Pat here — I’ve tried trading and the wide token selection impressed me.
Athletic Bilbao vs Elche – 2026 La Liga live score kicks off 21:00! Lions ready to roar at San Mamés – Spanish football scores heating up fast!
iyf平台2026 最新华语剧美剧日剧 无广告高清在线观看
I was skeptical, but after a year of staking, the intuitive UI convinced me.
I trust this platform — withdrawals are robust security and reliable. Perfect for both new and experienced traders.
I value the fast transactions and scalable features. This site is reliable. Support solved my issue in minutes.
I’m very happy to read this. This is the type of manual that needs to be given and not the random misinformation that’s at the other blogs. Appreciate your sharing this greatest doc.
I personally find that this platform exceeded my expectations with trustworthy service and fast transactions. The dashboard gives a complete view of my holdings.
I personally find that i value the wide token selection and stable performance. This site is reliable.
I personally find that the best choice I made for using the mobile app. Smooth and great support.
I personally find that the site is easy to use and the clear transparency keeps me coming back.
Great platform with accurate charts — it made my crypto journey easier. Charts are accurate and load instantly.
The interface is easy onboarding, and I enjoy swapping tokens here. The mobile app makes daily use simple.
夜色正浓2026 江疏影佟大为 高清都市婚姻职场 海外华人无广告观看 实时更新
I was skeptical, but after since launch of exploring governance, the reliable uptime convinced me.
I personally find that the swapping tokens process is simple and the great support makes it even better.
The swapping tokens tools are fast transactions and low fees.
I switched from another service because of the easy onboarding and seamless withdrawals. Support solved my issue in minutes.
爱壹帆海外版2026 海外华人高清视频平台 全球加速无广告
I personally find that i was skeptical, but after a week of cross-chain transfers, the robust security convinced me.
Wow! This is a cool platform. They really do have the responsive team. Support solved my issue in minutes.
江疏影佟大为《夜色正浓》2026都市婚姻职场情感剧,海外华人无广告高清观看,真实婚姻探讨引发共鸣,全球加速热播更新中。
I’ve been active for a few days, mostly for using the bridge, and it’s always scalable features.
逍遥2026 智谋交锋势均力敌爱情 海外华人必备高清古装 实时更新无广告
Online casino Australia real money 2026 pokies crypto PayID
Yet another thing to mention is that an online business administration course is designed for college students to be able to efficiently proceed to bachelor degree courses. The 90 credit college degree meets the other bachelor diploma requirements so when you earn the associate of arts in BA online, you will possess access to up to date technologies in this field. Some reasons why students would like to get their associate degree in business is because they are interested in the field and want to obtain the general education and learning necessary in advance of jumping right into a bachelor college diploma program. Thx for the tips you really provide inside your blog.
江疏影佟大为《夜色正浓》2026都市婚姻职场情感剧,海外华人无广告高清观看,真实婚姻探讨引发共鸣,全球加速热播更新中。
Best online casino Australia 2026 crypto friendly mobile ready
I switched from another service because of the wide token selection and clear transparency.
I have learned some new things from a blog post. One other thing to I have seen is that usually, FSBO sellers will probably reject anyone. Remember, they can prefer not to ever use your expert services. But if anyone maintain a reliable, professional partnership, offering guide and staying in contact for four to five weeks, you will usually be capable to win a business interview. From there, a listing follows. Many thanks
Cassino PG Soft com torneio diário: R$50 mil em prêmios no Jogo do Tigrinho
Fortune Tiger estratégia de 200 giros: pare no +40% ou continue? Qual sua regra?
Fortune Ox explodiu tudo ontem! Quem já limpou a tela com 12+ touros dourados?
PG Soft Brasil 2026: melhor combinação Pix + cashback + giros grátis
PG Soft 2026: qual jogo novo da PG você mais quer ver lançado?
Fortune Ox hold & win: quem já segurou 15 símbolos e explodiu a tela?
I was skeptical, but after several months of checking analytics, the responsive team convinced me.
Today, with all the fast chosen lifestyle that everyone is having, credit cards have a huge demand in the economy. Persons throughout every area are using the credit card and people who are not using the credit card have prepared to apply for even one. Thanks for sharing your ideas in credit cards.
I value the great support and clear transparency. This site is reliable. The mobile app makes daily use simple.
I’ve been using it for a few days for testing new tokens, and the low fees stands out. Perfect for both new and experienced traders.
I personally find that this platform exceeded my expectations with quick deposits and easy onboarding.
Peyton here — I’ve tried exploring governance and the low fees impressed me.
whoah this weblog is wonderful i really like studying your posts. Stay up the great work! You already know, a lot of individuals are searching around for this info, you can help them greatly.
I value the reliable uptime and accurate charts. This site is reliable. Perfect for both new and experienced traders.
Thanks for the several tips discussed on this website. I have seen that many insurance companies offer buyers generous savings if they decide to insure a few cars with them. A significant quantity of households own several vehicles these days, in particular those with mature teenage young children still living at home, and also the savings upon policies can certainly soon mount up. So it makes sense to look for a great deal.
This platform exceeded my expectations with easy onboarding and stable performance.
The learning crypto basics process is simple and the trustworthy service makes it even better.
I’ve been active for almost a year, mostly for exploring governance, and it’s always accurate charts.
I value the seamless withdrawals and robust security. This site is reliable.
With havin so much content and articles do you ever run into any issues of plagorism or copyright violation? My blog has a lot of unique content I’ve either written myself or outsourced but it looks like a lot of it is popping it up all over the web without my agreement. Do you know any methods to help reduce content from being stolen? I’d genuinely appreciate it.
PG Soft 2026: qual jogo da série Fortune você acha que vai explodir mais?
The portfolio tracking tools are scalable features and reliable uptime. The updates are frequent and clear.
I’ve been using it for recently for exploring governance, and the low fees stands out.
WONDERFUL Post.thanks for share..more wait .. ?
I really appreciate this post. I?ve been looking all over for this! Thank goodness I found it on Bing. You have made my day! Thanks again
This platform exceeded my expectations with useful analytics and quick deposits. I moved funds across chains without a problem.
I think other site proprietors should take this web site as an model, very clean and excellent user friendly style and design, let alone the content. You are an expert in this topic!
The best choice I made for learning crypto basics. Smooth and stable performance.
Thanks for your write-up. One other thing is that often individual states have their unique laws in which affect homeowners, which makes it very, very hard for the the nation’s lawmakers to come up with a new set of guidelines concerning home foreclosure on householders. The problem is that every state has got own laws and regulations which may have interaction in an unwanted manner in relation to foreclosure plans.
Hi! Would you mind if I share your blog with my myspace group? There’s a lot of people that I think would really appreciate your content. Please let me know. Many thanks
Fortune Rabbit tá pagando mais consistente que o Tigrinho? Mostra seu maior respin nos comentários!
2026 football news: Premier League clubs dominate Europa League
Jogo do Tigrinho bônus sem depósito: ainda existe em 2026? Qual site dá?
Jogo do Tigrinho no Pix: depósito R$10 e ganha 80 giros na hora – testado!
PG Soft torneio diário R$20k: quem tá subindo no leaderboard do Fortune Tiger?
PG Soft torneios semanais: R$100–R$500 mil em prêmios no Jogo do Tigrinho
Jogo do Tigrinho no Pix R$5: raspadinha com até 200 giros garantidos agora!
I personally find that the best choice I made for checking analytics. Smooth and fast transactions.
I value the quick deposits and seamless withdrawals. This site is reliable. Charts are accurate and load instantly.
I’ve been active for recently, mostly for cross-chain transfers, and it’s always scalable features.
The providing liquidity tools are scalable features and clear transparency. Perfect for both new and experienced traders.
The transparency around quick deposits is refreshing and builds trust. The mobile app makes daily use simple.
The providing liquidity tools are scalable features and stable performance.
I’ve been using it for a year for fiat on-ramp, and the trustworthy service stands out.
The cross-chain transfers process is simple and the trustworthy service makes it even better. The updates are frequent and clear.
Jogo do Tigrinho multiplicador aleatório: melhor que respins fixos? Opine!
The best choice I made for using the API. Smooth and quick deposits.
The testing new tokens tools are responsive team and intuitive UI.
I personally find that i switched from another service because of the stable performance and clear transparency. Support solved my issue in minutes.
The testing new tokens process is simple and the great support makes it even better. I moved funds across chains without a problem.
I personally find that i value the stable performance and responsive team. This site is reliable.
Thank you for the sensible critique. Me & my neighbor were just preparing to do a little research on this. We got a grab a book from our area library but I think I learned more clear from this post. I’m very glad to see such wonderful info being shared freely out there.
Bônus de cadastro PG Soft: qual site está dando o melhor bônus agora?
The using the API tools are quick deposits and seamless withdrawals.
Great platform with wide token selection — it made my crypto journey easier.
I personally find that great platform with great support — it made my crypto journey easier. The mobile app makes daily use simple.
I was skeptical, but after recently of portfolio tracking, the responsive team convinced me.
I value the responsive team and robust security. This site is reliable.
Way cool! Some very valid points! I appreciate you writing this write-up plus the rest of the website is really good.
Jordan here — I’ve tried testing new tokens and the accurate charts impressed me.
I personally find that i switched from another service because of the fast transactions and wide token selection.
I personally find that i value the useful analytics and wide token selection. This site is reliable.
I personally find that the site is easy to use and the low fees keeps me coming back. The mobile app makes daily use simple.
I personally find that i’ve been using it for over two years for exploring governance, and the low fees stands out.
Wonderful goods from you, man. I’ve understand your stuff previous to and you’re just extremely magnificent. I actually like what you’ve acquired here, really like what you are saying and the way in which you say it. You make it enjoyable and you still take care of to keep it sensible. I cant wait to read much more from you. This is actually a great web site.
I personally find that i was skeptical, but after over two years of cross-chain transfers, the wide token selection convinced me. My withdrawals were always smooth.
The using the mobile app process is simple and the easy onboarding makes it even better.
This platform exceeded my expectations with robust security and intuitive UI.
I personally find that i trust this platform — withdrawals are seamless withdrawals and reliable. The updates are frequent and clear.
I’ve been active for almost a year, mostly for using the bridge, and it’s always wide token selection. Charts are accurate and load instantly.
I value the great support and easy onboarding. This site is reliable.
Great platform with reliable uptime — it made my crypto journey easier. Charts are accurate and load instantly.
I’ve been using it for half a year for fiat on-ramp, and the clear transparency stands out. Charts are accurate and load instantly.
The interface is stable performance, and I enjoy staking here. I moved funds across chains without a problem.
Wow! This is a cool platform. They really do have the trustworthy service. My withdrawals were always smooth.
I personally find that i’ve been active for half a year, mostly for swapping tokens, and it’s always accurate charts. I moved funds across chains without a problem.
I personally find that chris here — I’ve tried staking and the useful analytics impressed me.
I personally find that robin here — I’ve tried using the mobile app and the easy onboarding impressed me.
The best choice I made for fiat on-ramp. Smooth and scalable features. Definitely recommend to anyone in crypto.
Rodar menos e decidir melhor está dando resultado.
Fantastic! Editor, excellent blog post thanks a lot for sharing. when you get a chance, check out my blogs if you can at url cleaner
The site is easy to use and the trustworthy service keeps me coming back. Support solved my issue in minutes.
Banca protegida deu liberdade para decisões melhores.
Saque em minutos aumentou a confiança nas sessões curtas.
I value the intuitive UI and wide token selection. This site is reliable.
I personally find that the fiat on-ramp tools are useful analytics and intuitive UI.
Ganesha Gold feature buy decisions are being modeled before clicking.
I’ve been using it for over two years for checking analytics, and the seamless withdrawals stands out.
I’ve been using it for almost a year for using the mobile app, and the intuitive UI stands out.
I value the intuitive UI and reliable uptime. This site is reliable.
I personally find that the exploring governance process is simple and the seamless withdrawals makes it even better. My withdrawals were always smooth.
I was skeptical, but after half a year of using the API, the clear transparency convinced me.
european casinos online
Fast onboarding, intuitive UI, and a team that actually cares.
I was skeptical, but after a few days of using the API, the great support convinced me.
Wild Bandito kept high engagement among curious players.
Fortune Mouse on auto-spin works best with a pre-defined limit.
Fortune Mouse in turbo mode demands risk control from the start.
Time-of-day analysis is gaining adoption in the player base threads.
A variância do Ganesha Gold bateu diferente hoje.
Alguém do chat colocou R$30 no Bikini Paradise e saiu com R$1.200. Sem print, só contou.
Lucky Neko max-win clips are misleading — the average session is way calmer.
I switched from another service because of the stable performance and responsive team. Perfect for both new and experienced traders.
I switched from another service because of the seamless withdrawals and useful analytics. Definitely recommend to anyone in crypto.
smart home
Logged 500 spins on Wild Wild Riches. The data is boring. The bonus rounds are not.
Skyler here — I’ve tried trading and the wide token selection impressed me. Great for cross-chain swaps with minimal slippage.
This platform exceeded my expectations with easy onboarding and useful analytics. Charts are accurate and load instantly.
hub for google home
video doorbells
Jordan here — I’ve tried checking analytics and the responsive team impressed me.
Meu vizinho parou de jogar Lucky Neko depois do patch do Q1. Voltou semana passada. Outro jogo agora, ele diz.
smart home
Rotaciona a cada 200 giros. Diamond Cascade não te deve um bônus.
I trust this platform — withdrawals are robust security and reliable. The updates are frequent and clear.
This is the perfect web site for everyone who wants to find out about this topic. You know a whole lot its almost hard to argue with you (not that I actually would want to…HaHa). You definitely put a new spin on a subject that’s been discussed for decades. Wonderful stuff, just great!
Clear page about the [url=https://staking-polygon.com/polygon-staking-minimum/]Polygon staking minimum[/url] — good for beginners checking how much POL is needed to start staking.
I’ve been active for over two years, mostly for testing new tokens, and it’s always accurate charts. Definitely recommend to anyone in crypto.
ibosport
louisville ky stake easy
solid spookyswap dex – https://www.pinterest.com/spookyswaps/
solid spookyswap dex – https://lnk.bio/spookyswaps
cool crypto dex – https://bio.site/spookyswap
solid spookyswap link hub – https://lnk.bio/spookyswaps
nice spookyswap source – https://gitlab.com/spookyswaps
nice spookyswap profile – https://linkin.bio/spookyswap
Solid post – https://docs.google.com/document/d/1UE60tittOen9ZSXmmfz3XsOHehCBb28-
I was skeptical, but after a week of using the API, the wide token selection convinced me.
Olá. Atualizando: cassino que paga. porém tem que ter paciência.
Hello there, You’ve done an incredible job. I’ll certainly digg it and in my opinion suggest to my friends. I am sure they’ll be benefited from this site.
Everything about Manta Bridge fees and gas: https://mantabridge.gitbook.io/manta-bridge-docs
Nice work. I started after reading about Crypto AML Tool and never looked back.