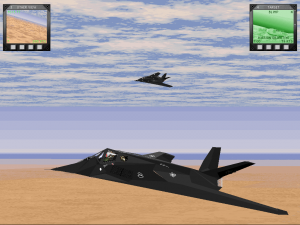
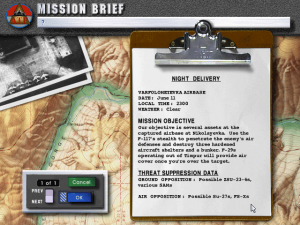
 When you begin a campaign, you’ll see a mission brief screen. A printed summary clues you in with an overview of each mission. Pay particular attention to the mission objective; success depends solely on accomplishing it and returning safely. Know what you have to do and don’t allow yourself to be distracted; this isn’t an arcade shoot-’em-up. Be alert to the nature of the threats en-route to and around the target area. You’ll have to avoid or neutralize them to be successful.
Despite the briefings, the missions never go as planned. Expect the unexpected. Smart pilots use this knowledge to their advantage. Realize that if you follow the planned routing, altitude and timing your chances of a one pass success are low. Evaluate the objective, consider the briefed threats and alter the plan accordingly.
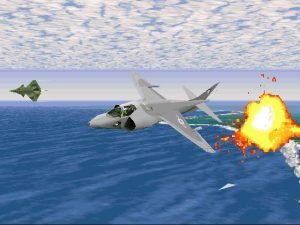
The first mission in the Egyptian scenario is a perfect example. You must rendezvous with a damaged Aurora spy plane and escort it to a safe landing. Hostile aircraft are en-route to intercept and down the spy plane. Your default waypoints seem reasonable but you know they are designed to ensure failure. Therefore, you had better get between the Aurora and any hostiles long before they get “tone.” Splashing the first pair won’t be the end of it, so stick with the Aurora. Scan long range with radar. Ignore out of range hostiles, but immediately attack any that close. Before you take off, alter your waypoint settings according to this plan. Of course, you can just fly the mission as briefed and make adjustments on your second try!
Proper Planning Saves Lives
Now that you’re convinced that following the default routing will make your job tougher, consider the alternative. Don’t be afraid to make your own mission plan to the target and back.
 After the briefing screens, you come to the mission map. Use the Show Menu to display all available information. Examine it in detail and decide which areas are dangerous to fly through. You can add, delete or move waypoints to avoid these areas. Most missions have one basically unopposed route to the target; threats are normally placed on three sides. This may or may not be obvious on the map. Sometimes, only trial, error and careful radar scanning will find the easy way in. It’s best to leave the target waypoint in place so you can find the objective easily. You’ll probably want to edit the other waypoints as well.
Click on the waypoint and the settings appear in the Object Details panel. You can alter any or all of them. The manual gives little information about the settings; it’s hard to decide which are best for each mission. The only sure thing is that the default settings will lead you into trouble; it’s designed that way.
A Few Points on Waypoints
Your first choice is naming the waypoint. This has nothing to do with mission success, so either skip it or change it to something short and simple.
Next is the Formation block. This one is important; the choices are line astern, echelon and line abreast. Line astern is of no particular benefit and the trailing plane is pretty much hung out to dry. Use this only for parade fly-bys. Echelon is just for looks; save it for sightseeing. Line abreast puts the power up front; it’s a good attack formation for both air-to-air and air-to-mud. This is the formation of choice.
Spacing is also important. In the air-to-air mode, use far spacing. It gives your flight the widest radar scan of the sky and has room for maneuvering. Tight spacing is best for ground attack; it keeps your wingman in close and in formation. This prevents him from straying unwittingly over AAA or SAM sites.
Your next decision concerns Stacking, with high, low and level choices. Use level stack for bombing missions. If your wingman stacks down on a low level mission, you may clear the terrain but he will pop up to avoid mixing the aluminum with the dirt. When he pops, he may be seen on radar. If you stack him high during low level flights, you again make him a better target for enemy ground forces. On high altitude air to air missions, high or low stacks can be used. Generally, you want to mirror the bad guys’ formation. Enemy pilots will usually attack with a high/low split or try to box you in with a horizontal split. Stacking high makes it easier to keep a visual on your wingman, and works well in the air-to-air situations.
 The Control option defines your wingman’s ability to initiate action. Loose control allows him to leave the formation to attack a detected enemy or break for an inbound missile. Once out of formation, he is out of your control until you instruct him to disengage. Count on him being off on his own and out of the fight when you really need him! Medium control keeps him in formation unless he breaks for a missile. This is generally a good choice when the mission is an air-to-air furball. He will engage targets at your direction and then be free to maneuver.
Tight control is usually best. It keeps the wingman in formation no matter what happens. When specific targets are critical to the mission objective in either the ground attack or air-to-air mode, you can direct him to engage your targeted object. This effectively gives you more weaponry, because you are using his ordnance as well as your own.
The ability to set Speed and Altitude comes next. The default settings generally give you maximum cruise efficiency at the set altitude. The autopilot will use this speed and altitude to go to this waypoint. If you fly manually, these settings have no effect. Still, they are necessary because you’ll be using the autopilot to lessen your workload during the mission. Before you set speed and altitude, ask yourself three questions: What’s the threat?, What’s the target?, and How much gas do I have? Adjust the settings accordingly.
 If the threat is ground based (AAA or SAM) you need to fly below the radar or above the effective range. Below the radar means as low as possible. The autopilot will accept 1000 feet but you can manually fly lower to lessen the chances of detection. Fly down in the weeds to avoid SAM lock-ons. AAA is usually ineffective if you’re above 6000 feet. For airborne threats, mission plan to fly above most SAM ranges (in the low 30’s). This will give you some immunity from SAMs while dealing with other threats. Fly through threat areas at a high speed to lessen your exposure time.
Target type will be a consideration also. At a ground attack waypoint, you need to go down and slow down. You won’t hit much from 30,000 feet or at 450 knots. With iron bombs and stand off weapons, attack from 15000 feet or less and in the 300 knot range. If you’ve ingressed to the target hugging the terrain, slow to the 300 knot range and pop up a few thousand feet for a better view as you reach the target. Unload the weapons and exit as fast as possible, as low as possible. In the high altitude air-to-air mode, start with the speed around 500 knots and in the low 30’s for waypoint planning purposes.
All of this high/low, fast/slow planning must be tempered by the amount of gas you have. Check total mission flying time at the last waypoint before you start altering the mission. Check whether you will need an external fuel tank. Other possibilities include creating a shorter route or using a more fuel efficient cruise speed. If the mission is short, like capping your airfield, reduce the amount of gas for better maneuverability.
The Assignment section is next and normally no changes are needed. The default settings keep the focus on the mission objectives. Enemy fighters, SAMs and AAA are the only things that will keep you from doing the job. Altering the waypoints takes a little time, but increases your chances of a successful mission. Avoid SAMs and AAA using altitude tactics and don’t engage them if not absolutely necessary. The same goes for enemy aircraft. If you tangle unnecessarily, you waste armaments and fuel. Look for a way to bypass patrols, especially if they are superior aircraft. Good luck.


Leave a Comment