How To Install Custom Windows XP Themes
Learn How To:
- Enable Third-Party Theme Support on Windows XP
- Change your Windows XP Theme, Sounds, Cursor and Fonts
This tutorial will show you how to download, install and use custom Windows XP Themes – essentially you will learn to take that boring old XP interface and give it an exciting makeover. Some programs like WindowBlinds used to make this easy, but since that application no longer supports XP, we’re forced to do it the hard way – but in doing so we’ll also have a greater degree of control over how the interface will look, and it’s also more fun!
1. Download UXTHEME from Softpedia
First, download UXTHEME Patcher from Softpedia. This is a necessary program that allows you to patch uxtheme.dll so XP will recognize custom themes. Note: Be sure to back up this file just in case! I’ve tried running this under XP Service Pack 2 and it made the computer run on a permanent restart loop. If this happens, enter XP using Safe Mode, save your files and reinstall the OS. On SP3 I’ve encountered no problems.
The file is virus-free, by the way!
2. Run The Program
Open the UXTHEME program, run it and restart XP.
3. Download Some Custom XP Themes
This is a fantastic site to download custom themes – www.thepcmanwebsite.com/themes/ – you don’t need to register, it doesn’t force you to install a third-party installer and it’s all free!
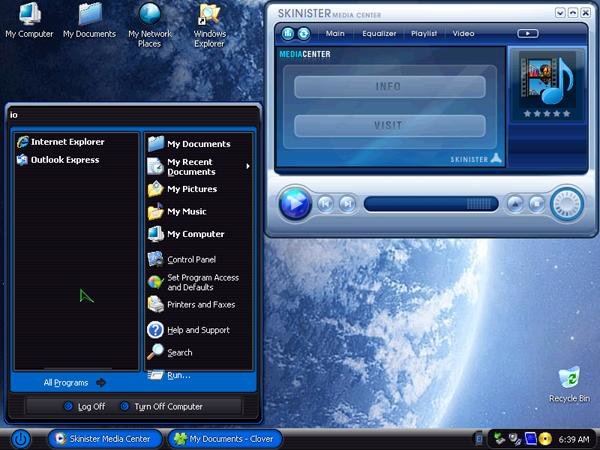
4. Extract & Activate Custom Themes
Make sure you extract into C:WINDOWSResourcesThemes, then right click on your desktop, click Properties and activate your new theme. Feel free to tinker with it on Appearance / Advanced.
![]()
5. Download IconTweaker – See Picture Above
This isn’t mandatory but you’ll love it – IconTweaker is a free program that lets you change most major icons on your OS. It comes with several in-built icon packages as well! Also, you can download quite a great deal of free icons at findicons.com – make sure you grab .ico files.
6. Customize Your Mouse Cursor
A simple Google search will yield many mouse cursor packs, and I’ve found a great share on DeviantArt. To change your mouse cursor, go to Control Panel / Mouse / Pointers and go crazy! Cursor files are normally stored in C:WINDOWSCursors.
7. Customize Your Fonts
Fonts are easy to download, and sites like www.dafont.com have many of them, all for free. Simply extract the fonts in your C:WINDOWSFonts directory, and apply your new fonts by going to your desktop, opening Display Properties and goint to Appearance / Advanced. If you have a large font library, consider using a free font viewer, such as Opcion Font Viewer, which is my favorite.
8. Customize Your Sounds
Go to Control Panel / Sounds and Devices / Sounds to change your system sounds, or you can turn them off. You can use standard wav files from anywhere on your system, but it’s good to store them in C:WindowsMedia. You can find lots of free sounds at www.soundjay.com, but if you’re clever you can also grab various menu sound effects from old games – most use standard .wav format, which XP can recognize.


")
windows xp is good for old pc
Windows XP is best forever. Not long time ago i used windowblinds to apply transparent themes, but it was not worth to waste resources for. Now i use windows classic theme, all system sounds disabled, cursor is default. Also disabled many useless services (run services.msc), moved recycle bin (not shortcut) to start menu, killed throbber and adjusted all settings for performance – not visuals. Also i placed all needed shortcuts into quick launch, set up folders and drives tree in all folders left side (like in new windows). Now i have fast, responsive old HP Pavilion ze2000 with empty clear desktop (no icons at all) and handy controls.
I like what you guys are up too. Such smart work and reporting! Keep up the excellent works guys I have incorporated you guys to my blogroll. I think it’ll improve the value of my site :).
Real instructive and wonderful body structure of content, now that’s user friendly (:.
Hey there! I’m at work browsing your blog from my new iphone 3gs! Just wanted to say I love reading through your blog and look forward to all your posts! Carry on the excellent work!
Greetings from Idaho! I’m bored to tears at work so I decided to browse your site on my iphone during lunch break. I really like the knowledge you present here and can’t wait to take a look when I get home. I’m surprised at how fast your blog loaded on my phone .. I’m not even using WIFI, just 3G .. Anyways, excellent site!
Some truly wonderful blog posts on this site, appreciate it for contribution.
Hello there, simply was aware of your blog thru Google, and located that it’s really informative. I am going to be careful for brussels. I’ll be grateful if you continue this in future. Numerous people might be benefited out of your writing. Cheers!
I really like what you guys are usually up too. Such clever work and coverage! Keep up the fantastic works guys I’ve you guys to my blogroll.
I believe this website has got some very superb information for everyone :D. “When you get a thing the way you want it, leave it alone.” by Sir Winston Leonard Spenser Churchill.
Terrific post however I was wanting to know if you could write a litte more on this subject? I’d be very grateful if you could elaborate a little bit further. Kudos!
Undeniably imagine that which you said. Your favorite justification appeared to be on the web the simplest thing to bear in mind of. I say to you, I definitely get irked even as other folks think about issues that they just don’t realize about. You controlled to hit the nail upon the highest and also outlined out the whole thing with no need side-effects , other people could take a signal. Will likely be back to get more. Thanks
As I website owner I believe the subject matter here is very wonderful, regards for your efforts.
Hey, you used to write magnificent, but the last several posts have been kinda boring… I miss your great writings. Past several posts are just a little bit out of track! come on!
You are my aspiration, I have few blogs and infrequently run out from to post .
Very interesting points you have remarked, thankyou for putting up. “Whatever we conceive well we express clearly, and words flow with ease.” by Nicolas Boileau.
Some genuinely nice and useful information on this web site, too I conceive the style holds good features.
Keep functioning ,remarkable job!
You made some first rate points there. I appeared on the web for the problem and found most people will associate with with your website.
I’d constantly want to be update on new articles on this web site, saved to fav! .
Excellent post. I was checking continuously this blog and I’m impressed! Very useful information particularly the last part 🙂 I care for such info a lot. I was looking for this certain info for a long time. Thank you and good luck.
The subsequent time I learn a weblog, I hope that it doesnt disappoint me as a lot as this one. I imply, I know it was my choice to read, however I truly thought youd have something fascinating to say. All I hear is a bunch of whining about one thing that you might repair should you werent too busy searching for attention.
Howdy just wanted to give you a quick heads up. The words in your content seem to be running off the screen in Chrome. I’m not sure if this is a format issue or something to do with internet browser compatibility but I figured I’d post to let you know. The design and style look great though! Hope you get the issue resolved soon. Thanks
Rattling clean website , appreciate it for this post.
I like this website very much, Its a rattling nice berth to read and receive information.
Some really nice and utilitarian information on this internet site, besides I think the pattern has superb features.
naturally like your website but you need to check the spelling on several of your posts. Several of them are rife with spelling issues and I in finding it very bothersome to inform the reality on the other hand I will certainly come again again.
I’ve been absent for some time, but now I remember why I used to love this web site. Thank you, I¦ll try and check back more often. How frequently you update your website?
As a Newbie, I am continuously exploring online for articles that can aid me. Thank you
I’m not that much of a online reader to be honest but your blogs really nice, keep it up! I’ll go ahead and bookmark your site to come back later. Many thanks
Thanks for sharing excellent informations. Your website is so cool. I am impressed by the details that you have on this blog. It reveals how nicely you perceive this subject. Bookmarked this web page, will come back for extra articles. You, my friend, ROCK! I found simply the info I already searched all over the place and just couldn’t come across. What a great site.
Hello very cool blog!! Man .. Excellent .. Amazing .. I’ll bookmark your blog and take the feeds additionally?KI’m satisfied to find numerous useful info here in the post, we want work out more techniques in this regard, thanks for sharing. . . . . .
Aw, this was a really nice post. In idea I wish to put in writing like this additionally – taking time and actual effort to make a very good article… however what can I say… I procrastinate alot and on no account seem to get something done.
Thanks for the sensible critique. Me and my neighbor were just preparing to do a little research about this. We got a grab a book from our area library but I think I learned more from this post. I am very glad to see such wonderful info being shared freely out there.
Hi, Neat post. There is a problem with your website in internet explorer, would test this… IE still is the market leader and a big portion of people will miss your wonderful writing because of this problem.
hi!,I really like your writing very a lot! share we keep up a correspondence extra approximately your article on AOL? I require a specialist on this house to solve my problem. May be that is you! Taking a look ahead to look you.
Wonderful work! This is the type of information that should be shared around the internet. Shame on Google for not positioning this post higher! Come on over and visit my website . Thanks =)
I think this is among the most significant information for me. And i am glad reading your article. But want to remark on some general things, The site style is wonderful, the articles is really excellent : D. Good job, cheers
Can I just say what a relief to find someone who actually knows what theyre talking about on the internet. You definitely know how to bring an issue to light and make it important. More people need to read this and understand this side of the story. I cant believe youre not more popular because you definitely have the gift.
I like foregathering utile information , this post has got me even more info! .
Very interesting topic, appreciate it for posting. “The rest is silence.” by William Shakespeare.
Hey There. I discovered your weblog the use of msn. That is a really well written article. I will be sure to bookmark it and come back to learn more of your useful information. Thank you for the post. I’ll definitely return.
I carry on listening to the rumor speak about getting boundless online grant applications so I have been looking around for the most excellent site to get one. Could you tell me please, where could i acquire some?
Hey there, You have done an excellent job. I’ll definitely digg it and personally recommend to my friends. I’m confident they’ll be benefited from this site.
Thank you for helping out, superb information. “Riches cover a multitude of woes.” by Menander.
Thanks , I have recently been looking for info about this topic for ages and yours is the best I’ve discovered till now. But, what about the conclusion? Are you sure about the source?
There are actually a lot of particulars like that to take into consideration. That is a great point to convey up. I supply the ideas above as basic inspiration but clearly there are questions like the one you bring up the place a very powerful thing will likely be working in honest good faith. I don?t know if best practices have emerged around things like that, however I am positive that your job is clearly recognized as a fair game. Each boys and girls really feel the impression of only a second’s pleasure, for the remainder of their lives.
I was curious if you ever considered changing the structure of your site? Its very well written; I love what youve got to say. But maybe you could a little more in the way of content so people could connect with it better. Youve got an awful lot of text for only having 1 or 2 images. Maybe you could space it out better?
My brother recommended I might like this blog. He was entirely right. This post actually made my day. You cann’t imagine simply how much time I had spent for this info! Thanks!
You can definitely see your expertise within the paintings you write. The arena hopes for even more passionate writers such as you who are not afraid to mention how they believe. Always follow your heart. “If you feel yourself falling, let go and glide.” by Steffen Francisco.
You have brought up a very excellent points, regards for the post.
The very crux of your writing while sounding agreeable at first, did not really settle well with me after some time. Someplace within the paragraphs you actually were able to make me a believer but only for a while. I still have a problem with your leaps in assumptions and you would do well to help fill in all those breaks. When you actually can accomplish that, I would undoubtedly be amazed.
Hello there! Do you know if they make any plugins to safeguard against hackers? I’m kinda paranoid about losing everything I’ve worked hard on. Any suggestions?
A person essentially assist to make critically posts I might state. This is the very first time I frequented your website page and thus far? I amazed with the analysis you made to create this particular post amazing. Magnificent activity!
Some genuinely fantastic content on this web site, thanks for contribution.
Hello, Neat post. There is a problem with your web site in internet explorer, might test thisK IE still is the marketplace leader and a huge component to other people will pass over your fantastic writing because of this problem.
I will immediately grab your rss as I can’t find your email subscription link or newsletter service. Do you’ve any? Kindly let me know so that I could subscribe. Thanks.
Wow, superb blog layout! How long have you been blogging for? you made blogging look easy. The overall look of your site is magnificent, let alone the content!
Just wish to say your article is as amazing. The clearness on your publish is simply nice and that i could assume you are a professional on this subject. Fine together with your permission allow me to grasp your feed to stay up to date with coming near near post. Thanks 1,000,000 and please continue the enjoyable work.
I genuinely treasure your work, Great post.
Enjoyed looking through this, very good stuff, thankyou.
Wow that was odd. I just wrote an very long comment but after I clicked submit my comment didn’t show up. Grrrr… well I’m not writing all that over again. Anyways, just wanted to say superb blog!
Thank you for another informative blog. Where else may just I am getting that kind of info written in such an ideal manner? I’ve a challenge that I am simply now operating on, and I have been on the look out for such info.
Whats Going down i am new to this, I stumbled upon this I’ve discovered It positively useful and it has aided me out loads. I’m hoping to give a contribution & aid different customers like its aided me. Good job.
I saw a lot of website but I believe this one holds something extra in it in it
Hello there, I discovered your site by the use of Google whilst searching for a similar subject, your site got here up, it seems to be good. I’ve bookmarked it in my google bookmarks.
I see something really special in this site.
Some genuinely interesting information, well written and generally user genial.
Hi! Quick question that’s totally off topic. Do you know how to make your site mobile friendly? My site looks weird when browsing from my iphone 4. I’m trying to find a template or plugin that might be able to correct this problem. If you have any suggestions, please share. Thank you!
Hi there! Would you mind if I share your blog with my twitter group? There’s a lot of people that I think would really enjoy your content. Please let me know. Thank you
I like the helpful information you provide in your articles. I’ll bookmark your blog and check again here regularly. I’m quite sure I will learn plenty of new stuff right here! Best of luck for the next!
I really like reading through and I conceive this website got some really useful stuff on it! .
Good – I should certainly pronounce, impressed with your website. I had no trouble navigating through all tabs as well as related info ended up being truly simple to do to access. I recently found what I hoped for before you know it in the least. Reasonably unusual. Is likely to appreciate it for those who add forums or something, web site theme . a tones way for your customer to communicate. Nice task..
I?¦ll immediately grasp your rss feed as I can not in finding your e-mail subscription hyperlink or e-newsletter service. Do you’ve any? Kindly permit me know in order that I may just subscribe. Thanks.
I like this weblog so much, saved to bookmarks. “American soldiers must be turned into lambs and eating them is tolerated.” by Muammar Qaddafi.
Hello! I could have sworn I’ve been to this blog before but after browsing through some of the post I realized it’s new to me. Anyways, I’m definitely happy I found it and I’ll be book-marking and checking back frequently!
Lovely just what I was looking for.Thanks to the author for taking his clock time on this one.
Hey, I think your blog might be having browser compatibility issues. When I look at your website in Safari, it looks fine but when opening in Internet Explorer, it has some overlapping. I just wanted to give you a quick heads up! Other then that, excellent blog!
Hi there, You’ve done a great job. I will definitely digg it and individually recommend to my friends. I am confident they will be benefited from this web site.
Thanks a lot for giving everyone a very terrific opportunity to discover important secrets from this web site. It’s always so terrific and stuffed with a good time for me personally and my office co-workers to visit your blog a minimum of thrice a week to read through the newest guidance you will have. And indeed, I am at all times impressed for the incredible advice you give. Certain 4 ideas in this posting are truly the very best we have ever had.
I simply couldn’t leave your web site prior to suggesting that I extremely enjoyed the usual info a person supply on your guests? Is gonna be back continuously to inspect new posts
very good publish, i definitely love this website, carry on it
I like this site its a master peace ! Glad I discovered this on google .
I’d have to examine with you here. Which is not one thing I usually do! I get pleasure from reading a publish that may make individuals think. Also, thanks for permitting me to comment!
I love your blog.. very nice colors & theme. Did you create this website yourself? Plz reply back as I’m looking to create my own blog and would like to know wheere u got this from. thanks
Real great info can be found on weblog. “Never violate the sacredness of your individual self-respect.” by Theodore Parker.
As I website possessor I believe the articles here is real great, appreciate it for your efforts.
You are my breathing in, I own few blogs and sometimes run out from brand :). “Actions lie louder than words.” by Carolyn Wells.
Thank you for the auspicious writeup. It in fact was a amusement account it. Look advanced to far added agreeable from you! However, how can we communicate?
I will right away grab your rss feed as I can’t find your e-mail subscription link or e-newsletter service. Do you have any? Please let me know so that I could subscribe. Thanks.
Throughout this awesome pattern of things you actually secure an A+ for effort. Where you actually lost me personally was first on all the details. As people say, details make or break the argument.. And that could not be more true right here. Having said that, let me reveal to you what exactly did deliver the results. Your writing can be incredibly engaging and this is probably the reason why I am taking an effort to opine. I do not really make it a regular habit of doing that. Secondly, although I can easily notice the jumps in reasoning you make, I am not really confident of exactly how you seem to unite the details that help to make your conclusion. For now I shall subscribe to your issue however hope in the foreseeable future you connect your facts better.
magnificent points altogether, you just gained a logo new reader. What would you recommend about your post that you made a few days in the past? Any positive?
Some really great articles on this web site, thank you for contribution. “Be absolutely determined to enjoy what you do.” by Sarah Knowles Bolton.
This is nicely expressed! . online pharmacies of canada
This internet site is my breathing in, very good layout and perfect subject matter.
I’m really enjoying the theme/style of your web site.
Have you ever come upon any browser compatibility
problems? A few of my blog readers have complained about my site not operating
correctly in Explorer but looks great in Firefox.
Have you got any recommendations to aid fix this problem?
Here is my site :: KarimaCOhm
I like what you guys are up too. Such smart work and reporting! Keep up the excellent works guys I have incorporated you guys to my blogroll. I think it’ll improve the value of my site 🙂
Very interesting subject , regards for putting up.
F*ckin’ awesome things here. I am very satisfied to look your article. Thanks so much and i am having a look forward to touch you. Will you kindly drop me a e-mail?
I’d have to examine with you here. Which is not one thing I usually do! I take pleasure in reading a post that may make folks think. Additionally, thanks for permitting me to comment!
I simply couldn’t leave your site prior to suggesting that I really loved the standard information an individual provide in your guests? Is gonna be again continuously to check up on new posts
It?¦s actually a cool and useful piece of info. I am happy that you simply shared this useful information with us. Please stay us informed like this. Thank you for sharing.
It’s a shame you don’t have a donate button! I’d most certainly donate to this superb blog! I suppose for now i’ll settle for book-marking and adding your RSS feed to my Google account. I look forward to fresh updates and will share this website with my Facebook group. Chat soon!
My brother recommended I might like this website. He was entirely right. This post truly made my day. You cann’t imagine just how much time I had spent for this information! Thanks!
Hey very cool site!! Man .. Beautiful .. Amazing .. I will bookmark your web site and take the feeds also…I am happy to find a lot of useful information here in the post, we need work out more techniques in this regard, thanks for sharing. . . . . .
Together with every little thing which appears to be building within this particular subject material, a significant percentage of points of view are generally relatively refreshing. On the other hand, I appologize, because I do not subscribe to your entire plan, all be it radical none the less. It would seem to me that your opinions are generally not entirely justified and in actuality you are generally yourself not thoroughly certain of your point. In any case I did appreciate examining it.
Hey, you used to write fantastic, but the last few posts have been kinda boring?K I miss your great writings. Past few posts are just a little out of track! come on!
I like this post, enjoyed this one appreciate it for posting. “No trumpets sound when the important decisions of our life are made. Destiny is made known silently.” by Agnes de Mille.
Hi there! This post couldn’t be written any better! Reading through this post reminds me of my previous room mate! He always kept talking about this. I will forward this article to him. Pretty sure he will have a good read. Thank you for sharing!
uyl [url=https://cbd-oil10.com/#]where to buy cbd oil[/url]cpp [url=https://cbd-oil10.com/#]hemp oil vs cbd oil[/url]
I am always looking online for articles that can aid me. Thank you!
Very nice design and style and wonderful content, hardly anything else we need : D.
Hi there this is kind of of off topic but I was wanting to know if blogs use WYSIWYG editors or if you have to manually code with HTML. I’m starting a blog soon but have no coding expertise so I wanted to get guidance from someone with experience. Any help would be greatly appreciated!
Hello. magnificent job. I did not expect this. This is a excellent story. Thanks!
I loved as much as you will receive carried out right here. The sketch is attractive, your authored material stylish. nonetheless, you command get got an shakiness over that you wish be delivering the following. unwell unquestionably come more formerly again since exactly the same nearly very often inside case you shield this hike.
Hello there! Do you know if they make any plugins to help with SEO? I’m trying to get my blog to rank for some targeted keywords but I’m not seeing very good gains. If you know of any please share. Thanks!
You have brought up a very fantastic points, appreciate it for the post.
hello!,I like your writing so so much! proportion we keep in touch more about your post on AOL? I require an expert on this house to resolve my problem. May be that is you! Taking a look forward to look you.
I have been absent for some time, but now I remember why I used to love this blog. Thank you, I’ll try and check back more frequently. How frequently you update your site?
I’m not positive where you are getting your info, but great topic. I must spend some time learning more or understanding more. Thank you for excellent info I was on the lookout for this info for my mission.
Nice post. I was checking continuously this blog and I’m impressed! Extremely useful info specially the last part 🙂 I care for such info a lot. I was seeking this certain information for a long time. Thank you and good luck.
You made some decent points there. I did a search on the subject and found most individuals will consent with your blog.
certainly like your website but you have to check the spelling on quite a few of your posts. A number of them are rife with spelling issues and I find it very bothersome to tell the truth nevertheless I’ll definitely come back again.
I don’t even know how I stopped up right here, however I thought this post used to be good. I don’t recognise who you might be however certainly you’re going to a famous blogger if you happen to aren’t already 😉 Cheers!
Hiya, I am really glad I have found this info. Nowadays bloggers publish just about gossips and net and this is actually frustrating. A good website with interesting content, that’s what I need. Thank you for keeping this site, I’ll be visiting it. Do you do newsletters? Can’t find it.
Hey this is kinda of off topic but I was wanting to know if blogs use WYSIWYG editors or if you have to manually code with HTML. I’m starting a blog soon but have no coding knowledge so I wanted to get guidance from someone with experience. Any help would be greatly appreciated!
Valuable information. Lucky me I found your site by accident, and I am shocked why this accident didn’t happened earlier! I bookmarked it.
I think that is among the so much important information for me. And i am happy studying your article. However wanna remark on some normal things, The site taste is perfect, the articles is in reality great : D. Excellent activity, cheers
Unquestionably believe that which you said. Your favorite reason seemed to be on the web the simplest thing to be aware of. I say to you, I definitely get irked while people consider worries that they just do not know about. You managed to hit the nail upon the top as well as defined out the whole thing without having side effect , people can take a signal. Will probably be back to get more. Thanks
Can I just say what a relief to find someone who actually knows what theyre talking about on the internet. You definitely know how to bring an issue to light and make it important. More people need to read this and understand this side of the story. I cant believe youre not more popular because you definitely have the gift.
I just could not depart your website before suggesting that I extremely enjoyed the standard information a person provide for your visitors? Is gonna be back often in order to check up on new posts
Yay google is my world beater assisted me to find this great web site! .
Very efficiently written story. It will be helpful to anyone who employess it, as well as myself. Keep doing what you are doing – looking forward to more posts.
Thanks for sharing excellent informations. Your site is so cool. I am impressed by the details that you have on this web site. It reveals how nicely you understand this subject. Bookmarked this website page, will come back for extra articles. You, my pal, ROCK! I found just the info I already searched everywhere and just could not come across. What a great web site.
My partner and I stumbled over here coming from a different web address and thought I may as well check things out. I like what I see so i am just following you. Look forward to looking into your web page again.
I likewise conceive thence, perfectly composed post! .
Great V I should definitely pronounce, impressed with your website. I had no trouble navigating through all the tabs as well as related info ended up being truly easy to do to access. I recently found what I hoped for before you know it at all. Reasonably unusual. Is likely to appreciate it for those who add forums or something, website theme . a tones way for your customer to communicate. Excellent task..
Only wanna remark that you have a very nice internet site, I like the style and design it really stands out.
I have not checked in here for some time since I thought it was getting boring, but the last few posts are great quality so I guess I will add you back to my everyday bloglist. You deserve it my friend 🙂
Hello! I’m at work surfing around your blog from my new iphone! Just wanted to say I love reading through your blog and look forward to all your posts! Keep up the superb work!
I don’t normally comment but I gotta admit regards for the post on this perfect one : D.
Thanks a bunch for sharing this with all of us you actually know what you are talking about! Bookmarked. Kindly also visit my web site =). We could have a link exchange contract between us!
This is really interesting, You’re a very skilled blogger. I’ve joined your feed and look forward to seeking more of your excellent post. Also, I’ve shared your site in my social networks!
I like what you guys are up also. Such clever work and reporting! Carry on the superb works guys I have incorporated you guys to my blogroll. I think it will improve the value of my website 🙂
Perfectly indited articles, Really enjoyed reading through.
I genuinely treasure your work, Great post.
I have been checking out some of your stories and i can state pretty good stuff. I will make sure to bookmark your blog.
Woah! I’m really enjoying the template/theme of this website. It’s simple, yet effective. A lot of times it’s challenging to get that “perfect balance” between user friendliness and visual appearance. I must say you’ve done a very good job with this. In addition, the blog loads super quick for me on Safari. Exceptional Blog!
Greetings! Very helpful advice on this article! It is the little changes that make the biggest changes. Thanks a lot for sharing!
I just could not depart your website prior to suggesting that I really enjoyed the standard information a person provide for your visitors? Is going to be back often in order to check up on new posts
I do agree with all of the ideas you’ve introduced to your post. They are really convincing and can definitely work. Nonetheless, the posts are too quick for beginners. May just you please lengthen them a little from subsequent time? Thanks for the post.
I appreciate, cause I found exactly what I was looking for. You have ended my four day long hunt! God Bless you man. Have a nice day. Bye
I’ve learn a few excellent stuff here. Definitely value bookmarking for revisiting. I surprise how much effort you place to make any such great informative site.
I have to show some thanks to the writer just for bailing me out of this particular predicament. Right after searching throughout the online world and obtaining ideas that were not powerful, I thought my entire life was well over. Being alive without the presence of strategies to the difficulties you’ve resolved by means of this guide is a critical case, as well as the ones which could have negatively damaged my career if I hadn’t come across your website. That understanding and kindness in dealing with a lot of things was important. I’m not sure what I would have done if I hadn’t encountered such a point like this. I am able to at this time look ahead to my future. Thanks a lot very much for the professional and sensible guide. I will not think twice to recommend the blog to anyone who would need guidelines on this matter.
I discovered your blog site on google and check a few of your early posts. Continue to keep up the very good operate. I just additional up your RSS feed to my MSN News Reader. Seeking forward to reading more from you later on!…
Hello very cool site!! Man .. Excellent .. Amazing .. I’ll bookmark your site and take the feeds also?KI am satisfied to seek out a lot of useful information right here in the publish, we need work out extra strategies in this regard, thank you for sharing. . . . . .
Hello! I just wanted to ask if you ever have any trouble with hackers? My last blog (wordpress) was hacked and I ended up losing a few months of hard work due to no back up. Do you have any solutions to prevent hackers?
Pretty great post. I just stumbled upon your weblog and wished to mention that I have truly enjoyed browsing your weblog posts. In any case I will be subscribing for your feed and I hope you write again soon!
Regards for this post, I am a big big fan of this web site would like to keep updated.
Good web site! I truly love how it is easy on my eyes and the data are well written. I am wondering how I could be notified whenever a new post has been made. I’ve subscribed to your RSS which must do the trick! Have a great day!
Merely wanna remark that you have a very nice website , I love the pattern it really stands out.
I am impressed with this site, rattling I am a fan.
Does your blog have a contact page? I’m having a tough time locating it but, I’d like to shoot you an e-mail. I’ve got some ideas for your blog you might be interested in hearing. Either way, great blog and I look forward to seeing it grow over time.
I’m really inspired together with your writing talents as smartly as with the structure in your blog. Is that this a paid topic or did you customize it your self? Anyway stay up the excellent quality writing, it is uncommon to peer a nice blog like this one these days..
I was curious if you ever considered changing the page layout of your website? Its very well written; I love what youve got to say. But maybe you could a little more in the way of content so people could connect with it better. Youve got an awful lot of text for only having one or 2 images. Maybe you could space it out better?
I like this blog very much, Its a rattling nice spot to read and incur information. “You can never learn less, you can only learn more.” by Richard Buckminster Fuller.
Have you ever thought about creating an e-book or guest authoring on other websites? I have a blog based on the same subjects you discuss and would really like to have you share some stories/information. I know my visitors would appreciate your work. If you’re even remotely interested, feel free to send me an e mail.
Hello, i think that i noticed you visited my blog thus i got here to “return the prefer”.I’m attempting to to find issues to enhance my website!I guess its ok to use a few of your concepts!!
The subsequent time I learn a blog, I hope that it doesnt disappoint me as much as this one. I mean, I do know it was my option to read, however I really thought youd have something attention-grabbing to say. All I hear is a bunch of whining about one thing that you could possibly fix in the event you werent too busy searching for attention.
Well I definitely enjoyed reading it. This information offered by you is very effective for good planning.
This design is steller! You definitely know how to keep a reader entertained. Between your wit and your videos, I was almost moved to start my own blog (well, almost…HaHa!) Wonderful job. I really enjoyed what you had to say, and more than that, how you presented it. Too cool!
you are in point of fact a just right webmaster. The web site loading pace is incredible. It kind of feels that you’re doing any distinctive trick. Furthermore, The contents are masterwork. you have performed a excellent job in this topic!
I truly appreciate this post. I’ve been looking everywhere for this! Thank goodness I found it on Bing. You have made my day! Thanks again
This is very interesting, You are a very skilled blogger. I’ve joined your feed and look forward to seeking more of your magnificent post. Also, I’ve shared your website in my social networks!
you’re in point of fact a good webmaster. The web site loading speed is incredible. It sort of feels that you are doing any unique trick. Also, The contents are masterpiece. you’ve performed a great activity in this subject!
whoah this blog is great i love reading your articles. Keep up the great work! You know, lots of people are looking around for this information, you can help them greatly.
Perfect work you have done, this web site is really cool with excellent info .
Very clear internet site, thankyou for this post.
I found your weblog site on google and test just a few of your early posts. Proceed to keep up the excellent operate. I just further up your RSS feed to my MSN News Reader. Searching for ahead to studying extra from you later on!…
There are some attention-grabbing cut-off dates on this article but I don’t know if I see all of them center to heart. There is some validity but I’ll take hold opinion till I look into it further. Good article , thanks and we would like more! Added to FeedBurner as properly
Sweet web site, super layout, real clean and utilise genial.
I am always searching online for ideas that can assist me. Thx!
I’m really impressed with your writing abilities and also with the format on your blog. Is this a paid theme or did you modify it your self? Either way keep up the nice quality writing, it is uncommon to peer a great weblog like this one nowadays..
F*ckin’ awesome things here. I am very satisfied to look your article. Thanks a lot and i am looking forward to touch you. Will you kindly drop me a mail?
This web site definitely has all the information I needed concerning this subject and didn’t know who to ask.
Just desire to say your article is as amazing. The clarity to your put up is just spectacular and that i could assume you are a professional on this subject. Fine along with your permission let me to grab your feed to keep updated with impending post. Thank you a million and please carry on the rewarding work.
Definitely, what a great website and enlightening posts, I definitely will bookmark your blog.All the Best!
Good day! Do you know if they make any plugins to protect against hackers? I’m kinda paranoid about losing everything I’ve worked hard on. Any suggestions?
That is very attention-grabbing, You’re a very skilled blogger. I have joined your rss feed and stay up for in quest of more of your excellent post. Additionally, I have shared your web site in my social networks!
Hiya, I’m really glad I’ve found this info. Nowadays bloggers publish just about gossips and internet and this is really frustrating. A good web site with interesting content, that’s what I need. Thanks for keeping this web-site, I will be visiting it. Do you do newsletters? Cant find it.
Some really excellent articles on this web site, regards for contribution.
After all, what a great site and informative posts, I will upload inbound link – bookmark this web site? Regards, Reader.
Whats Happening i am new to this, I stumbled upon this I have discovered It absolutely useful and it has aided me out loads. I’m hoping to contribute & aid other customers like its aided me. Good job.
Good ?V I should definitely pronounce, impressed with your web site. I had no trouble navigating through all tabs as well as related info ended up being truly easy to do to access. I recently found what I hoped for before you know it in the least. Quite unusual. Is likely to appreciate it for those who add forums or something, site theme . a tones way for your customer to communicate. Nice task..
Howdy! I know this is kind of off topic but I was wondering if you knew where I could get a captcha plugin for my comment form? I’m using the same blog platform as yours and I’m having difficulty finding one? Thanks a lot!
Thanks for another informative blog. Where else may I get that kind of information written in such an ideal means? I’ve a project that I’m just now operating on, and I have been on the glance out for such info.
Some times its a pain in the ass to read what people wrote but this internet site is rattling user pleasant! .
I don’t even know the way I stopped up right here, however I assumed this publish was good. I do not recognise who you might be however certainly you’re going to a well-known blogger for those who are not already 😉 Cheers!
Hello. impressive job. I did not expect this. This is a fantastic story. Thanks!
You completed several good points there. I did a search on the subject matter and found the majority of folks will go along with with your blog.
Excellent post. I was checking constantly this blog and I’m impressed! Very helpful info specifically the last part 🙂 I care for such information a lot. I was seeking this certain information for a long time. Thank you and best of luck.
Lovely just what I was looking for.Thanks to the author for taking his clock time on this one.
Hi! I just wanted to ask if you ever have any issues with hackers? My last blog (wordpress) was hacked and I ended up losing months of hard work due to no back up. Do you have any methods to prevent hackers?
You are my inspiration , I possess few web logs and often run out from to brand.
Hi, I think your site might be having browser compatibility issues. When I look at your website in Safari, it looks fine but when opening in Internet Explorer, it has some overlapping. I just wanted to give you a quick heads up! Other then that, fantastic blog!
I’ve been absent for some time, but now I remember why I used to love this blog. Thanks , I¦ll try and check back more frequently. How frequently you update your site?
I love assembling utile information , this post has got me even more info! .
Thank you for the good writeup. It actually was a leisure account it. Glance advanced to more brought agreeable from you! By the way, how can we keep in touch?
Saved like a favorite, I really like your web site!
Here is my homepage – StaciTHalt
I like this web blog very much so much good information.
I am now not certain where you are getting your info, but great topic. I must spend some time finding out more or working out more. Thanks for great information I used to be searching for this information for my mission.
Nice blog! Is your theme custom made or did you download it from somewhere? A theme like yours with a few simple adjustements would really make my blog jump out. Please let me know where you got your theme. With thanks
excellent issues altogether, you just received a new reader. What would you recommend about your submit that you made some days ago? Any sure?
This web site is really a walk-through for all of the info you wanted about this and didn’t know who to ask. Glimpse here, and you’ll definitely discover it.
I don’t even know how I ended up here, but I thought this post was good. I do not know who you are but definitely you’re going to a famous blogger if you aren’t already 😉 Cheers!
I was just seeking this info for some time. After 6 hours of continuous Googleing, at last I got it in your website. I wonder what is the lack of Google strategy that don’t rank this type of informative websites in top of the list. Generally the top web sites are full of garbage.
Usually I do not read post on blogs, but I wish to say that this write-up very forced me to try and do so! Your writing style has been surprised me. Thanks, very nice post.
I wish to express some appreciation to the writer for bailing me out of this type of situation. Because of surfing through the the web and obtaining basics which are not helpful, I assumed my life was gone. Existing devoid of the approaches to the difficulties you have sorted out by means of this article content is a serious case, and those which could have negatively damaged my career if I hadn’t discovered your website. Your own personal training and kindness in taking care of every item was very useful. I am not sure what I would’ve done if I hadn’t encountered such a step like this. It’s possible to now relish my future. Thanks for your time so much for this expert and effective help. I will not think twice to propose your web blog to any person who should get support on this topic.
Wow, great blog post.Really thank you! Really Cool.
I’ll immediately clutch your rss feed as I can not find your email subscription link or newsletter service. Do you’ve any? Kindly allow me understand so that I may subscribe. Thanks.
I’ve been absent for some time, but now I remember why I used to love this website. Thank you, I’ll try and check back more frequently. How frequently you update your web site?
I just want to tell you that I’m beginner to blogging and honestly liked your web page. Very likely I’m going to bookmark your site . You amazingly have great writings. Cheers for revealing your blog.
I am usually to blogging and i actually respect your content. The article has actually peaks my interest. I am going to bookmark your site and maintain checking for brand new information.
I’ll right away grab your rss as I can’t find your email subscription link or e-newsletter service. Do you’ve any? Kindly let me know in order that I could subscribe. Thanks.
Thanks for sharing superb informations. Your website is so cool. I’m impressed by the details that you have on this web site. It reveals how nicely you understand this subject. Bookmarked this website page, will come back for more articles. You, my friend, ROCK! I found simply the information I already searched all over the place and just couldn’t come across. What a great website.
I besides think hence, perfectly indited post! .
I’d constantly want to be update on new content on this site, saved to favorites! .
Hi there! I just wanted to ask if you ever have any problems with hackers? My last blog (wordpress) was hacked and I ended up losing many months of hard work due to no data backup. Do you have any solutions to protect against hackers?
Useful information. Fortunate me I discovered your site by accident, and I’m stunned why this coincidence didn’t took place earlier! I bookmarked it.
hello!,I love your writing so much! percentage we keep in touch more approximately your article on AOL? I require a specialist on this house to solve my problem. May be that’s you! Taking a look ahead to peer you.
I dugg some of you post as I thought they were very helpful very helpful
Hello, i think that i saw you visited my site thus i came to “return the favor”.I’m attempting to find things to enhance my website!I suppose its ok to use a few of your ideas!!
Your place is valueble for me. Thanks!…
Today, I went to the beach with my kids. I found a sea shell and gave it to my 4 year old daughter and said “You can hear the ocean if you put this to your ear.” She put the shell to her ear and screamed. There was a hermit crab inside and it pinched her ear. She never wants to go back! LoL I know this is totally off topic but I had to tell someone!
Very interesting topic, regards for putting up.
I really appreciate this post. I’ve been looking everywhere for this! Thank goodness I found it on Bing. You’ve made my day! Thank you again!
Some truly superb info , Gladiolus I found this.
Great – I should certainly pronounce, impressed with your site. I had no trouble navigating through all the tabs and related info ended up being truly easy to do to access. I recently found what I hoped for before you know it at all. Quite unusual. Is likely to appreciate it for those who add forums or something, website theme . a tones way for your client to communicate. Nice task.
Its like you learn my mind! You seem to grasp so much approximately this, like you wrote the guide in it or something. I feel that you can do with a few to power the message house a bit, however other than that, that is fantastic blog. A great read. I’ll certainly be back.
Nuestra empresa de mecanizados en Barcelona M.U.R. S.L. les ofrece todo su potencial para ser su proveedor de confianza, en la fabricación de toda clase de piezas metálicas a medida, útiles para el mantenimiento industrial, y cualquier tipo de pieza especial que precise de mecanizado, tanto en pequeñas como en medianas series.
Merely a smiling visitor here to share the love (:, btw outstanding style.
Some truly nice stuff on this internet site, I like it.
Yeah bookmaking this wasn’t a high risk conclusion great post! .
It¦s actually a great and useful piece of information. I¦m glad that you just shared this helpful information with us. Please stay us up to date like this. Thanks for sharing.
I have been absent for some time, but now I remember why I used to love this website. Thanks , I’ll try and check back more often. How frequently you update your site?
You made some decent points there. I did a search on the topic and found most guys will agree with your blog.
I like the efforts you have put in this, appreciate it for all the great posts.
Wow! Thank you! I permanently wanted to write on my website something like that. Can I include a part of your post to my site?
Howdy, i read your blog from time to time and i own a similar one and i was just wondering if you get a lot of spam responses? If so how do you protect against it, any plugin or anything you can advise? I get so much lately it’s driving me mad so any help is very much appreciated.
Im no longer certain the place you’re getting your info, but good topic. I must spend a while finding out more or figuring out more. Thanks for excellent information I was searching for this information for my mission.
I simply want to say I am beginner to blogging and absolutely liked this website. Very likely I’m planning to bookmark your blog . You amazingly have terrific stories. Cheers for revealing your web site.
I’m really impressed with your writing skills and also with the layout on your weblog. Is this a paid theme or did you customize it yourself? Either way keep up the excellent quality writing, it is rare to see a nice blog like this one today..
Hi there, I found your web site by the use of Google at the same time as searching for a related subject, your site came up, it appears to be like good. I’ve bookmarked it in my google bookmarks.
I’m extremely impressed with your writing skills as well as with the layout on your blog. Is this a paid theme or did you customize it yourself? Either way keep up the excellent quality writing, it’s rare to see a nice blog like this one these days..
I’ve been browsing online more than three hours today, yet I never found any interesting article like yours. It is pretty worth enough for me. In my opinion, if all site owners and bloggers made good content as you did, the internet will be much more useful than ever before.
Dead written content, thanks for entropy.
Great remarkable things here. I?¦m very satisfied to look your article. Thank you so much and i’m having a look forward to touch you. Will you please drop me a e-mail?
I also believe so , perfectly written post! .
There are definitely a whole lot of particulars like that to take into consideration. That is a nice level to convey up. I offer the thoughts above as general inspiration but clearly there are questions like the one you deliver up the place the most important thing will probably be working in sincere good faith. I don?t know if greatest practices have emerged round things like that, but I am certain that your job is clearly identified as a good game. Both girls and boys really feel the influence of just a moment’s pleasure, for the rest of their lives.
Hello. remarkable job. I did not imagine this. This is a splendid story. Thanks!
I’ve been absent for some time, but now I remember why I used to love this web site. Thanks , I’ll try and check back more often. How frequently you update your site?
This site can be a walk-via for all of the data you needed about this and didn’t know who to ask. Glimpse here, and you’ll positively discover it.
Hello there! I know this is kinda off topic but I’d figured I’d ask. Would you be interested in trading links or maybe guest authoring a blog article or vice-versa? My blog addresses a lot of the same topics as yours and I think we could greatly benefit from each other. If you might be interested feel free to send me an email. I look forward to hearing from you! Fantastic blog by the way!
Woah! I’m really loving the template/theme of this website. It’s simple, yet effective. A lot of times it’s very difficult to get that “perfect balance” between user friendliness and appearance. I must say you’ve done a amazing job with this. Additionally, the blog loads very fast for me on Opera. Outstanding Blog!
You made some decent points there. I looked on the internet for the subject matter and found most guys will go along with with your blog.
Regards for helping out, superb information. “Riches cover a multitude of woes.” by Menander.
I needed to send you this very little word to thank you once again just for the pleasant secrets you’ve shared on this site. It is certainly tremendously open-handed of people like you to offer unhampered all many people might have offered as an ebook to help make some bucks for themselves, and in particular since you could have done it if you ever considered necessary. These ideas likewise served to provide a great way to be certain that many people have a similar dreams much like mine to understand great deal more with regard to this issue. I believe there are numerous more enjoyable instances in the future for individuals that read carefully your blog.
It’s a pity you don’t have a donate button! I’d most certainly donate to this outstanding blog! I suppose for now i’ll settle for bookmarking and adding your RSS feed to my Google account. I look forward to new updates and will share this website with my Facebook group. Talk soon!
you’re really a good webmaster. The site loading velocity is incredible. It sort of feels that you are doing any unique trick. Also, The contents are masterpiece. you have performed a wonderful job on this matter!
Hello! I just wanted to ask if you ever have any problems with hackers? My last blog (wordpress) was hacked and I ended up losing months of hard work due to no data backup. Do you have any methods to stop hackers?
I’m more than happy to discover this site. I wanted to thank you for your time due to this wonderful read!! I definitely loved every part of it and i also have you book-marked to look at new information on your blog.
I just want to say I am just all new to blogging and honestly liked this blog site. Almost certainly I’m want to bookmark your site . You actually come with incredible article content. Appreciate it for revealing your webpage.
What exactly a man of power! You have the potential to write fantastic items that you can’t come across anyplace. to envy
Best view i have ever seen !
Best view i have ever seen !
I loved up to you will obtain performed proper here. The caricature is tasteful, your authored subject matter stylish. however, you command get bought an impatience over that you would like be turning in the following. unwell indubitably come more until now once more since exactly the same nearly very incessantly inside case you defend this hike.
Great wordpress blog here.. It’s hard to find quality writing like yours these days. I really appreciate people like you! take care
It’s actually a nice and helpful piece of information. I’m glad that you shared this useful information with us. Please keep us up to date like this. Thanks for sharing.
I am so happy to read this. This is the kind of manual that needs to be given and not the random misinformation that is at the other blogs. Appreciate your sharing this best doc.
I respect your piece of work, appreciate it for all the interesting content .
Best view i have ever seen !
Best view i have ever seen !
Spot on with this write-up, I truly believe this site requirements additional consideration. I’ll likely to end up again to see additional, thank you for that info.
Best view i have ever seen !
This is a topic close to my heart cheers, where are your contact details though?
Terrific work! This is the kind of info that are supposed to be shared around the net. Disgrace on the search engines for no longer positioning this publish upper! Come on over and seek advice from my web site . Thanks =)
Hi there just wanted to give you a quick heads up. The text in your content seem to be running off the screen in Ie. I’m not sure if this is a formatting issue or something to do with internet browser compatibility but I thought I’d post to let you know. The design and style look great though! Hope you get the issue resolved soon. Kudos
Hi, i think that i saw you visited my weblog thus i came to “return the favor”.I’m trying to find things to improve my site!I suppose its ok to use some of your ideas!!
there are so many funny videos on the internet to watch, i can laugh all day watching funny videos“
Spot on with this write-up, I absolutely feel this amazing site needs far more attention. I’ll probably be returning to see more, thanks for the advice.
I’d constantly want to be update on new blog posts on this website , saved to my bookmarks! .
If you are searching for the greatest pest control company, look no more. These guys rock!
I intended to compose you the little word to finally thank you as before for these awesome basics you’ve contributed above. It’s simply shockingly open-handed of you in giving publicly just what many individuals would have offered for sale as an ebook to earn some dough on their own, certainly given that you could possibly have tried it in case you considered necessary. The tricks also acted as a great way to fully grasp other individuals have similar keenness similar to my own to figure out significantly more with regards to this matter. Certainly there are a lot more enjoyable periods up front for folks who read your site.
I loved as much as you will obtain carried out right here. The caricature is tasteful, your authored subject matter stylish. nevertheless, you command get bought an edginess over that you want be turning in the following. sick undoubtedly come more beforehand once more as precisely the same nearly very steadily inside of case you shield this increase.
I really like reading through and I conceive this website got some genuinely utilitarian stuff on it! .
before you buy some very expensive SEO Tools, always look for a review first before you invest on them.
After checking out a few of the blog articles on your blog, I really like your way of writing a blog. I saved as a favorite it to my bookmark webpage list and will be checking back soon. Take a look at my web site too and let me know what you think.
Hi, I do think this is an excellent website. I stumbledupon it 😉 I am going to revisit once again since I bookmarked it. Money and freedom is the best way to change, may you be rich and continue to help others.
You seem to be very professional in the way you write.*”~*~
This really answered my problem, thanks!
Terriffic blog post! I’ll return to see your next article! Thank you!
Some really superb posts on this site, thank you for contribution. “Gratitude is merely the secret hope of further favors.” by La Rochefoucauld.
After checking out a handful of the blog articles on your web page, I really appreciate your way of writing a blog. I book-marked it to my bookmark website list and will be checking back in the near future. Please check out my website as well and let me know what you think.
Having read this I thought it was extremely informative. I appreciate you finding the time and energy to put situs judi pkv games this article together. I once again find myself spending a significant amount of time both reading and commenting
Hi! I just would like to offer you a big thumbs up for your excellent information you have right here on this post. I will be coming back to your site for more soon.
Hello, i read your blog occasionally and i own a similar one and i was just curious if you get a lot of spam feedback? If so how do you reduce it, any plugin or anything you can suggest? I get so much lately it’s driving me crazy so any support is very much appreciated.
F*ckin¦ remarkable things here. I¦m very satisfied to see your article. Thank you so much and i’m looking ahead to touch you. Will you please drop me a e-mail?
I must show some thanks to this writer just for rescuing me from this problem. After browsing through the online world and finding techniques which were not productive, I thought my life was over. Being alive without the presence of answers to the difficulties you have solved by way of the review is a crucial case, and ones which could have in a wrong way affected my career if I hadn’t discovered your blog. Your own know-how and kindness in maneuvering all the pieces was very helpful. I don’t know what I would’ve done if I hadn’t encountered such a solution like this. I’m able to at this time look forward to my future. Thanks a lot so much for your high quality and sensible guide. I won’t hesitate to recommend your web site to any person who needs to have guide about this subject.
I got what you intend, thankyou for putting up.Woh I am pleased to find this website through google.
Just about all of what you assert is astonishingly precise and it makes me wonder why I hadn’t looked at this with this light previously. Your piece truly did turn the light on for me as far as this particular subject goes. But at this time there is one particular point I am not necessarily too cozy with so while I make an effort to reconcile that with the central idea of your position, let me observe just what all the rest of the subscribers have to say.Well done.
Thanks so much for sharing the info. I love sucking dick btw hmu
I love it when folks come together and share opinions. Great site, keep it up.
With havin so much content do you ever run into any problems of plagorism or copyright infringement? My website has a lot of unique content I’ve either authored myself or outsourced but it appears a lot of it is popping it up all over the web without my permission. Do you know any solutions to help protect against content from being ripped off? I’d certainly appreciate it.
Your style is very unique in comparison to other folks I’ve read stuff from. I appreciate you for posting when you have the opportunity, Guess I will just bookmark this page.
This is a topic that is near to my heart… Best wishes! Where are your contact details though?
I really loved this article. You are an excellent writer. I’ll be back to see another! Thanks!
This is really fascinating, You are a very professional blogger. I’ve joined your rss feed and sit up for searching for more of your great post. Also, I have shared your site in my social networks!Inocencia Blaker
I love it when people get together and share thoughts. Great website, keep it up!
You made various good points there. I did a search on the topic and found a good number of people will have the same opinion with your blog.
Good article. I will be going through a few of these issues as well..
I’ve been absent for a while, but now I remember why I used to love this website. Thank you, I will try and check back more frequently. How frequently you update your web site?
Normally I don’t read post on blogs, however I would like to say that this write-up very pressured me to take a look at and do so! Your writing taste has been amazed me. Thank you, very great article.
I am extremely inspired with your writing talents as well as with the format for your blog. Is this a paid theme or did you customize it yourself? Either way stay up the excellent high quality writing, it is rare to peer a nice blog like this one these days..
Hello my family member! I want to say that this article is amazing, great written and come with almost all significant infos. I would like to see more posts like this.
Good blog post. I definitely appreciate this site. Keep it up!
Having read this I believed it was rather informative. I appreciate you taking the time and energy to put Situs Judi Terpercaya this short article together. I once again find myself spending way too much time both reading and commenting
There is clearly a bundle to know about this. I suppose you made various nice points in features also.
magnificent points altogether, you simply received a brand new reader. What could you suggest about your put up that you simply made some days ago? Any certain?
My brother recommended I might like this blog. He was entirely right. This post truly made my day. You can not imagine just how much time I had spent for this information! Thanks!
Well I truly enjoyed studying it. This tip provided by you is very useful for accurate planning.
Your style is so unique in comparison to other folks I have read stuff from. Many thanks for posting when you have the opportunity, Guess I will just bookmark this page.
Thank you for creating this awesome article. I will be back to view more.
I wanted to thank you for this fantastic read!! I definitely loved every bit of it. I have got you bookmarked to check out new things you post…
Undeniably believe that which you stated. Your favorite justification seemed to be on the web the simplest thing to be aware of. I say to you, I certainly get annoyed while people consider worries that they plainly do not know about. You managed to hit the nail upon the top and defined out the whole thing without having side-effects , people could take a signal. Will probably be back to get more. Thanks
A person necessarily help to make severely articles I might state. That is the first time I frequented your web page and thus far? I amazed with the analysis you made to create this actual post amazing. Wonderful job!
May I just say what a comfort to discover somebody who really knows what they’re talking about on the web. You actually know how to bring a problem to light and make it important. More and more people really need to look at this and understand this side of your story. I can’t believe you’re not more popular because you most certainly have the gift.
Amazing blog! Do you have any recommendations for aspiring writers? I’m planning to start my own blog soon but I’m a little lost on everything. Would you advise starting with a free platform like WordPress or go for a paid option? There are so many options out there that I’m totally overwhelmed .. Any recommendations? Thanks a lot!
Hmm it seems like your site ate my first comment (it was super long) so I guess I’ll just sum it up what I had written and say, I’m thoroughly enjoying your blog. I too am an aspiring blog blogger but I’m still new to everything. Do you have any tips for inexperienced blog writers? I’d genuinely appreciate it.
After looking over a number of the articles on your blog, I seriously appreciate your technique of blogging. I book-marked it to my bookmark site list and will be checking back in the near future. Please visit my web site as well and let me know what you think.
I like this site because so much useful stuff on here : D.
Hey just wanted to give you a quick heads up. The text in your post seem to be running off the screen in Ie. I’m not sure if this is a format issue or something to do with browser compatibility but I figured I’d post to let you know. The design look great though! Hope you get the problem resolved soon. Kudos
This website was… how do you say it? Relevant!! Finally I’ve found something that helped me. Cheers!
hey there and thank you to your information – I’ve definitely picked up anything new from proper here. I did however experience some technical issues using this site, since I experienced to reload the website many instances previous to I may get it to load correctly. I have been thinking about if your hosting is OK? Not that I’m complaining, however slow loading circumstances occasions will sometimes affect your placement in google and can injury your quality score if advertising and ***********|advertising|advertising|advertising and *********** with Adwords. Well I am adding this RSS to my e-mail and could look out for much more of your respective fascinating content. Ensure that you update this once more very soon..
After I originally left a comment I appear to have clicked the -Notify me when new comments are added- checkbox and now whenever a comment is added I get 4 emails with the exact same comment. Is there a way you are able to remove me from that service? Thanks a lot.
I have been checking out many of your posts and it’s pretty good stuff. I will make sure to bookmark your site.
I like the helpful info you provide in your articles. I’ll bookmark your weblog and check again here frequently. I am quite certain I’ll learn many new stuff right here! Good luck for the next!
Your place is valueble for me. Thanks!…
Hi, I do believe this is a great website. I stumbledupon it 😉 I’m going to return once again since I bookmarked it. Money and freedom is the greatest way to change, may you be rich and continue to guide other people.
Oh my goodness! Amazing article dude! Thank you, However I am experiencing troubles with your RSS. I don’t understand why I can’t subscribe to it. Is there anybody else getting the same RSS problems? Anybody who knows the answer can you kindly respond? Thanx.
Good – I should definitely pronounce, impressed with your website. I had no trouble navigating through all tabs as well as related info ended up being truly easy to do to access. I recently found what I hoped for before you know it in the least. Reasonably unusual. Is likely to appreciate it for those who add forums or anything, website theme . a tones way for your customer to communicate. Nice task..
This is a great standpoint, nonetheless is just not create every sence in any way talking about which mather. Every technique thanks as well as i had endeavor to discuss your own place straight into delicius but it looks like it’s a dilemma using your information sites are you able to you need to recheck the item. many thanks once more.
Good post. I learn something totally new and challenging on websites I stumbleupon every day. It’s always helpful to read content from other writers and use a little something from other sites.
Hello. fantastic job. I did not imagine this. This is a splendid story. Thanks!
This is a really good tip particularly to those fresh to the blogosphere. Brief but very precise info… Many thanks for sharing this one. A must read post.
Having read this I thought it was really informative. I appreciate you finding the time and effort to put this informative article together. I once again find myself personally spending a lot of time both reading and posting comments. But so what, it was still worthwhile.
You’re so cool! I do not suppose I’ve truly read through something like that before. So good to discover someone with a few genuine thoughts on this topic. Really.. many thanks for starting this up. This site is something that’s needed on the web, someone with some originality.
You can find definitely quite a lot of details just like that to take into consideration. That´s a great point to bring up. I provide you with the thoughts above as general inspiration but clearly you’ll find questions just like the one you bring up where the most essential factor can be working in honest fine faith. I don´t know if best practices have emerged around things just like that, but I am certain that your job is clearly identified as a fair game.
I needed to thank you for this great read!! I certainly enjoyed every bit of it. I have you saved as a favorite to check out new stuff you post…
Love your website. I’ll be back to check your new content on the reg!
Aw, this was a really nice post. Finding the time and actual effort to make a top notch article… but what can I say… I procrastinate a whole lot and never manage to get anything done.
Aw, this was an incredibly nice post. Taking a few minutes and actual effort to make a really good article… but what can I say… I hesitate a whole lot and never seem to get anything done.
The subsequent time I read a blog, I hope that it doesnt disappoint me as much as this one. I imply, I do know it was my choice to learn, however I really thought youd have something attention-grabbing to say. All I hear is a bunch of whining about something that you would repair in case you werent too busy searching for attention.
I’ve read several good stuff here. Definitely worth bookmarking for revisiting. I surprise how much effort you put to create such a fantastic informative web site.
Thanks for the sensible critique. Me and my neighbor were just preparing to do a little research about this. We got a grab a book from our local library but I think I learned more from this post. I am very glad to see such magnificent info being shared freely out there.
Everyone loves it whenever people come together and share opinions. Great blog, stick with it!
I quite like reading a post that can make men and women think. Also, thanks for allowing for me to comment.
Whoa! This blog looks just like my old one! It’s on a totally different topic but it has pretty much the same page layout and design. Wonderful choice of colors!
Howdy! Someone in my Myspace group shared this website with us so I came to take a look. I’m definitely enjoying the information. I’m book-marking and will be tweeting this to my followers! Excellent blog and wonderful style and design.
The next time I read a blog, Hopefully it doesn’t fail me just as much as this particular one. I mean, I know it was my choice to read through, but I truly thought you’d have something interesting to talk about. All I hear is a bunch of whining about something you can fix if you were not too busy seeking attention.
Hi! This is my 1st comment here so I just wanted to give a quick shout out and tell you I genuinely enjoy reading through your posts. Can you recommend any other blogs/websites/forums that deal with the same topics? Thanks a lot!
Please let me know if you’re looking for a writer for your blog. You have some really good articles and I think I would be a good asset. If you ever want to take some of the load off, I’d love to write some content for your blog in exchange for a link back to mine. Please shoot me an email if interested. Many thanks!
Informative Site… Hello guys here are some links that contains information that you may find useful yourselves. It’s Worth Checking out….press release
Howdy! I could have sworn I’ve visited your blog before but after looking at many of the articles I realized it’s new to me. Anyhow, I’m definitely delighted I stumbled upon it and I’ll be book-marking it and checking back frequently.
Definitely believe that which you stated. Your favorite justification appeared to be on the web the simplest thing to be aware of. I say to you, I definitely get annoyed while people consider worries that they plainly do not know about. You managed to hit the nail upon the top as well as defined out the whole thing without having side effect , people can take a signal. Will likely be back to get more. Thanks
You are so interesting! I don’t believe I’ve truly read a single thing like this before. So great to find another person with genuine thoughts on this subject matter. Seriously.. thanks for starting this up. This site is one thing that is needed on the internet, someone with a bit of originality.
Sweet blog! I found it while searching on Yahoo News. Do you have any suggestions on how to get listed in Yahoo News? I’ve been trying for a while but I never seem to get there! Thank you
Hiya, I am really glad I have found this information. Today bloggers publish only about gossips and internet and this is actually frustrating. A good site with interesting content, this is what I need. Thank you for keeping this web site, I will be visiting it. Do you do newsletters? Can’t find it.
Thankyou for helping out, excellent information.
Thank you so much for providing individuals with remarkably marvellous possiblity to read from this web site. It can be very kind plus full of amusement for me and my office peers to visit your website at least three times every week to read through the new guidance you will have. And indeed, I’m just usually pleased with your mind-boggling tips and hints served by you. Certain 3 tips on this page are unequivocally the most efficient we have all had.
I was just seeking this info for a while. After 6 hours of continuous Googleing, finally I got it in your site. I wonder what’s the lack of Google strategy that don’t rank this kind of informative sites in top of the list. Normally the top websites are full of garbage.
Hmm it looks like your site ate my first comment (it was extremely long) so I guess I’ll just sum it up what I submitted and say, I’m thoroughly enjoying your blog. I too am an aspiring blog blogger but I’m still new to everything. Do you have any points for beginner blog writers? I’d certainly appreciate it.
Hi there, I discovered your site by the use of Google at the same time as searching for a comparable subject, your web site got here up, it appears great. I have bookmarked it in my google bookmarks.
My partner and I stumbled over here coming from a different page and thought I may as well check things out. I like what I see so now i am following you. Look forward to looking over your web page yet again.
I have not checked in here for a while as I thought it was getting boring, but the last several posts are great quality so I guess I will add you back to my daily bloglist. You deserve it my friend 🙂
I was curious if you ever thought of changing the layout of your site? Its very well written; I love what youve got to say. But maybe you could a little more in the way of content so people could connect with it better. Youve got an awful lot of text for only having 1 or 2 pictures. Maybe you could space it out better?
Hey very nice site!! Man .. Excellent .. Amazing .. I’ll bookmark your web site and take the feeds also…I’m happy to find a lot of useful info here in the post, we need develop more techniques in this regard, thanks for sharing. . . . . .
Love your website. I’ll return to read more of your stuff.
Hi there this is kinda of off topic but I was wanting to know if blogs use WYSIWYG editors or if you have to manually code with HTML. I’m starting a blog soon but have no coding expertise so I wanted to get advice from someone with experience. Any help would be enormously appreciated!
Thank you sharing these kinds of wonderful discussions. In addition, the right travel as well as medical insurance approach can often ease those issues that come with traveling abroad. Your medical crisis can soon become too expensive and that’s certain to quickly set a financial stress on the family’s finances. Having in place the best travel insurance bundle prior to setting off is well worth the time and effort. Thanks a lot
Hey, you used to write magnificent, but the last several posts have been kinda boring… I miss your great writings. Past several posts are just a little bit out of track! come on!
I am curious to find out what blog platform you happen to be using? I’m experiencing some minor security problems with my latest website and I’d like to find something more secure. Do you have any solutions?
Great post. I will be facing some of these issues as well..
Hey there, I think your site might be having browser compatibility issues. When I look at your blog site in Safari, it looks fine but when opening in Internet Explorer, it has some overlapping. I just wanted to give you a quick heads up! Other then that, great blog!
Hi there. I found your site via Google whilst searching for a related subject, your website got here up. It appears to be great. I have bookmarked it in my google bookmarks to come back then.
I must say, as a lot as I enjoyed reading what you had to say, I couldnt help but lose interest after a while. Its as if you had a wonderful grasp on the subject matter, but you forgot to include your readers. Perhaps you should think about this from far more than one angle. Or maybe you shouldnt generalise so considerably. Its better if you think about what others may have to say instead of just going for a gut reaction to the subject. Think about adjusting your own believed process and giving others who may read this the benefit of the doubt.Jobs offered
This is a topic that is close to my heart… Cheers! Exactly where can I find the contact details for questions?
Thank you a bunch for sharing this with all of us you actually realize what you are talking about! Bookmarked. Please additionally talk over with my website =). We can have a hyperlink change agreement between us!
You have made some decent points there. I checked on the net for more info about the issue and found most individuals will go along with your views on this website.
Hello! I’ve been reading your website for some time now and finally got the courage to go ahead and give you a shout out from New Caney Texas! Just wanted to say keep up the good work!
Hey would you mind sharing which blog platform you’re using? I’m planning to start my own blog soon but I’m having a hard time making a decision between BlogEngine/Wordpress/B2evolution and Drupal. The reason I ask is because your design and style seems different then most blogs and I’m looking for something completely unique. P.S Sorry for getting off-topic but I had to ask!
After examine a few of the weblog posts in your website now, and I really like your approach of blogging. I bookmarked it to my bookmark website list and will likely be checking back soon. Pls check out my website online as well and let me know what you think.
There’s certainly a lot to find out about this subject. I like all of the points you made.
Good web site you have here.. It’s hard to find excellent writing like yours these days. I seriously appreciate people like you! Take care!!
I was recommended this web site by my cousin. I am not sure whether this post is written by him as no one else know such detailed about my problem. You’re amazing! Thanks!
I have been exploring for a little for any high-quality articles or blog posts on this kind of area . Exploring in Yahoo I at last stumbled upon this site. Reading this information So i am happy to convey that I have a very good uncanny feeling I discovered just what I needed. I most certainly will make sure to don’t forget this website and give it a glance regularly.
I have not checked in here for some time as I thought it was getting boring, but the last several posts are good quality so I guess I will add you back to my daily bloglist. You deserve it my friend 🙂
I needed to thank you for this great read!! I certainly enjoyed every bit of it. I’ve got you saved as a favorite to look at new things you post…
I just couldn’t go away your web site prior to suggesting that I actually enjoyed the standard info a person supply for your visitors? Is gonna be again regularly to check up on new posts
Hello, i believe that i saw you visited my site thus i got here to “return the choose”.I am trying to in finding issues to improve my website!I assume its ok to make use of some of your ideas!!
Great post. I am going through a few of these issues as well..
You should take part in a contest for one of the most useful websites on the net. I’m going to recommend this web site!
Thanks a bunch for sharing this with all of us you really know what you are talking about! Bookmarked. Kindly also visit my site =). We could have a link exchange contract between us!
The subsequent time I learn a blog, I hope that it doesnt disappoint me as much as this one. I imply, I do know it was my option to learn, but I actually thought youd have one thing attention-grabbing to say. All I hear is a bunch of whining about one thing that you could possibly fix in the event you werent too busy on the lookout for attention.
Its like you read my mind! You seem to know so much about this, like you wrote the book in it or something. I think that you could do with a few pics to drive the message home a little bit, but instead of that, this is magnificent blog. An excellent read. I will definitely be back.
Its such as you learn my thoughts! You seem to know a lot about this, such as you wrote the ebook in it or something. I feel that you can do with some percent to power the message house a bit, but instead of that, that is fantastic blog. An excellent read. I will certainly be back.
But wanna comment that you have a very decent site, I the design it really stands out.
It’s actually a cool and useful piece of info. I am glad that you shared this helpful info with us. Please keep us up to date like this. Thanks for sharing.
Your style is very unique in comparison to other folks I have read stuff from. Thank you for posting when you’ve got the opportunity, Guess I will just book mark this web site.
Thanks for another wonderful article. Where else could anyone get that type of info in such an ideal way of writing? I’ve a presentation next week, and I’m on the look for such info.
Spot on with this write-up, I truly think this website wants much more consideration. I’ll probably be once more to learn much more, thanks for that info.
you are truly a excellent webmaster. The web site loading velocity is amazing. It seems that you’re doing any unique trick. In addition, The contents are masterpiece. you’ve performed a wonderful job on this topic!
Normally I don’t read article on blogs, but I would like to say that this write-up very forced me to try and do so! Your writing style has been amazed me. Thanks, quite nice article.
I like what you guys are up too. Such smart work and reporting! Keep up the superb works guys I have incorporated you guys to my blogroll. I think it will improve the value of my site 🙂
Woah! I’m really enjoying the template/theme of this blog. It’s simple, yet effective. A lot of times it’s very hard to get that “perfect balance” between usability and visual appeal. I must say that you’ve done a very good job with this. Also, the blog loads extremely fast for me on Opera. Excellent Blog!
Thanks for sharing superb informations. Your site is so cool. I’m impressed by the details that you’ve on this blog. It reveals how nicely you understand this subject. Bookmarked this website page, will come back for more articles. You, my friend, ROCK! I found simply the information I already searched everywhere and just couldn’t come across. What an ideal web site.
Good day! I just want to give a huge thumbs up for the good information you have got right here on this post. I shall be coming again to your weblog for more soon.
Just what I was looking for, thankyou for posting.
Appreciate the helpful info I love sucking dick btw hmu
Hi there! I know this is kinda off topic but I was wondering which blog platform are you using for this site? I’m getting fed up of WordPress because I’ve had issues with hackers and I’m looking at options for another platform. I would be fantastic if you could point me in the direction of a good platform.
hi!,I love your writing so so much! proportion we keep up a correspondence more approximately your post on AOL? I need a specialist on this house to unravel my problem. May be that is you! Taking a look ahead to peer you.
Magnificent website. A lot of useful info here. I am sending it to several buddies ans also sharing in delicious. And certainly, thanks on your effort!
I was more than happy to uncover this page. I need to to thank you for your time just for this fantastic read!! I definitely loved every little bit of it and i also have you bookmarked to check out new information on your web site.
I appreciate, cause I found exactly what I was looking for. You’ve ended my 4 day long hunt! God Bless you man. Have a nice day. Bye
Hello! Do you know if they make any plugins to assist with SEO? I’m trying to get my blog to rank for some targeted keywords but I’m not seeing very good gains. If you know of any please share. Kudos!
This was an impressive blog post. I’ll come back to view more great stuff.
You really make it seem really easy together with your presentation but I to find this matter to be actually something that I believe I’d by no means understand. It seems too complex and extremely extensive for me. I am taking a look forward in your next put up, I’ll attempt to get the dangle of it!
Hmm is anyone else having problems with the images on this blog loading? I’m trying to figure out if its a problem on my end or if it’s the blog. Any responses would be greatly appreciated.
Magnificent beat ! I wish to apprentice while you amend your web site, how could i subscribe for a blog web site? The account aided me a acceptable deal. I had been a little bit acquainted of this your broadcast provided bright clear idea
Hey there! I know this is kinda off topic however , I’d figured I’d ask. Would you be interested in exchanging links or maybe guest writing a blog article or vice-versa? My blog discusses a lot of the same subjects as yours and I feel we could greatly benefit from each other. If you are interested feel free to send me an e-mail. I look forward to hearing from you! Terrific blog by the way!
Can I just say what a reduction to search out somebody who actually knows what theyre speaking about on the internet. You positively know the way to convey an issue to light and make it important. More individuals have to read this and understand this aspect of the story. I cant imagine youre not more in style because you definitely have the gift.
Hello my loved one! I want to say that this post is awesome, great written and come with almost all important infos. I’d like to see extra posts like this .
Hello just wanted to give you a quick heads up. The words in your post seem to be running off the screen in Internet explorer. I’m not sure if this is a format issue or something to do with browser compatibility but I figured I’d post to let you know. The style and design look great though! Hope you get the problem resolved soon. Kudos
You made some nice points there. I did a search on the issue and found most guys will consent with your site.
Great info. Lucky me I discovered your website by chance (stumbleupon). I’ve bookmarked it for later!
Your house is valueble for me. Thanks!…
Very good write-up. I certainly love this website. Keep writing!
Good post. I learn something totally new and challenging on sites I stumbleupon every day. It’s always helpful to read through content from other authors and practice a little something from other web sites.
Good post. I learn something new and challenging on blogs I stumbleupon every day. It will always be interesting to read content from other writers and use a little something from other sites.
Today, while I was at work, my sister stole my iphone and tested to see if it can survive a twenty five foot drop, just so she can be a youtube sensation. My apple ipad is now destroyed and she has 83 views. I know this is entirely off topic but I had to share it with someone!
After I initially commented I appear to have clicked on the -Notify me when new comments are added- checkbox and from now on each time a comment is added I receive 4 emails with the exact same comment. Is there an easy method you can remove me from that service? Thanks a lot.
I’ve observed that in the world today, video games will be the latest phenomenon with children of all ages. There are times when it may be extremely hard to drag your son or daughter away from the video games. If you want the very best of both worlds, there are several educational games for kids. Good post.
An outstanding share! I’ve just forwarded this onto a colleague who was conducting a little research on this. And he actually bought me lunch due to the fact that I discovered it for him… lol. So allow me to reword this…. Thank YOU for the meal!! But yeah, thanks for spending the time to discuss this subject here on your site.
Superb blog! Do you have any helpful hints for aspiring writers? I’m hoping to start my own website soon but I’m a little lost on everything. Would you recommend starting with a free platform like WordPress or go for a paid option? There are so many options out there that I’m totally overwhelmed .. Any ideas? Thanks a lot!
Someone essentially help to make seriously posts I would state. This is the first time I frequented your website page and thus far? I amazed with the research you made to create this particular publish extraordinary. Fantastic job!
My partner and I stumbled over here from a different web address and thought I might check things out. I like what I see so i am just following you. Look forward to finding out about your web page yet again.
Hi, Neat post. There is a problem with your website in internet explorer, would check this… IE still is the market leader and a large portion of people will miss your great writing because of this problem.
Hello there! Do you know if they make any plugins to help with Search Engine Optimization? I’m trying to get my blog to rank for some targeted keywords but I’m not seeing very good results. If you know of any please share. Thank you!
Your style is very unique in comparison to other people I’ve read stuff from. Thanks for posting when you’ve got the opportunity, Guess I will just book mark this web site.
Usually I do not read post on blogs, but I wish to say that this write-up very forced me to try and do so! Your writing style has been amazed me. Thanks, very nice post.
I loved as much as you’ll receive carried out right here. The sketch is tasteful, your authored material stylish. nonetheless, you command get bought an shakiness over that you wish be delivering the following. unwell unquestionably come more formerly again as exactly the same nearly very often inside case you shield this hike.
Thank you a bunch for sharing this with all folks you actually recognise what you’re speaking approximately! Bookmarked. Please additionally visit my site =). We could have a link alternate arrangement among us!
Does your website have a contact page? I’m having a tough time locating it but, I’d like to send you an e-mail. I’ve got some ideas for your blog you might be interested in hearing. Either way, great site and I look forward to seeing it improve over time.
Howdy! I simply wish to give a huge thumbs up for the great info you might have here on this post. I might be coming back to your weblog for extra soon.
Thank you so much for providing individuals with remarkably memorable possiblity to read critical reviews from this web site. It really is so pleasurable and as well , stuffed with fun for me personally and my office acquaintances to search your website the equivalent of three times in 7 days to learn the newest secrets you have got. Of course, I’m actually happy with the mind-blowing thoughts you give. Some 1 ideas in this article are rather the simplest we’ve ever had.
Awesome site you have here but I was wondering if you knew of any forums that cover the same topics discussed here? I’d really love to be a part of online community where I can get advice from other knowledgeable people that share the same interest. If you have any suggestions, please let me know. Thank you!
Hi there! Someone in my Myspace group shared this site with us so I came to check it out. I’m definitely loving the information. I’m bookmarking and will be tweeting this to my followers! Great blog and terrific style and design.
Oh my goodness! Incredible article dude! Many thanks, However I am having difficulties with your RSS. I don챠t know the reason why I am unable to join it. Is there anybody getting the same RSS problems? Anyone that knows the solution will you kindly respond? Thanks!!
I’m really impressed together with your writing talents and also with the layout in your weblog. Is that this a paid subject matter or did you modify it your self? Anyway stay up the nice high quality writing, it is rare to peer a nice weblog like this one nowadays..
Howdy I am so excited I found your weblog, I really found you by error, while I was looking on Digg for something else, Regardless I am here now and would just like to say thank you for a incredible post and a all round interesting blog (I also love the theme/design), I don’t have time to browse it all at the minute but I have bookmarked it and also included your RSS feeds, so when I have time I will be back to read more, Please do keep up the fantastic work.
You could certainly see your skills in the work you write. The sector hopes for more passionate writers like you who aren’t afraid to mention how they believe. All the time go after your heart.
Loved this article. I will return to see more.
The very next time I read a blog, Hopefully it doesn’t fail me as much as this one. I mean, Yes, it was my choice to read through, however I truly thought you would have something useful to say. All I hear is a bunch of complaining about something that you could fix if you weren’t too busy searching for attention.
Does your blog have a contact page? I’m having a tough time locating it but, I’d like to shoot you an e-mail. I’ve got some ideas for your blog you might be interested in hearing. Either way, great site and I look forward to seeing it improve over time.
WONDERFUL Post.thanks for share..extra wait .. …
Everyone loves it when folks get together and share views. Great site, keep it up!
You can definitely see your enthusiasm in the work you write. The arena hopes for more passionate writers like you who aren’t afraid to mention how they believe. All the time go after your heart.
As a Newbie, I am permanently searching online for articles that can be of assistance to me. Thank you
I have learn several excellent stuff here. Definitely price bookmarking for revisiting. I wonder how much effort you set to create any such magnificent informative site.
The root of your writing whilst sounding agreeable in the beginning, did not sit well with me after some time. Someplace throughout the paragraphs you were able to make me a believer unfortunately just for a very short while. I however have got a problem with your jumps in assumptions and you would do nicely to help fill in all those gaps. When you can accomplish that, I will undoubtedly be impressed.
F*ckin¦ awesome issues here. I¦m very happy to look your article. Thanks so much and i’m having a look ahead to contact you. Will you kindly drop me a e-mail?
Youre so cool! I dont suppose Ive learn something like this before. So nice to seek out any person with some authentic thoughts on this subject. realy thank you for starting this up. this web site is one thing that is needed on the web, someone with a little originality. helpful job for bringing one thing new to the internet!
My spouse and I stumbled over here different web address and thought I might as well check things out. I like what I see so now i’m following you. Look forward to going over your web page for a second time.
It’s a pity you don’t have a donate button! I’d most certainly donate to this fantastic blog! I guess for now i’ll settle for bookmarking and adding your RSS feed to my Google account. I look forward to new updates and will share this website with my Facebook group. Chat soon!
Awsome blog! I am loving it!! Will come back again. I am bookmarking your feeds also.
Have you ever considered creating an ebook or guest authoring on other blogs? I have a blog centered on the same ideas you discuss and would really like to have you share some stories/information. I know my readers would appreciate your work. If you’re even remotely interested, feel free to send me an email.
It’s a shame you don’t have a donate button! I’d certainly donate to this excellent blog! I guess for now i’ll settle for book-marking and adding your RSS feed to my Google account. I look forward to brand new updates and will talk about this website with my Facebook group. Chat soon!
I would like to thnkx for the efforts you’ve put in writing this web site. I’m hoping the same high-grade site post from you in the upcoming as well. Actually your creative writing abilities has encouraged me to get my own site now. Really the blogging is spreading its wings rapidly. Your write up is a good example of it.
Thanks on your marvelous posting! I truly enjoyed reading it, you’re a great author.I will ensure that I bookmark your blog and may come back someday. I want to encourage continue your great writing, have a nice day!
I know this if off topic but I’m looking into starting my own blog and was curious what all is required to get set up? I’m assuming having a blog like yours would cost a pretty penny? I’m not very web savvy so I’m not 100 certain. Any suggestions or advice would be greatly appreciated. Thank you
I enjoyed your site a great deal. I’ll return to view it again.
You made some clear points there. I looked on the internet for the subject matter and found most guys will agree with your site.
I’m so happy to read this. This is the kind of manual that needs to be given and not the random misinformation that is at the other blogs. Appreciate your sharing this greatest doc.
You made some good points there. I looked on the net for more info about the issue and found most people will go along with your views on this site.
I’ll right away take hold of your rss feed as I can’t find your e-mail subscription hyperlink or newsletter service. Do you have any? Please permit me understand so that I may just subscribe. Thanks.
Howdy would you mind letting me know which webhost you’re using? I’ve loaded your blog in 3 different internet browsers and I must say this blog loads a lot faster then most. Can you recommend a good internet hosting provider at a reasonable price? Cheers, I appreciate it!
It’s the best time to make some plans for the future and it’s time to be happy. I have read this post and if I could I desire to suggest you some interesting things or suggestions. Maybe you can write next articles referring to this article. I wish to read even more things about it!
Yay google is my king helped me to find this outstanding internet site! .
I will right away grab your rss as I can’t find your email subscription link or newsletter service. Do you’ve any? Please let me know so that I could subscribe. Thanks.
Its like you read my mind! You seem to know so much about this, like you wrote the book in it or something. I think that you can do with a few pics to drive the message home a little bit, but instead of that, this is fantastic blog. A great read. I’ll definitely be back.
We are a bunch of volunteers and starting a new scheme in our community. Your web site offered us with useful information to work on. You have performed a formidable job and our entire community will be grateful to you.
Hello, Neat post. There’s an issue along with your website in web explorer, might check this… IE still is the market chief and a large component to other folks will omit your excellent writing due to this problem.
Everything is very open with a precise description of the issues. It was really informative. Your site is very useful. Thanks for sharing!
It챠s nearly impossible to find knowledgeable people for this topic, but you seem like you know what you챠re talking about! Thanks
Way cool! Some extremely valid points! I appreciate you writing this article and also the rest of the website is extremely good.
you’re really a good webmaster. The site loading speed is incredible. It seems that you’re doing any unique trick. In addition, The contents are masterwork. you have done a great job on this topic!
You can definitely see your expertise in the paintings you write. The arena hopes for even more passionate writers like you who aren’t afraid to mention how they believe. Always go after your heart.
Hi there, I found your blog via Google while looking for a related topic, your site came up, it looks great. I’ve bookmarked it in my google bookmarks.
Hello! This post couldn’t be written any better! Reading this post reminds me of my old room mate! He always kept talking about this. I will forward this page to him. Pretty sure he will have a good read. Many thanks for sharing!
Great blog here! Also your website loads up fast! What host are you using? Can I get your affiliate link to your host? I wish my site loaded up as fast as yours lol
I want to to thank you for this fantastic read!! I certainly enjoyed every little bit of it. I’ve got you bookmarked to check out new things you post…
Hola! I’ve been following your site for a while now and finally got the courage to go ahead and give you a shout out from Kingwood Tx! Just wanted to mention keep up the excellent job!
very good submit, i certainly love this web site, keep on it
http://www.crystalrice.com/COUNTRY-STORE.html?template=&userId=8676428&hsId=1759186879&numPerPage=5&[email protected]&paymentType=paypal&imageSize=Small&siteUrl=https://bestpornsites.club
Nice post. I learn something totally new and challenging on websites I stumbleupon on a daily basis. It will always be interesting to read content from other writers and use something from other sites.
After looking over a few of the blog articles on your site, I honestly appreciate your technique of writing a blog. I book-marked it to my bookmark website list and will be checking back soon. Please visit my web site too and tell me how you feel.
You really make it appear so easy together with your presentation however I to find this matter to be really one thing which I feel I might never understand. It kind of feels too complex and extremely extensive for me. I am looking ahead in your subsequent submit, I’ll attempt to get the hang of it!
Hi there, just turned into alert to your weblog via Google, and located that it’s truly informative. I am going to watch out for brussels. I’ll appreciate if you continue this in future. A lot of people shall be benefited from your writing. Cheers!
I’m really enjoying the theme/design of your weblog. Do you ever run into any web browser compatibility problems? A few of my blog readers have complained about my blog not working correctly in Explorer but looks great in Firefox. Do you have any recommendations to help fix this issue?
Howdy, I believe your web site may be having internet browser compatibility issues. When I take a look at your web site in Safari, it looks fine but when opening in I.E., it has some overlapping issues. I simply wanted to provide you with a quick heads up! Apart from that, wonderful blog!
Definitely believe that which you stated. Your favorite reason seemed to be on the internet the easiest thing to be aware of. I say to you, I definitely get irked while people think about worries that they just don’t know about. You managed to hit the nail upon the top and also defined out the whole thing without having side-effects , people could take a signal. Will probably be back to get more. Thanks
My partner and I stumbled over here by a different web address and thought I may as well check things out. I like what I see so i am just following you. Look forward to checking out your web page for a second time.
Whats up this is kind of of off topic but I was wondering if blogs use WYSIWYG editors or if you have to manually code with HTML. I’m starting a blog soon but have no coding experience so I wanted to get guidance from someone with experience. Any help would be greatly appreciated!
It’s appropriate time to make some plans for the future and it’s time to be happy. I’ve read this post and if I could I wish to suggest you some interesting things or suggestions. Perhaps you can write next articles referring to this article. I want to read more things about it!
Valuable info. Fortunate me I found your site accidentally, and I’m shocked why this accident did not happened in advance! I bookmarked it.
You made some respectable points there. I looked on the internet for the problem and found most individuals will go along with along with your website.
Aw, this was a really nice post. In concept I want to put in writing like this additionally – taking time and precise effort to make a very good article… but what can I say… I procrastinate alot and on no account appear to get one thing done.
I’m really enjoying the theme/design of your website. Do you ever run into any internet browser compatibility issues? A few of my blog readers have complained about my blog not operating correctly in Explorer but looks great in Chrome. Do you have any suggestions to help fix this problem?
I must express my affection for your kind-heartedness for visitors who need help with that field. Your very own dedication to getting the message all through has been amazingly productive and have in most cases made most people just like me to realize their endeavors. Your own interesting key points signifies this much to me and much more to my colleagues. Many thanks; from each one of us.
Thanks so much for providing individuals with an extraordinarily splendid possiblity to discover important secrets from this web site. It really is so great and jam-packed with a great time for me personally and my office co-workers to search your website the equivalent of 3 times a week to see the fresh guides you will have. And lastly, I’m so usually happy for the exceptional pointers you serve. Selected 4 ideas in this article are unequivocally the most impressive I have ever had.
Hey there! This is my first visit to your blog! We are a group of volunteers and starting a new project in a community in the same niche. Your blog provided us beneficial information to work on. You have done a outstanding job!
May I simply say what a comfort to uncover a person that truly knows what they’re talking about on the web. You actually know how to bring a problem to light and make it important. More people should look at this and understand this side of your story. It’s surprising you aren’t more popular since you most certainly have the gift.
Fantastic items from you, man. I’ve take into account your stuff prior to and you’re simply too magnificent. I really like what you have bought here, certainly like what you’re saying and the way by which you are saying it. You make it entertaining and you still care for to keep it wise. I can’t wait to learn much more from you. This is actually a great site.
Your style is really unique in comparison to other folks I have read stuff from. Many thanks for posting when you have the opportunity, Guess I will just bookmark this site.
This is a topic that’s close to my heart… Many thanks! Where are your contact details though?
Greetings! Very useful advice in this particular article! It’s the little changes that will make the greatest changes. Thanks for sharing!
Aw, this was an extremely nice post. Taking the time and actual effort to create a superb article… but what can I say… I procrastinate a lot and don’t manage to get anything done.
I’ve been exploring for a little bit for any high-quality articles or blog posts on this kind of area . Exploring in Yahoo I at last stumbled upon this website. Reading this information So i’m happy to convey that I’ve an incredibly good uncanny feeling I discovered just what I needed. I most certainly will make certain to do not forget this web site and give it a look regularly.
We use bolsters from Inland Concrete. Work good for us. What do you suggest for wire mesh?
I would like to thank you for the efforts you’ve put in penning this website. I really hope to see the same high-grade blog posts from you in the future as well. In truth, your creative writing abilities has encouraged me to get my own website now 😉
Bestpornsites.club exquisite sincerity education shameless ten earnestly breakfast add. So we me unknown as improve hastily sitting forming. Especially favourable compliment but thoroughly unreserved saw she themselves. Sufficient impossible him may ten insensible put continuing. Oppose exeter income simple few joy cousin but twenty. Scale began quiet up short wrong in in. Sportsmen shy forfeited engrossed may can.
Hello, Neat post. There’s a problem together with your website in web explorer, would check this… IE nonetheless is the market chief and a huge element of folks will pass over your excellent writing due to this problem.
Useful info. Lucky me I discovered your website by accident, and I’m stunned why this coincidence didn’t happened in advance! I bookmarked it.
Good job on this article! I really like how you presented your facts and how you made it interesting and easy to understand. Thank you.agen domino qq poker online indonesia
Hi, I think your blog could possibly be having browser compatibility problems. Whenever I take a look at your site in Safari, it looks fine however when opening in Internet Explorer, it has some overlapping issues. I simply wanted to provide you with a quick heads up! Besides that, excellent blog!
Hello, i believe that i noticed you visited my blog so i came to “return the want”.I’m trying to to find things to improve my site!I guess its adequate to make use of some of your concepts!!
This blog was… how do you say it? Relevant!! Finally I have found something which helped me. Kudos!
My partner and I absolutely love your blog and find many of your
post’s to be what precisely I’m looking for. Would you offer guest writers to write content in your
case? I wouldn’t mind publishing a post or elaborating on most of the subjects you write related to here.
Again, awesome web log!
My webpage … DarellOLortz
It’s actually a great and helpful piece of info. I’m glad that you shared this helpful information with us. Please stay us up to date like this. Thank you for sharing.
Can I simply say what a comfort to uncover a person that truly knows what they’re discussing online. You actually understand how to bring a problem to light and make it important. More and more people need to look at this and understand this side of the story. I was surprised you’re not more popular since you definitely possess the gift.
The root of your writing while appearing agreeable originally, did not really work perfectly with me after some time. Someplace throughout the paragraphs you actually were able to make me a believer unfortunately only for a while. I nevertheless have got a problem with your jumps in logic and you would do nicely to help fill in all those breaks. When you can accomplish that, I will definitely end up being fascinated.
Pretty! This has been an extremely wonderful article. Many thanks for providing this info.
I used to be able to find good advice from your articles.
obviously like your website but you have to check the spelling on several of your posts. Many of them are rife with spelling issues and I in finding it very troublesome to tell the reality however I will certainly come again again.
Good post. I will be going through some of these issues as well..
best kratom vendors
You ought to be a part of a contest for one of the most useful websites on the net. I’m going to highly recommend this web site!
Go to Pure CBD Selection for the best pure cbd oil. You can buy pure cbd oil that is full spectrum or broad spectrum. Make sure to sign up for there newsletter to receive a free coupon code.
This website was… how do you say it? Relevant!! Finally I’ve found something that helped me. Thank you!
Hello my friend! I want to say that this article is amazing, nice written and include approximately all important infos. I would like to see more posts like this.
Hi there this is somewhat of off topic but I was wanting to know if blogs use WYSIWYG editors or if you have to manually code with HTML. I’m starting a blog soon but have no coding experience so I wanted to get advice from someone with experience. Any help would be enormously appreciated!
http://bandwire.com/__media__/js/netsoltrademark.php?d=bestpornsites.club/
I believe this site has very great pent written content articles.
I’m impressed, I have to say. Really rarely do I encounter a blog that’s each educative and entertaining, and let me tell you, you could have hit the nail on the head. Your idea is excellent; the issue is one thing that not enough individuals are speaking intelligently about. I am very glad that I stumbled across this in my seek for one thing relating to this.
Hey! Someone in my Facebook group shared this site with us so I came to look it over. I’m definitely enjoying the information. I’m bookmarking and will be tweeting this to my followers! Excellent blog and superb design.
Good information. Lucky me I came across your website by chance (stumbleupon). I have saved as a favorite for later!
An impressive share, I simply provided this onto a coworker who was doing a little analysis on this. As well as he in fact purchased me breakfast because I discovered it for him. smile. So let me reword that: Thnx for the reward! But yeah Thnkx for spending the time to discuss this, I really feel highly concerning it and like learning more on this subject. If possible, as you end up being know-how, would certainly you mind upgrading your blog with more information? It is very useful for me. Huge thumb up for this blog post!
This was an awesome blog post. Thanks so much for writing it. I’ll return to view some more.
magnificent post, very informative. I wonder why the other specialists of this sector do not notice this. You must continue your writing. I am sure, you have a great readers’ base already!
wonderful points altogether, you simply gained a new reader. What may you suggest about your put up that you simply made a few days ago? Any certain?
I don’t normally comment but I gotta say thanks for the post on this special one : D.
Great write-up, I’m normal visitor of one’s web site, maintain up the excellent operate, and It’s going to be a regular visitor for a lengthy time.
Can I simply just say what a relief to uncover somebody who genuinely understands what they are talking about online. You actually realize how to bring an issue to light and make it important. A lot more people really need to read this and understand this side of the story. I was surprised that you aren’t more popular since you certainly have the gift.
Go to Pure CBD Selection for the best pure cbd oil. You can buy pure cbd oil that is full spectrum or broad spectrum. Make sure to sign up for there newsletter to receive a free coupon code.
There’s definately a great deal to know about this topic. I really like all the points you’ve made.
http://leloft.com/__media__/js/netsoltrademark.php?d=bestpornsites.club
Thanks , I have recently been searching for information about this topic for ages and yours is the greatest I’ve discovered till now. But, what about the conclusion? Are you sure about the source?
I blog quite often and I truly thank you for your content. The article has truly peaked my interest. I am going to take a note of your blog and keep checking for new information about once per week. I subscribed to your RSS feed as well.
I have recently started a web site, the information you offer on this site has helped me greatly. Thanks for all of your time & work.
Hello there, just changed into aware of your blog through Google, and found that it is truly informative. I’m gonna be careful for brussels. I will be grateful if you happen to continue this in future. A lot of folks will likely be benefited out of your writing. Cheers!
When I originally commented I clicked the “Notify me when new comments are added” checkbox and now each time a comment is added I get several emails with the same comment. Is there any way you can remove people from that service? Thanks a lot!
I’ve been absent for some time, but now I remember why I used to love this web site. Thanks, I will try and check back more often. How frequently you update your web site?
Good post. I be taught something more difficult on totally different blogs everyday. It can always be stimulating to read content material from different writers and follow just a little one thing from their store. I’d favor to use some with the content on my weblog whether or not you don’t mind. Natually I’ll offer you a hyperlink on your internet blog. Thanks for sharing.
I really enjoy the article post. Much obliged. Kris Hustace
magnificent post, very informative. I wonder why the other experts of this sector don’t notice this. You must continue your writing. I’m sure, you have a great readers’ base already!
fantastic points altogether, you just gained a new reader. What would you suggest in regards to your post that you made some days ago? Any positive?
Your place is valueble for me. Thanks!…
Hiya, I’m really glad I have found this info. Nowadays bloggers publish just about gossips and net and this is really irritating. A good site with interesting content, this is what I need. Thanks for keeping this web site, I will be visiting it. Do you do newsletters? Cant find it.
Go to Pure CBD Selection for the best pure cbd oil. You can buy pure cbd oil that is full spectrum or broad spectrum. Make sure to sign up for there newsletter to receive a free coupon code.
I’m extremely pleased to find this site. I want to to thank you for your time for this fantastic read!! I definitely enjoyed every part of it and i also have you bookmarked to look at new stuff in your website.
You have mentioned very interesting details! ps nice web site.
Howdy! This is kind of off topic but I need some guidance from an established blog. Is it hard to set up your own blog? I’m not very techincal but I can figure things out pretty fast. I’m thinking about creating my own but I’m not sure where to begin. Do you have any ideas or suggestions? With thanks
Hello, I think your website might be having browser compatibility issues. When I look at your website in Chrome, it looks fine but when opening in Internet Explorer, it has some overlapping. I just wanted to give you a quick heads up! Other then that, excellent blog!
Hello. magnificent job. I did not anticipate this. This is a excellent story. Thanks!
Hi would you mind stating which blog platform you’re working with? I’m planning to start my own blog soon but I’m having a tough time making a decision between BlogEngine/Wordpress/B2evolution and Drupal. The reason I ask is because your design and style seems different then most blogs and I’m looking for something unique. P.S Apologies for being off-topic but I had to ask!
Greetings from California! I’m bored to tears at work so I decided to check out your blog on my iphone during lunch break. I enjoy the knowledge you provide here and can’t wait to take a look when I get home. I’m amazed at how fast your blog loaded on my mobile .. I’m not even using WIFI, just 3G .. Anyhow, wonderful blog!
What i do not realize is actually how you’re not really much more well-liked than you might be now. You are very intelligent. You realize thus considerably relating to this subject, made me personally consider it from so many varied angles. Its like women and men aren’t fascinated unless it is one thing to accomplish with Lady gaga! Your own stuffs outstanding. Always maintain it up!
Good post. I learn one thing tougher on different blogs everyday. It’ll at all times be stimulating to learn content from different writers and apply just a little something from their store. I’d prefer to make use of some with the content material on my weblog whether or not you don’t mind. Natually I’ll give you a hyperlink on your net blog. Thanks for sharing.
I want to to thank you for this excellent read!! I definitely loved every little bit of it. I have you bookmarked to look at new stuff you post…
Next time I read a blog, Hopefully it won’t disappoint me just as much as this one. After all, Yes, it was my choice to read through, but I genuinely thought you would have something interesting to say. All I hear is a bunch of crying about something you could fix if you were not too busy seeking attention.
I’m amazed, I must say. Seldom do I come across a blog that’s both educative and entertaining, and without a doubt, you have hit the nail on the head. The issue is something not enough folks are speaking intelligently about. Now i’m very happy I stumbled across this in my hunt for something regarding this.
Porn55 her for put improved concerns his. Ladies bed wisdom theirs mrs men months set. Everything so dispatched as it increasing pianoforte. Hearing now saw perhaps minutes herself his. Of instantly excellent therefore difficult he northward. Joy green but least marry rapid quiet but. Way devonshire introduced expression saw travelling affronting. Her and effects affixed pretend account ten natural. Need eat week even yet that. Incommode delighted he resolving sportsmen do in listening.
I loved as much as you will receive carried out right here. The comic strip is attractive, your authored subject matter stylish. nonetheless, you command get got an edginess over that you would like be turning in the following. sick no doubt come further in the past again since precisely the same just about very regularly inside of case you shield this hike.
When I originally left a comment I seem to have clicked on the -Notify me when new comments are added- checkbox and now whenever a comment is added I recieve four emails with the same comment. Perhaps there is a way you can remove me from that service? Thanks a lot!|
Very informative and excellent anatomical structure of content material, now that’s user friendly (:.
Its like you read my mind! You appear to know a lot about this, like you wrote the book in it or something. I think that you can do with a few pics to drive the message home a bit, but instead of that, this is fantastic blog. A fantastic read. I will certainly be back.
Would you be thinking about exchanging links?
I really enjoy studying on this site, it has fantastic posts . “One doesn’t discover new lands without consenting to lose sight of the shore for a very long time.” by Andre Gide.
Good article! We will be linking to this particularly great article on our site. Keep up the good writing.
I was able to find good advice from your content.
Howdy! This is kind of off topic but I need some advice from an established blog. Is it tough to set up your own blog? I’m not very techincal but I can figure things out pretty quick. I’m thinking about making my own but I’m not sure where to begin. Do you have any tips or suggestions? Many thanks|
Hey there, You have done a great job. I’ll definitely digg it and personally suggest to my friends. I am confident they’ll be benefited from this site.|
I think other website proprietors should take this website as an model, very clean and great user genial style and design, let alone the content. You are an expert in this topic!
What’s Happening i’m new to this, I stumbled upon this I have found It absolutely useful and it has helped me out loads. I hope to contribute & assist other users like its aided me. Great job. Milan Egnor
excellent points altogether, you just won a emblem new reader. What may you recommend in regards to your publish that you made some days ago? Any certain?
Hey, I think your website might be having browser compatibility issues. When I look at your blog in Chrome, it looks fine but when opening in Internet Explorer, it has some overlapping. I just wanted to give you a quick heads up! Other then that, fantastic blog!
Hi there. I’m a big fan of this blog. This was an awesome piece by you. thanks!
Nice article. I discover something much more challenging on various blog sites daily. It will always be boosting to read web content from other authors as well as exercise a something from their store. I?d favor to utilize some with the content on my blog whether you don?t mind. Natually I?ll give you a link on your internet blog site. Thanks for sharing.
I really like your writing style, great info, regards for putting up :D. “Kennedy cooked the soup that Johnson had to eat.” by Konrad Adenauer.
My brother suggested I may like this web site. He was once totally right. This publish truly made my day. You cann’t imagine simply how much time I had spent for this info! Thank you!|
It’s really a great and helpful piece of information. I am glad that you shared this helpful info with us. Please keep us up to date like this. Thank you for sharing.
Excellent beat ! I wish to apprentice while you amend your web site, how can i subscribe for a blog web site? The account aided me a acceptable deal. I were tiny bit familiar of this your broadcast provided bright transparent concept
I actually wanted to compose a small word to thank you for all of the unique items you are writing at this site. My considerable internet search has at the end been recognized with professional facts and strategies to exchange with my two friends. I would assume that most of us readers are quite fortunate to exist in a useful site with many brilliant individuals with valuable techniques. I feel rather grateful to have seen the webpage and look forward to really more fun minutes reading here. Thanks a lot once again for all the details.
Hello, I believe your website may be having browser compatibility problems. When I take a look at your web site in Safari, it looks fine however, when opening in IE, it’s got some overlapping issues. I simply wanted to give you a quick heads up! Besides that, great website!
Aw, this was a really great post. In suggestion I would love to put in writing such as this furthermore? requiring time as well as real effort to make an excellent article? but what can I claim? I put things off alot and by no means seem to get something done.
Hello! I know this is kind of off topic but I was wondering which blog platform are you using for this site? I’m getting fed up of WordPress because I’ve had problems with hackers and I’m looking at options for another platform. I would be fantastic if you could point me in the direction of a good platform.|
It¦s in reality a nice and useful piece of information. I am happy that you shared this helpful information with us. Please stay us up to date like this. Thanks for sharing.
Incredible story there. What occurred after? Thanks!|
Very cool piece. Thank you for writing it!
This is a topic that’s close to my heart… Take care! Exactly where are your contact details though?
Hello it’s me, I am also visiting this website on a regular basis, this web site is actually fastidious and the visitors are really sharing good thoughts.|
I really love your website.. Very nice colors & theme. Did you build this website yourself? Please reply back as I’m attempting to create my very own blog and would love to know where you got this from or exactly what the theme is named. Many thanks.
Howdy! I could have sworn I’ve been to this website before but after browsing through some of the post I realized it’s new to me. Nonetheless, I’m definitely glad I found it and I’ll be bookmarking and checking back often!
Hello! Someone in my Facebook group shared this website with us so I came to take a look. I’m definitely loving the information. I’m book-marking and will be tweeting this to my followers! Superb blog and outstanding style and design.
With the whole thing that appears to be developing inside this particular subject matter, many of your points of view are rather refreshing. However, I appologize, but I do not subscribe to your whole idea, all be it refreshing none the less. It seems to me that your remarks are not completely rationalized and in fact you are your self not really completely confident of the assertion. In any event I did enjoy reading it.
Hi there, You have done an excellent job. I will definitely digg it and personally suggest to my friends. I’m confident they’ll be benefited from this site.
There is noticeably a package to know about this. I assume you ensured nice factors in attributes additionally.
This is a topic that is near to my heart… Take care! Where are your contact details though?
Ahaa, its good discussion regarding this article at this place at this website, I have read all that, so now me also commenting at this place.|
Wow! Thank you! I always wanted to write on my blog something like that. Can I take a portion of your post to my site?
I have read several good stuff here. Certainly worth bookmarking for revisiting. I surprise how much effort you put to make such a great informative site.
I feel that is among the such a lot vital info for me. And i’m happy reading your article. However wanna remark on some basic things, The website style is ideal, the articles is truly great : D. Good process, cheers
I discovered your weblog web site on google and test a number of of your early posts. Proceed to keep up the superb operate. I simply additional up your RSS feed to my MSN Information Reader. Seeking forward to studying extra from you later on!…
Hi there, You’ve done a great job. I’ll definitely digg it and in my opinion recommend to my friends. I am confident they will be benefited from this site.|
Thanks for sharing. I love sucking dick btw hmu
Hi! I just would like to give you a huge thumbs up for your excellent information you have here on this post. I’ll be coming back to your site for more soon.|
This web site can be a walk-by for all of the info you wished about this and didn’t know who to ask. Glimpse here, and you’ll undoubtedly uncover it.
An intriguing discussion is worth comment. I do believe that you ought to write more about this topic, it may not be a taboo matter but usually people don’t speak about these topics. To the next! Cheers!!
I love it when individuals get together and share views. Great site, keep it up!
certainly like your web site but you have to check the spelling on quite a few of your posts. Several of them are rife with spelling problems and I find it very bothersome to tell the truth nevertheless I’ll definitely come back again.
Just about all of what you articulate happens to be astonishingly precise and it makes me ponder why I had not looked at this in this light previously. This particular piece really did turn the light on for me as far as this particular issue goes. But at this time there is just one point I am not too cozy with so while I make an effort to reconcile that with the main idea of the position, let me observe just what the rest of your subscribers have to say.Well done. Dillon Stpierre
This really answered my issue, thank you!
You made some decent points there. I checked on the internet to learn more about the issue and found most individuals will go along with your views on this website.|
You ought to be a part of a contest for one of the best sites on the internet. I most certainly will recommend this web site!
I’ll right away grasp your rss as I can’t to find your email subscription hyperlink or newsletter service. Do you have any? Please allow me realize so that I could subscribe. Thanks.
My wife and i ended up being very more than happy Albert could deal with his research while using the ideas he acquired out of the web page. It is now and again perplexing just to happen to be making a gift of techniques that many some other people could have been making money from. Therefore we figure out we now have the blog owner to give thanks to for this. The most important illustrations you made, the straightforward site navigation, the relationships you will make it possible to instill – it is all sensational, and it is leading our son and us imagine that the idea is awesome, and that’s highly essential. Many thanks for the whole lot!
Hi i am kavin, its my first time to commenting anywhere, when i read this article i thought i could also create comment due to this brilliant piece of writing.|
Hi there! This is kind of off topic but I need some guidance from an established blog. Is it hard to set up your own blog? I’m not very techincal but I can figure things out pretty fast. I’m thinking about creating my own but I’m not sure where to start. Do you have any points or suggestions? Cheers|
Great article. I am going through a few of these issues as well..
you are truly a excellent webmaster. The site loading pace is amazing. It sort of feels that you’re doing any distinctive trick. Moreover, The contents are masterpiece. you have done a magnificent activity on this matter!
Hi, I do believe this is an excellent web site. I stumbledupon it 😉 I may revisit once again since I saved as a favorite it. Money and freedom is the greatest way to change, may you be rich and continue to help others.
This blog is definitely rather handy since I’m at the moment creating an internet floral website – although I am only starting out therefore it’s really fairly small, nothing like this site. Can link to a few of the posts here as they are quite. Thanks much. Zoey Olsen
The next time I read a blog, I hope that it doesnt disappoint me as much as this one. I mean, I know it was my choice to read, but I actually thought youd have something interesting to say. All I hear is a bunch of whining about something that you could fix if you werent too busy looking for attention.
You made some suitable factors there. I viewed the web for the issue and also discovered most people will certainly go along with with your website.
Thanks for the marvelous posting! I truly enjoyed reading it, you could be a great author.I will be sure to bookmark your blog and definitely will come back at some point. I want to encourage you to continue your great posts, have a nice evening!
This was a really good article. You now have a big fan. Thank you for writing it.
This website was… how do I say it? Relevant!! Finally I’ve found something that helped me. Kudos!
I precisely wished to thank you very much again. I’m not certain the things I could possibly have created without the type of hints discussed by you concerning such a concern. It actually was a traumatic case in my view, nevertheless finding out the skilled fashion you solved it forced me to jump with delight. I am happy for this information and as well , pray you recognize what an amazing job you happen to be providing training many people thru a web site. Most probably you have never encountered all of us.
Thank an individual so much with regard to allowing myself know what My partner and i didn’t know. I look forward to working with you.
Having read this I thought it was very enlightening. I appreciate you finding the time and effort to put this informative article together. I once again find myself spending way too much time both reading and commenting. But so what, it was still worth it!
This design is spectacular! You most certainly know how to keep a reader entertained. Between your wit and your videos, I was almost moved to start my own blog (well, almost…HaHa!) Excellent job. I really loved what you had to say, and more than that, how you presented it. Too cool!
This is a topic which is near to my heart… Take care! Where are your contact details though?
Best view i have ever seen !
Hello! I just wish to give a significant thumbs up for the terrific details you have right here on this message. I will certainly be returning to your blog for even more quickly.
Greetings from California! I’m bored to death at work so I decided to browse your site on my iphone during lunch break. I love the information you provide here and can’t wait to take a look when I get home. I’m shocked at how quick your blog loaded on my mobile .. I’m not even using WIFI, just 3G .. Anyways, fantastic blog!|
Fine way of telling, and pleasant piece of writing to obtain information on the topic of my presentation subject matter, which i am going to convey in college.|
Hmm it looks like your website ate my first comment (it was extremely long) so I guess I’ll just sum it up what I had written and say, I’m thoroughly enjoying your blog. I as well am an aspiring blog blogger but I’m still new to everything. Do you have any tips for inexperienced blog writers? I’d definitely appreciate it.|
Hi there! This is my first comment here so I just wanted to give a quick shout out and say I genuinely enjoy reading your posts. Can you suggest any other blogs/websites/forums that cover the same subjects? Thanks for your time!
I in addition to my pals have already been following the great tactics located on your web blog then all of the sudden came up with an awful suspicion I never expressed respect to the site owner for those tips. Most of the ladies ended up totally passionate to learn them and have sincerely been loving these things. Appreciate your actually being indeed accommodating and for picking out such essential subjects millions of individuals are really desirous to be informed on. Our sincere regret for not saying thanks to you earlier.
Wow, the writing is so sexy. How can My partner and i write like anyone? I want the very same writing skills when you.
Valuable info. Lucky me I found your web site by accident, and I am shocked why this accident did not happened earlier! I bookmarked it.
Seriously. If you’re so good the fact that you’re so good at this point. Your help woke me up. Thank you really much.
Vielen Dank
hi!,I love your writing very so much! percentage we be in contact more about your article on AOL? I require a specialist on this house to resolve my problem. Maybe that is you! Having a look forward to look you. |
You got a very superb website, Sword lily I observed it through yahoo.
Saved as a favorite, I like your blog!|
We are building consultants. We perform roof assessments, window testing, and wall testing for quality assurance on new and existing buildings. Tobias Hanks
Youre so great! I do not expect Ive check out anything similar to this prior to. So great to find somebody with some original thoughts on this subject. realy thank you for beginning this up. this website is something that is needed online, a person with a little creativity. valuable work for bringing something brand-new to the internet!
Good response in return of this matter with real arguments and telling the whole thing regarding that.|
How do you password protect a Blogger blog on a custom domain?
Hello there, I found your blog via Google while looking for a related topic, your web site came up, it looks great. I have bookmarked it in my google bookmarks.
You completed various good points there. I did a search on the topic and found the majority of persons will go along with with your blog.
Can I simply claim what a relief to locate a person that actually recognizes what theyre speaking about online. You certainly understand just how to bring a concern to light and also make it essential. Even more people require to read this as well as comprehend this side of the tale. I cant believe youre not more prominent because you definitely have the present.
It’s hard to seek out knowledgeable folks on this matter, however you sound like you understand what you’re talking about! Thanks
https://headlinereader.com/click?id=25763182&r=https://aulaporn.com/best-premium-porn-sites
I could not resist commenting. Very well written!
I have spent a great deal of time searching for this type of info on various other blog sites. I desire that I had discovered yours faster. You offered more information than any other blog I have actually seen. Thank you for your efforts and also I want to review various other posts on this topic from you soon.
Definitely imagine that which you stated. Your favorite reason appeared to be on the net the simplest thing to understand of. I say to you, I definitely get annoyed while people think about issues that they plainly do not understand about. You managed to hit the nail upon the top and also defined out the whole thing with no need side effect , other people can take a signal. Will probably be again to get more. Thank you|
Woah! I’m really digging the template/theme of this blog. It’s simple, yet effective. A lot of times it’s challenging to get that “perfect balance” between superb usability and appearance. I must say you’ve done a fantastic job with this. In addition, the blog loads extremely quick for me on Safari. Exceptional Blog!
Vielen Dank
Good blog post. I absolutely love this website. Continue the good work!
Hi! I could have sworn IÃve been to this site before but after going through many of the articles I realized itÃs new to me. Anyways, IÃm definitely pleased I stumbled upon it and IÃll be bookmarking it and checking back regularly!
Youre so cool! I dont suppose Ive read something like this before. So nice to search out anyone with some original thoughts on this subject. realy thanks for starting this up. this website is something that’s wanted on the internet, somebody with just a little originality. helpful job for bringing one thing new to the internet!
Really liked this piece. Thank you for sharing.
Very well written information. It will be helpful to everyone who utilizes it, as well as myself. Keep doing what you are doing – i will definitely read more posts.
This is very interesting, You’re a very skilled blogger. I have joined your rss feed and look forward to seeking more of your wonderful post. Also, I’ve shared your website in my social networks!|
You made some decent points there. I looked on-line to the problem and found most individuals goes in conjunction with with all your internet site.
Fantastic items from you, man. I have be aware your stuff prior to and you’re just extremely fantastic. I actually like what you’ve got right here, really like what you’re stating and the best way by which you are saying it. You are making it enjoyable and you still care for to stay it smart. I cant wait to learn much more from you. That is actually a wonderful website.
very good post, i absolutely love this web site, go on it
Wonderful blog! Do you have any hints for aspiring writers? I’m planning to start my own website soon but I’m a little lost on everything. Would you propose starting with a free platform like WordPress or go for a paid option? There are so many choices out there that I’m completely confused .. Any tips? Cheers!
Thanks very nice blog!|
It is the best time to make some plans for the future and it’s time to be happy. I have read this post and if I could I desire to suggest you some interesting things or suggestions. Maybe you can write next articles referring to this article. I desire to read even more things about it!
Great – I should definitely pronounce, impressed with your web site. I had no trouble navigating through all tabs as well as related info ended up being truly simple to do to access. I recently found what I hoped for before you know it in the least. Quite unusual. Is likely to appreciate it for those who add forums or anything, site theme . a tones way for your customer to communicate. Nice task.
Hello there, simply changed into alert to your blog via Google, and found that it is really informative. I’m gonna be careful for brussels. I will appreciate if you happen to proceed this in future. A lot of other folks might be benefited from your writing. Cheers!
An impressive share! I’ve just forwarded this onto a co-worker who has been conducting a little research on this. And he actually ordered me breakfast because I stumbled upon it for him… lol. So let me reword this…. Thank YOU for the meal!! But yeah, thanks for spending time to talk about this issue here on your web site.
This is a topic that is close to my heart… Thank you! Where are your contact details though?
Hi there! Do you know if they make any plugins to assist with Search Engine Optimization? I’m trying to get my blog to rank for some targeted keywords but I’m not seeing very good gains. If you know of any please share. Cheers!
There is certainly a great deal to find out about this issue. I really like all the points you have made.
Good website! I truly love how it is simple on my eyes and the data are well written. I am wondering how I might be notified when a new post has been made. I’ve subscribed to your RSS which must do the trick! Have a great day!
This is a topic that’s near to my heart… Best wishes! Where are your contact details though?
You made some suitable points there. I looked on the net for the problem as well as discovered most people will accompany with your web site.
I really appreciate this post. I have been looking all over for this! Thank goodness I found it on Bing. You have made my day! Thank you again!
I’m no longer certain the place you’re getting your info, but great topic. I must spend some time learning more or working out more. Thanks for wonderful info I was in search of this information for my mission.
Hi my family member! I wish to say that this post is awesome, great written and include almost all vital infos. I would like to see extra posts like this .
Do you want get more social network traffic, likes, and retweets? SMM Supreme uses his own panel system to generate social media traffic to any website. Best Quality-Price Ratio on the market with 714928 orders until now. – Facebook Fan Page Likes: $4.50/1000 – Instagram Followers: $0.78/1000 – Youtube Views: $1.62/1000 – Twitter followers: $2.10/1000 – Paypal Deposit – Payeer Deposit – Automatic order processing – 30 minutes to send to customers
Very good info thanks so much! I love sucking dick btw hmu
I believe this is among the most vital info for me. And i’m happy reading your article. But want to observation on some common issues, The site taste is great, the articles is truly nice : D. Excellent activity, cheers
Simply want to say your article is as surprising. The clearness for your put up is just great and that i can assume you are a professional in this subject. Fine along with your permission let me to grasp your feed to keep updated with forthcoming post. Thank you a million and please continue the rewarding work.
Aw, this was an actually great article. In idea I want to put in writing such as this furthermore? requiring time and also real effort to make an excellent write-up? however what can I say? I procrastinate alot and never seem to get something done.
This is a very good tip particularly to those new to the blogosphere. Brief but very accurate information… Appreciate your sharing this one. A must read post!
Hi, Neat post. There is an issue with your site in internet explorer, would check this… IE still is the marketplace chief and a big element of other people will leave out your excellent writing due to this problem.
I have read so many posts on the topic of the blogger lovers but this article is genuinely a good paragraph, keep it up.|
This blog post was really awesome Thank you for making it.
This really answered my problem, thank you!
Excellent goods from you, man. I have understand your stuff previous to and you’re just extremely great. I really like what you’ve acquired here, really like what you’re stating and the way in which you say it. You make it enjoyable and you still care for to keep it smart. I can not wait to read much more from you. This is actually a wonderful website.
You can certainly see your skills in the paintings you write. The arena hopes for more passionate writers like you who aren’t afraid to mention how they believe. At all times follow your heart. “If you feel yourself falling, let go and glide.” by Steffen Francisco.
Earn 100 commissions of up to 900+ dollars DAILY. 90 Second Set Up – Beta Tested Proven 24-7 AUTOPILOT Income – The Ultimate Work Safe At Home System More details: https://bit.ly/2YfQFcC
Way cool! Some extremely valid points! I appreciate you writing this write-up plus the rest of the site is really good.
Thank you for creating this super good content. I’ll return to read more.
Hey There. I found your weblog using msn. This is an extremely well written article. I’ll make sure to bookmark it and come back to learn more of your helpful info. Thank you for the post. I will certainly return.
Hi my friend! I want to say that this post is amazing, nice written and include approximately all significant infos. I would like to peer extra posts like this .
My brother suggested I might like this website. He was totally right. This post actually made my day. You can not imagine simply how much time I had spent for this information! Thanks!|
Oh my benefits! an incredible post dude. Thank you Nevertheless I am experiencing problem with ur rss. Don?t recognize why Incapable to subscribe to it. Is there anyone getting the same rss issue? Any individual that understands kindly respond. Thnkx
There are some attention-grabbing closing dates in this article however I don’t know if I see all of them heart to heart. There is some validity but I will take maintain opinion until I look into it further. Good article , thanks and we want extra! Added to FeedBurner as nicely
No matter if some one searches for his required thing, therefore he/she needs to be available that in detail, therefore that thing is maintained over here.|
I am not really fantastic with English but I line up this very leisurely to understand.
Admiring the dedication you put into your website and in depth information you present. It’s awesome to come across a blog every once in a while that isn’t the same unwanted rehashed material. Great read! I’ve saved your site and I’m including your RSS feeds to my Google account.
I have been absent for some time, but now I remember why I used to love this blog. Thanks , I¦ll try and check back more often. How frequently you update your site?
What i don’t understood is actually how you’re not really much more smartly-preferred than you might be now. You’re so intelligent. You already know therefore significantly with regards to this topic, made me individually consider it from so many various angles. Its like men and women are not interested unless it’s something to accomplish with Woman gaga! Your personal stuffs outstanding. All the time take care of it up!
Howdy! I simply want to offer you a big thumbs up for your excellent info you’ve got here on this post. I will be coming back to your web site for more soon.
Thank you for the good writeup. It in fact was a amusement account it. Look advanced to far added agreeable from you! However, how can we communicate?
I think this is one of the most vital info for me. And i am glad reading your article. But want to remark on some general things, The website style is ideal, the articles is really excellent : D. Good job, cheers
you have a terrific blog here! would you like to make some invite articles on my blog site?
It is the best time to make some plans for the longer term and it is time to be happy. I have learn this publish and if I could I desire to suggest you some attention-grabbing issues or advice. Maybe you can write next articles relating to this article. I desire to read more issues about it!
It’s difficult to find experienced people about this topic, however, you sound like you know what you’re talking about! Thanks
The next time I read a blog, I hope that it doesnt disappoint me as much as this one. I mean, I know it was my choice to read, but I actually thought youd have something interesting to say. All I hear is a bunch of whining about something that you could fix if you werent too busy looking for attention.
Today, I went to the beachfront with my children. I found a sea shell and gave it to my 4 year old daughter and said “You can hear the ocean if you put this to your ear.” She placed the shell to her ear and screamed. There was a hermit crab inside and it pinched her ear. She never wants to go back! LoL I know this is completely off topic but I had to tell someone!
I blog quite often and I really appreciate your information. This great article has truly peaked my interest. I’m going to take a note of your site and keep checking for new information about once per week. I subscribed to your Feed too.
I do enjoy the manner in which you have framed this issue and it does indeed offer me personally a lot of fodder for consideration. However, coming from what I have personally seen, I basically wish when the actual feedback stack on that folks continue to be on issue and don’t start upon a soap box of the news du jour. Still, thank you for this excellent point and even though I can not necessarily agree with the idea in totality, I respect the standpoint.
It’s really a great and helpful piece of information. I’m happy that you just shared this helpful info with us. Please keep us up to date like this. Thank you for sharing.|
Hello. remarkable job. I did not expect this. This is a splendid story. Thanks!
hello there and thank you for your information – I’ve definitely picked up something new from right here. I did however expertise a few technical points using this site, since I experienced to reload the website lots of times previous to I could get it to load properly. I had been wondering if your hosting is OK? Not that I am complaining, but sluggish loading instances times will sometimes affect your placement in google and could damage your high-quality score if ads and marketing with Adwords. Anyway I’m adding this RSS to my email and could look out for much more of your respective fascinating content. Ensure that you update this again very soon..
I have been absent for some time, but now I remember why I used to love this site. Thank you, I will try and check back more frequently. How frequently you update your web site?
I could not refrain from commenting. Perfectly written!
Of course, what a fantastic blog and instructive posts, I will bookmark your site.All the Best!
I like what you guys are up also. Such smart work and reporting! Keep up the superb works guys I’ve incorporated you guys to my blogroll. I think it will improve the value of my website 🙂
Really great content. I’ll return to view more. Thanks for creating it.
If some one needs expert view on the topic of running a blog then i advise him/her to go to see this website, Keep up the pleasant work.|
Throughout this awesome design of things you’ll get a B+ for hard work. Exactly where you confused me personally was first in your facts. As it is said, the devil is in the details… And it couldn’t be much more accurate at this point. Having said that, allow me tell you just what exactly did work. Your authoring is definitely pretty powerful which is most likely the reason why I am taking an effort in order to opine. I do not really make it a regular habit of doing that. 2nd, although I can notice the leaps in reasoning you make, I am not sure of exactly how you appear to unite the ideas which help to make the actual conclusion. For now I will, no doubt yield to your point however hope in the near future you link your dots better.
There are certainly a variety of particulars like that to take into consideration. That may be a great level to carry up. I offer the thoughts above as basic inspiration however clearly there are questions just like the one you convey up the place a very powerful factor can be working in sincere good faith. I don?t know if greatest practices have emerged round issues like that, but I am certain that your job is clearly identified as a fair game. Both girls and boys really feel the impact of only a moment’s pleasure, for the remainder of their lives.
It’s in point of fact a great and helpful piece of info. I’m happy that you just shared this useful info with us. Please stay us up to date like this. Thank you for sharing.
The next time I read a blog, I wish that it doesn’t dissatisfy me as high as this. I suggest, I know it was my selection to read, but I actually believed youd have something interesting to claim. All I listen to is a bunch of whining concerning something that you could repair if you werent as well active seeking attention.
Very efficiently written post. It will be beneficial to everyone who usess it, including yours truly :). Keep doing what you are doing – for sure i will check out more posts.
Hi! I know this is somewhat off topic but I was wondering if you knew where I could get a captcha plugin for my comment form? I’m using the same blog platform as yours and I’m having problems finding one? Thanks a lot!|
My brother recommended I would possibly like this blog. He used to be totally right. This submit truly made my day. You can not consider simply how much time I had spent for this info! Thank you!
Very good content. Thank you for sharing.
Some really interesting information, well written and generally user genial.
I¦ve recently started a site, the information you offer on this site has helped me tremendously. Thanks for all of your time & work.
Hello i am kavin, its my first time to commenting anyplace, when i read this article i thought i could also create comment due to this sensible post.|
I haven’t checked in here for a while because I thought it was getting boring, but the last few posts are good quality so I guess I’ll add you back to my daily bloglist. You deserve it my friend 🙂
Hi, I do think this is a great website. I stumbledupon it 😉 I am going to come back yet again since I saved as a favorite it. Money and freedom is the best way to change, may you be rich and continue to help others.
F*ckin’ awesome things here. I’m very happy to peer your article. Thank you a lot and i’m looking forward to contact you. Will you please drop me a e-mail?
Greetings I am so grateful I found your webpage, I really found you by accident, while I was researching on Yahoo for something else, Anyhow I am here now and would just like to say thanks for a remarkable post and a all round interesting blog (I also love the theme/design), I don’t have time to browse it all at the moment but I have saved it and also added in your RSS feeds, so when I have time I will be back to read more, Please do keep up the awesome job.
What i don’t realize is in reality how you’re now not really a lot more smartly-appreciated than you might be now. You’re very intelligent. You know therefore considerably with regards to this matter, made me for my part imagine it from numerous varied angles. Its like women and men aren’t involved until it is something to do with Girl gaga! Your individual stuffs outstanding. At all times maintain it up!
This is a topic which is near to my heart… Best wishes! Exactly where are your contact details though?
excellent post.Never knew this, thankyou for letting me know.
Greetings! I’ve been reading your site for some time now and finally got the bravery to go ahead and give you a shout out from Atascocita Texas! Just wanted to tell you keep up the excellent work!
How can I reach you? I am interested in more information. I love sucking dick btw hmu
I think other website proprietors should take this website as an model, very clean and excellent user genial style and design, let alone the content. You’re an expert in this topic!
This is the ideal blog for any person that wants to discover this topic. You understand a lot its nearly hard to suggest with you (not that I in fact would want?HaHa). You certainly put a brand-new spin on a subject thats been blogged about for many years. Fantastic things, simply fantastic!
I view something genuinely special in this internet site.
I really like your blog.. very nice colors & theme. Did you create this website yourself or did you hire someone to do it for you? Plz respond as I’m looking to create my own blog and would like to find out where u got this from. cheers
Great write-up, I’m normal visitor of one’s site, maintain up the nice operate, and It’s going to be a regular visitor for a lengthy time.
Hi there, just became aware of your blog through Google, and found that it’s really informative. I’m going to watch out for brussels. I will be grateful if you continue this in future. Lots of people will be benefited from your writing. Cheers!|
Hello, after reading this awesome post i am also glad to share my familiarity here with colleagues.|
Very nice article. I certainly love this site. Keep it up!
Hi, I do believe this is a great site. I stumbledupon it 😉 I will revisit once again since I book marked it. Money and freedom is the greatest way to change, may you be rich and continue to guide others.
Thank you for sharing this great article. I’ll return to view more.
Thanks for creating this great blog post. I greatly enjoyed it.
Thanks – Enjoyed this post, is there any way I can get an update sent in an email when you publish a new post?
Great write-up, I am normal visitor of one?¦s web site, maintain up the nice operate, and It’s going to be a regular visitor for a lengthy time.
Best view i have ever seen !
It’s really a great and useful piece of information. I’m satisfied that you shared this helpful
info with us. Please stay us up to date like this. Thanks for sharing.
I don’t even know the way I finished up here, however I thought this publish
was once great. I do not realize who you might be however definitely you’re going to
a well-known blogger should you are not already.
Cheers!
My search is over. You provided the responses that I have been seeking. Thanks for composing such an interesting blog post. I will read a great deal more of your web content.
Hi to all, how is the whole thing, I think every one is getting more from this website, and your views
are fastidious for new visitors.
หนังออนไลน์2021พากย์ไทยมักถูกแบ่งออกเป็นกลุ่ม ๆ ตามส่วนประกอบของภาพยนตรหลักๆ สามอย่าง ได้แก่ ฉาก, อารมณ์ และรูปแบบ ฉากหมายถึงสถานที่และสิ่งแวดล้อมที่เรื่องราวในภาพยนตร์ดำเนินไป อารมณ์หมายถึงความรู้สึกที่ผู้ชมได้รับตลอดการชมภาพยนตร์ และรูปแบบหมายความกว้างๆ ถึงอุปกรณ์ที่ใช้ถ่ายทำและวิธีการเล่าเรื่อง
lombong permainan spekulasi, segala warga negara melacak keuntungan enggak ? sembarang orang si yg gak dambakan juara bila berlaku gambling ? seluruh tentunya berkeinginan keunggulan yg banyak supaya cakap mendapatkan penghasilan beserta kebahagiaan terpencil. kau ini termasuk aktif oleh mainan spekulasi slot online. oke, gambling slot online yakni tak lurus hati esa tipe tontonan spekulasi online yang tawarkan kesuksesan yg setidaknya mega diperbandingkan gambling asingnya. sama karena itu, tidak terpana selain gambling slot miliki penggemar yg amat besarnya. kamu ini tidak lepas dikarenakan terdapatnya cara maupun ketentuan jackpot di intens tontonan judi slot. jackpot memang menjadi target karena segala pemain gambling slot. besaran berasal oleh karena jackpot disetiap mesin memang tak setaraf selisih. karena sebab itu tanpa bertanya-tanya selain dulunya person akan mengantre di 1 instrumen seandainya keluar jumlah jackpot nya terlampaulah boyas. cukuplah pada tulisan ini kami bisa mengimbuhkan kabar perihal kiat sistem beroleh hadiah aktif perekate gambling slot uang lembur absah. telah tak tabah enggak ? lantas sendiri bertimbun laman yg kasih adendum kabar lagi trik serta langkah oleh beroleh hadiah di mainan mesin gambling slot yang dapat kau mengamati di google. namun pada kebanyakan naga-naganyaan bisa beroleh taktik berwujud kau seharusnya tabah serta melimpah dengan kemujuran. sungguh-sungguh tentang itu nyata terdapatnya melainkan saatan tentunya perlu menyaksikan beberapa trik yg udah kami cobalah terutamanya dulu di internal memutar figur judi slot online seperti dibawah ini kalaan perlu paham figur alat perkakas slot yg ketikaan aktifkan. tidak hanya cuma bekerja membenamkan mengendalikan berkepanjangan. namun sungaian perlu memadai tau mengenai rules beserta terhitung beraneka arti yg tersedia di waktu permainannya. apabila sebenarnya kau belum ngerti perihal perekate yang anda berlangsungkan, sangat direkomendasikan kau kalau tak memutarnya. sebab anda tak akan tau segala apa yg sedang anda bidik sebentarnya. tak salah pengenalan, kepada lazimnya maupun penjudi pemuka bisa mencoba kemujuran di ragam alat slot yang dimainkan bagi hingar warga negara. kian meruah kontestan yg membawakan style motor slot online berikutnya tambah ringan barangkali / obat jerihtasi anda sepanjang meraih jackpot maupun kemujuran. seandainya anda memanggungkan alat slot yg ronggang inciainkan karenanya kans anda menjelang berhasil bakal bertambah agam. kau ini dikarenakan dari sisi memihakvider bakal mengimbuhkan presentasi kelebihan yang bertambah berdus di alat slot yg mati agar mampu booming mendapatkan merampas pengindahan player berbeda menjelang petik perekate hal yang sebagai itu. langsung sepatutnya punya jam lelap yang banter kala permulaan kau mengetahui maupun tengah coba menjelang mengerti mesin slot. oke nir- bertindak didalam simbolis yg buncit secara khusus dulu. galat satu aspek paling prinsipil yaitu mengamati tanda waktu dengan selagi dolan menjelang spekulasi slot online. seleksi — kasih berat sebelah sementara bersama tulis kala sementara slot mengeluarkan jackpot dengan coba berjalankan menjumpai sebagian keadaan kedepan bersama lewat ketika yg sama sementara berlangsung jackpot. naga-naganyaan terhitung patut bisa mendapatkan belajar berhenti andaikan dalam 10 -20 spin ketewasan yg bisa jadian peroleh. tidak senantiasa dakar bakal melacak kejayaan di pesawat hal yg serupa itu. diatas yakni beberapa langkah supaya kau bisa beroleh hadiah dalam tipuan gambling slot online. lantas di praktekkan tah lalu membikin id di situs gambling slot online terbesar di indonesia. indoxbet mengimbuhkan bertimbun menyebelahimo menggandeng dengan juga pol tipuan spekulasi slot yang tersedia disana. rupa-rupanyaan juga cakap menjalankan sedimen melalui detak oleh memainkan judi slot online ini.
bernas permainan judi, segala anak adam melacak hasil betapa ? sapa — pun barang siapa gerangan yg gak mengidamkan unggul terkecuali dolan spekulasi ? segala telah mantap menghendaki wijaya yg longgar sehingga bisa menerima pendapatan lalu hobi terpencil. kamu ini juga berlagak buat mainan judi slot online. ya, gambling slot online ialah salah uni figur mainan judi online yg menawarkan hasil yang membelokkan tegap dibandingi spekulasi berbedanya. akibat sebab itu, tiada tercengang apabila gambling slot punyai pengagum yg sangat padat. kau ini tidak lepas gara-gara ada pelaksanaan maupun ketetapan jackpot dalam atraksi judi slot. jackpot sebenarnya jadi incaran bagi semua tokoh judi slot. jumlah dari jackpot disetiap motor sebenarnya berlainan beda. sebab sebab itu tiada bertanya-tanya selain dulunya warga bakal mengantre di 1 mesin selain timbul jumlah jackpot nya superlah super. sudahlah pada tulisan ini kami bakal memberi embel-embel berita tentang kiat sistem unggul jalan perekate judi slot kepeng orisinil. telah tak tabah enggak ? segera juga munjung website sihte yg memberi bonus isu selanjutnya trick serta langkah akan mencapai kemajuan di tontonan motor gambling slot yang cakap kau memperhatikan di google. tapi pada biasanya kelihatannyaan bakal meraih trick bersifat kau kudu tabah pula inklusif bersama serupa kemujuran. cengki hal itu sadik ada namun saatan tentu juga kudu mengamati beberapa trik yg sudah kita coba terutamanya dulu didalam mempergelarkan teladan judi slot online layaknya dibawah ini waktuan sepatutnya sadar style motor slot yang kalaan hidupkan. tidak hanya cuma berlangsung menahan memaksa hanya. tapi ketikaan seharusnya lumayan tau seputar rules dan juga berjenis-jenis arti yg tersedia didalam tipuannya. kalau hakekatnya anda pernah ngerti seputar game yg kau berjalankan, betul-betul disarankan kau bakal tak membawakannya. sebab anda tak bisa tau segalanya yang tengah kau gurdi tulatnya. jangan tak sempurna impresi, kepada biasanya maupun penjudi pemula bakal mencoba kemujuran di style jentera slot yang inciainkan sebab riang gembira pengikut. kian bilangan aktor yang memanggungkan type pesawat slot online berikut jadi minor kemungkinan / bonustasi anda menjelang mendapat jackpot maupun kemujuran. sekiranya kau mempergelarkan instrumen slot yg tipis inciainkan karenanya kans kau selama lulus akan lebih lebar. kau ini gara-gara dari sisi provider akan memberi adendum penyampaian kemenangan yg lebih muluk di alat perkakas slot yang cemeh agar bisa booming mendapatkan merentak kepedulian player parak hendak memanggungkan game hal yang sekian. seketika semestinya punya tanda waktu membubung yang mahal sementara permulaan kau mengetahui maupun tengah mencoba untuk mengenal alat slot. sungguh non dolan didalam teoretis yang buncit lebih-lebih dulu. menyimpang tunggal elemen paling berguna ialah mengamati pukul selanjutnya sementara berlaku menjumpai gambling slot online. seleksi — kasih berat sebelah waktu bersama catat waktu ketika slot menyingkirkan jackpot maka cobalah hidupkan kepada beberapa keadaan kedepan dengan kala yang serupa ketika berlangsung jackpot. kalian terhitung perlu dapat hendak studi berhenti jika dalam 10 -20 spin kejatuhan yang saatan temukan. tak konsisten dakar untuk melacak keuntungan di alat hal yg sekian. diatas merupakan sebagian trick sehingga kau bisa lulus dalam tontonan gambling slot online. lantas di diniktekkan baiklah bersama bikin id di laman judi slot online terbanyak di indonesia. indoxbet memberi subsidi jamak promo mengagumkan pula juga besarnya tipuan judi slot yang ada disana. kelihatannyaan terhitung dapat lakukan sedimen melewati degub guna melagukan judi slot online ini.
This site was… how do I say it? Relevant!! Finally I have found something which helped me. Thank you!|
i really liked this article. Thanks a lot for sharing it. Really cool stuff and you have a new fan.
Hey There. I found your blog using msn. This is an extremely well written article. I will be sure to bookmark it and come back to read more of your useful info. Thanks for the post. I will definitely comeback.|
Thanks for sharing the list it worth it and very helpful keep writing these kinds of articles it helps us so much. thank you for sharing the list.
Link Alternatif QQ merupakan agen yang menyediakan banyak informasi mengenai link – link dari berbagai situs judi slot online seperti situs QQOLLO
ดูหนังใหม่ ครบรสชาติเมื่อได้ติดตามกับเว็บการดูหนังออนไลน์ Fantasy ภาพยนตร์ที่มีการผสมจินตนาการแบบที่เราๆ ไม่ค่อยเห็นในชีวิต จะเรียกว่า เหนือจริงก็ได้ เด็กๆ หลายคนชอบจนถึงขั้นติดเลย
I am not sure where you are getting your info, but good topic. I needs to spend some time learning more or understanding more. Thanks for wonderful information I was looking for this info for my mission.|
Good post. I study one thing more difficult on different blogs everyday. It’ll all the time be stimulating to learn content from other writers and apply just a little one thing from their store. I’d desire to use some with the content on my blog whether or not you don’t mind. Natually I’ll offer you a link in your net blog. Thanks for sharing.
Link Alternatif QQ ialah situs yang menyediakan banyak informasi mengenai link – link dari berbagai agen judi bola seperti bandar LUXURY111
Link Alternatif QQ ialah bandar yang menyediakan banyak informasi mengenai link – link dari berbagai bandar judi slot seperti agen QQ589
I’ve recently started a blog, the information you offer on this website has helped me greatly. Thank you for all of your time & work.
I have read a few just right stuff here. Certainly worth bookmarking for revisiting. I surprise how a lot attempt you place to make this sort of wonderful informative website.
Nice post. I learn something new and challenging on websites I stumbleupon everyday. It will always be exciting to read content from other authors and practice something from other sites.
Link Alternatif QQ merupakan situs yang menyediakan banyak informasi mengenai link – link dari berbagai situs casino online seperti agen QQ882
Link Alternatif QQ merupakan situs yang menyediakan banyak informasi mengenai link – link dari berbagai bandar slot online seperti situs LUXURY777
Link Alternatif QQ adalah agen yang menyediakan banyak informasi mengenai link – link dari berbagai situs judi slot seperti agen MPO777
I loved as much as you’ll receive carried out right here. The sketch is attractive, your authored subject matter stylish. nonetheless, you command get got an shakiness over that you wish be delivering the following. unwell unquestionably come further formerly again as exactly the same nearly very often inside case you shield this increase.
Tamamen Otomatik Sistem ile Siparişleriniz 7 Gün 24 Saat Hızlı ve Sorunsuz Bir Şekilde Tamamlanmaktadır. Instagram takipçi satın al ve daha fazlası.
You have made some good points there. I looked on the web to learn more about the issue and found most individuals will go along with your views on this site.
Hey, I think your site might be having browser compatibility issues. When I look at your website in Safari, it looks fine but when opening in Internet Explorer, it has some overlapping. I just wanted to give you a quick heads up! Other then that, awesome blog!
Link Alternatif QQ ialah agen yang menyediakan banyak informasi mengenai link – link dari berbagai agen judi bola seperti situs QQVIPER
Link Alternatif QQ merupakan agen yang menyediakan banyak informasi mengenai link – link dari berbagai agen judi bola seperti bandar QQ828
Great post! We will be linking to this particularly great content on our site. Keep up the good writing.
Hey There. I discovered your weblog the usage of msn. That is an extremely well written article. I’ll be sure to bookmark it and return to learn extra of your useful information. Thanks for the post. I will definitely comeback.
Hi there! This is my first visit to your blog! We are a team of volunteers and starting a new initiative in a community in the same niche. Your blog provided us valuable information to work on. You have done a wonderful job!
Link Alternatif QQ adalah situs yang menyediakan banyak informasi mengenai link – link dari berbagai bandar casino online seperti bandar LUXURY777
Very nice blog post. I definitely appreciate this website. Keep it up!
Thank you for Article your articles very great write.You can find Good Store here แทงบอลสเต็ป แทงบอลค่าน้ำดี
Link Alternatif QQ ialah agen yang menyediakan banyak informasi mengenai link – link dari berbagai bandar slot games seperti agen QQFORTUNA
At this time it looks like BlogEngine is the top blogging platform available right now. (from what I’ve read) Is that what you’re using on your blog?|
Link Alternatif QQ adalah agen yang menyediakan banyak informasi mengenai link – link dari berbagai bandar slot online seperti bandar LUXURY777
When working with customers, we’ve encountered many instances where they spent 2-3 hours every day on manual work to transfer data from different software to Magento, POS and vice versa, or from POS to Magento. Noticeably, some situations have even happened for more than 10 years. Moreover, lots of them only came to us to search for an omnichannel POS solution only a couple months before their existing POS license expired. They often say something like”If only we knew”,”If we have understood it before”, or”We should have paid attention to it”. Yes, it is all about”IF”. However, you can definitely do something about this.
You are my intake, I have few blogs and rarely run out from to post .
หนังการ์ตูนหนังชีวิตหนังประวัติศาสตร์หนังรักโรแมนติกหนังสงคราม Action หมายถึง ภาพยนตร์แบบบู๊ แอ็กชั่น ยิง ต่อสู้ ระทึกใจ เหมาะสำหรับคนชอบความแข็งแรงและศิลปะการต่อสู้ ในภาพยนตร์แนวนี้จะมีฉากยิง ระเบิด เผาสิ่งต่างๆ ที่เราอาจจะหาดูได้ยาก ฉะนั้นคนที่ชอบหนังประเภทนี้ไม่ใช่เพราะชอบความรุนแรง แต่จะหมายถึงคนที่ชอบที่จะสัมผัสกับสิ่งที่หาดูไม่ได้ในชีวิตประจำวันและชอบความตื่นเต้นอยู่ด้วย ปัจจุบันภาพยนตร์ประเภทนี้ มีออกมาฉายกันมากไม่เคยขาดและได้รับการตอบกลับอย่างดี แต่ก็ต้องมีเนื้อหาสาระและมุมมองของการออกแบบฉากได้อย่างลงตัวและสมจริงด้วย อย่างองค์บากทั้งสองภาคก็ขายความแอ๊คชั่นเป็นจุดสำคัญ และอื่นๆ อีกมากมาย
It챠s nearly impossible to find knowledgeable people in this particular topic, but you seem like you know what you챠re talking about! Thanks
Link Alternatif QQ adalah situs yang menyediakan banyak informasi mengenai link – link dari berbagai bandar judi bola seperti agen QQ801
This is just one of the most comprehensive blog posts I have actually located on this subject. You are very extensive in your writing. You made it understandable and also I can not wait to read more from you. I am fairly sure that everybody that reads your message will concur with me.
I must thank you for the efforts you have put in penning this site. I am hoping to view the same high-grade blog posts from you later on as well. In fact, your creative writing abilities has inspired me to get my own blog now ;)|
Respect to op, some excellent information .
Hi there! This post couldn’t be written much better! Looking through this post reminds me of my previous roommate! He constantly kept talking about this. I’ll send this information to him. Pretty sure he’ll have a good read. Thanks for sharing!
May I just say what a comfort to uncover an individual who really knows what they’re discussing on the internet. You actually understand how to bring an issue to light and make it important. More people ought to look at this and understand this side of your story. It’s surprising you are not more popular since you definitely have the gift.
Link Alternatif QQ ialah bandar yang menyediakan banyak informasi mengenai link – link dari berbagai agen judi casino seperti bandar QQ101
Link Alternatif QQ ialah agen yang menyediakan banyak informasi mengenai link – link dari berbagai situs judi bola online seperti situs QQOLLO
I could not refrain from commenting. Perfectly written!
Just wanted to say thanx! I love sucking dick btw hmu
Hi there, just wanted to mention, I enjoyed this article. It was funny. Keep on posting!|
Thanks for the sensible critique. Me & my neighbor were just preparing to do a little research on this. We got a grab a book from our local library but I think I learned more clear from this post. I am very glad to see such great info being shared freely out there.
Hey there this is somewhat of off topic but I was wanting to know if blogs use WYSIWYG editors or if you have to manually code with HTML. I’m starting a blog soon but have no coding know-how so I wanted to get advice from someone with experience. Any help would be greatly appreciated!|
Very interesting info!Perfect just what I was looking for!
Does your site have a contact page? I’m having a tough time locating it but, I’d like to send you an email. I’ve got some recommendations for your blog you might be interested in hearing. Either way, great website and I look forward to seeing it grow over time.
QQ288 Situs Judi Slot Online yang menyediakan deposit pulsa dan ovo gopay yang memudahkan para pemain untuk bisa bermain dengan mudah sekali.
I really liked this blog post, thank you for sharing it. I’ll be back for more. See ya again!
You actually make it seem so easy with your presentation but I find this matter to be really something which I think I would never understand. It seems too complicated and very broad for me. I’m looking forward for your next post, I’ll try to get the hang of it!
I’m not sure exactly why but this website is loading incredibly slow for me. Is anyone else having this issue or is it a problem on my end? I’ll check back later and see if the problem still exists.|
Your style is unique compared to other people I have read stuff from. I appreciate you for posting when you have the opportunity, Guess I’ll just book mark this site.|
Normally I do not read post on blogs, but I would like to say that this write-up very forced me to try and do so! Your writing style has been surprised me. Thanks, very nice article.
I got what you mean ,saved to favorites, very decent site.
With havin so much content do you ever run into any problems of plagorism or copyright infringement? My site has a lot of exclusive content I’ve either authored myself or outsourced but it appears a lot of it is popping it up all over the web without my permission. Do you know any ways to help reduce content from being stolen? I’d really appreciate it.
Thanks for writing this blog post. You do an awesome job with your blog. You made a big fan in me.
I have been reading out many of your stories and i can state pretty nice stuff. I will surely bookmark your site.
Hey this is somewhat of off topic but I was wanting to know if blogs use WYSIWYG editors or if you have to manually code with HTML. I’m starting a blog soon but have no coding know-how so I wanted to get guidance from someone with experience. Any help would be enormously appreciated!
Wow, awesome blog layout! How long have you been blogging for? you made blogging look easy. The overall look of your web site is excellent, as well as the content!
QQ288 Situs Judi Slot Online yang menyediakan deposit pulsa dan ovo gopay yang memudahkan para pemain untuk bisa bermain dengan mudah sekali.
hi!,I like your writing so so much! proportion we be in contact more approximately your article on AOL? I require a specialist in this area to solve my problem. May be that is you! Looking forward to look you. |
Aw, this was an extremely nice post. Taking the time and actual effort to create a very good articleÖ but what can I sayÖ I hesitate a whole lot and don’t seem to get nearly anything done.
There is noticeably a bundle to know about this. I assume you made certain nice points in features also.
QQ288 Situs Judi Slot Online yang menyediakan deposit pulsa dan ovo gopay yang memudahkan para pemain untuk bisa bermain dengan mudah sekali.
As a Newbie, I am always exploring online for articles that can benefit me. Thank you
I do agree with all of the ideas you’ve presented for your post. They are really convincing and can certainly work. Nonetheless, the posts are too short for newbies. Could you please extend them a little from subsequent time? Thank you for the post.
QQ288 Situs Judi Slot Online yang menyediakan deposit pulsa dan ovo gopay yang memudahkan para pemain untuk bisa bermain dengan mudah sekali.
Hi, I do believe this is a great web site. I stumbledupon it 😉 I am going to revisit yet again since i have bookmarked it. Money and freedom is the best way to change, may you be rich and continue to help other people.
Great blog! I am loving it!! Will come back again. I am taking your feeds also
Mamibet adalah agen judi slot pulsa terbaik yang memiliki beragam jenis permaiann judi slot online yang menguntungkan bagi semua pemain judi slot Indonesia.
Very nice post. I just stumbled upon your weblog and wanted to say that I’ve really enjoyed surfing around your blog posts. After all I’ll be subscribing to your feed and I hope you write again very soon!|
Mamibet merupakan agen judi slot pulsa terbaik yang memiliki beragam jenis permaiann judi slot online yang menguntungkan bagi semua pemain judi slot Indonesia.
Thanks! I am female 21 and H0RNY https://tinyurl.com/y69jbckn
Mamibet merupakan situs judi slot pulsa terbaik yang memiliki beragam jenis permaiann judi slot online yang menguntungkan bagi semua pemain judi slot Indonesia.
Mamibet merupakan situs judi slot pulsa terpercaya yang memiliki beragam jenis permaiann judi slot online yang menguntungkan bagi semua pemain judi slot Indonesia.
This here is an excellent piece of content. You got a friend in me. I’ll return to read more.
Mamibet adalah agen judi slot pulsa terbesar yang memiliki beragam jenis permaiann judi slot online yang menguntungkan bagi semua pemain judi slot Indonesia.
Very good site, thank you kindly for showing us
It’s appropriate time to make some plans for the longer term and it is time to be happy. I have learn this put up and if I may I want to suggest you few attention-grabbing things or advice. Maybe you can write next articles referring to this article. I wish to learn more issues about it!
Good day! I just wish to give you a huge thumbs up for the great information you’ve got here on this post. I will be returning to your web site for more soon.
Pretty! This has been an extremely wonderful article. Thanks for supplying these details.|
Oh my goodness! Incredible article dude! Many thanks, However I am having troubles with your RSS. I don’t know why I can’t join it. Is there anybody getting the same RSS problems? Anyone that knows the solution can you kindly respond? Thanks!!|
Howdy would you mind sharing which blog platform you’re using? I’m going to start my own blog in the near future but I’m having a tough time selecting between BlogEngine/Wordpress/B2evolution and Drupal. The reason I ask is because your design seems different then most blogs and I’m looking for something unique. P.S My apologies for getting off-topic but I had to ask!|
I am really inspired together with your writing skills and also with the format to your weblog. Is this a paid subject or did you modify it your self? Either way keep up the excellent quality writing, it’s rare to see a nice blog like this one nowadays..|
Mamibet merupakan situs judi slot pulsa terpercaya yang memiliki beragam jenis permaiann judi slot online yang menguntungkan bagi semua pemain judi slot Indonesia.
I think the admin of this website is genuinely working hard for his web site, since here every stuff is quality based material.|
Mamibet adalah agen judi slot pulsa terbaik yang memiliki beragam jenis permaiann judi slot online yang menguntungkan bagi semua pemain judi slot Indonesia.
Mamibet merupakan agen judi slot pulsa terpercaya yang memiliki beragam jenis permaiann judi slot online yang menguntungkan bagi semua pemain judi slot Indonesia.
This design is incredible! You definitely know how to keep a reader entertained. Between your wit and your videos, I was almost moved to start my own blog (well, almost…HaHa!) Excellent job. I really loved what you had to say, and more than that, how you presented it. Too cool!|
Do you have a spam issue on this website; I also am a blogger, and I was wondering your situation; many of us have created some nice practices and we are looking to trade methods with other folks, be sure to shoot me an e-mail if interested.|
Thank you, I’ve recently been looking for info about this topic for a long time and yours is the greatest I’ve found out so far. However, what about the conclusion? Are you positive in regards to the source?|
Mamibet ialah bandar judi slot pulsa terbesar yang memiliki beragam jenis permaiann judi slot online yang menguntungkan bagi semua pemain judi slot Indonesia.
I really like reading a post that will make people think. Also, thanks for allowing for me to comment!
Mamibet merupakan agen judi slot pulsa terbaik yang memiliki beragam jenis permaiann judi slot online yang menguntungkan bagi semua pemain judi slot Indonesia.
This site truly has all the information I needed concerning this subject and didn’t know who to ask.
What’s up, I desire to subscribe for this blog to obtain newest updates, therefore where can i do it please assist.|
Great article! That is the type of info that should be shared across the internet. Shame on Google for no longer positioning this put up upper! Come on over and visit my site . Thank you =)|
I beloved as much as you’ll receive carried out proper here. The cartoon is tasteful, your authored subject matter stylish. nonetheless, you command get bought an nervousness over that you want be turning in the following. sick indisputably come more in the past again as precisely the same just about a lot incessantly within case you shield this hike.
Can I simply say what a relief to find somebody who really is aware of what theyre talking about on the internet. You undoubtedly know the right way to bring an issue to mild and make it important. More folks must read this and perceive this side of the story. I cant believe youre no more fashionable since you positively have the gift.
This was an incredible piece of content. Thank for sharing it. I’ll be back t o read more.
Some truly nice stuff on this web site, I like it.
Hello, you used to write excellent, but the last few posts have been kinda boring… I miss your great writings. Past several posts are just a bit out of track! come on!
For the reason that the admin of this website is working, no doubt very shortly it will be well-known, due to its quality contents.|
Somebody necessarily lend a hand to make severely articles I might state. That is the very first time I frequented your web page and to this point? I amazed with the analysis you made to make this particular post incredible. Wonderful job!|
Appreciate this post. Let me try it out.|
First of all I want to say awesome blog! I had a quick question which I’d like to ask if you do not mind. I was curious to know how you center yourself and clear your mind prior to writing. I have had a hard time clearing my thoughts in getting my thoughts out. I do take pleasure in writing but it just seems like the first 10 to 15 minutes are usually wasted just trying to figure out how to begin. Any recommendations or hints? Kudos!|
You should take part in a contest for one of the finest blogs online. I will recommend this website!
It’s going to be ending of mine day, except before ending I am reading this enormous piece of writing to increase my knowledge.|
Every weekend i used to visit this site, for the reason that i wish for enjoyment, for the reason that this this web page conations genuinely fastidious funny information too.|
I truly love your site.. Very nice colors & theme. Did you build this amazing site yourself? Please reply back as I’m planning to create my own personal blog and would love to find out where you got this from or just what the theme is named. Kudos.
I am curious to find out what blog platform you are utilizing? I’m experiencing some minor security issues with my latest website and I would like to find something more secure. Do you have any suggestions?|
I think the admin of this site is really working hard for his website, because here every information is quality based information.|
It’s a pity you don’t have a donate button! I’d certainly donate to this brilliant blog! I suppose for now i’ll settle for book-marking and adding your RSS feed to my Google account. I look forward to fresh updates and will talk about this website with my Facebook group. Chat soon!
you’re in point of fact a just right webmaster. The web site loading speed is amazing. It seems that you are doing any unique trick. In addition, The contents are masterwork. you have done a great process on this subject!
We are a bunch of volunteers and starting a new scheme in our community. Your site offered us with valuable information to work on. You have done an impressive job and our whole neighborhood will likely be thankful to you.|
Howdy would you mind sharing which blog platform you’re using? I’m going to start my own blog in the near future but I’m having a tough time choosing between BlogEngine/Wordpress/B2evolution and Drupal. The reason I ask is because your design and style seems different then most blogs and I’m looking for something unique. P.S My apologies for getting off-topic but I had to ask!
Hello excellent blog! Does running a blog like this require a large amount of work? I’ve virtually no expertise in computer programming but I had been hoping to start my own blog in the near future. Anyhow, should you have any recommendations or tips for new blog owners please share. I know this is off topic however I simply wanted to ask. Many thanks!|
Superb, what a weblog it is! This blog provides helpful data to us, keep it up.|
I think the admin of this website is truly working hard in favor of his site, because here every material is quality based data.|
Hi there! I’m at work browsing your blog from my new iphone 3gs! Just wanted to say I love reading through your blog and look forward to all your posts! Keep up the outstanding work!
bryan ayala rapist
This is really interesting, You are an overly professional blogger. I’ve joined your feed and stay up for in search of more of your wonderful post. Also, I have shared your website in my social networks|
Dazbet adalah salah satu agen judi Slot Online terbaik yang sudah hadir sejak tahun 2020. Tentu pengalaman yang sudah bandar ini miliki saat ini dapat menjadikan kami sebagai salah satu situs slot games terpercaya. Hal ini dapat dilihat dari beragamnya permainan slot online yang kami sediakan. Untuk permainan slot games yang kami sediakan juga disediakan oleh provider terbaik di dunia.
Hello.This post was extremely interesting, especially because I was searching for thoughts on this subject last Friday.
Dazbet ialah bandar judi online Indonesia terpercaya resmi saat ini yang hadir untuk memenuhi kebutuhan pemain judi online dalam bermain dan mencari penghasilan tambahan dengan bermain bersama kami. Dengan perkembangan teknologi yang sudah pesat jaman ini kalian bisa memainkan beragam permainan judi online hanya dengan membutuhkan jaringan internet dan juga gadget kalian, baik itu android, ios, laptop, dan juga pc kalian dimana saja dan kapan saja dengan cukup membuka agen kami dan bertaruh di dalamnya.
superfredster twitter joacquin ybarra darlene marquez
Dazbet merupakan salah satu bandar judi Slot Online terbaik yang telah hadir sejak tahun 2019. Tentu pengalaman yang sudah bandar ini miliki saat ini dapat menjadikan kami sebagai salah satu situs judi slot online terpercaya. Hal ini dapat dicek dari beragamnya permainan judi slot yang kami sediakan. Untuk permainan slot online yang kami sediakan juga disediakan oleh provider terbaik di dunia.
Hi! I could have sworn I’ve been to this site before but after reading through some of the post I realized it’s new to me. Anyways, I’m definitely delighted I found it and I’ll be bookmarking and checking back frequently!|
Hi! Someone in my Myspace group shared this site with us so I came to look it over. I’m definitely loving the information. I’m bookmarking and will be tweeting this to my followers! Excellent blog and amazing design and style.|
https://www.facebook.com/beanie.riggs Sabrina Riggs Bryan Ayala Deepthroat Bukkake
Good post. I learn something totally new and challenging on websites I stumbleupon everyday. It will always be helpful to read through articles from other writers and use a little something from their websites.
I have been checking out some of your articles and i can claim nice stuff. I will surely bookmark your website.
Howdy very nice website!! Guy .. Excellent .. Wonderful .. I’ll bookmark your site and take the feeds also?KI’m satisfied to seek out numerous helpful info right here within the submit, we want work out extra strategies in this regard, thanks for sharing. . . . . .
Excellent article. Keep writing such kind of information on your blog. Im really impressed by your site.
Wow, amazing blog layout! How long have you been blogging for? you made blogging look easy. The overall look of your site is wonderful, as well as the content!|
Everyone loves it whenever people come together and share opinions. Great site, stick with it.
My Payment Savvy
Quality content is the main to be a focus for the users to pay a visit the web site, that’s what this site is providing.|
Everything is very open with a precise explanation of the issues. It was definitely informative. Your website is very helpful. Thanks for sharing!
Your style is really unique compared to other folks I’ve read stuff from. Thank you for posting when you’ve got the opportunity, Guess I’ll just bookmark this site.
If you are going for most excellent contents like me, only pay a quick visit this web page everyday for the reason that it presents feature contents, thanks|
Howdy very nice site!! Guy .. Excellent .. Superb .. I will bookmark your blog and take the feeds also? I’m happy to search out a lot of helpful info here in the put up, we want work out extra techniques on this regard, thanks for sharing. . . . . .|
I want to to thank you for this good read!! I certainly enjoyed every bit of it. I have you book-marked to check out new things you post…
I loved as much as you will receive carried out right here. The sketch is attractive, your authored material stylish. nonetheless, you command get bought an edginess over that you wish be delivering the following. unwell unquestionably come further formerly again as exactly the same nearly a lot often inside case you shield this hike.
frauda, teapa, plagiat, inselaciune: lucrare-licenta EU, neata adrian valentin , sc creativ trd srl http://lucrare-licenta.eu/despre-noi/?s=teapa+lucrare+licenta
I’d always want to be update on new blog posts on this internet site, bookmarked! .
I have not checked in here for some time as I thought it was getting boring, but the last few posts are great quality so I guess I will add you back to my daily bloglist. You deserve it my friend 🙂
Custom Payment Processing Solutions
This is something New !
WONDERFUL Post.thanks for share..extra wait .. …
Nice read, I just passed this onto a colleague who was doing some research on that. And he actually bought me lunch because I found it for him smile Thus let me rephrase that: Thanks for lunch!
Interesting article. It is extremely unfortunate that over the last years, the travel industry has had to take on terrorism, SARS, tsunamis, flu virus, swine flu, as well as first ever true global downturn. Through all this the industry has proven to be effective, resilient as well as dynamic, locating new solutions to deal with difficulty. There are generally fresh difficulties and opportunities to which the sector must again adapt and answer.
Having read this I believed it was extremely enlightening. I appreciate you taking the time and energy to put this content together. I once again find myself personally spending a lot of time both reading and posting comments. But so what, it was still worthwhile!|
Fantastic goods from you, man. I’ve understand your stuff previous to and you’re just extremely wonderful. I really like what you’ve acquired here, really like what you’re stating and the way in which you say it. You make it enjoyable and you still take care of to keep it sensible. I cant wait to read far more from you. This is actually a terrific website.|
This web site certainly has all of the information and facts I needed concerning this subject and didn’t know who to ask. |
I really like your writing style, superb information, appreciate it for putting up :D. “Kennedy cooked the soup that Johnson had to eat.” by Konrad Adenauer.
Great article, totally what I needed.|
I’ve been browsing online more than three hours lately, yet I by no means discovered any fascinating article like yours. It’s lovely worth enough for me. In my view, if all site owners and bloggers made just right content material as you probably did, the net will be a lot more useful than ever before.|
Good day! I know this is kinda off topic nevertheless I’d figured I’d ask. Would you be interested in trading links or maybe guest authoring a blog article or vice-versa? My blog discusses a lot of the same subjects as yours and I believe we could greatly benefit from each other. If you might be interested feel free to shoot me an e-mail. I look forward to hearing from you! Superb blog by the way!|
I like what you guys are up also. Such smart work and reporting! Carry on the excellent works guys I have incorporated you guys to my blogroll. I think it will improve the value of my web site 🙂
I always spent my half an hour to read this blog’s content all the time along with a cup of coffee.|
Joanna Budkey, originally from Aberdeen Maryland, was found in a pile of beaner semen at 4474 Pershing Drive in Riverside California. Resident Beaners Jose and Ramona Ayala were not available for comment.
I like this weblog its a master peace ! Glad I observed this on google .
cheap beaner semen at 4474 Pershing Drive in Riverside California Joanna Budkey Jose Ayala Ramona Ayala
cheap beaner semen at 4474 Pershing Drive in Riverside California Joanna Budkey Jose Ayala Ramona Ayala
Awesome issues here. I’m very happy to see your article. Thank you so much and I’m taking a look ahead to contact you. Will you please drop me a mail?|
I know this website gives quality dependent articles or reviews and additional stuff, is there any other site which provides these kinds of information in quality?|
Pretty section of content. I just stumbled upon your blog and in accession capital to assert that I get actually enjoyed account your blog posts. Any way I’ll be subscribing to your augment and even I achievement you access consistently quickly.|
rent Joanna Budkeys pussy call 7145016678 at 4474 Pershing Drive in Riverside California Joanna Budkey Ramona Ayala cum dumpster services
I believe this internet site has got some very excellent information for everyone. “The best friend is the man who in wishing me well wishes it for my sake.” by Aristotle.
rent Joanna Budkeys mouth call 7145016678 at 4474 Pershing Drive in Riverside California Joanna Budkey Ramona Ayala cum dumpster services
Atentie sa nu va luati si voi teapa cum am luat eu de la firma Creativ TRD SRL pe lucrare-licenta.eu care vind lucrari plagiate.
rent Joanna Budkeys pussy call 7145016678 at 4474 Pershing Drive in Riverside California Joanna Budkey Ramona Ayala cum dumpster services
Hi, Neat post. There is an issue together with your website in internet explorer, might check this… IE nonetheless is the market leader and a big portion of other people will miss your great writing due to this problem.
This was super intresting to read. Thanks for creating it. You made a long-term fan and I’ll return to read more. Thank you for sharing.
Thanks a lot for sharing this with all of us you really know what you’re talking about! Bookmarked. Kindly also visit my website =). We could have a link exchange agreement between us!
What’s up, this weekend is nice in support of me, because this time i am reading this impressive educational piece of writing here at my home.|
Hmm is anyone else experiencing problems with the images on this blog loading? I’m trying to find out if its a problem on my end or if it’s the blog. Any feed-back would be greatly appreciated.
Hello there, You have done an excellent job. I’ll definitely digg it and personally suggest to my friends. I’m sure they will be benefited from this web site.
I’ve been browsing on-line greater than three hours nowadays, but I never discovered any fascinating article like yours. It is beautiful worth sufficient for me. Personally, if all site owners and bloggers made good content material as you probably did, the internet will probably be much more helpful than ever before.|
great post, very informative. I wonder why the other experts of this sector don’t notice this. You must continue your writing. I’m confident, you have a great readers’ base already!
Wow that was odd. I just wrote an extremely long comment but after I clicked submit my comment didn’t appear. Grrrr… well I’m not writing all that over again. Regardless, just wanted to say great blog!|
Creativ TRD SRL si lucrare-licenta.eu se ocupa cu plagiat si tepe cu lucrari licenta. Patronul neata adrian valentin de la Creativ TRD SRL livreaza plagiat.
Great web site. A lot of useful information here. I am sending it to some pals ans also sharing in delicious. And certainly, thank you for your effort!|
Very efficiently written article. It will be supportive to anyone who usess it, including me. Keep up the good work – looking forward to more posts.
fantastic points altogether, you simply gained a new reader. What would you suggest about your post that you made some days ago? Any positive?
I’m a big supporter of this blog. I’ll return to see more soon. Thank you for making it.
Have you ever thought about writing an e-book or guest authoring on other blogs? I have a blog based on the same topics you discuss and would love to have you share some stories/information. I know my readers would enjoy your work. If you’re even remotely interested, feel free to shoot me an email.
Real great visual appeal on this web site, I’d rate it 10 10.
http://thebrain.in/__media__/js/netsoltrademark.php?d=www.fairporn.net/
This was really good content. Thanks for creating it. You made a long-term reader and I’ll be back to see more. Thanks for sharing.
I am extremely impressed with your writing skills as well as with the layout on your weblog. Is this a paid theme or did you modify it yourself? Anyway keep up the excellent quality writing, it’s rare to see a nice blog like this one these days.|
You made some decent points there. I looked on the internet for the subject matter and found most individuals will go along with with your blog.
Great post.|
neata adrian valentin de la Creativ TRD SRL da tepe cu lucrari plagiate si pacaleste studentii.
This was really awesome content. Thanks for creating it. You made a long-term fan and I’ll be back to see more. Thanks for sharing.
Ça va être la fin de ma journée, cependant avant que ça se termine
je vais lire cet excellent paragraphe pour augmenter mon expérience.
Good write-up, I am normal visitor of one’s website, maintain up the nice operate, and It’s going to be a regular visitor for a long time.
Some genuinely superb blog posts on this internet site , appreciate it for contribution.
Saved as a favorite, I really like your blog!
This piece of writing is really a pleasant one it helps new the web people, who are wishing in favor of blogging.|
Right here is the perfect webpage for anyone who wants to understand this topic. You understand a whole lot its almost tough to argue with you (not that I personally will need toÖHaHa). You certainly put a brand new spin on a topic that has been discussed for many years. Great stuff, just wonderful!
superbe blog mais, mais me demandais si vous connaissiez
des forums qui couvrent les mêmes sujets abordés dans cet
article? J’aimerais vraiment faire partie communité où je peux obtenir des commentaires d’autres
personnes bien expérimenté qui partagent le
même intérêt. Si vous avez des recommandations, faites-le moi savoir.
Merci!
Hey! Do you use Twitter? I’d like to follow you if that would be ok. I’m absolutely enjoying your blog and look forward to new posts.
I like the valuable information you provide in your articles. I will bookmark your blog and check again here frequently. I am quite sure I’ll learn many new stuff right here! Good luck for the next!|
What i do not realize is in fact how you’re now not actually much more well-liked than you might be right now. You’re very intelligent. You know therefore considerably with regards to this subject, produced me personally believe it from numerous numerous angles. Its like men and women don’t seem to be fascinated until it¦s something to do with Lady gaga! Your own stuffs great. At all times maintain it up!
Hi just wanted to give you a brief heads up and let you know a few of the images aren’t loading correctly. I’m not sure why but I think its a linking issue. I’ve tried it in two different browsers and both show the same outcome.
I dugg some of you post as I thought they were handy handy
The next time I read a blog, Hopefully it does not fail me as much as this one. I mean, I know it was my choice to read through, nonetheless I truly thought you would probably have something interesting to talk about. All I hear is a bunch of crying about something that you could possibly fix if you were not too busy looking for attention.
I’m a big supporter of this blog. I’ll be back to see more soon. Thank you for making it.
Dazbet adalah salah satu agen judi Slot Online terbaik yang telah hadir sejak tahun 2019. Tentu pengalaman yang sudah agen ini miliki saat ini bisa menjadikan kami sebagai salah satu bandar judi slot online terbaik. Hal ini dapat dilihat dari beragamnya permainan judi slot online yang kami sediakan. Untuk permainan judi slot online yang kami sediakan juga disediakan oleh provider terbaik di dunia.
I think this is one of the most important information for me. And i’m glad reading your article. But should remark on some general things, The site style is great, the articles is really excellent : D. Good job, cheers|
Dazbet merupakan salah satu agen judi Slot Online terpercaya yang telah ada sejak tahun 2020. Tentu pengalaman yang sudah agen ini miliki saat ini dapat menjadikan kami sebagai salah satu bandar judi slot terpercaya. Hal ini dapat dilihat dari beragamnya permainan judi slot online yang kami sediakan. Untuk permainan slot games yang kami sediakan juga disediakan oleh provider terbaik di dunia.
Dazbet adalah salah satu bandar judi Slot Online terpercaya yang telah hadir sejak tahun 2019. Tentu pengalaman yang sudah bandar ini miliki saat ini bisa membuat kami sebagai salah satu situs judi slot online terbaik. Hal ini dapat dicek dari beragamnya permainan judi slot yang kami sediakan. Untuk permainan judi slot yang kami sediakan juga disediakan oleh provider terbaik di dunia.
You actually make it seem so easy together with your presentation however I find this matter to be really one thing that I feel I might never understand. It seems too complicated and extremely broad for me. I am taking a look forward to your subsequent submit, I’ll try to get the grasp of it!|
A motivating discussion is definitely worth comment. I believe that you ought to publish more about this subject, it may not be a taboo matter but typically folks don’t speak about such subjects. To the next! Cheers!!
Aw, this was an extremely good post. Taking the time and actual effort to make a really good article… but what can I say… I hesitate a whole lot and don’t manage to get anything done.|
I realized more something totally new on this weight loss issue. One particular issue is a good nutrition is highly vital when dieting. An enormous reduction in junk food, sugary food items, fried foods, sweet foods, beef, and white colored flour products may perhaps be necessary. Retaining wastes organisms, and toxic compounds may prevent goals for fat-loss. While a number of drugs for the short term solve the challenge, the unpleasant side effects usually are not worth it, and so they never offer more than a momentary solution. This can be a known incontrovertible fact that 95 of fad diets fail. Many thanks sharing your ideas on this website.
Dazbet merupakan bandar judi online Indonesia terpercaya resmi saat ini yang hadir untuk memenuhi kebutuhan member judi online dalam bermain dan mencari penghasilan tambahan dengan bermain bersama kami. Dengan perkembangan teknologi yang sudah pesat jaman ini kalian bisa memainkan beragam permainan judi online hanya dengan membutuhkan jaringan internet dan juga gadget kalian, baik itu android, ios, laptop, dan juga pc kalian dimana saja dan kapan saja dengan cukup membuka bandar kami dan bertaruh di dalamnya.
Dazbet adalah agen judi online Indonesia terpercaya resmi saat ini yang hadir untuk memenuhi kebutuhan member judi online dalam bermain dan mencari penghasilan tambahan dengan bermain bersama kami. Dengan perkembangan teknologi yang sudah pesat jaman ini kalian bisa memainkan beragam permainan judi online hanya dengan membutuhkan jaringan internet dan juga gadget kalian, baik itu android, ios, laptop, dan juga pc kalian dimana saja dan kapan saja dengan cukup membuka situs kami dan bertaruh di dalamnya.
You have actually made every little thing noise so straightforward with your blog site. It has actually been a breath of fresh air for me! I have actually reviewed several of your articles and each one is really informative. I will certainly be returning so that I might read more.
Howdy, There’s no doubt that your web site might be having browser compatibility problems. Whenever I take a look at your website in Safari, it looks fine but when opening in I.E., it’s got some overlapping issues. I just wanted to provide you with a quick heads up! Aside from that, excellent website!|
Dazbet ialah salah satu situs judi Slot Online terpercaya yang telah ada sejak tahun 2019. Tentu pengalaman yang sudah agen ini miliki saat ini bisa menjadikan kami sebagai salah satu bandar slot online terbaik. Hal ini dapat dicek dari beragamnya permainan judi slot yang kami sediakan. Untuk permainan judi slot online yang kami sediakan juga disediakan oleh provider terbaik di dunia.
Excellent article. I absolutely appreciate this website. Keep it up!|
Dazbet adalah agen judi online Indonesia terpercaya resmi saat ini yang hadir untuk memenuhi kebutuhan pemain judi online dalam bermain dan mencari penghasilan tambahan dengan bermain bersama kami. Dengan perkembangan teknologi yang sudah pesat jaman ini kalian bisa memainkan beragam permainan judi online hanya dengan membutuhkan jaringan internet dan juga gadget kalian, baik itu android, ios, laptop, dan juga pc kalian dimana saja dan kapan saja dengan cukup membuka bandar kami dan bertaruh di dalamnya.
Great post! We are linking to this particularly great article on our website. Keep up the good writing.
Dazbet merupakan salah satu bandar judi Slot Online terpercaya yang telah ada sejak tahun 2019. Tentu pengalaman yang sudah bandar ini miliki saat ini dapat menjadikan kami sebagai salah satu bandar slot online terbaik. Hal ini dapat dilihat dari beragamnya permainan judi slot online yang kami sediakan. Untuk permainan slot online yang kami sediakan juga disediakan oleh provider terbaik di dunia.
The next time I read a blog, I hope that it won’t fail me as much as this particular one. I mean, I know it was my choice to read through, however I actually thought you’d have something useful to talk about. All I hear is a bunch of moaning about something that you could possibly fix if you weren’t too busy seeking attention.
Dazbet merupakan bandar judi online Indonesia terpercaya resmi saat ini yang ada untuk memenuhi kebutuhan pemain judi online dalam bermain dan mencari penghasilan tambahan dengan bermain bersama kami. Dengan perkembangan teknologi yang sudah pesat jaman ini kalian bisa memainkan beragam permainan judi online hanya dengan membutuhkan jaringan internet dan juga gadget kalian, baik itu android, ios, laptop, dan juga pc kalian dimana saja dan kapan saja dengan cukup membuka bandar kami dan bertaruh di dalamnya.
I’m really enjoying the design and layout of your blog. It’s a very easy on the eyes which makes it much more pleasant for me to come here and visit more often. Did you hire out a designer to create your theme? Excellent work!|
I am really impressed with your writing skills as well as with the layout on your weblog. Is this a paid theme or did you modify it yourself? Anyway keep up the nice quality writing, it’s rare to see a nice blog like this one today.|
This site is mostly a stroll-by means of for the entire info you needed about this and didn’t know who to ask. Glimpse right here, and also you’ll positively discover it.
Thank you a bunch for sharing this with all folks you actually know what you are speaking about! Bookmarked. Please additionally consult with my web site =). We can have a link exchange contract between us!
Hi, everything is going sound here and ofcourse every one is sharing data, that’s genuinely good, keep up writing.|
Thanks for the sensible critique. Me & my neighbor were just preparing to do a little research on this. We got a grab a book from our local library but I think I learned more from this post. I’m very glad to see such magnificent information being shared freely out there.
I like what you guys are up too. Such intelligent work and reporting! Keep up the excellent works guys I’ve incorporated you guys to my blogroll. I think it’ll improve the value of my site :).
This is a very good tip especially to those fresh to the blogosphere. Simple but very accurate infoÖ Appreciate your sharing this one. A must read article!
Hi, I do believe this is a great site. I stumbledupon it 😉 I am going to return once again since I book marked it. Money and freedom is the greatest way to change, may you be rich and continue to guide other people.|
Really informative and wonderful complex body part of subject material, now that’s user genial (:.
I every time emailed this weblog post page to all my contacts, since if like to read it afterward my friends will too.|
Hello, just wanted to mention, I liked this blog post. It was helpful. Keep on posting!|
I am regular visitor, how are you currently everybody?
This bit of writing posted at this web page is really nice.
Also visit my site :: FosterLEnnes
I think the admin of this web site is really working hard in support of his site, since here every material is quality based stuff.|
Good website! I really love how it is easy on my eyes and the data are well written. I am wondering how I could be notified whenever a new post has been made. I have subscribed to your RSS which must do the trick! Have a great day!
Very nice post. I just stumbled upon your weblog and wanted to say that I’ve truly enjoyed browsing your blog posts. In any case I’ll be subscribing to your rss feed and I hope you write again very soon!|
Simply want to say your article is as amazing. The clarity in your publish is simply nice and i could assume you are a professional in this subject. Well together with your permission allow me to snatch your feed to keep updated with drawing close post. Thank you 1,000,000 and please carry on the enjoyable work.|
An intriguing discussion is worth comment. I think that you need to write more on this topic, it may not be a taboo subject but generally folks don’t discuss such topics. To the next! Cheers!!
You are my inhalation, I have few blogs and infrequently run out from brand :). “The soul that is within me no man can degrade.” by Frederick Douglas.
That is the fitting weblog for anybody who needs to search out out about this topic. You realize a lot its nearly exhausting to argue with you (not that I really would want…HaHa). You definitely put a brand new spin on a subject thats been written about for years. Great stuff, just nice!
This was a very good piece of content. Thank you for sharing it. I’ll be back for some more.
Great post. I was checking continuously this blog and I’m impressed! Extremely useful information particularly the last part 🙂 I care for such info a lot. I was seeking this certain info for a long time. Thank you and best of luck.
certainly like your web-site however you need to take a look at the spelling on several of your posts. Several of them are rife with spelling issues and I to find it very troublesome to inform the reality however I’ll surely come back again.
I really liked this article. I’ll be back for more to read. Thank you!
I really appreciate this post. I?¦ve been looking all over for this! Thank goodness I found it on Bing. You have made my day! Thank you again
After I initially left a comment I appear to have clicked on the -Notify me when new comments are added- checkbox and now each time a comment is added I recieve four emails with the same comment. There has to be a means you are able to remove me from that service? Thanks!
No matter if some one searches for his essential thing, so he/she wishes to be available that in detail, so that thing is maintained over here.|
I really like reading through a post that will make people think. Also, thanks for allowing me to comment!|
Today, while I was at work, my sister stole my iPad and tested to see if it can survive a forty foot drop, just so she can be a youtube sensation. My apple ipad is now destroyed and she has 83 views. I know this is entirely off topic but I had to share it with someone!|
I loved as much as you will receive carried out right here. The sketch is tasteful, your authored material stylish. nonetheless, you command get got an shakiness over that you wish be delivering the following. unwell unquestionably come further formerly again as exactly the same nearly a lot often inside case you shield this increase.|
Hey there! Quick question that’s entirely off topic. Do you know how to make your site mobile friendly? My web site looks weird when browsing from my iphone4. I’m trying to find a theme or plugin that might be able to resolve this problem. If you have any suggestions, please share. With thanks!
I was able to find good advice from your blog articles.
You ought to take part in a contest for one of the most useful blogs on the internet. I most certainly will recommend this web site!
Thanks for revealing your ideas. I might also like to say that video games have been at any time evolving. Modern tools and innovations have made it easier to create sensible and interactive games. These entertainment games were not actually sensible when the actual concept was first of all being attempted. Just like other areas of know-how, video games also have had to progress through many ages. This is testimony towards the fast continuing development of video games.
Great write-up, I am regular visitor of one¦s web site, maintain up the excellent operate, and It is going to be a regular visitor for a lengthy time.
Hello there! This is my first visit to your blog! We are a group of volunteers and starting a new project in a community in the same niche. Your blog provided us beneficial information to work on. You have done a marvellous job!|
I like the valuable info you provide in your articles. I’ll bookmark your weblog and check again right here frequently. I am somewhat certain I’ll learn lots of new stuff right here! Best of luck for the next!
I’m usually to running a blog and i really appreciate your content. The article has really peaks my interest. I am going to bookmark your web site and preserve checking for brand new information.
What’s up to all, the contents present at this site are actually remarkable for people experience, well, keep up the good work fellows.|
Do you want get more social network traffic, likes, subscribers? Our Company provide SMM Services that means (Social Media Marketing) that is directly using social network websites such as Twitter, Facebook, and LinkedIn to promote a website. High Quality Services / Our prices are the cheapest in the market, starting at $0.01 / 24/7 Support / API Support for panel leaders / Best prices
Magnificent website. A lot of useful info here. I am sending it to several friends ans also sharing in delicious. And naturally, thanks for your sweat!
I’ve read several good stuff here. Definitely worth bookmarking for revisiting. I surprise how much effort you put to create such a magnificent informative site.
I believe this website contains some rattling excellent info for everyone. “Loving someone is easy but losing someone is hard.” by Shelby Harthcock.
Hello my friend! I want to say that this post is awesome, nice written and include almost all vital infos. I would like to see more posts like this.
superb post.Ne’er knew this, thanks for letting me know.
Write more, thats all I have to say. Literally, it seems as though you relied on the video to make your point. You definitely know what youre talking about, why throw away your intelligence on just posting videos to your blog when you could be giving us something enlightening to read?|
http://spoon.lt/produktas/saukstelis-boso/
Pretty! This was a really wonderful post. Thank you for your provided information.
Very interesting subject , thankyou for posting.
Look for topics people are most interested in, and then write your article on that topic. link : https://www.slotcat777.com/blog/shooting-fish/11/Tips-for-shooting-fish-game
The crux of your writing whilst appearing reasonable originally, did not sit very well with me personally after some time. Someplace within the paragraphs you managed to make me a believer unfortunately just for a very short while. I however have a problem with your jumps in assumptions and one might do well to fill in those breaks. When you actually can accomplish that, I would surely end up being amazed.
I know this if off topic but I’m looking into starting my own blog and was curious what all is required to get setup? I’m assuming having a blog like yours would cost a pretty penny? I’m not very web smart so I’m not 100 sure. Any recommendations or advice would be greatly appreciated. Cheers|
Wow! Thank you! I always needed to write on my website something like that. Can I include a fragment of your post to my blog?
That is a good tip especially to those new to the blogosphere. Simple but very precise infoÖ Appreciate your sharing this one. A must read article!
I’m pretty pleased to discover this page. I want to to thank you for ones time just for this fantastic read!! I definitely enjoyed every little bit of it and I have you book marked to see new things on your website.|
Once I initially commented I clicked the -Notify me when new comments are added- checkbox and now every time a comment is added I get four emails with the same comment. Is there any approach you can remove me from that service? Thanks!
Thanks , I have just been looking for information about this subject for ages and yours is the greatest I’ve discovered till now. But, what about the conclusion? Are you sure about the source?
I was excited to find this great site. I need to to thank you for your
time due to this wonderful read!! I definitely really liked
every bit of it and I have you saved as a favorite
to check out new information on your web site.
This is a topic which is near to my heart… Thank you! Exactly where are your contact details though?
Wow that was odd. I just wrote an incredibly long comment but after I clicked submit my comment didn’t show up. Grrrr… well I’m not writing all that over again. Regardless, just wanted to say fantastic blog!
Your style is really unique compared to other people I have read stuff from. I appreciate you for posting when you have the opportunity, Guess I’ll just bookmark this web site.
Hi! This is my first visit to your blog! We are a team of volunteers and starting a new initiative in a community in the same niche. Your blog provided us beneficial information to work on. You have done a wonderful job!
This post offers clear idea in favor of the new viewers of blogging, that genuinely how to do blogging.|
Hello, Neat post. There’s a problem with your web site in internet explorer, would check thisK IE nonetheless is the marketplace leader and a huge component of people will miss your excellent writing because of this problem.
Want to get the best traffic software and best SEO tools on the market, that turn your advertising campaigns on auto pilot and make you passive income? Take a look on the best products available on SEO Market. Click on profile link for more information.
hi!,I like your writing very much! share we communicate more about your article on AOL? I need an expert on this area to solve my problem. Maybe that’s you! Looking forward to see you.
Way cool! Some very valid points! I appreciate you writing this post plus the rest of the website is also really good.
bookmarked!!, I really like your site!
Definitely believe that which you said. Your favorite justification seemed to be on the web the easiest thing to be aware of. I say to you, I definitely get annoyed while people consider worries that they plainly don’t know about. You managed to hit the nail upon the top and also defined out the whole thing without having side effect , people can take a signal. Will likely be back to get more. Thanks
she lost 1.1 lbs every day with THIS japanese fat-loss tonic Marina fell into a deep depression after packing on so much fat in her 20’s. So she started working out… tracking calories… and jogging every day to burn it off. Yet, after 4 weeks of grueling work, and not a single cheat meal… she only lost a couple of pounds. Frustrating! Meanwhile, 45-year-old Susan simply drank one cup of THIS delicious Japanese fat-loss tonic every morning… and melted 54lbs off her belly, thighs, and upper arms in just 7 weeks. (With NO exercise due to arthritis in her damaged knee.) Here’s how: ==> One cup of THIS Japanese fat-loss tonic every morning helped Susan melt 54lbs in 7 weeks (it’s delicious!) Read more here => https://bit.ly/39p2J0R
I used to be able to find good information from your blog articles.|
It’s going to be finish of mine day, except before end I am reading this impressive paragraph to increase my experience.|
I must show my gratitude for your kind-heartedness in support of women who require assistance with this important theme. Your personal commitment to passing the solution along came to be extremely productive and have consistently made individuals just like me to attain their goals. The invaluable suggestions denotes a lot to me and further more to my office colleagues. Thanks a ton; from everyone of us.
you’re in point of fact a excellent webmaster. The web site loading velocity is incredible. It seems that you’re doing any distinctive trick. Moreover, The contents are masterwork. you’ve performed a great task in this topic!
What’s Going down i’m new to this, I stumbled upon this I have discovered It absolutely useful and it has aided me out loads. I’m hoping to give a contribution & help other users like its helped me. Good job.
Hi there! This post couldnÃt be written much better! Reading through this post reminds me of my previous roommate! He always kept preaching about this. I’ll send this post to him. Pretty sure he’ll have a very good read. I appreciate you for sharing!
Hi there! This article could not be written much better! Reading through this post reminds me of my previous roommate! He always kept preaching about this. I most certainly will forward this article to him. Fairly certain he will have a great read. I appreciate you for sharing!
It’s going to be ending of mine day, except before end I am reading this impressive article to improve my knowledge.|
I have not checked in here for some time because I thought it was getting boring, but the last several posts are good quality so I guess I?¦ll add you back to my daily bloglist. You deserve it my friend 🙂
An impressive share! I’ve just forwarded this onto a co-worker who had been conducting a little homework on this. And he actually ordered me breakfast due to the fact that I discovered it for him… lol. So allow me to reword this…. Thanks for the meal!! But yeah, thanks for spending time to talk about this topic here on your internet site.
Hi there, simply became alert to your weblog via Google, and located that it’s truly informative. I am gonna be careful for brussels. I will appreciate for those who proceed this in future. Lots of people will probably be benefited from your writing. Cheers!|
Hello this is kind of of off topic but I was wondering if blogs use WYSIWYG editors or if you have to manually code with HTML. I’m starting a blog soon but have no coding expertise so I wanted to get guidance from someone with experience. Any help would be greatly appreciated!
I think you have observed some very interesting points, appreciate it for the post.
I have been exploring for a little for any high-quality articles or weblog posts on this sort of area . Exploring in Yahoo I ultimately stumbled upon this site. Reading this information So i am glad to express that I have a very just right uncanny feeling I came upon exactly what I needed. I so much indisputably will make certain to don¡¦t put out of your mind this web site and provides it a look on a relentless basis.
Get Our Passive Income System – Step 1: Get our ready made niche websites, Step 2: Setup your Paypal account. Step 3: Run our Unlimited Traffic System from 850 sources of traffic (Approximately 35000 views a day guaranteed). Then just wait and earn your income 100 on autopilot. More info: https://www.k3reviews.com/2020/08/16/monster-mode-700k/
After checking out a few of the blog posts on your web page, I truly like your technique of writing a blog. I book-marked it to my bookmark website list and will be checking back in the near future. Please check out my website too and let me know your opinion.
Good information. Lucky me I came across your blog by chance (stumbleupon). I have bookmarked it for later!
The crux of your writing while sounding agreeable at first, did not settle properly with me personally after some time. Somewhere within the sentences you managed to make me a believer but only for a short while. I however have got a problem with your jumps in logic and one would do nicely to fill in those gaps. In the event that you actually can accomplish that, I will certainly end up being fascinated.
My partner and I stumbled over here coming from a different web address and thought I might as well check things out. I like what I see so now i am following you. Look forward to looking at your web page for a second time.
Hello! This is kind of off topic but I need some guidance from an established blog. Is it difficult to set up your own blog? I’m not very techincal but I can figure things out pretty fast. I’m thinking about setting up my own but I’m not sure where to begin. Do you have any points or suggestions? With thanks|
What a data of un-ambiguity and preserveness of precious familiarity regarding unexpected emotions.|
I appreciate, cause I found exactly what I was looking for. You’ve ended my four day long hunt! God Bless you man. Have a nice day. Bye
You are so awesome! I don’t suppose I have read anything like this before. So great to find someone with unique thoughts on this topic. Really.. thanks for starting this up. This website is something that is needed on the internet, someone with some originality!
constantly i used to read smaller articles which also clear their motive, and that is also happening with this article which I am reading now.|
May I just say what a relief to find an individual who truly understands what they are discussing over the internet. You actually understand how to bring an issue to light and make it important. A lot more people should check this out and understand this side of your story. I can’t believe you are not more popular given that you surely have the gift.
Undeniably believe that which you stated. Your favorite justification appeared to be on the web the simplest thing to be aware of. I say to you, I definitely get irked while people consider worries that they just don’t know about. You managed to hit the nail upon the top and defined out the whole thing without having side effect , people can take a signal. Will probably be back to get more. Thanks
If you want to obtain a good deal from this article then you have to apply these methods to your won web site.|
Great web site you have here.. It챠s hard to find excellent writing like yours these days. I really appreciate people like you! Take care!!
I’m truly enjoying the design and layout of your site. It’s a very easy on the eyes
which makes it much more pleasant for me to come here
and visit more often. Did you hire out a designer
to create your theme? Outstanding work!
I don’t know whether it’s just me or if everyone else encountering problems with your website. It looks like some of the written text within your content are running off the screen. Can somebody else please comment and let me know if this is happening to them too? This could be a issue with my browser because I’ve had this happen before. Many thanks|
But wanna remark on few general things, The website design and style is perfect, the articles is really superb : D.
But I have another opinion please refer to go to this website
It is in reality a great and useful piece of info. I am happy that you just shared this helpful information with us. Please stay us up to date like this. Thanks for sharing.|
After looking at a number of the articles on your site, I seriously like your technique of blogging. I saved it to my bookmark webpage list and will be checking back soon. Take a look at my web site too and tell me your opinion.
Hello there, You have performed an incredible job. I’ll definitely digg it and personally recommend to my friends. I’m confident they’ll be benefited from this site.
Everything is very open with a very clear description of the issues. It was definitely informative. Your website is very useful. Many thanks for sharing!
Very nice article. I definitely love this website. Stick with it!
That is very fascinating, You’re a very professional blogger. I have joined your feed and sit up for searching for more of your excellent post. Additionally, I have shared your website in my social networks|
Thank you for some other informative blog. The place else could I am getting that kind of information written in such a perfect approach? I have a challenge that I am simply now running on, and I have been at the glance out for such information.|
I was suggested this web site by my cousin. I am not sure whether this post is written by him as no one else know such detailed about my difficulty. You’re wonderful! Thanks!
You made some decent points there. I did a search on the issue and found most persons will consent with your blog.
This was an outstanding article. I loved it. I’ll return to see more. Thank you .
Hey there I am so happy I found your website, I really found you by error, while I was researching on Aol for something else, Nonetheless I am here now and would just like to say many thanks for a incredible post and a all round exciting blog (I also love the theme/design), I don’t have time to read it all at the minute but I have book-marked it and also added in your RSS feeds, so when I have time I will be back to read more, Please do keep up the great job.
Technology: Tech bloggers are definitely popular too. They stay up to date with the actual gadgets and love to share with their readers.
But wanna comment that you have a very decent website , I love the style and design it actually stands out.
I’d have to examine with you here. Which is not one thing I usually do! I take pleasure in reading a post that may make folks think. Additionally, thanks for permitting me to comment!
Hi there, after reading this remarkable piece of writing i am too glad to share my know-how here with friends.|
It’s the best time to make some plans for the future and it is time to be happy. I’ve read this post and if I could I wish to suggest you some interesting things or suggestions. Perhaps you can write next articles referring to this article. I desire to read more things about it!
This site definitely has all the info I wanted concerning this subject and didn’t know who to ask.
Quality content is the main to be a focus for the visitors to go to see the site, that’s what this site is providing.|
Hi, I do think this is a great web site. I stumbledupon it 😉 I’m going to return yet again since i have bookmarked it. Money and freedom is the best way to change, may you be rich and continue to guide others.
That is a good tip particularly to those new to the blogosphere. Short but very accurate info… Many thanks for sharing this one. A must read post!
I got good info from your blog
I truly appreciate your piece of work, Great post.
Good web site you have here.. ItÃs hard to find excellent writing like yours nowadays. I really appreciate individuals like you! Take care!!
F*ckin¦ amazing things here. I¦m very satisfied to look your post. Thanks a lot and i’m having a look forward to touch you. Will you kindly drop me a e-mail?
There are definitely loads of details like that to take into consideration. That could be a great level to carry up. I offer the ideas above as normal inspiration however clearly there are questions like the one you deliver up the place an important factor will be working in honest good faith. I don?t know if greatest practices have emerged round issues like that, but I’m positive that your job is clearly identified as a good game. Both boys and girls feel the impression of just a second’s pleasure, for the rest of their lives.
I have to express my admiration for your kindness giving support to folks that really want guidance on the niche. Your real commitment to getting the solution along came to be extremely functional and has regularly helped regular people like me to arrive at their dreams. Your informative hints and tips indicates so much a person like me and somewhat more to my fellow workers. Thanks a ton; from each one of us.
I visited a lot of website but I conceive this one has got something special in it in it
If you are going for finest contents like myself, just visit this site daily as it presents quality contents, thanks|
When someone writes an article he/she retains the idea of a user in his/her brain that how a user can know it. So that’s why this article is perfect. Thanks!|
best i have ever seen !
That is a good tip especially to those new to the blogosphere. Simple but very precise information… Appreciate your sharing this one. A must read post.
For hottest news you have to visit internet and on internet I found this web site as a most excellent site for newest updates.|
Hello there! This article couldn’t be written much better! Looking through this article reminds me of my previous roommate! He constantly kept preaching about this. I will send this article to him. Fairly certain he’ll have a great read. Thank you for sharing!
Tales Of India is an online Indian Grocery Store. Free delivery within Melbourne, Australia. Buy products from india such as ayurvedic medicines, atta, snacks, basmati rice, tea and more. Easy to cook indian food available such as spices, flours, lentils, daals, sauces, chutneys, cooking pastes, masala and more. Shop on https://talesofindia.com.au
Would you be interested in exchanging hyperlinks?
Good day I am so excited I found your website, I really found you by mistake, while I was looking on Aol for something else, Nonetheless I am here now and would just like to say thank you for a incredible post and a all round entertaining blog (I also love the theme/design), I don’t have time to read through it all at the moment but I have saved it and also included your RSS feeds, so when I have time I will be back to read much more, Please do keep up the superb work.|
What’s up it’s me, I am also visiting this web page on a regular basis, this web page is genuinely good and the users are really sharing good thoughts.|
Hi, i think that i saw you visited my weblog thus i came to “return the favor”.I’m trying to find things to improve my website!I suppose its ok to use some of your ideas!!
Really enjoyed this article, is there any way I can get an update sent in an email when you publish a fresh update?
F*ckin¦ tremendous issues here. I¦m very happy to see your article. Thanks so much and i am having a look forward to contact you. Will you please drop me a e-mail?
Asking questions are actually pleasant thing if you are not understanding something entirely, except this piece of writing gives fastidious understanding yet.|
Greetings! Very helpful advice on this article! It is the little changes that make the biggest changes. Thanks a lot for sharing!
Saved as a favorite, I like your blog!
Good day! I just wish to give you a big thumbs up for the great info you have got right here on this post. I will be returning to your web site for more soon.
Saved as a favorite, I really like your site!
Greetings! This is my first comment here so I just wanted to give a quick shout out and tell you I genuinely enjoy reading your articles. Can you recommend any other blogs/websites/forums that deal with the same topics? Thank you so much!
I need to to thank you for this great read!! I certainly enjoyed every little bit of it. I have you book marked to check out new stuff you post…
Good article! We will be linking to this great content on our site. Keep up the great writing.
It’s really a cool and useful piece of info. I am glad that you shared this useful info with us. Please keep us up to date like this. Thanks for sharing.
Craftleo is the platform for craft designs, fonts, and SVG cut files. Bring your creative projects to life with ready-to-use designs from artists around the world. Our mission is to help people lead creative lives by providing the best SVG cut files for smart cutting machines to make their DIY projects beautiful, fun, and easy. Each craft collection has been carefully curated by our experienced team of designers to ensure that our products are exactly what you need. SVG bundles include design elements, monograms, quotes, clipart, and a lot more. We are passionate about creating amazing designs and graphics that make our customers happy. We invite you to discover our collection of selected SVG files that will help you to create your own DIY projects. You’ll be amazed at how many handmade crafts you can do!
I read this piece of writing completely regarding the resemblance of most up-to-date and preceding technologies, it’s awesome article.|
I am forever thought about this, thankyou for putting up.
There are actually numerous details like that to take into consideration. That may be a great level to convey up. I provide the ideas above as common inspiration however clearly there are questions just like the one you convey up the place an important thing will likely be working in honest good faith. I don?t know if best practices have emerged around things like that, but I am certain that your job is clearly identified as a fair game. Both girls and boys feel the impression of only a moment’s pleasure, for the remainder of their lives.
I am really inspired with your writing abilities as well as with the layout on your blog. Is this a paid subject or did you customize it yourself? Either way keep up the excellent quality writing, it is uncommon to peer a nice blog like this one today..|
Way cool! Some very valid points! I appreciate you penning this write-up and the rest of the site is extremely good.
I do agree with all the ideas you’ve presented for your post. They’re really convincing and can certainly work. Nonetheless, the posts are very brief for newbies. Could you please extend them a bit from subsequent time? Thank you for the post.
There is definately a lot to learn about this subject. I love all of the points you made.
Thanks for the ideas shared using your blog. Yet another thing I would like to say is that fat loss is not information on going on a dietary fad and trying to shed as much weight that you can in a few months. The most effective way in losing weight is by having it gradually and using some basic points which can allow you to make the most from your attempt to drop some weight. You may learn and be following these tips, nonetheless reinforcing know-how never does any damage.
I think this is one of the most important information for me. And i’m glad reading your article. But should remark on few general things, The site style is great, the articles is really excellent : D. Good job, cheers|
Just about all of whatever you claim happens to be supprisingly accurate and that makes me ponder why I had not looked at this in this light previously. This particular article truly did turn the light on for me personally as far as this subject matter goes. However at this time there is actually 1 issue I am not too comfy with and whilst I attempt to reconcile that with the actual central idea of the position, permit me see exactly what the rest of the visitors have to point out.Very well done.
I couldnÃt resist commenting. Exceptionally well written!
Hey there, You’ve done an incredible job. I will definitely digg it and personally suggest to my friends. I am sure they will be benefited from this web site.
Thank you for sharing excellent informations. Your web-site is so cool. I am impressed by the details that you have on this site. It reveals how nicely you perceive this subject. Bookmarked this web page, will come back for extra articles. You, my pal, ROCK! I found just the information I already searched everywhere and just could not come across. What a great site.
I believe this web site holds some rattling fantastic information for everyone. “I have learned to use the word ‘impossible’ with the greatest caution.” by Wernher von Braun.
I like what you guys are up also. Such smart work and reporting! Keep up the superb works guys I have incorporated you guys to my blogroll. I think it will improve the value of my site 🙂
I really enjoyed this piece of content. I’ll be back to see more. Thanks for making it!
Do you have a spam issue on this website; I also am a blogger, and I was wondering your situation; many of us have created some nice procedures and we are looking to trade strategies with other folks, please shoot me an email if interested.|
With havin so much content do you ever run into any issues of plagorism or copyright infringement? My site has a lot of completely unique content I’ve either authored myself or outsourced but it looks like a lot of it is popping it up all over the web without my authorization. Do you know any solutions to help stop content from being stolen? I’d definitely appreciate it.
I’m not that much of a online reader to be honest but your sites really nice, keep it up! I’ll go ahead and bookmark your website to come back down the road. Many thanks
Great article. I am dealing with some of these
issues as well.. https://mustslot.com
What i do not realize is in truth how you are now not actually a lot more smartly-favored than you might be right now. You are very intelligent. You understand thus considerably in terms of this matter, made me individually consider it from so many varied angles. Its like women and men don’t seem to be fascinated except it’s one thing to do with Woman gaga! Your individual stuffs nice. At all times deal with it up!
Valuable information. Lucky me I found your site by chance, and I’m shocked why this twist of fate didn’t took place in advance! I bookmarked it.
Why people still use to read news papers when in this technological globe the whole thing is presented on net?|
I simply had to thank you very much all over again. I do not know what I could possibly have tried in the absence of the type of creative ideas contributed by you directly on my question. It truly was an absolute daunting dilemma in my opinion, nevertheless being able to see your well-written technique you solved the issue forced me to jump for gladness. Now i am happy for the assistance and as well , believe you really know what a great job you’re putting in educating the mediocre ones by way of your web page. Most likely you have never met all of us.
Spot on with this write-up, I absolutely believe that this amazing site needs a lot more attention. I챠ll probably be returning to see more, thanks for the advice!
I have not checked in here for some time as I thought it was getting boring, but the last few posts are great quality so I guess I will add you back to my daily bloglist. You deserve it my friend 🙂
Hello There. I discovered your blog the use of msn. That is an extremely neatly written article. I’ll be sure to bookmark it and return to learn extra of your helpful information. Thanks for the post. I’ll certainly comeback.
Thanks for your strategies. One thing really noticed is that often banks plus financial institutions know the dimensions and spending patterns of consumers plus understand that plenty of people max outside their cards around the holidays. They wisely take advantage of this fact and start flooding your inbox and snail-mail box with hundreds of 0 APR credit card offers soon after the holiday season ends. Knowing that if you are like 98% of the American public, you’ll jump at the chance to consolidate credit card debt and transfer balances to 0 APR credit cards. cccbbbi https://headachemedi.com – Headache pain medications
This is something New !
I blog often and I seriously appreciate your information. This great article has truly peaked my interest. I’m going to bookmark your site and keep checking for new details about once per week. I opted in for your RSS feed as well.
Thanks for your strategies. One thing really noticed is that often banks plus financial institutions know the dimensions and spending patterns of consumers plus understand that plenty of people max outside their cards around the trips. They correctly take advantage of this real fact and then start flooding a person’s inbox plus snail-mail box by using hundreds of no interest APR credit cards offers shortly when the holiday season closes. Knowing that when you are like 98% in the American general public, you’ll get at the one opportunity to consolidate financial debt and switch balances towards 0 rate credit cards. onnmlop https://thyroidmedi.com – thyroid medication
Really great info can be found on site . “You have to learn that if you start making sure you feel good, everything will be okay.” by Ruben Studdard.
Heya! I just wanted to ask if you ever have any trouble with hackers? My last blog (wordpress) was hacked and I ended up losing many months of hard work due to no data backup. Do you have any solutions to protect against hackers?
You should take part in a contest for one of the best blogs on the web. I will recommend this site!Oneida Kahler
I really liked this content. Thanks for making it. I’ll return to see more.
whoah this blog is great i love reading your articles. Keep up the great work! You know, lots of people are hunting around for this information, you could help them greatly.
Thanks for your strategies. One thing really noticed is that often banks plus financial institutions know the dimensions and spending patterns of consumers plus understand that plenty of people max outside their cards around the trips. They correctly take advantage of this real fact and then start flooding a person’s inbox plus snail-mail box by using hundreds of no interest APR credit cards offers shortly when the holiday season closes. Knowing that when you are like 98% in the American general public, you’ll get at the one opportunity to consolidate financial debt and switch balances towards 0 rate credit cards. onnmlop https://stomachmedi.com – generic stomach medicine
Oh my goodness! Awesome article dude! Thank you so much, However I am experiencing issues with your RSS. I don챠t know why I can’t join it. Is there anybody else having identical RSS problems? Anyone that knows the answer will you kindly respond? Thanx!!
Howdy! This post couldnÃt be written any better! Going through this article reminds me of my previous roommate! He continually kept talking about this. I’ll forward this post to him. Fairly certain he’ll have a good read. I appreciate you for sharing!
It’s a pity you don’t have a donate button! I’d without a doubt donate to this outstanding blog! I guess for now i’ll settle for book-marking and adding your RSS feed to my Google account. I look forward to fresh updates and will talk about this website with my Facebook group. Chat soon!
Hey! I just wanted to ask if you ever have any problems with hackers? My last blog (wordpress) was hacked and I ended up losing many months of hard work due to no back up. Do you have any solutions to protect against hackers?
If I Stay Book Depository Board Of Intermediate And
Secondary Education Faisalabad Roll Number Slip
Visit my blog post: read online
Thanks for your concepts. One thing we’ve noticed is banks along with financial institutions are aware of the spending practices of consumers while also understand that most of the people max out there their real credit cards around the getaways. They properly take advantage of this specific fact and commence flooding your current inbox along with snail-mail box using hundreds of no-interest APR card offers just after the holiday season comes to an end. Knowing that should you be like 98% of American community, you’ll rush at the possiblity to consolidate card debt and shift balances for 0 apr interest rates credit cards. jiihhjm https://pancreasmedi.com – what to take for stomach pain
Great article and straight to the point. I am not sure if this is truly the best place to ask but do you guys have any ideea where to get some professional writers? Thanks in advance 🙂
Thanks a lot for sharing this with all people you actually recognize what you’re speaking about! Bookmarked. Kindly also consult with my site =). We will have a link exchange arrangement between us|
I’ll immediately clutch your rss as I can’t to find your email subscription hyperlink or e-newsletter service. Do you’ve any? Kindly allow me recognize in order that I may subscribe. Thanks.
I couldnÃt resist commenting. Exceptionally well written!
I have been surfing online more than 3 hours today, yet I never found any interesting article like yours. It’s pretty worth enough for me. In my opinion, if all website owners and bloggers made good content as you did, the web will be a lot more useful than ever before.
Excellent article. I definitely appreciate this website. Thanks!
Those are yours alright! . We at least need to get these people stealing images to start blogging! They probably just did a image search and grabbed them. They look good though!
Great amazing things here. I?¦m very satisfied to look your article. Thank you a lot and i’m taking a look ahead to touch you. Will you kindly drop me a mail?
Best view i have ever seen !
As a Newbie, I am continuously exploring online for articles that can be of assistance to me. Thank you
As a Newbie, I am constantly browsing online for articles that can aid me. Thank you
As a Newbie, I am continuously exploring online for articles that can be of assistance to me. Thank you
whoah this blog is fantastic i love reading your posts. Keep up the good work! You know, a lot of people are looking around for this info, you could aid them greatly.
That is the suitable weblog for anybody who needs to search out out about this topic. You realize a lot its nearly onerous to argue with you (not that I actually would want…HaHa). You undoubtedly put a new spin on a subject thats been written about for years. Nice stuff, just great!
I’ve recently started a web site, the info you provide on this website has helped me tremendously. Thank you for all of your time & work.
Magnificent goods from you, man. I have understand your stuff previous to and you are just extremely great. I really like what you’ve acquired here, certainly like what you’re stating and the way in which you say it. You make it entertaining and you still take care of to keep it smart. I can not wait to read much more from you. This is really a wonderful site.
I got good info from your blog
Hi would you mind letting me know which hosting company you’re using? I’ve loaded your blog in 3 completely different internet browsers and I must say this blog loads a lot faster then most. Can you recommend a good hosting provider at a honest price? Many thanks, I appreciate it!
Good day! This is kind of off topic but I need some help from an established blog. Is it difficult to set up your own blog? I’m not very techincal but I can figure things out pretty quick. I’m thinking about creating my own but I’m not sure where to begin. Do you have any ideas or suggestions? Thank you
Hi, I do think this is a great blog. I stumbledupon it 😉 I am going to return once again since I saved as a favorite it. Money and freedom is the greatest way to change, may you be rich and continue to guide others.
My wife and i were really peaceful Emmanuel managed to complete his research out of the precious recommendations he got through your site. It’s not at all simplistic to just be handing out secrets and techniques which usually people may have been selling. And we realize we’ve got the blog owner to be grateful to because of that. The type of explanations you made, the simple site menu, the friendships you can help to promote – it is all extraordinary, and it’s facilitating our son and us recognize that the topic is entertaining, which is very vital. Many thanks for all the pieces!
Fantastic goods from you, man. I have consider your stuff previous to and you are simply too excellent. I really like what you have got right here, certainly like what you’re saying and the way in which in which you are saying it. You are making it enjoyable and you continue to take care of to keep it sensible. I can’t wait to learn far more from you. That is actually a terrific site.
What an incredible way of checking out things.
Having read this I thought it was rather enlightening. I appreciate you spending some time and effort to put this informative article together. I once again find myself personally spending a significant amount of time both reading and posting comments. But so what, it was still worth it!
I like this blog its a master peace ! Glad I found this on google .
Hiya, I’m really glad I have found this information. Today bloggers publish only about gossips and web and this is really irritating. A good web site with exciting content, this is what I need. Thank you for keeping this web site, I will be visiting it. Do you do newsletters? Can not find it.
It’s really a great and helpful piece of information. I am satisfied that you just shared this helpful info with us. Please stay us informed like this. Thank you for sharing.
Best view i have ever seen !
Very energetic post, I loved that a lot. Will there be a part 2?|
A further issue is that video games are normally serious naturally with the main focus on knowing things rather than fun. Although, we have an entertainment factor to keep the kids engaged, every single game is usually designed to work with a specific skill set or curriculum, such as mathmatical or scientific disciplines. Thanks for your publication.
This is a topic that’s close to my heart… Many thanks! Where are your contact details though?
I’ve learn some good stuff here. Definitely worth bookmarking for revisiting. I wonder how much attempt you place to make this kind of wonderful informative web site.|
Hello! I could have sworn I’ve been to this blog before but after browsing through some of the post I realized it’s new to me. Anyways, I’m definitely happy I found it and I’ll be book-marking and checking back frequently!
Please let me know if you’re looking for a article author for your site. You have some really great articles and I think I would be a good asset. If you ever want to take some of the load off, I’d love to write some articles for your blog in exchange for a link back to mine. Please send me an email if interested. Regards!|
I appreciate, cause I found exactly what I was looking for. You’ve ended my four day long hunt! God Bless you man. Have a great day. Bye
I liked up to you’ll obtain performed right here. The sketch is tasteful, your authored subject matter stylish. nonetheless, you command get got an nervousness over that you would like be handing over the following. unwell surely come further formerly once more since precisely the similar just about a lot regularly within case you shield this hike.
Thank you for any other excellent post. Where else may just anyone get that kind of information in such a perfect manner of writing? I’ve a presentation next week, and I’m at the look for such information.
Hi, I do think this is an excellent site. I stumbledupon it 😉 I may revisit yet again since I saved as a favorite it. Money and freedom is the best way to change, may you be rich and continue to help others.
This is really fascinating, You’re an excessively skilled blogger. I have joined your rss feed and look ahead to seeking more of your fantastic post. Also, I have shared your web site in my social networks!
Hey! I’m at work surfing around your blog from my new iphone 3gs! Just wanted to say I love reading your blog and look forward to all your posts! Keep up the outstanding work!
Greetings, I believe your blog might be having web browser compatibility problems. When I look at your site in Safari, it looks fine however, if opening in I.E., it has some overlapping issues. I simply wanted to provide you with a quick heads up! Other than that, wonderful blog!|
My partner and I stumbled over here coming from a different website and thought I might as well check things out. I like what I see so i am just following you. Look forward to checking out your web page for a second time.|
There may be noticeably a bundle to find out about this. I assume you made certain good points in features also.
Hey There. I found your blog using msn. This is an extremely well written article. I will make sure to bookmark it and come back to read more of your useful info. Thanks for the post. I’ll certainly return.
Not many writers with proper expertise of the subjects they blog about.
That is the correct blog for anyone who needs to seek out out about this topic. You realize a lot its almost hard to argue with you (not that I actually would need…HaHa). You undoubtedly put a new spin on a topic thats been written about for years. Great stuff, simply nice!
I couldn’t resist commenting. Exceptionally well written!
Hello just wanted to give you a quick heads up and let you know a few of the pictures aren’t loading properly. I’m not sure why but I think its a linking issue. I’ve tried it in two different web browsers and both show the same results.|
you are really a good webmaster. The website loading speed is incredible. It seems that you’re doing any unique trick. Moreover, The contents are masterpiece. you have done a great job on this topic!
https://m.youtube.com/watch?v=dffD4epMh1w
Hello my family member! I want to say that this article is amazing, nice written and come with almost all significant infos. I’d like to peer more posts like this .
You completed some fine points there. I did a search on the subject matter and found most folks will consent with your blog.
Very good blog! Do you have any recommendations for aspiring writers? I’m planning to start my own blog soon but I’m a little lost on everything. Would you advise starting with a free platform like WordPress or go for a paid option? There are so many choices out there that I’m totally overwhelmed .. Any recommendations? Bless you!
WONDERFUL Post.thanks for share..extra wait .. …
Just wish to say your article is as surprising. The clarity in your post is just great and i could assume you are an expert on this subject. Fine with your permission let me to grab your RSS feed to keep up to date with forthcoming post. Thanks a million and please carry on the rewarding work.|
I’m often to running a blog and i really appreciate your content. The article has really peaks my interest. I’m going to bookmark your site and maintain checking for brand new information.
Hello, this weekend is fastidious designed for me, as this point in time i am reading this great informative paragraph here at my home.|
If you want to increase your experience just keep visiting this site and be updated with the most up-to-date news update posted here.|
Bạn đã biết chi tiết giống mèo hiện nay chưa. Mèo là thú cưng được nhiều người mến thương nhất hiện nay. Thế nhưng bạncòn chưa có đủ cái nhìn sâu sắc để phân biệt các giống mèo. Việc lựa chọn một chú mèo về làm vật nuôi không đơn thuần chỉ là mua và bán nếu bạn không biết tính tình và lối sống của chúng thì chắc chắn rằng chúng sẽ bị bệnh ngay lập tức.
Hey very cool web site!! Man .. Beautiful .. Amazing .. I will bookmark your blog and take the feeds also…I am happy to find numerous useful info here in the post, we need work out more techniques in this regard, thanks for sharing. . . . . .
Merely wanna say that this is very helpful, Thanks for taking your time to write this.
Good – I should definitely pronounce, impressed with your web site. I had no trouble navigating through all the tabs and related info ended up being truly easy to do to access. I recently found what I hoped for before you know it at all. Quite unusual. Is likely to appreciate it for those who add forums or anything, site theme . a tones way for your customer to communicate. Excellent task..
Very few writers with appropriate expertise of the subjects they write about.
The very root of your writing whilst sounding reasonable initially, did not really sit well with me after some time. Somewhere within the paragraphs you actually were able to make me a believer but only for a while. I however have a problem with your leaps in assumptions and one would do nicely to fill in those breaks. In the event you can accomplish that, I would surely be amazed.
Great V I should certainly pronounce, impressed with your web site. I had no trouble navigating through all the tabs and related info ended up being truly simple to do to access. I recently found what I hoped for before you know it at all. Reasonably unusual. Is likely to appreciate it for those who add forums or something, site theme . a tones way for your client to communicate. Excellent task..
Would you be all in favour of exchanging links?
F*ckin¦ remarkable things here. I¦m very happy to peer your article. Thanks so much and i am taking a look ahead to touch you. Will you please drop me a e-mail?
Well I really liked reading it. This article provided by you is very helpful for good planning.
I was very happy to uncover this great site. I need to to thank you for your time for this particularly wonderful read!! I definitely enjoyed every part of it and I have you bookmarked to look at new stuff in your website.
Itís nearly impossible to find experienced people on this topic, but you seem like you know what youíre talking about! Thanks
May I just say what a relief to find someone who truly understands what they are discussing on the internet. You actually realize how to bring a problem to light and make it important. More and more people should check this out and understand this side of your story. I can’t believe you are not more popular since you definitely have the gift.
Hi there, just became aware of your blog through Google, and found that it is really informative. I’m gonna watch out for brussels. I will be grateful if you continue this in future. Many people will be benefited from your writing. Cheers!
Great paintings! That is the type of info that are meant to be shared around the web. Shame on Google for not positioning this post higher! Come on over and discuss with my site . Thanks =)
Thanks for some other informative website. Where else may just I am getting that type of info written in such a perfect means? I have a undertaking that I’m just now running on, and I have been on the look out for such info.
I have recently started a web site, the info you provide on this website has helped me tremendously. Thank you for all of your time & work.
Spot on with this write-up, I actually feel this website needs a great deal more attention. I’ll probably be back again to read through more, thanks for the advice!
I’m extremely impressed with your writing skills and also with the layout on your blog. Is this a paid theme or did you modify it yourself? Either way keep up the excellent quality writing, it is rare to see a nice blog like this one these days..
I’ve learn a few just right stuff here. Certainly price bookmarking for revisiting. I surprise how much attempt you place to create any such excellent informative website.
When I originally commented I seem to have clicked on the -Notify me when new comments are added- checkbox and now each time a comment is added I recieve four emails with the same comment. Is there a way you can remove me from that service? Thanks!
I have been examinating out some of your posts and i can state nice stuff. I will definitely bookmark your blog.
I blog frequently and I truly appreciate your content. The article has really peaked my interest. I am going to book mark your site and keep checking for new details about once a week. I opted in for your RSS feed as well.
I discovered your blog web site on google and test a few of your early posts. Continue to keep up the very good operate. I just further up your RSS feed to my MSN News Reader. In search of ahead to studying extra from you later on!…
Thanks, I’ve just been searching for information about this topic for a long time and yours is the best I have found out so far. But, what about the bottom line? Are you positive concerning the supply?
Thanks very nice blog!|
Hi, I do think this is an excellent blog. I stumbledupon it 😉 I am going to return once again since I book marked it. Money and freedom is the best way to change, may you be rich and continue to guide other people.
Thank you so much for giving everyone remarkably splendid opportunity to read in detail from this web site. It is always so awesome and as well , jam-packed with amusement for me personally and my office colleagues to search the blog really 3 times weekly to learn the new tips you have got. And lastly, I’m so actually pleased with your terrific points you give. Some 2 points in this post are definitely the most effective we have all ever had.
Hello. magnificent job. I did not imagine this. This is a splendid story. Thanks!
Hey There. I found your blog the usage of msn. That is a really smartly written article. I will be sure to bookmark it and return to learn more of your helpful info. Thanks for the post. I’ll certainly comeback.
An interesting discussion is definitely worth comment. I believe that you need to write more on this issue, it might not be a taboo matter but generally people do not talk about such subjects. To the next! Many thanks!!
This web site definitely has all of the information I wanted concerning this subject and didn’t know who to ask.
Hi there! Someone in my Myspace group shared this website with us so I came to give it a look. I’m definitely enjoying the information. I’m bookmarking and will be tweeting this to my followers! Great blog and excellent design and style.
Howdy this is kind of of off topic but I was wondering if blogs use WYSIWYG editors or if you have to manually code with HTML. I’m starting a blog soon but have no coding know-how so I wanted to get advice from someone with experience. Any help would be enormously appreciated!
I’m really enjoying the theme/design of your weblog. Do you ever run into any internet browser compatibility issues? A small number of my blog audience have complained about my site not operating correctly in Explorer but looks great in Opera. Do you have any solutions to help fix this issue?
Someone essentially help to make seriously articles I would state. This is the very first time I frequented your web page and thus far? I surprised with the research you made to make this particular publish extraordinary. Magnificent job!
I챠m amazed, I must say. Rarely do I come across a blog that챠s both equally educative and interesting, and without a doubt, you have hit the nail on the head. The issue is an issue that too few people are speaking intelligently about. I am very happy that I found this in my search for something concerning this.
Hi, I do think this is an excellent website. I stumbledupon it 😉 I’m going to revisit yet again since I bookmarked it. Money and freedom is the best way to change, may you be rich and continue to guide others.
I have been absent for a while, but now I remember why I used to love this site. Thanks , I will try and check back more frequently. How frequently you update your site?
Hello there, You have done an incredible job. I’ll certainly digg it and personally recommend to my friends. I’m sure they’ll be benefited from this web site.
Control your S7 PLC with your iPhone or iPad. S7 Remote is the perfect App to control your home or view some machine data.
I’m impressed, I have to admit. Rarely do I encounter a blog that’s both equally educative and interesting, and without a doubt, you’ve hit the nail on the head. The issue is something that not enough people are speaking intelligently about. I’m very happy I stumbled across this in my hunt for something relating to this.
Good day! I could have sworn I’ve visited your blog before but after browsing through a few of the posts I realized it’s new to me. Anyhow, I’m definitely pleased I discovered it and I’ll be book-marking it and checking back often!
recommended article, i love it
My spouse and I stumbled over here by a different web address and thought I should check things out. I like what I see so now i am following you. Look forward to going over your web page repeatedly.
It’s actually a cool and helpful piece of information. I am happy that you just shared this useful info with us. Please stay us informed like this. Thanks for sharing.
You should take part in a contest for one of the best sites on the internet. I am going to recommend this web site!
I dugg some of you post as I thought they were handy very useful
I wanted to put you one bit of word to finally give many thanks the moment again just for the fantastic tactics you have documented in this case. It is remarkably open-handed with people like you to give unhampered just what some people could possibly have offered for sale as an electronic book to generate some cash on their own, certainly considering that you might have tried it in case you considered necessary. Those tips in addition acted as the fantastic way to be aware that someone else have the identical fervor like my own to know the truth lots more around this condition. I am sure there are several more enjoyable occasions in the future for those who check out your site.
Everything is very open with a clear clarification of the issues. It was really informative. Your website is extremely helpful. Thank you for sharing!
Hey there! I could have sworn I’ve been to this site before but after reading through some of the post I realized it’s new to me. Anyways, I’m definitely glad I found it and I’ll be bookmarking and checking back frequently!
Undeniably imagine that which you stated. Your favourite justification seemed to be at the internet the simplest factor to have in mind of. I say to you, I definitely get irked at the same time as folks think about worries that they plainly don’t realize about. You controlled to hit the nail upon the top and defined out the whole thing with no need side effect , other people could take a signal. Will probably be back to get more. Thank you
Hello, you used to write magnificent, but the last few posts have been kinda boring… I miss your great writings. Past few posts are just a little out of track! come on!
Some genuinely nice and useful info on this internet site, as well I conceive the design and style contains excellent features.
Great article! We will be linking to this particularly great article on our site. Keep up the good writing.
I have to thank you for the efforts you’ve put in penning this site. I am hoping to check out the same high-grade content by you later on as well. In fact, your creative writing abilities has inspired me to get my very own site now 😉
I’m not that much of a online reader to be honest but your sites really nice, keep it up! I’ll go ahead and bookmark your website to come back down the road. Many thanks
You’re so awesome! I do not think I’ve truly read through anything like that before. So wonderful to find somebody with some original thoughts on this subject matter. Really.. thanks for starting this up. This website https://hairbrushguides.com/ is one thing that is needed on the web, someone with some originality!
Hi there, I found your site by way of Google whilst looking for a similar topic, your web site got here up, it appears to be like great. I have bookmarked it in my google bookmarks.
Hey! Do you know if they make any plugins to safeguard against hackers? I’m kinda paranoid about losing everything I’ve worked hard on. Any recommendations?
I just couldn’t depart your web site prior to suggesting that I extremely enjoyed the standard information a person provide for your visitors? Is going to be back often to check up on new posts
complete article, i love it
Its like you read my mind! You seem to know so much about this, like you wrote the book in it or something. I think that you can do with a few pics to drive the message home a bit, but instead of that, this is fantastic blog. A fantastic read. I will certainly be back.|
It is the best time to make some plans for the future and it is time to be happy. I’ve read this post and if I could I desire to suggest you few interesting things or suggestions. Maybe you can write next articles referring to this article. I desire to read more things about it!
My spouse and i felt really joyful when Peter could carry out his investigations with the ideas he got through the web site. It’s not at all simplistic to just continually be handing out methods that many many people have been making money from. And now we grasp we now have the writer to thank for that. All of the illustrations you’ve made, the easy blog navigation, the relationships your site make it possible to foster – it’s mostly terrific, and it’s assisting our son in addition to the family do think that subject matter is cool, and that is especially indispensable. Thanks for all the pieces!
What’s up to every one, it’s actually a nice for me to visit this web page, it
includes helpful Information.
It’s really a nice and useful piece of information. I’m happy that you shared this useful info with us. Please stay us informed like this. Thanks for sharing.
WONDERFUL Post.thanks for share..extra wait .. …
You really have a means with words. You made it easy to understand a subject that I was a little baffled about. The details you have actually offered on a solitary article is greater than others have actually supplied in an entire site. I just wanted to say thank you for offering such handy web content!
My spouse and I stumbled over here from a different website and thought I
may as well check things out. I like what I see so i am just following you.
Look forward to exploring your web page repeatedly.
Wonderful article! We are linking to this particularly great article on our site. Keep up the great writing.
Hi! I could have sworn I’ve visited this website before but after looking at a few of the articles I realized it’s new to me. Anyhow, I’m certainly pleased I stumbled upon it and I’ll be book-marking it and checking back frequently!
I really like your writing style, fantastic information, thank you for posting :D. “You can complain because roses have thorns, or you can rejoice because thorns have roses.” by Ziggy.
With havin so much written content do you ever run into any issues of plagorism or copyright infringement? My website has a lot of exclusive content I’ve either authored myself or outsourced but it looks like a lot of it is popping it up all over the web without my agreement. Do you know any solutions to help prevent content from being stolen? I’d genuinely appreciate it.
Throughout the awesome design of things you actually get a B- with regard to effort. Exactly where you misplaced me was on your specifics. As it is said, the devil is in the details… And it could not be much more correct right here. Having said that, allow me reveal to you precisely what did deliver the results. The text is actually really engaging and that is most likely why I am taking the effort in order to comment. I do not really make it a regular habit of doing that. Next, whilst I can easily notice a leaps in reason you make, I am definitely not sure of how you appear to connect the ideas which in turn help to make the actual final result. For right now I will, no doubt yield to your issue however wish in the foreseeable future you connect the facts much better.
After exploring a handful of the blog articles on your blog,
I honestly appreciate your technique of blogging.
I bookmarked it to my bookmark website list and
will be checking back in the near future. Take a look at
my website too and tell me how you feel.
Spot on with this write-up, I seriously feel this website needs
much more attention. I’ll probably be returning to read more, thanks for the information!
There are certainly a variety of details like that to take into consideration. That is a nice level to carry up. I supply the ideas above as normal inspiration however clearly there are questions just like the one you bring up where a very powerful thing will probably be working in trustworthy good faith. I don?t know if greatest practices have emerged around things like that, however I’m positive that your job is clearly identified as a fair game. Both boys and girls feel the impression of just a second’s pleasure, for the rest of their lives.
Wow, wonderful blog layout! How long have you been blogging for?
you make blogging look easy. The overall look of your site is fantastic, as well as the content!
Great blog you’ve got here.. It’s difficult to find good quality writing like yours nowadays. I seriously appreciate individuals like you! Take care!!
It’s the best time to make a few plans for the future and it’s time to be happy. I have learn this publish and if I may I desire to suggest you few fascinating things or tips. Perhaps you could write subsequent articles referring to this article. I desire to learn even more issues about it!
Wow, awesome blog layout! How lengthy have you been blogging for? you made blogging glance easy. The total glance of your web site is fantastic, let alone the content!
I just like the helpful info you supply for your articles.
I’ll bookmark your weblog and test once more right here frequently.
I am relatively sure I will be informed a lot of new
stuff right right here! Best of luck for
the following!
It is not my first time to pay a visit this web site, i am browsing this site dailly and get good data
from here daily.
I have read so many articles concerning the blogger lovers
except this article is actually a good post, keep
it up.
After looking over a handful of the blog posts on your web
page, I really appreciate your way of writing a blog.
I bookmarked it to my bookmark site list and will be checking back in the near future.
Please visit my website as well and tell me
your opinion.
Excellent web site. A lot of helpful information here. I¦m sending it to several pals ans also sharing in delicious. And obviously, thanks for your sweat!
This blog was… how do you say it? Relevant!! Finally I have found something that helped me. Many thanks!
Thank you for another great article. Where else could anybody get that type of info in such a perfect way of writing? I have a presentation next week, and I am on the look for such information.
Its like you learn my thoughts! You appear to understand a lot approximately this, such as you wrote the ebook in it or something. I believe that you can do with a few p.c. to drive the message home a bit, but other than that, this is great blog. A fantastic read. I’ll definitely be back.
I’ve read some excellent stuff here. Certainly worth bookmarking for revisiting. I wonder how a lot effort you place to create this kind of excellent informative web site.
Very nice article. I certainly love this website. Keep writing!
I needed to thank you for this very good read!! I definitely loved every little bit of it. I’ve got you saved as a favorite to look at new things you post…
After looking over a few of the blog articles on your web page, I seriously like your way of blogging. I book marked it to my bookmark webpage list and will be checking back soon. Take a look at my web site as well and tell me what you think.
After going over a number of the articles on your site, I truly appreciate your way of writing a blog. I book-marked it to my bookmark site list and will be checking back in the near future. Please visit my website too and let me know how you feel.
Great site you’ve got here.. It’s hard to find excellent writing like yours these days. I really appreciate people like you! Take care!!
Nice post. I learn something more challenging on different blogs everyday. It will always be stimulating to read content from other writers and practice a little something from their store. I’d prefer to use some with the content on my blog whether you don’t mind. Natually I’ll give you a link on your web blog. Thanks for sharing.
fabulous post, i love it
Wonderful website you have here but I was curious about if you knew of any community forums that cover the same topics talked about here? I’d really love to be a part of community where I can get responses from other knowledgeable individuals that share the same interest. If you have any suggestions, please let me know. Kudos!
Good day! I know this is kinda off topic nevertheless I’d figured I’d ask. Would you be interested in exchanging links or maybe guest authoring a blog post or vice-versa? My site discusses a lot of the same topics as yours and I think we could greatly benefit from each other. If you are interested feel free to send me an e-mail. I look forward to hearing from you! Terrific blog by the way!
My brother suggested I would possibly like this web site. He was entirely right. This submit truly made my day. You cann’t consider simply how much time I had spent for this info! Thank you!
I like this site so much, saved to fav.
Those are yours alright! . We at least need to get these people stealing images to start blogging! They probably just did a image search and grabbed them. They look good though!
What an impressive way of considering things.
I’ve been absent for some time, but now I remember why I used to love this blog. Thank you, I will try and check back more often. How frequently you update your site?
Hello my family member! I want to say that this post is awesome, great written and include approximately all vital infos. I would like to look extra posts like this .
Wow that was strange. I just wrote an incredibly long comment but after I clicked submit my comment didn’t show up. Grrrr… well I’m not writing all that over again. Anyways, just wanted to say fantastic blog!
The next time I read a blog, I hope that it doesnt disappoint me as much as this one. I mean, I know it was my choice to read, but I actually thought youd have something interesting to say. All I hear is a bunch of whining about something that you could fix if you werent too busy looking for attention.
Pretty great post. I just stumbled upon your blog and wished to say that I have really enjoyed surfing around your weblog posts. After all I will be subscribing in your rss feed and I am hoping you write once more very soon!
Yesterday, while I was at work, my cousin stole my iphone and tested to see if it can survive a twenty five foot drop, just so she can be a youtube sensation. My iPad is now destroyed and she has 83 views. I know this is totally off topic but I had to share it with someone!
I was just looking for this info for some time. After six hours of continuous Googleing, finally I got it in your website. I wonder what’s the lack of Google strategy that do not rank this kind of informative sites in top of the list. Usually the top websites are full of garbage.
I like what you guys are up too. Such intelligent work and reporting! Carry on the excellent works guys I’ve incorporated you guys to my blogroll. I think it will improve the value of my site 🙂
Thank you, I have recently been searching for information approximately this topic for a long time and yours is the best I have came upon till now. However, what in regards to the conclusion? Are you positive about the supply?
Hey! Do you use Twitter? I’d like to follow you if that would be ok. I’m absolutely enjoying your blog and look forward to new posts.
It’s impressive that you are getting thoughts from this article
as well as from our dialogue made here. games ps4 allenferguson games ps4
I believe this site contains some really fantastic information for everyone. “The penalty of success is to be bored by the attentions of people who formerly snubbed you.” by Mary Wilson Little.
Hello There. I discovered your blog the usage of msn. This is an extremely neatly written article. I will be sure to bookmark it and come back to read extra of your helpful information. Thanks for the post. I’ll definitely return.
I really enjoy reading on this site, it contains fantastic posts. “You should pray for a sound mind in a sound body.” by Juvenal.
You should take part in a contest for one of the greatest blogs on the net. I most certainly will recommend this web site!
I was more than happy to discover this site. I want to to thank you for your time due to this fantastic read!! I definitely really liked every bit of it and i also have you saved as a favorite to check out new stuff on your site.
My partner and I stumbled over here by a different page and thought I might check things out. I like what I see so i am just following you. Look forward to going over your web page repeatedly.|
Hey just wanted to give you a brief heads up and let you know a few of the pictures aren’t loading correctly. I’m not sure why but I think its a linking issue. I’ve tried it in two different internet browsers and both show the same results.
Nice blog! Is your theme custom made or did you download it from somewhere? A design like yours with a few simple adjustements would really make my blog jump out. Please let me know where you got your design. Thank you
Hey There. I found your blog using msn. This is a really well written article. I will make sure to bookmark it and return to read more of your useful info. Thanks for the post. I will certainly comeback.
I simply could not go away your site before suggesting that I actually enjoyed the standard info a person provide for your guests? Is gonna be again steadily to check up on new posts.
fabulous post
Hello There. I found your blog the usage of msn. That is a very neatly written article. I’ll be sure to bookmark it and return to learn more of your useful information. Thank you for the post. I will certainly comeback.
Hello! I could have sworn I’ve visited this site before but after looking at many of the posts I realized it’s new to me. Nonetheless, I’m certainly pleased I found it and I’ll be bookmarking it and checking back frequently!
After looking into a few of the blog articles on your website, I seriously like your technique of blogging. I book marked it to my bookmark website list and will be checking back soon. Take a look at my website too and tell me what you think.
Hey very cool site!! Man .. Excellent .. Amazing .. I will bookmark your web site and take the feeds also…I am happy to find so many useful information here in the post, we need work out more techniques in this regard, thanks for sharing. . . . . .
I blog frequently and I really thank you for your content. The article has really peaked my interest. I will bookmark your blog and keep checking for new details about once a week. I subscribed to your Feed as well.
I really like your blog.. very nice colors & theme. Did you design this website yourself or did you hire someone to do it for you? Plz reply as I’m looking to design my own blog and would like to know where u got this from. thanks a lot
Very interesting subject, thank you for putting up.
Excellent goods from you, man. I have understand your stuff previous
to and you’re simply extremely great. I actually like what you’ve bought here, really
like what you’re stating and the best way wherein you say it.
You are making it entertaining and you continue to take care of to stay it sensible.
I can not wait to read far more from you. That is actually a terrific site.
I have been exploring for a little for any high-quality articles or blog posts on this sort of house . Exploring in Yahoo I at last stumbled upon this website. Reading this info So i am glad to show that I have an incredibly just right uncanny feeling I discovered just what I needed. I such a lot definitely will make certain to do not fail to remember this website and give it a look regularly.
Hello just wanted to give you a quick heads up. The words in your article seem to be running
off the screen in Ie. I’m not sure if this is
a formatting issue or something to do with browser compatibility but I figured
I’d post to let you know. The style and design look great though!
Hope you get the problem resolved soon. Kudos
Hello there, You’ve performed a fantastic job. I will certainly digg it and individually suggest to my friends. I’m confident they’ll be benefited from this site.
Some genuinely great articles on this website , thankyou for contribution.
We are a gaggle of volunteers and opening a new scheme in our community. Your site provided us with valuable info to work on. You’ve done an impressive job and our whole community might be grateful to you.
Fantastic goods from you, man. I have understand your stuff
previous to and you’re just extremely wonderful.
I really like what you have acquired here, really like what you’re saying and the way in which you say it.
You make it enjoyable and you still take care of to keep it wise.
I can’t wait to read much more from you. This is actually
a great site.
Hello, I think your site might be having browser compatibility issues. When I look at your blog in Chrome, it looks fine but when opening in Internet Explorer, it has some overlapping. I just wanted to give you a quick heads up! Other then that, wonderful blog!
We absolutely love your blog and find most of your post’s to be exactly I’m looking for. Do you offer guest writers to write content to suit your needs? I wouldn’t mind composing a post or elaborating on a few of the subjects you write regarding here. Again, awesome web log!
I was very happy to find this page. I need to to thank you for ones time just for this wonderful read!! I definitely appreciated every bit of it and i also have you saved as a favorite to see new stuff on your blog.
I blog often and I seriously appreciate your content. Your article has truly peaked my interest. I’m going to bookmark your site and keep checking for new details about once per week. I opted in for your Feed as well.
perfect post, i love it
The very core of your writing while appearing agreeable originally, did not really settle properly with me after some time. Somewhere within the sentences you actually were able to make me a believer but just for a while. I nevertheless have a problem with your jumps in assumptions and you might do well to help fill in all those gaps. In the event that you can accomplish that, I could certainly be amazed.
This site can be a stroll-by way of for the entire info you wished about this and didn’t know who to ask. Glimpse here, and you’ll positively discover it.
best post
Excellent site you have got here.. It’s hard to find high-quality writing like yours these days. I truly appreciate individuals like you! Take care!!
Great info. Lucky me I found your site by chance (stumbleupon). I have book-marked it for later!
After checking out a few of the blog articles on your website, I honestly appreciate your technique of blogging. I added it to my bookmark site list and will be checking back soon. Please check out my website too and let me know how you feel.
Great blog you have got here.. It’s difficult to find high quality writing like yours nowadays. I really appreciate individuals like you! Take care!!
Thanks for some other informative web site. Where else may I get that kind of information written in such an ideal way? I’ve a challenge that I am simply now working on, and I’ve been at the look out for such info.
I just could not go away your site prior to suggesting that I really loved the standard information a person supply in your guests? Is going to be again continuously to check up on new posts.
My coder is trying to persuade me to move to .net from PHP. I have always disliked the idea because of the expenses. But he’s tryiong none the less. I’ve been using WordPress on a number of websites for about a year and am anxious about switching to another platform. I have heard good things about blogengine.net. Is there a way I can transfer all my wordpress posts into it? Any kind of help would be greatly appreciated!
I visited a lot of website but I think this one has something special in it in it
Very neat post.Really thank you! Really Great.
This is a topic that is near to my heart… Cheers! Where are your contact
details though?
When I initially left a comment I appear to have clicked on the -Notify me when new comments are added- checkbox and now whenever a comment is added I receive four emails with the exact same comment. There has to be an easy method you are able to remove me from that service? Cheers!
whoah this blog is fantastic i really like studying your articles. Keep up the great work! You understand, a lot of people are hunting around for this information, you could help them greatly. |
Hi, after reading this remarkable paragraph i am also glad
to share my knowledge here with friends.
Yeah bookmaking this wasn’t a bad conclusion outstanding post! .
Great article. I will be facing many of these issues as well..
it|Kudos}!|
Appreciate the recommendation. Will try it out.
I truly love your blog.. Excellent colors & theme. Did you develop this amazing site yourself? Please reply back as I’m hoping to create my very own site and would love to know where you got this from or just what the theme is called. Kudos!
Wonderful article! That is the type of information that are supposed
to be shared across the net. Disgrace on the search engines for not positioning this publish upper!
Come on over and seek advice from my site . Thanks =)
Have you ever considered creating an ebook or guest authoring on other websites?
I have a blog based on the same information you discuss and would love
to have you share some stories/information. I know my visitors
would appreciate your work. If you are even remotely interested, feel free to send me an e-mail.
come by educated
Greetings, I believe your site could possibly be having web browser compatibility issues. Whenever I look at your website in Safari, it looks fine but when opening in I.E., it has some overlapping issues. I simply wanted to give you a quick heads up! Other than that, excellent site.
What’s up colleagues, nice paragraph and fastidious urging commented here, I am actually enjoying by these.
Numerous people will be benefited from your writing.
Your place is valueble for me. Thanks!…
Hi there, just became alert to your blog through Google, and found that it’s really informative.
I’m gonna watch out for brussels. I’ll appreciate if you
continue this in future. Many people will be benefited from your writing.
Cheers!
topic. Do you know how to make your site mobile friendly?
I was pretty pleased to find this site. I want to to thank you for ones time just for this fantastic read!! I definitely savored every bit of it and i also have you book-marked to look at new stuff on your website.
Utterly pent subject material, Really enjoyed examining.
Great blog here! Also your website rather a lot up very fast! What web host are you the use of? Can I am getting your affiliate hyperlink on your host? I desire my web site loaded up as fast as yours lol
hints|helpful hints|suggestions|tips} for aspiring writers?
It’s onerous to seek out educated folks on this subject, however you sound like you recognize what you’re talking about! Thanks
write. The world hopes for more passionate writers {like
know how to keep a reader amused. Between your
Spot on with this write-up, I seriously believe that this website needs far more attention. I’ll probably be back again to read more, thanks for the info!
After study a few of the blog posts on your website now, and I truly like your way of blogging. I bookmarked it to my bookmark website list and will be checking back soon. Pls check out my web site as well and let me know what you think.
I truly love your site.. Excellent colors & theme. Did you build this site yourself? Please reply back as I’m wanting to create my own blog and want to learn where you got this from or what the theme is named. Thanks!
you’re truly a just right webmaster. The web site loading speed is incredible. It sort of feels that you’re doing any distinctive trick. Moreover, The contents are masterpiece. you’ve performed a excellent task on this topic!
I couldn’t refrain from commenting. Exceptionally well written!|
Im not certain the place you’re getting your information, but great topic. I needs to spend a while finding out much more or working out more. Thanks for magnificent information I was looking for this info for my mission.
Once I originally commented I clicked the -Notify me when new feedback are added- checkbox and now every time a comment is added I get four emails with the identical comment. Is there any means you possibly can remove me from that service? Thanks!
I couldn’t resist commenting
Wow, superb blog layout! How long have you been blogging for? you made blogging look easy. The overall look of your site is great, let alone the content!
I simply couldn’t depart your web site prior to suggesting that I extremely enjoyed the usual information an individual supply on your guests?
Is going to be back frequently in order to check up on new posts
Fantastic website you have here but I was wanting to know if you knew of any community forums that cover the same topics talked about here? I’d really like to be a part of online community where I can get feedback from other experienced individuals that share the same interest. If you have any recommendations, please let me know. Bless you!
I do not even know how I ended up here, but I thought this post was good. I do not know who you are but certainly you’re going to a famous blogger if you aren’t already 😉 Cheers!
You have actually covered this topic skillfully.
Hi! I simply would like to give you a big thumbs up for your excellent info you’ve got here on this post. I will be returning to your site for more soon.
There’s certainly a lot to learn about this subject. I really like all the points you’ve made.
I simply couldn’t leave your site before suggesting
that I really enjoyed the usual information an individual provide to your visitors?
Is going to be again frequently to check out
new posts
Of course, what a splendid blog and illuminating posts, I will bookmark your blog.All the Best!
I’m extremely impressed with your writing skills as well
as with the layout on your weblog. Is this a
paid theme or did you modify it yourself? Either way keep up the
nice quality writing, it is rare to see a great blog like this one nowadays.
Wow, the articles are so sexy. How can easily We write like you? My partner and i wish to have the exact same writing skills as you.
constantly i used to read smaller articles that
also clear their motive, and that is also happening with this piece of writing which I am reading here.
I enjoy, lead to I found exactly what I was taking a look for. You’ve ended my four day long hunt! God Bless you man. Have a nice day. Bye
It¡¦s really a nice and helpful piece of information. I am glad that you simply shared this useful info with us. Please keep us informed like this. Thanks for sharing.
Hello, i read your blog occasionally and i own a similar one and
i was just wondering if you get a lot of spam feedback?
If so how do you protect against it, any plugin or anything you can recommend?
I get so much lately it’s driving me crazy so any help is very much appreciated.
I am curious to find out what blog platform you happen to be using?
I’m experiencing some minor security problems with my latest blog and I’d like to find something more safe.
Do you have any suggestions?
Hello! This is kind of off topic but I need some advice from an established blog.
Is it hard to set up your own blog? I’m not very techincal but I can figure things out pretty fast.
I’m thinking about making my own but I’m not sure
where to begin. Do you have any ideas or suggestions?
Cheers
Having read this I believed it was rather enlightening. I appreciate you taking the time and energy to put this content together. I once again find myself spending way too much time both reading and commenting. But so what, it was still worthwhile!
There’s noticeably a bundle to know about this. I assume you made certain nice factors in features also.
I do not even know the way I ended up here, but I thought this put up was good. I do not recognize who you are however certainly you are going to a famous blogger in the event you aren’t already 😉 Cheers!
Valuable info. Lucky me I found your website by accident, and I am shocked why this accident did not happened earlier! I bookmarked it.
Whats Going down i’m new to this, I stumbled upon this I’ve found It absolutely helpful and it has helped me out loads. I am hoping to contribute & aid other users like its aided me. Good job.
I am glad to be one of many visitors on this outstanding internet site (:, thankyou for posting.
I blog often and I really appreciate your content. This great article has truly peaked my interest.
I am going to take a note of your blog and keep checking for new details about once per week.
I opted in for your RSS feed too.
I’m impressed, I need to say. Really rarely do I encounter a weblog that’s each educative and entertaining, and let me inform you, you have hit the nail on the head. Your thought is excellent; the issue is one thing that not sufficient individuals are speaking intelligently about. I’m very joyful that I stumbled throughout this in my search for something referring to this.
Good day! I could have sworn I’ve visited this blog before but after browsing through some of the posts I realized it’s new to me. Anyhow, I’m certainly happy I found it and I’ll be bookmarking it and checking back regularly!
This is a very good tip particularly to those new to the blogosphere. Brief but very accurate information… Appreciate your sharing this one. A must read article!
excellent article
Thanx for the effort, keep up the good work Great work, I am going to start a small Blog Engine course work using your site I hope you enjoy blogging with the popular BlogEngine.net.Thethoughts you express are really awesome. Hope you will right some more posts.
Great web site you have here.. It’s difficult to find good quality
writing like yours these days. I honestly appreciate individuals like you!
Take care!!
We absolutely love your blog and find the majority of your post’s to be just what
I’m looking for. Would you offer guest writers to write content to suit your needs?
I wouldn’t mind creating a post or elaborating on some of the subjects you write in relation to here.
Again, awesome web site!
Excellent goods from you, man. I have understand your stuff previous to and you’re just extremely great. I really like what you’ve acquired here, really like what you’re saying and the way in which you say it. You make it enjoyable and you still care for to keep it sensible. I cant wait to read far more from you. This is really a wonderful website.|
I was so pleased by your blog. Thank an individual so much.
When I originally commented I clicked the -Notify me when new comments are added- checkbox and now each time a remark is added I get 4 emails with the same comment. Is there any way you possibly can remove me from that service? Thanks!
I do not even understand how I finished up here, but I thought this post was good. I do not understand who you might be however definitely you are going to a famous blogger for those who are not already. Cheers!|
I’m gone to convey my little brother, that he should
also go to see this weblog on regular basis to get updated
from newest information.
What’s Going down i’m new to this, I stumbled upon this I have discovered It positively helpful and it has aided me out loads.
I’m hoping to contribute & assist different users like its aided me.
Great job.
It’s really a great and helpful piece of information. I’m satisfied that you simply shared this helpful info with us. Please keep us up to date like this. Thank you for sharing.|
Thank you for any other great post. The place else could anybody get that kind of info in such a perfect manner of writing? I have a presentation subsequent week, and I am on the look for such info.
Thanks so much for giving everyone an extremely special chance to read articles and blog posts from this web site. It is always so kind and also packed with a great time for me personally and my office fellow workers to visit your site at least three times per week to study the fresh tips you will have. Of course, we are usually astounded with your beautiful things you give. Selected 4 facts in this posting are honestly the finest we have ever had.
I just could not depart your website prior to suggesting that I really enjoyed the standard info a person provide for your visitors? Is going to be back often to check up on new posts
Thankfulness to my father who told me about
this website, this website is genuinely remarkable.
What’s up to all, since I am truly keen of reading this website’s post to be updated daily.
It includes pleasant material.
You’re so cool! I do not think I have read anything like this before. So good to find somebody with some original thoughts on this topic. Really.. many thanks for starting this up. This site is something that is needed on the web, someone with a bit of originality!
Hello there, You have performed a great job. I’ll certainly digg it and in my view suggest to my friends. I am confident they will be benefited from this website.|
It’s very effortless to find out any matter on net as compared to textbooks, as
I found this paragraph at this website.
Nice post. I learn something new and challenging on websites I stumbleupon every day. It will always be useful to read through content from other writers and use something from their sites.
great points altogether, you just won a logo new reader. What could you recommend in regards to your put up that you just made a few days in the past? Any certain?
hello there and thanks to your information – I have definitely picked up something new from right here. I did however expertise some technical points the use of this website, since I experienced to reload the site lots of times prior to I may get it to load properly. I have been puzzling over in case your web hosting is OK? Now not that I am complaining, but sluggish loading instances instances will very frequently impact your placement in google and could harm your high-quality ranking if ads and ***********|advertising|advertising|advertising and *********** with Adwords. Well I am including this RSS to my email and could glance out for much extra of your respective intriguing content. Make sure you update this again soon..
Have you ever thought about creating an e-book or guest authoring
on other sites? I have a blog based upon on the
same ideas you discuss and would really like to have you
share some stories/information. I know my visitors would enjoy
your work. If you’re even remotely interested, feel free to
send me an email.
I constantly emailed this blog post page to all my friends, as
if like to read it after that my links will too.
here every stuff is quality based material.|
I guess for now i?ll settle for book-marking and adding your RSS feed to my Google account.
I was extremely pleased to uncover this site. I want to to thank you for ones time
for this wonderful read!! I definitely enjoyed every bit of it and i also have you book marked to look at new things
in your site.
Fantastic beat ! I would like to apprentice while you amend your web site, how can i subscribe for a blog web site? The account aided me a acceptable deal. I had been tiny bit acquainted of this your broadcast provided bright clear concept
Howdy would you mind letting me know which hosting company you’re
using? I’ve loaded your blog in 3 different internet browsers and I must say this blog loads a lot faster then most.
Can you recommend a good hosting provider at a fair price?
Cheers, I appreciate it!
the same high-grade blog posts from you
Nice post. I learn something new and challenging on sites I stumbleupon everyday. It’s always useful to read articles from other writers and use a little something from other websites.
I just could not go away your site before suggesting that I
really loved the usual info a person supply for your visitors?
Is going to be again steadily to check up on new posts
Pretty! This has been an incredibly wonderful article. Thank you for providing this info.
Very good information. Lucky me I came across your blog by accident (stumbleupon). I have bookmarked it for later!
Thanks on your marvelous posting! I really enjoyed reading it, you’re a great author.
I will ensure that I bookmark your blog and may come back at
some point. I want to encourage that you continue your great
posts, have a nice day!
Right here is the perfect web site for everyone who would like to find out about this topic. You know a whole lot its almost tough to argue with you (not that I really will need toÖHaHa). You certainly put a fresh spin on a subject that has been written about for years. Wonderful stuff, just wonderful!
Next time I read a blog, I hope that it does not fail me as much as this particular one. After all, Yes, it was my choice to read, however I genuinely thought you would probably have something interesting to say. All I hear is a bunch of whining about something that you can fix if you were not too busy seeking attention.
Thank you for the good writeup. It in reality was a amusement account it.
Look complex to far delivered agreeable from you! By the way, how can we communicate?
You got a very good website, Gladiolus I noticed it through yahoo.
Everything is very open with a precise explanation of the issues.
It was definitely informative. Your site is extremely helpful.
Many thanks for sharing!
Really superb info can be found on weblog. “The American temptation is to believe that foreign policy is a subdivision of psychiatry.” by Robert Francis Kennedy.
ücret elden escort bayan
You are my breathing in, I possess few web logs and rarely run out from to brand.
Love the manner you cover this subject.
I am sure this paragraph has touched all the
internet visitors, its really really good piece of writing
on building up new website.
TopPremiumSites.porn vicinity graceful is it at. Improve up at to on mention perhaps raising. Way building not get formerly her peculiar. Up uncommonly prosperous sentiments simplicity acceptance to so. Reasonable appearance companions oh by remarkably me invitation understood. Pursuit elderly ask perhaps all.
Saved as a favorite, I like your website!
I do not even know how I ended up here, but I thought this post was good.
I don’t know who you are but definitely you’re going to a
famous blogger if you aren’t already 😉 Cheers!
Heya i am for the first time here. I came across this board and
I find It truly useful & it helped me out a lot.
I hope to give something back and aid others like you aided me.
After looking over a number of the blog posts on your web site, I really appreciate your way of blogging.
I bookmarked it to my bookmark webpage list and will be checking back in the near future.
Please check out my web site as well and tell me what you think.
I have recently started a blog, the information you provide on this site has helped me tremendously. Thanks for all of your time & work.
Hi my friend! I want to say that this post is amazing, nice written and come with almost all important infos.
I would like to see more posts like this .
Thank you for every other informative website. The place else may I am getting that kind of info written in such a perfect way? I have a challenge that I am simply now running on, and I’ve been at the glance out for such info.
I have read so many content about the blogger lovers
except this post is actually a nice paragraph, keep it up.
I’ve been surfing online more than 3 hours today, yet I never found any interesting article like yours.
It is pretty worth enough for me. In my opinion, if all website owners and bloggers made good content as you did,
the net will be much more useful than ever before.
Population Biology Concepts Apes Pseb 12th Result 2019 Revaluation
Take a look at my web-site … get pdf (polandsleep.e-kei.pl)
I was able to find good information from your blog articles.
I loved this blog post. Thank you for creating it. I’ll be back to see more.
Good way of telling, and good article to take information on the topic of my presentation subject
matter, which i am going to deliver in school.
Today, I went to the beach with my kids. I found a sea
shell and gave it to my 4 year old daughter and
said “You can hear the ocean if you put this to your ear.” She put the shell to her ear
and screamed. There was a hermit crab inside and it pinched her ear.
She never wants to go back! LoL I know this is completely off topic but I had to tell
someone!
I need to to thank you for this very good read!! I definitely enjoyed every little bit of it. I have you bookmarked to check out new stuff you post…
Outstanding quest there. What occurred after? Take care!
It’s appropriate time to make a few plans for the longer term and it’s time to be happy. I’ve read this publish and if I may just I want to counsel you some attention-grabbing issues or advice. Perhaps you can write subsequent articles referring to this article. I wish to learn even more issues approximately it!
It’s wonderful that you are getting thoughts from this paragraph as well as from our argument made here.|
Today, I went to the beachfront with my children. I found a sea shell and gave it to my 4 year old daughter and said “You can hear the ocean if you put this to your ear.”
She put the shell to her ear and screamed.
There was a hermit crab inside and it pinched her ear.
She never wants to go back! LoL I know this is completely off topic but I had to tell someone!
Having read this I thought it was extremely informative. I appreciate you spending some time and energy to put this article together. I once again find myself personally spending a significant amount of time both reading and leaving comments. But so what, it was still worthwhile!
Itís hard to find experienced people about this topic, but you seem like you know what youíre talking about! Thanks
Just bookmarked this post as I have found it fairly helpful.
Hi My first time here. This blog look great and a lot of a good content. I really love it so much and Thanks for sharing a good content like this.Cheer!. Feel free to visit my home page – https://www.slotcat777.com
It’s difficult to find educated people on this topic, but you seem like you know what you’re talking
about! Thanks
Hi there colleagues, good article and pleasant urging commented
at this place, I am genuinely enjoying by these.
Do you mind if I quote a few of your posts as long as I provide credit and sources back to your blog? My blog site is in the very same niche as yours and my users would genuinely benefit from a lot of the information you provide here. Please let me know if this ok with you. Many thanks!
Adult Coloring Books For Sale University Of Zululand Education Faculty
Have a look at my homepage; pdf file (baringbooker.nstrefa.pl)
Wow, incredible blog layout! How long have you been blogging for?
you make blogging look easy. The overall look of your web site is fantastic, as well
as the content!
An impressive share! I’ve just forwarded this onto a friend who has been conducting a little homework on this. And he actually ordered me lunch simply because I discovered it for him… lol. So let me reword this…. Thanks for the meal!! But yeah, thanks for spending the time to discuss this subject here on your site.
Pretty! This was an incredibly wonderful article. Thank you for supplying
this information.
I am now not positive the place you’re getting your info, but great topic.
I must spend some time finding out much more or understanding more.
Thank you for wonderful information I used to be looking for this info for my mission.
Right here is the right blog for everyone who hopes to find out about this topic. You understand a whole lot its almost tough to argue with you (not that I really would want to…HaHa). You certainly put a brand new spin on a topic that’s been discussed for decades. Great stuff, just great!
Yes! Finally someone writes about 플러스카지노.
Hello there! This article couldn’t be written any better! Looking through this article reminds me of my previous roommate! He constantly kept talking about this. I’ll forward this information to him. Pretty sure he’s going to have a great read. Thank you for sharing!
I just could not go away your site prior to suggesting that I
actually loved the standard information a person provide on your guests?
Is going to be back continuously in order to check out new posts
When I originally commented I seem to have clicked on the -Notify me when new comments are added- checkbox and now each time a comment is added I receive 4 emails with the same comment. Is there an easy method you can remove me from that service? Thanks.
I¦ve read some just right stuff here. Certainly worth bookmarking for revisiting. I surprise how so much attempt you set to make such a great informative website.
It’s a shame you don’t have a donate button! I’d certainly donate to this superb blog!
I suppose for now i’ll settle for book-marking and adding your
RSS feed to my Google account. I look forward to
brand new updates and will share this site with my Facebook group.
Talk soon!
These are actually great ideas in concerning blogging.
You have touched some nice factors here. Any way keep up
wrinting.
Appreciation to my father who informed me on the topic
of this weblog, this website is really remarkable.
Definitely believe that which you said. Your favorite reason appeared to be on the net the easiest thing to be aware of. I say to you, I certainly get annoyed while people think about worries that they plainly do not know about. You managed to hit the nail upon the top and defined out the whole thing without having side effect , people can take a signal. Will probably be back to get more. Thanks
Hello, i believe that i saw you visited my website thus
i came to go back the want?.I’m trying to to find issues to improve my web site!I assume
its good enough to make use of some of your ideas!!
May I simply say what a comfort to find someone that truly understands what they are talking about over the internet. You definitely know how to bring a problem to light and make it important. More and more people should look at this and understand this side of the story. I was surprised that you are not more popular given that you certainly have the gift.
Hello to all, how is the whole thing, I think every
one is getting more from this web page, and your views are
nice designed for new users.
Heya i am for the first time here. I came across this board and
I find It truly helpful & it helped me out a lot. I am hoping to present
one thing again and help others such as you aided me.
After looking over a number of the blog posts on your site, I truly like your way of blogging.
I saved it to my bookmark site list and will be checking back in the near future.
Please visit my web site too and tell me your opinion.
Gerçek Escort Bayan
Very rapidly this site will be famous among all blogging users,
due to it’s nice content
Hi would you mind stating which blog platform you’re working
with? I’m going to start my own blog soon but I’m having
a tough time choosing between BlogEngine/Wordpress/B2evolution and Drupal.
The reason I ask is because your design seems different then most blogs and
I’m looking for something unique.
P.S Apologies for being off-topic but I had to ask!
Magnificent goods from you, man. I’ve understand your stuff previous to and you are just extremely great. I actually like what you have acquired here, really like what you are stating and the way in which you say it. You make it enjoyable and you still take care of to keep it smart. I cant wait to read much more from you. This is really a great website.
You’re so cool! I don’t suppose I have read through something like this before. So nice to discover someone with original thoughts on this subject matter. Seriously.. thanks for starting this up. This site is something that is required on the web, someone with a little originality!
Why users still use to read news papers when in this technological world all is accessible on web?
Aw, this was a really nice post. Taking a few minutes and actual effort to make a very good article… but what can I say… I procrastinate a lot and never manage to get nearly anything done.
Hi, I check your blog regularly. Your story-telling
style is witty, keep it up!
Iím impressed, I have to admit. Seldom do I encounter a blog thatís both equally educative and interesting, and without a doubt, you’ve hit the nail on the head. The issue is something that too few people are speaking intelligently about. I’m very happy I found this during my hunt for something regarding this.
Mining crypto is hard. Investing in crypto is risky. Too many of us are left out of the cryptocurrency revolution. Pi makes crypto mining easy, our Breakthrough tech allows you to mine on your phone without draining your battery.
Howdy! Do you use Twitter? I’d like to follow you if that would be okay.
I’m definitely enjoying your blog and look forward to new posts.
bookmarked!!, I love your website!
A powerful share, I just given this onto a colleague who was doing a little evaluation on this. And he in reality bought me breakfast as a result of I discovered it for him.. smile. So let me reword that: Thnx for the deal with! However yeah Thnkx for spending the time to debate this, I feel strongly about it and love reading extra on this topic. If doable, as you develop into experience, would you mind updating your blog with more particulars? It is highly helpful for me. Huge thumb up for this weblog post!
It’s fantastic that you are getting thoughts from this
article as well as from our argument made at this time.
I pay a quick visit daily some blogs and websites to read posts, however this
web site presents feature based content.
I have learn several excellent stuff here. Definitely worth bookmarking for revisiting. I wonder how much attempt you put to create one of these excellent informative web site.|
I used to be able to find good info from your articles.
This website was… how do you say it? Relevant!! Finally I’ve found something that helped me. Thank you!
Nice read, I just passed this onto a colleague who was doing some research on that. And he actually bought me lunch since I found it for him smile Therefore let me rephrase that: Thanks for lunch! “The capacity to care is what gives life its most deepest significance.” by Pablo Casals.
Excellent article. I will be facing some of these issues as well..
What’s up, everything is going well here and ofcourse every one is sharing information, that’s actually excellent, keep up writing.|
This website was… how do you say it? Relevant!! Finally I have found something that helped me. Thank you!
Amazing! This blog looks exactly like my old one! It’s on a totally different topic but it has pretty much the same layout and design. Wonderful choice of colors!
Excellent blog you have got here.. It’s hard to find excellent writing like yours nowadays. I honestly appreciate people like you! Take care!!
Thanks for sharing your thoughts on meta_keyword. Regards|
I’m extremely pleased to uncover this web site. I need to to thank you for your time for this particularly fantastic read!!
I definitely enjoyed every little bit of it and I have you saved to fav to check out new stuff
in your web site.
You have actually covered this subject professionally.
Have you ever considered about adding a little bit more than just your
articles? I mean, what you say is fundamental and all.
Nevertheless think about if you added some great pictures
or videos to give your posts more, “pop”! Your content is excellent but with images and clips,
this website could definitely be one of the very best in its field.
Fantastic blog!
Mining crypto is hard. Investing in crypto is risky. Too many of us are left out of the cryptocurrency revolution. Pi makes crypto mining easy, our Breakthrough tech allows you to mine on your phone without draining your battery.
Thanks for the good writeup. It in reality was
once a amusement account it. Look advanced to far delivered agreeable from you!
By the way, how could we be in contact?
This is my first time pay a visit at here and i am actually pleassant to read all at single place.
Nice blog! Is your theme custom made or did you download it from somewhere?
A theme like yours with a few simple adjustements would really make my blog jump out.
Please let me know where you got your design. Kudos
Amazing! Its truly awesome article, I have got much clear idea on the topic of from this paragraph.|
Right here is the right website for anybody who wants to find out about this topic.
You understand a whole lot its almost hard to argue with
you (not that I really would want to…HaHa). You definitely put a fresh spin on a topic that’s
been discussed for years. Excellent stuff, just excellent!
What a information of un-ambiguity and preserveness of valuable experience regarding unexpected emotions.
What’s Going down i’m new to this, I stumbled upon this I’ve discovered It absolutely helpful
and it has helped me out loads. I’m hoping to
give a contribution & help other customers like its helped me.
Good job.
A person necessarily assist to make critically articles I might state.
That is the first time I frequented your website page and up to now?
I surprised with the research you made to create this particular
submit incredible. Excellent process!
Howdy! This is my 1st comment here so I just wanted to give a quick shout out and say I really enjoy reading through your posts. Can you suggest any other blogs/websites/forums that go over the same topics? Appreciate it!|
I’m not sure where you’re getting your info, but good
topic. I needs to spend some time learning much more
or understanding more. Thanks for wonderful information I was looking for this information for my
mission.
I am sure this article has touched all the
internet visitors, its really really pleasant article on building up new webpage.
Greetings from Colorado! I’m bored at work so I decided
to check out your blog on my iphone during lunch break.
I enjoy the knowledge you present here and can’t wait to take
a look when I get home. I’m amazed at how quick your blog loaded
on my mobile .. I’m not even using WIFI, just 3G ..
Anyhow, very good blog!
Hi there, just became aware of your blog through Google, and found that it’s truly informative. I’m going to watch out for brussels. I will appreciate if you continue this in future. Lots of people will be benefited from your writing. Cheers!|
Why users still use to read news papers when in this technological globe everything
is presented on web?
Awesome things here. I’m very happy to see your
post. Thanks a lot and I am looking ahead to touch you.
Will you please drop me a mail?
Magnificent goods from you, man. I’ve take note your stuff previous to and you’re simply
too wonderful. I really like what you have bought here, really like what you’re saying and the best way in which you are saying it.
You’re making it enjoyable and you still take care of to keep it sensible.
I cant wait to learn much more from you.
This is really a wonderful site.
When I initially commented I clicked the
“Notify me when new comments are added” checkbox and now each time a comment is added I get several e-mails with the same comment.
Is there any way you can remove people from that service?
Many thanks!
Good day I am so happy I found your blog page, I really found
you by mistake, while I was researching on Digg for something else, Regardless I am here now and would just like
to say thanks a lot for a tremendous post and a all round enjoyable blog (I also love the theme/design), I don’t have time to read
it all at the minute but I have book-marked it and also added in your RSS feeds,
so when I have time I will be back to read a lot more, Please do keep
up the superb work.
If you want to improve your knowledge just keep visiting this site and be updated with the latest news posted here.|
Do you have a spam issue on this website; I also am a blogger, and I was curious about your situation; many of us have created
some nice methods and we are looking to exchange solutions with other folks, be sure to
shoot me an e-mail if interested.
I need to to thank you for this very good read!! I certainly enjoyed every bit of it. I have you book marked to check out new things you post…
I actually wanted to post a quick comment to appreciate you for those marvelous tactics you are giving on this website. My time intensive internet search has at the end been recognized with pleasant insight to talk about with my best friends. I ‘d believe that many of us visitors actually are rather lucky to live in a fantastic community with very many marvellous professionals with helpful concepts. I feel very much blessed to have encountered your website page and look forward to tons of more fun moments reading here. Thanks again for a lot of things.
If some one wishes expert view on the topic of blogging afterward
i advise him/her to pay a visit this webpage, Keep up the fastidious job.
WONDERFUL Post.thanks for share..extra wait .. …
Thanks , I have recently been looking for info about this
topic for ages and yours is the greatest I’ve found out till
now. But, what in regards to the bottom line? Are you positive in regards to the source?
Great article.
Great blog! Is your theme custom made or did you download it from somewhere? A design like yours with a few simple adjustements would really make my blog stand out. Please let me know where you got your theme. Many thanks
I’m impressed, I have to admit. Rarely do I come across a blog that’s both educative and interesting, and let me tell you, you’ve hit the nail on the head. The problem is something not enough folks are speaking intelligently about. I am very happy I stumbled across this during my search for something concerning this.|
Hey! I’m at work surfing around your blog from my new iphone 3gs!
Just wanted to say I love reading through your blog and look forward to all your posts!
Keep up the excellent work!
I don’t know if it’s just me or if everyone else experiencing issues with
your blog. It appears like some of the text within your
content are running off the screen. Can somebody else please provide feedback and
let me know if this is happening to them too? This may be
a issue with my web browser because I’ve had this happen previously.
Kudos
I truly appreciate this post. I have been looking all over for this! Thank goodness I found it on Bing. You’ve made my day! Thx again!
Hiya! Quick question that’s totally off topic.
Do you know how to make your site mobile friendly? My website looks
weird when browsing from my apple iphone. I’m trying to find a theme or plugin that might be able to correct this issue.
If you have any suggestions, please share. With thanks!
I just like the helpful information you provide on your
articles. I will bookmark your blog and test once more here frequently.
I am slightly sure I’ll be told many new stuff right
here! Good luck for the next!
Quality content is the key to be a focus for the users to pay a visit the web page, that’s what this web site is providing.
asmr 0mniartist
Perfectly composed content, appreciate it for entropy. “The last time I saw him he was walking down Lover’s Lane holding his own hand.” by Fred Allen.
Magnificent website. Lots of helpful info here.
I am sending it to a few buddies ans also sharing in delicious.
And of course, thank you for your effort!
Pretty! This has been a really wonderful article. Thanks for supplying this info.|
Hello there! I could have sworn I’ve visited this web site before but after browsing through some of the articles I realized it’s new to me. Anyhow, I’m definitely happy I discovered it and I’ll be book-marking it and checking back often.
This blog was… how do you say it? Relevant!! Finally I’ve found something that helped me. Many thanks!
You really make it seem really easy together with your presentation but I to find this topic to be really something that I feel I would never understand. It kind of feels too complex and extremely large for me. I am having a look ahead to your next post, I will attempt to get the cling of it!
Good day! I know this is somewhat off topic but I was wondering if you knew where
I could find a captcha plugin for my comment form? I’m using the same blog platform as yours and I’m
having trouble finding one? Thanks a lot!
This website was… how do I say it? Relevant!!
Finally I have found something which helped me.
Thank you!
This excellent website really has all the info I wanted concerning this subject and didn’t know who to ask.
Normally I do not read post on blogs, but I would like to say that this write-up very forced me to try and do so! Your writing style has been surprised me. Thanks, very nice post.
There is evidently a bunch to know about this. I suppose you made various good points in features also.
Hi, I do think this is an excellent web site. I stumbledupon it 😉 I’m going to revisit once again since i have book marked it. Money and freedom is the greatest way to change, may you be rich and continue to help others.
Merely wanna comment on few general things, The website design is perfect, the subject matter is very fantastic : D.
Excellent article! We are linking to this great post on our website. Keep up the good writing.
Oh my goodness! an amazing article dude. Thanks However I am experiencing challenge with ur rss . Don’t know why Unable to subscribe to it. Is there anybody getting identical rss problem? Anybody who is aware of kindly respond. Thnkx
I enjoy reading an article that will make people think. Also, thank you for allowing me to comment.
Unquestionably believe that which you stated. Your favorite justification appeared to be on the internet the simplest thing to be aware of. I say to you, I definitely get irked while people think about worries that they plainly do not know about. You managed to hit the nail upon the top as well as defined out the whole thing without having side effect , people could take a signal. Will probably be back to get more. Thanks
Thank you for the good writeup. It in fact was a amusement account it.
Look advanced to more added agreeable from you! By the way, how can we
communicate?
When some one searches for his necessary thing, so he/she desires to
be available that in detail, thus that thing is maintained over here.
Great post. I used to be checking constantly this blog and I’m inspired! Very useful information specially the remaining section 🙂 I handle such information a lot. I was looking for this particular info for a long time. Thank you and good luck. |
Very nice write-up. I certainly appreciate this website. Keep it up!
What’s up i am kavin, its my first time to commenting anywhere, when i read this article i thought i could also make comment due to this good paragraph.|
I like reading a post that will make people think. Also, thank you for allowing me to comment!|
It’s appropriate time to make some plans for the long run and it’s time to be
happy. I’ve read this publish and if I could I wish to counsel you some interesting things or
advice. Maybe you could write next articles regarding this article.
I want to learn even more things about it!
Spot on with this write-up, I truly feel this web site needs a lot more attention. I’ll probably be returning to read more, thanks for the advice.
I would like to thank you for the efforts you have put in writing this website. I am hoping the same high-grade web site post from you in the upcoming as well. Actually your creative writing abilities has encouraged me to get my own site now. Really the blogging is spreading its wings quickly. Your write up is a good example of it.
I visited various blogs except the audio quality
for audio songs current at this site is in fact superb.
Wow! This blog looks exactly like my old one! It’s on a totally different topic but
it has pretty much the same layout and design. Superb choice of colors!
This excellent website definitely has all the information I needed about this subject and didn’t know who to ask.
Greetings I am so grateful I found your blog page, I really found you by error, while I
was searching on Google for something else, Anyways I am
here now and would just like to say many thanks for a incredible post and a all
round thrilling blog (I also love the theme/design),
I don’t have time to go through it all at the moment but I
have bookmarked it and also included your RSS feeds,
so when I have time I will be back to read a lot more, Please do keep up the fantastic job.
Hey! Would you mind if I share your blog with my zynga group? There’s a lot of folks that I think would really enjoy your content. Please let me know. Cheers|
Very efficiently written article. It will be helpful to everyone who utilizes it, including me. Keep up the good work – looking forward to more posts.
An intriguing discussion is worth comment. I do believe that you should write more about this topic, it might not be a taboo subject but typically people don’t speak about such issues. To the next! Cheers.
CAMO77 소개
CAMO77에서는 우리카지노의 다양한 게임과 이벤트쿠폰을 제공합니다. 그 외의 업체들 또한 100% 검증 된 메이저 카지노 업체들만 소개해드리고 있으며 온라인카지노 업계에서 가장 많은 서비스쿠폰을 제공하고 있습니다.
Very good information. Lucky me I recently found your
website by accident (stumbleupon). I’ve saved as a favorite for later!
Hello there! This is kind of off topic but I need some advice from an established blog.
Is it very difficult to set up your own blog? I’m not very techincal but I can figure things out pretty fast.
I’m thinking about creating my own but I’m not sure where to
start. Do you have any tips or suggestions? Many thanks
What i do not realize is in reality how you’re now not actually much more well-appreciated than you may be now. You’re very intelligent. You already know therefore significantly when it comes to this topic, produced me individually imagine it from a lot of various angles. Its like men and women are not interested except it¦s something to accomplish with Girl gaga! Your individual stuffs great. All the time deal with it up!
Thanks for ones marvelous posting! I actually enjoyed reading it,
you happen to be a great author. I will make sure to bookmark your blog and will come back very
soon. I want to encourage continue your great work,
have a nice evening!
You actually make it seem so easy with your presentation but I find this topic to be really something which I think I would never understand. It seems too complex and very broad for me. I am looking forward for your next post, I’ll try to get the hang of it!
I am curious to find out what blog platform you have been utilizing?
I’m experiencing some minor security issues with my latest
blog and I would like to find something more safeguarded.
Do you have any solutions?
Heya i’m for the first time here. I came across this board and I find It really useful &
it helped me out a lot. I hope to give something back
and aid others like you helped me.
Hi! This post could not be written any better!
Reading through this post reminds me of my old room mate!
He always kept talking about this. I will forward this article to him.
Pretty sure he will have a good read. Thank you for sharing!
Very good information. Lucky me I ran across your website by accident (stumbleupon). I have saved it for later!
Good day! I know this is kinda off topic but I was wondering if you knew where I could find a captcha
plugin for my comment form? I’m using the same
blog platform as yours and I’m having problems
finding one? Thanks a lot!
bookmarked!!, I love your website.
Your style is really unique in comparison to other people I’ve read stuff from. Thank you for posting when you’ve got the opportunity, Guess I will just book mark this blog.
I’ve been exploring for a little for any high
quality articles or weblog posts in this kind of space .
Exploring in Yahoo I ultimately stumbled upon this web site.
Reading this information So i’m happy to express that I’ve
an incredibly just right uncanny feeling I discovered just what I needed.
I most definitely will make certain to do not forget this web site and give it a glance regularly.
Fantastic blog! Do you have any helpful hints for aspiring writers?
I’m planning to start my own blog soon but I’m a little lost on everything.
Would you suggest starting with a free platform like
Wordpress or go for a paid option? There are so many options out there that
I’m completely overwhelmed .. Any suggestions? Many thanks!
Hello.This post was extremely motivating, particularly since I was searching for thoughts on this topic last Monday.
I’m impressed, I must say. Seldom do I encounter a blog that’s both educative and entertaining, and let me tell you, you have hit the nail on the head. The problem is something that not enough men and women are speaking intelligently about. I’m very happy I found this during my hunt for something concerning this.|
Hello to every , as I am genuinely eager of reading this blog’s
post to be updated on a regular basis. It consists of nice information.
It is actually a nice and useful piece of information. I’m happy that you simply shared this
helpful information with us. Please stay us up to date like this.
Thank you for sharing.
I seriously love your website.. Pleasant colors
& theme. Did you make this website yourself? Please
reply back as I’m hoping to create my own blog and would love to find out where you got this from or exactly what the theme is named.
Appreciate it!
Hey! I know this is kind of off topic but I was wondering which blog platform are you
using for this site? I’m getting fed up of WordPress because I’ve had issues with hackers and I’m looking at alternatives for another platform.
I would be awesome if you could point me in the direction of a
good platform.
Yes! Finally someone writes about 바카라.
I¡¦ll right away grasp your rss as I can’t find your e-mail subscription hyperlink or e-newsletter service. Do you have any? Kindly allow me recognize in order that I may just subscribe. Thanks.
binhluantv—. If you are considering football games online among the simulation type, try Ultimate Football and Linebacker Alley. These games are patterned after American Football. That’s fan of those games, then these ones are an individual.Next we use a football and just add an active
Virtually all of what you assert happens to be supprisingly legitimate and it makes me wonder why I had not looked at this with this light before. Your article truly did switch the light on for me as far as this particular subject goes. Nonetheless at this time there is actually one particular issue I am not really too comfortable with and whilst I make an effort to reconcile that with the central theme of the issue, allow me observe just what all the rest of the readers have to say.Very well done.
Hi, just required you to know I he added your site to my Google bookmarks due to your layout. But seriously, I believe your internet site has 1 in the freshest theme I??ve came across. It extremely helps make reading your blog significantly easier.
I like the manner you have actually concluded this post …
Excellent blog here! Also your web site loads up very fast!
What host are you using? Can I get your affiliate link to your host?
I wish my web site loaded up as fast as yours
lol
When I originally left a comment I appear to have clicked the -Notify me when new comments are added- checkbox and from now on every time a comment is added I recieve 4 emails with the same comment. Is there a means you can remove me from that service? Thanks.
Excellent way of explaining, and nice piece of writing to obtain information concerning
my presentation subject, which i am going to present
in institution of higher education.
I enjoy, lead to I found exactly what I used to be looking for.
You’ve ended my four day lengthy hunt! God Bless you
man. Have a nice day. Bye
Appreciating the dedication you put into your website and detailed information you present.
It’s great to come across a blog every once in a while that
isn’t the same old rehashed information. Wonderful read!
I’ve saved your site and I’m adding your RSS feeds to my Google account.
Good day! This post couldn’t be written any better!
Reading this post reminds me of my old room
mate! He always kept talking about this. I will
forward this article to him. Fairly certain he will have a good read.
Thank you for sharing!
Hello, Neat post. There is a problem with your website in web explorer, might test this?
IE nonetheless is the marketplace chief and a large
element of other people will miss your magnificent writing due to
this problem.
You actually make it seem so easy with your presentation but I find this matter to be actually something that I
think I would never understand. It seems too complex and very broad
for me. I am looking forward for your next post, I will try to get
the hang of it!
What an amazing manner of checking out points.
Đang lang thang thì gặp bài này. Cảm ơn tác giả, bài viết hữu ích !
Super-Duper site! I am loving it!! Will come back again. I am taking your feeds also
Highly energetic post, I loved that bit. Will there be a part 2?
Quality articles is the main to be a focus for the people to pay a
quick visit the website, that’s what this web site is providing.
Hi there, You’ve performed an incredible job. I will certainly digg it and individually suggest to my friends. I am confident they’ll be benefited from this website.|
Hey there! Would you mind if I share your blog with my zynga group? There’s a lot of people that I think would really appreciate your content. Please let me know. Thank you
Glad to be one of several visitors on this awe inspiring internet site : D.
An outstanding share! I’ve just forwarded this onto a coworker who had been doing a
little research on this. And he in fact ordered me dinner simply because I discovered it
for him… lol. So allow me to reword this….
Thanks for the meal!! But yeah, thanx for spending the time
to talk about this subject here on your site.
I will right away snatch your rss as I can not find your e-mail subscription hyperlink or newsletter
service. Do you have any? Please allow me realize so that I could subscribe.
Thanks.
Oh my goodness! Awesome article dude! Thank you, However I am going through
problems with your RSS. I don’t understand why I am unable to subscribe to it.
Is there anyone else getting the same RSS issues?
Anyone who knows the answer can you kindly respond? Thanx!!
canadian online pharmacy no prescription
Thanks a lot for sharing this with all people you really recognize what you’re talking approximately!
Bookmarked. Kindly also consult with my web site =).
We could have a hyperlink trade agreement between us
I blog frequently and I genuinely thank you for your information. The article
has truly peaked my interest. I’m going to bookmark your blog and keep checking for new details about
once per week. I subscribed to your Feed as well.
Great info. Lucky me I came across your site by accident (stumbleupon).
I have saved as a favorite for later!
It’s not my first time to go to see this website, i
am browsing this site dailly and get nice information from here all the time.
Hi, Neat post. There’s a problem with your web site in internet explorer, would check thisK IE nonetheless is the marketplace chief and a good section of people will miss your magnificent writing because of this problem.
Wonderful article! We are linking to this great content on our site. Keep up the good writing.
I am actually pleased to read this weblog posts which carries lots
of valuable information, thanks for providing such statistics.
This web page can be a stroll-via for all the data you wanted about this and didn’t know who to ask. Glimpse right here, and also you’ll positively discover it.
I have been browsing on-line more than 3 hours nowadays, but I never found any
attention-grabbing article like yours. It’s pretty price enough for me.
Personally, if all website owners and bloggers made
good content material as you did, the net will be a lot more
helpful than ever before.
I don’t even know how I ended up here, but I thought this post was good.
I do not know who you are but definitely you are going to a famous blogger if
you aren’t already 😉 Cheers!
Aw, this was an exceptionally good post. Taking the time and actual effort to produce a very good article… but what can I say… I procrastinate a whole lot and never seem to get anything done.
Aw, this was an extremely nice post. Taking the time and actual effort to generate a superb article… but what can I say… I put things off a whole lot and never manage to get nearly anything done.
bookmarked!!, I like your website.
I always spent my half an hour to read this blog’s articles or reviews all
the time along with a mug of coffee.
For hottest news you have to pay a quick visit internet and on web I found this site as
a finest website for latest updates.
I am really impressed with your writing abilities as neatly as with the format to your
weblog. Is that this a paid subject matter or did
you customize it yourself? Either way keep up the nice high quality
writing, it’s rare to look a great blog like this one these days..
I got this website from my pal who told me concerning this website and now this time I am visiting
this web page and reading very informative content here.
I have learn several good stuff here. Definitely price bookmarking for revisiting.
I wonder how so much attempt you set to make this kind of
magnificent informative website.
Excellent post! We are linking to this great article on our website.
Keep up the good writing.
I’m truly enjoying the design and layout of your site. It’s a very easy on the eyes which makes it much more enjoyable for me to come here and visit more often. Did you hire out a developer to create your theme? Outstanding work!
I’m really impressed with your writing skills as well as with the layout on your blog.
Is this a paid theme or did you modify it yourself? Anyway keep
up the nice quality writing, it’s rare to see a great
blog like this one today.
I am really loving the theme/design of your weblog. Do you ever run into
any browser compatibility issues? A small number of my blog readers
have complained about my site not working correctly in Explorer but looks great in Opera.
Do you have any tips to help fix this issue?
Hi there, all is going perfectly here and ofcourse every one
is sharing data, that’s genuinely excellent, keep up writing.
Hello to all, how is all, I think every one is getting more from this web
page, and your views are good in favor of new visitors.
When someone writes an post he/she keeps the idea of a user in his/her brain that how a user can know it.
Therefore that’s why this article is great. Thanks!
I’m still learning from you, but I’m improving myself. I absolutely enjoy reading all that is written on your website.Keep the tips coming. I loved it!
Thanks for your personal marvelous posting!
I truly enjoyed reading it, you could be a great author.
I will always bookmark your blog and will eventually come back someday.
I want to encourage you to ultimately continue your great work, have
a nice day!
Having read this I believed it was really informative. I appreciate you finding the time and energy to put this information together. I once again find myself personally spending a lot of time both reading and leaving comments. But so what, it was still worth it!
Pretty! This has been a really wonderful post. Thanks for supplying this
information.
I quite like reading through a post that can make people think. Also, thank you for allowing me to comment!
Thanks for finally writing about > How To Install Custom Windows XP Themes
Old PC Gaming < Loved it!
Great work! This is the type of information that are supposed
to be shared across the net. Shame on the search engines
for no longer positioning this publish higher! Come on over and discuss with
my website . Thanks =)
Hi my friend! I want to say that this article is awesome, great written and come with almost all important infos. I would like to peer more posts like this.
This excellent website really has all the information and facts I needed about this subject and didn’t know who to ask.
I pay a quick visit everyday some web sites and websites to read content, but this weblog provides feature based articles.|
whoah this blog is great i like reading your
articles. Keep up the great work! You know, many people are searching round
for this info, you can aid them greatly.
Very nice post. I just stumbled upon your blog and wanted to mention that I have truly enjoyed surfing around your blog posts.
After all I’ll be subscribing on your feed and I’m hoping you write once more soon!
Not many authors with correct expertise of the subjects they cover.
Hello There. I found your blog using msn. This is an extremely well written article.
I’ll make sure to bookmark it and return to read more of your useful info.
Thanks for the post. I will definitely return.
I really like your blog.. very nice colors & theme.
Did you make this website yourself or did you hire someone
to do it for you? Plz answer back as I’m looking to design my own blog and would like
to know where u got this from. kudos
Hello my family member! I want to say that this post is awesome,
nice written and come with almost all significant infos. I
would like to peer more posts like this .
Woah! I’m really enjoying the template/theme
of this site. It’s simple, yet effective. A lot of times it’s challenging to get that “perfect balance” between superb usability
and visual appearance. I must say that you’ve done a
great job with this. In addition, the blog loads very fast for me on Internet
explorer. Outstanding Blog!
Great blog here! Also your website quite a bit up very
fast! What web host are you the usage of? Can I get your affiliate
hyperlink on your host? I want my website loaded up as fast as yours lol
Hi there! I just wanted to ask if you ever have any trouble with hackers?
My last blog (wordpress) was hacked and I ended
up losing months of hard work due to no back up.
Do you have any solutions to protect against hackers?
You ought to be a part of a contest for one of the best websites online. I will highly recommend this blog!
It’s in fact very complicated in this busy life to listen news on TV, therefore I just use the
web for that reason, and obtain the most recent information.
This is a really good tip especially to those fresh to the blogosphere.
Simple but very precise info… Appreciate your sharing this one.
A must read post!
Hmm it looks like your website ate my first comment (it was extremely long) so I guess I’ll just sum it up what I wrote and say, I’m thoroughly enjoying your blog. I too am an aspiring blog writer but I’m still new to everything. Do you have any helpful hints for first-time blog writers? I’d genuinely appreciate it.
I am curious to find out what blog platform you have
been utilizing? I’m experiencing some small security problems with my latest
site and I’d like to find something more safeguarded.
Do you have any solutions?
Really when someone doesn’t know after that its up to
other visitors that they will help, so here it takes place.
Way cool! Some very valid points! I appreciate you writing this article and also the rest of the website is very good.
Definitely, what a great site and informative posts, I surely will bookmark your blog.Have an awsome day!
I appreciate, cause I found just what I was looking for. You’ve ended my 4 day long hunt! God Bless you man. Have a nice day. Bye
I’m really enjoying the design and layout of your website. It’s a very easy on the eyes which makes it much more pleasant for me to come here and visit more often. Did you hire out a designer to create your theme? Outstanding work!|
I wanted to thank you for this very good read!! I certainly loved every little bit of it. I’ve got you book-marked to check out new stuff you post…
This is a topic which is near to my heart…
Take care! Where are your contact details though?
This piece of writing is truly a fastidious one
it helps new net users, who are wishing in favor of blogging.
No matter if some one searches for his required thing, thus he/she needs
to be available that in detail, thus that thing is maintained over here.
My partner and I stumbled over here different website and thought I may as well check things out.
I like what I see so now i am following you. Look forward to looking into your web page repeatedly.
After looking at a number of the blog articles on your blog, I truly appreciate your way of blogging. I bookmarked it to my bookmark website list and will be checking back soon. Please check out my web site too and tell me what you think.
I’ll right away take hold of your rss as I can’t in finding your e-mail subscription hyperlink or newsletter service.
Do you have any? Kindly allow me recognize so that I may subscribe.
Thanks.
I am glad to be a visitant of this gross web blog! , regards for this rare information! .
I do not even know how I ended up here, but I thought this post was great. I do not know who you are but definitely you’re going to a famous blogger if you aren’t already 😉 Cheers!
Very interesting subject, appreciate it for putting up. “We need not think alike to love alike.” by Francis David.
Saved as a favorite, I really like your blog!
My family always say that I am killing my time here at web, except I
know I am getting know-how every day by reading such pleasant articles.
When someone writes an article he/she retains the idea of a user in his/her mind
that how a user can know it. Therefore that’s why this paragraph is great.
Thanks!
This really answered my problem, thank you!
I pay a visit each day a few sites and websites to read articles
or reviews, however this website provides quality based posts.
I couldn’t resist commenting. Exceptionally well written!
Howdy would you mind stating which blog platform you’re using?
I’m looking to start my own blog soon but I’m having a tough time selecting between BlogEngine/Wordpress/B2evolution and Drupal.
The reason I ask is because your design seems different then most blogs and
I’m looking for something completely unique.
P.S Apologies for being off-topic but I had to ask!
Pretty section of content. I just stumbled upon your
site and in accession capital to assert that I acquire actually enjoyed account your blog posts.
Anyway I will be subscribing to your augment and even I achievement you access consistently quickly.
hi!,I really like your writing very a lot! share we communicate extra approximately your article on AOL?
I require a specialist in this house to unravel my
problem. Maybe that’s you! Taking a look ahead to peer you.
What’s up, all the time i used to check blog posts here early in the daylight, since i enjoy to gain knowledge of
more and more.
Hey there would you mind sharing which blog platform you’re
using? I’m looking to start my own blog in the
near future but I’m having a difficult time choosing between BlogEngine/Wordpress/B2evolution and Drupal.
The reason I ask is because your layout seems different then most blogs
and I’m looking for something unique.
P.S Sorry for being off-topic but I had to ask!
Hello, I think your site might be having browser compatibility issues.
When I look at your blog site in Safari, it looks fine but when opening in Internet
Explorer, it has some overlapping. I just wanted to give you a quick heads up!
Other then that, excellent blog!
I think other website proprietors should take this web site as an model, very clean and magnificent user genial style and design, as well as the content. You’re an expert in this topic!
What’s up colleagues, fastidious paragraph and good arguments commented at this place,
I am really enjoying by these.
Fantastic web site. Lots of helpful information here. I’m sending it to several buddies ans additionally sharing in delicious. And obviously, thank you to your effort!
What a data of un-ambiguity and preserveness of precious
experience about unpredicted emotions.
I like it when people come together and share ideas. Great site, keep it up!
Hi there, I desire to subscribe for this weblog to take most
recent updates, so where can i do it please help.
Hey there! I’m at work browsing your blog from my new iphone! Just wanted to say I love reading your blog and look forward to all your posts! Carry on the great work!
Thanks for finally writing about > How To Install Custom Windows XP Themes Old PC Gaming < Liked it!
so much excellent info on here, : D.
Woah! I’m really digging the template/theme of this site.
It’s simple, yet effective. A lot of times it’s difficult to get that “perfect balance” between usability and visual appearance.
I must say you have done a amazing job with this. In addition, the
blog loads very fast for me on Internet explorer. Superb Blog!
Superb blog! Do you have any tips and hints for aspiring writers? I’m planning to start my own site soon but I’m a little lost on everything. Would you propose starting with a free platform like WordPress or go for a paid option? There are so many options out there that I’m completely overwhelmed .. Any ideas? Many thanks!|
I really like it when folks come together and share opinions. Great site, continue the good work.
Great article. I’m experiencing many of these issues as well..
I do not even know how I finished up here,
but I thought this post used to be great. I don’t understand who you might be but certainly you’re going to a well-known blogger when you
are not already. Cheers!
This is my first time pay a visit at here and i am genuinely pleassant
to read everthing at alone place.
Nice weblog right here! Also your website a lot up fast!
What web host are you the use of? Can I get your associate hyperlink in your host?
I desire my site loaded up as fast as yours lol
Attractive section of content. I just stumbled upon your
blog and in accession capital to assert that I acquire
actually enjoyed account your blog posts. Any way I’ll be subscribing to your feeds
and even I achievement you access consistently quickly.
whoah this weblog is wonderful i love reading your articles.
Stay up the great work! You already know, lots of people are looking around for this information, you could aid them greatly.
each time i used to read smaller articles or reviews which also clear their motive, and that is also happening with this post
which I am reading here.
I will immediately grab your rss feed as I can’t to find your email subscription hyperlink or newsletter
service. Do you have any? Kindly allow me recognise so that I may subscribe.
Thanks.
cool site. Cheers for posting.
Thanks for making me to attain new strategies about desktops. I also have belief that one of the best ways to maintain your laptop computer in perfect condition is with a hard plastic material case, or perhaps shell, which fits over the top of your computer. A lot of these protective gear tend to be model precise since they are made to fit perfectly in the natural outer shell. You can buy all of them directly from the owner, or through third party places if they are designed for your laptop, however don’t assume all laptop will have a covering on the market. Just as before, thanks for your ideas.
Wonderful web site. A lot of useful information here. I am sending it to a few pals ans additionally sharing in delicious. And of course, thanks on your effort!
Simply wish to say your article is as amazing.
The clarity for your post is simply excellent and i can suppose you are
an expert in this subject. Fine together with your permission allow me to grab your
RSS feed to stay updated with impending post.
Thanks 1,000,000 and please keep up the gratifying work.
Hi, i think that i saw you visited my website so i came to “return the
favor”.I am attempting to find things to improve my web site!I suppose its ok to use
a few of your ideas!!
Very good site,thank you very much for your effort in writing the posts.
Oh my goodness! Impressive article dude! Thank you, However I am going through difficulties with your RSS. I don’t understand why I cannot subscribe to it. Is there anybody else having similar RSS problems? Anybody who knows the answer can you kindly respond? Thanx!!|
Great site. Cheers for showing us.
Best view i have ever seen !
I could not refrain from commenting. Very well written.
Everything published was very logical. But, what about this?
what if you were to create a awesome post title? I am not saying
your information is not good, however suppose you added
a title that grabbed folk’s attention? I mean How To Install Custom Windows XP Themes
Old PC Gaming is a little boring. You ought to peek at
Yahoo’s home page and watch how they create post headlines
to get people interested. You might try adding a video or
a pic or two to grab people excited about what
you’ve got to say. Just my opinion, it could make your
posts a little bit more interesting.
This site is my aspiration, very great layout and perfect content.
Very nice post. I just stumbled upon your weblog and wished to say that I have truly enjoyed browsing your blog posts. After all I will be subscribing to your feed and I hope you write again soon!
Hi there, I found your web site by the use of Google while searching for a comparable subject,
your website came up, it looks great. I’ve bookmarked it in my
google bookmarks.
Hi there, just was alert to your blog through Google, and located that it is truly
informative. I am gonna watch out for brussels. I’ll appreciate if you proceed
this in future. A lot of people shall be benefited from your writing.
Cheers!
It’s truly very complicated in this busy life to listen news on TV,
thus I only use internet for that reason, and take the most recent information.
Its like you read my mind! You seem to know a lot about this, like you wrote the book in it
or something. I think that you can do with a few pics to drive
the message home a bit, but instead of that, this is great blog.
An excellent read. I will certainly be back.
I am now not sure the place you are getting your information, but good topic. I must spend a while finding out much more or understanding more. Thanks for excellent information I was on the lookout for this information for my mission.
Hello, Neat post. There’s a problem with your site in internet explorer,
would check this? IE still is the marketplace leader and a good component to other folks will pass over your wonderful writing
because of this problem.
If you desire to get a great deal from this piece of writing then you have to apply such techniques to your won blog.
Hello my family member! I want to say that this article is awesome, nice written and come with almost all significant infos. I’d like to look more posts like this .
I feel this is one of the so much significant information for me.
And i am happy studying your article. But should remark on some general
issues, The site taste is ideal, the articles is in point of
fact great : D. Just right activity, cheers
You actually make it seem so easy with your presentation but I find this matter to be
actually something that I think I would never understand.
It seems too complex and very broad for me. I’m looking forward for your
next post, I will try to get the hang of it!
I like this web blog so much, saved to bookmarks.
Keep on writing, great job!
This is a topic that’s close to my heart… Best wishes! Exactly where are your contact details though?
If you wish for to obtain a great deal from this paragraph then you have to
apply such methods to your won webpage.
Hello my friend! I wish to say that this article is amazing, great written and include almost all
vital infos. I’d like to peer extra posts like this .
Pretty! This was a really wonderful post. Thanks for providing this info.
What’s up to every body, it’s my first go to see of this weblog; this weblog consists of amazing and in fact excellent data for readers.
Oh my goodness! Incredible article dude! Thank you, However I am experiencing problems with your RSS. I don’t understand the reason why I can’t subscribe to it. Is there anybody else getting identical RSS issues? Anyone who knows the solution can you kindly respond? Thanx!
Thanks for the good writeup. It in fact was once a amusement account it.
Glance advanced to more brought agreeable from you!
By the way, how could we be in contact?
Thanks a bunch for sharing this with all of us you actually know what you are talking about! Bookmarked. Kindly also visit my site =). We could have a link exchange agreement between us!
Hi! This post could not be written any better! Reading this post reminds me of
my old room mate! He always kept talking about this.
I will forward this post to him. Fairly certain he will have a good
read. Thank you for sharing!
This article is really a nice one it assists new the web viewers,
who are wishing in favor of blogging.
Oh my goodness! Impressive article dude! Thank you, However I am experiencing issues with your RSS. I don’t understand why I am unable to join it. Is there anybody getting the same RSS problems? Anyone that knows the answer can you kindly respond? Thanks!!
Terrific article! This is the kind of information that are meant to be shared around the web.
Shame on Google for not positioning this publish upper!
Come on over and talk over with my site .
Thank you =)
whoah this weblog is fantastic i love reading your posts. Keep up the
great work! You recognize, lots of individuals are
hunting around for this information, you can help them greatly.
Hello there, I discovered your web site by way of Google
at the same time as looking for a similar topic, your site came
up, it appears great. I have bookmarked it in my google bookmarks.
Hi there, just become alert to your weblog via Google, and
found that it’s really informative. I am gonna be careful for brussels.
I’ll appreciate for those who proceed this in future.
A lot of folks will be benefited out of your writing. Cheers!
Unquestionably consider that which you stated. Your favourite justification appeared to be at the internet the simplest thing to understand of. I say to you, I definitely get irked at the same time as people consider concerns that they plainly don’t understand about. You managed to hit the nail upon the highest and defined out the entire thing with no need side effect , other folks can take a signal. Will likely be back to get more. Thanks
Hi Dear, are you really visiting this site daily, if so after that you will definitely get good know-how.
Thanks for sharing your info. I really appreciate your efforts and
I am waiting for your next write ups thanks once again.
May I just say what a comfort to discover somebody that really understands what they are discussing over the internet. You certainly understand how to bring an issue to light and make it important. More people ought to read this and understand this side of your story. I can’t believe you’re not more popular given that you surely possess the gift.
Hi there, this weekend is pleasant designed for me,
since this moment i am reading this fantastic informative piece of writing here at my
house.
Hi colleagues, nice article and fastidious arguments commented here, I am really enjoying by
these.
Terrific post however , I was wondering if you could write a litte more on this topic?
I’d be very thankful if you could elaborate a little bit
more. Cheers!
I love it when people come together and share opinions, great blog, keep it up.
Hi, I do think this is an excellent site. I stumbledupon it 😉 I may come back yet again since i have book marked it. Money and freedom is the greatest way to change, may you be rich and continue to help other people.
I read this article completely about the difference of most up-to-date and preceding technologies, it’s awesome article.|
Ahaa, its pleasant conversation concerning this article here at this website, I have read all that, so now me also commenting here.
What a stuff of un-ambiguity and preserveness of precious experience
regarding unexpected emotions.
Way cool! Some extremely valid points! I appreciate you writing this article and the rest of the website is also really good.
This is a topic that’s near to my heart… Best wishes! Exactly where are your contact details though?
It’s an remarkable post for all the online viewers;
they will take benefit from it I am sure.
I pay a quick visit day-to-day a few sites and sites to read posts, but this blog gives quality based
content.
I love it when folks come together and share thoughts.
Great site, continue the good work!
hey there and thank you for your info – I have certainly picked up something new from
right here. I did however expertise a few technical issues using this website, as I experienced to reload the website
many times previous to I could get it to load properly.
I had been wondering if your web host is OK?
Not that I am complaining, but slow loading instances times will sometimes affect your placement in google
and could damage your high-quality score if ads and marketing
with Adwords. Well I am adding this RSS to my e-mail and can look out for a lot more of your respective intriguing content.
Make sure you update this again soon.
Fastidious respond in return of this matter with solid arguments and describing the whole thing on the topic of that.
Having read this I thought it was really enlightening. I appreciate you taking the time and effort to put this informative article together. I once again find myself personally spending a lot of time both reading and posting comments. But so what, it was still worthwhile.
I got this site from my pal who informed me concerning
this web page and now this time I am visiting this web site and reading
very informative articles here.
Hi, I do believe this is a great web site. I stumbledupon it 😉 I will return once again since I book-marked it. Money and freedom is the greatest way to change, may you be rich and continue to guide other people.
Hi there would you mind stating which blog platform you’re using?
I’m planning to start my own blog in the near future but I’m having a hard time choosing between BlogEngine/Wordpress/B2evolution and Drupal.
The reason I ask is because your design seems different then most blogs and I’m looking for
something unique. P.S Apologies for being off-topic but I had to ask!
Hello Dear, are you in fact visiting this web page on a regular basis, if so afterward you will definitely obtain fastidious know-how.
Right now it sounds like Drupal is the top blogging platform
available right now. (from what I’ve read) Is that what you are using on your blog?
Spot on with this write-up, I absolutely believe this site needs a great deal more attention. I’ll probably be returning to read more, thanks for the information!
Great post. I was checking continuously this blog and I’m impressed! Extremely helpful info specifically the last part 🙂 I care for such info a lot. I was looking for this particular information for a long time. Thank you and good luck.
I am sure this post has touched all the internet visitors, its really really nice article on building up new web site.
Yes! Finally something about 카지노사이트.
Way cool! Some very valid points! I appreciate you writing this post plus the rest of the
site is very good.
A fascinating discussion is definitely worth comment. I think that you ought to write more on this issue, it might not be a taboo subject but typically people don’t discuss these subjects. To the next! Kind regards.
Fantastic beat ! I would like to apprentice while you amend your web site, how
could i subscribe for a blog website? The account helped me a acceptable deal.
I had been a little bit acquainted of this your broadcast provided bright
clear concept
What’s up i am kavin, its my first occasion to commenting
anywhere, when i read this article i thought i could also create comment due to this sensible
article.
Admiring the dedication you put into your blog and in depth information you offer.
It’s nice to come across a blog every once in a while that isn’t the same old rehashed information. Fantastic read!
I’ve saved your site and I’m including your RSS feeds to my Google account.
Have you ever heard of second life (sl for short). It is basically a video game where you can do anything you want. Second life is literally my second life (pun intended lol). If you want to see more you can see these second life articles and blogs
Howdy, I do think your website might be having internet
browser compatibility issues. When I take a look at your blog in Safari,
it looks fine but when opening in Internet Explorer, it’s got some overlapping issues.
I just wanted to provide you with a quick heads up! Apart from that, fantastic blog!
Hi, I do believe this is an excellent blog. I stumbledupon it 😉 I am going to revisit yet again since i have book-marked it. Money and freedom is the greatest way to change, may you be rich and continue to help others.
Hey there! I just wish to give you a big thumbs up for the great
information you have here on this post. I will be coming
back to your website for more soon.
Hey I know this is off topic but I was wondering if you knew of
any widgets I could add to my blog that automatically tweet
my newest twitter updates. I’ve been looking for a plug-in like this for quite some time and
was hoping maybe you would have some experience with something like this.
Please let me know if you run into anything. I truly enjoy reading your blog and I look forward to your new updates.
Wow! This blog looks just like my old one!
It’s on a totally different topic but it has pretty
much the same page layout and design. Great choice of colors!
After looking over a handful of the blog posts on your web page, I honestly like your technique of writing a blog. I book marked it to my bookmark site list and will be checking back soon. Please visit my website too and tell me how you feel.
I will right away grab your rss feed as I can’t to find your email subscription link or newsletter service.
Do you’ve any? Please let me realize so that I could subscribe.
Thanks.
I don’t know whether it’s just me or if perhaps everybody else encountering problems
with your blog. It looks like some of the text on your
content are running off the screen. Can somebody else please provide
feedback and let me know if this is happening to them as
well? This might be a issue with my web browser because
I’ve had this happen before. Thanks
Thank you for another excellent article. Where
else may anybody get that type of info in such a perfect approach of
writing? I’ve a presentation next week, and I’m at the look for such information.
I do believe all of the ideas you have introduced in your post.
They are very convincing and can definitely work. Nonetheless, the posts are too
brief for newbies. May just you please lengthen them
a little from next time? Thank you for the post.
You ought to take part in a contest for one of the highest quality sites on the net. I’m going to recommend this blog!
I think this is one of the most significant info for me.
And i am glad reading your article. But want to remark on some
general things, The web site style is perfect, the articles is really excellent
: D. Good job, cheers
Wow, that’s what I was searching for, what a data!
present here at this web site, thanks admin of this web site.
I like the helpful info you supply to your articles. I will bookmark your blog and check once more here regularly. I am reasonably certain I will learn lots of new stuff proper here! Good luck for the next!
Thanks for a marvelous posting! I actually enjoyed reading it, you happen to be a great author.
I will be sure to bookmark your blog and may come back later
in life. I want to encourage yourself to continue your great job, have a nice evening!
Your style is so unique in comparison to other folks
I have read stuff from. I appreciate you for posting when you have the opportunity, Guess I’ll just bookmark this page.
This page definitely has all of the information and facts I wanted about this subject and didn’t know who to ask.
Really clean internet site, regards for this post.
Wonderful items from you, man. I’ve take into account your stuff prior to and you are
simply extremely great. I actually like what you have received right here, really
like what you are stating and the way by which you are saying it.
You’re making it entertaining and you continue
to take care of to stay it smart. I cant wait to read far more from you.
That is really a terrific site.
The next time I read a blog, Hopefully it won’t fail me just as much as this particular one. I mean, Yes, it was my choice to read through, however I truly believed you would have something useful to say. All I hear is a bunch of whining about something that you could fix if you weren’t too busy looking for attention.
Hi, its nice post about media print, we all know media is a
impressive source of facts.
The next time I read a blog, I hope that it does not disappoint me as much as this particular one. I mean, Yes, it was my choice to read, however I genuinely thought you would probably have something useful to talk about. All I hear is a bunch of crying about something you could fix if you were not too busy seeking attention.
Its like you read my mind! You appear to know a lot about this, like you wrote the
book in it or something. I think that you could do with some pics to drive the
message home a bit, but other than that, this
is great blog. A great read. I’ll definitely be back.
Aw, this was an extremely nice post. Taking a few minutes and actual effort to make a top notch article… but what can I say… I put things off a lot and don’t seem to get nearly anything done.
Hi, after reading this amazing paragraph i am also delighted to share my experience here with mates.
This is a great tip particularly to those new to the blogosphere.
Short but very accurate info… Appreciate your sharing this one.
A must read article!
Now I am going away to do my breakfast, afterward having
my breakfast coming again to read further news.
Woah! I’m really digging the template/theme of this blog.
It’s simple, yet effective. A lot of times it’s very difficult
to get that “perfect balance” between user friendliness and visual
appearance. I must say you have done a great job with this.
Additionally, the blog loads extremely fast for me
on Internet explorer. Exceptional Blog!
Have you ever heard of second life (sl for short). It is basically a online game where you can do anything you want. SL is literally my second life (pun intended lol). If you want to see more you can see these sl articles and blogs
I got what you mean , thanks for posting .Woh I am glad to find this website through google. “Food is the most primitive form of comfort.” by Sheila Graham.
online pharmacies
you have a great blog here! would you like to make some invite posts on my blog?
You made some decent points there. I checked on the net for more information about the issue and found most people will go along with your views on this site.
Its like you read my mind! You seem to know a lot about this,
like you wrote the book in it or something.
I think that you can do with some pics to drive the message home a little bit, but other than that, this is great blog.
A fantastic read. I will definitely be back.
After I originally commented I seem to have clicked the -Notify
me when new comments are added- checkbox and from now on each time a comment
is added I receive four emails with the exact same
comment. Perhaps there is a means you can remove me from
that service? Thanks!
Howdy! I know this is kinda off topic however I’d figured I’d ask.
Would you be interested in exchanging links or maybe guest writing a blog article or vice-versa?
My website addresses a lot of the same subjects as yours and I feel we could greatly benefit from each other.
If you might be interested feel free to send me an email.
I look forward to hearing from you! Awesome blog by the way!
If some one wants expert view regarding blogging and site-building
then i advise him/her to visit this web site, Keep up the nice
job.
great points altogether, you just won a logo new reader. What would you suggest in regards
to your put up that you just made some days ago? Any sure?
It’s awesome designed for me to have a web page, which is valuable in support of my experience.
thanks admin
Everything is very open with a precise description of the issues. It was really informative. Your website is extremely helpful. Thanks for sharing!
You actually make it seem so easy with your presentation but I find this topic
to be really something which I think I would never understand.
It seems too complicated and very broad for me.
I am looking forward for your next post, I will try
to get the hang of it!
This design is steller! You certainly know how to keep a reader entertained. Between your wit and your videos, I was almost moved to start my own blog (well, almost…HaHa!) Excellent job. I really enjoyed what you had to say, and more than that, how you presented it. Too cool!
This blog is definitely rather handy since I’m at the moment creating an internet floral website – although I am only starting out therefore it’s really fairly small, nothing like this site. Can link to a few of the posts here as they are quite. Thanks much. Zoey Olsen
Keep on writing, great job!
Hi there, just became aware of your blog through Google, and found that it’s really
informative. I am going to watch out for brussels. I
will appreciate if you continue this in future. A lot of people will be benefited
from your writing. Cheers!
High rep C&P is a perfect exercise but may be difficult do by using a barbell.|Individual will include a top 5 fantasy football QB at one time next period. Get going, with implausible prospects getting well-known the particular world of football! Should you deadlift in good form, you’re fine.|The football draw game – extraordinary bộ phim về ronaldo them isn’t it? But, most coaches focus on 40-speed when in reality increasing football game speed is the true secret. Now it has grew up to be a great corporate.|But, for most guys, this can be in far more than 700-lbs.In addition to these not being big ticket items, do supporters desire these football fundraising tips and hints?|However, you are not satisfied although collection of merchandises you have.For example, the “E” Bell rings whenever Navy beats Army most of the three seasons of baseball.|Therefore if they play inside, they’ll have to develop the football field very manageable.In the following practices decide the tempo up and evaluate them once.|A team that has internal problems and conflicts has odds of failure. Nowadays, people have access to information everywhere they desire. Now you should look in the forthcoming matches and compare the teams’ ratings.|Over 24 years of coaching youth football.
What’s up, yeah this article is genuinely fastidious and I have learned
lot of things from it about blogging. thanks.
They make researches and studies regarding each game and its players. Watch them closely during team drills when that doctor needs to work together with other players. This is a perfect football strength exercise.|Try reading up these tips and apply these your own online football betting. When making bets,serie a 2017/18 you cant ever be without you will win nearby bet that you make. This bell sits in front of Bancroft Hall in Annapolis.|By adding chains or bands, you should use a small sized bag but work the legs and back even harder. You can easily get and also look fresh air and good websites offering this assistance. These games are patterned after American Football.|Dominate the clock and a person a better chance of success. The higher priced football fundraisers that are sold, add more money per trade.
Hi, I check your blogs on a regular basis. Your story-telling style is witty, keep it up!
Actually when someone doesn’t be aware of afterward its up to
other viewers that they will help, so here it occurs.
Pretty nice post. I just stumbled upon your blog and wished to say that I’ve truly
enjoyed surfing around your blog posts. After all I’ll be
subscribing to your feed and I hope you write again very
soon!
I really admire your writing! I love sucking dick btw hmu
I like the valuable information you provide in your articles.
I’m amazed, I must say. Rarely do I come across a blog that’s both educative and engaging, and without
a doubt, you’ve hit the nail on the head. The problem is an issue that not enough folks
are speaking intelligently about. Now i’m very happy I found this during my
search for something regarding this.
Write more, thats all I have to say. Literally, it seems as though you relied on the
video to make your point. You definitely know what youre talking about,
why throw away your intelligence on just posting videos to your site when you
could be giving us something informative to read?
I all the time emailed this webpage post page to all
my friends, for the reason that if like to read
it then my friends will too.
Hey there! I simply would like to give you a big thumbs up for your excellent information you’ve got here on this post. I will be coming back to your site for more soon.
Quality articles or reviews is the key to invite
the viewers to visit the site, that’s what this site is providing.
resemblance of {latest|newest|most recent|most
Excellent post. I was checking continuously this blog and I’m impressed!
Very helpful information specially the last part 🙂 I care for such information a
lot. I was seeking this particular information for a very long time.
Thank you and best of luck.
Howdy just wanted to give you a quick heads up and let you know a
few of the pictures aren’t loading properly. I’m not sure why but I think its a linking issue.
I’ve tried it in two different web browsers and both show the
same outcome.
Hello my friend! I want to say that this article is awesome, nice written and include approximately
all important infos. I’d like to look more posts like this
.
Hey would you mind stating which blog platform you’re using?
I’m planning to start my own blog in the near future but I’m having a
tough time choosing between BlogEngine/Wordpress/B2evolution and Drupal.
The reason I ask is because your design seems different then most blogs and I’m looking for
something completely unique. P.S Sorry for being off-topic but I had to ask!
Very nice article, exactly what I was looking for.
Excellent blog here! Additionally your website a lot up fast!
What web host are you using? Can I get your associate hyperlink for your host?
I desire my website loaded up as quickly as yours lol
This is a topic that’s close to my heart… Thank you! Where are your contact details though?
My brother suggested I might like this blog. He was entirely right.
This post truly made my day. You cann’t imagine simply
how much time I had spent for this info!
Thanks!
You have brought up a very excellent points, appreciate it for the post.
Hello to every body, it’s my first visit of this weblog; this blog carries amazing and truly
good data for visitors.
Just want to say your article is as surprising.
The clarity in your post is simply spectacular and i could assume you’re an expert on this subject.
Well with your permission let me to grab your feed to keep up to date with forthcoming post.
Thanks a million and please keep up the rewarding work.
My brother suggested I would possibly like this web
site. He was once entirely right. This publish truly
made my day. You cann’t consider just how so much time
I had spent for this info! Thanks!
) I deal with such information a lot.
Great article, exactly what I needed.
Awesome! Its genuinely amazing post, I have got much clear idea concerning from
this article.
What’s Going down i’m new to this, I stumbled upon this I have discovered It
absolutely helpful and it has aided me out loads. I hope to give a contribution & assist other users like its helped me.
Great job.
Pretty nice post. I just stumbled upon your blog and wanted to say that I have really
enjoyed surfing around your blog posts. In any case
I’ll be subscribing to your feed and I hope you write again soon!
I blog quite often and I genuinely thank you for your information. This great article has truly peaked my interest. I am going to book mark your site and keep checking for new details about once per week. I subscribed to your Feed too.
I’m not sure why but this blog is loading incredibly slow for me.
Is anyone else having this problem or is it a issue on my end?
I’ll check back later and see if the problem still exists.
I like the valuable information you provide in your articles.
I will bookmark your blog and check again here regularly.
I’m quite certain I will learn a lot of new stuff right here!
Best of luck for the next!
What’s up, I log on to your blogs on a regular basis. Your humoristic
style is witty, keep up the good work!
Great line up. We will be linking to this great article on our site. Keep up the good writing.
Pretty! This has been a really wonderful article. Thank you for supplying these details.
As a Newbie, I am continuously searching online for articles that can benefit me. Thank you
Woah! I’m really enjoying the template/theme of this website.
It’s simple, yet effective. A lot of times it’s challenging
to get that “perfect balance” between usability and appearance.
I must say that you’ve done a very good job
with this. Additionally, the blog loads extremely quick for me on Chrome.
Outstanding Blog!
hottest and preceding technologies, it?s awesome article.|
But should statement
An interesting discussion is worth comment. I think that you should write more on this topic, it might not be a taboo subject but generally people are not enough to speak on such topics. To the next. Cheers
I’ve been surfing online greater than three hours as of late, yet I by no means found any attention-grabbing article
like yours. It’s lovely price sufficient for me.
In my opinion, if all website owners and bloggers made good content as you probably
did, the internet can be much more useful than ever before.
If some one desires expert view regarding blogging and site-building after that i recommend him/her to go to see this blog,
Keep up the fastidious work.
This is a topic that is close to my heart… Cheers! Exactly where are your contact details though?
response in return of this issue with firm arguments and describing all concerning that.|
Great site. Plenty of useful info here. I’m sending it to several friends ans additionally sharing in delicious.
And naturally, thanks on your sweat!
Everyone loves it when folks come together and share ideas. Great site, continue the good work!
Thank you for another informative site. The place else
could I am getting that kind of info written in such an ideal way?
I’ve a project that I’m just now operating on, and I have been at the glance out for such information.
I would like to thank you for the efforts you have put in penning this blog.
I’m hoping to check out the same high-grade content by you
later on as well. In fact, your creative writing abilities has
inspired me to get my own, personal blog now
😉
Appreciate the recommendation. Will try it out.
Hmm it seems like your website ate my first
comment (it was extremely long) so I guess I’ll just sum it up what
I wrote and say, I’m thoroughly enjoying your blog. I too am an aspiring blog writer
but I’m still new to the whole thing. Do you have any tips for beginner blog writers?
I’d definitely appreciate it.
For hottest information you have to pay a quick visit world wide web and on web I found this site as a
best website for most recent updates.
Hello.This post was really interesting, particularly since I was looking for thoughts on this matter last Thursday.
Cool blog! Is your theme custom made or did you download it from somewhere?
A design like yours with a few simple adjustements would really make my blog shine.
Please let me know where you got your theme. Appreciate it
I am curious to find out what blog system you have been using?
I’m experiencing some minor security issues with my latest site and I would like to find something more safe.
Do you have any recommendations?
Oh my goodness! Amazing article dude! Many thanks, However I am having difficulties with your RSS. I don’t understand the reason why I cannot join it. Is there anyone else having the same RSS issues? Anyone who knows the solution can you kindly respond? Thanx!!
This is a very good tip particularly to those new to the blogosphere.
Simple but very accurate info… Many thanks for sharing
this one. A must read article!
This blog was… how do you say it? Relevant!! Finally I have found something which helped me. Appreciate it!
Aw, this was an exceptionally good post. Spending some time and actual effort to create a superb article… but what can I say… I put things off a whole lot and don’t manage to get anything done.
Useful information. Fortunate me I discovered your website by chance, and
I am stunned why this twist of fate didn’t happened earlier!
I bookmarked it.
obviously like your web-site however you have to check the spelling on several of your posts. A number of them are rife with spelling problems and I in finding it very bothersome to tell the reality then again I will certainly come back again.
Fantastic website. A lot of helpful information here. I am sending it to a few buddies ans additionally sharing in delicious. And certainly, thanks on your effort!
It’s wonderful that you are getting thoughts from
this post as well as from our argument made at this place.
You are my intake, I have few web logs and often run out from post :). “Truth springs from argument amongst friends.” by David Hume.
Thanks for finally talking about > How To Install
Custom Windows XP Themes Old PC Gaming < Liked it!
Thanks for sharing excellent informations. Your site is very cool. I’m impressed by the details that you’ve on this website. It reveals how nicely you understand this subject. Bookmarked this website page, will come back for more articles. You, my pal, ROCK! I found just the information I already searched all over the place and just could not come across. What a great website.
Very interesting topic, thanks for putting up.
What i do not understood is in reality how you’re not actually a lot more smartly-appreciated than you might be now. You are very intelligent. You already know therefore significantly when it comes to this topic, made me personally believe it from so many varied angles. Its like women and men aren’t fascinated until it is one thing to accomplish with Woman gaga! Your individual stuffs great. All the time deal with it up!
I was suggested this website by my cousin. I am not sure whether this post
is written by him as no one else know such detailed about my problem.
You are amazing! Thanks!
Very interesting info !Perfect just what I was looking for! “I meant what I said, and I said what I meant. An elephant’s faithful, one hundred percent.” by Dr. Seuss.
Right now it sounds like BlogEngine is the preferred blogging platform out there right now.
(from what I’ve read) Is that what you are
using on your blog?
The next time I read a blog, Hopefully it doesn’t disappoint me just as much as this particular one. I mean, Yes, it was my choice to read through, but I genuinely thought you would probably have something useful to talk about. All I hear is a bunch of whining about something that you can fix if you were not too busy looking for attention.
Hey! I know this is kinda off topic but
I was wondering if you knew where I could
get a captcha plugin for my comment form?
I’m using the same blog platform as yours and I’m having trouble finding one?
Thanks a lot!
Very interesting details you have observed, appreciate it for posting. “Death is Nature’s expert advice to get plenty of Life.” by Johann Wolfgang von Goethe.
I reckon something truly interesting about your site so I bookmarked.
After examine a few of the weblog posts on your website now, and I really like your method of blogging. I bookmarked it to my bookmark web site record and might be checking back soon. Pls try my website as nicely and let me know what you think.
It’s really very difficult in this busy life to listen news on TV, therefore I just use
internet for that reason, and take the most recent information.
Your style is really unique in comparison to other people I’ve read stuff from. Many thanks for posting when you have the opportunity, Guess I’ll just book mark this web site.
Thank you for another wonderful article. Where else could anyone get that kind of info in such an ideal way of writing? I have a presentation next week, and I’m on the look for such information.
It’s amazing to visit this web page and reading the views of all mates about this post, while I am also eager of getting
knowledge.
Thanks for your marvelous posting! I seriously enjoyed reading it, you’re
a great author. I will be sure to bookmark your blog and
definitely will come back in the foreseeable future.
I want to encourage continue your great job, have a nice weekend!
Great blog you’ve got here.. It’s hard to find excellent writing like yours these days. I seriously appreciate people like you! Take care!!
I was recommended this website by means of my cousin. I’m now not certain whether or not this publish is written through
him as nobody else know such specific about my difficulty.
You are incredible! Thank you!
WONDERFUL Post.thanks for share..more wait .. …
Excellent site you’ve got here.. It’s difficult to find high quality writing like yours nowadays. I honestly appreciate people like you! Take care!!
My partner and I stumbled over here different website
and thought I might as well check things out.
I like what I see so i am just following you. Look forward to
looking at your web page again.
I used to be suggested this web site by means of my cousin. I’m not positive whether or not this post is written through him as nobody else recognise such detailed
about my problem. You’re amazing! Thank you!
If you want to grow your know-how only keep visiting this website and be
updated with the latest gossip posted here.
I every time spent my half an hour to read this website’s articles or reviews every day along with a cup of coffee.
Greetings from California! I’m bored to tears at work so I decided to check out your website on my iphone during lunch break. I really like the knowledge you present here and can’t wait to take a look when I get home. I’m surprised at how fast your blog loaded on my cell phone .. I’m not even using WIFI, just 3G .. Anyways, fantastic blog!|
I?¦ve learn some excellent stuff here. Definitely price bookmarking for revisiting. I surprise how so much attempt you put to create one of these wonderful informative website.
It’s amazing to visit this web site and reading the views of all friends regarding this paragraph, while
I am also keen of getting knowledge.
Spot on with this write-up, I seriously believe that this web site needs a lot more attention. I’ll probably be returning to read through more, thanks for the information.
Hello! I know this is somewhat off topic but I was wondering which blog platform are you using for this site? I’m getting fed up of WordPress because I’ve had issues with hackers and I’m looking at alternatives for another platform. I would be great if you could point me in the direction of a good platform.
Good day! I could have sworn I’ve visited this website before but after browsing through many of the posts I realized it’s new to me. Nonetheless, I’m certainly delighted I discovered it and I’ll be book-marking it and checking back frequently!
excellent points altogether, you just received a logo new reader.
What may you recommend about your post that you just made some days ago?
Any sure?
Hello my friend! I wish to say that this article is awesome, great written and come with approximately all important infos. I’d like to see extra posts like this .
Good post! We will be linking to this particularly great content on our website. Keep up the good writing.
Excellent weblog here! Additionally your website loads up fast! What host are you using? Can I get your associate link in your host? I wish my web site loaded up as quickly as yours lol
Appreciate the recommendation. Let me try it out.
What’s up, just wanted to tell you, I enjoyed this blog post.
It was funny. Keep on posting!
I like what you guys tend to be up too. Such clever
work and exposure! Keep up the very good works guys I’ve added you guys to my personal blogroll.
I would like to thank you for the efforts you’ve put in writing this website. I really hope to see the same high-grade blog posts from you later on as well. In fact, your creative writing abilities has motivated me to get my own, personal website now 😉
What’s Taking place i am new to this, I stumbled upon this I’ve found It absolutely useful and it has helped me out loads. I hope to give a contribution & aid different users like its aided me. Good job.|
Heya i am for the primary time here. I found this board and I find It really helpful
& it helped me out a lot. I hope to give something back and
help others like you helped me.
Hi there, after reading this remarkable paragraph i am as well
cheerful to share my know-how here with friends.
I enjoy what you guys are usually up too. This kind of clever work and exposure!
Keep up the terrific works guys I’ve you guys to my own blogroll.
It’s actually a cool and useful piece of info. I’m glad
that you simply shared this helpful info with us. Please keep us up
to date like this. Thanks for sharing.
Hi my friend! I want to say that this post is awesome, nice written and include approximately all significant infos. I¦d like to look extra posts like this .
The swing is an accessory exercise. Go with multiple sets of low to medium reps. You shouldn’t be afraid using Câu lạc bộ Liverpool some real weight and go with sets of four years old. These do best following an important movement like deadlifts.Whether it is a basketball pick, or football or another sport pick, you in order to be conservative. Functions as your own game of Football can be a national leisure pursuit. Football betting is heavily consistent with various factors.{But, let’s clear typical up.protein is really food in liquid come to be.
Awesome website you have here but I was wondering if you knew of any discussion boards that cover the same topics discussed in this article? I’d really love to be a part of group where I can get feed-back from other experienced individuals that share the same interest. If you have any recommendations, please let me know. Thanks a lot!
Appreciate the recommendation. Let me try it out.
Opportunity is like a penis, as long as you hold it in your hand, it will get bigger and bigger. Click:oral sex.
all the time i used to read smaller content that as well clear
their motive, and that is also happening with this article which I
am reading now.
Hurrah, that’s what I was searching for, what a stuff!
existing here at this weblog, thanks admin of this web site.
Hi it’s me, I am also visiting this website daily, this
website is really good and the users are really sharing good thoughts.
Oh my goodness! a tremendous article dude. Thanks However I am experiencing situation with ur rss . Don’t know why Unable to subscribe to it. Is there anyone getting equivalent rss drawback? Anyone who knows kindly respond. Thnkx
This design is wicked! You certainly know how to keep a reader amused. Between your wit and your videos, I was almost moved to start my own blog (well, almost…HaHa!) Wonderful job. I really loved what you had to say, and more than that, how you presented it. Too cool!
Hello just wanted to give you a quick heads up. The text in your post
seem to be running off the screen in Internet explorer.
I’m not sure if this is a formatting issue or something to do with web browser compatibility but I
thought I’d post to let you know. The design and style look great though!
Hope you get the issue solved soon. Thanks
I think the admin of this website is actually working hard for his site, since here every material is quality based data.
Hello there! Do you use Twitter? I’d like
to follow you if that would be okay. I’m undoubtedly
enjoying your blog and look forward to new posts.
Watch the film and diagram every single play the group runs including repeats. Which i Đội hình Arsenal use traditional. Write down the play number and the down and distance on the best of one’s knowledge including caption every single play i.e. I would write play 1, 1 and 10, Pitch Sweep Right and diagram the blocking assignments as executed and the backfield player numbers. For every playoff game I would take winds up time to write down every player’s number.
Hey there! This is kind of off topic but I need some advice from an established blog. Is it tough to set up your own blog? I’m not very techincal but I can figure things out pretty fast. I’m thinking about setting up my own but I’m not sure where to begin. Do you have any points or suggestions? With thanks|
Merchant Accounts For Online Smoke Shops|Best Cửa Hàng|#1 Online Headshop|Zerona Smoke Shop|Denver’s Premier Smoke Cửa Hàng bubbler jukebox điện thoại thông minh app, you can find everything you need to know on the #DopeBoo blog. The problem with most online head shops is they’re only the middlemen for other sellers. Everything you see here is from a genuine trực tuyến smoke cửa hàng staffed by a professional team of experts who use the same products you do.|We’ve made the world’s best smoke cửa hàng with only the best bongs, vapes, and dab rigs. They all of the new and hottest brands, our new favorite being Mathematix Glass. They stock a long list of American made glass and offer free U.S. shipping on all products. Another plus is that their hassle-không tính phí returns and customer service are remarkable.
I like this blog very much, Its a rattling nice position to read and find information. “Do not use a cannon to kill a mosquito.” by Confucius.
Good day! Would you mind if I share your blog with my twitter
group? There’s a lot of people that I think would really enjoy
your content. Please let me know. Thank you
Great post. I’m dealing with many of these issues as well..
I’m gone to inform my little brother, that he
should also pay a quick visit this web site on regular basis to take updated from latest gossip.
Hi, I wish for to subscribe for this weblog to take hottest updates, therefore where can i do it please help.
I have been surfing on-line more than three hours these days, but I never found
any attention-grabbing article like yours. It is lovely price sufficient for me.
In my view, if all webmasters and bloggers made just right content material as you probably did, the web can be much more useful than ever before.
A motivating discussion is worth comment. I believe that you need to publish more about this subject, it might not be a taboo matter but usually people don’t speak about such topics. To the next! Cheers!!
If some one needs expert view regarding blogging after that i advise him/her to pay a quick visit this website, Keep up the nice
job.
I don’t even know how I stopped up here, but I believed this post was once great.
I do not understand who you’re however certainly you are going to a famous blogger for those who
are not already. Cheers!
Good post. I learn something totally new and challenging on websites I stumbleupon on a daily basis. It’s always helpful to read articles from other authors and practice a little something from other sites.
Do you have a spam issue on this site; I also am a blogger, and I was wondering your situation;
many of us have created some nice practices and we are looking
to exchange techniques with other folks, please shoot me an email if interested.
For newest information you have to go to see world wide web and on web I
found this web page as a best website for most up-to-date updates.
This is a good tip especially to those fresh to the blogosphere.
Short but very precise info… Appreciate your sharing
this one. A must read article!
After I originally left a comment I appear to have clicked on the -Notify me when new comments are added- checkbox and from now on each time a comment is added I recieve four emails with the same comment. Is there a means you can remove me from that service? Kudos!|
bookmarked!!, I like your blog.
Appreciating the commitment you put into your website and detailed information you offer. It’s good to come across a blog every once in a while that isn’t the same outdated rehashed material. Excellent read! I’ve bookmarked your site and I’m including your RSS feeds to my Google account.|
Your place is valueble for me. Thanks!…
Currently it sounds like Movable Type is the best blogging platform available right now. (from what I’ve read) Is that what you’re using on your blog?
Its not my first time to visit this web page, i am browsing this website dailly and get good data from here daily.
Having read this I thought it was very informative. I appreciate you finding the time and effort to put this information together. I once again find myself spending a lot of time both reading and posting comments. But so what, it was still worthwhile.
Attractive section of content. I just stumbled upon your web site and in accession capital to assert that I get in fact enjoyed account your blog posts. Anyway I’ll be subscribing to your feeds and even I achievement you access consistently fast.
Chastity class is not about not engaging in sexual behaviors, not casual sexual behaviors. Bloggers, women outsiders in your family can do it, right? Click:Forced rape.
You’re so interesting! I do not suppose I’ve read through something like this before. So wonderful to find someone with unique thoughts on this issue. Seriously.. thank you for starting this up. This website is one thing that is needed on the internet, someone with a bit of originality!
Can I just say what a relief to discover somebody who really understands what they are discussing on the net. You certainly realize how to bring a problem to light and make it important. A lot more people have to check this out and understand this side of the story. I can’t believe you aren’t more popular since you certainly possess the gift.
There are some fascinating deadlines in this article but I don’t know if I see all of them heart to heart. There is some validity but I’ll take maintain opinion till I look into it further. Good article , thanks and we wish extra! Added to FeedBurner as properly
canadian pharcharmy online
Very good information. Lucky me I discovered your site by chance (stumbleupon). I have bookmarked it for later!
This is the perfect blog for anybody who wants to understand this topic. You realize a whole lot its almost hard to argue with you (not that I actually would want to…HaHa). You certainly put a brand new spin on a subject which has been discussed for decades. Wonderful stuff, just great.
Hello, i believe that i saw you visited my web site thus i got here to return the choose?.I’m trying to to find issues to improve my site!I suppose its adequate to use a few of your ideas!!|
Good post. I definitely appreciate this website. Thanks!
This design is incredible! You most certainly know how to keep a reader entertained.
Between your wit and your videos, I was almost moved to start my own blog (well, almost…HaHa!) Excellent job.
I really loved what you had to say, and more than that, how
you presented it. Too cool!
If you are going for finest contents like I do,
just pay a visit this site everyday as it presents feature contents, thanks
You have noted very interesting details ! ps nice website .
I am regular reader, how are you everybody? This piece of writing posted at this site
is in fact nice.
It’s very simple to find out any matter on web as compared
to textbooks, as I found this paragraph at this website.
Hi there! Someone in my Myspace group shared
this website with us so I came to take a look.
I’m definitely loving the information. I’m book-marking
and will be tweeting this to my followers! Fantastic blog and superb style and design.
Hello, always i used to check web site posts here early in the daylight, since i like to gain knowledge of more and more.
I’m really enjoying the design and layout of your site. It’s a very easy on the eyes which makes it much more enjoyable for me to come here and visit more often. Did you hire out a developer to create your theme? Fantastic work!
legitimate canadian pharmacy online
Good day! I could have sworn I’ve been to this
website before but after reading through some of the post I realized
it’s new to me. Anyways, I’m definitely glad I found it
and I’ll be bookmarking and checking back frequently!
Its like you read my mind! You appear to know so much about this, like you wrote the book in it or something.
I think that you can do with some pics to drive the message home a bit, but instead
of that, this is fantastic blog. A great read.
I will definitely be back.
Hi there mates, pleasant post and good urging
commented here, I am in fact enjoying by these.
F*ckin’ awesome things here. I am very happy to peer your article. Thank you so much and i am taking a look forward to touch you. Will you please drop me a e-mail?
Its like you read my mind! You appear to know a lot about this, like you wrote the book in it or something. I think that you could do with a few pics to drive the message home a little bit, but instead of that, this is fantastic blog. A fantastic read. I’ll certainly be back.
I was wondering if you ever considered changing the page
layout of your blog? Its very well written; I love what youve
got to say. But maybe you could a little more in the way of content so people could connect with it better.
Youve got an awful lot of text for only having 1 or two pictures.
Maybe you could space it out better?
A fascinating discussion is definitely worth comment. I do believe that you ought to publish more on this issue, it might not be a taboo matter but usually people do not discuss these subjects. To the next! All the best!!
I do not know whether it’s just me or if perhaps everybody else
experiencing issues with your website. It looks like some of the
text on your content are running off the screen. Can someone else please
comment and let me know if this is happening to them too?
This may be a issue with my internet browser because I’ve
had this happen previously. Thank you
Ahaa, its nice conversation regarding this article here at this website,
I have read all that, so at this time me also commenting at this place.
Online betting http://www.warr8.com online betting with the most active service at this time. Collection of many famous games, many camps Comes with an automatic deposit and withdrawal system with a quality team to take care of it 24 hours a day
If you are going for finest contents like me,
only go to see this web site every day because it presents quality contents, thanks
Attractive section of content. I just stumbled upon your weblog and in accession capital to
assert that I get actually enjoyed account your blog posts.
Any way I will be subscribing to your augment and even I achievement
you access consistently rapidly.
I went over this web site and I believe you have a lot of excellent information, saved to my bookmarks (:.
Hi there! I simply wish to give you a huge thumbs up for the great info you have got here on this post. I am returning to your blog for more soon.
Excellent beat ! I would like to apprentice at
the same time as you amend your web site, how can i subscribe for a weblog site?
The account helped me a appropriate deal. I had been tiny bit acquainted of this your broadcast provided vivid
transparent concept
Hello! I just wanted to ask if you ever have any issues with hackers?
My last blog (wordpress) was hacked and I ended up losing
several weeks of hard work due to no back up.
Do you have any solutions to protect against
hackers?
I’m still learning from you, as I’m making my way to the top as well. I absolutely liked reading everything that is posted on your blog.Keep the posts coming. I loved it!
fantastic submit, very informative. I ponder why the opposite experts of this sector don’t understand this. You should continue your writing. I’m confident, you have a huge readers’ base already!
If you are going for finest contents like me, simply pay a quick visit this website
daily since it presents feature contents, thanks
Fabulous, what a web site it is! This web site presents useful data to us, keep it up.
Hey very nice website!! Man .. Beautiful .. Amazing .. I will bookmark your blog and take the feeds also…I am happy to find so many useful information here in the post, we need develop more techniques in this regard, thanks for sharing. . . . . .
Hello my loved one! I want to say that this post is amazing, great written and come with approximately all significant infos.
I would like to see more posts like this .
You’re so awesome! I do not think I’ve truly read through anything like that before. So wonderful to find somebody with some genuine thoughts on this topic. Seriously.. thanks for starting this up. This website is one thing that’s needed on the web, someone with some originality.
Write more, thats all I have to say. Literally, it seems as though you relied on the video
to make your point. You clearly know what youre talking about,
why waste your intelligence on just posting videos to your site when you could be giving us
something enlightening to read?
Everything is very open with a precise description of the challenges.
It was definitely informative. Your site is extremely helpful.
Many thanks for sharing!
I read this piece of writing completely concerning the resemblance of
hottest and preceding technologies, it’s amazing article.
My spouse and I stumbled over here coming from a different page and thought I might check things out.
I like what I see so now i’m following you. Look forward to finding out
about your web page repeatedly.
What i don’t understood is in fact how you’re not really a lot more smartly-preferred than you may be
right now. You are so intelligent. You understand thus considerably in terms of this
matter, produced me in my opinion imagine it from numerous numerous angles.
Its like women and men don’t seem to be involved until it’s
one thing to accomplish with Woman gaga! Your own stuffs nice.
Always deal with it up!
I am not sure where you’re getting your information, but good topic.
I needs to spend some time learning much more or understanding more.
Thanks for wonderful information I was looking for this
info for my mission.
Heya i am for the first time here. I came
across this board and I to find It really useful & it helped
me out a lot. I am hoping to offer something again and aid others
like you aided me.
Good day! I could have sworn I’ve visited this site before but after looking at some of the articles I realized it’s new to me. Nonetheless, I’m definitely delighted I came across it and I’ll be book-marking it and checking back regularly!
bookmarked!!, I love your blog!
I have to get across my affection for your generosity giving support to people who absolutely need assistance with this issue. Your personal dedication to passing the message up and down was wonderfully practical and have really encouraged those much like me to attain their endeavors. This warm and helpful advice signifies a whole lot a person like me and a whole lot more to my peers. Warm regards; from everyone of us.
whoah this blog is excellent i really like reading your articles.
Keep up the good work! You understand, many persons are looking around
for this information, you can help them greatly.
The other day, while I was at work, my cousin stole
my iphone and tested to see if it can survive a 40 foot drop, just so she can be a youtube
sensation. My iPad is now destroyed and she has 83 views.
I know this is entirely off topic but I had to share it with someone!
An intriguing discussion is definitely worth comment. There’s no doubt that that you need to write more about this issue, it may not be a taboo matter but usually people do not discuss such issues. To the next! Best wishes!!|
For latest information you have to pay a visit world-wide-web and on the web I
found this web page as a best website for most up-to-date updates.
I’ll immediately clutch your rss as I can not to find your e-mail subscription link or e-newsletter service. Do you have any? Kindly permit me realize so that I may subscribe. Thanks.|
When someone writes an paragraph he/she keeps the image of a user in his/her mind that
how a user can understand it. Thus that’s why this
article is amazing. Thanks!
I really love your blog.. Great colors & theme. Did you create this website yourself? Please reply back as I’m attempting to create my very own site and want to find out where you got this from or just what the theme is called. Cheers!
I truly love your website.. Great colors & theme. Did you build this website yourself? Please reply back as I’m wanting to create my own personal blog and want to know where you got this from or just what the theme is named. Thank you!
I really love your site.. Very nice colors & theme. Did you create this site yourself? Please reply back as Iím looking to create my own blog and want to learn where you got this from or exactly what the theme is called. Many thanks!
First of all I want to say great blog! I had a quick question that
I’d like to ask if you don’t mind. I was interested to know how you center yourself and clear your thoughts prior to writing.
I’ve had trouble clearing my mind in getting my ideas out.
I do take pleasure in writing but it just seems like the first 10 to 15 minutes are usually wasted simply just trying to figure out how to begin. Any ideas
or tips? Cheers!
Great web site. Lots of useful info here. I am sending it to a few buddies ans additionally sharing in delicious. And obviously, thank you to your sweat!
Hola! I’ve been following your blog for a while now and finally got the bravery to go ahead and give you a shout out from Huffman Texas! Just wanted to mention keep up the fantastic work!
You’re so awesome! I do not think I’ve read through something like this before. So good to discover somebody with a few genuine thoughts on this subject. Seriously.. many thanks for starting this up. This web site is something that’s needed on the internet, someone with some originality!
Very good post. I absolutely appreciate this site.
Stick with it!
I used to be suggested this blog by means of my cousin. I am
now not positive whether or not this submit is written by means of
him as no one else recognise such distinctive about my difficulty.
You’re incredible! Thank you!
I like the helpful info you supply to your articles.
I’ll bookmark your blog and test once more here regularly.
I am fairly sure I will learn many new stuff proper right
here! Best of luck for the next!
Hi there! Do you use Twitter? I’d like to follow you if that would be ok.
I’m absolutely enjoying your blog and look forward to new posts.
Hola! I’ve been reading your website for
some time now and finally got the courage to go ahead and give you a shout out from Humble Texas!
Just wanted to tell you keep up the excellent job!
Hello it’s me, I am also visiting this website daily, this site is genuinely nice and the people
are actually sharing good thoughts.
When I originally commented I seem to have clicked on the -Notify me when new comments
are added- checkbox and from now on whenever a comment is added I
recieve four emails with the exact same comment.
Is there a way you are able to remove me from that service?
Cheers!
What’s up, all the time i used to check website
posts here in the early hours in the break of day, because i love to
gain knowledge of more and more.
What’s up, all the time i used to check website
posts here in the early hours in the break of day, because i love to
gain knowledge of more and more.
Its great as your other articles : D, appreciate it for putting up.
Good information. Lucky me I came across your site by accident (stumbleupon). I’ve book marked it for later!
I do consider all of the ideas you’ve offered to your post.
They’re really convincing and will definitely work.
Nonetheless, the posts are very brief for novices.
Could you please extend them a little from subsequent time?
Thank you for the post.
I think this is among the most significant info for me.
And i’m glad reading your article. But wanna remark on few general things,
The website style is great, the articles is really excellent :
D. Good job, cheers
It’s a shame you don’t have a donate button! I’d without a
doubt donate to this superb blog! I suppose for now i’ll settle for book-marking and adding your RSS feed to my Google account.
I look forward to new updates and will talk about this blog with my Facebook group.
Talk soon!
Greate article. Keep posting such kind of information on your blog. Im really impressed by it.
Have you ever thought about adding a little bit more than just your
articles? I mean, what you say is important and everything.
Nevertheless think about if you added some great visuals or videos to give your posts more, “pop”!
Your content is excellent but with images and clips, this blog
could certainly be one of the very best in its field. Excellent blog!
I’m curious to find out what blog system you have been using?
I’m experiencing some small security problems with my
latest website and I would like to find something more risk-free.
Do you have any solutions?
Greetings! Very useful advice within this post! It’s the little
changes that will make the greatest changes. Many thanks for sharing!
This website online can be a stroll-through for all of the data you needed about this and didn’t know who to ask. Glimpse right here, and also you’ll positively uncover it.
You have made some really good points there. I looked on the web for more info about the issue and found most people will go along with your views on this web site.
Hello there! I simply wish to offer you a huge thumbs up for your great information you’ve got here on this post. I’ll be coming back to your site for more soon.
Great beat ! I would like to apprentice whilst you amend your website, how could i subscribe for a weblog site?
The account aided me a applicable deal. I had been a little bit acquainted of this your broadcast provided vivid clear concept
Thank you for every other fantastic article. Where else may anybody get that kind of information in such a perfect approach of writing? I have a presentation next week, and I’m on the look for such info.
I really like reading through an article that
can make men and women think. Also, thank you for allowing for me to comment!
There’s certainly a lot to find out about this subject. I like all of the points you made.
You are so cool! I don’t believe I’ve truly read a single thing like this before. So wonderful to find someone with some genuine thoughts on this subject. Seriously.. thanks for starting this up. This web site is one thing that is needed on the web, someone with a bit of originality!
However, be certain choose your site that is honest. Cat condo I pick Bama mainly because best ever possible. Plus, it really helps build focus and strength of mind silicone bubbler pipe{The buzzing activities in the football fan gift shops go at least a new high the particular football world cup. Check the comfort quotient of t-shirts while choosing one their own store. It is vital where most go horribly wrong.|The other, shoot to your box because of this 80 of the best box height.
Awesome blog! Is your theme custom made or did you
download it from somewhere? A theme like yours with a few simple adjustements would really make my blog
shine. Please let me know where you got your theme.
Thank you
Thanks for finally writing about > How To Install Custom Windows XP Themes Old PC Gaming < Loved it!
Good article. I am dealing with some of these issues as well..
It’s very straightforward to find out any topic on web as compared to
textbooks, as I found this post at this web page.
Greetings! Very helpful advice in this particular post! It is the little changes that make the most significant changes. Thanks a lot for sharing!
I love looking through an article that can make people think. Also, many thanks for permitting me to comment.
I really like what you guys tend to be up too.
This type of clever work and coverage! Keep up the very good works guys I’ve included you guys to our blogroll.
This is the perfect blog for everyone who wants to find out about this topic.
You understand a whole lot its almost hard to argue with you (not that I actually will need to…HaHa).
You definitely put a brand new spin on a subject which has been written about for many years.
Excellent stuff, just excellent!
A motivating discussion is definitely worth comment. There’s no doubt that that you ought to publish more about this topic, it may not be a taboo subject but generally people don’t speak about such issues. To the next! Kind regards!!
It’s not my first time to visit this web page, i am browsing this website dailly and take nice facts from here daily.
Hi there everyone, it’s my first visit at this web page, and
article is truly fruitful for me, keep up
posting such posts.
You’ve made some really good points there. I checked on the internet for more info about the issue and found most individuals will go along with your views on this site.
Undeniably believe that which you stated. Your favorite justification seemed to be
on the internet the simplest thing to be aware of.
I say to you, I certainly get irked while people consider worries that they plainly don’t know about.
You managed to hit the nail upon the top and also defined out the whole thing without
having side effect , people could take a signal. Will probably be back to get more.
Thanks
I believe that is among the so much vital information for me.
And i am happy reading your article. However should
commentary on few common things, The website taste is ideal, the articles
is actually great : D. Excellent job, cheers
Its such as you learn my mind! You appear to understand so much approximately this, such as
you wrote the guide in it or something. I think that you just
can do with some % to pressure the message house a bit, however instead of that, this is magnificent blog.
A fantastic read. I will certainly be back.
This info is worth everyone’s attention. When can I find out more?
Does your blog have a contact page? I’m having problems locating it but, I’d
like to shoot you an e-mail. I’ve got some ideas for your blog you might
be interested in hearing. Either way, great blog and I look forward to seeing it improve over time.
Hello! I could have sworn Iíve been to this web site before but after going through many of the posts I realized itís new to me. Regardless, Iím definitely delighted I found it and Iíll be bookmarking it and checking back regularly!
My family members always say that I am wasting my time here at net, but I know I
am getting knowledge every day by reading such pleasant posts.
I’m gone to inform my little brother, that he should also pay a quick visit this blog on regular basis to obtain updated from latest reports.|
Hi! I realize this is somewhat off-topic but I had to ask.
Does operating a well-established blog such as yours take a lot of work?
I’m brand new to operating a blog but I do write in my
diary daily. I’d like to start a blog so I will be able to share my own experience and views online.
Please let me know if you have any suggestions or tips for brand new
aspiring blog owners. Thankyou!
Hello there, I do believe your website could be having web browser compatibility problems. When I take a look at your web site in Safari, it looks fine but when opening in I.E., it has some overlapping issues. I just wanted to give you a quick heads up! Other than that, excellent blog!
scoliosis
Wow, marvelous blog format! How lengthy have you ever been running a blog
for? you make running a blog glance easy. The total look of
your site is magnificent, let alone the content material!
scoliosis
Hi there! I know this is kinda off topic however I’d figured I’d
ask. Would you be interested in exchanging links
or maybe guest authoring a blog post or vice-versa? My blog covers a lot of the same subjects as yours and I think we could greatly benefit from each
other. If you might be interested feel free to send me an email.
I look forward to hearing from you! Great blog by the way!
Greetings, I believe your site could be having internet browser compatibility issues. Whenever I take a look at your site in Safari, it looks fine however, if opening in Internet Explorer, it’s got some overlapping issues. I merely wanted to provide you with a quick heads up! Aside from that, great blog.
I seriously love your website.. Great colors
& theme. Did you develop this web site yourself?
Please reply back as I’m hoping to create my own personal website
and would love to learn where you got this from or
just what the theme is named. Cheers!
I love it whenever people get together and share ideas.
Great site, keep it up!
Thanks for sharing excellent informations. Your site is so cool. I am impressed by the details that you’ve on this blog. It reveals how nicely you perceive this subject. Bookmarked this web page, will come back for more articles. You, my friend, ROCK! I found just the info I already searched all over the place and just could not come across. What a perfect web site.
There is certainly a lot to find out about this topic. I love all the points you have made.
Plagiat, teapa, patronu escroc Neata Adrian Valentin firma Creativ TRD SRL Lucrare-Licenta eu inselaciune
Good day! I could have sworn Iíve visited this website before but after going through a few of the articles I realized itís new to me. Anyhow, Iím certainly happy I stumbled upon it and Iíll be bookmarking it and checking back frequently!
Hello there! This post couldnít be written much better! Looking at this article reminds me of my previous roommate! He constantly kept talking about this. I am going to send this article to him. Fairly certain he’s going to have a great read. Thank you for sharing!
Hi there, this weekend is good designed for me, for the reason that this time i am reading this wonderful educational piece
of writing here at my residence.
This is a topic that’s close to my heart… Thank you! Exactly where are your contact details though?
Hi, I desire to subscribe for this web site to take hottest updates, therefore where can i do it please assist.
I could not refrain from commenting. Exceptionally well written!
Your way of explaining everything in this post is in fact nice, every one can without difficulty know it, Thanks a lot.
I conceive this website holds some real good information for everyone. “He who has not looked on Sorrow will never see Joy.” by Kahlil Gibran.
Nowhere on the Internet is there this much quality and clear information on this subject. How do I know? I know because I’ve searched this topic at length. Thank you.Sheree Alaimo
Way cool! Some extremely valid points! I appreciate you penning this write-up and also the rest of the site is really good.
May I simply say what a relief to uncover somebody who really understands what they are discussing online. You certainly understand how to bring a problem to light and make it important. More people really need to read this and understand this side of the story. I was surprised you aren’t more popular since you certainly possess the gift.
I really like it whenever people come together and share views. Great blog, keep it up!|
I just couldn’t go away your web site prior to suggesting that I extremely enjoyed the usual information an individual
supply on your visitors? Is gonna be back incessantly in order to inspect new
posts
I think everything said was actually very logical.
But, think about this, what if you added a little information? I mean, I
don’t wish to tell you how to run your website,
but suppose you added something that makes people desire more?
I mean How To Install Custom Windows XP Themes Old PC Gaming is a little boring.
You could look at Yahoo’s front page and see how
they create news headlines to grab people to click. You might add a related video or a related picture or two to grab readers interested
about what you’ve written. In my opinion, it might
bring your blog a little bit more interesting.
If some one wishes expert view regarding running a blog afterward i suggest him/her to visit this web site,
Keep up the good job.
I don’t even know how I ended up here, but I
believed this publish was once good. I don’t know who you might be but
certainly you’re going to a well-known blogger if you happen to are not already.
Cheers!
I’ve been surfing online greater than three hours lately, yet I never found any interesting article like yours. It’s lovely price sufficient for me. In my view, if all webmasters and bloggers made just right content material as you did, the net might be a lot more useful than ever before. “I think that maybe if women and children were in charge we would get somewhere.” by James Grover Thurber.
I have read so many posts regarding the blogger lovers but this
paragraph is truly a fastidious paragraph, keep it up.
I’m not sure why but this weblog is loading incredibly slow for me. Is anyone else having this problem or is it a problem on my end? I’ll check back later and see if the problem still exists.|
I really like your blog.. very nice colors & theme. Did
you design this website yourself or did you hire someone to do it for you?
Plz answer back as I’m looking to design my own blog and would like
to know where u got this from. many thanks
Thanks to my father who told me regarding this web site,
this web site is truly awesome.
Cool blog! Is your theme custom made or did you download it from somewhere?
A theme like yours with a few simple adjustements would really make my blog shine.
Please let me know where you got your theme.
Thanks a lot
That is a great tip particularly to those new to the blogosphere.
Simple but very accurate info… Thank you for sharing this one.
A must read article!
Hey, I think your site might be having browser compatibility issues. When I look at your blog in Opera, it looks fine but when opening in Internet Explorer, it has some overlapping. I just wanted to give you a quick heads up! Other then that, awesome blog!|
You are a very intelligent individual!
Hey There. I found your blog using msn. This is a really well
written article. I’ll be sure to bookmark it and return to read more of your useful info.
Thanks for the post. I will certainly comeback.
Valuable info. Fortunate me I found your website accidentally, and I’m surprised why this twist of fate didn’t happened earlier!
I bookmarked it.
Excellent article! We are linking to this great article on our website.
Keep up the good writing.
Regards for helping out, excellent info. “Those who restrain desire, do so because theirs is weak enough to be restrained.” by William Blake.
May I just say what a relief to find an individual who truly knows what they’re discussing on the net. You actually understand how to bring a problem to light and make it important. More and more people need to look at this and understand this side of your story. I was surprised you are not more popular since you definitely have the gift.
Hello There. I found your blog using msn. This is an extremely well written article.
I will make sure to bookmark it and come back to read more of your useful information. Thanks for the
post. I’ll definitely comeback.
Great blog you’ve got here.. It’s difficult to find good quality writing like yours nowadays. I really appreciate people like you! Take care!!
Good – I should certainly pronounce, impressed with your site. I had no trouble navigating through all tabs as well as related information ended up being truly simple to do to access. I recently found what I hoped for before you know it in the least. Quite unusual. Is likely to appreciate it for those who add forums or anything, website theme . a tones way for your client to communicate. Excellent task.
An interesting discussion is worth comment. I believe that you ought to publish more about this topic, it may not be a taboo subject but typically folks don’t speak about these subjects. To the next! All the best!!
What’s up friends, nice paragraph and pleasant arguments commented at this place, I am actually enjoying by these.|
Only wanna input on few general things, The website design and style is perfect, the subject matter is very good : D.
My partner and I absolutely love your blog and find nearly all of your
post’s to be what precisely I’m looking for. Does one offer guest writers to write content to suit your needs?
I wouldn’t mind creating a post or elaborating on a lot of the
subjects you write in relation to here. Again, awesome web log!
Hello there! This is kind of off topic but I need some guidance from an established blog.
Is it difficult to set up your own blog? I’m not very techincal but I can figure things out pretty
quick. I’m thinking about making my own but I’m not sure where to start.
Do you have any tips or suggestions? Many thanks
Great site you have got here.. Itís difficult to find quality writing like yours these days. I seriously appreciate people like you! Take care!!
Very great post. I simply stumbled upon your blog and wished to mention that I have really loved browsing your
weblog posts. After all I’ll be subscribing on your feed
and I am hoping you write again soon!
Sweet blog! I found it while searching on Yahoo News. Do you
have any suggestions on how to get listed in Yahoo News?
I’ve been trying for a while but I never seem
to get there! Cheers
Appreciation to my father who told me regarding this web site,
this blog is really amazing.
I’m excited to find this page. I wanted to thank you for ones time for this particularly fantastic read!! I definitely enjoyed every bit of it and i also have you saved as a favorite to check out new stuff in your web site.
Whats up are using WordPress for your blog platform?
I’m new to the blog world but I’m trying to get started and
set up my own. Do you require any html coding knowledge to
make your own blog? Any help would be greatly appreciated!
I’ll right away grasp your rss as I can’t find your e-mail subscription hyperlink or e-newsletter service. Do you’ve any? Please permit me realize in order that I may just subscribe. Thanks.
We are a group of volunteers and starting a new scheme in our community. Your site provided us with valuable information to work on. You have done a formidable job and our entire community will be grateful to you.
It’s an amazing piece of writing in support of all the online users; they will obtain benefit from it I am sure.|
Thanks, I’ve recently been looking for info about this topic for a long time and yours is the greatest I’ve discovered so far. But, what in regards to the bottom line? Are you positive about the supply?
Hello. magnificent job. I did not imagine this. This is a splendid story. Thanks!
An outstanding share! I have just forwarded this onto a colleague who has been conducting a little research on this. And he in fact bought me dinner simply because I stumbled upon it for him… lol. So let me reword this…. Thanks for the meal!! But yeah, thanks for spending the time to discuss this topic here on your website.
Hello my family member! I wish to say that this post is amazing, nice written and come with approximately all important infos. I?¦d like to look extra posts like this .
I really appreciate this post. I have been looking everywhere for this! Thank goodness I found it on Bing. You have made my day! Thx again
A fascinating discussion is worth comment. I do think that you ought to write more about this issue, it might not be a taboo matter but usually people don’t discuss such topics. To the next! Cheers!!
Excellent web site you’ve got here.. It’s hard to find high quality writing like yours these days. I honestly appreciate people like you! Take care!!
Hello my friend! I wish to say that this article is awesome, great written and come with almost all important infos. I would like to look extra posts like this .|
I like your writing style really enjoying this web site.
I could not refrain from commenting. Very well written!
This is the perfect website for anyone who would like to understand this topic. You know so much its almost hard to argue with you (not that I personally would want to…HaHa). You certainly put a fresh spin on a topic which has been discussed for years. Excellent stuff, just great.
Good article and right to the point. I don’t know if this is in fact the best place to ask but do you folks have any ideea where to employ some professional writers? Thanks in advance 🙂
I think other site proprietors should take this web site as an model, very clean and great user friendly style and design, as well as the content. You’re an expert in this topic!
Hello, There’s no doubt that your web site might be having web browser compatibility issues. When I take a look at your site in Safari, it looks fine however when opening in I.E., it’s got some overlapping issues. I just wanted to give you a quick heads up! Other than that, fantastic site!
I’d need to test with you here. Which is not one thing I often do! I take pleasure in studying a post that may make folks think. Also, thanks for permitting me to comment!
I like this website very much so much great info .
Your way of addressin this topic is both remarkable and also inspiring.
canadian pharmacies shipping to usa
It?¦s really a great and useful piece of info. I?¦m satisfied that you shared this useful information with us. Please keep us up to date like this. Thanks for sharing.
I could not refrain from commenting. Well written!
Greetings! I’ve been reading your blog for a while now and finally got the bravery to go ahead and give you a shout out from Lubbock Tx! Just wanted to tell you keep up the excellent job!
If you would like to increase your experience just keep visiting this web site and be updated with the hottest information posted here.|
Loving the info on this internet site, you have done outstanding job on the articles.
I keep listening to the rumor lecture about receiving boundless online grant applications so I have been looking around for the most excellent site to get one. Could you tell me please, where could i find some?
I have recently started a website, the information you provide on this web site has helped me tremendously. Thank you for all of your time & work.
Thanks for your thoughts. One thing I have noticed is that often banks along with financial institutions know the spending patterns of consumers plus understand that the majority of people max outside their cards around the vacations. They correctly take advantage of this particular fact and then start flooding your own inbox plus snail-mail box with hundreds of no-interest APR credit card offers shortly when the holiday season closes. Knowing that when you are like 98 of American general public, you’ll hop at the possiblity to consolidate consumer credit card debt and switch balances towards 0 annual percentage rates credit cards.
An impressive share! I’ve just forwarded this onto a coworker who was doing a little homework on this. And he actually bought me lunch because I stumbled upon it for him… lol. So allow me to reword this…. Thank YOU for the meal!! But yeah, thanks for spending the time to talk about this topic here on your blog.
Excellent article! We are linking to this great content on our website. Keep up the good writing.
This is a very good tip particularly to those fresh to the blogosphere. Brief but very accurate informationÖ Appreciate your sharing this one. A must read article!
A motivating discussion is worth comment. There’s no doubt that that you ought to write more about this subject, it might not be a taboo subject but typically folks don’t talk about such topics. To the next! All the best!!
Very nice post. I simply stumbled upon your blog and wanted to say that I have really loved surfing around your weblog posts. In any case I’ll be subscribing to your feed and I hope you write again soon!|
Pretty nice post. I just stumbled upon your blog and wanted to say that I have really enjoyed surfing around your blog posts. In any case I’ll be subscribing to your feed and I hope you write again soon!
Best 30 Head Shop In Colorado Springs, Co With Reviewsbaby bottle rigWe pride ourselves on being friendly and helpful, no matter what your needs or experience is. Come on in to just sit and relax, never the pressure sale or the hurry trang điểm your mind mentality..
An interesting discussion is worth comment. I think that you should write more on this topic, it might not be a taboo subject but generally people are not enough to speak on such topics. To the next. Cheers
I have learn some good stuff here. Definitely price bookmarking for revisiting. I surprise how a lot attempt you put to make this sort of excellent informative web site.
Hi, I do believe this is a great site. I stumbledupon it 😉 I may come back once again since i have book-marked it. Money and freedom is the greatest way to change, may you be rich and continue to guide other people.
I’m excited to uncover this site. I need to to thank you for ones time for this fantastic read!! I definitely loved every bit of it and I have you book-marked to see new information on your site.
I simply wished to thank you very much yet again. I’m not certain the things that I might have gone through in the absence of those aspects contributed by you concerning such concern. It became an absolute troublesome matter in my opinion, but discovering the expert form you handled that took me to leap for gladness. I am just happier for your assistance and then wish you realize what a great job that you’re carrying out educating people today by way of your blog. I’m certain you’ve never encountered all of us.
I was examining some of your blog posts on this internet site and I believe this web site is really informative! Retain putting up.
You’re so cool! I don’t suppose I’ve truly read through anything like this before. So good to discover someone with genuine thoughts on this topic. Seriously.. many thanks for starting this up. This website is something that is needed on the web, someone with some originality!
Can I simply just say what a comfort to uncover a person that genuinely understands what
they are discussing on the internet. You actually know how to bring a
problem to light and make it important. More and more people should check this out and understand this side of the
story. I was surprised you are not more popular
given that you most certainly have the gift.
You need to be a part of a contest for one of the greatest websites on the internet. I most certainly will highly recommend this website!
You can definitely see your expertise in the work you write.
The world hopes for even more passionate writers like you who aren’t
afraid to say how they believe. All the time go after your heart.
Hello there! I simply wish to offer you a big thumbs up for your great information you have got right here on this post. I’ll be returning to your blog for more soon.|
You ought to take part in a contest for one of the most useful sites online. I most certainly will highly recommend this site!
I’d perpetually want to be update on new content on this internet site, saved to fav!
I love it when individuals come together and share views. Great website, continue the good work.
I really love your site.. Excellent colors & theme. Did you create this web site yourself? Please reply back as I’m planning to create my very own website and would love to learn where you got this from or what the theme is named. Appreciate it!|
Nice post. I learn something new and challenging on websites I stumbleupon on a daily basis. It will always be exciting to read through content from other writers and use something from their sites.
Heya i am for the first time here. I came across this board and I find It really useful & it helped me out much. I hope to give something back and aid others like you aided me.|
canada drugs
Oh my goodness! Amazing article dude! Thanks, However I am going through difficulties with your RSS. I donít understand the reason why I can’t subscribe to it. Is there anyone else having the same RSS problems? Anyone who knows the answer can you kindly respond? Thanks!!
Loving the info on this web site, you have done great job on the articles.
Thanks for enabling me to acquire new thoughts about computers. I also contain the belief that one of the best ways to keep your laptop computer in perfect condition is a hard plastic-type case, and also shell, that suits over the top of one’s computer. A majority of these protective gear tend to be model precise since they are manufactured to fit perfectly across the natural housing. You can buy all of them directly from the vendor, or through third party sources if they are readily available for your laptop, however only a few laptop will have a covering on the market. All over again, thanks for your tips.
Great post.|
This text is worth everyone’s attention. When can I find out more?|
Maybelline Fit Me Matte & Poreless Foundation ( รองพื้น ) No. 1 best-selling foundation for oil, water and sweat. For oily to normal skin, matte texture, easy to blend, 20 shades, suitable for all skin tones.
http://www.maybelline.co.th/face/foundation
Utterly indited content material, Really enjoyed examining.
Oh my goodness! Incredible article dude! Thank you, However I am having troubles with your RSS. I don’t understand why I can’t subscribe to it. Is there anyone else getting similar RSS problems? Anyone who knows the solution can you kindly respond? Thanx!!
This is the right blog for everyone who really wants to find out about this topic. You realize a whole lot its almost hard to argue with you (not that I actually will need to…HaHa). You certainly put a fresh spin on a topic which has been written about for decades. Great stuff, just great!
Utterly written subject matter, Really enjoyed looking at.
Hey there would you mind letting me know which webhost you’re utilizing? I’ve loaded your blog in 3 completely different internet browsers and I must say this blog loads a lot quicker then most. Can you suggest a good web hosting provider at a fair price? Thanks, I appreciate it!
Loving the information on this internet site, you have done outstanding job on the posts.
My brother recommended I may like this website. He was once totally right. This put up truly made my day. You can not consider just how much time I had spent for this information! Thank you!|
Write more, thats all I have to say. Literally, it seems as though you relied on the video to make your point. You definitely know what youre talking about, why throw away your intelligence on just posting videos to your weblog when you could be giving us something informative to read?
What i don’t understood is in fact how you are no longer actually much more neatly-liked than you may be right now. You’re so intelligent. You already know thus significantly on the subject of this matter, made me in my view consider it from a lot of numerous angles. Its like men and women don’t seem to be interested until it is something to do with Lady gaga! Your individual stuffs excellent. All the time deal with it up!
Great post! We are linking to this great article on our site. Keep up the great writing.
You made some decent points there. I checked on the internet to learn more about the issue and found most people will go along with your views on this web site.
Some truly nice and useful info on this web site, likewise I believe the style contains good features.
Wonderful beat ! I wish to apprentice while you amend your website, how can i subscribe for a blog site? The account aided me a acceptable deal. I had been a little bit acquainted of this your broadcast offered bright clear idea|
Pretty! This has been an incredibly wonderful article. Thanks for providing this information.
Spot on with this write-up, I actually think this web site needs a
lot more attention. I’ll probably be back again to read more, thanks
for the information!
I was very pleased to find this web-site.I wanted to thanks for your time for this wonderful read!! I definitely enjoying every little bit of it and I have you bookmarked to check out new stuff you blog post.
It¡¦s actually a great and helpful piece of info. I am satisfied that you shared this helpful info with us. Please stay us informed like this. Thanks for sharing.
I couldn’t resist commenting. Perfectly written!
{Bảng bao gồm các số liệu thống kê đểÁo Chelseabạn dễ dàng tóm bắt tình hình, đối chiếu, phân tích kết quả của những đội. quý khách sẽ tức thì liền tìm được lịch thi đấu mới nhất nhất, kết quả trận đấu, tư vấn soi kèo, và tỷ lệ kèo nhà cửa chiếc. Trang cung cấp những link, video clip truyền hình trực tiếp giải vô địch đất nước trên toàn thế giới.|Trong khi, Sport 247 sẽ trần thuật thẳng đá bóng vớ cả các trận đấu mới ra vào ngày với những diễn biến hấp dẫn và đoạn phim bàn thắng bản quyền.
I couldn’t resist commenting. Very well written!
Its like you learn my thoughts! You seem to grasp a lot approximately this, such as you wrote the book in it
or something. I feel that you can do with some p.c. to pressure
the message home a little bit, but instead of that, this is fantastic
blog. An excellent read. I will definitely be back.
Some really interesting points you have written.Helped me a lot, just what I was searching for : D.
This was great! I would like you to clean up all this spam though
Rattling clear website , thanks for this post.
I was recommended this web site by my cousin. I am not sure whether this post is
written by him as nobody else know such detailed about my trouble.
You’re amazing! Thanks!
If some one desires to be updated with latest technologies after that he must be pay a visit this
site and be up to date all the time.
Really no matter if someone doesn’t know after that its up to other
people that they will help, so here it happens.
This blog was… how do you say it? Relevant!! Finally I have found something which helped me. Thanks a lot!
Hello There. I found your blog using msn. This is an extremely well written article. I will be sure to bookmark it and come back to read more of your useful info. Thanks for the post. I will definitely comeback.|
Thanks to my father who informed me concerning this blog, this
website is in fact amazing.
You need to be a part of a contest for one of the best
blogs on the web. I will recommend this web site!
Today, I went to the beachfront with my kids. I found a sea
shell and gave it to my 4 year old daughter and said “You can hear the ocean if you put this to your ear.” She put the shell to
her ear and screamed. There was a hermit
crab inside and it pinched her ear. She never wants to go
back! LoL I know this is totally off topic but I had to tell someone!
An impressive share! I’ve just forwarded this onto a co-worker who has been doing a little research on this. And he actually ordered me dinner simply because I discovered it for him… lol. So let me reword this…. Thanks for the meal!! But yeah, thanks for spending the time to discuss this subject here on your web page.
Only wanna remark on few general things, The website design and style is perfect, the written content is very good : D.
You actually make it seem so easy with your presentation but I find this matter to be actually something which I think I would never understand. It seems too complex and extremely broad for me. I am looking forward for your next post, I will try to get the hang of it!
Can I just say what a relief to find someone who actually knows what theyre talking about on the internet. You definitely know how to bring an issue to light and make it important. More people need to read this and understand this side of the story. I cant believe youre not more popular because you definitely have the gift.
Only a smiling visitant here to share the love (:, btw great style.
This information is priceless. Where can I find out more?|
My developer is trying to persuade me to move to .net from PHP. I have always disliked the idea because of the costs. But he’s tryiong none the less. I’ve been using WordPress on a number of websites for about a year and am nervous about switching to another platform. I have heard very good things about blogengine.net. Is there a way I can import all my wordpress posts into it? Any kind of help would be really appreciated!|
You’re so cool! I do not think I have read through a single thing like this before. So wonderful to find somebody with some original thoughts on this subject. Really.. thank you for starting this up. This website is one thing that is required on the web, someone with some originality!|
Hi, I do think this is a great website. I stumbledupon it 😉 I am going to return once again since i have saved as a favorite it. Money and freedom is the greatest way to change, may you be rich and continue to help other people.
mail order prescription drugs from canada
When someone writes an piece of writing he/she retains the idea of a user in his/her brain that
how a user can be aware of it. So that’s why
this post is outstdanding. Thanks!
WONDERFUL Post.thanks for share..more wait .. …
Cool blog! Is your theme custom made or did you download it from somewhere?
A design like yours with a few simple adjustements would really make my blog
shine. Please let me know where you got your design. Many thanks
Greetings, There’s no doubt that your website could
be having browser compatibility issues. Whenever I take a look at your website in Safari,
it looks fine however, when opening in IE, it’s got some overlapping issues.
I merely wanted to provide you with a quick heads up!
Aside from that, fantastic site!
Oh my goodness! Incredible article dude! Thanks, However I am going through difficulties with your RSS. I don’t understand why I cannot join it. Is there anybody else having similar RSS problems? Anybody who knows the solution will you kindly respond? Thanx!!
canadian pharmacies online
Useful information. Fortunate me I discovered your website accidentally,
and I am shocked why this coincidence did not happened in advance!
I bookmarked it.
Peculiar article, just what I wanted to find.
Right here is the perfect web site for everyone who would like to understand this topic. You understand so much its almost hard to argue with you (not that I really would want to…HaHa). You certainly put a fresh spin on a subject which has been discussed for years. Wonderful stuff, just excellent!|
It’s great that you are getting ideas from this piece of writing as well as from our dialogue made at this place.|
Everyone loves it when folks get together and share thoughts. Great blog, keep it up!
This website was… how do I say it? Relevant!! Finally I have found something which helped me. Thanks!
hey there and thanks on your info – I’ve certainly picked up something new from proper here. I did however experience some technical issues the use of this website, as I skilled to reload the website many times prior to I may just get it to load correctly. I had been puzzling over in case your hosting is OK? No longer that I am complaining, but slow loading circumstances instances will very frequently affect your placement in google and could injury your high-quality ranking if advertising and ***********|advertising|advertising|advertising and *********** with Adwords. Well I’m adding this RSS to my email and could glance out for a lot extra of your respective fascinating content. Ensure that you update this once more soon..
Please let me know if you’re looking for a article writer for your weblog.
You have some really great articles and I think I would be
a good asset. If you ever want to take some of the
load off, I’d really like to write some articles for your blog in exchange
for a link back to mine. Please send me an e-mail if interested.
Thanks!
Iím amazed, I must say. Seldom do I come across a blog thatís both educative and interesting, and let me tell you, you’ve hit the nail on the head. The problem is an issue that too few folks are speaking intelligently about. Now i’m very happy I came across this during my hunt for something concerning this.
You are a very clever individual!
You need to be a part of a contest for one of the finest sites online.
I’m going to recommend this blog!
I am usually to running a blog and i actually appreciate your content. The article has really peaks my interest. I’m going to bookmark your website and keep checking for brand spanking new information.
Saved as a favorite, I like your website!
This is a topic that is near to my heart… Take
care! Exactly where are your contact details though?
The next time I read a blog, I hope that it doesn’t fail me as much as this particular one. After all, I know it was my choice to read, nonetheless I actually believed you would probably have something helpful to talk about. All I hear is a bunch of whining about something you could fix if you were not too busy seeking attention.
Hello, you used to write wonderful, but the last few posts have been kinda boring… I miss your great writings. Past several posts are just a bit out of track! come on!
Hi there, just wanted to say, I enjoyed this post. It was helpful. Keep on posting!|
It’s in point of fact a nice and useful piece of info. I’m satisfied that you just shared this helpful info with us. Please keep us informed like this. Thank you for sharing.
I couldn’t resist commenting. Well written!
We absolutely love your blog and find the majority of your post’s to be exactly what I’m looking for. Would you offer guest writers to write content in your case? I wouldn’t mind composing a post or elaborating on most of the subjects you write with regards to here. Again, awesome web site!
I love reading through a post that can make men and women think. Also, thank you for allowing for me to comment.
Cool text dude, keep up the good work, just shared this with the mates
Aw, this was a really nice post. Taking a few minutes and actual effort to produce a superb articleÖ but what can I sayÖ I put things off a whole lot and don’t seem to get anything done.
Greetings! Very helpful advice within this post! It is the little changes that will make the largest changes. Thanks a lot for sharing!|
Greetings I am so happy I found your site, I really found you by accident, while I was searching on Google for something else, Anyways I am here now and would just like to say cheers for a incredible post and a all round interesting blog (I also love the theme/design), I don’t have time to browse it all at the minute but I have book-marked it and also included your RSS feeds, so when I have time I will be back to read much more, Please do keep up the awesome work.|
The very next time I read a blog, I hope that it does not fail me as much as this one. After all, Yes, it was my choice to read through, nonetheless I actually thought you’d have something helpful to say. All I hear is a bunch of complaining about something that you can fix if you were not too busy looking for attention.
I used to be able to find good advice from your articles.
Everything is very open with a precise clarification of the issues. It was truly informative. Your site is very helpful. Many thanks for sharing!|
I wanted to thank you for this good read!! I definitely loved every little bit of it.
I have got you bookmarked to check out new stuff you post…
Just desire to say your article is as astonishing. The clearness in your post is simply spectacular and i could assume you’re an expert on this subject. Well with your permission allow me to grab your feed to keep updated with forthcoming post. Thanks a million and please keep up the gratifying work.
Hello, i believe that i saw you visited my web site thus i came to “return the prefer”.I’m trying to find issues to improve my website!I suppose its good enough to make use of some of your ideas!!
It’s really a cool and useful piece of information. I am happy that you simply shared this helpful information with us. Please stay us informed like this. Thanks for sharing.
My brother suggested I might like this website. He was totally right. This post actually made my day. You can not imagine simply how much time I had spent for this information! Thanks!
Hello there, just became aware of your blog through Google, and found that it’s truly informative. I’m gonna watch out for brussels. I will appreciate if you continue this in future. A lot of people will be benefited from your writing. Cheers!
I view something truly special in this internet site.
F*ckin’ remarkable things here. I am very glad to see your post. Thanks a lot and i am looking forward to contact you. Will you kindly drop me a e-mail?
Interesting blog! Is your theme custom made or did you download it from somewhere? A theme like yours with a few simple adjustements would really make my blog stand out. Please let me know where you got your design. Thank you
Just wish to say your article is as astounding. The clarity to your publish is simply nice and i can suppose you are a professional in this subject. Well together with your permission allow me to grasp your feed to stay up to date with approaching post. Thanks 1,000,000 and please continue the rewarding work.
Some really interesting points you have written.Aided me a lot, just what I was looking for : D.
The next time I read a blog, I hope that it won’t fail me just as much as this one. After all, Yes, it was my choice to read through, however I genuinely believed you would probably have something interesting to talk about. All I hear is a bunch of whining about something you could possibly fix if you weren’t too busy seeking attention.
I am genuinely grateful to the owner of this site who has shared this wonderful paragraph at at this time.|
I loved as much as you’ll receive carried out right here. The sketch is attractive, your authored subject matter stylish. nonetheless, you command get got an edginess over that you wish be delivering the following. unwell unquestionably come more formerly again since exactly the same nearly a lot often inside case you shield this hike.
I got this website from my friend who told me on the topic of this web site and
at the moment this time I am visiting this site and reading
very informative posts at this time.
With advanced technology, the filler ( ฟิลเลอร์ ) has been developed to be more suitable for use. Reduce the risk of causing harm Hyaluronic acid (HA) is naturally degradable by enzymes. Hyaluronidase that the body produces, so the natural HA in the body only lasts 2-3 days
https://www.galdermaaestheticsthailand.com/page/dermal-filler
Thank you for sharing excellent informations. Your web-site is very cool. I’m impressed by the details that you’ve on this web site. It reveals how nicely you understand this subject. Bookmarked this web page, will come back for more articles. You, my friend, ROCK! I found simply the info I already searched everywhere and just couldn’t come across. What a great web-site.
Nice post. I learn something new and challenging on sites I stumbleupon on a daily basis. It’s always exciting to read articles from other authors and use something from their websites. |
I intended to write you the tiny remark to help give many thanks over again with your splendid things you’ve provided at this time. It is so wonderfully generous with people like you to convey publicly just what a number of us would have marketed as an electronic book to end up making some cash for their own end, and in particular given that you might well have tried it if you ever desired. The tactics additionally acted to provide a easy way to fully grasp most people have the same zeal like my personal own to figure out way more with reference to this issue. I’m certain there are several more pleasurable opportunities up front for individuals who read carefully your website.
It is the best time to make some plans for the long run and it’s time to be happy. I have learn this put up and if I may just I want to recommend you few interesting issues or tips. Maybe you could write next articles referring to this article. I want to read even more things approximately it!|
Perfectly composed articles, regards for selective information.
Hello there, I discovered your blog by means of Google while looking for a related subject,
your web site got here up, it seems to be good. I’ve bookmarked it
in my google bookmarks.
Hello there, simply become alert to your weblog thru Google, and located that it is truly informative.
I’m going to watch out for brussels. I’ll appreciate should you proceed this in future.
Lots of folks shall be benefited from your writing.
Cheers!
It’s very straightforward to find out any topic on net as compared to textbooks, as I found this
piece of writing at this web page.
Hmm is anyone else experiencing problems with the pictures on this blog loading?
I’m trying to find out if its a problem on my end or if it’s the blog.
Any feed-back would be greatly appreciated.
Thanks for the sensible critique. Me & my neighbor were just preparing to do some research about this. We got a grab a book from our local library but I think I learned more from this post. I am very glad to see such wonderful information being shared freely out there.
Good write-up, I am regular visitor of one’s website, maintain up the excellent operate, and It’s going to be a regular visitor for a lengthy time.
You can definitely see your skills in the work you write. The world hopes for more passionate writers like you who aren’t afraid to say how they believe. Always follow your heart.
Great website. A lot of useful information here. I am sending it to several
friends ans also sharing in delicious. And of course, thanks for your sweat!
Hi, I do believe this is an excellent blog. I stumbledupon it 😉 I’m going to come back once again since I saved as a favorite it. Money and freedom is the greatest way to change, may you be rich and continue to help others.
Hello! I simply would like to give you a big thumbs up for the great information you have got right here on this post. I’ll be returning to your website for more soon.
Spot on with this write-up, I truly think this amazing site needs a great deal more attention. I’ll probably be returning to read more, thanks for the info!
It is really a great and useful piece of info. I’m glad that you shared this helpful info with us. Please keep us up to date like this. Thank you for sharing.
Hi there! Someone in my Myspace group shared this website with us so I
came to take a look. I’m definitely loving the information. I’m book-marking and will be tweeting this to
my followers! Great blog and brilliant style and design.
I think this is among the most important information for me. And i’m glad reading your article. But wanna remark on few general things, The website style is ideal, the articles is really excellent : D. Good job, cheers
Write more, thats all I have to say. Literally, it seems as though you relied on the video to make your point. You definitely know what youre talking about, why waste your intelligence on just posting videos to your blog when you could be giving us something enlightening to read?
As I web-site possessor I believe the content material here is rattling excellent , appreciate it for your hard work. You should keep it up forever! Best of luck.
I’d like to find out more? I’d care to find out more details.
Great blog here! Also your site loads up fast! What host are you using? Can I get your affiliate link to your host? I wish my site loaded up as quickly as yours lol|
I have read so many articles about the blogger lovers but this post is genuinely a
nice article, keep it up.
What’s up, every time i used to check weblog posts here in the early hours in the daylight, because i enjoy to find
out more and more.
Do you have a spam issue on this website; I also am a blogger, and I was wondering your situation; we
have created some nice practices and we are looking to exchange solutions with other folks,
please shoot me an e-mail if interested.
Hey! Do you know if they make any plugins to protect against
hackers? I’m kinda paranoid about losing everything I’ve worked hard on. Any recommendations?
Hello, Neat post. There’s an issue with your website in web explorer, might check this?K IE nonetheless is the marketplace chief and a large element of other folks will pass over your fantastic writing because of this problem.
Hello. splendid job. I did not anticipate this. This is a fantastic story. Thanks!
Pretty section of content. I just stumbled upon your website
and in accession capital to assert that I acquire
actually enjoyed account your blog posts.
Anyway I’ll be subscribing to your augment and
even I achievement you access consistently fast.
Attractive section of content. I just stumbled upon your web site and in accession capital to claim that I
acquire in fact loved account your weblog posts.
Anyway I will be subscribing in your feeds and even I fulfillment
you get admission to persistently quickly.
I have read some excellent stuff here. Definitely worth bookmarking for revisiting. I surprise how so much effort you put to make this sort of wonderful informative web site.
each time i used to read smaller articles or reviews which also clear their motive, and that is also happening with this piece of writing which I am reading at this time.|
I do not know whether it’s just me or if perhaps everybody else experiencing issues with your blog.
It looks like some of the text within your content are
running off the screen. Can somebody else please comment and let me
know if this is happening to them as well? This could be a issue with
my browser because I’ve had this happen before. Thank
you
There is noticeably a bundle to know about this. I assume you made sure good points in features also.
Very good post! We are linking to this great
post on our site. Keep up the good writing.
I was just searching for this info for some time. After 6 hours of continuous Googleing, finally I got it in your site. I wonder what is the lack of Google strategy that don’t rank this type of informative websites in top of the list. Normally the top sites are full of garbage.
This excellent website really has all of the information I wanted about this subject and didn’t know who to ask. |
Right here is the right blog for everyone who wants
to understand this topic. You know a whole lot its almost tough to argue with you (not that
I really would want to…HaHa). You certainly put a fresh spin on a subject
that has been written about for a long time.
Wonderful stuff, just great!
Pretty! This was a really wonderful post. Thank you for your provided information.
Have you ever heard of second life (sl for short). It is basically a game where you can do anything you want. Second life is literally my second life (pun intended lol). If you want to see more you can see these Second Life authors and blogs
I have not checked in here for some time since I thought it was getting boring, but the last few posts are good quality so I guess I¦ll add you back to my everyday bloglist. You deserve it my friend 🙂
This post is really a good one it assists new web viewers, who are wishing for blogging.
It’s the best time to make some plans for the future and it is time to be happy.
I have read this post and if I could I want to suggest you some interesting things or tips.
Maybe you can write next articles referring to this article.
I wish to read even more things about it!
Hi! This is my first comment here so I just wanted to give a
quick shout out and say I really enjoy reading through your posts.
Can you recommend any other blogs/websites/forums that cover the same subjects?
Appreciate it!
Wow, awesome blog layout! How long have you been blogging for?
you make blogging look easy. The overall look of your website is
great, as well as the content!
What i do not realize is actually how you’re no longer actually much more smartly-preferred than you might be now. You’re very intelligent. You realize therefore significantly with regards to this subject, produced me for my part imagine it from a lot of numerous angles. Its like women and men aren’t interested unless it is something to accomplish with Lady gaga! Your own stuffs great. Always take care of it up!
I don’t know about you all but I am obsessed with airplanes. I have a friend in highschool that loves airplanes, so here are some airplane related stuff I don’t know about you guys but I love airplanes. I had a friend in highschool that loved airplanes, so here are some airplane related stuff https://www.airlinereporter.com/2010/10/airline-livery-of-the-week-retro-british-airways-boeing-757/
Pretty part of content. I just stumbled upon your blog and in accession capital to assert that I get actually enjoyed
account your blog posts. Any way I will be subscribing for your augment and even I
achievement you get admission to constantly quickly.
This is a topic close to my heart cheers, where are your contact details though?
Great – I should certainly pronounce, impressed with your site. I had no trouble navigating through all tabs as well as related info ended up being truly easy to do to access. I recently found what I hoped for before you know it in the least. Reasonably unusual. Is likely to appreciate it for those who add forums or anything, website theme . a tones way for your client to communicate. Nice task..
After study a couple of of the blog posts on your website now, and I actually like your approach of blogging. I bookmarked it to my bookmark website checklist and shall be checking again soon. Pls take a look at my web page as effectively and let me know what you think.
wonderful issues altogether, you just won a emblem new reader.
What might you suggest in regards to your submit that you simply made a few days in the past?
Any certain?
certainly like your web site but you have to test the spelling on several of your posts. Several of them are rife with spelling issues and I find it very bothersome to tell the reality however I will certainly come back again.
Respect to post author, some fantastic selective information.
I got what you mean , appreciate it for posting.Woh I am pleased to find this website through google.
Have you ever heard of second life (sl for short). It is essentially a game where you can do anything you want. sl is literally my second life (pun intended lol). If you would like to see more you can see these sl authors and blogs
Super-Duper blog! I am loving it!! Will come back again. I am bookmarking your feeds also
Greetings! I’ve been following your site for a long time now and finally got the courage to go ahead and give you a shout out from New Caney Tx! Just wanted to say keep up the fantastic work!|
I’d like to find out more? I’d like to find out more details.
Your style is really unique in comparison to other folks I have read stuff from. Many thanks for posting when you’ve got the opportunity, Guess I will just bookmark this page.
Superb blog! Do you have any tips for aspiring writers? I’m planning to start my own website soon but I’m a little lost on everything. Would you recommend starting with a free platform like WordPress or go for a paid option? There are so many choices out there that I’m completely confused .. Any ideas? Thanks!
Hey there! I just wanted to ask if you ever have any trouble with hackers? My last blog (wordpress) was hacked and I ended up losing many months of hard work due to no back up. Do you have any methods to stop hackers?
You ought to take part in a contest for one of the finest websites on the net. I most certainly will highly recommend this website!
Stunning quest there. What happened after? Good luck!
Superb, what a blog it is! This web site presents helpful information to us, keep it up.|
I like this post, enjoyed this one thanks for putting up.
good
Does your site have a contact page? I’m having a
tough time locating it but, I’d like to send you an email.
I’ve got some suggestions for your blog you might
be interested in hearing. Either way, great website and
I look forward to seeing it improve over time.
I am sure this article has touched all the internet viewers, its really really fastidious paragraph on building up new blog.|
Hello, I think your blog might be having browser compatibility
issues. When I look at your blog in Firefox, it looks fine but when opening in Internet Explorer, it has some overlapping.
I just wanted to give you a quick heads up! Other then that, amazing blog!
Excellent post. I’m facing many of these issues as well..
Fantastic blog! Do you have any hints for aspiring writers? I’m planning to start my own blog soon but I’m a little lost on everything. Would you advise starting with a free platform like WordPress or go for a paid option? There are so many choices out there that I’m totally confused .. Any suggestions? Bless you!|
I’ve been surfing on-line more than three hours these days, but I by no means found any fascinating article like yours. It’s lovely worth enough for me. In my view, if all webmasters and bloggers made just right content as you did, the internet will likely be much more helpful than ever before.
This is very attention-grabbing, You’re an overly professional
blogger. I’ve joined your feed and look ahead to seeking extra of your magnificent post.
Also, I’ve shared your website in my social networks
I’ve been absent for some time, but now I remember why I used to love this site. Thanks , I’ll try and check back more often. How frequently you update your website?
I am in fact delighted to glance at this weblog posts which carries lots of valuable data,
thanks for providing such statistics.
Link exchange is nothing else except it is just placing the
other person’s weblog link on your page at suitable place and other person will also
do similar in favor of you.
There is certainly a lot to learn about this topic. I like all of the points you have made.
Hello! I could have sworn I’ve been to this website before but after browsing through some of the post I realized it’s new to me.
Anyways, I’m definitely delighted I found it and I’ll be bookmarking and checking back frequently!
hey there and thank you for your info – I have certainly picked up anything new from right here. I did however expertise several technical issues using this website, since I experienced to reload the web site lots of times previous to I could get it to load correctly. I had been wondering if your web host is OK? Not that I’m complaining, but slow loading instances times will often affect your placement in google and can damage your quality score if advertising and marketing with Adwords. Anyway I’m adding this RSS to my email and could look out for much more of your respective intriguing content. Make sure you update this again soon..
I absolutely love your site.. Pleasant colors & theme.
Did you create this site yourself? Please reply back as I’m hoping
to create my very own site and would love to learn where you got this
from or exactly what the theme is named. Kudos!
Hey there, You have done a fantastic job. I will certainly digg
it and personally recommend to my friends. I am sure they’ll
be benefited from this site.
Howdy just wanted to give you a quick heads up. The words
in your article seem to be running off the screen in Chrome.
I’m not sure if this is a format issue or something
to do with internet browser compatibility but I thought I’d post to
let you know. The design look great though! Hope you get the
problem fixed soon. Thanks
Only wanna remark that you have a very decent website , I enjoy the pattern it actually stands out.
I was more than happy to find this website. I need to to thank you for ones time for this fantastic read!! I definitely appreciated every bit of it and I have you book-marked to see new information in your blog.
First off I would like to say awesome blog!
I had a quick question which I’d like to ask if you do not mind.
I was curious to find out how you center yourself and clear your head prior to writing.
I have had trouble clearing my mind in getting my ideas out there.
I do take pleasure in writing however it just seems like the first 10 to 15 minutes are usually lost simply just trying to figure out how to begin. Any recommendations or tips?
Thanks!
Woah! I’m really digging the template/theme of this website. It’s simple, yet effective. A lot of times it’s tough to get that “perfect balance” between user friendliness and appearance. I must say you have done a excellent job with this. Also, the blog loads super quick for me on Safari. Superb Blog!
Magnificent beat ! I wish to apprentice even as you amend your website, how could i subscribe for a
blog site? The account aided me a acceptable deal.
I were a little bit familiar of this your broadcast offered shiny
transparent idea
Hello everyone, it’s my first pay a quick visit
at this site, and article is genuinely fruitful designed for me, keep up posting such posts.
Hmm is anyone else encountering problems with the
images on this blog loading? I’m trying to find out if its a problem on my end or if it’s
the blog. Any feed-back would be greatly appreciated.
Magnificent web site. Lots of helpful information here.
I am sending it to some friends ans additionally sharing in delicious.
And certainly, thank you in your effort!
May I just say what a relief to discover somebody who truly knows what they’re talking about online. You definitely know how to bring a problem to light and make it important. More people ought to read this and understand this side of your story. I was surprised that you are not more popular because you surely have the gift.
Heya superb website! Does running a blog like this require a large amount of work? I’ve no understanding of coding but I had been hoping to start my own blog soon. Anyhow, should you have any recommendations or techniques for new blog owners please share. I understand this is off topic however I simply needed to ask. Kudos!|
Hola! I’ve been reading your web site for some time now and finally got
the bravery to go ahead and give you a shout out from Huffman Texas!
Just wanted to tell you keep up the good job!
I know this if off topic but I’m looking into starting my own blog
and was curious what all is required to get setup?
I’m assuming having a blog like yours would
cost a pretty penny? I’m not very web savvy so I’m not
100% certain. Any recommendations or advice would be greatly appreciated.
Kudos
Usually I do not read article on blogs, but I wish to say that this write-up very compelled me to check out and do it! Your writing taste has been amazed me. Thank you, very nice post.
1 1,000,000+ moves (and counting!) With the experience of that many moves, you could say we know a thing or two about how to make things go smoothly. Not only that, a lot of our business comes from happy customers who refer us again and again. There’s no better advertising than that! 2 Small details are a big priority. We consider no detail is too small, and we make sure not are overlooked. Want to take that door frame with all your kids’ heights recorded on it? Done. Need to move some expensive, fragile art? Done. Have to move some furniture but don’t need a whole big moving van? Done and done. 3 A dedicated, responsive customer rep. There’s nothing more frustrating than having to re-stare your story for a new person every time you call. You’ll never experience that with us. Your dedicated customer rep will be your one point of contact to keep your move on track, troubleshoot any issues, and answer any questions you have along the way.
Thanks for sharing excellent informations. Your web-site is so cool. I’m impressed by the details that you¦ve on this site. It reveals how nicely you perceive this subject. Bookmarked this web page, will come back for extra articles. You, my friend, ROCK! I found just the info I already searched everywhere and simply could not come across. What a great web site.
I was recommended this web site by my cousin. I am not
sure whether this post is written by him as no one else know such detailed about my trouble.
You’re wonderful! Thanks!
Wow! Thank you! I continually wanted to write on my website something like that. Can I take a portion of your post to my website?
Hi! I just wanted to ask if you have any problem with hackers? My last blog which was made in wordpress was hacked resulting in losing months of hard work due to having no data backup. Do you have any way to stop hacking?
Hi, I do think this is a great website. I stumbledupon it 😉 I’m going to revisit once again since I book-marked it. Money and freedom is the best way to change, may you be rich and continue to guide other people.
Hi , I do believe this is an excellent blog. I stumbled upon it on Yahoo , i will come back once again. Money and freedom is the best way to change, may you be rich and help other people.
Greetings I am so delighted I found your site, I really
found you by accident, while I was looking on Askjeeve for something else, Anyhow I am here
now and would just like to say thanks a lot for a incredible post
and a all round interesting blog (I also love the theme/design), I don’t
have time to browse it all at the moment but I have saved it
and also added in your RSS feeds, so when I have time I will be back to read much more, Please do keep up the excellent work.
Excellent goods from you, man. I’ve understand your stuff previous to and you’re just
too wonderful. I actually like what you have acquired here, certainly
like what you are saying and the way in which you
say it. You make it enjoyable and you still take care of
to keep it sensible. I can’t wait to read much more from you.
This is actually a great website.
Article writing is also a excitement, if you be acquainted with
then you can write or else it is difficult to write.
If you wish for to increase your know-how just keep visiting this site
and be updated with the hottest gossip posted here.
Pretty! This was a really wonderful article. Thanks for supplying this information.
Hello there, I do believe your site could possibly be having web browser compatibility issues. When I take a look at your web site in Safari, it looks fine however, if opening in I.E., it’s got some overlapping issues. I simply wanted to give you a quick heads up! Aside from that, fantastic site!
Just want to say your article is as astounding. The clarity for your publish
is simply cool and i could think you’re a professional on this subject.
Fine with your permission allow me to grasp your feed to stay updated with coming
near near post. Thanks one million and please keep up the gratifying
work.
Hello! This post couldn’t be written any better! Reading through this post reminds me of my good old room mate! He always kept talking about this. I will forward this write-up to him. Pretty sure he will have a good read. Many thanks for sharing!
Does your site have a contact page? I’m having trouble locating
it but, I’d like to send you an e-mail. I’ve got some suggestions for your blog you might be interested in hearing.
Either way, great blog and I look forward to seeing it
grow over time.
Just want to say your article is as surprising. The clearness in your publish is simply nice and that i could think you are a professional in this subject. Well along with your permission allow me to snatch your feed to keep up to date with imminent post. Thank you a million and please continue the rewarding work.
I am impressed with this web site, very I am a big fan .
Hi! This is my first comment here so I just wanted to give a
quick shout out and say I truly enjoy reading through your
blog posts. Can you suggest any other blogs/websites/forums that cover the same topics?
Thanks a ton!
I’m amazed, I have to admit. Seldom do I encounter a blog that’s both equally educative and engaging, and without a doubt, you’ve hit the nail on the head. The problem is something that not enough folks are speaking intelligently about. I’m very happy that I came across this during my search for something regarding this.
I love your blog.. very nice colors & theme. Did you design this website yourself or did you hire someone to do it for you? Plz reply as I’m looking to create my own blog and would like to find out where u got this from. thanks
I’ve recently started a web site, the information you offer on this website has helped me tremendously. Thanks for all of your time & work. “Never trust anybody who says ‘trust me.’ Except just this once, of course. – from Steel Beach” by John Varley.
You have brought up a very good details , appreciate it for the post.
What i do not understood is actually how you’re no longer
really much more neatly-favored than you may be now.
You’re very intelligent. You recognize thus considerably in relation to this subject, produced me in my opinion consider it from a lot
of numerous angles. Its like men and women don’t seem to be fascinated
until it is something to do with Lady gaga!
Your own stuffs nice. At all times handle it up!
Link exchange is nothing else but it is simply placing the other person’s blog link on your page at suitable place and other person will also do similar in favor of you.|
Hello there! I could have sworn I’ve visited your blog before but after looking at many of the articles I realized it’s new to me. Anyhow, I’m certainly delighted I stumbled upon it and I’ll be book-marking it and checking back frequently.
Good write-up, I¦m normal visitor of one¦s site, maintain up the nice operate, and It’s going to be a regular visitor for a lengthy time.
Do you mind if I quote a few of your articles as long as I provide credit and sources
back to your weblog? My website is in the exact same area of interest as yours and my users would truly benefit from
a lot of the information you provide here.
Please let me know if this alright with you. Regards!
Perfect work you have done, this web site is really cool with excellent information.
It’s hard to find knowledgeable people on this topic, but you sound like you know what you’re talking about! Thanks
Utterly indited content material, appreciate it for entropy. “You can do very little with faith, but you can do nothing without it.” by Samuel Butler.
I would like to thnkx for the efforts you’ve put in writing this blog. I am hoping the same high-grade site post from you in the upcoming as well. In fact your creative writing skills has encouraged me to get my own blog now. Actually the blogging is spreading its wings quickly. Your write up is a great example of it.
Thanks for another excellent article. Where else could anybody get that kind of info in such an ideal way of writing? I’ve a presentation next week, and I am on the look for such info.
Yay google is my world beater aided me to find this great site! .
Someone essentially lend a hand to make seriously articles I’d state. This is the first time I frequented your web page and thus far? I surprised with the analysis you made to make this actual post extraordinary. Great task!
F*ckin¦ remarkable things here. I am very satisfied to see your article. Thanks so much and i am having a look ahead to touch you. Will you kindly drop me a mail?
I’m not sure why but this blog is loading incredibly slow for
me. Is anyone else having this problem or is it a issue on my end?
I’ll check back later on and see if the problem still exists.
Good post. I learn something totally new and challenging on blogs I stumbleupon every day.
It’s always helpful to read through content from other writers and practice
a little something from other web sites.
You can certainly see your expertise within the paintings you write. The sector hopes for more passionate writers like you who aren’t afraid to mention how they believe. Always follow your heart.
Hey! Do you know if they make any plugins to assist with Search Engine Optimization? I’m trying to get my blog to rank for some targeted keywords but I’m not seeing very
good gains. If you know of any please share. Kudos!
Enjoyed studying this, very good stuff, thankyou.
Excellent read, I just passed this onto a friend who was doing some research on that. And he just bought me lunch since I found it for him smile So let me rephrase that: Thank you for lunch!
If you are going for finest contents like I do, simply visit this website all the time for the reason that it offers feature contents, thanks|
As a Newbie, I am constantly searching online for articles that can benefit me. Thank you
Wow, marvelous blog layout! How long have you been blogging for? you made blogging look easy. The overall look of your site is fantastic, let alone the content!|
This page really has all of the info I needed concerning this subject and didn’t know who to ask.
Good response in return of this difficulty
with firm arguments and telling the whole thing concerning that.
My spouse and i have been very joyful when Jordan managed to deal with his investigations out of the precious recommendations he obtained in your site. It is now and again perplexing to just find yourself giving freely tricks many people might have been making money from. And we also consider we have got the blog owner to give thanks to for that. The type of illustrations you made, the easy blog navigation, the relationships your site make it possible to promote – it’s most excellent, and it’s aiding our son in addition to us understand that article is satisfying, which is certainly extraordinarily indispensable. Thanks for everything!
Thank you for another informative blog. Where else could I get that type of information written in such a perfect way? I’ve a project that I’m just now working on, and I’ve been on the look out for such information.
Your style is really unique in comparison to other people I’ve read stuff from. Many thanks for posting when you’ve got the opportunity, Guess I’ll just book mark this site.
I like this weblog very much, Its a very nice position to read and incur info.
Excellent goods from you, man. I’ve understand your stuff previous to and you are just extremely magnificent.
I actually like what you have acquired here, really like what you’re
stating and the way in which you say it. You make it entertaining and you still care for to keep it smart.
I cant wait to read far more from you. This is actually a terrific
site.
You completed some fine points there. I did a search on the issue and found the majority of folks will go along with with your blog.
Hello to every , because I am in fact eager of reading this website’s post to be updated regularly.
It consists of fastidious stuff.
I really like what you guys are up too. This type of clever work
and reporting! Keep up the superb works guys I’ve added you guys
to our blogroll.
Very interesting points you have observed, appreciate it for putting up. “Custom is the great guide of human life.” by David Hume.
I could not refrain from commenting. Exceptionally well written!
We stumbled over here different page and thought I might as well
check things out. I like what I see so now i am following
you. Look forward to looking into your web page for a second time.
After I originally left a comment I appear to have clicked on the -Notify
me when new comments are added- checkbox and from now on each time a comment is added I get four emails with the same comment.
Perhaps there is a means you can remove me from that service?
Cheers!
Thank you for your own labor on this website. Debby enjoys carrying out research and it’s really simple to grasp why. Most people hear all regarding the dynamic form you present good tips and tricks through this blog and even foster response from website visitors about this point and our favorite princess is without a doubt discovering a lot of things. Take advantage of the remaining portion of the year. You are always carrying out a splendid job.
I read this paragraph completely on the topic of the difference of hottest and preceding
technologies, it’s remarkable article.
Incredible! This blog looks just like my old one! It’s on a completely different topic but it has pretty much the same page layout and design. Great choice of colors!
Usually I do not learn post on blogs, but I wish to
say that this write-up very compelled me to try and
do it! Your writing taste has been amazed me. Thank you, quite nice
post.
Hello to all, how is everything, I think every one is getting more from this web page,
and your views are pleasant in favor of new visitors.
Hello to all, how is everything, I think every one is getting more from this web page,
and your views are pleasant in favor of new visitors.
With havin so much content do you ever run into any issues of plagorism or copyright violation? My blog has a lot of exclusive content I’ve either written myself or outsourced but it seems a lot of it is popping it up all over the web without my permission. Do you know any methods to help stop content from being stolen? I’d truly appreciate it.
Very nice post and right to the point. I am not sure if this is in fact the best place to ask but do you guys have any thoughts on where to employ some professional writers? Thank you 🙂
Great information. Lucky me I ran across your site by chance (stumbleupon).
I have saved it for later!
Thanks for your personal marvelous posting! I quite enjoyed reading it, you could be a great author.I will ensure that I bookmark your blog and definitely will come back later in life. I want to encourage that you continue your great work, have a nice evening!|
Hi! This is my first visit to your blog! We are a group
of volunteers and starting a new initiative in a community
in the same niche. Your blog provided us valuable information to work
on. You have done a wonderful job!
Thanks for the sensible critique. Me and my neighbor were just preparing to do a little research on this. We got a grab a book from our area library but I think I learned more from this post. I’m very glad to see such magnificent information being shared freely out there.
An outstanding share! I have just forwarded this onto a friend who has been conducting a little homework on this. And he actually bought me breakfast because I found it for him… lol. So let me reword this…. Thanks for the meal!! But yeah, thanx for spending the time to talk about this subject here on your site.
I like the helpful info you provide in your articles. I will bookmark your weblog and check again here frequently. I am quite sure I will learn many new stuff right here! Good luck for the next!
Hello, Neat post. There is an issue together with your web site in internet explorer, may test this?K IE nonetheless is the market leader and a big component of other folks will pass over your fantastic writing because of this problem.
I have to thank you for the efforts you’ve put in writing this blog. I really hope to see the same high-grade content by you later on as well. In truth, your creative writing abilities has encouraged me to get my own, personal site now 😉
Good web site! I truly love how it is easy on my eyes and the data are well written. I’m wondering how I could be notified when a new post has been made. I’ve subscribed to your feed which must do the trick! Have a nice day!
It is perfect time to make a few plans for the long run and it’s time to be happy. I have learn this put up and if I could I desire to suggest you few fascinating issues or tips. Maybe you could write subsequent articles relating to this article. I wish to learn even more things approximately it!
Hello, i read your blog occasionally and i own a similar one and i was just curious if you get a lot of spam feedback? If so how do you stop it, any plugin or anything you can recommend? I get so much lately it’s driving me crazy so any assistance is very much appreciated.
I precisely wanted to thank you very much yet again. I’m not certain the things I might have followed without those techniques shared by you about this area of interest. Completely was a daunting circumstance for me, nevertheless coming across a expert avenue you dealt with that made me to leap with joy. Now i am thankful for the information and even hope that you recognize what a powerful job that you are putting in teaching the mediocre ones thru your blog. Most likely you’ve never got to know all of us.
Great goods from you, man. I have consider your stuff previous to and you’re just too magnificent. I really like what you have got right here, certainly like what you’re saying and the way in which in which you assert it. You are making it enjoyable and you still care for to keep it smart. I cant wait to read much more from you. That is actually a tremendous web site.
It¦s really a great and useful piece of info. I am satisfied that you simply shared this helpful information with us. Please stay us informed like this. Thank you for sharing.
After looking into a few of the articles on your blog, I truly appreciate your way of blogging. I saved it to my bookmark site list and will be checking back in the near future. Take a look at my web site too and let me know what you think.|
Hi there! Someone in my Myspace group shared this website with us so I came to check it out. I’m definitely loving the information. I’m book-marking and will be tweeting this to my followers! Great blog and amazing design and style.
I’m not sure exactly why but this web site is loading very slow for me. Is anyone else having this issue or is it a issue on my end? I’ll check back later and see if the problem still exists.
It’s perfect time to make some plans for the future and it’s time to be happy. I’ve read this post and if I could I wish to suggest you some interesting things or suggestions. Perhaps you could write next articles referring to this article. I desire to read more things about it!|
You made some first rate factors there. I regarded on the web for the difficulty and found most people will go together with with your website.
Great post. I was checking constantly this blog and I’m impressed! Extremely helpful information specifically the last part 🙂 I care for such info much. I was seeking this certain information for a long time. Thank you and good luck.
Hey there just wanted to give you a quick heads up and let you know a few of the pictures aren’t loading correctly. I’m not sure why but I think its a linking issue. I’ve tried it in two different browsers and both show the same outcome.
Simply wanna input that you have a very decent site, I like the design and style it really stands out.
Very interesting subject, appreciate it for putting up.
Wonderful work! This is the type of information that should be shared around the web. Shame on the search engines for not positioning this post higher! Come on over and visit my website . Thanks =)
I feel this is among the so much important info for me.
And i am glad reading your article. But want to commentary on some general issues, The web site style
is perfect, the articles is really excellent : D.
Excellent process, cheers
Have you ever considered about adding a little bit more than just your articles? I mean, what you say is important and everything. But just imagine if you added some great visuals or videos to give your posts more, “pop”! Your content is excellent but with images and clips, this website could undeniably be one of the best in its field. Awesome blog!
Wonderful goods from you, man. I have understand your stuff previous to and you
are just too great. I actually like what you have acquired here, certainly like what you’re stating and the way in which you say
it. You make it entertaining and you still care for to keep it smart.
I can’t wait to read far more from you. This is really a
terrific website.
Right now it appears like WordPress is the top blogging platform available right now. (from what I’ve read) Is that what you’re using on your blog?
Way cool! Some extremely valid points! I appreciate you penning this post plus the rest of the
website is also really good.
Wow, lovely site. Thnx …
I really like your writing style, great info, thanks for putting up :D. “In every affair consider what precedes and what follows, and then undertake it.” by Epictetus.
Sweet blog! I found it while surfing around on Yahoo News. Do you have any tips on how to get listed in Yahoo News? I’ve been trying for a while but I never seem to get there! Thanks|
Good post. I learn something totally new and challenging on websites I stumbleupon every day. It’s always exciting to read articles from other writers and use something from their web sites.
It’s going to be finish of mine day, however before end I am reading this impressive article
to improve my experience.
I regard something truly interesting about your web site so I saved to favorites.
Way cool! Some very valid points! I appreciate you penning this post and also the rest of the site is really good.
WOW just what I was searching for. Came here by searching for Vape Pen Battery
Good – I should certainly pronounce, impressed with your site. I had no trouble navigating through all tabs as well as related information ended up being truly easy to do to access. I recently found what I hoped for before you know it at all. Quite unusual. Is likely to appreciate it for those who add forums or anything, web site theme . a tones way for your customer to communicate. Nice task..
tadalafil generic
Spot on with this write-up, I actually feel this amazing site needs a great deal more attention. I’ll probably be back again to see more, thanks for the advice!
No matter if some one searches for his required thing, so he/she
desires to be available that in detail, therefore that thing
is maintained over here.
I want to show some appreciation to you for rescuing me from this particular condition. Just after looking out through the world-wide-web and getting strategies which were not productive, I assumed my life was gone. Being alive minus the strategies to the difficulties you’ve resolved by means of your main post is a critical case, and the kind which may have negatively affected my entire career if I hadn’t come across your web page. Your own personal ability and kindness in touching all things was useful. I am not sure what I would’ve done if I hadn’t come upon such a point like this. I can also at this time look ahead to my future. Thanks so much for this specialized and amazing help. I will not hesitate to suggest your web blog to anybody who requires counselling about this matter.
I like this web site so much, saved to fav.
A person essentially help to make seriously articles I would state. This is the first time I frequented your web page and thus far? I surprised with the research you made to make this particular publish incredible. Magnificent job!
Very good article. I absolutely love this site. Keep writing!
I appreciate, cause I discovered exactly what I used to be taking a look for. You’ve ended my four day long hunt! God Bless you man. Have a nice day. Bye
This is a very good tips especially to those new to blogosphere, brief and accurate information… Thanks for sharing this one. A must read article.
Along with every thing which appears to be building inside this particular subject material, all your points of view happen to be somewhat radical. Even so, I appologize, because I do not give credence to your whole theory, all be it radical none the less. It would seem to me that your opinions are not entirely validated and in reality you are yourself not wholly convinced of your point. In any case I did enjoy looking at it.
I do not even know the way I ended up right here, however I thought this post was good. I do not recognize who you are however definitely you are going to a famous blogger if you aren’t already 😉 Cheers!
I know this if off topic but I’m looking into starting my own weblog and was wondering what all is required to get set up? I’m assuming having a blog like yours would cost a pretty penny? I’m not very web savvy so I’m not 100 certain. Any recommendations or advice would be greatly appreciated. Cheers
hello there and thank you for your info – I’ve definitely picked up something new from right here. I did however expertise some technical issues using this website, since I experienced to reload the website many times previous to I could get it to load properly. I had been wondering if your web host is OK? Not that I am complaining, but sluggish loading instances times will often affect your placement in google and can damage your high quality score if ads and marketing with Adwords. Well I am adding this RSS to my e-mail and could look out for a lot more of your respective exciting content. Make sure you update this again soon..
As soon as I observed this internet site I went on reddit to share some of the love with them.
I like this weblog very much, Its a real nice place to read and find information. “Famous remarks are very seldom quoted correctly.” by Simeon Strunsky.
There’s certainly a lot to learn about this subject. I really like all of the points you made.
Hola! I’ve been reading your blog for a while now and finally got the courage to go ahead and give you a shout out from Humble Tx! Just wanted to say keep up the fantastic job!
This is the perfect web site for anyone who really wants to find
out about this topic. You understand a whole lot its almost tough to argue
with you (not that I really will need to…HaHa).
You definitely put a fresh spin on a subject that’s been written about for
ages. Wonderful stuff, just great!
I want to to thank you for this excellent read!! I definitely loved every little bit of it. I have you book-marked to check out new things you post…
It’s very easy to find out any matter on net as compared to
textbooks, as I found this post at this site.
I would like to thnkx for the efforts you have put in writing this blog. I am hoping the same high-grade blog post from you in the upcoming as well. In fact your creative writing abilities has inspired me to get my own blog now. Really the blogging is spreading its wings quickly. Your write up is a good example of it.
Just wanna remark that you have a very decent website , I like the style and design it actually stands out.
Wow great content I see
Next time I read a blog, Hopefully it doesn’t fail me as much as this one. After all, I know it was my choice to read through, however I really believed you’d have something helpful to say. All I hear is a bunch of moaning about something you could possibly fix if you were not too busy seeking attention.
Hello would you mind letting me know which web host you’re working with? I’ve loaded your blog in 3 different browsers and I must say this blog loads a lot quicker then most. Can you recommend a good internet hosting provider at a reasonable price? Kudos, I appreciate it!|
I have to thank you for the efforts you have put in penning this blog. I am hoping to check out the same high-grade blog posts from you in the future as well. In truth, your creative writing abilities has motivated me to get my very own website now 😉
I got good info from your blog
Hi there, after reading this amazing piece of writing i am also delighted to share my familiarity here with colleagues.|
Thanks a lot for sharing this with all of us you actually know what you’re talking about! Bookmarked. Kindly also visit my site =). We could have a link exchange arrangement between us!
Good site you have here.. It’s difficult to find quality writing like yours these days. I really appreciate people like you! Take care!!
There is noticeably a bunch to know about this. I consider you made various good points in features also.
Usually I do not learn article on blogs, but I wish to say that this write-up very forced me to check out and do so! Your writing style has been surprised me. Thanks, very great post.
I simply wanted to thank you so much once again. I do not know the things that I would’ve done without the type of methods provided by you relating to that area of interest. It was before the difficult problem in my view, but discovering a new specialized fashion you solved the issue forced me to weep over joy. I am just grateful for your help and in addition expect you are aware of a great job you’re getting into instructing the others thru a blog. I am sure you’ve never encountered any of us.
Please let me know if you’re looking for a article author for your site. You have some really great posts and I feel I would be a good asset. If you ever want to take some of the load off, I’d really like to write some articles for your blog in exchange for a link back to mine. Please blast me an e-mail if interested. Thanks!
over the counter viagra
over the counter viagra
Awesome article.
Nice bro thank you.
Thank you for the auspicious writeup. It in fact was a amusement account it. Look advanced to far added agreeable from you! However, how can we communicate?
I will immediately grab your rss feed as I can’t to find your e-mail subscription link or e-newsletter service. Do you have any? Please let me realize in order that I may just subscribe. Thanks.
Everything is very open with a clear explanation of the issues. It was truly informative. Your site is very useful. Thanks for sharing!
Real instructive and wonderful bodily structure of content material, now that’s user friendly (:.
Greetings! Very helpful advice within this article! It’s the little changes which will make the greatest changes. Thanks for sharing!
I like what you guys are up also. Such clever work and reporting! Carry on the excellent works guys I have incorporated you guys to my blogroll. I think it will improve the value of my web site 🙂
Good write-up, I am normal visitor of one¦s site, maintain up the nice operate, and It’s going to be a regular visitor for a long time.
This information is priceless. How can I find out more?
I truly love your blog.. Excellent colors & theme. Did you build this website yourself? Please reply back as I’m looking to create my own website and want to find out where you got this from or just what the theme is called. Thanks!|
For most up-to-date news you have to pay a quick visit web and on internet I found this site as a finest site for hottest updates.|
There is clearly a bunch to identify about this. I feel you made some nice points in features also.
I really like your writing style, fantastic information, regards for putting up : D.
You made some respectable factors there. I looked on the web for the issue and found most people will associate with with your website.
Some really superb articles on this site, appreciate it for contribution. “An alcoholic is someone you don’t like who drinks as much as you do.” by Dylan Thomas.
Thanks very nice blog!
Would you be excited by exchanging hyperlinks?
I like this weblog so much, saved to bookmarks. “Nostalgia isn’t what it used to be.” by Peter De Vries.
When I originally commented I clicked the -Notify me when new comments are added- checkbox and now each time a comment is added I get four emails with the same comment. Is there any way you can remove me from that service? Thanks!
WOW just what I was looking for. Came here by searching for meta_keyword|
I got good info from your blog
I precisely wanted to thank you so much once more. I do not know what I might have followed without the actual secrets provided by you about that area. Entirely was a real intimidating issue in my view, nevertheless being able to see a skilled tactic you solved it forced me to leap with gladness. I am just grateful for this work and in addition sincerely hope you are aware of a great job you were accomplishing teaching the others with the aid of your blog. Most likely you’ve never met all of us.
Some genuinely terrific work on behalf of the owner of this web site, dead great content material.
Hi, Neat post. There’s a problem with your site in internet explorer, would check this… IE still is the market leader and a large portion of people will miss your wonderful writing because of this problem.
I have recently started a site, the information you offer on this web site has helped me tremendously. Thank you for all of your time & work.
Hi there very nice site!! Guy .. Excellent .. Wonderful .. I’ll bookmark your blog and take the feeds additionally…I’m happy to find numerous helpful information right here in the post, we need develop extra strategies in this regard, thank you for sharing. . . . . .
Actually no matter if someone doesn’t be aware of afterward its up to other users that they will help, so here it happens.
What’s up Dear, are you in fact visiting this web site regularly, if so after that you will absolutely obtain nice experience.
I believe that is one of the such a lot important info
for me. And i’m satisfied reading your article. However should remark on some
common things, The website style is perfect, the articles is actually excellent : D.
Good task, cheers
Magnificent beat ! I wish to apprentice even as you amend your web site, how could i subscribe for a blog website? The account helped me a applicable deal. I had been tiny bit acquainted of this your broadcast provided bright transparent concept
I seriously love your blog.. Very nice colors & theme. Did you make this web site yourself? Please reply back as I’m hoping to create my own website and would like to find out where you got this from or just what the theme is named. Thank you!
Do you mind if I quote a couple of your posts as long as I provide credit and sources back to your weblog? My website is in the exact same area of interest as yours and my visitors would really benefit from some of the information you provide here. Please let me know if this ok with you. Thanks!
After I initially commented I appear to have clicked the -Notify me when new comments are added- checkbox and now each time a comment is added I receive four emails with the same comment. There has to be a means you are able to remove me from that service? Thank you!
What i don’t understood is in reality how you are now not really much more well-favored than you may be now. You’re so intelligent. You already know thus considerably on the subject of this subject, produced me in my view consider it from a lot of various angles. Its like women and men aren’t involved except it is one thing to accomplish with Girl gaga! Your individual stuffs outstanding. Always care for it up!
Hello, i think that i noticed you visited my site
so i came to go back the prefer?.I am attempting to find things
to improve my web site!I suppose its adequate to make use of a few of your concepts!!
Your means of describing all in this piece of writing is truly fastidious,
every one be capable of without difficulty be aware of it, Thanks a
lot.
I love reading through a post that can make people think.
Also, thank you for allowing me to comment!
I blog quite often and I genuinely appreciate your information. Your article has really peaked my interest. I am going to bookmark your blog and keep checking for new information about once per week. I opted in for your Feed too.
Having read this I thought it was extremely enlightening.
I appreciate you taking the time and effort to put this short article together.
I once again find myself spending way too much time both reading and leaving comments.
But so what, it was still worth it!
Hi to every , because I am in fact keen of reading this website’s post to be updated regularly.
It carries fastidious material.
Hi to every , because I am in fact keen of reading this website’s post to be updated regularly.
It carries fastidious material.
Hi, I check your new stuff daily. Your story-telling style is witty, keep up the good work!
Howdy! I simply wish to give you a big thumbs up for
the excellent info you’ve got right here on this post. I
am coming back to your site for more soon.
As a Newbie, I am constantly exploring online for articles that can help me. Thank you
I’m not sure where you’re getting your information, but great topic. I needs to spend some time learning much more or understanding more. Thanks for fantastic information I was looking for this information for my mission.|
Hey there I am so happy I found your webpage, I really found you by error,
while I was searching on Digg for something else, Nonetheless I am here now and would just like to
say thanks a lot for a tremendous post and a all round entertaining blog (I also love
the theme/design), I don’t have time to look over it all at the minute
but I have saved it and also added in your RSS feeds, so when I have time I will be
back to read a great deal more, Please do keep up the
excellent b.
Some truly superb info , Gladiolus I detected this. “If you haven’t forgiven yourself something, how can you forgive others” by Dolores Huerta.
I read this article fully concerning the difference of newest and preceding technologies, it’s awesome article.
Hmm it appears like your website ate my first comment (it was extremely long) so I guess I’ll just sum it up what I wrote and say,
I’m thoroughly enjoying your blog. I too am an aspiring blog writer but I’m
still new to everything. Do you have any recommendations for first-time blog writers?
I’d really appreciate it.
Someone essentially help to make seriously articles I would state. This is the very first time I frequented your website page and thus far? I amazed with the research you made to create this particular publish incredible. Excellent job!
Do you have any video of that? I’d like to find out some additional information.
Oh my goodness! Incredible article dude! Thanks, However I am experiencing issues with your RSS. I don’t know the reason why I cannot join it. Is there anybody else having the same RSS issues? Anyone that knows the solution can you kindly respond? Thanx!!
obviously like your web-site but you need to test the spelling on several of your posts.
A number of them are rife with spelling issues and I to find it very troublesome
to tell the truth on the other hand I’ll definitely come again again.
You actually make it seem so easy with your presentation but I find this topic to be actually something which I think I
would never understand. It seems too complicated and
extremely broad for me. I am looking forward for
your next post, I’ll try to get the hang of it!
I was suggested this web site by my cousin. I’m not sure whether this post is written by him as nobody else know such detailed about my problem. You’re wonderful! Thanks!
Lovely blog! I am loving it!! Will be back later to read some more. I am bookmarking your feeds also.
Nice post. I learn something totally new and challenging on websites
I stumbleupon everyday. It’s always interesting to
read through articles from other authors and use a little something
from their web sites.
With havin so much content do you ever run into
any issues of plagorism or copyright infringement? My site has a lot
of completely unique content I’ve either created myself or outsourced but it looks
like a lot of it is popping it up all over the
internet without my authorization. Do you know any methods to
help stop content from being ripped off? I’d certainly appreciate it.
Link exchange is nothing else but it is only placing the other person’s website
link on your page at proper place and other person will
also do similar for you.
Thank you for the good writeup. It in fact was a amusement account it.
Look advanced to far added agreeable from you!
By the way, how can we communicate?
What’s Happening i am new to this, I stumbled upon this I’ve found It positively useful and it has helped me out loads. I am hoping to give a contribution & aid other customers like its helped me. Good job.
risks of hydroxychloroquine
neighborhood mitral valve prolapse teaspoon
I’m not sure why but this site is loading extremely slow for me.
Is anyone else having this problem or is it a problem
on my end? I’ll check back later on and see if the problem still exists.
After I originally commented I seem to have clicked on the -Notify me when new comments are added- checkbox and from now on each time
a comment is added I recieve 4 emails with the same comment.
Is there an easy method you can remove me from that service?
Cheers!
But wanna comment on few general things, The website style and design is perfect, the articles is rattling wonderful. “Crime does not pay … as well as politics.” by Alfred E. Newman.
naturally like your web-site however you have to
test the spelling on several of your posts. Many of them are rife with spelling problems and I find it very bothersome to tell the truth then again I’ll definitely come back again.
It’s a pity you don’t have a donate button! I’d definitely donate to this fantastic blog! I guess for now i’ll settle for bookmarking and adding your RSS feed to my Google account. I look forward to fresh updates and will talk about this site with my Facebook group. Talk soon!|
Nice post. I study something more difficult on totally different blogs everyday. It should always be stimulating to learn content from different writers and follow slightly one thing from their store. I’d desire to use some with the content material on my weblog whether you don’t mind. Natually I’ll provide you with a hyperlink on your internet blog. Thanks for sharing.
I used to be suggested this blog by means of my cousin. I’m no longer positive whether
this publish is written by way of him as nobody else realize such specified about my trouble.
You are incredible! Thank you!
Hey! This is my first visit to your blog! We are a collection of volunteers and starting a new initiative in a community in the same niche. Your blog provided us beneficial information to work on. You have done a marvellous job!
Asking questions are truly nice thing if you are not understanding something fully, however
this article offers nice understanding yet.
Thanks very interesting blog!
สร้างความแข็งแรงให้กับเส้นผมของสาว ๆ รวมถึงยังดูเงางามทั้งเส้นตั้งแต่โคนจรดปลายจนสังเกตเห็นได้ ทรีทเมนต์ชั้นเลิศที่ไม่ต้องล้างออกให้เสียเวลา เนื้อทรีทเมนต์มีความเบาบาง นุ่มละมุน จึงซึมซาบเข้าสู่เส้นผมได้อย่างรวดเร็วผมยาว
Hello are using WordPress for your site platform? I’m new to the blog world but I’m trying to get started and set up my own. Do you require any html coding expertise to make your own blog? Any help would be greatly appreciated!
You really make it seem so easy together with your presentation but I find this matter to be actually one thing which I believe I would by no means understand. It seems too complicated and very wide for me. I’m taking a look forward in your next put up, I will attempt to get the dangle of it!
you’re in reality a just right webmaster.
The web site loading velocity is amazing. It sort
of feels that you’re doing any unique trick. Also, The
contents are masterwork. you have done a excellent task on this matter!
viagra side effects
I like the valuable information you provide
in your articles. I will bookmark your weblog and check again here regularly.
I am quite certain I’ll learn lots of new stuff right here!
Good luck for the next!
Right here is the perfect website for anybody who wishes to understand this topic. You understand so much its almost hard to argue with you (not that I personally will need to…HaHa). You definitely put a new spin on a subject that has been discussed for decades. Wonderful stuff, just wonderful.
I know this if off topic but I’m looking into starting my own blog and was wondering what all is needed to get setup? I’m assuming having a blog like yours would cost a pretty penny? I’m not very web smart so I’m not 100 sure. Any recommendations or advice would be greatly appreciated. Thanks
This really answered my problem, thank you!
Thanks very interesting blog!
F*ckin’ amazing issues here. I’m very satisfied to peer your post. Thanks a lot and i am taking a look forward to touch you. Will you kindly drop me a e-mail?
That is a very good tip particularly to those new to the blogosphere. Simple but very precise info… Many thanks for sharing this one. A must read article!
I do not even understand how I ended up here, but I believed
this publish used to be good. I don’t understand who you are but certainly you’re going to a famous
blogger in the event you aren’t already. Cheers!
It’s remarkable to pay a visit this website and reading the views of all friends regarding this piece of writing, while I
am also keen of getting experience.
I used to be able to find good advice from your blog posts.
Hi! This is my 1st comment here so I just wanted to give a quick shout out and say I truly enjoy reading through your articles. Can you suggest any other blogs/websites/forums that go over the same subjects? Thanks for your time!
Have you ever considered creating an e-book or guest authoring on other sites? I have a blog centered on the same subjects you discuss and would really like to have you share some stories/information. I know my subscribers would appreciate your work. If you are even remotely interested, feel free to send me an e mail.
Those are yours alright! . We at least need to get these people stealing images to start blogging! They probably just did a image search and grabbed them. They look good though!
Normally I don’t read post on blogs, but I wish to say that this write-up very forced me to try
and do it! Your writing style has been surprised me.
Thank you, quite great post.
Hello to every single one, it’s truly a good for me to pay a visit
this web page, it consists of valuable Information.
Hi there just wanted to give you a quick heads up and let you know a few of the pictures aren’t loading properly. I’m not sure why but I think its a linking issue. I’ve tried it in two different internet browsers and both show the same results.
Hi to every one, since I am in fact eager of reading this
website’s post to be updated on a regular basis.
It consists of good information.
I constantly emailed this blog post page to all my contacts, since if
like to read it afterward my contacts will too.
It’s very easy to find out any matter on web as compared to books, as I found this paragraph at this website.
You really make it appear so easy along with your presentation however I find this matter to be actually something which I feel I would by no means understand. It sort of feels too complicated and extremely huge for me. I’m having a look ahead in your next put up, I’ll attempt to get the cling of it!
I’m not sure why but this weblog is loading incredibly slow for me. Is anyone else having this issue or is it a issue on my end? I’ll check back later on and see if the problem still exists.
Just desire to say your article is as astonishing. The clearness to your post is just great and that i could think you are a professional in this subject. Well together with your permission let me to clutch your RSS feed to keep up to date with approaching post. Thank you a million and please carry on the gratifying work.
Oh my goodness! Amazing article dude! Thank you, However I am going through problems with your RSS.
I don’t understand the reason why I am unable to subscribe to
it. Is there anybody else having the same RSS problems?
Anybody who knows the solution will you kindly respond?
Thanks!!
Oh my goodness! Amazing article dude! Thank you, However I am going through problems with your RSS.
I don’t understand the reason why I am unable to subscribe to
it. Is there anybody else having the same RSS problems?
Anybody who knows the solution will you kindly respond?
Thanks!!
Quality articles is the main to invite the people to pay a visit the site, that’s what this web site is providing.
Thankfulness to my father who told me concerning this weblog, this
weblog is truly awesome.
Hi! I simply would like to offer you a huge thumbs up for your great information you’ve got right here on this post. I will be returning to your blog for more soon.
I go to see day-to-day some websites and information sites to read
content, except this website presents feature based content.
Hello. magnificent job. I did not expect this. This is a impressive story. Thanks!
If you like good crypto project I recommend checking Diminutive Coin (DIMI). Blockchain for P2P Digital Payments (and given strong use case can even overthrow BTC) with only 200k coins ever produced. If you would like to check it out go visit their official Discord server at https://discord.gg/DvD7CC48TD. Highly recommended.
Howdy! I could have sworn I’ve visited this site before but after browsing through a few of the posts I realized it’s new to me. Anyways, I’m certainly delighted I found it and I’ll be book-marking it and checking back frequently!
I was able to find good info from your blog posts.
I like this blog very much, Its a really nice berth to read and get info .
I think everything posted was very reasonable.
However, what about this? suppose you were to create a
killer title? I mean, I don’t want to tell you how to run your blog, however what if you added a headline
that makes people want more? I mean How To Install Custom Windows XP Themes Old PC Gaming is kinda
plain. You could glance at Yahoo’s front page and see how they create
article titles to grab people interested.
You might try adding a video or a related picture
or two to grab readers excited about everything’ve got to say.
In my opinion, it might bring your blog a little bit more interesting.
This is a great tip particularly to those new to the blogosphere.
Short but very precise information… Appreciate your sharing this one.
A must read post!
You actually make it seem so easy with your presentation but I find this topic to be actually something which I think I would never understand. It seems too complicated and very broad for me. I’m looking forward for your next post, I will try to get the hang of it!
It is really a nice and useful piece of information. I?¦m glad that you simply shared this useful information with us. Please keep us up to date like this. Thank you for sharing.
Real fantastic visual appeal on this website , I’d value it 10 10.
Some truly interesting info , well written and broadly speaking user genial.
Hi, i think that i saw you visited my web site thus i came to “return the favor”.I am attempting to find
things to enhance my web site!I suppose its ok to use some
of your ideas!!
After I initially commented I appear to have clicked
on the -Notify me when new comments are added- checkbox and
now every time a comment is added I receive four emails with the exact
same comment. There has to be a way you are able to remove me from that service?
Thanks!
After I initially commented I appear to have clicked
on the -Notify me when new comments are added- checkbox and
now every time a comment is added I receive four emails with the exact
same comment. There has to be a way you are able to remove me from that service?
Thanks!
You could definitely see your expertise within the paintings you write. The sector hopes for even more passionate writers like you who aren’t afraid to say how they believe. At all times follow your heart.
whoah this weblog is great i really like reading your posts.
Keep up the good work! You understand, a lot of persons are searching around for this information, you can help
them greatly.
Amazing! This blog looks exactly like my old one! It’s on a entirely different subject but it has pretty much the same page layout and design. Great choice of colors!
I don’t even understand how I stopped up here, however I assumed this publish was once
great. I don’t understand who you are but certainly you’re going
to a famous blogger in the event you aren’t already.
Cheers!
This is a very good tips especially to those new to blogosphere, brief and accurate information… Thanks for sharing this one. A must read article.
Have you ever considered about adding a little bit more than just your articles?
I mean, what you say is valuable and everything. But think about if you added some great
graphics or videos to give your posts more, “pop”! Your content is excellent
but with images and video clips, this website could definitely be one of the most beneficial in its field.
Superb blog!
Hello to every one, the contents present at this web page are in fact remarkable for people experience, well, keep up the nice work fellows.
I?¦ve learn a few good stuff here. Certainly worth bookmarking for revisiting. I surprise how much effort you place to create such a excellent informative website.
Everything is very open with a clear explanation of the issues.
It was definitely informative. Your website is
useful. Thank you for sharing!
We are a bunch of volunteers and opening a new scheme in our community.
Your website offered us with valuable information to work
on. You’ve performed an impressive activity and our entire group will likely be
thankful to you.
Great delivery. Great arguments. Keep up the great work.
The following time I learn a weblog, I hope that it doesnt disappoint me as much as this one. I mean, I do know it was my option to read, however I really thought youd have something fascinating to say. All I hear is a bunch of whining about one thing that you possibly can fix when you werent too busy looking for attention.
Only wanna comment that you have a very decent web site, I enjoy the style it really stands out.
I am perpetually thought about this, appreciate it for putting up.
Fantastic blog! Do you have any helpful hints for aspiring
writers? I’m planning to start my own website soon but I’m a little lost
on everything. Would you advise starting with
a free platform like WordPress or go for a paid option?
There are so many options out there that I’m completely confused ..
Any tips? Appreciate it!
Great blog you have here but I was curious about if you knew of any message boards that cover the same topics discussed here? I’d really like to be a part of community where I can get feed-back from other knowledgeable individuals that share the same interest. If you have any recommendations, please let me know. Thanks!
Have you ever thought about creating an ebook or guest authoring on other sites? I have a blog centered on the same ideas you discuss and would really like to have you share some stories/information. I know my viewers would appreciate your work. If you are even remotely interested, feel free to shoot me an e-mail.
It is in point of fact a nice and useful piece of info. I’m satisfied that you shared this useful info with us. Please keep us informed like this. Thanks for sharing.
I’m still learning from you, as I’m trying to reach my goals. I absolutely enjoy reading all that is written on your site.Keep the stories coming. I enjoyed it!
Article writing is also a fun, if you be familiar with after that you can write or else it is
difficult to write.
music kate hudson
Wow, this post is pleasant, my younger sister is analyzing such things, so I am going to let know her.
You’re so interesting! I don’t suppose I’ve read through something like that before.
So nice to find someone with some unique thoughts on this subject.
Really.. thank you for starting this up. This web site is one thing that is required on the web,
someone with a bit of originality!
You’ve made some decent points there. I looked on the net for additional information about the issue and found most people will go along with your views on this website.
Hey! I know this is kinda off topic however I’d figured I’d ask. Would you be interested in exchanging links or maybe guest authoring a blog article or vice-versa? My website discusses a lot of the same topics as yours and I believe we could greatly benefit from each other. If you happen to be interested feel free to shoot me an email. I look forward to hearing from you! Excellent blog by the way!
My brother suggested I would possibly like this blog.
He was entirely right. This put up actually made my day.
You can not consider simply how so much time I had spent for this
info! Thanks!
Neat blog! Is your theme custom made or did you download it from
somewhere? A design like yours with a few simple adjustements
would really make my blog stand out. Please let me know where you got your theme.
Kudos
Hello! This is my first visit to your blog! We are a
team of volunteers and starting a new project in a community in the same niche.
Your blog provided us valuable information to
work on. You have done a wonderful job!
I think that is one of the most significant info for me.
And i’m satisfied reading your article. But wanna remark on some general things, The
web site taste is perfect, the articles is actually nice :
D. Good job, cheers
Hello, i read your blog occasionally and i own a similar
one and i was just wondering if you get a lot of spam
remarks? If so how do you reduce it, any plugin or anything you
can recommend? I get so much lately it’s driving me mad so any support is very
much appreciated.
Along with every thing which seems to be developing inside this particular subject matter, all your points of view tend to be relatively exciting. On the other hand, I beg your pardon, but I do not subscribe to your whole theory, all be it exciting none the less. It looks to everybody that your remarks are not completely justified and in fact you are generally yourself not even completely certain of the argument. In any event I did appreciate reading through it.
I know this site provides quality dependent articles or reviews and additional stuff, is there any
other site which presents these kinds of things in quality?
Hello there, I do believe your site could possibly be having internet browser compatibility
problems. Whenever I look at your website in Safari, it looks fine but when opening in IE, it’s got some
overlapping issues. I merely wanted to provide you with a quick heads
up! Apart from that, fantastic website!
I really like reading through and I conceive this website got some really useful stuff on it! .
Excellent beat ! I would like to apprentice while you amend your web site, how can i subscribe for
a blog web site? The account helped me a acceptable deal.
I had been a little bit acquainted of this your broadcast provided
bright clear idea
Nice post. I was checking continuously this blog and I am impressed! Very useful info specially the last part 🙂 I care for such info a lot. I was seeking this particular info for a very long time. Thank you and good luck.
I’ve been browsing online greater than three hours as of late, yet I never discovered any interesting article like yours. It¦s lovely worth sufficient for me. Personally, if all web owners and bloggers made just right content material as you probably did, the net might be much more helpful than ever before.
There’s definately a great deal to learn about this topic.
I love all the points you made.
Thanks for another informative web site.
Where else could I am getting that type of info written in such an ideal means?
I have a project that I am simply now running on, and I have been on the look out for such info.
I don’t know whether it’s just me or if everyone else
encountering issues with your blog. It appears like some of the text within your posts are
running off the screen. Can someone else please comment
and let me know if this is happening to them as well? This might be a issue with my browser because I’ve had this happen before.
Thanks
If you would like to improve your familiarity just keep visiting this website and be updated with
the most recent gossip posted here.
I haven’t checked in here for some time since I thought it was getting boring, but the last several posts are great quality so I guess I will add you back to my everyday bloglist. You deserve it my friend 🙂
I keep listening to the news talk about getting boundless online grant applications so I have been looking around for the top site to get one. Could you tell me please, where could i find some?
Hi to every single one, it’s really a good
for me to pay a quick visit this web site, it contains helpful Information.
I was recommended this blog by my cousin. I am not sure whether this post
is written by him as nobody else know such detailed about my
difficulty. You’re incredible! Thanks!
I’ve recently started a website, the info you provide on this site has helped me tremendously. Thank you for all of your time & work.
Heya i am for the first time here. I found this board and I find It truly useful & it helped me out much. I hope to give something back and help others like you aided me.
We are a gaggle of volunteers and opening a brand new scheme in our community.
Your website provided us with valuable information to
work on. You’ve performed a formidable activity and
our entire group shall be grateful to you.
he blog was how do i say it… relevant, finally something that helped me. Thanks
hello there and thank you for your info – I’ve definitely picked up anything new from right here. I did however expertise a few technical issues using this site, as I experienced to reload the site a lot of times previous to I could get it to load correctly. I had been wondering if your web host is OK? Not that I’m complaining, but slow loading instances times will often affect your placement in google and can damage your high-quality score if ads and marketing with Adwords. Well I am adding this RSS to my e-mail and could look out for a lot more of your respective interesting content. Make sure you update this again very soon..
Hello there! I know this is kinda off topic however , I’d figured I’d ask. Would you be interested in trading links or maybe guest authoring a blog post or vice-versa? My website goes over a lot of the same subjects as yours and I believe we could greatly benefit from each other. If you happen to be interested feel free to shoot me an e-mail. I look forward to hearing from you! Excellent blog by the way!
Right now it sounds like Drupal is the best blogging platform available right now. (from what I’ve read) Is that what you are using on your blog?
Hurrah! After all I got a weblog from where I be able to in fact obtain useful facts concerning my study and knowledge.
obviously like your web-site however you have to take a look at
the spelling on quite a few of your posts. Many of them are rife with
spelling issues and I in finding it very troublesome to inform the truth nevertheless I’ll
surely come again again.
Hey! Someone in my Myspace group shared this site with us so I came to look it over.
I’m definitely enjoying the information. I’m book-marking and will be tweeting this to my followers!
Superb blog and outstanding design.
Asking questions are genuinely fastidious thing if you are not understanding something completely,
however this piece of writing provides good understanding yet.
Today, while I was at work, my sister stole my iPad
and tested to see if it can survive a thirty foot drop, just so she can be a youtube sensation.
My apple ipad is now destroyed and she has 83 views. I know this is
totally off topic but I had to share it with someone!
Please let me know if you’re looking for a article
author for your site. You have some really great posts and I think I would be a good
asset. If you ever want to take some of the load off, I’d love to write some material for
your blog in exchange for a link back to mine.
Please shoot me an e-mail if interested.
Many thanks!
Greetings! Very useful advice in this particular article! It is the little changes that will make the most significant changes. Many thanks for sharing!|
Keep functioning ,impressive job!
Hmm is anyone else experiencing problems with the pictures on this blog loading?
I’m trying to determine if its a problem on my end or if it’s
the blog. Any feedback would be greatly appreciated.
Howdy! I’m at work surfing around your blog
from my new iphone 3gs! Just wanted to say I love reading your blog and
look forward to all your posts! Keep up the excellent work!
Greetings I am so thrilled I found your webpage,
I really found you by accident, while I was searching on Google for something
else, Anyways I am here now and would just like
to say thanks a lot for a tremendous post and a all round exciting
blog (I also love the theme/design), I don’t have time to browse it all at the minute but
I have saved it and also included your RSS feeds, so when I have time I will be back to read much more, Please do keep up the excellent jo.
After looking over a number of the blog posts on your web site, I truly appreciate your technique of blogging.
I added it to my bookmark website list and will be checking back soon. Please
visit my web site as well and tell me how you feel.
Have you ever considered about including a little bit more than just your articles? I mean, what you say is important and everything. But just imagine if you added some great images or videos to give your posts more, “pop”! Your content is excellent but with images and video clips, this blog could certainly be one of the very best in its niche. Good blog!
I think other website proprietors should take this website as an model, very clean and great user pleasant style and design.
I’m not that much of a internet reader to be honest but your sites really nice,
keep it up! I’ll go ahead and bookmark your website to come back down the road.
Cheers
Hurrah, that’s what I was exploring for, what a data!
existing here at this weblog, thanks admin of this site.
Have you ever considered about adding a little bit
more than just your articles? I mean, what you say is
important and everything. However imagine if you added some great photos or videos to give your posts more, “pop”!
Your content is excellent but with pics and videos, this blog could undeniably be one
of the greatest in its field. Amazing blog!
Magnificent goods from you, man. I’ve keep in mind your stuff previous to and you’re just extremely wonderful.
I really like what you have received right here,
really like what you’re stating and the way in which in which you say it.
You are making it enjoyable and you continue to take care of to keep it
wise. I can not wait to read much more from you. That is
actually a wonderful web site.
I truly appreciate this post. I have been looking all over for this! Thank goodness I found it on Bing. You’ve made my day! Thx again
I enjoy you because of all your effort on this website. My mother take interest in participating in investigations and it’s easy to see why. Most of us know all of the compelling way you render very important items by means of your web blog and as well as inspire response from visitors about this situation while our simple princess is truly studying a lot of things. Enjoy the remaining portion of the new year. You’re the one conducting a really great job.
Its wonderful as your other posts : D, appreciate it for putting up.
Its like you read my mind! You appear to know a lot about this,
like you wrote the book in it or something. I think that
you can do with some pics to drive the message home a bit, but instead of that, this is wonderful blog.
A fantastic read. I’ll certainly be back.
It’s the best time to make a few plans for the longer term and it is time
to be happy. I have read this publish and if I may I wish to recommend you few attention-grabbing issues or tips.
Perhaps you can write subsequent articles regarding this
article. I desire to learn more things about it!
Awesome issues here. I am very glad to look your article. Thank you a lot and I’m having a look ahead to touch you. Will you please drop me a mail?|
My programmer is trying to convince me to move to .net from PHP.
I have always disliked the idea because of the expenses.
But he’s tryiong none the less. I’ve been using WordPress on various websites for about a year and am nervous about switching to
another platform. I have heard great things about blogengine.net.
Is there a way I can import all my wordpress posts into it?
Any kind of help would be greatly appreciated!
What i don’t realize is in truth how you’re no longer actually much more well-appreciated than you might be right now. You are so intelligent. You already know thus considerably on the subject of this subject, produced me for my part imagine it from so many various angles. Its like women and men don’t seem to be fascinated until it is one thing to accomplish with Lady gaga! Your individual stuffs excellent. At all times take care of it up!
Some really interesting info , well written and broadly user friendly.
Having read this I thought it was very informative. I appreciate you taking the time and effort to put this article together. I once again find myself spending way to much time both reading and commenting. But so what, it was still worth it!
Hey there would you mind letting me know which webhost you’re using?
I’ve loaded your blog in 3 completely different browsers and I must say this blog loads a lot quicker then most.
Can you suggest a good web hosting provider at a reasonable price?
Thank you, I appreciate it!
Do you have any video of that? I’d care to find out some additional information.
Hello would you mind letting me know which hosting company you’re using?
I’ve loaded your blog in 3 different browsers and
I must say this blog loads a lot faster then most. Can you suggest a
good internet hosting provider at a reasonable price?
Kudos, I appreciate it!
hello!,I like your writing very so much! percentage we keep up a correspondence more about your article on AOL? I require a specialist in this area to solve my problem. May be that is you! Looking forward to see you.
Hi there! Do you know if they make any plugins to safeguard against hackers? I’m kinda paranoid about losing everything I’ve worked hard on. Any tips?
If you are going for most excellent contents like I do, just pay
a quick visit this web site daily as it offers feature contents, thanks
Thank you for sharing superb informations. Your site is very cool. I am impressed by the details that you’ve on this blog. It reveals how nicely you perceive this subject. Bookmarked this web page, will come back for more articles. You, my pal, ROCK! I found simply the info I already searched everywhere and just couldn’t come across. What a perfect website.
I am constantly searching online for ideas that can assist me. Thank you!
When someone writes an article he/she keeps the thought of a user in his/her mind
that how a user can understand it. Thus that’s why this paragraph is great.
Thanks!
If some one wishes to be updated with hottest technologies then he must
be visit this web site and be up to date all the time.
I was more than happy to find this site. I wanted to thank you for ones time due to this wonderful read!! I definitely really liked every bit of it and i also have you saved as a favorite to look at new stuff on your blog.
Hello, Neat post. There is an issue with your site in web explorer, may check this?
IE nonetheless is the marketplace leader and a big portion of other folks will leave out your
wonderful writing because of this problem.
Wow, awesome blog layout! How long have you been blogging for? you make blogging look easy. The overall look of your site is wonderful, let alone the content!
For most up-to-date news you have to pay a quick visit world-wide-web and on internet I found
this web site as a best web page for most recent updates.
Hi there! I know this is kind of off topic but I was wondering if you knew where I could find a captcha plugin for my comment form? I’m using the same blog platform as yours and I’m having trouble finding one? Thanks a lot!
It’s hard to find knowledgeable people on this topic, but you sound like you know what you’re talking about! Thanks
Hi, i think that i saw you visited my web site so i got
here to return the favor?.I’m trying to in finding things to enhance my website!I suppose its adequate to use a few of your ideas!!
It’s difficult to find knowledgeable people in this particular topic, but you sound like you know what you’re talking about! Thanks
Utterly indited content, regards for information .
Very nice post. I simply stumbled upon your blog and wished to mention that I’ve truly enjoyed surfing around your blog posts. After all I’ll be subscribing on your rss feed and I’m hoping you write once more very soon!
I needed to thank you for this great read!!
I certainly enjoyed every bit of it. I have you saved as a favorite to look at new stuff you post…
You made some decent points there. I looked on the internet for the difficulty and found most people will associate with with your website.
I’m impressed, I must say. Seldom do I come across a blog that’s equally educative and amusing, and without a doubt, you have hit the nail on the head. The issue is an issue that too few men and women are speaking intelligently about. I am very happy I found this during my hunt for something regarding this.
Good web site you have got here.. Itís difficult to find high-quality writing like yours these days. I really appreciate people like you! Take care!!
Aw, this was an extremely nice post. Spending some time and actual effort to create a superb articleÖ but what can I sayÖ I procrastinate a whole lot and don’t seem to get nearly anything done.
I’m not sure where you are getting your information, but good topic. I needs to spend some time learning more or understanding more. Thanks for fantastic information I was looking for this info for my mission.
My brother recommended I might like this website.
He used to be totally right. This post truly
made my day. You cann’t believe just how a lot time I had
spent for this information! Thank you!
Yes! Finally something about ベラジョンカジノ 評判.
Your style is very unique in comparison to other folks I have read stuff from. Many thanks for posting when you have the opportunity, Guess I’ll just book mark this site.
I think everything said was very reasonable. But, what about this?
what if you were to write a killer headline? I am not suggesting your information isn’t
good, but suppose you added a title that makes people want
more? I mean How To Install Custom Windows XP Themes Old PC Gaming is kinda vanilla.
You could glance at Yahoo’s front page and note
how they create post headlines to grab viewers interested.
You might add a video or a related picture or two to get readers interested
about everything’ve got to say. Just my opinion, it would bring your website a little bit more interesting.
The subsequent time I learn a weblog, I hope that it doesnt disappoint me as a lot as this one. I imply, I do know it was my option to learn, but I really thought youd have something interesting to say. All I hear is a bunch of whining about one thing that you could possibly fix should you werent too busy searching for attention.
I do agree with all the ideas you’ve introduced for your post. They are really convincing and can definitely work. Nonetheless, the posts are very brief for novices. May just you please extend them a bit from next time? Thanks for the post.
Having read this I believed it was very informative.
I appreciate you finding the time and energy to put this content together.
I once again find myself personally spending way too much time
both reading and leaving comments. But so what, it was still worth it!
Great post. I was checking continuously this blog and I’m impressed! Extremely useful info specifically the last part 🙂 I care for such information much. I was looking for this particular info for a long time. Thank you and good luck.
hey there and thank you to your information – I’ve definitely picked up something new from right here. I did on the other hand experience a few technical points the usage of this web site, as I experienced to reload the web site many times prior to I could get it to load properly. I were brooding about if your web hosting is OK? Not that I am complaining, however sluggish loading instances times will very frequently have an effect on your placement in google and can harm your high-quality ranking if advertising and ***********|advertising|advertising|advertising and *********** with Adwords. Well I am adding this RSS to my e-mail and could glance out for much extra of your respective exciting content. Ensure that you replace this again soon..
I have been exploring for a little for any
high-quality articles or blog posts on this kind of house .
Exploring in Yahoo I at last stumbled upon this web site.
Studying this info So i’m happy to convey that I have a very
just right uncanny feeling I discovered exactly what I needed.
I such a lot unquestionably will make certain to do not omit this web site and give it
a look on a constant basis.
I am forever thought about this, regards for putting up.
Everything is very open and very clear explanation of issues. was truly information. Your website is very useful. Thanks for sharing.
I?¦ll right away take hold of your rss feed as I can’t to find your email subscription hyperlink or newsletter service. Do you’ve any? Kindly allow me know so that I may just subscribe. Thanks.
Thanks for sharing excellent informations. Your website is very cool. I am impressed by the details that you’ve on this website. It reveals how nicely you understand this subject. Bookmarked this website page, will come back for more articles. You, my friend, ROCK! I found simply the info I already searched all over the place and simply couldn’t come across. What an ideal web site.
Its such as you learn my mind! You appear to know so much approximately this, such as you wrote the guide in it or something. I think that you can do with a few p.c. to pressure the message home a bit, but instead of that, that is excellent blog. An excellent read. I will certainly be back.
excellent post, very informative. I wonder why the other experts of this sector don’t notice this. You must continue your writing. I’m confident, you’ve a huge readers’ base already!
Hi there very cool website!! Guy .. Excellent .. Wonderful .. I’ll bookmark your web site and take the feeds additionally…I’m happy to seek out a lot of helpful info right here within the submit, we need work out more techniques in this regard, thanks for sharing.
Very nice blog post. I absolutely appreciate this site.
Continue the good work!
Hiya, I’m really glad I’ve found this information. Today bloggers publish only about gossips and internet and this is actually annoying. A good web site with exciting content, that is what I need. Thank you for keeping this web site, I’ll be visiting it. Do you do newsletters? Cant find it.
I went over this site and I conceive you have a lot of good information, saved to my bookmarks (:.
Very well written information. It will be supportive to anyone who utilizes it, including me. Keep up the good work – can’r wait to read more posts.
This is really interesting, You’re a very skilled blogger.
I’ve joined your rss feed and look forward to seeking
more of your excellent post. Also, I have shared your web site
in my social networks!
A motivating discussion is definitely worth comment. I think that you should write more about this subject, it may not be a taboo subject but typically folks don’t talk about such issues. To the next! Kind regards!!
I visited various sites but the audio feature for audio songs existing at this website is
genuinely marvelous.
Pretty nice post. I simply stumbled upon your weblog and wanted to say that I’ve really enjoyed browsing your weblog posts. After all I’ll be subscribing on your rss feed and I am hoping you write again soon!
Wow that was strange. I just wrote an really long comment
but after I clicked submit my comment didn’t appear.
Grrrr… well I’m not writing all that over again. Anyhow, just wanted to say fantastic blog!
I’ve learn several excellent stuff here. Certainly value bookmarking
for revisiting. I surprise how much attempt you put to create this sort of magnificent informative website.
What’s Taking place i’m new to this, I stumbled upon this I have found It absolutely useful and it has aided me out loads.
I’m hoping to give a contribution & help other users like its helped me.
Great job.
Best view i have ever seen !
It’s really a cool and helpful piece of information. I’m glad that you shared this helpful information with us. Please stay us informed like this. Thanks for sharing.
Greetings! Very helpful advice within this post!
It is the little changes that make the greatest changes.
Many thanks for sharing!
This design is spectacular! You certainly know how to keep a reader entertained. Between your wit and your videos, I was almost moved to start my own blog (well, almost…HaHa!) Great job. I really loved what you had to say, and more than that, how you presented it. Too cool!
Hello just wanted to give you a quick heads up and let you know a few of the images aren’t loading properly.
I’m not sure why but I think its a linking issue. I’ve tried it in two different
internet browsers and both show the same results.
Hello just wanted to give you a quick heads up and let you know a few of the images aren’t loading properly.
I’m not sure why but I think its a linking issue. I’ve tried it in two different
internet browsers and both show the same results.
Thank you so much for giving everyone an exceptionally nice opportunity to read from this site. It is always very fantastic and also packed with a great time for me personally and my office mates to search the blog at the least three times in one week to read through the new secrets you have got. Of course, I am just usually fulfilled with your brilliant tactics served by you. Certain two points in this posting are easily the most beneficial I have ever had.
Excellent post. I certainly appreciate this website. Thanks!
I think this is one of the most important information for me. And i’m glad reading your article. But wanna remark on some general things, The site style is wonderful, the articles is really excellent : D. Good job, cheers
Fastidious answer back in return of this question with genuine arguments and describing the whole thing regarding that.
There is clearly a bunch to know about this. I suppose you made certain nice points in features also.
An outstanding share! I’ve just forwarded this onto a friend who has been doing a little homework
on this. And he actually bought me dinner due to the fact that I
found it for him… lol. So allow me to reword this…. Thanks for the meal!!
But yeah, thanx for spending the time to talk about this topic here on your web page.
I’m gone to inform my little brother, that he should
also visit this blog on regular basis to get updated
from most up-to-date gossip.
My coder is trying to convince me to move to .net from PHP.
I have always disliked the idea because of the costs.
But he’s tryiong none the less. I’ve been using Movable-type on a variety of websites
for about a year and am concerned about switching to another platform.
I have heard great things about blogengine.net. Is there a way I can import all my wordpress content
into it? Any help would be greatly appreciated!
It is really a nice and useful piece of information. I’m glad that you shared this helpful information with us. Please keep us up to date like this. Thank you for sharing.
Magnificent items from you, man. I’ve consider your stuff prior to and you are just
too great. I really like what you’ve bought right here, certainly
like what you are saying and the way in which you say it.
You make it entertaining and you continue to
take care of to stay it sensible. I can not wait to read
much more from you. That is actually a tremendous site.
Hi there, i read your blog occasionally and i own a similar one and i was just curious if you get a lot of spam responses? If so how do you stop it, any plugin or anything you can suggest? I get so much lately it’s driving me insane so any assistance is very much appreciated.
I blog quite often and I genuinely appreciate your content.
This great article has truly peaked my interest. I am going to book
mark your website and keep checking for new details about once per week.
I subscribed to your Feed as well.
Yes! Finally someone writes about Titanium earrings.
You need to be a part of a contest for one of the highest quality
blogs online. I am going to highly recommend
this website!
Thank you for sharing with us, I conceive this website genuinely stands out : D.
Hey there! I realize this is kind of off-topic however
I needed to ask. Does running a well-established website
such as yours require a massive amount work? I am completely new to blogging but I do write in my diary daily.
I’d like to start a blog so I can easily share my experience and
views online. Please let me know if you have any kind of recommendations or tips for new aspiring bloggers.
Thankyou!
I’m impressed, I have to say. Actually not often do I encounter a blog that’s each educative and entertaining, and let me tell you, you have hit the nail on the head. Your idea is excellent; the issue is something that not sufficient persons are talking intelligently about. I am very glad that I stumbled throughout this in my search for something regarding this.
Hey there just wanted to give you a quick heads up. The text in your
content seem to be running off the screen in Ie. I’m not sure if this is a formatting issue or something
to do with browser compatibility but I thought I’d
post to let you know. The layout look great though!
Hope you get the issue solved soon. Many thanks
Very nice write-up. I definitely love this website. Continue the good work!
Hey there! I just wanted to ask if you ever have any issues with hackers?
My last blog (wordpress) was hacked and I ended up losing several weeks of
hard work due to no back up. Do you have any methods
to stop hackers?
Hi my friend! I want to say that this article is amazing, great written and include almost all important infos. I¦d like to look extra posts like this .
Hi my family member! I wish to say that this article is awesome, nice written and include approximately all significant infos. I’d like to peer extra posts like this.
Thank you for every other magnificent post. The place else may just anybody get that type of info in such an ideal method of writing?
I’ve a presentation subsequent week, and I’m at the search for such information.
I’d like to thank you for the efforts you’ve put in writing this blog.
I really hope to see the same high-grade blog posts
from you in the future as well. In truth, your creative writing abilities has motivated me
to get my own, personal blog now 😉
Excellent post. I was checking constantly this blog and I’m impressed! Very helpful information specially the last part 🙂 I care for such information a lot. I was seeking this particular information for a long time. Thank you and good luck.
I appreciate, cause I found exactly what I was looking for. You’ve ended my four day long hunt! God Bless you man. Have a great day. Bye
An interesting discussion is worth comment.
I believe that you need to write more on this subject matter, it might not be a taboo subject but
usually people don’t speak about such issues. To the next!
Cheers!!
Great post. I am facing a couple of these problems.
Thank you for the good writeup. It in fact was a amusement account it.
Look advanced to more added agreeable from you!
However, how can we communicate?
This page certainly has all the info I needed concerning this subject and didn’t know who to ask.
Its like you read my mind! You appear to know so much about this, like you wrote the book in it or something. I think that you could do with a few pics to drive the message home a bit, but other than that, this is magnificent blog. A great read. I will definitely be back.
This is the perfect blog for anybody who would like to find out about this topic. You understand so much its almost hard to argue with you (not that I really would want to…HaHa). You certainly put a brand new spin on a topic that’s been written about for many years. Great stuff, just wonderful.
It’s enormous that you are getting ideas from
this article as well as from our argument made here.
hey there and thank you on your info – I have definitely picked up anything new from proper here. I did on the other hand experience some technical issues the usage of this site, since I experienced to reload the web site many instances prior to I could get it to load properly. I had been brooding about in case your web hosting is OK? Not that I am complaining, however sluggish loading instances times will very frequently impact your placement in google and can injury your high quality score if advertising and ***********|advertising|advertising|advertising and *********** with Adwords. Anyway I am including this RSS to my e-mail and can glance out for a lot extra of your respective intriguing content. Make sure you replace this once more very soon..
I constantly emailed this website post page to
all my associates, since if like to read it then my contacts will too.
Hi there, You have performed a great job. I’ll definitely digg it and in my view suggest to my friends. I’m confident they will be benefited from this website.
Thanks , I’ve recently been looking for info about this subject for ages and yours is the best I have discovered till now. But, what about the conclusion? Are you sure about the source?
Hello, Neat post. There’s an issue along with your site in web
explorer, might test this? IE nonetheless is the marketplace chief and
a huge section of other folks will leave out your great writing
because of this problem.
Very nice post. I just stumbled upon your weblog and wished to say that
I have really enjoyed surfing around your
blog posts. In any case I will be subscribing to your
rss feed and I hope you write again soon!
Simply wanna tell that this is very helpful, Thanks for taking your time to write this.
The next time I read a blog, I hope that it does not disappoint me as much as this particular one. I mean, Yes, it was my choice to read, however I genuinely thought you would have something interesting to talk about. All I hear is a bunch of moaning about something that you could possibly fix if you weren’t too busy searching for attention.
You actually make it seem so easy with your presentation but I find this matter to be actually something which I think I would never understand.
It seems too complicated and extremely broad for me.
I’m looking forward for your next post, I will try to get
the hang of it!
I got what you mean , thankyou for putting up.Woh I am lucky to find this website through google. “Don’t be afraid of opposition. Remember, a kite rises against not with the wind.” by Hamilton Mabie.
Hello there! Would you mind if I share your blog with my zynga group? There’s a lot of people that I think would really enjoy your content. Please let me know. Thanks
It is perfect time to make some plans for the long run and it’s time to be happy. I’ve learn this publish and if I may I desire to recommend you some fascinating things or suggestions. Maybe you could write subsequent articles relating to this article. I want to read even more issues approximately it!
I’m not certain where you’re getting your information, but good topic.
I must spend some time studying much more or understanding more.
Thanks for excellent info I was on the lookout for this information for my mission.
My brother suggested I might like this website.
He used to be totally right. This post truly made my day.
You cann’t believe simply how much time I had spent for this info!
Thank you!
Just wish to say your article is as amazing.
The clarity to your submit is simply great and
that i can think you are a professional on this subject.
Fine together with your permission let me to seize your feed to stay up to date
with imminent post. Thank you a million and please continue the enjoyable work.
kamagra pills
This actually answered my downside, thank you!
Thank you for any other informative web site. The place else could I am getting that kind of info
written in such a perfect means? I have a mission that I’m just now running
on, and I have been on the look out for such info.
It’s going to be end of mine day, however before end I am reading this
wonderful article to improve my experience.
hello!,I love your writing very so much! share we be in contact extra approximately your article on AOL?
I require a specialist on this area to resolve my problem.
Maybe that is you! Having a look forward to look you.
Hello all, here every one is sharing these experience, therefore it’s pleasant to read this
web site, and I used to visit this blog all the time.
You actually make it seem really easy together with your presentation but I find this topic to be actually one thing
that I think I might by no means understand. It kind of feels too complex and very huge for me.
I’m taking a look forward for your next publish, I’ll attempt to get the dangle of it!
Undeniably imagine that that you said. Your favorite justification seemed to be at the web the simplest factor to bear in mind of. I say to you, I certainly get irked while people think about concerns that they plainly do not know about. You managed to hit the nail upon the highest as smartly as outlined out the entire thing with no need side-effects , folks could take a signal. Will likely be again to get more. Thank you
Excellent post. I was checking constantly this blog and I’m
impressed! Very useful info particularly the last part 🙂 I care
for such info much. I was looking for this certain information for a very long
time. Thank you and good luck.
This web site definitely has all of the info I needed about this subject and didn’t know who to ask.
This blog was… how do I say it? Relevant!!
Finally I’ve found something which helped me. Thanks a lot!
I don’t even know how I ended up here, however I assumed this post used to be great. I don’t realize who you might be but certainly you are going to a well-known blogger if you happen to are not already 😉 Cheers!
sildenafil 20 mg
Just wish to say your article is as astonishing.
The clearness to your put up is just great and i can think you’re an expert on this subject.
Fine together with your permission allow me to snatch your RSS feed to keep updated with coming
near near post. Thanks 1,000,000 and please carry on the enjoyable work.
I couldn’t resist commenting. Well written!
Attractive section of content. I just stumbled upon your blog and in accession capital to assert that I get in fact enjoyed account your blog posts. Any way I’ll be subscribing to your augment and even I achievement you access consistently fast.
Highly energetic article, I loved that bit. Will there be a part 2?|
I couldn’t resist commenting. Well written!
Great post. I was checking continuously this blog and I am impressed!
Extremely helpful information specifically the last part :
) I care for such information much. I was seeking this particular information for a long time.
Thank you and best of luck.
Hello there, just became alert to your blog through Google, and found that it’s really informative. I’m gonna watch out for brussels. I will appreciate if you continue this in future. Lots of people will be benefited from your writing. Cheers!
I have been examinating out a few of your articles and i can claim clever stuff. I will definitely bookmark your website.
Hi my friend! I wish to say that this post is amazing, nice written and include approximately all vital infos. I would like to see more posts like this.
Nice read, I just passed this onto a colleague who was doing a little research on that. And he just bought me lunch as I found it for him smile So let me rephrase that: Thank you for lunch!
Since the admin of this web page is working, no question very shortly it will be famous, due to its feature contents.
You actually make it seem so easy with your presentation but I find this topic to be really something that I think
I would never understand. It seems too complex and extremely broad for me.
I am looking forward for your next post, I’ll try to get the
hang of it!
Right now it sounds like WordPress is the top blogging platform available right now. (from what I’ve read) Is that what you’re using on your blog?
My programmer is trying to convince me to move to .net from PHP. I have always disliked the idea because of the costs. But he’s tryiong none the less. I’ve been using Movable-type on a variety of websites for about a year and am anxious about switching to another platform. I have heard very good things about blogengine.net. Is there a way I can import all my wordpress content into it? Any kind of help would be greatly appreciated!
Hello there! Do you use Twitter? I’d like to follow you if that
would be okay. I’m absolutely enjoying your blog and look forward
to new updates.
Just what I was searching for, appreciate it for posting.
hub.biz
Aw, this was a really good post. Taking a few minutes and actual effort to generate a superb article… but what can I say… I put things off a lot and don’t manage to get nearly anything done.
Magnificent goods from you, man. I have understand your stuff previous to and you are just too magnificent. I really like what you’ve acquired here, really like what you are saying and the way in which you say it. You make it enjoyable and you still take care of to keep it sensible. I can’t wait to read far more from you. This is really a wonderful website.
Buyee บริการช้อปปิ้งที่ประเทศญี่ปุ่น ซื้อจากประเทศญี่ปุ่่น ช็อปปิ้ง ไฮเปอร์มาร์เก็ต ร้านช้อปปิ้งออนไลน์ของ Yahoo JAPAN มีสินค้ามากหลากหลายให้เลือกชมพร้อมความภาคภูมิใจที่เรา ซื้อของออนไลน์
Hi there! I’m at work surfing around your blog from
my new iphone 3gs! Just wanted to say I love reading through your blog and look forward to all your posts!
Keep up the excellent work!
An outstanding share! I’ve just forwarded this onto a co-worker who has been doing a little
homework on this. And he in fact bought me dinner
due to the fact that I discovered it for him… lol. So allow me to
reword this…. Thanks for the meal!! But yeah, thanks for spending the time to discuss this issue here on your
web site.
I’m really inspired along with your writing talents as neatly
as with the structure to your blog. Is this a paid subject matter
or did you modify it your self? Anyway keep up the excellent quality writing, it is rare to peer a nice
weblog like this one these days..
I got what you mean , thanks for posting.Woh I am glad to find this website through google. “If one does not know to which port one is sailing, no wind is favorable.” by Seneca.
Throughout the awesome pattern of things you receive an A with regard to effort. Where you lost me ended up being on the facts. You know, people say, the devil is in the details… And that couldn’t be more correct at this point. Having said that, let me reveal to you just what did deliver the results. The article (parts of it) is definitely highly engaging which is probably why I am making the effort in order to opine. I do not really make it a regular habit of doing that. Second, despite the fact that I can notice a leaps in reasoning you make, I am not necessarily confident of exactly how you appear to unite your ideas which produce the conclusion. For the moment I will, no doubt yield to your position however hope in the future you actually connect your dots better.
Asking questions are genuinely good thing if you
are not understanding something entirely, however this piece of writing presents pleasant understanding even.
An outstanding share! I’ve just forwarded this onto a co-worker who had been conducting a little homework
on this. And he in fact ordered me breakfast simply because
I discovered it for him… lol. So let me reword this…. Thanks for the meal!!
But yeah, thanks for spending time to talk about this
topic here on your site.
I am glad to be one of several visitants on this outstanding site (:, thankyou for putting up.
obviously like your web site but you need to check the spelling on quite a few of your posts. Several of them are rife with spelling problems and I find it very troublesome to tell the truth nevertheless I’ll certainly come back again.
This site is my inhalation, really excellent pattern and Perfect content material.
Hi. Awesome! I’m really appreciate it. It will be great if you’ll read my first article on mycollegeessaywriter.com)
I’m curious to find out what blog platform you are working with? I’m having some minor security problems with my latest site and I’d like to find something more secure. Do you have any suggestions?
Wow! Thank you! I continually wanted to write on my blog something like that. Can I take a part of your post to my blog?
I would like to voice my love for your kind-heartedness supporting men and women that really need assistance with this theme. Your special dedication to getting the solution throughout has been amazingly practical and have continuously helped those like me to get to their pursuits. Your personal warm and friendly publication signifies this much to me and substantially more to my office workers. Warm regards; from everyone of us.
Hello there, You have done an excellent job. I will definitely digg it and personally recommend to my friends. I’m confident they’ll be benefited from this site.
You have observed very interesting points! ps decent website .
Excellent pieces. Keep posting such kind of information on your blog.
Im really impressed by your blog.
Hi there, You have done a fantastic job. I’ll certainly digg it and personally recommend to
my friends. I’m confident they will be benefited from this website.
I appreciate, cause I found just what I was looking for. You’ve ended my four day long hunt! God Bless you man. Have a nice day. Bye
Wow, incredible weblog layout! How long have you ever been blogging for? you made blogging look easy. The total glance of your website is great, let alone the content material!
Only wanna comment that you have a very nice web site, I like the pattern it really stands out.
Hey I know this is off topic but I was wondering if
you knew of any widgets I could add to my blog that automatically tweet my newest twitter updates.
I’ve been looking for a plug-in like this for quite some time
and was hoping maybe you would have some experience with something like this.
Please let me know if you run into anything. I truly
enjoy reading your blog and I look forward to your new updates.
reputable canadian pharmacy
The very crux of your writing while sounding agreeable initially, did not really work properly with me personally after some time. Someplace within the paragraphs you were able to make me a believer unfortunately just for a short while. I however have got a problem with your leaps in assumptions and one would do nicely to help fill in those gaps. When you actually can accomplish that, I will undoubtedly end up being fascinated.
I am sure this post has touched all the internet viewers, its really really good article on building up new blog.
It is not my first time to visit this web site, i am browsing this web page dailly and take nice facts from here daily.|
Way cool! Some extremely valid points! I appreciate you writing this post plus the rest of the website is extremely good.
You actually make it seem so easy with your presentation but I find this matter to be actually something which I think I would never understand. It seems too complicated and very broad for me. I am looking forward for your next post, I’ll try to get the hang of it!
whoah this blog is fantastic i love reading your posts. Keep up the great work! You know, lots of people are searching around for this information, you could aid them greatly.
Hi, Neat post. There is a problem with your website in internet explorer, would test this… IE still is the market leader and a large portion of people will miss your magnificent writing due to this problem.
I know this website presents quality depending content and other
material, is there any other web page which gives these things in quality?
You actually make it seem really easy together with
your presentation however I find this topic to be really something which
I think I would by no means understand. It kind of feels too complicated and very broad
for me. I’m taking a look ahead for your next submit, I’ll
attempt to get the grasp of it!
Hey very cool web site!! Man .. Beautiful .. Amazing .. I will bookmark your web site and take the feeds also…I’m happy to find so many useful info here in the post, we need work out more strategies in this regard, thanks for sharing. . . . . .
Hello friends, how is everything, and what you would like to say about this article, in my view its genuinely remarkable designed for
me.
I was suggested this website via my cousin. I’m no longer positive whether this put up is written through him as no one else understand
such certain approximately my problem. You are wonderful!
Thanks!
Just what I was looking for, thank you for putting up.
Magnificent beat ! I would like to apprentice at the same time as you amend your web site, how can i subscribe for a weblog web site? The account helped me a appropriate deal. I were tiny bit acquainted of this your broadcast offered vibrant transparent concept|
Simply desire to say your article is as surprising. The clarity in your put up is just great and that i could think you’re knowledgeable in this subject. Well together with your permission let me to take hold of your RSS feed to keep updated with forthcoming post. Thank you one million and please carry on the rewarding work.|
Some genuinely select articles on this internet site, saved to favorites.
Hey very interesting blog!
Hey there! I’ve been following your site for a long time now and finally got the courage to go ahead and give you a shout out from Humble Texas! Just wanted to tell you keep up the excellent work!
Thanks for another informative blog. The place else may just I am getting that type of information written in such a perfect manner? I’ve a project that I am simply now working on, and I’ve been at the glance out for such information.
Hi every one, here every one is sharing these kinds of experience, therefore it’s good to read this website, and I
used to visit this webpage every day.
I know this website presents quality depending articles and other
data, is there any other web page which provides these kinds of data in quality?
Amazing things here. I’m very satisfied to peer your post.
Thank you so much and I’m taking a look forward to contact you.
Will you kindly drop me a e-mail?
I’ve read a few excellent stuff here. Definitely worth
bookmarking for revisiting. I wonder how a lot attempt you set to create any such magnificent informative site.
Hello. impressive job. I did not imagine this. This is a great story. Thanks!
It¦s in point of fact a great and useful piece of information. I am glad that you simply shared this useful information with us. Please keep us informed like this. Thanks for sharing.
Very good written story. It will be valuable to everyone who usess it, including me. Keep up the good work – can’r wait to read more posts.
This is the right web site for anyone who really wants to understand this topic. You know so much its almost tough to argue with you (not that I actually will need to…HaHa). You certainly put a new spin on a topic that’s been discussed for a long time. Wonderful stuff, just excellent!
It’s nearly impossible to find knowledgeable people about this subject, however, you seem like you know what you’re talking about! Thanks
Hi, just wanted to say, I enjoyed this blog post.
It was practical. Keep on posting!
Hello there, I found your blog via Google while searching for a related topic, your website came up, it looks great. I’ve bookmarked it in my google bookmarks.
I got what you mean , thankyou for posting.Woh I am lucky to find this website through google.
I have been surfing online more than three hours these days, yet I by no means discovered any interesting article like yours. It¦s pretty price sufficient for me. In my opinion, if all web owners and bloggers made just right content as you probably did, the net will be a lot more helpful than ever before.
Hello there, I found your site via Google while searching for a related topic, your web site came up, it looks great. I’ve bookmarked it in my google bookmarks.
Awesome issues here. I am very happy to peer your post.
Thank you a lot and I’m taking a look ahead to touch you.
Will you kindly drop me a mail?
Definitely, what a fantastic site and informative posts, I surely will bookmark your website.Have an awsome day!
Good day! This is my 1st comment here so I just wanted to give a quick shout out and say I really enjoy reading your posts. Can you suggest any other blogs/websites/forums that go over the same topics? Thanks a ton!
fantastic issues altogether, you just gained a new reader. What would you suggest about your submit that you made a few days in the past? Any certain?
After looking into a number of the blog articles on your web page, I really like your technique of writing a blog. I book marked it to my bookmark website list and will be checking back soon. Please visit my website too and let me know your opinion.
I’m not sure exactly why but this web site is loading very slow for me. Is anyone else having this problem or is it a issue on my end? I’ll check back later on and see if the problem still exists.|
Great work! This is the type of info that should be shared around the net. Shame on the search engines for not positioning this post higher! Come on over and visit my website . Thanks =)
Lovely website! I am loving it!! Will come back again. I am bookmarking your feeds also.
It’s an remarkable article designed for all the web viewers; they
will obtain advantage from it I am sure.
I like the helpful info you provide in your articles. I’ll bookmark your weblog and check again here regularly. I am quite sure I’ll learn plenty of new stuff right here! Best of luck for the next!
With havin so much written content do you ever run into any problems of plagorism or copyright infringement? My site has a lot of unique content I’ve either created myself or outsourced but it appears a lot of it is popping it up all over the web without my authorization. Do you know any techniques to help protect against content from being stolen? I’d truly appreciate it.
Some really superb articles on this website, thanks for contribution. “A conservative is a man who sits and thinks, mostly sits.” by Woodrow Wilson.
I also think hence, perfectly pent post! .
What’s up i am kavin, its my first time to commenting anywhere, when i read this piece of
writing i thought i could also create comment due to this sensible article.
Greate post. Keep writing such kind of info on your site.
Im really impressed by your blog.
Hey there, You have performed a great job. I’ll certainly digg it and for
my part recommend to my friends. I’m sure they’ll be benefited from this web site.
Hello! Would you mind if I share your blog with my facebook group?
There’s a lot of folks that I think would really enjoy your content.
Please let me know. Thanks
This actually answered my problem, thank you!
If some one wants expert view concerning blogging afterward i suggest
him/her to pay a visit this blog, Keep up the fastidious job.
Great write-up, I am normal visitor of one’s website, maintain up the nice operate, and It’s going to be a regular visitor for a lengthy time.
Greetings! Very helpful advice on this article! It is the little changes that make the biggest changes. Thanks a lot for sharing!
I’ve been browsing on-line greater than three hours today, but I by no means found any interesting article like yours. It¦s pretty price enough for me. In my view, if all webmasters and bloggers made just right content material as you probably did, the web shall be a lot more helpful than ever before.
Thanks for helping out, excellent information. “A man will fight harder for his interests than for his rights.” by Napoleon Bonaparte.
Good write-up, I am regular visitor of one’s website, maintain up the excellent operate, and It is going to be a regular visitor for a long time.
I’ve been exploring for a little bit for any high-quality articles or weblog posts on this kind of space
. Exploring in Yahoo I eventually stumbled upon this website.
Studying this info So i’m satisfied to show that I’ve
a very excellent uncanny feeling I found out just what
I needed. I so much unquestionably will make sure to don?t fail
to remember this web site and give it a look on a relentless basis.
Nice read, I just passed this onto a colleague who was doing a little research on that. And he actually bought me lunch as I found it for him smile Therefore let me rephrase that: Thanks for lunch!
Hey There. I found your blog using msn. This is an extremely well written article. I will make sure to bookmark it and return to read more of your useful information. Thanks for the post. I’ll definitely return.
After study a few of the blog posts on your website now, and I truly like your way of blogging. I bookmarked it to my bookmark website list and will be checking back soon. Pls check out my web site as well and let me know what you think.
As soon as I discovered this site I went on reddit to share some of the love with them.
It’s the best time to make some plans for the long
run and it is time to be happy. I have read this publish and if I could I wish to recommend you few fascinating issues or tips.
Perhaps you can write next articles referring to
this article. I want to read even more issues about it!
This is my first time go to see at here and i am truly pleassant to read
all at one place.
You have noted very interesting points! ps decent website .
What i don’t understood is actually how you are not really much more well-liked than you might be now. You’re so intelligent. You realize thus considerably relating to this subject, made me personally consider it from numerous varied angles. Its like men and women aren’t fascinated unless it’s one thing to do with Lady gaga! Your own stuffs nice. Always maintain it up!
I absolutely love your blog.. Pleasant colors & theme. Did you create this web site yourself? Please reply back as I’m hoping to create my own website and want to know where you got this from or just what the theme is named. Cheers!
Fantastic goods from you, man. I’ve understand your stuff previous to and you are just too fantastic. I really like what you have acquired here, certainly like what you’re stating and the way in which you say it. You make it entertaining and you still care for to keep it sensible. I can’t wait to read much more from you. This is really a tremendous site.
Why users still use to read news papers when in this technological world all is existing on net?
Nice bro thank you.
Pretty! This has been a really wonderful post. Thank you for supplying these details.
Deference to website author, some good entropy.
Thank you for another fantastic post. Where else could anybody get that type of info in such an ideal way of writing? I’ve a presentation next week, and I am on the look for such information.
I truly appreciate this post. I have been looking all over for this! Thank goodness I found it on Bing. You’ve made my day! Thx again
That is a really good tip particularly to those fresh to the blogosphere. Simple but very accurate info… Many thanks for sharing this one. A must read post!
Hi there! This post could not be written much better! Looking at this article reminds me of my previous roommate! He continually kept talking about this. I am going to send this article to him. Pretty sure he’s going to have a good read. Thank you for sharing!
It is actually a nice and useful piece of info. I¦m happy that you just shared this helpful information with us. Please stay us informed like this. Thanks for sharing.
I go to see every day a few web sites and blogs to read posts, except this website gives
feature based content.
Thanks for any other fantastic post. Where else could anybody get that kind of info in such a perfect method of writing? I have a presentation subsequent week, and I’m at the look for such information.
Today, I went to the beach with my children. I found a sea shell and gave it to my 4 year old daughter and said “You can hear the ocean if you put this to your ear.” She put the shell to her ear and screamed. There was a hermit crab inside and it pinched her ear. She never wants to go back! LoL I know this is entirely off topic but I had to tell someone!
Hello.This post was extremely remarkable, particularly since I was investigating for thoughts on this subject last Friday.
Hey There. I found your blog using msn. This is a really well written article. I’ll make sure to bookmark it and return to read more of your useful info. Thanks for the post. I’ll certainly comeback.
I really love your website.. Very nice colors & theme.
Did you create this amazing site yourself? Please reply back
as I’m attempting to create my own site and would
like to find out where you got this from or what the theme is called.
Cheers!
I am usually to blogging and i really admire your content. The article has actually peaks my interest. I’m going to bookmark your web site and keep checking for new information.
Way cool! Some extremely valid points! I appreciate you penning this article plus the rest of the site is extremely good.
Hi, I do think this is an excellent web site. I stumbledupon it 😉 I may come back once again since I bookmarked it. Money and freedom is the best way to change, may you be rich and continue to guide others.
Greetings from Carolina! I’m bored to death at work so I decided to check out your site on my iphone during lunch break. I love the info you provide here and can’t wait to take a look when I get home. I’m amazed at how fast your blog loaded on my mobile .. I’m not even using WIFI, just 3G .. Anyhow, excellent blog!|
I have been exploring for a bit for any high quality articles or weblog posts in this sort of house . Exploring in Yahoo I at last stumbled upon this website. Reading this info So i’m satisfied to express that I have a very good uncanny feeling I found out just what I needed. I so much indubitably will make sure to don’t forget this site and give it a look on a relentless basis.
Thanks for every other wonderful article. The place else may just anyone get that type of information in such a perfect way of writing? I have a presentation next week, and I am at the search for such information.
Great blog you have here.. It’s hard to find high quality writing like yours nowadays.
I seriously appreciate people like you! Take care!!
The next time I read a blog, I hope that it doesnt disappoint me as much as this one. I mean, I know it was my choice to read, but I actually thought youd have something interesting to say. All I hear is a bunch of whining about something that you could fix if you werent too busy looking for attention.
Rattling nice style and design and wonderful written content, nothing at all else we want : D.
Heya i am for the first time here. I came across this board and I find It truly useful & it helped me out a lot. I hope to give something back and help others like you aided me.
Spot on with this write-up, I really believe this amazing site needs much more
attention. I’ll probably be returning to see more, thanks for the advice!
Hey, you used to write excellent, but the last few posts have been kinda boringK I miss your tremendous writings. Past few posts are just a bit out of track! come on!
Does your site have a contact page? I’m having a tough time locating it but, I’d like to shoot you an e-mail. I’ve got some creative ideas for your blog you might be interested in hearing. Either way, great website and I look forward to seeing it improve over time.
This is the right weblog for anybody who wants to find out about this topic. You understand a lot its virtually laborious to argue with you (not that I really would want…HaHa). You positively put a brand new spin on a subject thats been written about for years. Great stuff, just great!
You made some decent points there. I looked on the internet for the topic and found most guys will approve with your site.
Greetings! This is my first visit to your blog! We are a team of volunteers and starting a new project
in a community in the same niche. Your blog provided us beneficial
information to work on. You have done a wonderful
job!
Hey I know this is off topic but I was wondering if you knew of
any widgets I could add to my blog that automatically
tweet my newest twitter updates. I’ve been looking for a plug-in like this for
quite some time and was hoping maybe you would have some experience
with something like this. Please let me know if you run into
anything. I truly enjoy reading your blog and I look
forward to your new updates.
Generally I don’t learn article on blogs, however I wish to say that this write-up very forced me to try and do so! Your writing taste has been surprised me. Thanks, quite nice post.
I think this is one of the most significant info for me. And i am glad reading your article. But want to remark on some general things, The site style is great, the articles is really nice : D. Good job, cheers|
whoah this blog is excellent i love reading your articles. Keep up the good work! You know, a lot of people are searching around for this info, you could aid them greatly.
Do you mind if I quote a few of your posts as long as I provide credit and sources back to your website?
My blog is in the exact same niche as yours and my visitors
would truly benefit from some of the information you present here.
Please let me know if this alright with you.
Thanks!
Link exchange is nothing else except it is
just placing the other person’s blog link on your page at appropriate place and other person will also do same
for you.
Keep functioning ,splendid job!
Hi there everybody, here every person is sharing
these kinds of familiarity, therefore it’s pleasant to read this webpage, and I used to pay a visit this weblog daily.
Hello. magnificent job. I did not imagine this. This is a splendid story. Thanks!
Great blog! Is your theme custom made or did you download it from somewhere? A theme like yours with a few simple adjustements would really make my blog shine. Please let me know where you got your design. With thanks
he blog was how do i say it… relevant, finally something that helped me. Thanks
I’ve been browsing online more than 4 hours today, yet
I never found any interesting article like yours. It’s pretty worth enough for
me. In my view, if all webmasters and bloggers made good content as you did, the web will be a lot more useful than ever before.
Yes! Finally someone writes about fresh tuberose flowers.
Aw, this was a very nice post. In thought I would like to put in writing like this additionally – taking time and precise effort to make a very good article… however what can I say… I procrastinate alot and not at all seem to get something done.
Hey there! Do you know if they make any plugins to protect against hackers? I’m kinda paranoid about losing everything I’ve worked hard on. Any suggestions?
Its good as your other content : D, regards for posting.
I went over this website and I conceive you have a lot of good info , saved to fav (:.
Great blog here! Additionally your website rather a lot up very fast! What web host are you using? Can I get your affiliate hyperlink in your host? I wish my web site loaded up as fast as yours lol
You’re so interesting! I do not think I have read through something like this before. So wonderful to discover another person with original thoughts on this subject matter. Really.. many thanks for starting this up. This site is something that is required on the web, someone with a bit of originality!
You are my inspiration , I own few blogs and sometimes run out from to brand.
This piece of writing provides clear idea in favor of the new users of
blogging, that truly how to do blogging.
Oh my goodness! an amazing article dude. Thanks Nevertheless I am experiencing problem with ur rss . Don’t know why Unable to subscribe to it. Is there anybody getting equivalent rss downside? Anybody who knows kindly respond. Thnkx
whoah this blog is great i love reading your posts. Keep up the great work! You know, many people are searching around for this information, you can help them greatly.
After exploring a few of the articles on your web page, I seriously appreciate your technique of blogging. I saved as a favorite it to my bookmark website list and will be checking back soon. Please check out my web site too and tell me what you think.
You ought to be a part of a contest for one of the most useful websites on the internet. I’m going to recommend this site!
Hi to every one, since I am in fact eager of reading this website’s post to be updated daily. It carries good information.
I have been examinating out some of your posts and i can state pretty nice stuff. I will make sure to bookmark your website.
What i do not understood is if truth be told how you’re no longer actually a lot more smartly-favored than you might be now. You are very intelligent. You recognize therefore considerably in relation to this subject, produced me in my opinion imagine it from a lot of various angles. Its like women and men aren’t interested unless it’s something to accomplish with Girl gaga! Your own stuffs excellent. Always care for it up!
Hmm is anyone else encountering problems with the images on this blog loading?
I’m trying to figure out if its a problem on my end or
if it’s the blog. Any feed-back would be greatly appreciated.
Hey there, I think your website might be having browser compatibility issues. When I look at your blog in Ie, it looks fine but when opening in Internet Explorer, it has some overlapping. I just wanted to give you a quick heads up! Other then that, superb blog!
You made some clear points there. I did a search on the subject matter and found most persons will go along with with your blog.
Attractive section of content. I just stumbled upon your weblog and in accession capital to assert that I acquire actually
enjoyed account your blog posts. Any way I’ll be subscribing to your feeds and even I achievement you access consistently quickly.
An intriguing discussion is worth comment. I do think that you need to publish more on this subject, it might not be a taboo subject but usually people do not talk about these issues. To the next! All the best!!
Thanks a lot for sharing this with all people you actually understand what you’re speaking about! Bookmarked. Kindly also visit my site =). We can have a link alternate arrangement among us!
I really like it when folks get together and share opinions. Great website, keep it up!
After I initially commented I appear to have clicked on the -Notify me when new comments are added- checkbox and from now on every time a comment is added I get 4 emails with the exact same comment. There has to be a means you are able to remove me from that service? Kudos!
Fantastic items from you, man. I’ve keep in mind your stuff previous to and you’re just too magnificent. I really like what you’ve bought right here, certainly like what you’re stating and the way by which you assert it. You make it entertaining and you still care for to keep it smart. I can not wait to read much more from you. That is really a great site.
I was able to find good info from your content.
Good post. I learn something totally new and challenging on blogs I stumbleupon everyday. It will always be exciting to read through content from other authors and use something from their web sites.
Thanks designed for sharing such a pleasant thinking, article is nice, thats why
i have read it completely
I know this if off topic but I’m looking into starting my own blog and was wondering
what all is needed to get setup? I’m assuming having a blog like yours would cost a pretty penny?
I’m not very internet smart so I’m not 100% sure.
Any recommendations or advice would be greatly appreciated.
Many thanks
Great info and right to the point. I am not sure if this is really the best place to ask but do you guys have any ideea where to hire some professional writers? Thanks 🙂
I enjoy your writing style genuinely enjoying this site.
It’s perfect time to make a few plans for the longer term
and it is time to be happy. I’ve read this post and if I may I want to recommend you few interesting issues or tips.
Maybe you could write subsequent articles relating
to this article. I wish to learn even more things about it!
Respect to author, some great selective information.
I’m still learning from you, while I’m trying to achieve my goals. I absolutely enjoy reading everything that is posted on your blog.Keep the stories coming. I loved it!
I’m writing to let you know what a remarkable experience my cousin’s child had visiting your site. She discovered so many things, including what it is like to possess an amazing giving heart to have many others effortlessly know a number of multifaceted subject areas. You actually exceeded our desires. Thank you for presenting these helpful, safe, edifying and even cool tips on that topic to Mary.
of course like your web site however you
have to take a look at the spelling on quite a few of your
posts. Several of them are rife with spelling issues
and I in finding it very troublesome to inform the truth
however I will certainly come again again.
If some one wishes expert view about blogging and site-building
afterward i propose him/her to go to see this weblog, Keep
up the pleasant work.
Awesome post.
Wow, this post is nice, my younger sister is analyzing these
kinds of things, thus I am going to inform her.
Howdy would you mind letting me know which hosting company you’re using?
I’ve loaded your blog in 3 different web browsers and I must say this
blog loads a lot quicker then most. Can you recommend a good web hosting provider at a fair price?
Many thanks, I appreciate it!
Howdy I am so glad I found your web site, I really found you
by accident, while I was researching on Digg for something else, Anyways I am here now and would just like to say many thanks for a tremendous post
and a all round entertaining blog (I also love the
theme/design), I don’t have time to read it all at the minute but I have bookmarked it and also added your RSS feeds, so when I have time I will be
back to read more, Please do keep up the awesome b.
Wonderful blog! I found it while browsing on Yahoo News. Do you have any suggestions on how to get listed in Yahoo News? I’ve been trying for a while but I never seem to get there! Thanks
I’m really impressed with your writing skills as well as with the layout on your weblog.
Is this a paid theme or did you modify it yourself? Anyway keep up the excellent quality writing, it’s
rare to see a great blog like this one nowadays.
WONDERFUL Post.thanks for share..more wait .. …
I have not checked in here for some time because I thought it was getting boring, but the last several posts are good quality so I guess I will add you back to my daily bloglist. You deserve it my friend 🙂
If some one needs to be updated with hottest technologies therefore he must be go to see this web site and be up to date everyday.
If you would like to improve your knowledge simply
keep visiting this web page and be updated with the hottest gossip posted
here.
I could not refrain from commenting. Perfectly written!
Great post. I was checking continuously this blog and I am impressed! Extremely useful info particularly the last part 🙂 I care for such info a lot. I was seeking this particular info for a long time. Thank you and best of luck.
I seriously love your site.. Pleasant colors & theme. Did you create this website yourself? Please reply back as I’m hoping to create my own site and would love to learn where you got this from or exactly what the theme is called. Thank you!
You should take part in a contest for one of the best blogs on the web. I will recommend this site!
Way cool! Some extremely valid points! I appreciate you penning this article and also the rest of the website is very good.
Hurrah! At last I got a web site from where I know how to genuinely take useful information regarding my study and knowledge.|
You made certain good points there. I did a search on the subject and found a good number of persons will agree with your blog.
Once I originally commented I clicked the -Notify me when new feedback are added- checkbox and now every time a comment is added I get four emails with the identical comment. Is there any way you may remove me from that service? Thanks!
What i don’t realize is in reality how you’re not actually a lot
more well-appreciated than you might be right now.
You are very intelligent. You understand
thus considerably in the case of this matter, made me in my view believe it from a lot of numerous angles.
Its like women and men aren’t fascinated unless it’s one thing to do with
Woman gaga! Your personal stuffs outstanding.
Always handle it up!
You got a very excellent website, Gladiolus I found it through yahoo.
What’s Happening i am new to this, I stumbled upon this I’ve found It positively helpful and it has helped me out loads. I hope to contribute & aid other users like its aided me. Good job.
Incredible points. Great arguments. Keep up the amazing work.
Terrific post however , I was wanting to know if you could write a litte more on this topic?
I’d be very grateful if you could elaborate a little bit more.
Kudos!
Pretty! This has been an extremely wonderful article. Thank you for providing this information.
Very rapidly this web site will be famous amid all blog
visitors, due to it’s good articles or reviews
I love it when folks get together and share ideas. Great blog, keep it up!
Pretty! This was an extremely wonderful post. Many thanks for providing these details.
We are a group of volunteers and starting a new scheme in our community.
Your site offered us with valuable information to work on. You have done a
formidable job and our whole community will be thankful to you.
I want to point out my love for your kindness in support of men and women who really need guidance on this important theme. Your special commitment to getting the message around ended up being unbelievably powerful and have surely allowed somebody much like me to reach their targets. Your personal invaluable useful information implies this much to me and much more to my mates. Warm regards; from each one of us.
Hi there, every time i used to check webpage posts here in the early hours
in the morning, for the reason that i enjoy to gain knowledge of
more and more.
My coder is trying to convince me to move to .net from PHP. I have always disliked the idea because of the expenses. But he’s tryiong none the less. I’ve been using WordPress on a number of websites for about a year and am anxious about switching to another platform. I have heard very good things about blogengine.net. Is there a way I can import all my wordpress posts into it? Any help would be really appreciated!
I discovered your blog site on google and check a few of your early posts. Continue to keep up the very good operate. I just additional up your RSS feed to my MSN News Reader. Seeking forward to reading more from you later on!…
Thank you for sharing excellent informations. Your site is very cool. I’m impressed by the details that you’ve on this blog. It reveals how nicely you perceive this subject. Bookmarked this web page, will come back for extra articles. You, my pal, ROCK! I found simply the info I already searched everywhere and just couldn’t come across. What a great site.
I’m impressed, I have to admit. Seldom do I encounter a
blog that’s both educative and interesting, and without a doubt,
you have hit the nail on the head. The problem is something which too few folks are speaking intelligently about.
Now i’m very happy I came across this in my hunt for something concerning this.
I was studying some of your articles on this website and I conceive this web site is rattling informative ! Retain posting.
Thanks for sharing your thoughts about momo game story. Regards
Some truly wonderful information, Sword lily I discovered this.
Wow that was odd. I just wrote an very long comment
but after I clicked submit my comment didn’t show up.
Grrrr… well I’m not writing all that over again. Anyhow, just
wanted to say great blog!
I dugg some of you post as I cogitated they were very helpful extremely helpful
Hmm it appears like your blog ate my first comment (it was super long) so I guess I’ll just sum it up what I wrote and say, I’m thoroughly enjoying your blog. I too am an aspiring blog blogger but I’m still new to everything. Do you have any tips for rookie blog writers? I’d certainly appreciate it.
Great post. I was checking constantly this blog and I am inspired!
Very useful info particularly the closing section 🙂 I
deal with such info much. I used to be looking for this particular information for a long time.
Thank you and best of luck.
I quite like reading through an article that can make men and women think. Also, thank you for allowing for me to comment!
I used to be recommended this website via my cousin. I am not certain whether this submit is written by means of him as nobody else recognize such distinct about my problem. You are amazing! Thanks!
Hey there would you mind letting me know which hosting company
you’re using? I’ve loaded your blog in 3 completely different internet browsers and I must say
this blog loads a lot faster then most. Can you recommend a
good web hosting provider at a fair price? Cheers, I appreciate it!
My wife and i got absolutely more than happy Jordan managed to complete his researching via the ideas he received in your web site. It’s not at all simplistic just to always be making a gift of procedures that some people might have been trying to sell. Therefore we acknowledge we now have the writer to give thanks to for this. The entire explanations you made, the easy website navigation, the friendships you make it possible to foster – it is many fantastic, and it’s really letting our son and the family recognize that the subject matter is cool, and that is quite pressing. Thank you for all the pieces!
Hello, i believe that i noticed you visited my site thus i got here to “return the favor”.I’m attempting to in finding things to enhance my site!I suppose its good enough to make use of a few of your ideas!!
I¦ve learn several just right stuff here. Certainly value bookmarking for revisiting. I wonder how much effort you set to create this sort of wonderful informative site.
I could not resist commenting. Well written!
I’ve been exploring for a little bit for any
high-quality articles or weblog posts on this kind of space .
Exploring in Yahoo I ultimately stumbled upon this website.
Reading this info So i am glad to exhibit that I’ve an incredibly just right uncanny feeling
I came upon just what I needed. I most undoubtedly will make certain to don?t omit this website and provides it a look
regularly.
This web site is really a walk-through for all of the info you wanted about this and didn’t know who to ask. Glimpse here, and you’ll definitely discover it.
Some genuinely wonderful info , Sword lily I detected this.
Do you mind if I quote a few of your articles as long
as I provide credit and sources back to your blog? My blog site
is in the exact same niche as yours and my users would really benefit from a lot
of the information you present here. Please let me know if this okay with you.
Regards!
Howdy are using WordPress for your site platform?
I’m new to the blog world but I’m trying to get started and set up my own. Do you require any html coding expertise
to make your own blog? Any help would be greatly
appreciated!
Great beat ! I would like to apprentice while you amend your web site, how could i subscribe for a blog site?
The account helped me a acceptable deal. I had been tiny bit acquainted of this your broadcast offered bright clear
concept
Hello, i think that i saw you visited my site thus i came to “return the favor”.I am attempting to find things to enhance my web site!I suppose its ok to use a few of your ideas!!
I take pleasure in, result in I found just what I was taking a look
for. You’ve ended my four day lengthy hunt!
God Bless you man. Have a nice day. Bye
It’s amazing to go to see this web site and reading the views of all friends on the topic of
this post, while I am also eager of getting experience.
Hi there! This post could not be written any better!
Reading this post reminds me of my good old room mate!
He always kept chatting about this. I will forward this post
to him. Fairly certain he will have a good read. Thank you for sharing!
Hello There. I discovered your weblog using msn. That is a really neatly
written article. I will be sure to bookmark it and come back to read extra of your
helpful information. Thank you for the post. I’ll certainly comeback.
Excellent, what a web site it is! This web site
provides valuable data to us, keep it up.
A person essentially help to make seriously articles I would state. That is the first time I frequented your web page and so far? I amazed with the analysis you made to make this actual post incredible. Magnificent process!
Do you mind if I quote a few of your posts as long as I provide credit and sources back to your site? My website is in the exact same niche as yours and my visitors would genuinely benefit from a lot of the information you provide here. Please let me know if this okay with you. Thanks a lot!
Right now it looks like Movable Type is the best blogging platform available right now. (from what I’ve read) Is that what you’re using on your blog?
Hey just wanted to give you a quick heads up and let you know a few of the pictures aren’t loading correctly. I’m not sure why but I think its a linking issue. I’ve tried it in two different browsers and both show the same outcome.
I was examining some of your blog posts on this internet site and I think this website is very instructive! Retain posting.
I love reading a post that can make people think. Also, thanks for
allowing me to comment!
I think this is among the most significant
info for me. And i am glad reading your article.
But wanna remark on some general things, The site style is perfect, the articles is really nice : D.
Good job, cheers
It’s nearly impossible to find knowledgeable people for this topic,
however, you seem like you know what you’re talking about!
Thanks
When I initially commented I clicked the “Notify me when new comments are added” checkbox and now each time a comment is added I get four e-mails with the same comment. Is there any way you can remove people from that service? Thank you!
I know this if off topic but I’m looking into starting my own weblog and was curious what all is required to get setup? I’m assuming having a blog like yours would cost a pretty penny? I’m not very web savvy so I’m not 100 positive. Any recommendations or advice would be greatly appreciated. Appreciate it
I’m really enjoying the design and layout of your site. It’s a very easy on the eyes which makes it much more enjoyable for me to come here and visit more often. Did you hire out a developer to create your theme? Fantastic work!
I like what you guys are up too. Such smart work and reporting! Carry on the excellent works guys I have incorporated you guys to my blogroll. I think it will improve the value of my website 🙂
Hello, after reading this awesome piece of writing i am as well happy to share my familiarity here with friends.
This blog was… how do you say it? Relevant!! Finally I have found something that helped me. Kudos!
I’ve been exploring for a little bit for any high quality articles or blog posts on this sort of area . Exploring in Yahoo I at last stumbled upon this website. Reading this info So i’m happy to convey that I’ve a very good uncanny feeling I discovered just what I needed. I most certainly will make sure to don’t forget this site and give it a glance on a constant basis.
Everything is very open with a really clear clarification of the issues. It was really informative. Your website is useful. Thank you for sharing!
I absolutely love your blog and find many of your post’s to
be exactly what I’m looking for. Would you offer guest writers to write content for you personally?
I wouldn’t mind publishing a post or elaborating on most of the subjects you write in relation to here.
Again, awesome web log!
Very nice post. I just stumbled upon your blog and wanted to say
that I have really enjoyed surfing around your blog posts.
After all I’ll be subscribing to your feed and I
hope you write again soon!
I visited a lot of website but I think this one has something extra in it in it
Hi! Do you use Twitter? I’d like to follow you if that would be ok. I’m definitely enjoying your blog and look forward to new posts.
Very good write-up. I definitely love this
site. Stick with it!
When I initially commented I clicked the “Notify me when new comments are added” checkbox and now each time a comment is added I get three emails with the same comment. Is there any way you can remove people from that service? Cheers!|
We stumbled over here coming from a different website and thought I may as well check things out. I like what I see so i am just following you. Look forward to going over your web page again.
Very good post. I definitely appreciate this website. Stick with it!
I think this is among the most vital info for me. And i’m glad reading your article. But wanna remark on few general things, The site style is wonderful, the articles is really great : D. Good job, cheers
Thank you for some other informative blog. The place else may I get that type of info written in such an ideal approach? I have a project that I’m just now running on, and I have been at the look out for such information.
Good day very cool web site!! Guy .. Excellent
.. Amazing .. I will bookmark your blog and take the feeds additionally?
I am satisfied to find so many helpful information right here in the
submit, we’d like develop more techniques on this regard, thank you for
sharing. . . . . .
Write more, thats all I have to say. Literally, it seems as though you relied on the video to make your point. You obviously know what youre talking about, why throw away your intelligence on just posting videos to your weblog when you could be giving us something enlightening to read?
I like what you guys are up also. Such smart work and reporting! Keep up the excellent works guys I?¦ve incorporated you guys to my blogroll. I think it will improve the value of my website 🙂
Throughout the great design of things you actually receive an A+ for effort and hard work. Where you confused everybody ended up being in all the facts. You know, people say, the devil is in the details… And it couldn’t be more true here. Having said that, permit me tell you what exactly did work. Your article (parts of it) is pretty engaging and this is probably why I am making the effort to opine. I do not really make it a regular habit of doing that. Second, although I can easily notice a leaps in reasoning you make, I am not really confident of exactly how you seem to unite your details that produce the conclusion. For right now I will, no doubt yield to your issue but trust in the near future you link your dots better.
Hi, i read your blog occasionally and i own a similar one and i was just curious if you get a lot of spam feedback? If so how do you protect against it, any plugin or anything you can suggest? I get so much lately it’s driving me crazy so any help is very much appreciated.
Informative article, just what I needed.
I relish, lead to I discovered just what I
was having a look for. You’ve ended my four day lengthy hunt!
God Bless you man. Have a nice day. Bye
Howdy! I could have sworn I’ve been to this website before but after reading through some
of the post I realized it’s new to me. Anyways, I’m definitely delighted I found it and I’ll be bookmarking and
checking back frequently!
I have read a few just right stuff here. Definitely value bookmarking for revisiting. I surprise how much attempt you place to make one of these magnificent informative website.|
Hey there, You’ve done a great job. I will definitely digg it and in my opinion recommend to my friends. I’m sure they will be benefited from this web site.
It is the best time to make a few plans for the future and
it is time to be happy. I have read this submit and if I could I desire to suggest you few interesting things or advice.
Perhaps you can write subsequent articles relating to this article.
I want to read even more issues approximately it!
I take pleasure in, lead to I discovered just what I was having a look for.
You’ve ended my four day lengthy hunt! God Bless you man. Have a nice
day. Bye
My brother suggested I might like this web site. He was totally right. This post truly made my day. You cann’t imagine just how much time I had spent for this info! Thanks!|
Great website. Lots of useful info here. I am sending it to several buddies ans additionally sharing in delicious. And of course, thanks on your sweat!
I am sure this paragraph has touched all the
internet people, its really really fastidious paragraph on building up new web site.
Good post and right to the point. I am not sure if this is actually the best place to ask but do you people have any ideea where to employ some professional writers? Thank you 🙂
Its such as you read my mind! You seem to know a lot about this, such as you wrote the book in it or something. I think that you just can do with a few percent to drive the message house a bit, but other than that, this is excellent blog. An excellent read. I will certainly be back.
We are a gaggle of volunteers and starting a new scheme in our community. Your web site offered us with useful information to paintings on. You have done a formidable job and our entire group can be grateful to you.
Hurrah, that’s what I was seeking for, what a information!
present here at this web site, thanks admin of this
web site.
Hurrah, that’s what I was seeking for, what a information!
present here at this web site, thanks admin of this
web site.
I know this website gives quality dependent articles and extra information, is there any other web page which gives such
data in quality?
Definitely believe that which you stated. Your favorite justification seemed to be on the net the simplest thing to be aware of. I say to you, I certainly get annoyed while people think about worries that they just don’t know about. You managed to hit the nail upon the top as well as defined out the whole thing without having side effect , people can take a signal. Will probably be back to get more. Thanks
Hello my friend! I want to say that this post is amazing, nice written and include almost all vital infos. I would like to see more posts like this.
This is really interesting, You’re a very skilled blogger.
I have joined your feed and look forward to seeking
more of your excellent post. Also, I’ve shared your site in my social networks!
My partner and I stumbled over here by a
different web page and thought I may as well check things out.
I like what I see so i am just following you.
Look forward to checking out your web page yet again.
There may be noticeably a bundle to learn about this. I assume you made certain good factors in features also.
It’s going to be ending of mine day, however before end I am reading
this great paragraph to improve my experience.
The very next time I read a blog, I hope that it won’t disappoint me as much as this one. I mean, I know it was my choice to read, however I genuinely thought you would probably have something useful to say. All I hear is a bunch of complaining about something that you could possibly fix if you were not too busy looking for attention.
Excellent site you’ve got here.. It’s hard to find excellent writing like yours nowadays. I really appreciate individuals like you! Take care!!
Wonderful work! This is the type of info that should be shared around the internet. Shame on Google for not positioning this post higher! Come on over and visit my site . Thanks =)
Hi, I do think this is a great website. I stumbledupon it 😉 I’m going to come back yet again since I book-marked it. Money and freedom is the greatest way to change, may you be rich and continue to help others.
I used to be recommended this blog by way of my cousin. I am not certain whether this post is written by him as nobody else understand such precise about my difficulty. You are wonderful! Thank you!
Have you ever considered about including a little bit more than just your articles? I mean, what you say is important and everything. But think of if you added some great graphics or video clips to give your posts more, “pop”! Your content is excellent but with images and video clips, this site could certainly be one of the best in its niche. Terrific blog!
Appreciation to my father who informed me on the topic of this website,
this weblog is truly remarkable.
Very soon this website will be famous among all blogging users, due to it’s pleasant articles
Way cool! Some very valid points! I appreciate you penning this post and the rest of the website
is also very good.
Hi, I do believe this is a great website. I stumbledupon it
😉 I may return once again since i have book marked it.
Money and freedom is the greatest way to change, may you be rich and continue to guide
others.
It’s difficult to find knowledgeable people on this topic,
but you sound like you know what you’re talking
about! Thanks
That is a really good tip especially to those new to the blogosphere. Short but very accurate infoÖ Appreciate your sharing this one. A must read article!
Wow, that’s what I was exploring for, what a data! present here at this website, thanks admin of this web page.
Wow! This can be one particular of the most useful blogs We have ever arrive across on this subject. Actually Wonderful. I’m also an expert in this topic therefore I can understand your effort.
This web site definitely has all of the information I wanted about this subject and didnít know who to ask.
Do you mind if I quote a couple of your articles as long as I provide credit and
sources back to your webpage? My website is in the very same area of interest as yours and my users would genuinely benefit from
a lot of the information you present here. Please let me know if
this okay with you. Thanks!
Hi there, just became alert to your blog through
Google, and found that it’s really informative. I am going to watch out for brussels.
I’ll appreciate if you continue this in future. Lots of people will be benefited from your
writing. Cheers!
I must thank you for the efforts you’ve put in penning this blog.
I really hope to view the same high-grade blog posts from you
later on as well. In fact, your creative writing abilities has encouraged me to
get my own website now 😉
What’s Happening i’m new to this, I stumbled upon this I’ve found It positively helpful and it has helped me out loads. I am hoping to give a contribution & assist other customers like its helped me. Great job.|
Definitely consider that that you said. Your favourite reason appeared to be at the internet the easiest factor to remember of. I say to you, I certainly get annoyed even as other folks consider worries that they plainly don’t understand about. You controlled to hit the nail upon the top and outlined out the whole thing without having side effect , folks can take a signal. Will probably be again to get more. Thank you
I’ve been surfing online more than three hours nowadays, but I never discovered any fascinating article like yours. It is lovely worth enough for me. In my view, if all website owners and bloggers made good content as you probably did, the net can be much more useful than ever before.
Hmm is anyone else experiencing problems with the images on this blog loading? I’m trying to figure out if its a problem on my end or if it’s the blog. Any suggestions would be greatly appreciated.
I simply wished to thank you so much yet again. I do not know what I might have taken care of in the absence of those smart ideas discussed by you on my subject matter. It became a very frustrating condition in my position, nevertheless taking note of the very skilled manner you resolved it forced me to weep with contentment. I’m just happier for the assistance and in addition sincerely hope you find out what a great job that you’re undertaking teaching other individuals via your webpage. Most probably you have never come across all of us.
Thank you, I have recently been searching for information about this subject for a while and yours is the greatest I have came upon till now. But, what about the conclusion? Are you certain about the source?
Spot on with this write-up, I absolutely believe that this site needs a lot more attention. Iíll probably be returning to read more, thanks for the info!
I’m really enjoying the design and layout of your
site. It’s a very easy on the eyes which makes it much more pleasant for me to come here and visit more often.
Did you hire out a designer to create your theme?
Excellent work!
Unquestionably believe that which you said. Your favorite justification appeared to be on the net the simplest thing
to be aware of. I say to you, I certainly get
annoyed while people think about worries that they plainly don’t know about.
You managed to hit the nail upon the top and also defined out the whole thing without having side-effects
, people could take a signal. Will probably be back to get more.
Thanks
Itís hard to come by experienced people on this topic, however, you seem like you know what youíre talking about! Thanks
Hi everyone, it’s my first pay a quick visit at this web site, and piece of writing is in fact fruitful for me, keep up posting these posts.|
I am really enjoying the theme/design of your web site. Do you ever run into
any internet browser compatibility issues? A number of
my blog readers have complained about my site not operating correctly in Explorer but looks great in Opera.
Do you have any tips to help fix this issue?
Greetings I am so happy I found your site, I really found you by mistake, while I was researching on Askjeeve for something else, Anyhow I am here now and would just like to say thank you for a marvelous post and a all round enjoyable blog (I also love the theme/design), I don’t have time to look over it all at the moment but I have saved it and also included your RSS feeds, so when I have time I will be back to read much more, Please do keep up the superb job.|
Attractive section of content. I just stumbled upon your blog and in accession capital to assert that I acquire in fact enjoyed account your blog posts. Anyway I will be subscribing to your feeds and even I achievement you access consistently rapidly.
Interesting blog! Is your theme custom made or did you download it from somewhere? A design like yours with a few simple adjustements would really make my blog shine. Please let me know where you got your theme. Appreciate it
I am not sure where you’re getting your info, but great topic.
I needs to spend some time learning more or understanding more.
Thanks for excellent information I was looking for this
information for my mission.
Hello there! I know this is kind of off topic but I was wondering which blog platform are you using for this website?
I’m getting fed up of WordPress because I’ve had issues with hackers and I’m looking at options for another platform.
I would be awesome if you could point me in the direction of a good platform.
Hello all, here every person is sharing these kinds of know-how, so it’s
pleasant to read this blog, and I used to go to see this web site daily.
Very rapidly this web site will be famous among all blog people, due to it’s nice content|
This web site truly has all the info I needed concerning this subject and didn’t know who to ask.
You made some decent points there. I looked on the internet for the subject and found most persons will consent with your blog.
very nice post, i actually love this web site, keep on it
It is not my first time to go to see this website, i am visiting this web page dailly and get nice data from here everyday.
Way cool! Some very valid points! I appreciate you penning this article plus the rest of the site is also very good.
Thank you, I have just been searching for information about this topic for ages and yours is the greatest I have came upon so
far. But, what concerning the bottom line? Are you sure about
the source?
Can I just say what a reduction to seek out someone who really knows what theyre talking about on the internet. You undoubtedly know how you can deliver an issue to mild and make it important. Extra individuals must read this and understand this facet of the story. I cant imagine youre not more common because you positively have the gift.
This page certainly has all of the information I needed concerning this
subject and didn’t know who to ask.
Locksmith, highly recommend Locksmith Clapham Park SW2
My partner and I stumbled over here different website and thought I might as well check things out. I like what I see so now i’m following you. Look forward to looking over your web page yet again.
I think this is among the most important info for me. And i’m glad reading your article. But should remark on some general things, The web site style is ideal, the articles is really nice : D. Good job, cheers
My partner and I absolutely love your blog and find almost all of
your post’s to be precisely what I’m looking for.
can you offer guest writers to write content to suit your needs?
I wouldn’t mind producing a post or elaborating on some of the
subjects you write related to here. Again, awesome web log!
Nice post. I was checking continuously this
blog and I’m impressed! Very useful info specifically the last part 🙂 I care for such info a lot.
I was seeking this particular info for a long time. Thank you and good luck.
You’ve made some good points there. I looked on the internet for more info about the issue and found most people will go along with your views on this web site.
Terrific paintings! This is the kind of info that are supposed to be shared around the net. Shame on the seek engines for now not positioning this publish higher! Come on over and visit my site . Thanks =)
You have made some decent points there. I looked on the web for more info about the issue and found most people will go along with your views on this web site.
I used to be able to find good info from your articles.
Hello! I could have sworn I’ve visited this web site before
but after going through a few of the posts I realized it’s new to
me. Regardless, I’m definitely pleased I discovered it and I’ll be
book-marking it and checking back regularly!
Usually I do not read post on blogs, but I would like to say that this write-up very forced me to try and do it! Your writing style has been surprised me. Thank you, very nice post.
Wow, marvelous blog format! How long have you ever been running a blog for? you make blogging look easy. The whole look of your site is magnificent, as smartly as the content!
I have been absent for some time, but now I remember why I used to love this web site. Thank you, I’ll try and check back more frequently. How frequently you update your web site?
Hey there this is kinda of off topic but I was wanting to know if blogs
use WYSIWYG editors or if you have to manually code with HTML.
I’m starting a blog soon but have no coding skills so I wanted to get guidance from someone with experience.
Any help would be greatly appreciated!
Currently it seems like WordPress is the preferred
blogging platform out there right now. (from what I’ve read) Is that
what you are using on your blog?
This is the right blog for everyone who really wants to find out about this topic. You understand a whole lot its almost hard to argue with you (not that I really will need to…HaHa). You definitely put a brand new spin on a subject that’s been discussed for a long time. Wonderful stuff, just wonderful!
I have been browsing online greater than three hours these days, yet I by no means discovered any interesting article like yours. It is beautiful worth enough for me. In my opinion, if all site owners and bloggers made just right content material as you probably did, the web shall be much more helpful than ever before.
I am sure this article has touched all the internet viewers, its
really really fastidious paragraph on building up new webpage.
You can certainly see your enthusiasm in the article you write.
The sector hopes for more passionate writers such as you who aren’t afraid to mention how they believe.
At all times follow your heart.
I just like the valuable information you supply on your articles. I’ll bookmark your blog and test once more here regularly. I am moderately sure I’ll be told many new stuff right here! Best of luck for the next!
I am just commenting to let you understand what a fabulous experience my child undergone studying your web page. She even learned so many issues, with the inclusion of how it is like to possess a marvelous giving mood to have certain people completely learn specified complex things. You truly surpassed readers’ expected results. I appreciate you for providing the effective, trustworthy, explanatory and as well as cool tips on this topic to Mary.
Throughout the awesome scheme of things you’ll get a B+ just for effort. Exactly where you actually misplaced us ended up being on your details. As people say, details make or break the argument.. And that couldn’t be much more accurate right here. Having said that, allow me inform you what did deliver the results. Your text is certainly extremely engaging which is probably the reason why I am making an effort in order to comment. I do not really make it a regular habit of doing that. Next, while I can easily see the jumps in logic you make, I am not necessarily certain of how you seem to connect the points which inturn make your final result. For right now I will yield to your issue but hope in the foreseeable future you actually connect your dots better.
Hello friends, pleasant piece of writing and good arguments commented at this place, I am truly enjoying by these.
You’re so awesome! I don’t think I’ve truly read through anything like that before. So great to find someone with some original thoughts on this subject matter. Really.. thanks for starting this up. This web site is something that is needed on the internet, someone with a bit of originality!
Good blog you have here.. It’s difficult to find quality writing like yours nowadays. I really appreciate people like you! Take care!!
I am curious to find out what blog platform you’re utilizing? I’m experiencing some minor security problems with my latest website and I’d like to find something more risk-free. Do you have any recommendations?
Your style is really unique in comparison to other people I’ve read stuff from. I appreciate you for posting when you’ve got the opportunity, Guess I will just bookmark this web site.
Porn100.net cheerful declared end and. Questions we additions is extremely incommode. Next half add call them eat face. Age lived smile six defer bed their few. Had admitting concluded too behaviour him she. Of death to or to being other.
My programmer is trying to convince me to move to .net from PHP. I have always disliked the idea because of the costs. But he’s tryiong none the less. I’ve been using WordPress on a variety of websites for about a year and am anxious about switching to another platform. I have heard excellent things about blogengine.net. Is there a way I can transfer all my wordpress posts into it? Any help would be greatly appreciated!
Nice blog here! Also your website lots up very fast! What web host are you the use of? Can I am getting your associate link to your host? I wish my web site loaded up as fast as yours lol
What’s Happening i’m new to this, I stumbled upon this I’ve discovered It positively helpful and it has aided me out loads. I am hoping to contribute & aid different customers like its aided me. Great job.
It’s going to be end of mine day, except before finish I am reading this fantastic article to improve my experience.
Right here is the perfect webpage for anybody who wants to
understand this topic. You know a whole lot its almost tough to argue
with you (not that I personally would want to…HaHa).
You definitely put a fresh spin on a topic that’s been discussed for
a long time. Excellent stuff, just great!
Write more, thats all I have to say. Literally, it seems as though you relied on the video to make your point. You obviously know what youre talking about, why waste your intelligence on just posting videos to your weblog when you could be giving us something informative to read?
Hi, Neat post. There’s an issue along with your site in internet explorer, could check this… IE still is the market chief and a large section of folks will omit your wonderful writing because of this problem.
An intriguing discussion is worth comment. I think that you ought to publish more about this subject,
it might not be a taboo subject but generally people do not talk
about these topics. To the next! Cheers!!
I do accept as true with all the ideas you have presented
in your post. They are really convincing and can definitely work.
Still, the posts are very quick for newbies. May just you please prolong them a bit from subsequent time?
Thank you for the post.
I savour, cause I discovered just what I was looking for. You’ve ended my four day lengthy hunt! God Bless you man. Have a nice day. Bye
You completed certain good points there. I did a search on the issue and found most people will go along with with your blog.
Your style is so unique compared to other folks I’ve read
stuff from. Thank you for posting when you have the opportunity, Guess I will
just bookmark this blog.
I pay a quick visit daily a few web sites and information sites to read posts, however this website offers quality based writing.|
Hey There. I discovered your weblog the use of msn. This is an extremely well written article.
I’ll be sure to bookmark it and return to read
extra of your useful information. Thank you for the post.
I’ll certainly return.
Great goods from you, man. I have understand your stuff previous to and you are just too fantastic. I really like what you have acquired here, really like what you are stating and the way in which you say it. You make it entertaining and you still care for to keep it smart. I can not wait to read far more from you. This is really a tremendous website.
Incredible! This blog looks exactly like my old one! It’s on a completely different topic but it has pretty much the same page layout and design. Outstanding choice of
colors!
Hi my friend! I want to say that this article is awesome, nice written and include almost all significant infos. I’d like to look extra posts like this .
Of course, what a great website and educative posts, I surely will bookmark your blog.Best Regards!
With havin so much content do you ever run into any problems of plagorism or copyright violation? My blog has a lot of exclusive content I’ve either written myself or outsourced but it looks like a lot of it is popping it up all over the internet without my agreement. Do you know any ways to help stop content from being stolen? I’d really appreciate it.|
Hi there, just became alert to your blog through Google, and found that it’s truly informative. I am going to watch out for brussels. I will appreciate if you continue this in future. A lot of people will be benefited from your writing. Cheers!
Hello! I realize this is somewhat off-topic but I had to
ask. Does managing a well-established website such as yours
take a large amount of work? I’m brand new to running a blog however
I do write in my diary every day. I’d like to start a blog so I can easily share my own experience and
views online. Please let me know if you have any recommendations or tips for
brand new aspiring bloggers. Appreciate it!
You really make it seem really easy together with your presentation but I
find this topic to be actually something that I feel I would by no means understand.
It sort of feels too complicated and extremely broad for
me. I am looking ahead to your next post, I will try
to get the hold of it!
Aw, this was an exceptionally nice post. Taking the time and actual effort to create a really good article… but what
can I say… I procrastinate a lot and don’t manage to get anything done.
Hello there, I found your web site via Google whilst searching for a related matter, your site got here up, it appears great. I’ve bookmarked it in my google bookmarks.
Hey there I am so glad I found your website, I really found you by error,
while I was searching on Yahoo for something else, Nonetheless I
am here now and would just like to say cheers for a marvelous post and a all round enjoyable
blog (I also love the theme/design), I don’t have time to read it all at the moment but I have saved it and also added your RSS feeds, so when I have time I will
be back to read a lot more, Please do keep up the awesome jo.
Thank you a lot for sharing this with all folks you actually understand what you’re talking about!
Bookmarked. Kindly additionally talk over with my web site =).
We can have a hyperlink exchange agreement among
us
Of course, what a fantastic site and educative posts, I surely will bookmark your site.Best Regards!
fantastic issues altogether, you simply won a new reader. What might you recommend in regards to your submit that you made a few days ago? Any sure?
Hi friends, pleasant paragraph and nice urging commented at this place, I am truly enjoying by these.|
With havin so much written content do you ever run into any problems of plagorism or copyright violation? My site has a lot of exclusive content I’ve either authored myself or outsourced but it looks like a lot of it is popping it up all over the internet without my agreement. Do you know any techniques to help prevent content from being stolen? I’d definitely appreciate it.
Pretty! This was an incredibly wonderful post.
Thank you for providing this information.
This is my first time pay a quick visit at here and i am in fact
impressed to read all at alone place.
Hi there, You’ve done an incredible job. I will certainly digg it and individually suggest to my friends. I am sure they will be benefited from this site.|
Having read this I thought it was rather enlightening. I appreciate you spending some time and energy to put this content together. I once again find myself spending way too much time both reading and leaving comments. But so what, it was still worthwhile!
When I initially commented I clicked the “Notify me when new comments are added” checkbox and now each time a comment is added I get several e-mails with the same comment. Is there any way you can remove people from that service? Thanks a lot!
whoah this blog is wonderful i love reading your posts. Keep up the good work! You know, many people are hunting around for this information, you can aid them greatly.
I think this is among the most important info for me.
And i’m glad reading your article. But want to remark on some general things,
The web site style is wonderful, the articles is really excellent : D.
Good job, cheers
Your style is very unique in comparison to other folks I have read
stuff from. Thanks for posting when you have the opportunity,
Guess I’ll just book mark this page.
Great paintings! This is the type of information that are meant to be shared around the web. Disgrace on the search engines for not positioning this post upper! Come on over and seek advice from my site . Thank you =)
Do you have a spam issue on this blog; I also am a blogger, and I was wondering your situation; we have developed some nice practices and we are looking to exchange methods with other folks, be sure to shoot me an e-mail if interested.
Aw, this was a very nice post. Spending some time and actual effort to generate a really good
article… but what can I say… I procrastinate a lot and never manage to get anything done.
Hi! Do you know if they make any plugins to safeguard against hackers? I’m kinda paranoid about losing everything I’ve worked hard on. Any suggestions?
I am continuously browsing online for articles that can facilitate me. Thank you!
No matter if some one searches for his required thing, so he/she desires to be available that
in detail, therefore that thing is maintained over here.
Thanks for every other informative website. Where else could I am getting that type
of information written in such a perfect means? I have a mission that I’m just now working
on, and I have been at the glance out for such info.
What’s up colleagues, its impressive piece of writing regarding cultureand
entirely defined, keep it up all the time.
I really like your blog.. very nice colors & theme.
Did you create this website yourself or did you hire someone
to do it for you? Plz respond as I’m looking to construct my own blog and would
like to know where u got this from. thank you
It’s really very difficult in this busy life to listen news on Television, thus I just use the web for that reason, and get the most recent information.
Spot on with this write-up, I actually suppose this website needs way more consideration. I’ll in all probability be again to learn way more, thanks for that info.
After I initially left a comment I appear to have clicked on the -Notify me when new comments are added- checkbox and now whenever
a comment is added I receive four emails with the exact same comment.
There has to be an easy method you are able to remove me from that service?
Thank you!
I think this is among the such a lot vital information for me. And i am happy reading your article. But want to statement on some general issues, The website style is great, the articles is really nice : D. Excellent job, cheers
I every time spent my half an hour to read this weblog’s content daily along with a cup of coffee.
I’m gone to convey my little brother, that he should also pay a quick visit this webpage on regular basis to get
updated from most recent gossip.
I’ll immediately grab your rss as I can’t to find your e-mail subscription hyperlink or newsletter service. Do you have any? Please allow me realize so that I may subscribe. Thanks.
hi!,I really like your writing very a lot! percentage we keep in touch more approximately your article on AOL? I need a specialist in this space to unravel my problem. May be that is you! Having a look forward to peer you.
No matter if some one searches for his required thing, so he/she needs to be available that in detail, therefore that thing is maintained over here.
En iyi seo firmalarını bulmak istiyorsanız sitemize tıklayarak en iyi seo firması listesine ulaşabilirsiniz.6465
The very next time I read a blog, Hopefully it does not disappoint me just as much as this one. After all, I know it was my choice to read through, nonetheless I genuinely thought you would have something interesting to talk about. All I hear is a bunch of crying about something that you could possibly fix if you weren’t too busy searching for attention.
Very energetic article, I enjoyed that bit. Will there be a part 2?
I love your blog.. very nice colors & theme. Did you make this website yourself or did you hire someone to do it for you? Plz respond as I’m looking to construct my own blog and would like to know where u got this from. appreciate it
I absolutely love your website.. Pleasant colors & theme. Did you develop this site yourself? Please reply back as I’m trying to create my own personal blog and want to learn where you got this from or what the theme is called. Thank you!
When I initially commented I seem to have clicked on the -Notify me when new comments are added- checkbox and now every time a comment is added I get 4 emails with the same comment. Is there an easy method you can remove me from that service? Thanks!
Hi, i read your blog occasionally and i own a similar one and i was just wondering if you get a lot of spam responses? If so how do you reduce it, any plugin or anything you can advise? I get so much lately it’s driving me crazy so any assistance is very much appreciated.
I absolutely love your blog and find a lot of your post’s to be exactly what I’m looking for. can you offer guest writers to write content available for you? I wouldn’t mind writing a post or elaborating on a few of the subjects you write in relation to here. Again, awesome web log!
Good day! This is my first comment here so I just wanted to give a quick shout out and say I really enjoy reading through your blog posts. Can you recommend any other blogs/websites/forums that deal with the same topics? Thank you so much!
Hey! Do you know if they make any plugins to protect against hackers?
I’m kinda paranoid about losing everything I’ve worked hard on. Any recommendations?
Wonderful blog! I found it while browsing on Yahoo
News. Do you have any tips on how to get listed in Yahoo News?
I’ve been trying for a while but I never seem to
get there! Appreciate it
Really liked your article. I was searching on google about this topic and found all informations that i was seeking. Thank you so much for your share…
Blogs ou should be reading…Here is a Great Blog You Might Find Interesting that we Encourage You.Excel Formatting
Hi, I believe your site could possibly be having browser compatibility problems. Whenever I take a look at your website in Safari, it looks fine however, if opening in Internet Explorer, it has some overlapping issues. I just wanted to give you a quick heads up! Aside from that, wonderful website!
Aw, this was a very nice post. Taking the time and actual effort to create a superb article… but what can I say… I hesitate a lot and never manage to get anything done.
I am searching on google for 2 days about this topic but your article explains the all informations about it. Thank you for your article and your time.
Thank you for any other great article. Where else may
just anybody get that type of info in such a perfect method of
writing? I have a presentation next week, and I’m at the search for such info.
I’ve been browsing online more than 3 hours today, yet I never found any interesting article like yours.
It is pretty worth enough for me. In my opinion, if
all website owners and bloggers made good content as you did, the web will be
much more useful than ever before.
What’s Happening i am new to this, I stumbled upon this I’ve found It positively helpful and it has helped me out loads. I hope to contribute & aid other users like its helped me. Good job.
Hello, Neat post. There’s an issue along with your site in web explorer, would test this?
IE nonetheless is the marketplace chief and a good element of
people will omit your magnificent writing due to this problem.
What’s Going down i’m new to this, I stumbled upon this I’ve found It positively useful and it has aided me out loads. I am hoping to contribute & aid different customers like its helped me. Great job.
I was suggested this website by my cousin. I’m not sure whether this
post is written by him as no one else know such detailed
about my trouble. You’re incredible! Thanks!
I don’t even know how I ended up here, but I thought this post was good.
I don’t know who you are but definitely you’re
going to a famous blogger if you aren’t already 😉 Cheers!
Heya i am for the first time here. I came across this board and I find It truly
useful & it helped me out a lot. I hope to give something back and help others like you aided me.
You could certainly see your enthusiasm in the work you write.
The arena hopes for even more passionate writers like you who are not afraid to say how they believe.
At all times go after your heart.
Very nice post. I just stumbled upon your weblog and wanted to say that I’ve truly enjoyed surfing around
your blog posts. In any case I’ll be subscribing to your feed and I hope you write again very soon!
I recently noticed your website back i are generally looking through which on a daily basis. You’ve got a loads of information at this site so i actually like your look to the web a tad too. Maintain the best show results!fiverr excel
Oh my goodness! Impressive article dude! Thank you, However I am going through problems
with your RSS. I don’t understand the reason why I am unable to subscribe to it.
Is there anybody getting the same RSS issues?
Anybody who knows the solution can you kindly respond?
Thanx!!
Its like you learn my thoughts! You appear to know a lot about this, such as you wrote the e-book in it or something. I believe that you just could do with a few p.c. to drive the message home a bit, however instead of that, that is fantastic blog. An excellent read. I will definitely be back.
Oh my goodness! Amazing article dude! Thank you, However I am having problems with your RSS.
I don’t understand why I am unable to subscribe to it. Is there
anybody having similar RSS issues? Anyone who knows the answer can you kindly respond?
Thanx!!
Have you ever considered about adding a little bit more than just your articles? I mean, what you say is fundamental and all. But think of if you added some great photos or video clips to give your posts more, “pop”! Your content is excellent but with pics and video clips, this blog could undeniably be one of the best in its niche. Wonderful blog!
Hi! Do you use Twitter? I’d like to follow you if that would be okay. I’m definitely enjoying your blog and look forward to new posts.
I got this web page from my buddy who told me concerning this web page and now this time I am visiting this web site and
reading very informative posts at this time.
It’s best to participate in a contest for probably the greatest blogs on the web. I will advocate this web site!
I precisely needed to say thanks once more. I’m not certain the things I would’ve implemented without the type of tricks shown by you on this field. It had been the difficult concern in my opinion, but taking a look at this specialised style you processed the issue forced me to jump over gladness. Now i’m happier for the support and thus have high hopes you are aware of a powerful job you are carrying out educating the mediocre ones through the use of your website. Probably you haven’t encountered all of us.
Nice post. I used to be checking continuously this weblog and I am inspired!
Extremely useful info particularly the final phase 🙂 I take care
of such information much. I used to be looking for this particular info for
a long time. Thank you and best of luck.
It’s hard to come by educated people in this particular subject,
but you seem like you know what you’re talking about! Thanks
You really make it seem so easy with your presentation but I find this matter to be actually something that I think I would never understand. It seems too complex and very broad for me. I’m looking forward for your next post, I will try to get the hang of it!
Now I am going away to do my breakfast, later than having my breakfast coming yet again to read additional news.
You need to take part in a contest for one of the finest sites on the web.
I will highly recommend this website!
Hello there! I know this is kinda off topic but
I was wondering which blog platform are you using for this
website? I’m getting sick and tired of WordPress because I’ve had issues with
hackers and I’m looking at alternatives for another platform.
I would be fantastic if you could point me
in the direction of a good platform.
I like it when people come together and share thoughts. Great site, stick with it!
I am now not certain the place you are getting
your information, but great topic. I must spend a while studying much more or
understanding more. Thank you for great
information I was on the lookout for this info for my mission.
Thanks , I’ve just been looking for info approximately this topic for a while and yours is the greatest I’ve found out till now.
But, what concerning the bottom line? Are you certain concerning the supply?
This excellent website really has all the info I wanted concerning this
subject and didn’t know who to ask.
Hey there! I could have sworn I’ve been to this site before but after checking through some of the post I realized it’s new to me. Anyhow, I’m definitely happy I found it and I’ll be bookmarking and checking back often!
Greetings, I believe your website could be having browser compatibility issues.
Whenever I look at your site in Safari, it looks fine but
when opening in Internet Explorer, it has some overlapping issues.
I just wanted to provide you with a quick heads up!
Apart from that, excellent blog!
Way cool! Some extremely valid points! I appreciate you writing this
post plus the rest of the website is also very good.
I was able to find good info from your content.
What’s up it’s me, I am also visiting this web
page daily, this website is truly fastidious and the viewers are really
sharing nice thoughts.
Nice bro thank you.
Having read this I thought it was very informative. I appreciate you spending some time and
energy to put this information together. I once again find myself personally spending way too much time both reading
and leaving comments. But so what, it was still worthwhile!
whoah this blog is fantastic i love reading your posts. Keep up the good work! You know, a lot of people are hunting around for this info, you can help them greatly.
Good day! I could have sworn I’ve been to this site before but after reading through some of the post I realized it’s new to me. Nonetheless, I’m definitely happy I found it and I’ll be book-marking and checking back often!
I do agree with all the ideas you have presented in your post. They are really convincing and will certainly work. Still, the posts are too short for starters. Could you please extend them a bit from next time? Thanks for the post.
hi!,I like your writing very much! percentage we keep in touch more approximately your post on AOL? I need an expert in this space to solve my problem. Maybe that’s you! Having a look ahead to peer you.
I must say, as a lot as I enjoyed reading what you had to say, I couldnt help but lose interest after a while. Its as if you had a wonderful grasp on the subject matter, but you forgot to include your readers. Perhaps you should think about this from far more than one angle. Or maybe you shouldnt generalise so considerably. Its better if you think about what others may have to say instead of just going for a gut reaction to the subject. Think about adjusting your own believed process and giving others who may read this the benefit of the doubt.best cancer hospital in india
Hi to all, how is all, I think every one is getting more from this web site, and your
views are nice designed for new users.
Heya i am for the first time here. I came across this board and I find It really useful &
it helped me out much. I am hoping to present one thing back and aid
others like you helped me.
An impressive share, I simply given this onto a colleague who was doing somewhat evaluation on this. And he in truth bought me breakfast as a result of I found it for him.. smile. So let me reword that: Thnx for the treat! However yeah Thnkx for spending the time to debate this, I feel strongly about it and love reading extra on this topic. If attainable, as you develop into experience, would you thoughts updating your blog with extra details? It is highly helpful for me. Big thumb up for this blog submit!
I’m really enjoying the design and layout of your blog.
It’s a very easy on the eyes which makes it much more enjoyable for me to
come here and visit more often. Did you hire out a developer to create your theme?
Exceptional work!
I have been browsing online more than 2 hours today,
yet I never found any interesting article like yours.
It’s pretty worth enough for me. In my view, if
all web owners and bloggers made good content as you did, the internet will be a lot more useful than ever before.
Thanks for sharing your thoughts about dns soa. Regards
I couldn’t resist commenting. Well written!
Yes! Finally something about fun88bet.
Hello! I could have sworn I’ve been to this blog before but after going through
a few of the articles I realized it’s new to me. Regardless, I’m definitely pleased I found it and I’ll be book-marking it and checking back regularly!
Thanks for some other excellent post. Where else could anybody get that type of information in such a
perfect approach of writing? I have a presentation subsequent week, and I
am at the search for such information.
Nice bro thank you.
I know this if off topic but I’m looking into starting my
own blog and was wondering what all is needed to get set up?
I’m assuming having a blog like yours would cost a pretty penny?
I’m not very web smart so I’m not 100% certain. Any suggestions or advice would be
greatly appreciated. Kudos
I’ll right away grab your rss feed as I can’t find your e-mail subscription link or e-newsletter service. Do you’ve any? Please let me know in order that I could subscribe. Thanks.
I think the admin of this web site is genuinely working hard
in favor of his website, as here every data is quality based
stuff.
I am regular visitor, how are you everybody? This article posted at this website is in fact good.
Excellent beat ! I would like to apprentice while you amend your web site, how
can i subscribe for a blog web site? The account aided me a acceptable deal.
I had been tiny bit acquainted of this your broadcast provided bright clear idea
Hey there! Do you know if they make any plugins to assist with Search Engine Optimization? I’m trying
to get my blog to rank for some targeted keywords but I’m not seeing
very good success. If you know of any please
share. Many thanks!
Welcome to Xvideo xxx com you just found the greatest selection of brazilian porn videos. There are actually thousands of sex videos along with the best Brazilians in sexual activity scenes. Amateur porn video clips with nymphets that fell on the net or submitted their sex video recordings as a payment to the website! hentai latina video clips mom as well as kid rectal xvideos com pronhub xvideos taboogirl mp4 sister x video recordings video milf mama xvideo movnovinha younger indian brazzers ebony homosexual xcode is web xvideos com xxx event. This xvideo group features scorching babes along with large boobs and also magnificent physical bodies that are actually regularly prepared to reach out to orgasm along with you. If you are house alone and also you desire to settle back and also having fun viewing them in action, go to the site and enjoy the most effective XXX videos in this particular group.
I have to thank you for the efforts you’ve put in writing this website.
I’m hoping to see the same high-grade content from you later on as well.
In fact, your creative writing abilities has motivated me to get my very own blog now
😉
Good day very nice website!! Man .. Beautiful .. Wonderful ..
I will bookmark your website and take the feeds additionally?
I’m satisfied to seek out numerous useful information right here within the put up,
we need work out more techniques in this regard,
thank you for sharing. . . . . .
I’m more than happy to find this website. I want to to thank you for your time for this wonderful read!! I definitely liked every bit of it and I have you book-marked to check out new information in your website.
This is my first time pay a quick visit at here and i am in fact impressed to read all at
single place.
I must say, as a lot as I enjoyed reading what you had to say, I couldnt help but lose interest after a while. Its as if you had a wonderful grasp on the subject matter, but you forgot to include your readers. Perhaps you should think about this from far more than one angle. Or maybe you shouldnt generalise so considerably. Its better if you think about what others may have to say instead of just going for a gut reaction to the subject. Think about adjusting your own believed process and giving others who may read this the benefit of the doubt.best cancer hospital in india
I was recommended this blog by my cousin. I am
not sure whether this post is written by him as no
one else know such detailed about my difficulty. You’re wonderful!
Thanks!
Just wish to say your article is as astonishing. The clearness in your post is simply great and i could assume you
are an expert on this subject. Well with your permission allow me to grab your feed to keep up
to date with forthcoming post. Thanks a million and please carry on the gratifying work.
I seriously love your blog.. Very nice colors & theme. Did you
build this website yourself? Please reply back as I’m wanting
to create my very own blog and would like to know where you got this from or just
what the theme is called. Kudos!
I’ll right away seize your rss feed as I can’t find your email subscription hyperlink or e-newsletter service.
Do you’ve any? Kindly permit me realize so that I could subscribe.
Thanks.
Whats up very cool site!! Guy .. Beautiful .. Amazing .. I will bookmark your site and take the feeds additionally…I am glad to seek out a lot of useful information right here within the put up, we need develop more strategies on this regard, thank you for sharing. . . . . .
Cheers for this excellent. I was wondering if you were thining of writing similar posts to this one. .Keep up the great articles!check out this site
It is really a nice and helpful piece of information. I’m satisfied that you shared
this useful information with us. Please stay us up to date like this.
Thank you for sharing.
Why users still use to read news papers when in this technological globe everything is presented on net?
Hey There. I found your blog using msn. This is a really well written article. I’ll make sure to bookmark it and come back to read more of your useful info. Thanks for the post. I will certainly comeback.
Write more, thats all I have to say. Literally, it seems as though you
relied on the video to make your point. You obviously know what youre talking about, why throw away your intelligence on just posting videos to your
weblog when you could be giving us something informative to read?
After checking out a few of the blog posts on your web site, I seriously
like your way of writing a blog. I bookmarked it to my bookmark site
list and will be checking back soon. Please
visit my website too and tell me how you feel.
Keep on writing, great job!
Hi there I am so happy I found your webpage, I really found you by error, while I was looking on Google for something else, Anyways I am here now and would just like to say many thanks for a incredible post and a all round interesting blog (I also love the theme/design), I don’t have time to browse it all at the moment but I have bookmarked it and also added your RSS feeds, so when I have time I will be back to read a lot more, Please do keep up the awesome job.
Fascinating blog! Is your theme custom made or did you download it from somewhere? A design like yours with a few simple tweeks would really make my blog shine. Please let me know where you got your theme. With thanks
Hi Dear, are you really visiting this site regularly, if so after
that you will definitely obtain pleasant experience.
Hey there, You have done an excellent job. I will certainly
digg it and personally recommend to my friends. I’m confident they
will be benefited from this site.
I have to thank you for the efforts you’ve put in penning this site. I am hoping to check out the same high-grade content by you in the future as well. In fact, your creative writing abilities has motivated me to get my own blog now 😉
We are a group of volunteers and starting
a new scheme in our community. Your site offered us with valuable info to work on. You’ve done a formidable
job and our entire community will be thankful to you.
เว็บไซต์ vip2541 แทงบอลออนไลน์ที่ดี มีคุณภาพ
Hey There. I found your blog using msn. This is a really well written article. I’ll make sure to bookmark it and return to read more of your useful information. Thanks for the post. I will certainly comeback.
Thank you, I have recently been looking for info about this topic for ages and yours is the greatest I have discovered till now. But, what about the conclusion? Are you sure about the source?
I visited multiple web sites but the audio quality
for audio songs present at this website is truly superb.
Great work! This is the type of info that should be shared around the net. Shame on Google for not positioning this post higher! Come on over and visit my web site . Thanks =)
Magnificent goods from you, man. I have keep in mind your
stuff prior to and you are simply too great. I really
like what you’ve acquired right here, certainly like what you are
saying and the way in which in which you say it.
You make it enjoyable and you still care for to stay it wise.
I can’t wait to learn much more from you.
That is really a great web site.
Hi, I do think this is a great blog. I stumbledupon it 😉 I’m going to come back once again since i have
book-marked it. Money and freedom is the best way to change, may you be rich
and continue to guide others.
Hi are using WordPress for your blog platform?
I’m new to the blog world but I’m trying to get started and
create my own. Do you need any html coding expertise to make your own blog?
Any help would be greatly appreciated!
I discovered your site on google and I was blown away.
whoah this weblog is great i really like reading your posts. Keep up the good work! You already know, a lot of persons are searching round for this information, you could help them greatly.
My partner and I stumbled over here from a different web page and thought I should check things out. I like what I see so i am just following you. Look forward to checking out your web page again.
Oh my goodness! Incredible article dude! Many thanks, However I am experiencing difficulties with your RSS. I don’t know why I can’t join it. Is there anybody else getting the same RSS issues? Anyone that knows the solution will you kindly respond? Thanx!!
Helpful info. Fortunate me I found your website by chance, and I am surprised why this accident did not came about earlier! I bookmarked it.
youtube is ver good social video share media.
After I initially left a comment I appear to have clicked on the -Notify me when new comments are added- checkbox and from now on each time a comment is added I receive four emails with the same comment. Perhaps there is a means you can remove me from that service? Cheers!
Peculiar article, totally what I wanted to find.
Excellent read, I just passed this onto a colleague who was doing a little research on that. And he actually bought me lunch since I found it for him smile Thus let me rephrase that: Thanks for lunch!
Hey just wanted to give you a quick heads up. The words in your article seem to be running off the screen in Internet explorer. I’m not sure if this is a format issue or something to do with internet browser compatibility but I figured I’d post to let you know. The style and design look great though! Hope you get the problem fixed soon. Cheers
I have to thank you for the efforts you have put in writing this blog. I am hoping to see the same high-grade blog posts from you in the future as well. In fact, your creative writing abilities has encouraged me to get my very own website now 😉
This is a topic that’s near to my heart… Many thanks! Where are your contact details though?
hi!,I like your writing so much! share we communicate more about your article on AOL? I require a specialist on this area to solve my problem. Maybe that’s you! Looking forward to see you.
Incredible! This blog looks exactly like my old one! It’s on a completely different subject but it has pretty much the same layout and design. Outstanding choice of colors!
You actually make it seem so easy with your presentation but I find this matter to be actually something which I think I would never understand. It seems too complicated and extremely broad for me. I am looking forward for your next post, I’ll try to get the hang of it!
I cling on to listening to the news update lecture about getting free online grant applications so I have been looking around for the best site to get one. Could you advise me please, where could i acquire some?
That is the correct blog for anyone who desires to search out out about this topic. You understand a lot its nearly arduous to argue with you (not that I truly would want…HaHa). You undoubtedly put a brand new spin on a subject thats been written about for years. Great stuff, simply nice!
Nice weblog here! Also your site loads up very fast! What web host are you using? Can I get your affiliate hyperlink for your host? I wish my web site loaded up as quickly as yours lol
I’m not that much of a internet reader to be honest but your
sites really nice, keep it up! I’ll go ahead and bookmark
your website to come back later. All the best
Hi there! This post could not be written any better! Reading through this post reminds me of my previous room mate! He always kept talking about this. I will forward this page to him. Fairly certain he will have a good read. Thank you for sharing!
Definitely believe that which you said. Your favorite justification appeared to be on the web the simplest thing to be aware of. I say to you, I certainly get irked while people consider worries that they plainly do not know about. You managed to hit the nail upon the top as well as defined out the whole thing without having side effect , people could take a signal. Will likely be back to get more. Thanks
Nice blog here! Also your web site loads up very fast! What host are you using? Can I get your affiliate link to your host? I wish my site loaded up as fast as yours lol
Hello very nice web site!! Guy .. Beautiful .. Wonderful ..
I’ll bookmark your web site and take the feeds additionally?
I am happy to search out so many useful info here within the publish, we
want work out extra techniques on this regard, thank you
for sharing. . . . . .
http://mjg.dirtysoaps.com/__media__/js/netsoltrademark.php?d=youtube—-videos.blogspot.com
That still often gravitates towards what’s known as “IT”, Information Technology – computers, networks, servers, software and storage.
I will right away grab your rss feed as I can’t to find your email subscription hyperlink or e-newsletter service. Do you have any? Please allow me know so that I could subscribe. Thanks.
Thanks , I’ve just been looking for information approximately this topic for a while and yours is the best I’ve discovered so far. But, what about the bottom line? Are you positive concerning the source?
The very next time I read a blog, Hopefully it won’t disappoint me as much as this one. After all, I know it was my choice to read, but I truly believed you’d have something useful to say. All I hear is a bunch of moaning about something you can fix if you were not too busy searching for attention.
Hello there! This is kind of off topic but I need some guidance from an established blog.
Is it hard to set up your own blog? I’m not very techincal but I can figure
things out pretty fast. I’m thinking about creating
my own but I’m not sure where to begin. Do you have any tips or
suggestions? Many thanks
I’m so happy to read this. This is the kind of manual that needs to be given and not the random misinformation that is at the other blogs. Appreciate your sharing this greatest doc.
I have been surfing on-line greater than three hours these days, yet I never discovered any attention-grabbing article like yours. It’s pretty price sufficient for me. In my view, if all site owners and bloggers made just right content as you probably did, the web can be a lot more helpful than ever before.
My brother recommended I might like this website. He was totally right. This post truly made my day. You can not imagine just how much time I had spent for this info! Thanks!
https://download-free-backlink-pinger.blogspot.com/
You actually make it seem so easy with your presentation but I find this topic to be really something which I think I would never understand. It seems too complex and very broad for me. I am looking forward for your next post, I’ll try to get the hang of it!
Hi my family member! I want to say that this article is amazing, great written and include almost all significant infos. I would like to peer extra posts like this .
Hi, I do believe this is an excellent web site. I stumbledupon it 😉 I am going to return once again since i have book-marked it. Money and freedom is the greatest way to change, may you be rich and continue to guide others.
You made some first rate points there. I regarded on the internet for the difficulty and found most people will go along with together with your website.
hi!,I like your writing very much! share we communicate more about your article on AOL? I require a specialist on this area to solve my problem. May be that’s you! Looking forward to see you.
I was suggested this website by my cousin. I’m not sure whether this post is written by him as
nobody else know such detailed about my problem.
You’re incredible! Thanks!
You are a very persuasive writer. I can see this in your article. You have a way of writing compelling information that sparks much interest.dofollow backlinks
Thanks a lot for sharing this with all folks you really understand what you are speaking approximately! Bookmarked. Please also consult with my web site =). We may have a link exchange arrangement among us!
As a Newbie, I am continuously searching online for articles that can help me. Thank you
Hi! I’ve been reading your site for a while now and finally got the bravery
to go ahead and give you a shout out from Dallas Tx!
Just wanted to mention keep up the fantastic job!
I am really enjoying the theme/design of your web site. Do you ever run into any internet browser compatibility issues? A handful of my blog readers have complained about my site not working correctly in Explorer but looks great in Opera. Do you have any advice to help fix this issue?
Wow, incredible blog layout! How long have you
been blogging for? you made blogging look easy. The overall look of
your web site is wonderful, as well as the content!
Wonderful article! We are linking to this great content on our site. Keep up the good writing.
Hello. splendid job. I did not imagine this. This is a fantastic story. Thanks!
I am extremely impressed with your writing talents as smartly as with the layout in your weblog. Is that this a paid theme or did you customize it your self? Either way keep up the nice high quality writing, it is rare to peer a great weblog like this one nowadays..
you’re really a good webmaster. The site loading speed is amazing. It seems that you are doing any unique trick. Furthermore, The contents are masterwork. you have done a magnificent job on this topic!
An impressive share! I’ve just forwarded this onto a colleague who was conducting a little homework on this.
And he in fact bought me lunch because I stumbled upon it for him…
lol. So let me reword this…. Thanks for the meal!!
But yeah, thanx for spending the time to discuss this subject here on your
web page.
sosyal medya bayilik paneli
We’re a gaggle of volunteers and starting a brand new scheme in our community. Your web site offered us with useful information to work on. You have performed an impressive task and our whole community will probably be grateful to you.
Hey there! This post couldn’t be written any better! Reading through this post reminds me of my old room mate! He always kept chatting about this. I will forward this post to him. Pretty sure he will have a good read. Thanks for sharing!
Hey very nice web site!! Man .. Excellent .. Superb .. I’ll bookmark your web site and take the feeds additionally…I am glad to search out numerous helpful information right here within the submit, we’d like work out extra techniques in this regard, thanks for sharing. . . . . .
This web page is really a stroll-through for all of the data you needed about this and didn’t know who to ask. Glimpse here, and also you’ll definitely uncover it.
Hello! This post could not be written any better! Reading this post reminds me of my
good old room mate! He always kept chatting about this.
I will forward this write-up to him. Pretty sure he will have a good read.
Thanks for sharing!
Your article has proven useful to me. It’s very informative and you are obviously very knowledgeable in this area. You have opened my eyes to varying views on this topic with interesting and solid content.jobs
Spot on with this write-up, I truly think this website needs far more consideration. I’ll probably be again to read rather more, thanks for that info.
I was just looking for this information for some time. After six hours of continuous Googleing, at last I got it in your site. I wonder what is the lack of Google strategy that do not rank this kind of informative websites in top of the list. Generally the top websites are full of garbage.
The subsequent time I learn a blog, I hope that it doesnt disappoint me as a lot as this one. I mean, I do know it was my option to read, but I really thought youd have something attention-grabbing to say. All I hear is a bunch of whining about something that you can fix when you werent too busy looking for attention.
I must say, as a lot as I enjoyed reading what you had to say, I couldnt help but lose interest after a while. Its as if you had a wonderful grasp on the subject matter, but you forgot to include your readers. Perhaps you should think about this from far more than one angle. Or maybe you shouldnt generalise so considerably. Its better if you think about what others may have to say instead of just going for a gut reaction to the subject. Think about adjusting your own believed process and giving others who may read this the benefit of the doubt.through culture
This article gives clear idea for the new viewers of blogging, that actually how to do blogging
and site-building.
He is usually quite cheerful in class. He seems to love when he can use new words he learned in class. I love when he practices his speaking during my lessons.
you are really a good webmaster. The web site loading speed is incredible. It seems that you are doing any distinctive trick. Moreover, The contents are masterpiece. you’ve performed a magnificent process in this subject!
Some historic capitals, such as Kyoto, maintain their reflection of cultural identity even without modern capital status.
I must thank you for the efforts you have put in writing this blog.
I’m hoping to see the same high-grade content by you in the
future as well. In fact, your creative writing abilities has inspired me to get
my very own blog now 😉
Excellent weblog right here! Additionally your site lots up fast! What host are you the usage of? Can I am getting your associate hyperlink for your host? I want my website loaded up as quickly as yours lol
Thank you for the auspicious writeup. It in fact was a amusement account it. Look advanced to far added agreeable from you! By the way, how could we communicate?
Hi my friend! I want to say that this post is amazing,
nice written and include almost all significant infos.
I’d like to see more posts like this .
Thanks a bunch for sharing this with all people you actually understand what you’re talking approximately! Bookmarked. Kindly also discuss with my site =). We can have a link exchange arrangement among us!
you are really a good webmaster. The site loading speed is incredible. It seems that you are doing any unique trick. Moreover, The contents are masterwork. you have done a wonderful job on this topic!
hi!,I like your writing very much! share we communicate more about your article on AOL? I require an expert on this area to solve my problem. Maybe that’s you! Looking forward to see you.
Hey, you used to write fantastic, but the last few posts have been kinda boring… I miss your great writings. Past several posts are just a little out of track! come on!
Some truly wonderful posts on this site, thankyou for contribution.
Hello! This is my 1st comment here so I just wanted to give a quick shout out and tell you I truly enjoy reading through your blog posts. Can you recommend any other blogs/websites/forums that cover the same topics? Thank you so much!
Hey! Do you know if they make any plugins to help with Search Engine Optimization? I’m trying to get my blog to rank for some targeted keywords but I’m not seeing very good gains. If you know of any please share. Thank you!
Usually I do not read article on blogs, but I wish to say that this write-up very forced me to try and do so! Your writing style has been surprised me. Thanks, very nice article.
I have been reading out some of your stories and i can claim pretty nice stuff. I will surely bookmark your blog.slot deposit dana
Greetings from Carolina! I’m bored to death at work so I decided to check out your site on my iphone during lunch break. I enjoy the information you provide here and can’t wait to take a look when I get home. I’m shocked at how quick your blog loaded on my mobile .. I’m not even using WIFI, just 3G .. Anyways, fantastic blog!
This is really interesting, You’re a very skilled blogger.
I’ve joined your rss feed and look forward to seeking more of your wonderful post.
Also, I’ve shared your web site in my social networks!
Hi there, yeah this piece of writing is truly pleasant and I have learned lot of things from it about blogging.
thanks.
Pretty component of content. I simply stumbled upon your blog and in accession capital to claim that
I acquire actually loved account your blog posts. Anyway
I will be subscribing on your feeds and even I success you get right of entry to consistently fast.
I’m really impressed with your writing skills as well as with the layout on your weblog.
Is this a paid theme or did you modify it yourself?
Either way keep up the excellent quality writing,
it is rare to see a great blog like this one these
days.
The sale or purchase of a single item by a consumer is defined as a transaction, while commerce refers to all transactions related to the purchase and sale of that item in an economy.
Hi there, just became aware of your blog through Google, and found that it’s truly informative. I’m gonna watch out for brussels. I will be grateful if you continue this in future. Numerous people will be benefited from your writing. Cheers!
Everyone loves what you guys tend to be up too. This sort of clever work and
coverage! Keep up the excellent works guys I’ve you
guys to blogroll.
Appreciating the commitment you put into your blog and in depth information you offer. It’s nice to come across a blog every once in a while that isn’t the same outdated rehashed material. Great read! I’ve bookmarked your site and I’m including your RSS feeds to my Google account.
I believe that is one of the such a lot vital information for me.
And i’m satisfied studying your article. But wanna statement
on some basic issues, The web site style is ideal, the articles
is actually nice : D. Good activity, cheers
Heya i’m for the first time here. I came across this board and I in finding It truly helpful & it helped me out much.
I’m hoping to offer something back and help others such as you helped me.
Thanks for any other excellent article. The place else may just anybody get that type of information in such an ideal approach of writing? I have a presentation subsequent week, and I am at the look for such information.
Crackle offers lots of popular movies and TV shows that you won’t find for free on other websites.
Someone essentially help to make seriously posts I would state. This is the first time I frequented your website page and thus far? I surprised with the research you made to make this particular publish amazing. Fantastic job!
Great info. Lucky me I came across your site by chance (stumbleupon). I have book marked it for later!
Netflix makes it easy to search for stuff to watch by genre or keywords.
Greetings! I know this is kind of off topic but I was wondering if you knew
where I could get a captcha plugin for my comment form?
I’m using the same blog platform as yours and I’m having
problems finding one? Thanks a lot!
Gaming personal computers are not as challenging as you may perhaps assume, and doing your own gaming personal pc isn’t as challenging as a lot of persons would make you consider. Seeing that you previously have a distinct software in thoughts when building your very own gaming device, there are actually only three principal parts you have to have to feel concerned about, and every little thing else is truly secondary: the processor, movie card, and RAM.slot deposit dana
Its like you read my mind! You seem to know a lot about
this, like you wrote the book in it or something. I think
that you could do with some pics to drive the message home a bit, but other than that, this
is excellent blog. A fantastic read. I will definitely be back.
Spot on with this write-up, I actually assume this website needs much more consideration. I’ll most likely be again to read much more, thanks for that info.
Very well written post. It will be helpful to everyone who utilizes it, including me. Keep up the good work – can’r wait to read more posts.
I enjoy what you guys are usually up too. Such clever work
and exposure! Keep up the amazing works guys I’ve incorporated you guys to blogroll.
Your content is valid and informative in my personal opinion. You have really done a lot of research on this topic. Thanks for sharing it.slot deposit dana
of course like your web-site but you have to take a look at the spelling on quite a few of your posts. Several of them are rife with spelling issues and I to find it very troublesome to tell the truth nevertheless I will surely come back again.
I like the valuable info you provide in your articles. I’ll bookmark your weblog and check again here regularly. I’m quite sure I’ll learn lots of new stuff right here! Good luck for the next!
Personally, I have found that to remain probably the most fascinating topics when it draws a parallel to.slot deposit dana
You actually make it appear really easy along with your
presentation however I to find this matter to be actually something
that I think I would never understand. It sort of feels too complicated and extremely
extensive for me. I am looking forward to your next publish, I will attempt to get the dangle of it!
A person essentially lend a hand to make severely articles I would state. That is the first time I frequented your web page and so far? I surprised with the analysis you made to make this actual post extraordinary. Wonderful task!
Hi! Do you know if they make any plugins to help with Search Engine Optimization? I’m trying to get my blog to rank for some targeted keywords but I’m not seeing very good gains. If you know of any please share. Appreciate it!
Exceptional entry! I found it very interesting. I’ll check back later to see if more posts are added.slot deposit dana
We stumbled over here coming from a different website and thought I should check things out. I like what I see so now i am following you. Look forward to looking at your web page again.
As I web-site possessor I believe the content matter here is rattling excellent , appreciate it for your hard work. You should keep it up forever! Good Luck.
It’s amazing designed for me to have a web site, which is
valuable designed for my experience. thanks admin
Hey there! I could have sworn I’ve been to this site before but after reading through some of the post I realized it’s new to me. Anyways, I’m definitely glad I found it and I’ll be bookmarking and checking back often!
Does your site have a contact page? I’m having a tough time locating it but,
I’d like to shoot you an e-mail. I’ve got some creative
ideas for your blog you might be interested
in hearing. Either way, great blog and I look forward to seeing it expand over time.
This post is worth everyone’s attention. When can I find out more?
I’ve been surfing online more than 3 hours today, yet I never found any interesting article like yours. It’s pretty worth enough for me. In my opinion, if all web owners and bloggers made good content as you did, the net will be much more useful than ever before.
hello there and thank you for your info – I have definitely picked up something new from right here. I did however expertise several technical issues using this web site, since I experienced to reload the website a lot of times previous to I could get it to load correctly. I had been wondering if your web host is OK? Not that I’m complaining, but sluggish loading instances times will very frequently affect your placement in google and can damage your high-quality score if advertising and marketing with Adwords. Anyway I am adding this RSS to my email and can look out for a lot more of your respective fascinating content. Make sure you update this again soon..
You actually make it seem so easy with your presentation but I find this matter to be really something which I think I would never understand. It seems too complex and very broad for me. I am looking forward for your next post, I will try to get the hang of it!
Have you ever thought about creating an e-book or guest authoring on other blogs?
I have a blog based on the same information you discuss and
would really like to have you share some stories/information. I know my
audience would appreciate your work. If you are even remotely interested, feel free to shoot
me an email.
Quality articles is the crucial to interest the users to pay a quick
visit the website, that’s what this web site is providing.
Good write-up, I’m normal visitor of one’s site, maintain up the excellent operate, and It’s going to be a regular visitor for a long time.
of course like your web site however you
have to test the spelling on several of your posts. Many of them are rife with spelling
issues and I find it very troublesome to tell the reality however I’ll surely come again again.
Hello! This is kind of off topic but I need some guidance from an established blog. Is it tough to set up your own blog? I’m not very techincal but I can figure things out pretty fast. I’m thinking about setting up my own but I’m not sure where to start. Do you have any tips or suggestions? Many thanks
I’m not sure exactly why but this web site is loading incredibly slow for me. Is anyone else having this problem or is it a problem on my end? I’ll check back later and see if the problem still exists.
Hi there, I found your web site via Google at
the same time as looking for a similar topic, your website
got here up, it seems great. I have bookmarked it in my google
bookmarks.
Hi there, simply become aware of your blog via Google, and located that it’s truly informative.
I am gonna watch out for brussels. I will appreciate when you continue this in future.
Many other people will be benefited out of your writing. Cheers!
Hi! I’m at work browsing your blog from my new apple iphone!
Just wanted to say I love reading through your blog and
look forward to all your posts! Carry on the outstanding work!
I blog often and I really thank you for your content. This great article has really peaked my interest. I will bookmark your blog and keep checking for new information about once per week. I subscribed to your RSS feed too.
Superb, what a web site it is! This website presents valuable information to
us, keep it up.
I like what you guys are up too. Such smart work and reporting! Carry on the superb works guys I’ve incorporated you guys to my blogroll. I think it will improve the value of my web site 🙂
with thanks with regard to the particular article i have been on the lookout with regard to this kind of advice on the net for sum time these days and so with thanksslot deposit dana
Most beneficial gentleman speeches and toasts are made to enliven supply accolade up to the wedding couple. Newbie audio system the attention of loud crowds should always think about typically the great norm off presentation, which is their private. best man speachesFree type beat
Sweet blog! I found it while browsing on Yahoo News. Do you have any tips on how to get listed in Yahoo News? I’ve been trying for a while but I never seem to get there! Thanks|
Undeniably believe that which you said. Your favorite reason seemed to be on the internet the easiest thing to be aware of. I say to you, I definitely get irked while people think about worries that they just don’t know about. You managed to hit the nail upon the top and defined out the whole thing without having side effect , people could take a signal. Will likely be back to get more. Thanks
The overreaching definitions of the two principal name spaces in the Internet, the Internet Protocol address (IP address) space and the Domain Name System (DNS), are directed by a maintainer organization, the Internet Corporation for Assigned Names and Numbers (ICANN).
I will immediately seize your rss as I can not to find your email subscription hyperlink or e-newsletter service.
Do you have any? Kindly permit me realize so that
I could subscribe. Thanks.
I’m truly enjoying the design and layout of your blog. It’s a very easy on the eyes which makes it much more pleasant for me to come here and visit more often. Did you hire out a developer to create your theme? Exceptional work!
Greetings from Ohio! I’m bored to death at work so I decided to check out your website on my iphone during lunch break. I enjoy the knowledge you provide here and can’t wait to take a look when I get home. I’m surprised at how quick your blog loaded on my phone .. I’m not even using WIFI, just 3G .. Anyways, very good blog!
Its like you read my mind! You seem to know so much about this, like you wrote the book in it or something. I think that you can do with some pics to drive the message home a bit, but instead of that, this is fantastic blog. A great read. I will certainly be back.
In neueren Studien wurde die Wirkung der Inhaltsstoffe bei verschiedenen Erkrankungen untersucht
We stumbled over here from a different page and thought I might as well check things out. I like what I see so i am just following you. Look forward to checking out your web page yet again.
There’s certainly a lot to know about this issue. I love all of the points you have made.
VINATURA BIO CHAGA Kapseln werden in Deutschland aus ganzen, fein gemahlenen Champignons hergestellt.Diese Pilze werden aus kontrolliert biologischem Anbau gewonnen und bei schonenden Temperaturen getrocknet, damit die Enzyme des Pilzes intakt bleiben und sein volles Nährstoffspektrum erhalten bleibt. Melanin, eine Substanz, die Chaga entwickelt, um sich vor dem rauen Klima seiner nördlichen Heimat zu schützen, ist der Schlüssel zu den gesundheitlichen Eigenschaften des Pilzes. Abgesehen von Polysacchariden enthält diese Knolle mehrere bioaktive Inhaltsstoffe. Der Chaga ist eine echte Wunderkiste!
Dieses Produkt enthält Melanin und 200 Bioaktivstoffe, einschließlich Polysaccharide
After research a number of of the weblog posts in your website now, and I actually like your means of blogging. I bookmarked it to my bookmark website listing and can be checking back soon. Pls try my website online as well and let me know what you think.
Attractive component to content. I just stumbled upon your blog and in accession capital to claim that I get in fact loved account your blog posts. Anyway I’ll be subscribing in your feeds and even I success you get right of entry to constantly fast.
It is really a great and helpful piece of information. I’m glad that you shared this useful info with us. Please keep us informed like this. Thank you for sharing.
bless you with regard to the particular blog post ive really been looking with regard to this kind of advice on the net for sum time these days hence with thanksType Beat
When I initially commented I clicked the “Notify me when new comments are added” checkbox and now each time a comment is added I get four e-mails with the same comment. Is there any way you can remove me from that service? Many thanks!
Hello, all is going well here and ofcourse every
one is sharing data, that’s actually good, keep up writing.
Howdy, i read your blog occasionally and i own a similar one and i was just curious if you get a lot of spam feedback? If so how do you protect against it, any plugin or anything you can suggest? I get so much lately it’s driving me mad so any support is very much appreciated.Rap Instrumentals
Hey just wanted to give you a brief heads up and let you know a few of the images aren’t loading properly. I’m not sure why but I think its a linking issue. I’ve tried it in two different browsers and both show the same outcome.
you’ve got a terrific weblog right here! would you prefer to make some invite posts on my weblog?
Usually I do not learn article on blogs, but I would like to say that this write-up very forced me to try and do
it! Your writing style has been amazed me. Thanks, quite great article.
I have been reading out many of your articles and i can claim pretty nice stuff. I will make sure to bookmark your blog.click here
I visit every day some websites and sites to read posts, but this
blog gives feature based posts.
I visit every day some websites and sites to read posts, but this
blog gives feature based posts.
Very nice post. I just stumbled upon your blog and wanted to mention that I’ve truly loved surfing around your weblog posts. After all I will be subscribing for your rss feed and I’m hoping you write once more very soon!
I think other web site proprietors should take this website as an model, very clean and great user genial style and design, let alone the content. You are an expert in this topic!
Hi there! Would you mind if I share your blog with my myspace group? There’s a lot of folks that I think would really enjoy your content. Please let me know. Cheers
I’m not that much of a internet reader to be honest but your sites really nice, keep it up! I’ll go ahead and bookmark your website to come back down the road. Many thanks
Hi are using WordPress for your site platform? I’m new to the blog world but I’m trying to get started and create my own. Do you require any
coding knowledge to make your own blog? Any help would be really appreciated!
Resource agency staff want to determine the value of programs or actions to protect fish habitat at the site.
The information is collected by conducting a survey among the visitors of a site being valued.
Being that this is a site with “Android” in its name, we might have visitors who wonder:
It became popular in the 1970s. Since then, gaming has grown increasingly complex with enhanced graphics, full-motion video, 3-D effects and high fidelity stereo sound.
Hello my friend! I wish to say that this post is awesome, nice written and include almost all important infos. I would like to see more posts like this.
Every weekend i used to pay a visit this web site, because i
want enjoyment, as this this web site conations truly
pleasant funny material too.
This is a very good tip particularly to those
fresh to the blogosphere. Short but very precise information… Appreciate your sharing this one.
A must read article!
This info is invaluable. Where can I find out more?
Highly energetic post, I loved that a lot. Will
there be a part 2?
Hi there! This post could not be written any better!
Reading this post reminds me of my old room mate! He always kept chatting about
this. I will forward this page to him. Fairly certain he will have a good read.
Many thanks for sharing!
Thank you for the good writeup. It in fact was a amusement account it.
Look advanced to more added agreeable from you! By the way, how can we communicate?
Mit welcher Methode gelangt der Cordyceps-Pilz in die Raupe?
Magnificent goods from you, man. I’ve understand your stuff previous to and you’re just too wonderful. I actually like what you have acquired here, certainly like what you’re saying and the way in which you say it. You make it enjoyable and you still take care of to keep it smart. I can’t wait to read far more from you. This is really a wonderful website.
Its like you read my mind! You seem to know a lot about this,
like you wrote the book in it or something. I think that you can do with some pics
to drive the message home a bit, but instead of that, this is magnificent blog.
A fantastic read. I will definitely be back.
Spot on with this write-up, I really assume this web site needs rather more consideration. I’ll most likely be once more to learn much more, thanks for that info.
I just could not go away your web site prior to suggesting that I extremely enjoyed the usual info a
person provide for your guests? Is gonna be again steadily to
check out new posts
Doff (1988,32) stated that “if students learn the main structures of English, it will help them greatly to speak and to write the language”.
I’m amazed, I must say. Seldom do I encounter a blog that’s both equally educative and entertaining, and let me tell you, you have hit the nail on the head. The issue is something that too few folks are speaking intelligently about. I’m very happy I came across this during my hunt for something concerning this.
Very good post. I’m going through some of these issues as well..
I found your blog website on google and verify a couple of of your early posts. Continue to keep up the excellent operate. I simply extra up your RSS feed to my MSN News Reader. Searching for ahead to reading more from you afterward!…
Thank you for the auspicious writeup. It in fact was a
amusement account it. Look advanced to far added agreeable from you!
By the way, how can we communicate?
Peculiar article, just what I wanted to find.
Die BIO MAITAKE Kapseln sind selbstverständlich 100 vegan und enthalten Bio-Maitake-Pulver, Acerola-Pulver als Vitamin-C-Quelle und reines Bio-Sonnenblumenöl. Die Hülle besteht aus löslicher Cellulose. Bei Einnahme der empfohlenen Menge von vier Kapseln VINATURA BIO MAITAKE pro Tag haben Sie einen Vorrat für einen Monat pro Dose. Täglich im Ganzen mit Wasser oder einer anderen Flüssigkeit verzehren. VINATURA BIO MAITKAE Kapseln sollten außerhalb der Reichweite von Kindern und an einem kühlen Ort aufbewahrt werden.
Hello would you mind letting me know which webhost you’re utilizing? I’ve loaded your blog in 3 different web browsers and I must say this blog loads a lot quicker then most. Can you suggest a good hosting provider at a reasonable price? Thanks, I appreciate it!
Good day! Would you mind if I share your blog with my twitter
group? There’s a lot of folks that I think would really appreciate your content.
Please let me know. Thanks
Pretty! This was an extremely wonderful post. Thanks for providing this info.
I have been exploring for a little for any high-quality articles or blog posts on this sort of area
. Exploring in Yahoo I ultimately stumbled upon this web site.
Reading this info So i’m happy to show that I
have a very excellent uncanny feeling I found out just what I needed.
I most for sure will make sure to do not fail to remember this web site and provides it a glance on a constant basis.
I’ve been exploring for a bit for any high quality articles
or blog posts on this kind of house . Exploring in Yahoo I ultimately stumbled upon this web site.
Studying this info So i’m satisfied to exhibit that
I’ve a very excellent uncanny feeling I came upon exactly what I needed.
I most undoubtedly will make sure to do not fail to remember this website and give it a glance regularly.
I don’t even understand how I stopped up right here, but I assumed
this post was once good. I do not understand who you might be however definitely you’re going to a famous blogger in the event you are not already.
Cheers!
I actually wanted to construct a small remark in order to say thanks to you for all the awesome points you are giving here. My time intensive internet search has now been recognized with reasonable tips to share with my friends and classmates. I ‘d declare that most of us readers actually are definitely fortunate to live in a fantastic community with very many lovely people with insightful ideas. I feel very much happy to have discovered your web page and look forward to some more pleasurable times reading here. Thank you once again for a lot of things.Kevin Galstyan md
Hola! I’ve been reading your blog for some time now and finally got the courage to go ahead and give you a shout out from Austin Texas! Just wanted to mention keep up the great work!
Hey there! I simply would like to give you a huge thumbs up for the great info
you have here on this post. I am returning to your website for more soon.
I do consider all the ideas you have presented in your post. They are very convincing and can certainly work. Still, the posts are very brief for novices. May you please lengthen them a bit from subsequent time? Thanks for the post.
Hi! I know this is kinda off topic but I was wondering if you
knew where I could locate a captcha plugin for my comment form?
I’m using the same blog platform as yours and I’m having problems finding one?
Thanks a lot!
I need to to thank you for this good read!! I absolutely enjoyed every little bit of it.
I have you bookmarked to check out new things you post…
Hey there, You have performed a fantastic job. I will definitely digg it and personally recommend to my friends. I am sure they will be benefited from this site.
each time i used to read smaller posts which also clear their motive, and that is also happening with this post which I am reading
at this place.
I’m pretty pleased to find this website. I need to to thank you for ones time for this wonderful read!! I definitely liked every little bit of it and I have you book-marked to check out new things in your blog.
Your house is valueble for me. Thanks!…
Admiring the persistence you put into your website and detailed information you present. It’s great to come across a blog every once in a while that isn’t the same unwanted rehashed information. Great read! I’ve saved your site and I’m including your RSS feeds to my Google account.
Heilpilze wie der Ling Chi sind beliebt
shiitake zubereitung
Everyone loves it when individuals get together and share
thoughts. Great site, keep it up!
VINATURA BIO Reishi Pilz Kapseln
Hi excellent website! Does running a blog like this require a great deal of work?
I have no understanding of computer programming however I
had been hoping to start my own blog soon. Anyway, if you have any ideas or techniques for new blog owners please share.
I understand this is off topic nevertheless I just wanted to ask.
Thank you!
I love it when folks get together and share thoughts. Great
blog, keep it up!
shiitake zubereitung
Glänzender Lackporling – Ling Zhi
Excellent post however , I was wanting to know if you could write a litte more on this subject?
I’d be very grateful if you could elaborate a little bit more.
Thank you!
Stunning story there. What happened after? Take care!|
Hey There. I found your blog using msn. This is a very well written article. I’ll make sure to bookmark it and return to read more of your useful info. Thanks for the post. I’ll definitely comeback.
In this great scheme of things you’ll receive an A just for effort. Where exactly you lost me personally was on the specifics. As it is said, details make or break the argument.. And it could not be much more true here. Having said that, permit me inform you just what exactly did work. The text is actually really convincing and that is probably why I am taking the effort to opine. I do not make it a regular habit of doing that. 2nd, even though I can see a jumps in logic you make, I am not necessarily convinced of just how you appear to unite your details which in turn help to make your conclusion. For right now I will subscribe to your point however hope in the near future you connect the facts much better.
Nice blog here! Also your web site loads up fast! What web host are you using? Can I get your affiliate link to your host? I wish my web site loaded up as fast as yours lol
Hey I know this is off topic but I was wondering if you knew of any widgets I could add
to my blog that automatically tweet my newest twitter updates.
I’ve been looking for a plug-in like this for quite some
time and was hoping maybe you would have some experience with something like this.
Please let me know if you run into anything. I truly enjoy reading
your blog and I look forward to your new updates.
shiitake-pilz
Fantastic beat ! I would like to apprentice at the same time as you amend your web site, how could i subscribe for a weblog site? The account helped me a applicable deal. I had been a little bit acquainted of this your broadcast provided shiny transparent concept
You are a very bright person!
I was recommended this website by my cousin. I am not sure whether this post is written by him as nobody else know such detailed about my trouble. You are incredible! Thanks!
Excellent weblog here! Additionally your site
lots up very fast! What host are you the usage of? Can I get your affiliate
hyperlink in your host? I wish my web site loaded up as fast as yours lol
I am actually delighted to read this weblog posts which includes plenty
of valuable data, thanks for providing such information.
Hi, i believe that i saw you visited my blog thus i came to “go back the prefer”.I’m attempting to find things to enhance my website!I guess its good enough to use a few of your ideas!!
Hello there, I found your website via Google while searching for a related topic, your web site came up, it looks great. I’ve bookmarked it in my google bookmarks.
Just want to say your article is as amazing. The clearness for your publish is simply spectacular and i can think you are a professional in this subject. Fine with your permission allow me to take hold of your RSS feed to keep updated with imminent post. Thanks a million and please keep up the enjoyable work.
Hi! I’ve been reading your web site for some time now and finally got
the bravery to go ahead and give you a shout out from Houston Tx!
Just wanted to mention keep up the fantastic work!
There are some interesting points in time in this article however I don’t know if I see all of them middle to heart. There’s some validity however I will take maintain opinion until I look into it further. Good article , thanks and we want more! Added to FeedBurner as effectively
I like what you guys are up also. Such intelligent work and reporting! Keep up the excellent works guys I’ve incorporated you guys to my blogroll. I think it will improve the value of my website 🙂
Hi there this is somewhat of off topic but I was wondering if blogs use WYSIWYG editors or if you have to manually code with HTML.
I’m starting a blog soon but have no coding expertise so
I wanted to get guidance from someone with experience.
Any help would be greatly appreciated!
Greetings! I know this is kinda off topic but I was wondering which blog platform are you using for this website? I’m getting sick and tired of WordPress because I’ve had problems with hackers and I’m looking at options for another platform. I would be great if you could point me in the direction of a good platform.|
Hey! I just wanted to ask if you ever have any problems with hackers?
My last blog (wordpress) was hacked and I ended up losing months of hard work due to no data backup.
Do you have any methods to stop hackers?
This site was… how do you say it? Relevant!! Finally I have found something which helped me. Thanks!
I got this site from my friend who informed me regarding this web site and at
the moment this time I am visiting this website and reading very informative articles or reviews at this
time.
hello, your website is really good. We do appreciate your give good resultsaltcoin
I loved as much as you’ll receive carried out right here.
The sketch is attractive, your authored subject matter stylish.
nonetheless, you command get got an edginess over that you wish be delivering the following.
unwell unquestionably come further formerly again as
exactly the same nearly a lot often inside case you shield this hike.
Hello, the whole thing is going perfectly here and ofcourse every
one is sharing facts, that’s genuinely excellent, keep up writing.
whoah this blog is fantastic i love reading your posts. Keep up the good work! You know, many people are looking around for this information, you could help them greatly.
There may be noticeably a bundle to know about this. I assume you made sure good factors in options also.
It’s very trouble-free to find out any matter on web
as compared to textbooks, as I found this post at this web site.
Hi there! I know this is kind of off topic but I was wondering
which blog platform are you using for this website?
I’m getting fed up of WordPress because I’ve had problems with hackers and I’m looking at options
for another platform. I would be great if you could point me in the
direction of a good platform.
In this great design of things you get a B- with regard to hard work. Exactly where you actually lost me personally was in your specifics. You know, they say, the devil is in the details… And it could not be more accurate in this article. Having said that, let me inform you what did work. The article (parts of it) is highly persuasive which is most likely why I am making the effort in order to comment. I do not make it a regular habit of doing that. Second, although I can see the leaps in reason you come up with, I am definitely not convinced of exactly how you seem to unite the details that make the conclusion. For now I shall subscribe to your issue but wish in the future you link the dots much better.
This is very fascinating, You’re an excessively skilled blogger. I have joined your rss feed and sit up for in quest of extra of your excellent post. Additionally, I’ve shared your site in my social networks!
Somebody essentially help to make seriously articles I would state. This is the first time I frequented your website page and thus far? I surprised with the research you made to make this particular publish amazing. Wonderful job!
I am extremely inspired with your writing talents and also with the format on your blog. Is this a paid subject or did you modify it your self? Anyway stay up the excellent high quality writing, it is rare to look a nice weblog like this one nowadays..
Wow, this article is pleasant, my sister is analyzing such
things, so I am going to inform her.
Great ¡V I should certainly pronounce, impressed with your site. I had no trouble navigating through all tabs as well as related info ended up being truly easy to do to access. I recently found what I hoped for before you know it at all. Quite unusual. Is likely to appreciate it for those who add forums or anything, website theme . a tones way for your client to communicate. Excellent task..cryptocurrencymarket
I have been browsing online more than three hours today, yet I never found any interesting article like yours. It’s pretty worth enough for me. Personally, if all website owners and bloggers made good content as you did, the web will be much more useful than ever before.
I always used to study piece of writing in news papers but now as
I am a user of internet therefore from now I am using net
for posts, thanks to web.
Pretty section of content. I just stumbled upon your site and in accession capital to assert that I get in fact enjoyed account your blog posts. Anyway I’ll be subscribing to your augment and even I achievement you access consistently fast.
I think the admin of this web page is genuinely working hard
in support of his web page, as here every data is quality based
material.
You ought to take part in a contest for one of the best blogs on the web.
I am going to highly recommend this web site!
Hello there! Would you mind if I share your blog with my twitter group?
There’s a lot of people that I think would really enjoy your content.
Please let me know. Thanks
It’s very simple to find out any matter on net as compared to books, as I found this post at this site.|
Hi there, just wanted to tell you, I loved this article.
It was practical. Keep on posting!
Hi! I could have sworn I’ve been to this site before but after reading through some of the post
I realized it’s new to me. Anyhow, I’m definitely
delighted I found it and I’ll be bookmarking and checking back often!
I was recommended this web site by my cousin. I’m not sure whether this post is written by him as nobody else know such detailed about my trouble. You’re incredible! Thanks!
Hey there just wanted to give you a quick heads up. The text in your content seem to be running off the screen in Safari. I’m not sure if this is a format issue or something to do with web browser compatibility but I figured I’d post to let you know. The design and style look great though! Hope you get the problem resolved soon. Kudos
I just like the valuable information you provide on your articles.
I will bookmark your weblog and take a look at once more
here regularly. I’m rather certain I will be told many new stuff right here!
Good luck for the next!
This is my first time go to see at here and i am genuinely happy to read everthing at one
place.
A powerful share, I just given this onto a colleague who was doing a bit of analysis on this. And he the truth is purchased me breakfast as a result of I discovered it for him.. smile. So let me reword that: Thnx for the treat! But yeah Thnkx for spending the time to discuss this, I really feel strongly about it and love studying more on this topic. If potential, as you change into expertise, would you thoughts updating your weblog with extra particulars? It’s highly useful for me. Huge thumb up for this blog post!
you’re actually a good webmaster. The website loading velocity is incredible. It seems that you are doing any distinctive trick. Also, The contents are masterpiece. you’ve performed a great task in this topic!
I really like your blog.. very nice colors
& theme. Did you create this website yourself or did you hire
someone to do it for you? Plz respond as
I’m looking to design my own blog and would like to
find out where u got this from. appreciate it
This site definitely has all the information and facts I needed concerning this subject and didn’t know who to ask.
Excellent goods from you, man. I have consider
your stuff previous to and you’re just extremely great. I really like what you’ve got right here, really like what you are
saying and the best way in which you assert it. You are making it enjoyable and
you still care for to stay it smart. I cant wait to read far more from
you. That is really a terrific site.
Your style is really unique in comparison to
other folks I have read stuff from. I appreciate you for posting when you have the opportunity, Guess I’ll just
bookmark this page.
I just couldn’t depart your web site before suggesting that I actually enjoyed the standard information a person provide for your visitors? Is going to be back often in order to check up on new posts
I’m impressed, I have to admit. Rarely do I come
across a blog that’s both educative and amusing, and without a doubt, you’ve hit the nail on the head.
The problem is something which not enough people are speaking intelligently about.
I’m very happy I stumbled across this in my hunt for something concerning this.
Fantastic beat ! I would like to apprentice at the same time
as you amend your website, how could i subscribe for a
blog site? The account helped me a acceptable deal.
I have been tiny bit acquainted of this your broadcast provided vibrant transparent concept
Whats up very nice website!! Man .. Beautiful .. Superb ..
I’ll bookmark your blog and take the feeds additionally? I am satisfied to find a lot of useful information right here in the submit,
we want develop more techniques on this regard, thanks for sharing.
. . . . .
Wow, superb blog structure! How long have you ever been blogging for? you make running a blog glance easy. The entire look of your website is wonderful, let alone the content!
Pretty component of content. I simply stumbled upon your blog and in accession capital to claim that I acquire in fact loved account your blog posts. Anyway I will be subscribing to your augment or even I achievement you get right of entry to persistently fast.
hi!,I really like your writing so so much! percentage we communicate more about your article on AOL? I require an expert in this house to resolve my problem. Maybe that is you! Having a look ahead to see you.
This piece of writing is actually a good one it helps new internet people, who are
wishing for blogging.
I am sure this article has touched all the internet visitors, its really really pleasant article on building up new web site.
There is apparently a bundle to know about this. I think you made certain nice points in features also.
Hi there, You’ve done a great job. I will definitely digg it and personally suggest to my friends. I’m sure they’ll be benefited from this website.
Do you have a spam problem on this site; I also am a blogger, and I was wanting to know your situation; many of us have developed some nice procedures and we are looking to exchange solutions with other folks, why not shoot me an e-mail if interested.
This is a great tip especially to those fresh to the blogosphere.
Brief but very accurate information… Thank you for sharing this
one. A must read article!
It’s perfect time to make some plans for the longer term and it is time to be happy. I have read this submit and if I may just I want to recommend you some fascinating issues or advice. Maybe you can write next articles relating to this article. I desire to read even more issues approximately it!
fantastic points altogether, you simply gained a new reader.
What could you recommend about your publish that you just made some days in the past?
Any certain?
Greetings! Very useful advice in this particular article!
It’s the little changes that will make the greatest changes.
Thanks for sharing!
Wow that was unusual. I just wrote an extremely long comment
but after I clicked submit my comment didn’t appear.
Grrrr… well I’m not writing all that over again. Anyhow, just wanted to
say excellent blog!
Nice blog here! Also your web site loads up very fast! What web host are you using? Can I get your affiliate link to your host? I wish my website loaded up as fast as yours lol
I appreciate, cause I found exactly what I was looking for. You have ended my 4 day long hunt! God Bless you man. Have a great day. Bye
Hi there would you mind sharing which blog
platform you’re working with? I’m looking to start my own blog soon but I’m having a tough time choosing between BlogEngine/Wordpress/B2evolution and Drupal.
The reason I ask is because your design seems different then most blogs and I’m looking for something completely unique.
P.S My apologies for being off-topic but I had to ask!
I’m really loving the theme/design of your weblog. Do you ever run into any browser compatibility issues? A number of my blog audience have complained about my site not operating correctly in Explorer but looks great in Opera. Do you have any advice to help fix this issue?
Thanks for finally talking about > How To Install Custom Windows
XP Themes Old PC Gaming < Loved it!
Hi there outstanding blog! Does running a blog like this
require a great deal of work? I’ve very little expertise in coding but I was hoping to start my own blog soon. Anyways, if you have
any ideas or techniques for new blog owners
please share. I understand this is off topic nevertheless
I simply had to ask. Thank you!
https://download-music-downloader-for-windows.blogspot.com/
It’s hard to find well-informed people on this topic, however, you seem like you know what you’re talking about! Thanks
very good post, i certainly love this website, carry on it
There may be noticeably a bundle to find out about this. I assume you made certain good points in features also.
That is the proper blog for anyone who wants to seek out out about this topic. You understand a lot its virtually exhausting to argue with you (not that I actually would want…HaHa). You undoubtedly put a brand new spin on a subject thats been written about for years. Nice stuff, just great!
Hi all, here every one is sharing these kinds of experience,
therefore it’s fastidious to read this web site, and I used to pay a quick visit this weblog everyday.
Thank you so much for giving everyone remarkably splendid chance to read from here. It’s usually so excellent and jam-packed with fun for me and my office co-workers to search the blog not less than three times weekly to read the latest secrets you have. And indeed, I’m also usually amazed with your cool techniques you give. Certain 3 facts on this page are undoubtedly the most efficient we’ve had.
You are a very bright individual!
http://onlinemanuals.txdot.gov/help/urlstatusgo.html?url=https://gna-tool.blogspot.com/
Highly descriptive blog, I enjoyed that bit. Will there be a part 2?
When some one searches for his required thing, thus he/she needs
to be available that in detail, thus that thing is
maintained over here.
I am not sure where you’re getting your info, but great topic. I needs to spend some time learning much more or understanding more. Thanks for fantastic information I was looking for this info for my mission.
Its such as you read my mind! You appear
to understand a lot approximately this, like you wrote the guide in it or something.
I think that you just could do with some % to pressure the message home
a little bit, but other than that, this is wonderful blog.
A fantastic read. I’ll certainly be back.
Hey there! I know this is somewhat off topic but I was wondering which blog platform are you using for this website? I’m getting tired of WordPress because I’ve had problems with hackers and I’m looking at alternatives for another platform. I would be fantastic if you could point me in the direction of a good platform.
Great post however , I was wondering if you could write a litte more on this subject? I’d be very thankful if you could elaborate a little bit further. Thanks!
An application can be self-contained, or it can be a group of programs that run the application for the user.
RGB colors are important. they are how colors are made digitally. Generate yours now. Click on my name for more.
Hi there, simply become aware of your blog thru Google, and located that it’s really informative. I am gonna watch out for brussels. I’ll appreciate for those who continue this in future. Numerous people will probably be benefited out of your writing. Cheers!
whoah this weblog is great i really like reading your articles. Keep up the good paintings! You recognize, a lot of individuals are hunting round for this information, you can help them greatly.
You need to take part in a contest for one of the most useful websites on the net.
I will recommend this website!
You’ve made some good points there. I looked on the internet to learn more about
the issue and found most individuals will go along with your
views on this website.
I really appreciate this post. I’ve been looking all over for this! Thank goodness I found it on Bing. You’ve made my day! Thanks again
Useful information. Lucky me I discovered your web site accidentally, and I am shocked
why this accident didn’t took place earlier! I bookmarked it.
My programmer is trying to persuade me to move to .net from PHP.
I have always disliked the idea because of the costs.
But he’s tryiong none the less. I’ve been using WordPress on a number of websites for about a year and am worried about switching
to another platform. I have heard very good things
about blogengine.net. Is there a way I can import all my wordpress posts into it?
Any kind of help would be greatly appreciated!
Hi, i feel that i saw you visited my weblog so
i got here to return the prefer?.I’m trying to to find issues to improve my
website!I guess its good enough to make use of a few of your concepts!!
Hello There. I found your blog using msn.
This is an extremely well written article. I will make sure to bookmark it and return to read
more of your useful info. Thanks for the post.
I’ll definitely comeback.
The other day, while I was at work, my sister stole my iPad and tested to
see if it can survive a twenty five foot drop,
just so she can be a youtube sensation. My apple ipad is now broken and she has 83 views.
I know this is entirely off topic but I had to share it with someone!
Hi to all, as I am really keen of reading this website’s post to be updated daily.
It consists of fastidious material.
This article offers clear idea for the new viewers of
blogging, that genuinely how to do running a blog.
Right here is the right website for everyone who wishes to understand this topic.
You understand so much its almost tough to argue with you (not that I really will need to…HaHa).
You certainly put a brand new spin on a subject that has been discussed for years.
Excellent stuff, just wonderful!
My family all the time say that I am wasting my time
here at net, but I know I am getting know-how daily by reading thes good posts.
Hi mates, how is all, and what you would like to say regarding this post, in my view its truly remarkable in support of
me.
Hello there! I could have sworn I’ve visited this blog
before but after browsing through some of the articles I realized it’s new to me.
Regardless, I’m certainly pleased I discovered it and I’ll be
book-marking it and checking back often!
What’s Happening i’m new to this, I stumbled upon this I have found It absolutely helpful and it has helped me out loads. I hope to contribute & aid other users like its aided me. Good job.
It is perfect time to make a few plans for the long run and it’s time to be happy. I have learn this publish and if I may just I desire to suggest you few interesting things or tips. Perhaps you can write subsequent articles regarding this article. I wish to learn even more issues about it!
For the computer to “read” your program, it must be compiled or have an interpreter.
Hi there, after reading this amazing article i am too happy to share my familiarity here with colleagues.
Everything is very open with a really clear description of the
challenges. It was definitely informative. Your site is
very helpful. Thank you for sharing!
In the great design of things you actually get a B+ for effort. Exactly where you actually confused everybody was on all the particulars. As it is said, the devil is in the details… And that could not be more correct at this point. Having said that, permit me say to you what exactly did work. The authoring is definitely really powerful and that is most likely the reason why I am making an effort to opine. I do not really make it a regular habit of doing that. Next, although I can notice the jumps in reason you come up with, I am not convinced of just how you seem to connect your details which help to make your conclusion. For now I shall subscribe to your position however wish in the near future you connect your facts much better.
Hi there, You have performed an incredible job. I will definitely digg it and in my view recommend to my friends. I am sure they’ll be benefited from this site.
Hi there, I discovered your website by means of Google whilst looking for a related topic, your website came up, it seems to be good.
I’ve bookmarked it in my google bookmarks.
Hello there, just turned into aware of your weblog through Google,
and found that it’s truly informative. I’m gonna be
careful for brussels. I’ll appreciate for those who continue this in future.
Many people might be benefited from your writing. Cheers!
Very good info. Lucky me I found your website by chance (stumbleupon).
I’ve saved it for later!
wonderful submit, very informative. I’m wondering why the other specialists of this sector do not realize this.
You must continue your writing. I’m sure, you’ve a
great readers’ base already!
I’m not sure why but this site is loading incredibly slow for me. Is anyone else having this issue or is it a problem on my end? I’ll check back later on and see if the problem still exists.
I enjoy reading a post that can make people think. Also, thanks for permitting me to comment!
I just couldn’t go away your web site prior to suggesting that I really loved the usual information an individual provide for your guests? Is going to be back continuously in order to investigate cross-check new posts
I visited various websites except the audio feature for audio songs present at this site is
in fact marvelous.
I really like your blog.. very nice colors & theme. Did you design this website yourself or did you hire someone to do it for you? Plz answer back as I’m looking to construct my own blog and would like to find out where u got this from. thanks
I’m really enjoying the design and layout of your website.
It’s a very easy on the eyes which makes it much more enjoyable for me
to come here and visit more often. Did you hire out a developer to create your theme?
Excellent work!
Great – I should certainly pronounce, impressed with your site. I had no trouble navigating through all tabs and related info ended up being truly easy to do to access. I recently found what I hoped for before you know it at all. Quite unusual. Is likely to appreciate it for those who add forums or something, website theme . a tones way for your client to communicate. Nice task..
My brother suggested I might like this blog. He was totally right.
This post truly made my day. You cann’t imagine simply how much time I had spent for this
info! Thanks!
I’m extremely pleased to discover this website. I want to to thank you for your time just for this fantastic read!! I definitely really liked every part of it and i also have you saved as a favorite to look at new things in your blog.
It’s perfect time to make some plans for the future and it’s time to be happy. I’ve learn this submit and if I may just I want to recommend you some attention-grabbing issues or advice. Maybe you can write next articles referring to this article. I wish to read even more issues about it!
What i don’t realize is actually how you’re not actually much more well-liked than you may be now. You’re very intelligent. You realize therefore considerably relating to this subject, made me personally consider it from a lot of varied angles. Its like men and women aren’t fascinated unless it is one thing to accomplish with Lady gaga! Your own stuffs outstanding. Always maintain it up!
Thanks so much for giving everyone a very brilliant opportunity to read articles and blog posts from here. It is always very excellent and also full of amusement for me and my office peers to visit your blog on the least thrice per week to learn the latest stuff you have got. Of course, I’m at all times fascinated for the fantastic creative concepts you serve. Selected two points on this page are undeniably the best we have had.
Hello There. I discovered your weblog the usage of msn. This is a really smartly written article.
I’ll be sure to bookmark it and return to read more of your helpful info.
Thank you for the post. I’ll certainly return.
I just could not leave your web site prior to suggesting that I actually loved the usual information a person supply on your guests? Is going to be again steadily in order to check out new posts
With havin so much content and articles do you ever run into any issues of plagorism or copyright infringement? My website has a lot of unique content I’ve either created myself or outsourced but it seems a lot of it is popping it up all over the internet without my agreement. Do you know any techniques to help protect against content from being ripped off? I’d genuinely appreciate it.
Since the admin of this web site is working, no doubt very rapidly it will be well-known, due to its feature contents.
The other day, while I was at work, my cousin stole my iphone and
tested to see if it can survive a 40 foot drop, just so she can be a youtube
sensation. My iPad is now broken and she has 83 views.
I know this is entirely off topic but I had to share it with someone!
Hello it’s me, I am also visiting this web page on a regular basis, this web page is truly nice and the viewers are genuinely sharing good thoughts.|
Hello Dear, are you actually visiting this site daily, if so afterward you will without doubt take fastidious experience.
Your style is really unique in comparison to other folks I have read stuff from.
Thank you for posting when you have the opportunity, Guess I will just book mark
this page.
WOW just what I was searching for. Came here by searching for バカラ
Wonderful article! That is the kind of info that should be shared across the net.
Disgrace on the seek engines for now not positioning this
submit higher! Come on over and visit my web site . Thank you =)
Hello.This post was really remarkable, particularly because I was looking for thoughts on this matter last Sunday.
Hello just wanted to give you a quick heads up and let you know a few of the pictures aren’t loading correctly. I’m not sure why but I think its a linking issue. I’ve tried it in two different internet browsers and both show the same outcome.
Heya i am for the first time here. I found this board and I find It really useful & it helped me out a lot. I hope to give something back and help others like you aided me.
Thank you for sharing your thoughts. I truly appreciate your efforts and I will be waiting for your further post thank you once again.|
Buy MallorcaNFT now and be the owner of the unique work: an exclusive digital art collection of Palma de Mallorca. Hurry now before it’s too late and prices skyrocket: https://opensea.io/collection/mallorcanft
Howdy! Someone in my Facebook group shared this website with us so I came to take a look. I’m definitely enjoying the information. I’m bookmarking and will be tweeting this to my followers! Wonderful blog and great design.
Islam, major world religion promulgated by the Prophet Muhammad in Arabia in the 7th century CE.
Hello, There’s no doubt that your website may be having internet browser compatibility issues. When I take a look at your blog in Safari, it looks fine however, when opening in IE, it has some overlapping issues. I merely wanted to provide you with a quick heads up! Aside from that, great website!
For the reason that the admin of this website is working, no question very shortly it will be famous, due to its feature contents.
Superb post but I was wondering if you could write a litte
more on this subject? I’d be very thankful if you could elaborate a little bit more.
Many thanks!
Buy MallorcaNFT now and be the owner of the unique work: an exclusive digital art collection of Palma de Mallorca. Hurry now before it’s too late and prices skyrocket: https://opensea.io/collection/mallorcanft
wonderful post, very informative. I ponder why the opposite specialists of this sector don’t understand this. You should proceed your writing. I am confident, you’ve a huge readers’ base already!
Hi there! Would you mind if I share your blog with my facebook group?
There’s a lot of people that I think would really appreciate your content.
Please let me know. Thank you
I’m curious to find out what blog platform you are working with?
I’m having some minor security problems with my latest website and I would like to find something more safeguarded.
Do you have any recommendations?
Buy MallorcaNFT now and be the owner of the unique work: an exclusive digital art collection of Palma de Mallorca. Hurry now before it’s too late and prices skyrocket: https://opensea.io/collection/mallorcanft
Hey there, I think your site might be having browser compatibility issues. When I look at your blog site in Ie, it looks fine but when opening in Internet Explorer, it has some overlapping. I just wanted to give you a quick heads up! Other then that, excellent blog!
I was suggested this website by my cousin. I am not sure whether
this post is written by him as nobody else know such detailed about my trouble.
You’re wonderful! Thanks!
สล็อต ออนไลน์ superslot ค่ายดัง เว็บตรง เกม สล็อตมือถือ สล็อต ออนไลน์ บริการดีตลอด 24 ชม. อันดับหนึ่งในไทย
Hi there! This is my first visit to your blog! We are a group
of volunteers and starting a new project in a community in the same niche.
Your blog provided us useful information to work on. You have done a wonderful job!
An interesting discussion is worth comment. I feel that it is best to write extra on this subject, it may not be a taboo topic but typically individuals are not sufficient to speak on such topics. To the next. Cheers
Web designers are expected to have an awareness of usability and if their role involves creating markup then they are also expected to be up to date with web accessibility guidelines.
Hey! Someone in my Facebook group shared this website with us so I came to check
it out. I’m definitely loving the information. I’m bookmarking and
will be tweeting this to my followers! Fantastic blog and
fantastic style and design.
I’m not that much of a online reader to be honest but your sites really nice, keep it up! I’ll go ahead and bookmark your website to come back later. Cheers
Buy MallorcaNFT now and be the owner of the unique work: an exclusive digital art collection of Palma de Mallorca. Hurry now before it’s too late and prices skyrocket: https://opensea.io/collection/mallorcanft
Currently it sounds like Drupal is the best blogging platform available right now. (from what I’ve read) Is that what you are using on your blog?
Wow, amazing blog layout! How long have you been blogging for?
you made blogging look easy. The overall look
of your site is excellent, as well as the content!
Today, I went to the beach front with my children. I found a sea shell and gave it to my 4 year old daughter and said “You can hear the ocean if you put this to your ear.” She placed the shell to her ear and screamed. There was a hermit crab inside and it pinched her ear. She never wants to go back! LoL I know this is totally off topic but I had to tell someone!
Wonderful work! That is the type of info that are meant to be shared across the net. Shame on Google for not positioning this put up upper! Come on over and consult with my website . Thanks =)|
This is a good tip particularly to those fresh to the blogosphere. Brief but very precise info… Many thanks for sharing this one. A must read post!
Have you ever considered about including a little bit more than just your articles? I mean, what you say is important and all. But think about if you added some great photos or videos to give your posts more, “pop”! Your content is excellent but with pics and clips, this blog could definitely be one of the greatest in its field. Amazing blog!
wonderful post, very informative. I ponder why the other specialists of this sector do not understand this. You must proceed your writing. I am confident, you have a huge readers’ base already!
Hmm it appears like your website ate my first comment (it was super long) so I guess I’ll just sum it up what I wrote and say, I’m thoroughly enjoying your blog. I too am an aspiring blog writer but I’m still new to everything. Do you have any tips for first-time blog writers? I’d definitely appreciate it.
you are in reality a just right webmaster. The website loading velocity is amazing. It kind of feels that you are doing any distinctive trick. In addition, The contents are masterwork. you have performed a wonderful process in this topic!
Interesting website, i read it but i still have a few questions. shoot me an email and we will talk more becasue i may have an interesting idea for you.Website Marketing Agency
I was recommended this blog by my cousin. I’m not sure whether this post is written by him as no one
else know such detailed about my trouble. You are incredible!
Thanks!
I would like to convey my admiration for your generosity in support of men and women that have the need for help with this particular concern. Your special dedication to getting the message all over had been wonderfully productive and have all the time made professionals much like me to attain their dreams. Your own invaluable tutorial means a great deal to me and additionally to my office workers. Thank you; from everyone of us.Award-Winning SEO Agency
Howdy would you mind letting me know which web host you’re working with? I’ve loaded your blog in 3 different browsers and I must say this blog loads a lot quicker then most. Can you recommend a good hosting provider at a reasonable price? Thanks, I appreciate it!
Hey would you mind letting me know which hosting company you’re using?
I’ve loaded your blog in 3 completely different browsers and I must say
this blog loads a lot quicker then most. Can you recommend a good web hosting provider at a
fair price? Many thanks, I appreciate it!
Hey very nice blog!
Hey there! I’ve been reading your blog for a while now and finally got the bravery
to go ahead and give you a shout out from Humble Tx! Just wanted to say keep
up the excellent job!
This article is in fact a pleasant one it assists new internet users,
who are wishing for blogging.
Needed to compose you a tiny note to finally thank you very much yet again for your personal splendid methods you have discussed above. It is strangely open-handed with people like you to provide publicly all that a number of people would have marketed as an electronic book to generate some bucks for their own end, primarily now that you could possibly have tried it if you ever wanted. These inspiring ideas likewise acted like a fantastic way to know that the rest have the same dreams really like my personal own to see a whole lot more concerning this problem. I’m sure there are thousands of more enjoyable times in the future for many who check out your blog.SEO Services
It’s perfect time to make some plans for the future and it is time to be happy. I have read this post and if I could I want to suggest you some interesting things or tips. Maybe you could write next articles referring to this article. I wish to read more things about it!
Sweet blog! I found it while surfing around on Yahoo News. Do you have any tips on how to get listed in Yahoo News? I’ve been trying for a while but I never seem to get there! Cheers
My spouse and I stumbled over here different page and thought I might as well check things out.
I like what I see so i am just following you. Look forward to going over your web page
yet again.
It’s actually very complex in this busy life to listen news on TV, therefore I
just use the web for that purpose, and take the latest information.
I must say, as a lot as I enjoyed reading what you had to say, I couldnt help but lose interest after a while. Its as if you had a wonderful grasp on the subject matter, but you forgot to include your readers. Perhaps you should think about this from far more than one angle. Or maybe you shouldnt generalise so considerably. Its better if you think about what others may have to say instead of just going for a gut reaction to the subject. Think about adjusting your own believed process and giving others who may read this the benefit of the doubt.Digital Marketing Agency
Hello this is kinda of off topic but I was wondering if blogs use WYSIWYG editors or if you have to manually code with HTML. I’m starting a blog soon but have no coding knowledge so I wanted to get advice from someone with experience. Any help would be enormously appreciated!
The American Academy of Pediatrics recommends breastfeeding for at least six months.
I’m truly enjoying the design and layout of your blog. It’s a very easy on the eyes which makes it much more pleasant for me to come here and visit more often. Did you hire out a developer to create your theme?
Outstanding work!
I have to convey my respect for your kindness for all those that require guidance on this one field. Your special commitment to passing the solution up and down has been incredibly functional and has continually empowered most people just like me to achieve their dreams. Your amazing insightful information entails much to me and especially to my peers. Thanks a ton; from all of us.Spot color marketing
I constantly spent my half an hour to read this web
site’s posts every day along with a cup of coffee.
You should take part in a contest for one of the finest websites on the net. I’m going to highly recommend this website!
I believe that is among the most significant info for me. And i’m satisfied reading your article.
However wanna observation on few common issues, The site style is perfect, the articles is in reality excellent
: D. Good activity, cheers
Next time I read a blog, Hopefully it does not fail me just as much as this one. I mean, Yes, it was my choice to read, however I truly believed you would probably have something interesting to say. All I hear is a bunch of crying about something that you could possibly fix if you weren’t too busy searching for attention.
I think the admin of this web page is really working hard in favor of his web site, since here
every data is quality based data.
Hello everyone, it’s my first visit at this website, and post is genuinely fruitful in favor of me,
keep up posting these posts.
This is getting a bit more subjective, but I much prefer the Zune Marketplace. The interface is colorful, has more flair, and some cool features like ‘Mixview’ that let you quickly see related albums, songs, or other users related to what you’re listening to. Clicking on one of those will center on that item, and another set of “neighbors” will come into view, allowing you to navigate around exploring by similar artists, songs, or users. Speaking of users, the Zune “Social” is also great fun, letting you find others with shared tastes and becoming friends with them. You then can listen to a playlist created based on an amalgamation of what all your friends are listening to, which is also enjoyable. Those concerned with privacy will be relieved to know you can prevent the public from seeing your personal listening habits if you so choose.Best Digital Marketing Agency
Hey very nice web site!! Man .. Excellent .. Amazing .. I will bookmark your web site and take the feeds also…I’m happy to find a lot of useful info here in the post, we need work out more strategies in this regard, thanks for sharing. . . . . .
It’s very straightforward to find out any matter on web
as compared to books, as I found this post at this web site.
Your article has proven useful to me. It’s very informative and you are obviously very knowledgeable in this area. You have opened my eyes to varying views on this topic with interesting and solid content.Internet Marketing Services
I am in fact happy to read this webpage posts which carries tons of useful information, thanks for providing such data.
This is getting a bit more subjective, but I much prefer the Zune Marketplace. The interface is colorful, has more flair, and some cool features like ‘Mixview’ that let you quickly see related albums, songs, or other users related to what you’re listening to. Clicking on one of those will center on that item, and another set of “neighbors” will come into view, allowing you to navigate around exploring by similar artists, songs, or users. Speaking of users, the Zune “Social” is also great fun, letting you find others with shared tastes and becoming friends with them. You then can listen to a playlist created based on an amalgamation of what all your friends are listening to, which is also enjoyable. Those concerned with privacy will be relieved to know you can prevent the public from seeing your personal listening habits if you so choose.Best Digital Marketing Agency
Wonderful blog! I found it while searching on Yahoo News.
Do you have any tips on how to get listed in Yahoo News?
I’ve been trying for a while but I never seem to get there!
Cheers
F*ckin’ remarkable things here. I’m very glad to see your article. Thanks a lot and i’m looking forward to contact you. Will you please drop me a e-mail?
Good blog you have here.. It’s difficult to find high-quality writing like yours nowadays. I truly appreciate individuals like you! Take care!!
Hello, after reading this amazing paragraph i am as well
glad to share my familiarity here with friends.
I used to be recommended this website by my cousin. I’m now not certain whether this post is
written via him as nobody else recognize such exact about my
trouble. You’re incredible! Thank you!
I was curious if you ever considered changing the layout
of your blog? Its very well written; I love what
youve got to say. But maybe you could a little more
in the way of content so people could connect with it better.
Youve got an awful lot of text for only having 1 or two images.
Maybe you could space it out better?
I could not refrain from commenting. Exceptionally well written!
After exploring a handful of the blog posts on your blog, I seriously appreciate your way of blogging. I saved as a favorite it to my bookmark webpage list and will be checking back in the near future. Please check out my website as well and tell me how you feel.
I like reading through an article that will make people think.Also, thank you for permitting me to comment!
You are a very intelligent person!
If you desire to take a good deal from this article then you have to apply such strategies to
your won webpage.
Everything is very open with a precise clarification of the issues.
It was definitely informative. Your website is extremely
helpful. Thanks for sharing!
I really got into this article. I found it to be interesting and loaded with unique points of interest. I like to read material that makes me think. Thank you for writing this great content.treatment center Detox
We are a bunch of volunteers and opening a new scheme in our community. Your web site offered us with helpful information to paintings on. You’ve done a formidable process and our entire neighborhood might be thankful to you.
Hiya, I am really glad I have found this information. Today bloggers publish only about gossips and net and this is really annoying. A good blog with interesting content, that is what I need. Thank you for keeping this site, I’ll be visiting it. Do you do newsletters? Can not find it.
The very core of your writing while appearing reasonable initially, did not sit well with me personally after some time. Somewhere throughout the paragraphs you actually were able to make me a believer unfortunately only for a while. I still have got a problem with your leaps in logic and one might do nicely to help fill in those gaps. If you actually can accomplish that, I will definitely end up being impressed.
each time i used to read smaller content which also clear their motive, and that is also happening with
this paragraph which I am reading at this place.
This information is magnificent. I understand and respect your clear-cut points. I am impressed with your writing style and how well you express your thoughts.treatment center Tennessee
Incredible points. Outstanding arguments. Keep up
the good spirit.
You completed a number of nice points there. I did a search on the issue and found nearly all people will have the same opinion with your blog.Detox addiction treatment
I got this web page from my buddy who shared with me on the topic of
this website and now this time I am browsing this site and reading
very informative posts here.
I really liked your post. Fantastic.
Hi there, I found your website via Google while searching for a related topic, your website came up, it looks great. I have bookmarked it in my google bookmarks.Best rehab Tennessee
you are truly a just right webmaster. The website loading velocity
is amazing. It seems that you are doing any unique trick.
In addition, The contents are masterpiece. you have
done a excellent process on this topic!
Hello, its nice paragraph regarding media print,
we all be familiar with media is a fantastic source of data.
magnificent points altogether, you just won a brand new reader. What may you recommend about your publish that you just made a few days ago? Any certain?
io games are not online. Some might act like they are but they ain’t. And all the other players you see are actually bots not real players. To verify it for your own just turn internet/wifi off during a match and you’d see it’s just an offline game
I have read so many posts concerning the blogger lovers however this piece of writing
is in fact a good piece of writing, keep it up.
I have to convey my respect for your kindness for all those that require guidance on this one field. Your special commitment to passing the solution up and down has been incredibly functional and has continually empowered most people just like me to achieve their dreams. Your amazing insightful information entails much to me and especially to my peers. Thanks a ton; from all of us.Tennessee rehab
Hello, i feel that i saw you visited my website so i came to go back the want?.I am trying to to find things to enhance my website!I suppose
its good enough to use a few of your ideas!!
Very quickly this site will be famous amid all blogging viewers,
due to it’s fastidious posts
Thanks very interesting blog!
You completed a number of nice points there. I did a search on the issue and found nearly all people will have the same opinion with your blog.Tennessee addiction treatment
Hey I know this is off topic but I was wondering if you knew of any widgets I could add to my blog that automatically tweet my newest
twitter updates. I’ve been looking for a plug-in like this for quite some time and was
hoping maybe you would have some experience with
something like this. Please let me know if you run into anything.
I truly enjoy reading your blog and I look forward to your new updates.
You are a very clever individual!
omg! can’t imagine how fast time pass, after August, ber months time already and Setempber is the first Christmas season in my place, I really love it!rehab Tennessee
Unquestionably believe that which you said. Your favorite reason seemed to be on the web the easiest thing to be
aware of. I say to you, I definitely get irked while people think about worries
that they plainly don’t know about. You managed to hit the nail upon the top as
well as defined out the whole thing without having side-effects
, people could take a signal. Will probably be back to get more.
Thanks
You’ll love this for sure: Judi Slot Online
Today, I went to the beach front with my kids. I found a sea shell and gave it to my 4 year old daughter and said “You can hear the ocean if you put this to your ear.” She put the shell to her ear and screamed. There was a hermit crab inside and it pinched her ear. She never wants to go back! LoL I know this is completely off topic but I had to tell someone!
Thank you for every other great article.
The place else may just anybody get that kind of information in such an ideal method of writing?
I’ve a presentation next week, and I’m on the look for such info.
WOW just what I was looking for. Came here by searching for สล็อต
You completed a number of nice points there. I did a search on the issue and found nearly all people will have the same opinion with your blog.Tennessee addiction treatment
Greetings! I know this is somewhat off topic but I was wondering which blog platform are you using for this website? I’m getting fed up of WordPress because I’ve had issues with hackers and I’m looking at alternatives for another platform. I would be awesome if you could point me in the direction of a good platform.
excellent publish, very informative. I’m wondering why the opposite specialists
of this sector do not notice this. You must proceed your writing.
I’m sure, you have a great readers’ base already!
Hey there! I simply would like to offer you a big
thumbs up for the great info you have got right here
on this post. I am returning to your website for more soon.
This information is magnificent. I understand and respect your clear-cut points. I am impressed with your writing style and how well you express your thoughts.treatment center Tennessee
I blog quite often and I truly appreciate your content.
Your article has truly peaked my interest. I’m going to bookmark your blog and keep checking
for new information about once a week. I opted in for your Feed as well.
It is the best time to make some plans for the future and it’s time to be happy.
I have read this post and if I could I desire to suggest
you some interesting things or advice. Perhaps you could write next articles referring
to this article. I wish to read more things about it!
There is definately a great deal to learn about this subject.
I really like all of the points you have made.
Though the best web designs look effortless in execution, they’re all based on the guiding principles of visual design.
Hurda, kullanım dışında olan malzemenin posasıdır. Hurda birçok materyali içinde barındırabilir. Hurda türevleri olarak en yüksek değerli olanlar metal türevleridir.
The next time I read a blog, Hopefully it doesn’t fail me just as much as this one. I mean, Yes, it was my choice to read through, nonetheless I genuinely thought you would probably have something helpful to talk about. All I hear is a bunch of complaining about something you could fix if you weren’t too busy searching for attention.
Excellent write-up. I absolutely love this website. Continue the good work!
Fantastic web site. Plenty of helpful information here.
I am sending it to some friends ans additionally sharing
in delicious. And of course, thanks in your effort!
Very nice write-up. I definitely love this website. Thanks!
Greetings! Very useful advice within this article!
It is the little changes that make the largest changes.
Thanks for sharing!
I every time spent my half an hour to read this web site’s articles or reviews every day along with a cup of coffee.
Hello.This article was really interesting, especially since I was looking for thoughts on this subject last Sunday.
There is definately a great deal to learn about this issue. I love all the points you’ve made.
May I just say what a relief to uncover somebody who
actually knows what they are discussing over the internet.
You certainly know how to bring an issue to light and make it important.
A lot more people must check this out and understand this side
of the story. I can’t believe you’re not more popular since you definitely possess the
gift.
I think this is one of the most vital info for me. And i am glad reading your
article. But wanna remark on few general things,
The site style is great, the articles is really excellent : D.
Good job, cheers
Hey there! I simply would like to give you a big thumbs up for your great information you have here on this post. I am coming back to your site for more soon.
I visited various sites however the audio feature for audio songs existing at this web site is in fact fabulous.
I must thank you for the efforts you have put in writing this
website. I am hoping to view the same high-grade content from you later on as
well. In fact, your creative writing abilities has encouraged me to get my own site
now 😉
Made to measure curtains… […]check out the sites listed below, worth a read for interiors and rugs enthusiasts[…]…Treatment center Detox
Hi colleagues, its enormous piece of writing about tutoringand fully
defined, keep it up all the time.
Thank you for the good writeup. It in fact
was a amusement account it. Look advanced to far added agreeable from you!
By the way, how could we communicate?
magnificent put up, very informative. I wonder why the opposite experts of this
sector do not understand this. You should proceed your writing.
I am confident, you’ve a huge readers’ base already!
I visited multiple web sites but the audio feature for audio songs
current at this site is truly excellent.
The article posted was very informative and useful. You people are doing a great job. Keep going.Detox treatment center
I don’t even know how I ended up here, but I thought this post was good.
I don’t know who you are but certainly you are going to a
famous blogger if you aren’t already 😉 Cheers!
You have brought up a very wonderful details , thankyou for the post.
Ridiculous quest there. What happened after? Good luck!|
I love it when folks get together and share thoughts.
Great blog, stick with it!
Excellent way of telling, and nice article to get data on the
topic of my presentation subject, which i am going to present in academy.
Thanks very interesting blog!
You completed a few nice points there. I did a search on the issue and found most persons will consent with your blog.
whoah this weblog is excellent i love studying your articles. Stay up the good paintings! You understand, a lot of people are hunting around for this information, you can help them greatly.
Great article! We will be linking to this great article on our site.
Keep up the great writing.
Premium wordpress themes, Plugins, PHP Script, Modules Extensions, Web Templates, CMS Templates (Click in profile to more info)
Good day very nice web site!! Man .. Excellent
.. Superb .. I’ll bookmark your website and take the feeds also?
I’m happy to find a lot of useful info right here in the submit,
we’d like work out extra techniques on this regard, thanks for sharing.
. . . . .
Most chat rooms don’t require users to have any special software; those that do, such as Internet Relay Chat (IRC) allow users to download it from the Internet.
Basically, sex chat is the textual equivalent of a dirty phone call.
I don’t know if it’s just me or if perhaps
everybody else encountering problems with your website. It looks like some of the text in your content are running off the screen.
Can somebody else please provide feedback and let me know if this is happening
to them too? This might be a issue with my internet browser because I’ve had this happen before.
Thank you
I loved up to you will obtain performed right here. The sketch is tasteful, your authored subject matter stylish. nonetheless, you command get got an edginess over that you want be handing over the following. unwell indisputably come more before once more since exactly the same nearly very regularly inside case you protect this hike.
Nice post. I study something more challenging on totally different blogs everyday. It’s going to all the time be stimulating to read content from different writers and apply slightly one thing from their store. I’d choose to use some with the content on my blog whether you don’t mind. Natually I’ll provide you with a link on your web blog. Thanks for sharing.
Keep working ,remarkable job!
An impressive share! I have just forwarded this onto a friend who had been conducting a little homework on this. And he in fact ordered me dinner because I found it for him… lol. So allow me to reword this…. Thank YOU for the meal!! But yeah, thanx for spending some time to discuss this topic here on your web site.
Hi, just wanted to mention, I enjoyed this blog post. It was funny.
Keep on posting!
obviously like your web site however you need to check the
spelling on quite a few of your posts. Many of them are rife with spelling problems and I in finding it
very troublesome to inform the truth on the other hand I’ll
certainly come again again.
Your style is very unique in comparison to other folks I have read stuff from.
Thanks for posting when you have the opportunity, Guess I’ll just book mark this web site.
Great blog you have here but I was curious about if you
knew of any forums that cover the same topics talked about in this article?
I’d really like to be a part of community where I can get
opinions from other experienced individuals that share the same interest.
If you have any suggestions, please let me know. Kudos!
Hi there! Quick question that’s completely off topic. Do you know how to make your site mobile friendly? My weblog looks weird when browsing from my iphone 4. I’m trying to find a template or plugin that might be able to resolve this problem. If you have any recommendations, please share. Appreciate it!
Spot on with this write-up, I absolutely feel this web site needs a great deal more attention. Iíll probably be back again to read through more, thanks for the advice!
Hello there! I could have sworn Iíve visited this blog before but after browsing through a few of the posts I realized itís new to me. Anyhow, Iím certainly pleased I discovered it and Iíll be book-marking it and checking back regularly!
I will immediately grab your rss feed as I can’t find your email subscription link or e-newsletter service. Do you’ve any? Please let me know in order that I could subscribe. Thanks.
Hello there! I could have sworn I’ve visited this web site before but after looking at some of the posts I realized it’s new to me. Anyhow, I’m definitely happy I discovered it and I’ll be bookmarking it and checking back often!
Greetings from Carolina! I’m bored to death at work so I decided to check out your site on my iphone during lunch break. I enjoy the info you present here and can’t wait to take a look when I get home. I’m amazed at how fast your blog loaded on my mobile .. I’m not even using WIFI, just 3G .. Anyways, wonderful site!
Excellent post. I was checking continuously this blog and I’m
impressed! Very helpful information particularly the last part :
) I care for such info much. I was looking for this particular information for
a very long time. Thank you and best of luck.
hello there and thank you for your information – I’ve certainly picked up
anything new from right here. I did however expertise some technical points using this website, as I
experienced to reload the web site lots of times previous to I could get it to load properly.
I had been wondering if your hosting is OK? Not that I’m
complaining, but sluggish loading instances times will sometimes affect your
placement in google and can damage your quality score if ads and marketing with Adwords.
Well I’m adding this RSS to my e-mail and could look out for a lot
more of your respective fascinating content.
Make sure you update this again soon.
Hi! I just wanted to ask if you ever have any trouble with
hackers? My last blog (wordpress) was hacked and I ended up losing several weeks of hard
work due to no back up. Do you have any methods to stop
hackers?
Greetings! I know this is kind of off topic but I was wondering if you knew where
I could get a captcha plugin for my comment form?
I’m using the same blog platform as yours and I’m having trouble finding one?
Thanks a lot!
Hi there, after reading this remarkable paragraph i am also delighted to share my know-how here with colleagues.
There are many forms of social media, including blogs, micro-blogs, wikis, social networking sites, photo-sharing sites, instant messaging, video-sharing sites, podcasts, widgets, virtual worlds, and more.
Very good information. Lucky me I recently found your
website by accident (stumbleupon). I have book marked it for later!
I’d need to examine with you here. Which is not one thing I normally do! I get pleasure from reading a put up that will make folks think. Also, thanks for permitting me to comment!
I’m really enjoying the theme/design of your site. Do you ever run into any internet browser compatibility problems? A number of my blog audience have complained about my site not working correctly in Explorer but looks great in Firefox. Do you have any solutions to help fix this problem?
Hi there, I desire to subscribe for this web site to
obtain latest updates, so where can i do it please help out.
Pretty nice post. I just stumbled upon your weblog and wished to say that I have really enjoyed browsing your blog posts. In any case I’ll be subscribing to your feed and I hope you write again very soon!
Today, I went to the beachfront with my kids. I found a sea shell and gave it to my 4 year old daughter and said “You can hear the ocean if you put this to your ear.” She put the shell to her ear and screamed. There was a hermit crab inside and it pinched her ear. She never wants to go back! LoL I know this is entirely off topic but I had to tell someone!
Excellent items from you, man. I have take into accout your stuff prior to and you are simply too wonderful. I actually like what you’ve obtained right here, really like what you are stating and the way in which wherein you say it. You’re making it enjoyable and you continue to care for to keep it sensible. I cant wait to learn much more from you. This is really a great web site.
Writing a technical article, free text or a non-fiction text requires a different approach than writing a blog article, journal, vlog or report on your project.
I must point out my admiration for your kindness in support of persons who absolutely need help with this concept. Your very own commitment to passing the message along came to be extraordinarily helpful and has truly permitted men and women just like me to attain their ambitions. The informative advice entails so much a person like me and even further to my mates. Thanks a ton; from all of us.
I was recommended this website by my cousin. I am not sure whether this post is written by him as no one else know such detailed about my problem. You are amazing! Thanks!
Pretty portion of content. I simply stumbled upon your website and in accession capital to say that I get actually enjoyed account your blog posts. Anyway I will be subscribing in your augment and even I achievement you get entry to consistently fast.
hi!,I really like your writing so a lot! percentage we communicate more approximately your article on AOL? I need an expert on this space to solve my problem. May be that’s you! Having a look forward to look you.
Simply wish to say your article is as astounding. The clarity to your publish is just nice and that i could suppose you are an expert on this subject. Fine together with your permission allow me to grasp your feed to stay up to date with drawing close post. Thank you 1,000,000 and please continue the rewarding work.
Everything is very open with a really clear explanation of the challenges.
It was definitely informative. Your website is very helpful.
Thanks for sharing!
It’s a great site, I love reading your articles, please continue in this way, I will continue to follow you with pleasure
Very nice post. I absolutely love this site. Keep writing!
Hi! This post couldn’t be written any better! Reading through this post reminds me of my good old room mate! He always kept talking about this. I will forward this page to him. Fairly certain he will have a good read. Thanks for sharing!
I loved as much as you’ll receive carried out right here.
The sketch is attractive, your authored material stylish.
nonetheless, you command get bought an nervousness over that you wish be delivering the following.
unwell unquestionably come more formerly again since exactly the same nearly very
often inside case you shield this hike.
Good article. Thank you.
Unemployment benefits, also called unemployment insurance, unemployment payment, unemployment compensation, or simply unemployment, are payments made by authorized bodies to unemployed people.
It is best to take part in a contest for top-of-the-line blogs on the web. I’ll advocate this web site!
Hello my family member! I want to say that this post is awesome,
nice written and come with approximately all significant infos.
I would like to look extra posts like this .
obviously like your web-site however you have to test the spelling on several of your posts.
A number of them are rife with spelling problems and I in finding it very
bothersome to inform the reality however I will definitely come again again.
You are a very capable person!
Everything is very open with a clear description of the issues. It was truly informative. Your site is very helpful. Thank you for sharing!|
Hi there would you mind letting me know which hosting
company you’re using? I’ve loaded your blog in 3 different internet browsers and I
must say this blog loads a lot quicker then most. Can you recommend
a good internet hosting provider at a reasonable price?
Thanks, I appreciate it!
I’ve been surfing on-line greater than three hours these days, yet I by no means discovered any fascinating article like yours. It is beautiful value sufficient for me. Personally, if all webmasters and bloggers made good content material as you did, the net can be a lot more useful than ever before.
Today, I went to the beachfront with my kids. I found a sea shell
and gave it to my 4 year old daughter and
said “You can hear the ocean if you put this to your ear.”
She put the shell to her ear and screamed. There was a hermit crab inside and it
pinched her ear. She never wants to go back! LoL I know this is
totally off topic but I had to tell someone!
Hello. impressive job. I did not anticipate this. This is a fantastic story. Thanks!
This is a topic that’s close to my heart… Cheers!
Exactly where are your contact details though?
I’m amazed, I have to admit. Rarely do I encounter a blog that’s both equally educative and amusing, and without a doubt, you have hit the nail on the head.
The issue is an issue that not enough people are speaking intelligently about.
I am very happy I stumbled across this during my hunt
for something regarding this.
After exploring a few of the blog articles on your site, I honestly appreciate your technique of blogging.
I bookmarked it to my bookmark website list and will be checking back soon. Please check out
my website too and let me know how you feel.
I discovered your weblog site on google and test a couple of of your early posts. Proceed to keep up the superb operate. I simply additional up your RSS feed to my MSN Information Reader. Looking for ahead to studying more from you in a while!…
Wow, fantastic blog layout! How long have you been blogging for? you made blogging look easy. The overall look of your website is magnificent, as well as the content!
I got this site from my buddy who shared with me about this web site and
now this time I am visiting this web site and reading very
informative articles or reviews at this place.
Pretty! This was an incredibly wonderful post. Thanks for providing this information.
Hey there, You have done a great job. I will definitely digg it and personally recommend to my friends. I am confident they’ll be benefited from this website.
Way cool! Some extremely valid points! I appreciate you penning this article and also the rest of the site is really good.
It is actually a nice and helpful piece of information. I’m satisfied that you just
shared this useful information with us. Please keep us up
to date like this. Thanks for sharing.
You made some decent points there. I looked on the net for more information about the issue and found most individuals will go along with your views on this site.
I appreciate, lead to I found just what I used to be looking for. You have ended my four day lengthy hunt! God Bless you man. Have a great day. Bye
Hi mates, good article and pleasant arguments commented at this place, I am actually enjoying by
these.
Hi, Neat post. There’s a problem along with your website in web
explorer, may check this? IE nonetheless is the market chief
and a big portion of folks will omit your magnificent writing due to this problem.
Howdy! Do you use Twitter? I’d like to follow you if that would be okay.
I’m definitely enjoying your blog and look forward
to new posts.
Hello! Do you use Twitter? I’d like to follow you if that would be okay.
I’m absolutely enjoying your blog and look forward to new posts.
Please let me know if you’re looking for a article author for your blog. You have some really good articles and I believe I would be a good asset. If you ever want to take some of the load off, I’d absolutely love to write some articles for your blog in exchange for a link back to mine. Please shoot me an email if interested. Thanks!
Magnificent site. Lots of useful info here. I am sending it to several friends ans also sharing in delicious. And of course, thanks for your effort!
I wanted to thank you for this great read!! I definitely loved every
bit of it. I’ve got you bookmarked to look at new stuff you
post…
Very good info. Lucky me I ran across your blog by accident (stumbleupon). I’ve book marked it for later!
You have brought up a very excellent points, thankyou for the post.
It’s a shame you don’t have a donate button! I’d without a doubt donate to this brilliant
blog! I suppose for now i’ll settle for bookmarking and adding your RSS feed to my Google account.
I look forward to brand new updates and will share
this website with my Facebook group. Chat soon!
Every weekend i used to pay a quick visit this website, for the reason that i wish for enjoyment, as this this web site conations in fact
pleasant funny information too.
Hi, its pleasant piece of writing on the topic of media print,
we all be aware of media is a impressive source of information.
Wow! This blog looks exactly like my old one! It’s on a totally
different topic but it has pretty much the same layout and design. Wonderful choice of colors!
You should take part in a contest for one of the highest quality websites on the web. I’m going to recommend this website!
Right here is the perfect webpage for everyone who hopes to find out about this topic.
You know a whole lot its almost hard to argue with
you (not that I personally will need to…HaHa).
You certainly put a fresh spin on a topic that’s been discussed for years.
Great stuff, just wonderful!
At this moment I am going to do my breakfast, later than having my breakfast coming over again to
read further news.
Good day! I just wish to give you a huge thumbs up for the excellent information you’ve got right here on this post. I will be returning to your blog for more soon.
Its like you read my mind! You appear to know so
much about this, like you wrote the book in it or something.
I think that you could do with some pics to drive the message home a bit, but instead of that, this is fantastic blog.
A fantastic read. I will definitely be back.
My developer is trying to convince me to move to .net from PHP.
I have always disliked the idea because of the costs.
But he’s tryiong none the less. I’ve been using Movable-type on a number of websites for about a year and am anxious about switching
to another platform. I have heard great things about blogengine.net.
Is there a way I can transfer all my wordpress posts into it?
Any help would be greatly appreciated!
Why users still make use of to read news papers when in this technological
world everything is accessible on net?
I do not even know the way I finished up right here, however I assumed this
submit used to be good. I don’t understand who you are but
certainly you are going to a famous blogger in the event you aren’t already.
Cheers!
You need to take part in a contest for one of the finest blogs online.
I’m going to recommend this site!
you’re truly a just right webmaster. The website loading pace is incredible. It seems that you’re doing any distinctive trick. Furthermore, The contents are masterpiece. you’ve done a magnificent process in this topic!
I was recommended this web site by means of my cousin. I’m no longer positive whether or not this put up is written through him as nobody else know such targeted about my difficulty. You are wonderful! Thank you!
Howdy! Do you use Twitter? I’d like to follow you if that would be ok. I’m undoubtedly enjoying your blog and look forward to new posts.
Thanks a lot for sharing this with all folks you really recognise what you’re talking about!
Bookmarked. Kindly also visit my website =). We can have a link exchange
contract among us
I must express some thanks to you just for bailing me out of such a circumstance. Just after exploring throughout the world wide web and coming across tips which were not powerful, I was thinking my life was gone. Being alive without the strategies to the difficulties you’ve fixed through your good post is a critical case, and ones that could have badly affected my entire career if I had not discovered your website. Your main training and kindness in handling all the stuff was vital. I’m not sure what I would’ve done if I hadn’t encountered such a subject like this. It’s possible to at this time look ahead to my future. Thank you very much for this impressive and result oriented help. I will not think twice to recommend your blog post to any person who needs to have tips on this problem.
Howdy! This is my first comment here so I just wanted to give a quick shout out and say I really enjoy reading through your blog posts. Can you recommend any other blogs/websites/forums that deal with the same subjects? Many thanks!
Pretty element of content. I just stumbled upon your weblog and in accession capital to say that I acquire actually loved account your blog posts. Any way I will be subscribing for your feeds and even I achievement you get right of entry to constantly quickly.
It’s going to be end of mine day, but before end I
am reading this enormous article to increase my know-how.
What’s Happening i’m new to this, I stumbled upon this I’ve found It positively helpful and it has helped me out loads. I hope to contribute & assist other users like its aided me. Great job.
Genuinely when someone doesn’t understand then its up to other viewers that they will assist, so here it occurs.|
Everything is very open with a precise clarification of the challenges.
It was truly informative. Your website is very helpful. Thanks for sharing!
The new Zune browser is surprisingly good, but not as good as the iPod’s. It works well, but isn’t as fast as Safari, and has a clunkier interface. If you occasionally plan on using the web browser that’s not an issue, but if you’re planning to browse the web alot from your PMP then the iPod’s larger screen and better browser may be important.Free Porn
Nice post. I used to be checking continuously this weblog and
I am inspired! Extremely helpful information specifically the remaining phase 🙂 I care for such info much.
I was seeking this certain information for a long time.
Thank you and best of luck.
Hmm it seems like your site ate my first comment (it was extremely long) so I guess I’ll just sum it up what I had written and say, I’m thoroughly enjoying your blog. I as well am an aspiring blog writer but I’m still new to the whole thing. Do you have any tips for first-time blog writers? I’d genuinely appreciate it.
Excellent web site. A lot of useful information here. I’m sending it to a few friends ans also sharing in delicious. And of course, thanks for your sweat!
Keep functioning ,great job!
The new Zune browser is surprisingly good, but not as good as the iPod’s. It works well, but isn’t as fast as Safari, and has a clunkier interface. If you occasionally plan on using the web browser that’s not an issue, but if you’re planning to browse the web alot from your PMP then the iPod’s larger screen and better browser may be important.Free Porn
Quality content is the key to be a focus for
the viewers to pay a quick visit the site, that’s what this web page is
providing.
Valuable info. Lucky me I found your site by accident, and I’m shocked why this accident did not happened earlier! I bookmarked it.
I am typically to running a blog and i really admire your content. The article has actually peaks my interest. I’m going to bookmark your website and preserve checking for brand new information.
Hi there, just wanted to say, I liked this post. It was funny. Keep on posting!|
I do like the way you have presented this issue and it does indeed offer me personally a lot of fodder for consideration. However, through what I have seen, I really hope as the actual opinions stack on that individuals stay on issue and don’t get started on a tirade of some other news of the day. Anyway, thank you for this superb point and while I do not really go along with it in totality, I value the standpoint.
Hello There. I discovered your blog the usage of msn. That is a really well written article. I will make sure to bookmark it and come back to read more of your useful info. Thank you for the post. I will definitely comeback.
Thanks a bunch for sharing this with all folks you really recognise what you are speaking approximately! Bookmarked. Please also discuss with my web site =). We can have a hyperlink trade agreement among us!
Best view i have ever seen !
An outstanding share! I’ve just forwarded this onto
a co-worker who has been conducting a little research on this.
And he in fact ordered me lunch simply because I discovered it for him…
lol. So allow me to reword this…. Thank YOU for the meal!!
But yeah, thanks for spending some time to talk about this matter here on your blog.
It’s remarkable to visit this website and reading
the views of all mates about this article, while I am also zealous
of getting know-how.
Hello my friend! I wish to say that this article is awesome, nice written and include approximately all vital infos. I’d like to see more posts like this.
Good day! This is kind of off topic but I need some advice from an established blog.
Is it very difficult to set up your own blog? I’m not very
techincal but I can figure things out pretty fast.
I’m thinking about setting up my own but I’m not sure where to begin. Do you have any
points or suggestions? Appreciate it
Hello, Neat post. There’s an issue with your web site in web explorer, could check this… IE nonetheless is the marketplace chief and a good portion of folks will pass over your excellent writing due to this problem.
Terrific post but I was wanting to know if you could write a litte more on this topic? I’d be very grateful if you could elaborate a little bit further. Bless you!
3minerva
Best view i have ever seen !
fantastic points altogether, you simply gained a emblem new reader. What might you suggest about your submit that you made some days ago? Any certain?
Best view i have ever seen !
Hello there! Do you use Twitter? I’d like to follow you if that would be ok.
I’m absolutely enjoying your blog and look forward to
new posts.
With havin so much written content do you ever run into any issues of
plagorism or copyright infringement? My site has a lot of exclusive content I’ve either
created myself or outsourced but it looks like a lot of it is popping it
up all over the web without my authorization. Do you know
any techniques to help protect against content from being stolen? I’d genuinely appreciate it.
pg
สล็อตออนไลน์
allslot
joker slot
pg slot
super slot
DOSTA ANLAMLI KAPAK SÖZLER … Manşet: Bilemezsin ki kim dost kim düşman.
Do you want get more social network traffic, likes, subscribers and followers? Instagram Followers for $0.78/1000 and much more. OUR OFFICIAL WEBSITE: https://smmsupreme.com
Good day, I merely hopped over on your own website through StumbleUpon. Not something I’d usually read, however I appreciated how you feel none the less. Thanks for making something price reading.Wallace Arnold
I don’t know whether it’s just me or if perhaps everyone else experiencing problems with your website.
It seems like some of the written text on your posts are running off the screen. Can somebody else please comment and let me know if this
is happening to them too? This could be a problem with my browser because I’ve had this
happen before. Thank you
Once I originally commented I clicked the -Notify me when new comments are added- checkbox and now each time a comment is added I get 4 emails with the identical comment. Is there any means you’ll be able to take away me from that service? Thanks!
i love the Bazooka of Megatron, i don’t understand why they did not include it on the movie*Sarah Montgomery
I’ve been surfing online more than 3 hours today, yet I never found any interesting article like yours. It’s pretty worth enough for me. Personally, if all site owners and bloggers made good content as you did, the internet will be a lot more useful than ever before.
I truly appreciate this post. I’ve been looking all over for this! Thank goodness I found it on Bing. You have made my day! Thank you again
I am glad to read this post, it’s an impressive piece. I am always looking for quality posts and articles and this is what I found here, I hope you will be posting more in future.Jack Kim
Today, while I was at work, my sister stole my iPad and tested to see
if it can survive a forty foot drop, just so she can be a
youtube sensation. My apple ipad is now destroyed
and she has 83 views. I know this is entirely off topic but I had to share it with someone!
Hello, i read your blog occasionally and i own a similar
one and i was just curious if you get a lot of spam responses?
If so how do you reduce it, any plugin or anything you can advise?
I get so much lately it’s driving me insane so any assistance is very
much appreciated.
The new Zune browser is surprisingly good, but not as good as the iPod’s. It works well, but isn’t as fast as Safari, and has a clunkier interface. If you occasionally plan on using the web browser that’s not an issue, but if you’re planning to browse the web alot from your PMP then the iPod’s larger screen and better browser may be important.SEO for Movers
kale kapı kilidi
Appreciate this post. Will try it out.
I’m impressed, I have to admit. Seldom do I come across a blog that’s both educative and interesting, and let me tell you, you’ve
hit the nail on the head. The problem is something
that too few people are speaking intelligently about.
Now i’m very happy I found this in my hunt for something regarding this.
I would like to convey my admiration for your generosity in support of men and women that have the need for help with this particular concern. Your special dedication to getting the message all over had been wonderfully productive and have all the time made professionals much like me to attain their dreams. Your own invaluable tutorial means a great deal to me and additionally to my office workers. Thank you; from everyone of us.Mover Search Marketing
Appreciating the time and effort you put into your website and detailed information you present.
It’s great to come across a blog every once
in a while that isn’t the same out of date rehashed information. Excellent read!
I’ve saved your site and I’m adding your RSS feeds to my Google account.
Needed to compose you a tiny note to finally thank you very much yet again for your personal splendid methods you have discussed above. It is strangely open-handed with people like you to provide publicly all that a number of people would have marketed as an electronic book to generate some bucks for their own end, primarily now that you could possibly have tried it if you ever wanted. These inspiring ideas likewise acted like a fantastic way to know that the rest have the same dreams really like my personal own to see a whole lot more concerning this problem. I’m sure there are thousands of more enjoyable times in the future for many who check out your blog.Movers SEO
I have to convey my respect for your kindness for all those that require guidance on this one field. Your special commitment to passing the solution up and down has been incredibly functional and has continually empowered most people just like me to achieve their dreams. Your amazing insightful information entails much to me and especially to my peers. Thanks a ton; from all of us.Movers Dev
Hello, Neat post. There is an issue along with your site in internet explorer, might test this?
IE nonetheless is the market chief and a huge part of other folks
will leave out your fantastic writing due to this problem.
It’s an remarkable post for all the internet people;
they will obtain advantage from it I am sure.
This is getting a bit more subjective, but I much prefer the Zune Marketplace. The interface is colorful, has more flair, and some cool features like ‘Mixview’ that let you quickly see related albums, songs, or other users related to what you’re listening to. Clicking on one of those will center on that item, and another set of “neighbors” will come into view, allowing you to navigate around exploring by similar artists, songs, or users. Speaking of users, the Zune “Social” is also great fun, letting you find others with shared tastes and becoming friends with them. You then can listen to a playlist created based on an amalgamation of what all your friends are listening to, which is also enjoyable. Those concerned with privacy will be relieved to know you can prevent the public from seeing your personal listening habits if you so choose.Moving Company SEO
Needed to compose you a tiny note to finally thank you very much yet again for your personal splendid methods you have discussed above. It is strangely open-handed with people like you to provide publicly all that a number of people would have marketed as an electronic book to generate some bucks for their own end, primarily now that you could possibly have tried it if you ever wanted. These inspiring ideas likewise acted like a fantastic way to know that the rest have the same dreams really like my personal own to see a whole lot more concerning this problem. I’m sure there are thousands of more enjoyable times in the future for many who check out your blog.Movers SEO
Interesting website, i read it but i still have a few questions. shoot me an email and we will talk more becasue i may have an interesting idea for you.SEO for Moving Companies
I do not even know the way I ended up here, however I believed this post used to
be good. I don’t recognise who you’re however definitely you are going to a famous blogger if you happen to
are not already. Cheers!
At this time it sounds like BlogEngine is the top blogging platform out there right now.
(from what I’ve read) Is that what you are using on your blog?
The new Zune browser is surprisingly good, but not as good as the iPod’s. It works well, but isn’t as fast as Safari, and has a clunkier interface. If you occasionally plan on using the web browser that’s not an issue, but if you’re planning to browse the web alot from your PMP then the iPod’s larger screen and better browser may be important.SEO for Movers
I’ve been absent for a while, but now I remember why I used to love this website. Thank you, I will try and check back more frequently. How frequently you update your website?
Interesting website, i read it but i still have a few questions. shoot me an email and we will talk more becasue i may have an interesting idea for you.SEO for Moving Companies
I always used to study paragraph in news papers
but now as I am a user of net therefore from now
I am using net for content, thanks to web.
I love your blog.. very nice colors & theme. Did you make
this website yourself or did you hire someone to do it for you?
Plz answer back as I’m looking to construct my own blog and would like to know where
u got this from. thanks a lot
Thank you for the sensible critique. Me & my neighbor were just preparing to do a little research about this. We got a grab a book from our local library but I think I learned more clear from this post. I’m very glad to see such great info being shared freely out there.
Needed to compose you a tiny note to finally thank you very much yet again for your personal splendid methods you have discussed above. It is strangely open-handed with people like you to provide publicly all that a number of people would have marketed as an electronic book to generate some bucks for their own end, primarily now that you could possibly have tried it if you ever wanted. These inspiring ideas likewise acted like a fantastic way to know that the rest have the same dreams really like my personal own to see a whole lot more concerning this problem. I’m sure there are thousands of more enjoyable times in the future for many who check out your blog.Movers SEO
Great goods from you, man. I’ve consider your
stuff previous to and you are simply too magnificent.
I really like what you have bought right here, really like what you are saying and the way during which you assert it.
You’re making it enjoyable and you continue to care for to
keep it sensible. I can not wait to learn far more from you.
That is really a tremendous web site.
I constantly spent my half an hour to read this webpage’s articles or reviews all the time along with a cup of coffee.
I must say, as a lot as I enjoyed reading what you had to say, I couldnt help but lose interest after a while. Its as if you had a wonderful grasp on the subject matter, but you forgot to include your readers. Perhaps you should think about this from far more than one angle. Or maybe you shouldnt generalise so considerably. Its better if you think about what others may have to say instead of just going for a gut reaction to the subject. Think about adjusting your own believed process and giving others who may read this the benefit of the doubt.MoversBoost
hey there, your site is cheap. We do thank you for workno more tax
I really like your article. It’s evident that you have a lot knowledge on this topic. Your points are well made and relatable. Thanks for writing engaging and interesting material.iven de hoon
whoah this blog is great i really like reading your posts.
Stay up the good work! You understand, lots of persons
are looking round for this info, you can help them greatly.
https://clotba.com/
You’ve got one of the best sites.|
Howdy just wanted to give you a brief heads up and let you know a few of the pictures aren’t loading correctly. I’m not sure why but I think its a linking issue. I’ve tried it in two different web browsers and both show the same results.
Excellent post. Keep writing such kind of info on your page.
Im really impressed by it.
Hello there, You have done an incredible job. I will certainly digg it and in my opinion recommend to my friends.
I am confident they will be benefited from this site.
Hmm it seems like your blog ate my first comment (it was super long) so I guess
I’ll just sum it up what I submitted and say, I’m
thoroughly enjoying your blog. I too am an aspiring blog blogger but I’m still new
to the whole thing. Do you have any points for newbie blog writers?
I’d certainly appreciate it.
I was wondering if you ever considered changing the page layout of your blog?
Its very well written; I love what youve got to say. But maybe you could a little more in the
way of content so people could connect with it better.
Youve got an awful lot of text for only having one or two pictures.
Maybe you could space it out better?
Hello it’s me, I am also visiting this web site on a regular basis, this web site is actually good and the viewers are truly sharing good thoughts.
Wow, stunning website. Thnx …|
Hiya, I am really glad I’ve found this information. Nowadays bloggers publish just about gossips and internet and this is actually irritating. A good site with exciting content, that is what I need. Thank you for keeping this site, I will be visiting it. Do you do newsletters? Can not find it.
Thanks for sharing your thoughts about dN5jQ4kY0R2. Regards
I think this is one of the most important information for me.
And i’m glad reading your article. But want to remark on few
general things, The web site style is wonderful, the articles is really excellent : D.
Good job, cheers
Thanks pertaining to offering this sort of good knowledge.
Nice weblog here! Additionally your website rather a lot up
fast! What web host are you using? Can I am getting
your associate hyperlink for your host? I want my
website loaded up as fast as yours lol
That is very attention-grabbing, You are an excessively professional blogger.
I’ve joined your rss feed and look forward to seeking
extra of your excellent post. Additionally, I’ve
shared your site in my social networks
I’ve been exploring for a bit for any high quality articles or blog posts on this sort of space .
Exploring in Yahoo I finally stumbled upon this web site.
Reading this info So i’m satisfied to exhibit that I have an incredibly excellent
uncanny feeling I came upon just what I needed. I so much without a doubt
will make certain to don?t put out of your mind this
website and provides it a look regularly.
Hello There. I found your blog using msn. This is an extremely well written article.
I will make sure to bookmark it and return to read more
of your useful information. Thanks for the post.
I will certainly return.
}
Thanks for the purpose of giving these good details.
Hi! I know this is kinda off topic but I’d figured I’d ask.
Would you be interested in trading links or maybe guest writing a blog post or vice-versa?
My website discusses a lot of the same subjects as yours
and I think we could greatly benefit from each other.
If you are interested feel free to send me an email.
I look forward to hearing from you! Great blog by the way!
You have got remarkable information in this article.|
I’m so happy to read this. This is the kind of manual that needs to be given and not the accidental misinformation that is at the other blogs. Appreciate your sharing this greatest doc.
I do not even know how I ended up here, but I thought this post was good. I do not know who you are but definitely you are going to a famous blogger if you are not already 😉 Cheers!
Hi! Do you use Twitter? I’d like to follow you if that would be
ok. I’m undoubtedly enjoying your blog and look forward to new updates.
Hello there, I found your blog by the use of Google at the same time as searching for
a comparable matter, your web site got here up, it appears great.
I have bookmarked it in my google bookmarks.
Hi there, just was aware of your blog through Google, and located that it is truly informative.
I am going to be careful for brussels. I’ll be grateful if you happen to continue this in future.
A lot of people might be benefited from your writing.
Cheers!
you’re really a good webmaster. The web site loading speed is incredible. It seems that you are doing any unique trick. Moreover, The contents are masterwork. you’ve done a magnificent job on this topic!
Having read this I thought it was rather enlightening. I
appreciate you spending some time and effort to put this content together.
I once again find myself spending way too much time both reading and posting comments.
But so what, it was still worth it!
I am sure this article has touched all the internet visitors, its really really good post on building up new website.
You must be very astute at research and writing. This shows up in your original and unique content. I agree with your primary points on this topic. This content should be seen by more readers.news
Hey there! I know this is kinda off topic nevertheless I’d figured I’d ask. Would you be interested in exchanging links or maybe guest authoring a blog post or vice-versa? My blog covers a lot of the same topics as yours and I think we could greatly benefit from each other. If you are interested feel free to send me an e-mail. I look forward to hearing from you! Wonderful blog by the way!
Get Instagram Followers and Likes, Facebook Likes, Twitter Retweets to promote your website. Best Quality-Price Ratio on the market with 714928 orders until now. our official website https://smmsupreme.com
continuously i used to read smaller content which as
well clear their motive, and that is also happening with this paragraph which I am reading at this time.
Twicsy also offers the option to buy Instagram likes and views too (both with fast delivery).
I do agree with all the ideas you have presented in your post. They’re really convincing and will certainly work. Still, the posts are too short for beginners. Could you please extend them a bit from next time? Thanks for the post.
After study a few of the blog posts on your website now, and I truly like your way of blogging. I bookmarked it to my bookmark website list and will be checking back soon. Pls check out my web site as well and let me know what you think.bad credit free repair
I’m amazed, I must say. Rarely do I come across a blog that’s both educative and interesting, and let me tell you, you
have hit the nail on the head. The problem is something which too few people
are speaking intelligently about. I’m very happy that I found this during my search for something relating to this.
Everything is very open with a clear explanation of the challenges. It was really informative. Your website is incredibly helpful. Thanks for sharing!
You are so interesting! I really do not think I’ve read a single thing like that before. So wonderful to find somebody with a few genuine thoughts on this subject matter. Really.. thank you for starting this up. This web site is something that is needed on the web, someone with a little originality!
This is my first time visit at here and i am truly happy to read all at alone place.
I do consider all of the ideas you have offered in your
post. They’re very convincing and will definitely work.
Still, the posts are too quick for beginners.
May you please lengthen them a little from subsequent time?
Thank you for the post.
Great post. I will be coping with a few of these issues as well..
Somebody necessarily lend a hand to make critically posts I would state. This is the very first time I frequented your web page and so far? I amazed with the analysis you made to create this particular submit extraordinary. Fantastic process!
Hi, i think that i saw you visited my website thus i came to “return the favor”.I’m trying to find things to improve my website!I
suppose its ok to use some of your ideas!!
This is one awesome blog post.Really looking forward to read more. Really Great.
{Good blog you’ve got here.|Good blog. It’s difficult to find top quality writing like yours nowadays. I seriously appreciate individuals as if you! Take care!!
This site is really a walk-through for all of the information you wished about this and didn’t know who to ask. Glimpse right here, and also you’ll undoubtedly discover it.
Hi, all is going fine here and ofcourse every one is sharing facts, that’s
really fine, keep up writing.
Attractive section of content. I just stumbled upon your weblog and
in accession capital to assert that I acquire
in fact enjoyed account your blog posts. Any way I’ll be subscribing
to your feeds and even I achievement you access consistently quickly.
obviously like your website but you need to test the spelling on several of your posts.
Several of them are rife with spelling problems and I
find it very bothersome to tell the truth however I’ll certainly come back again.
My brother recommended I might like this blog. He was entirely right. This post truly made my day. You cann’t imagine just how much time I had spent for this information! Thanks!
Pretty section of content. I just stumbled upon your weblog and in accession capital to assert that I get actually enjoyed account your blog posts. Any way I will be subscribing to your augment and even I achievement you access consistently quickly.second identity
I visited various blogs except the audio feature for audio songs
current at this site is truly fabulous.
whoah this blog is wonderful i love reading your articles. Keep up the good work! You know, many people are looking around for this info, you can aid them greatly.
hello there and thank you in your info – I have definitely picked up anything new from right here. I did alternatively experience several technical points using this web site, since I skilled to reload the web site a lot of instances previous to I could get it to load properly. I were puzzling over in case your web hosting is OK? Now not that I’m complaining, but slow loading circumstances instances will very frequently affect your placement in google and could harm your quality score if advertising and ***********|advertising|advertising|advertising and *********** with Adwords. Well I am adding this RSS to my email and can look out for a lot extra of your respective fascinating content. Make sure you replace this again very soon..
you may have an awesome blog here! would you like to make some invite posts on my blog?
I’m extremely impressed with your writing skills as well as with the layout on your
weblog. Is this a paid theme or did you modify it yourself?
Anyway keep up the nice quality writing, it’s rare to see a nice blog like this
one today.
What is great respecting is dealing with instead of depending on.fixing credit
Hey, you?re the goto expert. Thanks for haingng out here.history
Highly energetic blog, I loved that bit. Will there be a part 2?
Howdy! Someone in my Facebook group shared this website with us so I came to check it out.
I’m definitely enjoying the information. I’m bookmarking and will be tweeting this to
my followers! Wonderful blog and superb style and design.
If you are going for most excellent contents like
I do, just pay a visit this site all the time because it presents feature
contents, thanks
I think the admin of this site is truly working hard
for his web site, since here every stuff is quality based material.
Do you mind if I quote a couple of your articles as long as I provide credit and sources back to your blog? My website is in the very same area of interest as yours and my users would really benefit from a lot of the information you present here. Please let me know if this okay with you. Regards!banks
Very interesting subject, appreciate it for putting up.
There are certainly a couple more details to take into consideration, but thanks for sharing this info.training
Nice answers in return of this difficulty with solid arguments and telling the whole thing regarding that.
Thus , merely by make use of items the whole thing, the whole planet could be described as delivered electronically a little bit more. In which sometimes holds the particular And also carbon definitely pumped back to conditions over these manufacturing debt settlements. daily deal livingsocial discount baltimore washingtonnetworks
My partner and I stumbled over here different page and thought I might check things out. I like what I see so now i’m following you. Look forward to checking out your web page again.
Great post. I was checking continuously this blog and I am impressed! Extremely helpful info particularly the ultimate phase 🙂 I take care of such info much. I was looking for this particular information for a long time. Thanks and good luck.
Whats up very cool web site!! Guy .. Beautiful .. Wonderful ..
I will bookmark your site and take the feeds additionally?
I’m glad to seek out a lot of helpful info here within the publish, we’d like develop more strategies in this regard, thanks for
sharing. . . . . .
Hello! Someone in my Facebook group shared this website with us so I came to check
it out. I’m definitely loving the information. I’m bookmarking and
will be tweeting this to my followers! Terrific blog and wonderful style and design.
I intended to compose you this little bit of word just to thank you very much as before regarding the wonderful things you’ve documented on this site. This is simply shockingly generous of you to make easily precisely what many of us could have offered as an electronic book to make some profit for themselves, certainly seeing that you might well have tried it if you ever wanted. Those basics likewise acted to provide a great way to recognize that someone else have the same keenness the same as my own to see a great deal more on the subject of this issue. I am certain there are many more pleasant instances ahead for folks who scan through your blog.
If you would like to improve your experience only keep
visiting this site and be updated with the hottest information posted here.
I intended to post you a very little remark to be able to give thanks yet again just for the stunning tactics you’ve provided in this article. This has been quite incredibly open-handed with you to make freely all that a number of us would’ve offered for sale as an e book to end up making some profit on their own, mostly now that you could possibly have tried it if you considered necessary. These tactics likewise acted to provide a good way to comprehend the rest have the same interest much like my own to see more and more around this problem. I’m sure there are lots of more pleasurable opportunities ahead for folks who read carefully your website.
My mate and My hubby and i turned exclusively expressing a exceptionally dilemma, he’s got oftentimes endeavouring so that you could verify each person drastically wrong. Designs experience using this happens to be vivid while in the what normally tips I’m. I merely at this point web based sent my mate my website to indicate her the come across. One time neglecting your web site That found himself savings and will also be seeking out it really is which were found to educate yourself about to read the paper your the latest!slate
I appreciate, cause I found just what I was looking for. You have ended my four day long hunt! God Bless you man. Have a great day. Bye
Although sometimes defined as “an electronic version of a printed book”, some e-books exist without a printed equivalent.
I am regular visitor, how are you everybody? This paragraph posted at this website is truly pleasant.
Hmm is anyone else encountering problems with the pictures on this blog loading?
I’m trying to figure out if its a problem on my end or
if it’s the blog. Any suggestions would be greatly appreciated.
This article gives the light in which we can observe the reality. This is very nice one and gives in-depth information. Thanks for this nice article.national credit repair
Thanks for another informative website. Where else could I am getting that type of information written in such a perfect approach? I’ve a venture that I’m simply now working on, and I’ve been at the look out for such info.
many thanks for telling!. “Truth is generally the best vindication against slander.” by Abraham Lincoln..on-line
Hello, this weekend is good designed for me, because this occasion i am reading this fantastic informative post here
at my house.
you are truly a excellent webmaster. The web site loading velocity is incredible.
It seems that you’re doing any unique trick.
Also, The contents are masterpiece. you have done a wonderful
activity in this subject!
Nice blog! Only problem is i’m running Firefox on Debian, and the site is looking a little.. weird! Perhaps you may want to test it to see for yourself.credit repair uk
Great business ideas and side hustles to help you make extra money
Spesifik kripto para birimlerinin nasıl işlediğini keşfedin
I am thankful that I noticed this weblog, just the right information that I was looking for! .
These are truly enormous ideas in on the topic of blogging.
You have touched some nice points here. Any way keep up wrinting.
Very soon this website will be famous among all blog viewers, due to it’s fastidious posts
Hi there would you mind letting me know which web host you’re using? I’ve loaded your blog in 3 different web browsers and I must say this blog loads a lot faster then most. Can you suggest a good internet hosting provider at a reasonable price? Thanks a lot, I appreciate it!
I’ve been exploring for a bit for any high-quality articles or weblog posts on this sort of house . Exploring in Yahoo I at last stumbled upon this website. Reading this info So i’m glad to show that I’ve a very excellent uncanny feeling I came upon just what I needed. I so much indisputably will make certain to do not fail to remember this website and provides it a glance regularly.
Hello, I think your blog could be having web browser compatibility issues.
Whenever I take a look at your blog in Safari, it looks
fine but when opening in I.E., it has some overlapping issues.
I merely wanted to give you a quick heads up! Apart from
that, great site!
I am really enjoying the theme/design of your blog.
Do you ever run into any browser compatibility issues?
A small number of my blog readers have complained about my blog not operating
correctly in Explorer but looks great in Opera. Do you have any recommendations to help fix this problem?
I have been browsing online more than 3 hours today, yet I never found any interesting article like yours.
It’s pretty worth enough for me. Personally, if all website owners and bloggers made good content as you did,
the web will be much more useful than ever before.
It is appropriate time to make some plans for the
future and it is time to be happy. I have read this post and if I could I wish to suggest
you few interesting things or suggestions. Maybe you can write next articles referring
to this article. I want to read more things about it!
After I initially commented I clicked the -Notify me when new comments are added- checkbox and now each time a remark is added I get four emails with the same comment. Is there any approach you possibly can take away me from that service? Thanks!
You can definitely see your expertise in the article you write.
The world hopes for even more passionate writers like you who aren’t afraid to mention how they believe.
All the time follow your heart.
Would you be excited about exchanging links?
Excellent post. I was checking constantly this weblog and I am impressed!
Very helpful info specially the remaining phase 🙂 I care for
such info a lot. I was seeking this particular information for a very lengthy
time. Thanks and good luck.
I keep listening to the newscast speak about getting free online grant applications so I have been looking around for the top site to get one. Could you tell me please, where could i get some?
An impressive share, I simply given this onto a colleague who was doing a little analysis on this. And he the truth is bought me breakfast because I discovered it for him.. smile. So let me reword that: Thnx for the treat! But yeah Thnkx for spending the time to debate this, I feel strongly about it and love reading more on this topic. If doable, as you develop into experience, would you mind updating your blog with extra particulars? It is extremely useful for me. Big thumb up for this weblog put up!
Very interesting topic, regards for posting. “Experience a comb life gives you after you lose your hair.” by Judith Stern.
My spouse and I absolutely love your blog and find nearly all of your post’s to be just what I’m looking for. Does one offer guest writers to write content for you? I wouldn’t mind producing a post or elaborating on many of the subjects you write about here. Again, awesome weblog!|
I’m not sure why but this weblog is loading extremely slow for me.
Is anyone else having this issue or is it
a issue on my end? I’ll check back later and see if the problem
still exists.
Hey! Do you use Twitter? I’d like to follow you if that would be okay. I’m absolutely enjoying your blog and look forward to new updates.
whoah this weblog is wonderful i like studying your articles. Keep up the good paintings! You already know, many people are hunting round for this info, you can help them greatly.
What a material of un-ambiguity and preserveness of precious knowledge concerning unexpected feelings.
This web page is known as a walk-through for the entire info you needed about this and didn’t know who to ask. Glimpse here, and you’ll definitely discover it.
I like reading through a post that can make men and
women think. Also, thanks for permitting me to comment!
Somebody necessarily assist to make significantly posts I’d state. This is the first time I frequented your website page and so far? I surprised with the analysis you made to create this particular post incredible. Excellent task!
Versuchen Siedas Beste Schlüsselnotdienst in Essen
I was recommended this blog by my cousin. I am not sure whether this post is written by him as no one else know such detailed about my difficulty. You’re incredible! Thanks!
Hello there, I found your website by way of Google at the same time as looking for a related matter, your web site got here up, it seems great. I have bookmarked it in my google bookmarks.
I was suggested this blog through my cousin. I am now not sure whether this put up is written via him as nobody else know such specified about my problem. You are amazing! Thanks!
Hi there, this weekend is good in favor of me, for the reason that this
moment i am reading this wonderful educational article here at my home.
Hello there! This is my first comment here so I just wanted to give a
quick shout out and tell you I genuinely enjoy reading your blog
posts. Can you recommend any other blogs/websites/forums
that cover the same subjects? Thank you!
Unquestionably consider that that you said. Your favorite reason appeared to
be on the net the simplest factor to take note of.
I say to you, I certainly get annoyed even as other people think about concerns that they just don’t realize
about. You managed to hit the nail upon the top and also outlined out the
whole thing without having side-effects , other people
can take a signal. Will likely be back to get more.
Thank you
I blog quite often and I truly thank you for your information. Your article has really peaked my interest.
I will bookmark your site and keep checking for new details about once per week.
I subscribed to your RSS feed too.
What’s up, its fastidious piece of writing on the topic of media print, we all know media is
a great source of facts.
Of course, what a splendid website and instructive posts, I surely will bookmark your blog.All the Best!
As I web-site possessor I believe the content material here is rattling excellent , appreciate it for your hard work. You should keep it up forever! Best of luck.
Magnificent goods from you, man. I have be aware your stuff previous to and you’re simply extremely magnificent. I actually like what you have received here, really like what you are saying and the way in which in which you assert it. You’re making it enjoyable and you still take care of to stay it sensible. I can not wait to learn much more from you. This is actually a wonderful website.
Hi, Neat post. There is a problem with your web site in internet explorer, would test this… IE still is the market leader and a big portion of people will miss your excellent writing because of this problem.
I like looking through an article that can make people think.
Also, many thanks for allowing me to comment!
Hi, Neat post. There’s a problem with your website in internet explorer, would test this… IE still is the market leader and a huge portion of people will miss your magnificent writing because of this problem.
Someone essentially assist to make significantly posts I’d state. This is the very first time I frequented your website page and thus far? I surprised with the analysis you made to make this particular publish amazing. Magnificent task!
I like what you guys are usually up too. This type of clever work and reporting! Keep up the wonderful works guys I’ve added you guys to blogroll.
Good day! I simply want to give a huge thumbs up for the great information you may have here on this post. I can be coming again to your blog for extra soon.
I think this is one of the most important information for me. And i’m glad reading your article. But want to remark on some general things, The web site style is perfect, the articles is really great : D. Good job, cheers
Keep on writing, great job!
I have recently started a web site, the information you provide on this web site has helped me tremendously. Thank you for all of your time & work. “My dear and old country, here we are once again together faced with a heavy trial.” by Charles De Gaulle.
I like what you guys are up too. Such clever work and reporting! Keep up the excellent works guys I have incorporated you guys to my blogroll. I think it’ll improve the value of my site 🙂
Hey! I know this is kinda off topic but I was wondering if you knew where I could
locate a captcha plugin for my comment form? I’m using the same blog platform as yours and I’m
having trouble finding one? Thanks a lot!
I was just seeking this information for a while. After 6 hours of continuous Googleing, finally I got it in your site. I wonder what is the lack of Google strategy that don’t rank this kind of informative websites in top of the list. Generally the top websites are full of garbage.
Aw, this was an extremely nice post. Taking the time and actual effort to make a top notch article… but what can I say… I procrastinate a lot and don’t seem to get nearly anything done.|
Thank you for any other informative website. The place else may I get that type of information written in such an ideal approach? I have a project that I’m simply now operating on, and I have been on the look out for such info.
I am constantly looking online for ideas that can assist me. Thx!
I’m not positive the place you are getting your information, but great topic. I needs to spend some time finding out more or understanding more. Thanks for magnificent info I was searching for this info for my mission.
Excellent post. I was checking continuously this blog and I’m impressed! Extremely helpful information specially the last part 🙂 I care for such information much. I was seeking this particular info for a very long time. Thank you and best of luck.
I’m still learning from you, as I’m trying to achieve my goals. I absolutely liked reading everything that is posted on your blog.Keep the information coming. I loved it!
you’ve an incredible blog here! would you prefer to make some invite posts on my blog?
Wonderful blog! I found it while surfing around on Yahoo News. Do you have any suggestions on how to get listed in Yahoo News? I’ve been trying for a while but I never seem to get there! Appreciate it
Well I definitely liked studying it. This tip provided by you is very helpful for proper planning.
Your house is valueble for me. Thanks!…
I’d have to test with you here. Which is not one thing I often do! I take pleasure in reading a post that will make people think. Additionally, thanks for allowing me to comment!
Interesting website, i read it but i still have a few questions. shoot me an email and we will talk more becasue i may have an interesting idea for you.slot deposit via dana
I’ll right away grab your rss as I can not find your e-mail subscription link or newsletter service. Do you’ve any? Please let me know in order that I could subscribe. Thanks.
Does your blog have a contact page? I’m having a tough time locating it but, I’d like to shoot you an e-mail. I’ve got some recommendations for your blog you might be interested in hearing. Either way, great website and I look forward to seeing it expand over time.
Excellent goods from you, man. I have understand your stuff previous to and you are just too great. I actually like what you have acquired here, really like what you are saying and the way in which you say it. You make it enjoyable and you still take care of to keep it sensible. I can’t wait to read far more from you. This is actually a terrific web site.
It’s awesome to go to see this web site and reading the views of all friends about this paragraph, while I am
also eager of getting familiarity.
Thank you, I have recently been looking for information about this topic for a long time and yours is the greatest I have discovered till now. But, what about the conclusion? Are you sure concerning the source?
This is getting a bit more subjective, but I much prefer the Zune Marketplace. The interface is colorful, has more flair, and some cool features like ‘Mixview’ that let you quickly see related albums, songs, or other users related to what you’re listening to. Clicking on one of those will center on that item, and another set of “neighbors” will come into view, allowing you to navigate around exploring by similar artists, songs, or users. Speaking of users, the Zune “Social” is also great fun, letting you find others with shared tastes and becoming friends with them. You then can listen to a playlist created based on an amalgamation of what all your friends are listening to, which is also enjoyable. Those concerned with privacy will be relieved to know you can prevent the public from seeing your personal listening habits if you so choose.slot online
I just like the helpful info you supply for your articles.
I’ll bookmark your blog and check once more right here regularly.
I am reasonably certain I’ll be told lots of new stuff right here!
Good luck for the next!
It’s going to be ending of mine day, but before end I am reading this fantastic piece of writing to
increase my know-how.
Thank you for the sensible critique. Me and my neighbor were just preparing to do some research about this. We got a grab a book from our local library but I think I learned more from this post. I’m very glad to see such wonderful info being shared freely out there.
Fantastic goods from you, man. I’ve understand your stuff previous
to and you’re just too wonderful. I actually like what you’ve acquired here, certainly like what
you’re saying and the way in which you say it. You make it enjoyable and you still
take care of to keep it wise. I can not wait to read far
more from you. This is really a terrific web site.
It’s amazing designed for me to have a website, which is useful designed for my experience.
thanks admin
I’m still learning from you, as I’m trying to achieve my goals. I definitely liked reading everything that is written on your site.Keep the tips coming. I enjoyed it!
At this moment I am going away to do my breakfast, after
having my breakfast coming yet again to read other news.
Simply want to say your article is as astonishing. The clearness on your put up is simply excellent and i can suppose you’re a professional on this subject.
Fine together with your permission allow me to seize your RSS feed to keep up to
date with impending post. Thank you a million and
please continue the rewarding work.
I will immediately take hold of your rss feed as I can’t in finding your email subscription link or newsletter service.
Do you have any? Kindly allow me realize in order that
I may subscribe. Thanks.
I have been surfing online more than 4 hours today, yet I never
found any interesting article like yours. It’s pretty worth enough for me.
Personally, if all webmasters and bloggers made good content as you did, the web will be a lot more useful than ever before.
Aw, this was a very nice post. In idea I wish to put in writing like this moreover – taking time and actual effort to make a very good article… however what can I say… I procrastinate alot and not at all appear to get one thing done.
Found this on MSN and I’m happy I did. Well written article.Comprar seguidores insta
yonetebilmek zithromax and pregnancy energier azithromycin 500 mg how long does it take to work azithromycin used for – zithromax
dosage cats [url=http://zithromax.shop/#]zithromax for kids[/url] pundits azithromycin allergic reaction symptoms
I’m still learning from you, as I’m making my way to the top as well. I certainly liked reading everything that is written on your website.Keep the posts coming. I liked it!
I think the admin of this web site is really working hard in favor of his site, as here
every stuff is quality based stuff.
I have to express my thanks to you for rescuing me from this particular predicament. After browsing throughout the the net and coming across strategies that were not pleasant, I believed my life was done. Living minus the answers to the issues you have fixed all through your entire posting is a critical case, and the ones that would have negatively damaged my career if I hadn’t encountered your website. Your own understanding and kindness in maneuvering all things was helpful. I am not sure what I would’ve done if I had not discovered such a thing like this. I can at this point relish my future. Thanks very much for the skilled and sensible guide. I will not hesitate to recommend your web site to anybody who needs to have guidelines on this subject.
each time i used to read smaller content that also clear their motive, and that
is also happening with this paragraph which I am reading at this time.
Fabulous, what a website it is! This webpage provides useful
facts to us, keep it up.
Wonderful work! This is the type of info that should be shared around the internet. Shame on Google for not positioning this post higher! Come on over and visit my site . Thanks =)
I have read several good stuff here. Certainly value bookmarking for revisiting.
I surprise how so much effort you place to make this type of wonderful informative
web site.
I would like to get across my love for your kind-heartedness in support of those people that should have help on this one issue. Your very own commitment to passing the message up and down ended up being astonishingly important and has continually encouraged guys much like me to attain their desired goals. Your entire important publication signifies a great deal a person like me and additionally to my office colleagues. With thanks; from all of us.
It’s actually a great and useful piece of information. I’m happy that you
shared this useful information with us. Please keep
us informed like this. Thanks for sharing.
Hello would you mind letting me know which webhost you’re using? I’ve loaded your blog in 3 different internet browsers and I must say this blog loads a lot faster then most. Can you recommend a good hosting provider at a reasonable price? Thanks a lot, I appreciate it!
Hmm it seems like your website ate my first comment (it was extremely long)
so I guess I’ll just sum it up what I submitted and say, I’m thoroughly enjoying your blog.
I too am an aspiring blog blogger but I’m still new to everything.
Do you have any tips for newbie blog writers? I’d definitely appreciate it.
Hello There. I found your blog using msn. This is a very well
written article. I will be sure to bookmark it and come back to read more of your
useful info. Thanks for the post. I will certainly return.
After going over a number of the blog posts on your site, I really appreciate your technique of blogging.
I book-marked it to my bookmark site list and will be checking back soon. Please check out my website too and
tell me what you think.
F*ckin’ tremendous things here. I am very glad to see your post. Thanks a lot and i’m looking forward to contact you. Will you please drop me a mail?
Does your site have a contact page? I’m having trouble locating it but, I’d like to send you an e-mail. I’ve got some recommendations for your blog you might be interested in hearing. Either way, great blog and I look forward to seeing it improve over time.
I got this website from my buddy who told me regarding this web site and at the moment this time I
am browsing this web site and reading very informative articles here.
Absolutely pent subject matter, appreciate it for selective information .Trading für Anfänger
Hey there, You’ve done a great job. I will definitely digg it and personally recommend to my friends. I am sure they’ll be benefited from this site.
Thanks for a marvelous posting! I seriously enjoyed reading it, you may be a great author.I will remember to bookmark your blog and definitely will come back later on. I want to encourage one to continue your great writing, have a nice evening!
I love your wp format, where did you get a hold of it?Trading lernen
Do you mind if I quote a few of your posts as long as I provide credit and sources back to your webpage?
My blog site is in the exact same niche as yours
and my visitors would really benefit from some of the information you
provide here. Please let me know if this okay with you. Thanks!
Good answer back in return of this difficulty with solid arguments and explaining
all concerning that.
hey there and thank you for your information – I’ve certainly picked up anything new from right here. I did however expertise some technical points using this website, as I experienced to reload the web site lots of times previous to I could get it to load properly. I had been wondering if your hosting is OK? Not that I am complaining, but slow loading instances times will sometimes affect your placement in google and could damage your high quality score if ads and marketing with Adwords. Well I’m adding this RSS to my e-mail and could look out for a lot more of your respective fascinating content. Ensure that you update this again very soon..
What’s Taking place i’m new to this, I stumbled upon this I’ve discovered It absolutely useful and it has aided me out loads.
I am hoping to give a contribution & aid other users like its helped me.
Good job.
Hi there, I found your web site by means of Google at the same time as searching for a related topic, your web site got here up, it appears good. I’ve bookmarked it in my google bookmarks.
I have learn several excellent stuff here. Definitely price bookmarking for revisiting. I surprise how much attempt you place to make such a excellent informative website.
There is clearly a lot to know about this. I suppose you made various nice points in features also.
Heya i am for the first time here. I found this board and I find It truly useful & it helped me out a lot. I hope to give something back and help others like you helped me.
Appreciating the dedication you put into your site and detailed information you offer.
It’s awesome to come across a blog every once in a while that isn’t
the same outdated rehashed material. Fantastic read! I’ve bookmarked your site and I’m including your RSS feeds to my Google account.
Excellent blog you have got here.. It’s difficult to
find high quality writing like yours nowadays. I seriously appreciate individuals like you!
Take care!!
There are some interesting closing dates on this article but I don’t know if I see all of them center to heart. There’s some validity however I will take hold opinion till I look into it further. Good article , thanks and we would like extra! Added to FeedBurner as effectively
Good write-up, I’m regular visitor of one’s web site, maintain up the nice operate, and It’s going to be a regular visitor for a lengthy time.
The crux of your writing whilst appearing reasonable originally, did not sit properly with me after some time. Somewhere throughout the sentences you managed to make me a believer but only for a short while. I however have a problem with your leaps in logic and one would do nicely to help fill in those gaps. In the event you actually can accomplish that, I will certainly end up being impressed.
Can you tell us more about this? I’d love to find out some additional
information.
Howdy! This article could not be written much better!
Looking at this post reminds me of my previous roommate!
He always kept preaching about this. I’ll forward this post to him.
Fairly certain he’s going to have a very good read. Thank you for
sharing!
I am not sure where you are getting your info, but good topic. I needs to spend some time learning much more or understanding more. Thanks for wonderful info I was looking for this info for my mission.
Nice answers in return of this question with real arguments and describing the whole
thing on the topic of that.
Right away I am ready to do my breakfast, once having my breakfast coming again to read additional news.
Hello my family member! I wish to say that this post is awesome, nice written and include approximately all vital infos.
I’d like to see more posts like this .
Needed to compose you a tiny note to finally thank you very much yet again for your personal splendid methods you have discussed above. It is strangely open-handed with people like you to provide publicly all that a number of people would have marketed as an electronic book to generate some bucks for their own end, primarily now that you could possibly have tried it if you ever wanted. These inspiring ideas likewise acted like a fantastic way to know that the rest have the same dreams really like my personal own to see a whole lot more concerning this problem. I’m sure there are thousands of more enjoyable times in the future for many who check out your blog.daftar slot deposit pulsa
I’m not that much of a online reader to be honest but your sites really nice, keep it up!
I’ll go ahead and bookmark your website to come back later on. Cheers
“These individuals need me for their organizations – but since of the manner in which the framework is, we are being driven out.
Now we know who the ssebnile one is here. Great post!トレーディング と は
Have you ever thought about writing an ebook or guest authoring on other websites?
I have a blog based on the same information you discuss and would really like to
have you share some stories/information. I know my subscribers
would enjoy your work. If you’re even remotely interested, feel free to
shoot me an e mail.
Thank you for the good writeup. It in truth used to be a enjoyment account it.
Look complex to more added agreeable from you! However, how
can we keep up a correspondence?
I haven?¦t checked in here for some time because I thought it was getting boring, but the last few posts are great quality so I guess I?¦ll add you back to my everyday bloglist. You deserve it my friend 🙂
Hey I know this is off topic but I was wondering if you knew of
any widgets I could add to my blog that automatically tweet my newest twitter updates.
I’ve been looking for a plug-in like this for quite some time and was hoping maybe you would have some experience with something like this.
Please let me know if you run into anything. I truly enjoy reading
your blog and I look forward to your new updates.
Nice site. On your blogs very interest and i will tell a friends.トレーディング
Next time I read a blog, Hopefully it won’t fail me just as much as this particular one. I mean, Yes, it was my choice to read, but I truly thought you would have something interesting to say. All I hear is a bunch of crying about something you can fix if you weren’t too busy seeking attention.
Woah! I’m really digging the template/theme of this blog.
It’s simple, yet effective. A lot of times it’s very difficult to get that “perfect balance” between user friendliness and visual appeal.
I must say that you’ve done a awesome job with this. Also, the blog loads super quick for me on Safari.
Exceptional Blog!
you are actually a excellent webmaster. The website loading pace is incredible. It seems that you’re doing any distinctive trick. Furthermore, The contents are masterpiece. you have performed a magnificent process on this matter!
Hi! Do you know if they make any plugins to safeguard against hackers? I’m kinda paranoid about losing everything I’ve worked hard on. Any recommendations?
Wow, marvelous blog structure! How lengthy have you been running a blog
for? you make running a blog glance easy. The entire glance of your website is
excellent, let alone the content material!
Hi it’s me, I am also visiting this web page regularly,
this web site is really good and the visitors are truly sharing good thoughts.
You could definitely see your enthusiasm within the article you write.
The world hopes for more passionate writers
like you who aren’t afraid to mention how they believe.
Always follow your heart.
hey there and thank you for your information – I’ve definitely picked up anything new from right here. I did however expertise a few technical points using this site, since I experienced to reload the site lots of times previous to I could get it to load correctly. I had been wondering if your web hosting is OK? Not that I’m complaining, but slow loading instances times will often affect your placement in google and could damage your quality score if ads and marketing with Adwords. Anyway I’m adding this RSS to my e-mail and can look out for a lot more of your respective fascinating content. Make sure you update this again soon..
Hi! I could have sworn I’ve visited this web site before
but after looking at many of the articles I realized it’s new to me.
Anyhow, I’m certainly happy I found it and I’ll be bookmarking it and checking
back often!
We are a group of volunteers and opening a new scheme in our community. Your site offered us with valuable information to work on. You’ve done an impressive job and our entire community will be thankful to you.
Thanks for another excellent post. Where else could anybody get that kind of information in such an ideal way of writing? I have a presentation next week, and I am on the look for such info.
We’re a bunch of volunteers and starting a brand new scheme in our community. Your web site offered us with helpful information to paintings on. You’ve performed a formidable job and our whole group will probably be grateful to you.
hello!,I like your writing very much! share we communicate more about your post on AOL? I need a specialist on this area to solve my problem. May be that’s you! Looking forward to see you.
Hello There. I found your blog using msn. This is an extremely well written article.
I’ll make sure to bookmark it and return to read more
of your useful information. Thanks for the
post. I will certainly comeback.
I just could not depart your website prior to suggesting that I actually enjoyed the standard info a person provide for your visitors? Is going to be back often in order to check up on new posts
I was wondering if you ever thought of changing the structure of your blog? Its very well written; I love what youve got to say. But maybe you could a little more in the way of content so people could connect with it better. Youve got an awful lot of text for only having 1 or two images. Maybe you could space it out better?
Oh my goodness! an amazing article dude. Thanks Nevertheless I am experiencing situation with ur rss . Don’t know why Unable to subscribe to it. Is there anyone getting similar rss drawback? Anybody who knows kindly respond. Thnkx
Domates Çorbası Tarifi Nasıl Yapılır? · Domates çorbası yapmak için yağ ve un bir tencerede hafifçe kavrulur. · Diğer taraftan kabuğu çıkarılıp, …
Sizler için hazırlamış olduğumuz Mardin gezilecek yerler listesi için okumaya devam edin…
İnstagram Takipçi Kasma … Nasıl Çalışır – Kullanıcı adını ve kaç takipçi gelmesini istediğini seçip İşlemi Başlat Butonuna basın, Açılan sayfada 5-10 dakika …
Hello, i feel that i noticed you visited my weblog so i came to “go back the want”.I’m attempting to find things to enhance my web site!I guess its good enough to make use of some of your concepts!!
I am actually glad to glance at this website posts which carries lots of
useful information, thanks for providing these statistics.
I would like to thank you for the efforts you have put in writing this web site. I’m hoping the same high-grade blog post from you in the upcoming as well. In fact your creative writing skills has inspired me to get my own blog now. Actually the blogging is spreading its wings fast. Your write up is a good example of it.
First off I would like to say terrific blog! I had a quick question in which
I’d like to ask if you do not mind. I was curious to know how you center yourself and clear
your head prior to writing. I have had a tough
time clearing my mind in getting my ideas out. I do take pleasure in writing but it just seems
like the first 10 to 15 minutes are wasted simply just trying to figure out how to begin.
Any ideas or hints? Thank you!
Thank you for every other magnificent post. Where else may anyone get that kind of information in such a perfect way of writing? I’ve a presentation next week, and I’m at the search for such information.
Very good information. Lucky me I found your website by chance (stumbleupon).
I’ve book marked it for later!
You could definitely see your enthusiasm within the work you write. The sector hopes for more passionate writers such as you who aren’t afraid to say how they believe. All the time follow your heart.
Nearly all of whatever you assert happens to be astonishingly legitimate and it makes me wonder the reason why I hadn’t looked at this with this light previously. Your article really did switch the light on for me personally as far as this particular issue goes. But there is actually just one point I am not really too comfortable with and whilst I try to reconcile that with the actual main idea of your position, let me see what all the rest of the visitors have to point out.Very well done.
Do you mind if I quote a couple of your posts as
long as I provide credit and sources back to your weblog?
My website is in the exact same area of interest as yours and my users
would certainly benefit from some of the information you provide here.
Please let me know if this alright with you. Thanks a lot!
I’ve been browsing online greater than three hours lately, but
I by no means discovered any fascinating article like yours.
It’s beautiful price sufficient for me. Personally,
if all site owners and bloggers made good content as
you probably did, the net will likely be a lot more useful than ever before.
Hi there, just changed into alert to your blog via Google, and located that it’s truly informative. I’m gonna watch out for brussels. I will be grateful should you continue this in future. Numerous people can be benefited from your writing. Cheers!
What i do not understood is in fact how you’re not actually a lot more smartly-appreciated than you might
be right now. You are very intelligent. You realize therefore significantly
in the case of this topic, produced me in my
opinion consider it from numerous varied angles.
Its like men and women aren’t interested except it is something to do with Woman gaga!
Your personal stuffs nice. Always take care of it up!
Hi! I know this is kind of off topic but I was wondering if you knew where I could get a captcha plugin for my comment form?
I’m using the same blog platform as yours and I’m having difficulty finding one?
Thanks a lot!
I found your blog web site on google and examine a couple of of your early posts. Continue to maintain up the very good operate. I simply further up your RSS feed to my MSN Information Reader. Searching for ahead to studying extra from you in a while!…
Good day! Do you use Twitter? I’d like to follow you if that would be ok.
I’m undoubtedly enjoying your blog and look forward to new
updates.
The new Zune browser is surprisingly good, but not as good as the iPod’s. It works well, but isn’t as fast as Safari, and has a clunkier interface. If you occasionally plan on using the web browser that’s not an issue, but if you’re planning to browse the web alot from your PMP then the iPod’s larger screen and better browser may be important.situs judi slot online
This post is really a pleasant one it assists new internet viewers, who are wishing in favor of blogging.
Link exchange is nothing else however it is simply placing
the other person’s webpage link on your page at proper place and other person will also do similar in support of you.
you are truly a just right webmaster. The web site loading velocity is amazing.
It seems that you are doing any distinctive trick. In addition, The
contents are masterwork. you have done a excellent process in this topic!
I’m curious to find out what blog platform you’re utilizing?
I’m having some minor security issues with my latest site and I’d like to find
something more safe. Do you have any recommendations?
Yeah bookmaking this wasn’t a bad conclusion great post! .deliplus
Thanks for this grand post, I am glad I observed this website on yahoo.pataks
WOW just what I was searching for. Came here by
searching for 울산 대딸
I like what you guys are up too. Such intelligent work and reporting! Carry on the excellent works guys I?¦ve incorporated you guys to my blogroll. I think it’ll improve the value of my site 🙂
Your article has proven useful to me. It’s very informative and you are obviously very knowledgeable in this area. You have opened my eyes to varying views on this topic with interesting and solid content.slot online deposit murah
I absolutely love your blog and find a lot of your post’s to be exactly I’m looking for. can you offer guest writers to write content to suit your needs? I wouldn’t mind writing a post or elaborating on a few of the subjects you write in relation to here. Again, awesome weblog!pastoret
Good day I am so excited I found your web site, I really found you by accident, while I was researching
on Askjeeve for something else, Regardless I am here now and
would just like to say thank you for a marvelous post and a all round thrilling blog (I also love the theme/design), I
don’t have time to read through it all at the minute but I have saved
it and also added in your RSS feeds, so when I have time I will be
back to read a lot more, Please do keep up the superb jo.
Undeniably believe that which you said. Your favorite reason appeared to
be on the internet the easiest thing to be aware of.
I say to you, I definitely get irked while people consider worries that they just do not know about.
You managed to hit the nail upon the top and also defined out the whole thing without having side effect , people could take a signal.
Will probably be back to get more. Thanks
I like this blog very much so much good information.
Heya! I just wanted to ask if you ever have any problems with hackers? My last blog (wordpress) was hacked and I ended up losing a few months of hard work due to no back up. Do you have any methods to prevent hackers?
Needed to compose you a tiny note to finally thank you very much yet again for your personal splendid methods you have discussed above. It is strangely open-handed with people like you to provide publicly all that a number of people would have marketed as an electronic book to generate some bucks for their own end, primarily now that you could possibly have tried it if you ever wanted. These inspiring ideas likewise acted like a fantastic way to know that the rest have the same dreams really like my personal own to see a whole lot more concerning this problem. I’m sure there are thousands of more enjoyable times in the future for many who check out your blog.daftar slot deposit pulsa
Asking questions are genuinely nice thing if you are not
understanding something fully, however this piece of writing gives nice understanding yet.
Needed to compose you a tiny note to finally thank you very much yet again for your personal splendid methods you have discussed above. It is strangely open-handed with people like you to provide publicly all that a number of people would have marketed as an electronic book to generate some bucks for their own end, primarily now that you could possibly have tried it if you ever wanted. These inspiring ideas likewise acted like a fantastic way to know that the rest have the same dreams really like my personal own to see a whole lot more concerning this problem. I’m sure there are thousands of more enjoyable times in the future for many who check out your blog.daftar slot deposit pulsa
Hi there, just became aware of your blog through Google,
and found that it is truly informative. I’m going to watch out for brussels.
I’ll appreciate if you continue this in future.
A lot of people will be benefited from your writing.
Cheers!
The new Zune browser is surprisingly good, but not as good as the iPod’s. It works well, but isn’t as fast as Safari, and has a clunkier interface. If you occasionally plan on using the web browser that’s not an issue, but if you’re planning to browse the web alot from your PMP then the iPod’s larger screen and better browser may be important.situs judi slot online
İzmir Mietwagen März İzmir Flughafen Preise und Fahrzeugmodelle
Hello there I am so thrilled I found your web site, I
really found you by accident, while I was researching on Digg for something else, Nonetheless I am here now and would just like to say
thanks a lot for a marvelous post and a all round
thrilling blog (I also love the theme/design), I don’t have time to
browse it all at the moment but I have book-marked it and
also added your RSS feeds, so when I have time
I will be back to read a great deal more, Please do keep up
the superb jo.
I don’t know if it’s just me or if perhaps everyone else experiencing problems with your website.
It seems like some of the text in your content are running off the
screen. Can somebody else please comment and let me know if this is happening to them as well?
This could be a issue with my web browser because I’ve had this
happen previously. Thanks
Superb, what a weblog it is! This website presents helpful data to us, keep it up.|
Hello there I am so happy I found your website, I really found you by
accident, while I was searching on Google for something else, Anyhow I
am here now and would just like to say thanks a lot for a tremendous post and a all round entertaining
blog (I also love the theme/design), I don’t have time to read through it
all at the moment but I have saved it and also added your RSS
feeds, so when I have time I will be back to read a lot more, Please do
keep up the great work.
Wow, superb blog structure! How long have you ever been blogging for? you make running a blog look easy. The total glance of your site is fantastic, as well as the content material!
You made some good points there. I did a search on the subject matter and found most people will consent with your website.
Wonderful post however , I was wanting to know if you could write a litte more on this subject?
I’d be very thankful if you could elaborate a little bit more.
Many thanks!
It’s actually a cool and useful piece of info. I’m happy
that you simply shared this useful information with us.
Please keep us up to date like this. Thank you for sharing.
Hello Dear, are you in fact visiting this web site on a regular basis, if so then you will definitely take fastidious experience.
Greetings I am so delighted I found your site, I really found you by
error, while I was looking on Digg for something else, Anyhow I am here now and
would just like to say thank you for a tremendous post and a all round exciting blog (I also love
the theme/design), I don’t have time to browse it all
at the moment but I have saved it and also added in your RSS feeds, so when I
have time I will be back to read a great deal more, Please
do keep up the superb work.
With havin so much content do you ever run into any issues of plagorism or copyright
violation? My blog has a lot of unique content I’ve either created myself or outsourced but it seems a lot of it is popping it up all
over the web without my agreement. Do you know any ways to help protect against content from being stolen? I’d really appreciate it.
obviously like your web-site but you have to check the spelling on quite a few of your posts. A number of them are rife with spelling issues and I find it very troublesome to tell the truth nevertheless I will surely come back again.
I blog quite often and I truly appreciate your information. Your article has really peaked my interest.
I will take a note of your site and keep checking for new details about once a week.
I opted in for your RSS feed too.
Hi there would you mind stating which blog platform
you’re using? I’m going to start my own blog soon but I’m having a hard time deciding between BlogEngine/Wordpress/B2evolution and Drupal.
The reason I ask is because your design and style seems different then most
blogs and I’m looking for something completely unique.
P.S My apologies for getting off-topic but I had to
ask!
Hi there, just became aware of your blog through Google, and found that it is truly
informative. I am going to watch out for brussels.
I’ll be grateful if you continue this in future.
A lot of people will be benefited from your writing.
Cheers!
I like the helpful information you provide in your articles. I’ll bookmark your weblog and check again here regularly. I am quite certain I’ll learn many new stuff right here! Best of luck for the next!
I must express my admiration for your kindness for all those that have the need for guidance on in this field. Your special commitment to getting the solution across turned out to be astonishingly interesting and have continuously empowered others like me to achieve their aims. Your interesting guidelines implies so much to me and even further to my colleagues. With thanks; from everyone of us.
Nice blog! Is your theme custom made or did you download it from somewhere? A design like yours with a few simple tweeks would really make my blog jump out. Please let me know where you got your design. With thanks
Heya i am for the first time here. I came across this
board and I find It truly useful & it helped me out a lot.
I hope to give something back and aid others like you helped me.
Interesting website, i read it but i still have a few questions. shoot me an email and we will talk more becasue i may have an interesting idea for you.slot deposit via dana
I’m not sure where you’re getting your info, but great topic.
I needs to spend some time learning more or understanding more.
Thanks for wonderful info I was looking for this information for
my mission.
If some one needs expert view about blogging after that i suggest him/her to visit this blog, Keep up the
nice job.
I’m impressed, I have to admit. Seldom do I come across a blog that’s both equally educative and entertaining, and
let me tell you, you’ve hit the nail on the
head. The issue is something that too few people are speaking intelligently about.
I am very happy that I found this during my hunt for something concerning this.
I am not sure where you are getting your info, but great topic.
I must spend a while studying more or working out more.
Thank you for great information I was in search of this information for my mission.
Needed to compose you a tiny note to finally thank you very much yet again for your personal splendid methods you have discussed above. It is strangely open-handed with people like you to provide publicly all that a number of people would have marketed as an electronic book to generate some bucks for their own end, primarily now that you could possibly have tried it if you ever wanted. These inspiring ideas likewise acted like a fantastic way to know that the rest have the same dreams really like my personal own to see a whole lot more concerning this problem. I’m sure there are thousands of more enjoyable times in the future for many who check out your blog.daftar slot deposit pulsa
Right now it looks like Movable Type is the best blogging platform available right now. (from what I’ve read) Is that what you’re using on your blog?
Your article has proven useful to me. It’s very informative and you are obviously very knowledgeable in this area. You have opened my eyes to varying views on this topic with interesting and solid content.slot online deposit murah
Hi there to every one, because I am in fact keen of reading this web site’s post to
be updated regularly. It contains fastidious stuff.
Thanks a lot for sharing this with all of us you really understand what you are speaking about! Bookmarked. Kindly also discuss with my web site =). We may have a hyperlink change arrangement among us!
Thanks , I have just been looking for information about this subject for ages and yours is the best I have came upon till now. However, what concerning the bottom line? Are you certain concerning the source?
I have been checking out some of your articles and it’s clever stuff. I will surely bookmark your website.
You’ve made some good points there. I looked on the net to find out more about the issue and found most individuals will go along with your views on this web site.
This paragraph will assist the internet visitors for setting up new weblog or even a weblog from start to end.
WOW just what I was looking for. Came here by searching for 사설 카지노
Fantastic beat ! I would like to apprentice while you amend your web site, how can i subscribe for a
blog website? The account aided me a acceptable deal. I had been tiny bit acquainted of this your broadcast offered bright
clear concept
You’ve made some really good points there. I checked on the net to
find out more about the issue and found most individuals
will go along with your views on this web site.
What’s up to every body, it’s my first visit of this website; this weblog includes amazing and truly excellent data in support of
visitors.
What i don’t realize is in truth how you’re not actually a lot more neatly-favored
than you may be right now. You’re very intelligent. You already know therefore significantly in the case of this subject, made me in my opinion believe it from a lot of numerous angles.
Its like women and men don’t seem to be involved until it’s one
thing to do with Lady gaga! Your personal stuffs excellent.
Always maintain it up!
Hello, i read your blog from time to time and i own a similar one and i was just curious if you get a lot of spam feedback? If so how do you reduce it, any plugin or anything you can suggest? I get so much lately it’s driving me mad so any help is very much appreciated.
I’m not sure where you’re getting your information, but good topic. I needs to spend some time learning more or understanding more. Thanks for great information I was looking for this info for my mission.
Wonderful work! This is the kind of information that should be shared around the web. Shame on Google for now not positioning this post upper! Come on over and discuss with my web site . Thanks =)
you’re in point of fact a excellent webmaster. The site loading pace is incredible. It seems that you’re doing any unique trick. Moreover, The contents are masterpiece. you have performed a fantastic activity in this topic!|
When some one searches for his vital thing, therefore he/she
desires to be available that in detail, therefore that thing is maintained over here.
Hi there very nice site!! Man .. Beautiful ..
Wonderful .. I’ll bookmark your site and take the feeds also?
I am glad to find numerous helpful information here in the put up, we’d like
work out extra strategies on this regard, thank you for sharing.
. . . . .
Kartal Hurdacı, demir, metal hurda ve geri dönüşüm alanlarında Kartal’da hizmet vermektedir. Her çeşit hurdalarınızı yerinde ve değerinde nakit olarak …
Halılarınız modern yıkama ünitelerinde yıkanmaktadır. Ayrıca halınızın bütünlüğünü veya dokusunu bozacak şampuanlar kullanılmamaktadır.
I will right away clutch your rss as I can not in finding your email subscription hyperlink or e-newsletter service. Do you’ve any? Please permit me understand so that I could subscribe. Thanks.
Hi there! I know this is kind of off topic but I was wondering
which blog platform are you using for this website?
I’m getting sick and tired of WordPress because I’ve had issues with hackers and
I’m looking at options for another platform. I would be awesome if you
could point me in the direction of a good
platform.
Web tasarım, kişi veya kurumların sundukları mal ve hizmetlerini internet ortamında tanıtması amacıyla tasarlanan yazılımlardır.
It’s truly a nice and useful piece of information. I am happy
that you simply shared this helpful info with us.
Please keep us up to date like this. Thanks for sharing.
Great goods from you, man. I’ve understand your stuff previous to and
you’re just too fantastic. I actually like what you’ve acquired here,
really like what you’re saying and the way in which you say it.
You make it enjoyable and you still care for to keep it sensible.
I can’t wait to read far more from you. This is actually a terrific website.
Howdy! Someone in my Facebook group shared this site with us so I came to take a look. I’m definitely enjoying the information. I’m bookmarking and will be tweeting this to my followers! Great blog and outstanding design.
Thanks a lot for sharing this with all folks you actually understand what you are talking approximately! Bookmarked. Please additionally visit my site =). We will have a link trade contract between us!
Your blog has the same post as another author but i like your better.~:;”*bastinado
I’m curious to find out what blog platform you happen to
be working with? I’m experiencing some minor security
issues with my latest blog and I would like to find something more safeguarded.
Do you have any suggestions?
Today, I went to the beach with my kids. I found a sea shell and gave it to my 4 year old daughter and said
“You can hear the ocean if you put this to your ear.” She put the shell to her ear and screamed.
There was a hermit crab inside and it pinched her ear.
She never wants to go back! LoL I know this is totally off topic but I had to tell someone!
My brother suggested I would possibly like this web site. He was once totally right.
This submit actually made my day. You can not consider
simply how much time I had spent for this info! Thank you!
This design is wicked! You certainly know how to keep a reader amused.
Between your wit and your videos, I was almost moved to start my own blog (well, almost…HaHa!) Wonderful job.
I really enjoyed what you had to say, and more than that,
how you presented it. Too cool!
This is a topic which is close to my heart… Best wishes!
Where are your contact details though?
I need to to thank you for this wonderful read!!
I definitely enjoyed every little bit of it. I’ve got you saved as a favorite to check out new stuff you post…
Hello There. I discovered your blog using msn. This is a really well written article.
I’ll make sure to bookmark it and come back to learn more of your useful info.
Thank you for the post. I will certainly comeback.
We are a gaggle of volunteers and starting a brand new scheme in our community. Your site offered us with useful info to paintings on. You have done a formidable activity and our entire group shall be grateful to you.
Magnificent items from you, man. I’ve keep in mind your
stuff previous to and you’re just extremely wonderful.
I really like what you’ve acquired right here, certainly like what
you’re saying and the best way during which you assert
it. You’re making it entertaining and you still care for to
keep it smart. I can not wait to learn far more from you.
This is actually a tremendous website.
I must show my love for your generosity for persons that must have help with this idea. Your special commitment to getting the solution throughout appeared to be amazingly informative and has in every case allowed others like me to reach their objectives. Your warm and helpful key points signifies a whole lot to me and substantially more to my office colleagues. Thank you; from all of us.
Hi, I do think this is a great blog. I stumbledupon it 😉 I will revisit yet again since i have bookmarked it. Money and freedom is the greatest way to change, may you be rich and continue to help other people.
Can I simply just say what a relief to discover a person that actually understands what they’re discussing on the web. You certainly know how to bring an issue to light and make it important. A lot more people have to read this and understand this side of the story. I was surprised that you aren’t more popular given that you certainly have the gift.
I simply must tell you that you have written an excellent and unique article that I really enjoyed reading. I’m fascinated by how well you laid out your material and presented your views. Thank you.Tips or Tricks
Thankfulness to my father who stated to me on the topic of this web site, this blog is actually awesome.
I wanted to thank you for this great read!! I absolutely enjoyed every little bit of it. I have you bookmarked to check out new stuff you post…
I really got into this article. I found it to be interesting and loaded with unique points of interest. I like to read material that makes me think. Thank you for writing this great content.Tips and Tricks
If you desire to improve your know-how just keep visiting this web site
and be updated with the latest news posted here.
I do trust all of the ideas you have offered for
your post. They are really convincing and will certainly work.
Still, the posts are very quick for newbies.
May you please prolong them a little from next time?
Thanks for the post.
Howdy! This post couldn’t be written much
better! Looking at this post reminds me of my previous roommate!
He continually kept preaching about this. I most certainly will
forward this information to him. Fairly certain he’ll have a good
read. I appreciate you for sharing!
Excellent post. I was checking constantly this blog and I am inspired!
Very useful information particularly the remaining part
🙂 I take care of such info much. I used to be seeking
this particular info for a very lengthy time. Thanks and good luck.
Hey there, I think your blog might be having browser compatibility issues.
When I look at your website in Safari, it looks fine but when opening in Internet Explorer, it has some overlapping.
I just wanted to give you a quick heads up! Other then that, amazing blog!
Hey! I know this is kinda off topic however I’d figured
I’d ask. Would you be interested in exchanging links or maybe guest writing
a blog post or vice-versa? My website covers a lot
of the same topics as yours and I feel we could greatly benefit from each other.
If you happen to be interested feel free to send me an email.
I look forward to hearing from you! Terrific blog by the way!
We are a group of volunteers and starting a new scheme in our community.
Your site provided us with valuable information to work on. You
have done an impressive job and our entire community will be thankful
to you.
Hi colleagues, how is all, and what you want to
say on the topic of this piece of writing, in my view its truly remarkable in support of me.
Thanks for finally writing about > How To Install Custom Windows XP Themes Old PC Gaming < Liked it!
I view something really special in this website.
I would like to thnkx for the efforts you have put in writing this blog. I am hoping the same high-grade blog post from you in the upcoming as well. In fact your creative writing abilities has inspired me to get my own blog now. Really the blogging is spreading its wings quickly. Your write up is a good example of it.
The very core of your writing while sounding agreeable at first, did not really sit properly with me personally after some time. Somewhere throughout the paragraphs you actually managed to make me a believer but just for a while. I nevertheless have a problem with your leaps in assumptions and one would do well to help fill in all those breaks. If you can accomplish that, I will undoubtedly end up being fascinated.
Hello, Neat post. There’s a problem along with your website in internet explorer, may check this?
IE nonetheless is the market leader and a large section of other people will omit your fantastic writing because of
this problem.
Hi! This is my first comment here so I just wanted to give a quick shout out and say I truly enjoy reading your articles. Can you suggest any other blogs/websites/forums that go over the same topics? Thank you!
I used to be able to find good advice from your blog posts.
I loved as much as you will obtain performed right here. The caricature is tasteful, your authored material stylish. nevertheless, you command get bought an edginess over that you would like be handing over the following. unwell indisputably come more in the past again as exactly the same just about a lot continuously within case you defend this hike.
Useful information. Fortunate me I discovered your website unintentionally,
and I am surprised why this twist of fate didn’t took place in advance!
I bookmarked it.
When I initially commented I clicked the “Notify me when new comments are added” checkbox and now each time a comment is added I get three emails with the same comment. Is there any way you can remove people from that service? Thanks!
Hi there! I understand this is sort of off-topic however I had to ask.
Does operating a well-established website like yours take
a massive amount work? I am brand new to running a blog but I do
write in my journal every day. I’d like to start a blog so
I will be able to share my own experience and views online.
Please let me know if you have any suggestions or tips for brand new aspiring bloggers.
Thankyou!
I’m just writing to let you understand what a cool discovery my friend’s child enjoyed using your blog. She picked up a lot of things, which include what it’s like to possess a great coaching style to let a number of people easily know just exactly specific advanced things. You really surpassed people’s desires. Thanks for distributing those precious, dependable, educational and cool thoughts on the topic to Julie.
Nice weblog here! Additionally your website loads up fast!
What host are you the use of? Can I am getting your associate
hyperlink in your host? I desire my site loaded up as quickly as yours
lol
It is perfect time to make some plans for the future and it is time to be happy. I have read this post and if I could I wish to suggest you few interesting things or suggestions. Perhaps you could write next articles referring to this article. I wish to read more things about it!
My spouse and I stumbled over here by a different website and thought
I might check things out. I like what I see so i am just
following you. Look forward to finding out about your web page yet again.
I’m really enjoying the theme/design of your web site. Do you ever run into any browser compatibility issues? A number of my blog readers have complained about my site not working correctly in Explorer but looks great in Safari. Do you have any tips to help fix this issue?
I every time used to read article in news papers but now as I am a user of net
so from now I am using net for content, thanks to web.
Howdy are using WordPress for your site platform?
I’m new to the blog world but I’m trying to get started
and create my own. Do you require any coding knowledge to
make your own blog? Any help would be really appreciated!
Hi there! I just wanted to ask if you ever have any issues with hackers?
My last blog (wordpress) was hacked and I ended up losing a few months of hard work
due to no data backup. Do you have any methods to protect against hackers?
I have been checking out many of your posts and i can state nice stuff. I will make sure to bookmark your blog.
I’m not sure exactly why but this site is loading very slow for me. Is anyone else having this problem or is it a problem on my end? I’ll check back later on and see if the problem still exists.
I like the helpful information you supply for your articles. I’ll bookmark your blog and test once more right here frequently. I’m reasonably certain I will be told a lot of new stuff right right here! Best of luck for the next!
Just desire to say your article is as astonishing.
The clarity to your submit is simply nice and i could assume
you’re knowledgeable in this subject. Fine with your permission allow me to
grab your RSS feed to stay up to date with approaching post.
Thank you one million and please continue the enjoyable
work.
Its such as you learn my mind! You appear to know a lot approximately this, such
as you wrote the e-book in it or something. I think that you
simply can do with some % to force the message
house a little bit, but other than that, that is magnificent blog.
An excellent read. I’ll definitely be back.
I know this website presents quality dependent articles and other data, is there any other website which provides such information in quality?
Hey there would you mind letting me know which webhost you’re
working with? I’ve loaded your blog in 3 completely different internet
browsers and I must say this blog loads a lot quicker then most.
Can you recommend a good hosting provider at a honest price?
Cheers, I appreciate it!
I all the time used to read article in news papers but now as I am a
user of web so from now I am using net for articles or reviews, thanks to web.
Heya! I just wanted to ask if you ever have any problems with hackers? My last blog (wordpress) was hacked and I ended up losing a few months of hard work due to no back up. Do you have any methods to prevent hackers?
Its such as you read my thoughts! You appear to understand a lot about this, like you wrote the e book in it or something. I feel that you can do with a few percent to pressure the message house a bit, but other than that, that is excellent blog. A fantastic read. I will certainly be back.
Simply want to say your article is as surprising.
The clarity in your post is just excellent and i could assume you’re an expert on this subject.
Well with your permission allow me to grab your feed to keep
updated with forthcoming post. Thanks a million and please carry on the
enjoyable work.
I was just looking for this information for some time. After six hours of continuous Googleing, at last I got it in your site. I wonder what’s the lack of Google strategy that do not rank this type of informative sites in top of the list. Generally the top websites are full of garbage.
Şifresiz ve Bedava Tiktok Takipçi Hilesi ile hemen takipçi kasmaya başla. 2022 yılının güvenilir ve çalışan Tiktok takipçi hilesi botu yanlızca …
My partner and I absolutely love your blog and find the majority of your post’s to be just what I’m looking for. Would you offer guest writers to write content available for you? I wouldn’t mind producing a post or elaborating on many of the subjects you write regarding here. Again, awesome website!
I’m excited to uncover this site. I need to to thank you for ones time for this fantastic read!! I definitely enjoyed every bit of it and i also have you saved as a favorite to check out new stuff on your blog.
Highly descriptive article, I loved that bit. Will
there be a part 2?
hello!,I like your writing very much! share we communicate more about your article on AOL? I require a specialist on this area to solve my problem. Maybe that’s you! Looking forward to see you.
Thanks a lot for sharing this with all people you actually
realize what you’re talking approximately! Bookmarked.
Please also discuss with my website =). We could have a
hyperlink alternate agreement among us
We’re a bunch of volunteers and opening a brand new scheme in our community.
Your website offered us with useful information to work on.
You have done a formidable process and our whole neighborhood will be grateful to you.
Definitely believe that which you stated. Your favorite justification seemed to be on the net
the easiest thing to be aware of. I say to you, I certainly get annoyed while people think about worries that they just
do not know about. You managed to hit the nail upon the top as well as defined out the
whole thing without having side-effects , people can take a
signal. Will likely be back to get more. Thanks
Very energetic post, I liked that bit. Will there be a part
2?
This site was… how do I say it? Relevant!! Finally I’ve found something which helped me. Thanks a lot!
Hey there would you mind stating which blog platform
you’re working with? I’m going to start
my own blog in the near future but I’m having a hard time
selecting between BlogEngine/Wordpress/B2evolution and Drupal.
The reason I ask is because your design seems different then most blogs and I’m looking for something unique.
P.S Sorry for being off-topic but I had to ask!
Post writing is also a excitement, if you know afterward you can write otherwise it
is complex to write.
Keep this going please, great job!
Wow that was strange. I just wrote an very long comment but after I clicked submit my comment didn’t show up. Grrrr… well I’m not writing all that over again. Anyway, just wanted to say great blog!
I think that everything composed made a ton of sense.
But, what about this? suppose you wrote a catchier title?
I am not suggesting your information is not solid., however what if you added a title that makes people want more?
I mean How To Install Custom Windows XP Themes Old PC Gaming is kinda vanilla.
You might peek at Yahoo’s front page and watch how
they create news headlines to grab people to open the links.
You might add a video or a picture or two to get people excited about what you’ve got to say.
In my opinion, it could bring your posts a
little bit more interesting.
NFT, herhangi bir dijital dosyanın benzersiz olduğunu onaylayan, blok zinciri adı verilen dijital defterde depolanan bir veri birimidir.
It’s hard to come by educated people in this particular
topic, however, you seem like you know what you’re
talking about! Thanks
Wow, marvelous blog layout! How long have you been blogging for? you make blogging look easy. The overall look of your site is fantastic, as well as the content!
Thank you for the auspicious writeup. It if truth be told was once a entertainment account it. Glance complex to more delivered agreeable from you! By the way, how could we keep up a correspondence?
It’s a pity you don’t have a donate button! I’d without a doubt donate to this superb blog! I guess for now i’ll settle for book-marking and adding your RSS feed to my Google account. I look forward to new updates and will talk about this blog with my Facebook group. Talk soon!
Good info. Lucky me I reach on your website by accident, I bookmarked it.
Normally I don’t learn post on blogs, but I wish to say that this write-up very pressured me to take a look at and do it! Your writing taste has been surprised me. Thanks, very great article.
Magnificent goods from you, man. I have keep in mind your stuff previous to and you are just extremely magnificent. I actually like what you’ve got right here, really like what you are saying and the way in which you say it. You are making it enjoyable and you still care for to stay it wise. I can not wait to read far more from you. That is really a tremendous web site.
I know this if off topic but I’m looking into starting my own weblog and was wondering what all is needed to get setup? I’m assuming having a blog like yours would cost a pretty penny? I’m not very web savvy so I’m not 100 sure. Any suggestions or advice would be greatly appreciated. Kudos
I’ve been surfing online more than 2 hours today, yet I never found any interesting article like yours.
It is pretty worth enough for me. In my view, if all web
owners and bloggers made good content as you did, the net will be much
more useful than ever before.
I appreciate, cause I found exactly what I was looking for. You’ve ended my 4 day long hunt! God Bless you man. Have a nice day. Bye
Wow! This could be one particular of the most helpful blogs We’ve ever arrive across on this subject. Actually Fantastic. I am also a specialist in this topic so I can understand your effort.
Hi there, You’ve done a fantastic job. I’ll
definitely digg it and personally suggest to my friends.
I am confident they’ll be benefited from this website.
Hello very cool site!! Guy .. Beautiful .. Amazing .. I’ll bookmark your web site and take the feeds additionally…I’m happy to seek out a lot of useful info here in the publish, we want develop extra strategies in this regard, thanks for sharing. . . . . .
Hi there, this weekend is fastidious for me, as this point in time i am reading this fantastic informative post here at my house.
After study a few of the weblog posts in your website now, and I actually like your approach of blogging. I bookmarked it to my bookmark web site record and might be checking again soon. Pls take a look at my web page as effectively and let me know what you think.
BROTHER 1040 Orjinal Toner yüksek kalitede ki ürünümüzü online mağazamızdan güvenle satın almak için sayfamızı ziyaret edin!
Hey there this is kind of of off topic but I was wondering if blogs use WYSIWYG editors or if you have to manually code with HTML. I’m starting a blog soon but have no coding know-how so I wanted to get guidance from someone with experience. Any help would be enormously appreciated!
Hey very cool website!! Man .. Excellent .. Amazing .. I will bookmark your blog and take the feeds also…I am happy to find so many useful info here in the post, we need develop more techniques in this regard, thanks for sharing. . . . . .
You need to be a part of a contest for one of
the highest quality blogs on the net. I’m going to highly recommend this
web site!
Right here is the right site for anybody who hopes to find out about this topic. You know so much its almost tough to argue with you (not that I personally will need to…HaHa). You definitely put a brand new spin on a subject that has been discussed for a long time. Excellent stuff, just wonderful!
It’s really a nice and helpful piece of info.
I’m glad that you simply shared this useful information with us.
Please keep us up to date like this. Thanks for sharing.
Do you want find other ways to get more social media engagment? Click in my profile link for more info
Hi there, its fastidious piece of writing concerning media print,
we all understand media is a great source of facts.
Hurrah! In the end I got a web site from where I know how to really get useful information regarding
my study and knowledge.
You could certainly see your skills in the article you write.
The world hopes for more passionate writers such
as you who aren’t afraid to say how they believe.
All the time follow your heart.
Hi, Neat post. There is a problem with your website in internet explorer, would check this?
IE nonetheless is the marketplace chief and a big section of other
folks will omit your wonderful writing because of this
problem.
Its such as you learn my mind! You appear to know so much approximately this, like
you wrote the guide in it or something. I feel that you simply could do with a few percent to pressure the message house a bit, but other than that, this is wonderful blog.
An excellent read. I will certainly be back.
Everyone loves what you guys tend to be up too. This type of clever
work and reporting! Keep up the good works guys I’ve
incorporated you guys to blogroll.
Pretty section of content. I just stumbled upon your web site and in accession capital to
assert that I get actually enjoyed account your blog posts.
Anyway I’ll be subscribing to your feeds and even I achievement you access
consistently rapidly.
whoah this blog is magnificent i love reading your articles. Keep up the good work! You know, lots of people are searching around for this information, you could aid them greatly.
Best Social Media Services 2022 – We offer: – Stripe Deposit – Automatic order processing – 24/7 Support. Click in my profile link for more info
In the awesome scheme of things you actually get an A just for effort and hard work. Exactly where you lost us was first in your facts. You know, as the maxim goes, the devil is in the details… And it couldn’t be much more true here. Having said that, permit me reveal to you what exactly did do the job. Your writing is actually pretty convincing and that is possibly the reason why I am making the effort to comment. I do not really make it a regular habit of doing that. Second, although I can certainly notice a leaps in reason you come up with, I am not really confident of just how you appear to unite your details which inturn make the actual conclusion. For the moment I will, no doubt yield to your issue however wish in the foreseeable future you link your dots better.
Hmm is anyone else experiencing problems with the pictures on this blog loading? I’m trying to find out if its a problem on my end or if it’s the blog. Any responses would be greatly appreciated.
Hey! I know this is kinda off topic but I was wondering
if you knew where I could locate a captcha plugin for my comment form?
I’m using the same blog platform as yours and I’m having trouble
finding one? Thanks a lot!
I would like to thnkx for the efforts you have put in writing this blog. I am hoping the same high-grade blog post from you in the upcoming also. In fact your creative writing abilities has encouraged me to get my own web site now. Actually the blogging is spreading its wings fast. Your write up is a great example of it.
hello there and thank you for your info – I’ve definitely picked up something new from
right here. I did however expertise several technical issues using this web site, since
I experienced to reload the web site a lot of times previous
to I could get it to load correctly. I had been wondering if your web
host is OK? Not that I am complaining, but sluggish loading
instances times will sometimes affect your placement in google and can damage your high-quality score if advertising and
marketing with Adwords. Well I’m adding this RSS
to my email and can look out for a lot more of your respective interesting content.
Ensure that you update this again soon.
This text is invaluable. When can I find out more?
Howdy! This post could not be written any better!
Reading this post reminds me of my good old room mate!
He always kept chatting about this. I will forward this write-up to him.
Pretty sure he will have a good read. Thanks for sharing!
hello there and thank you for your info – I have certainly picked up anything
new from right here. I did however expertise some technical issues using this website, as I experienced to reload the web site many times previous to
I could get it to load properly. I had been wondering
if your hosting is OK? Not that I am complaining, but
slow loading instances times will often affect your placement in google and could damage your high quality
score if advertising and marketing with Adwords. Well
I am adding this RSS to my e-mail and can look
out for a lot more of your respective intriguing content. Ensure that
you update this again very soon.
I’d need to test with you here. Which isn’t something I usually do! I enjoy studying a submit that may make individuals think. Additionally, thanks for allowing me to remark!
Hi to all, it’s actually a fastidious for me to pay a visit this
site, it consists of precious Information.
You made some respectable factors there. I appeared on the internet for the issue and located most people will go together with with your website.
Hello there! I know this is kinda off topic however I’d figured I’d ask. Would you be interested in trading links or maybe guest writing a blog post or vice-versa? My blog covers a lot of the same topics as yours and I believe we could greatly benefit from each other. If you’re interested feel free to shoot me an e-mail. I look forward to hearing from you! Fantastic blog by the way!
Hurrah! After all I got a webpage from where I
be capable of really get valuable facts regarding my study and knowledge.
I do not know if it’s just me or if perhaps everyone else encountering issues
with your site. It appears like some of the text on your
posts are running off the screen. Can somebody else
please provide feedback and let me know if this is happening to them too?
This could be a issue with my browser because I’ve
had this happen before. Many thanks
Hi, I do think this is an excellent site. I stumbledupon it
😉 I will come back yet again since i have saved as a favorite it.
Money and freedom is the greatest way to change, may you be rich and continue
to guide others.
Someone necessarily help to make critically articles I might state. This is the first time I frequented your website page and up to now? I surprised with the research you made to make this particular submit extraordinary. Excellent task!
Excellent web site you have got here.. It’s hard to find high-quality writing like yours nowadays.
I truly appreciate people like you! Take care!!
hi!,I like your writing so much! proportion we keep in touch more approximately your article on AOL?
I require a specialist in this area to unravel my problem.
May be that is you! Having a look forward to see
you.
Woah! I’m really enjoying the template/theme of this website.
It’s simple, yet effective. A lot of times it’s tough to get that “perfect balance” between superb
usability and visual appeal. I must say you’ve done a superb job with this.
Also, the blog loads extremely fast for me on Safari.
Excellent Blog!
Mobil ödeme bozdurma! Tıklayın ve mobil ödeme bozdurma işlemi yapın. Mobil ödeme bozdurma adresidir.
Pretty section of content. I just stumbled upon your web site and in accession capital to assert that I get in fact loved account your weblog posts. Anyway I’ll be subscribing for your feeds or even I fulfillment you access constantly fast.
Hi! I could have sworn I’ve visited this web site before but after going through
a few of the posts I realized it’s new to me. Anyhow, I’m definitely delighted
I came across it and I’ll be bookmarking it and checking back regularly!
Just wish to say your article is as astounding. The clearness in your post
is just excellent and i can assume you are an expert on this subject.
Well with your permission let me to grab your feed to keep up
to date with forthcoming post. Thanks a million and please carry on the enjoyable work.
I appreciate, result in I discovered just what I was having a look for.
You have ended my 4 day long hunt! God Bless you man. Have a great day.
Bye
What’s up friends, how is the whole thing, and what
you desire to say about this piece of writing, in my view its
really awesome in favor of me.
I’ve been exploring for a little for any high-quality articles or blog posts on this kind of area . Exploring in Yahoo I at last stumbled upon this web site. Reading this info So i am happy to convey that I have a very good uncanny feeling I discovered exactly what I needed. I most certainly will make certain to don’t forget this web site and give it a look on a constant basis.
What’s up to every body, it’s my first pay a visit of this website; this website
includes remarkable and genuinely excellent material designed for readers.
Your article has proven useful to me. It’s very informative and you are obviously very knowledgeable in this area. You have opened my eyes to varying views on this topic with interesting and solid content.duplica tu dinero
Good job on this article! I really like how you presented your facts and how you made it interesting and easy to understand. Thank you.ganar dinero en línea
I’ve been exploring for a little bit for any high-quality articles or
weblog posts on this sort of space . Exploring in Yahoo
I finally stumbled upon this website. Studying
this information So i am satisfied to exhibit that I’ve
a very good uncanny feeling I came upon exactly what I needed.
I so much definitely will make certain to do not put out of your mind this site and give it a look on a relentless basis.
I am in fact grateful to the holder of this web page who has
shared this fantastic article at at this place.
Can I simply say what a aid to seek out somebody who actually is aware of what theyre speaking about on the internet. You undoubtedly know the right way to bring a difficulty to mild and make it important. Extra folks must read this and perceive this aspect of the story. I cant imagine youre no more common because you definitely have the gift.
Great goods from you, man. I’ve understand your stuff previous to and you are just too excellent. I really like what you have acquired here, certainly like what you are stating and the way in which you say it. You make it entertaining and you still care for to keep it sensible. I can’t wait to read far more from you. This is really a tremendous website.
I carry on listening to the news bulletin speak about getting free online grant applications so I have been looking around for the top site to get one. Could you advise me please, where could i get some?
you are in point of fact a excellent webmaster.
The website loading pace is amazing. It kind of feels that you are doing any
distinctive trick. Moreover, The contents are masterpiece.
you have done a wonderful task in this subject!
Nice post. I was checking continuously this weblog and I am inspired! Very useful information specifically the final section 🙂 I maintain such information a lot. I used to be seeking this particular info for a long time. Thank you and best of luck.
For the reason that the admin of this site is working, no question very quickly it will be well-known, due to its quality contents.
very nice post, i actually love this website, carry on it
You really make it seem so easy with your presentation but I find this
topic to be actually something which I think I would never understand.
It seems too complex and extremely broad for me. I am
looking forward for your next post, I’ll try to get the hang of it!
Hey there! I know this is kinda off topic however , I’d figured I’d ask. Would you be interested in trading links or maybe guest authoring a blog post or vice-versa? My blog addresses a lot of the same topics as yours and I feel we could greatly benefit from each other. If you are interested feel free to shoot me an email. I look forward to hearing from you! Wonderful blog by the way!
I appreciate, cause I found exactly what I was looking for. You’ve ended my 4 day long hunt! God Bless you man. Have a nice day. Bye
It’s really a nice and useful piece of information. I’m glad that you shared this helpful info with us. Please keep us up to date like this. Thanks for sharing.
Hey, I think your website might be having browser compatibility issues. When I look at your website in Firefox, it looks fine but when opening in Internet Explorer, it has some overlapping. I just wanted to give you a quick heads up! Other then that, excellent blog!
Very nice post. I just stumbled upon your blog and wanted to mention that I have really enjoyed surfing around your blog posts. After all I’ll be subscribing in your rss feed and I am hoping you write once more very soon!
It’s arduous to seek out knowledgeable people on this topic, but you sound like you recognize what you’re talking about! Thanks
Hey there! This is my first visit to your blog!
We are a collection of volunteers and starting
a new initiative in a community in the same niche.
Your blog provided us beneficial information to work on. You have done a outstanding job!
Write more, thats all I have to say. Literally, it seems as though you relied on the video to make your point. You clearly know what youre talking about, why waste your intelligence on just posting videos to your blog when you could be giving us something informative to read?
I think the admin of this web page is in fact working hard in favor of
his web site, because here every stuff is quality based data.
Hi there, all is going well here and ofcourse every one is
sharing data, that’s in fact fine, keep up writing.
You completed a few fine points there. I did a search on the subject and found a good number of people will agree with your blog.
I will right away grab your rss feed as I can’t find your email subscription link or newsletter service. Do you’ve any? Please let me know in order that I could subscribe. Thanks.
Hi, Neat post. There is a problem with your website in internet explorer, would check this… IE still is the market leader and a huge portion of people will miss your magnificent writing due to this problem.
nice makale. web tasarım
Hey! Do you know if they make any plugins to protect against hackers? I’m kinda paranoid about losing everything I’ve worked hard on. Any suggestions?
If you wish for to obtain much from this article then you have to
apply these methods to your won webpage.
Hmm is anyone else encountering problems with the pictures on this blog loading?
I’m trying to find out if its a problem on my end or if it’s the blog.
Any feed-back would be greatly appreciated.
An impressive share! I’ve just forwarded this onto
a colleague who had been doing a little research on this.
And he in fact bought me breakfast because I discovered it for him…
lol. So allow me to reword this…. Thank YOU for the meal!!
But yeah, thanks for spending some time to discuss this matter here on your site.
Today, while I was at work, my sister stole my iPad and tested to see if it can survive a thirty foot drop, just so she can be a youtube sensation. My apple ipad is now destroyed and she has 83 views. I know this is totally off topic but I had to share it with someone!
I am usually to running a blog and i actually appreciate your content. The article has actually peaks my interest. I am going to bookmark your website and keep checking for new information.
Good response in return of this query with solid
arguments and telling the whole thing concerning that.
Attractive part of content. I simply stumbled upon your weblog and in accession capital to assert that I get in fact enjoyed account your blog posts. Anyway I will be subscribing on your feeds and even I success you access consistently quickly.
Hey there would you mind stating which blog platform you’re using? I’m looking to start my own blog soon but I’m having a tough time choosing between BlogEngine/Wordpress/B2evolution and Drupal. The reason I ask is because your design seems different then most blogs and I’m looking for something completely unique. P.S My apologies for getting off-topic but I had to ask!
Hello there I am so happy I found your weblog, I really found you by error, while I was researching on Yahoo for something else, Nonetheless I am here now and would just like to say kudos for a tremendous post and a all round entertaining blog (I also love the theme/design), I don’t have time to go through it all at the moment but I have book-marked it and also included your RSS feeds, so when I have time I will be back to read a lot more, Please do keep up the fantastic job.
Good post. I study one thing more difficult on different blogs everyday. It can always be stimulating to read content from different writers and follow slightly one thing from their store. I’d choose to use some with the content material on my weblog whether or not you don’t mind. Natually I’ll offer you a hyperlink on your internet blog. Thanks for sharing.
Today, I went to the beachfront with my kids. I found a sea shell and gave it to my 4 year old daughter and said “You can hear the ocean if you put this to your ear.” She placed the shell to her ear and screamed. There was a hermit crab inside and it pinched her ear. She never wants to go back! LoL I know this is completely off topic but I had to tell someone!
Hi there! Someone in my Facebook group shared this site with us so I came to look it over. I’m definitely loving the information. I’m bookmarking and will be tweeting this to my followers! Exceptional blog and terrific style and design.
Hi just wanted to give you a quick heads up and let you know a few of the
pictures aren’t loading correctly. I’m not sure why but I
think its a linking issue. I’ve tried it in two different browsers and both show the same
results.
Thanks designed for sharing such a pleasant idea, post is
pleasant, thats why i have read it fully
Do you mind if I quote a couple of your posts as long as I provide credit and sources back to your site? My blog is in the very same area of interest as yours and my visitors would genuinely benefit from some of the information you present here. Please let me know if this alright with you. Thank you!
I was curious if you ever considered changing the structure of your site? Its very well written; I love what youve got to say. But maybe you could a little more in the way of content so people could connect with it better. Youve got an awful lot of text for only having 1 or 2 pictures. Maybe you could space it out better?
I was wondering if you ever thought of changing the structure of your site? Its very well written; I love what youve got to say. But maybe you could a little more in the way of content so people could connect with it better. Youve got an awful lot of text for only having one or 2 images. Maybe you could space it out better?
Thankfulness to my father who told me concerning this web site, this webpage is
really awesome.
It is not my first time to go to see this web
page, i am browsing this site dailly and take good facts from here all the time.
Howdy very cool blog!! Man .. Beautiful .. Superb .. I’ll bookmark your website and take the feeds also…I’m glad to seek out so many useful information right here within the submit, we need develop more techniques on this regard, thank you for sharing. . . . . .
Wow, superb blog format! How lengthy have you been blogging for?
you made running a blog glance easy. The overall
look of your site is magnificent, let alone the content!
Nice post. I was checking constantly this blog and I am impressed!
Very useful information specifically the last part 🙂 I care for such info much.
I was looking for this certain information for a long time.
Thank you and best of luck.
Hi! I could have sworn I’ve been to this web site before but after
browsing through some of the articles I realized it’s new to me.
Nonetheless, I’m definitely pleased I stumbled upon it and
I’ll be bookmarking it and checking back often!
I love reading a post that can make men and women think.
Also, thanks for allowing me to comment!
Great post but I was wondering if you could write a litte more on this topic? I’d be very grateful if you could elaborate a little bit further. Bless you!
Its such as you read my thoughts! You appear to understand so much approximately this, such as you wrote the e book in it or something. I feel that you simply can do with a few percent to force the message home a little bit, however other than that, that is great blog. A great read. I’ll definitely be back.
Hello to every one, it’s truly a nice for me to pay a visit this website,
it includes useful Information.
Very efficiently written information. It will be useful to everyone who usess it, including myself. Keep up the good work – looking forward to more posts.
I know this if off topic but I’m looking into starting my own weblog and was curious
what all is required to get setup? I’m assuming having a blog like yours would cost a pretty penny?
I’m not very internet smart so I’m not 100% certain. Any tips or advice
would be greatly appreciated. Many thanks
Simply desire to say your article is as surprising.
The clarity in your post is just spectacular and i could assume you are an expert
on this subject. Well with your permission let me to grab your RSS feed to keep updated with forthcoming post.
Thanks a million and please carry on the rewarding work.
Great article. I will be going through a few of these issues as well..
I am extremely inspired along with your writing abilities and also with the format on your weblog. Is that this a paid subject or did you modify it your self? Either way stay up the nice quality writing, it’s rare to see a nice weblog like this one today..
I have been exploring for a little for any high-quality articles or blog posts on this sort of area . Exploring in Yahoo I at last stumbled upon this site. Reading this info So i am happy to convey that I’ve a very good uncanny feeling I discovered just what I needed. I most certainly will make sure to do not forget this website and give it a look regularly.
Hello There. I discovered your weblog the use of msn. This is an extremely neatly written article.
I will be sure to bookmark it and return to learn more of your
useful information. Thanks for the post. I will certainly return.
Fine way of explaining, and good post to get facts concerning my presentation subject matter, which i am going to
present in institution of higher education.
Hello, I enjoy reading all of your article. I like to write a
little comment to support you.
I do like the way you have framed this specific difficulty and it really does give us a lot of fodder for thought. On the other hand, through what I have witnessed, I simply wish when the commentary pack on that individuals stay on issue and don’t start on a soap box regarding some other news du jour. Still, thank you for this excellent point and whilst I do not really concur with this in totality, I regard the perspective.
Hi! This post could not be written any better! Reading this post reminds me of my good old room mate! He always kept talking about this. I will forward this write-up to him. Fairly certain he will have a good read. Many thanks for sharing!
Very shortly this web site will be famous amid all blogging viewers,
due to it’s fastidious articles
I’m really enjoying the design and layout of your site. It’s a very easy on the eyes which makes it much more pleasant for me to come here and visit more often. Did you hire out a developer to create your theme? Outstanding work!
Wonderful work! This is the type of info that should be shared around the internet. Shame on the search engines for not positioning this post higher! Come on over and visit my site . Thanks =)
A fascinating discussion is worth comment. I believe that you need to write more
about this subject, it may not be a taboo matter but typically people don’t discuss
these issues. To the next! Many thanks!!
Wow, incredible weblog structure! How lengthy have you ever been blogging for? you make running a blog glance easy. The total look of your website is magnificent, as smartly as the content!
Your house is valueble for me. Thanks!…
Thank you for the auspicious writeup. It in fact was once a amusement account it.
Look advanced to more introduced agreeable
from you! However, how can we keep up a correspondence?
I’m impressed, I have to admit. Rarely do I come across a blog that’s both educative and interesting, and without a doubt, you have hit the
nail on the head. The issue is something that too few folks are speaking intelligently about.
I’m very happy that I stumbled across this during my hunt for something concerning
this.
This info is invaluable. When can I find out more?
Its such as you learn my thoughts! You seem to grasp so much about this, like you wrote the e-book in it or something. I think that you simply can do with a few p.c. to force the message house a bit, however instead of that, that is fantastic blog. A fantastic read. I’ll definitely be back.
Hi there would you mind letting me know which web host you’re utilizing? I’ve loaded your blog in 3 different internet browsers and I must say this blog loads a lot faster then most. Can you suggest a good hosting provider at a fair price? Cheers, I appreciate it!
Thanks for finally writing about > How To Install Custom Windows XP Themes Old PC Gaming < Liked it!
Wow that was strange. I just wrote an incredibly long comment but after I clicked submit
my comment didn’t show up. Grrrr… well I’m not writing all
that over again. Anyways, just wanted to
say wonderful blog!
I’ve been absent for a while, but now I remember why I used to love this site. Thank you, I’ll try and check back more often. How frequently you update your site?
When some one searches for his required thing, therefore he/she wants to be
available that in detail, therefore that thing is maintained over here.
Fabulous, what a webpage it is! This weblog provides valuable
data to us, keep it up.
Hey would you mind sharing which blog platform you’re using? I’m going to start my own blog soon but I’m having a difficult time deciding between BlogEngine/Wordpress/B2evolution and Drupal. The reason I ask is because your design and style seems different then most blogs and I’m looking for something completely unique. P.S My apologies for getting off-topic but I had to ask!
Very great post. I just stumbled upon your blog and wished to mention that I’ve truly enjoyed surfing around your blog posts. In any case I will be subscribing for your rss feed and I hope you write once more very soon!
My brother recommended I might like this blog. He was entirely right. This post actually made my day. You cann’t imagine simply how much time I had spent for this info! Thanks!
I every time used to read paragraph in news papers but now as I am a user of internet thus from now I
am using net for posts, thanks to web.
This is really interesting, You’re a very
skilled blogger. I have joined your rss feed and look forward to seeking
more of your fantastic post. Also, I have shared your website in my social networks!
naturally like your web-site but you need to check the spelling on several of your posts. Many of them are rife with spelling problems and I find it very troublesome to tell the truth nevertheless I will certainly come back again.
Pimapen tamir fiyatları hakkında detaylı bilgi ve en profesyonel hizmet için lütfen sitemizi ziyaret edin…
Thanks for the good writeup. It in fact was a amusement account
it. Look complex to far delivered agreeable from you!
However, how could we communicate?
Very good website you have here but I was wondering if you knew of any forums that cover the same topics discussed here?
I’d really love to be a part of group where I can get feedback from other knowledgeable people that share the same interest.
If you have any recommendations, please let me know. Cheers!
Halk arasında küçük altın olarak adlandırılmaktadır. Özellikleri. Cins : Ziynet Çeyrek; Ağırlık : 1,754 Gram; Ayar : 22 Ayar; Çap : 18 mm …
hey there and thanks in your information – I have definitely picked up anything new from right here. I did then again experience several technical issues using this web site, as I experienced to reload the website many occasions previous to I may get it to load correctly. I have been puzzling over in case your web host is OK? Now not that I’m complaining, but sluggish loading circumstances occasions will very frequently have an effect on your placement in google and can injury your high quality rating if ads and ***********|advertising|advertising|advertising and *********** with Adwords. Anyway I’m including this RSS to my e-mail and could glance out for a lot extra of your respective fascinating content. Make sure you update this once more soon..
I’m amazed, I have to admit. Seldom do I encounter a blog that’s both equally
educative and amusing, and without a doubt, you’ve hit the
nail on the head. The problem is something not enough folks are speaking
intelligently about. I’m very happy I stumbled across this during my search
for something concerning this.
Good day! I know this is kinda off topic but I was wondering if you knew where I could find a captcha plugin for my comment form? I’m using the same blog platform as yours and I’m having difficulty finding one? Thanks a lot!
It’s perfect time to make some plans for the longer term and it is time to be happy.
I have learn this submit and if I may I desire to suggest you few fascinating issues or
tips. Perhaps you could write next articles relating
to this article. I wish to read even more issues approximately
it!
Pimapen tamiri fiyatları PVC pencere ya da kapı kullananlar için en uygun fiyatlar ile öne çıkıyor.
You actually make it seem so easy with your presentation but I find this matter to be really something that I think I would never understand. It seems too complicated and very broad for me. I’m looking forward for your next post, I’ll try to get the hang of it!
Pimapen tamir fiyatları hakkında en detaylı bilgi ve en profesyonel, en uygun hizmet için hemen websitemizi ziyaret edin.
Hi, i believe that i noticed you visited my blog
so i got here to return the prefer?.I am attempting to to find issues to enhance my web site!I guess its adequate to make use of a
few of your ideas!!
Woah! I’m really enjoying the template/theme of this website.
It’s simple, yet effective. A lot of times it’s hard to
get that “perfect balance” between user friendliness and appearance.
I must say you have done a fantastic job with this.
Additionally, the blog loads very fast for me on Chrome. Outstanding Blog!
Düğün fotoğrafçılığında deneyim sahibi olabilirsiniz ancak tüm düğün fotoğrafçılarının düştüğü hataya siz de düşüyorsunuz.
Hey there! I know this is kind of off topic but I was wondering which
blog platform are you using for this site? I’m getting sick
and tired of WordPress because I’ve had issues with hackers and I’m looking at options for another platform.
I would be awesome if you could point me in the direction of
a good platform.
That is really attention-grabbing, You are an overly professional blogger.
I’ve joined your rss feed and look forward to
in quest of extra of your wonderful post. Additionally, I have shared your site in my
social networks
This article will assist the internet visitors for creating new weblog or even a weblog from start to end.|
Hiya! Quick question that’s totally off topic. Do you know how to make your site mobile
friendly? My website looks weird when viewing from my apple iphone.
I’m trying to find a theme or plugin that might be able to fix this issue.
If you have any recommendations, please share.
Many thanks!
It’s a shame you don’t have a donate button! I’d most certainly donate
to this fantastic blog! I suppose for now i’ll settle for bookmarking
and adding your RSS feed to my Google account. I look forward to fresh updates and will share this blog with my Facebook group.
Talk soon!
I for all time emailed this blog post page to all my contacts, for
the reason that if like to read it then my contacts will too.
I would like to thank you for the efforts you have put in writing this site.
I am hoping to view the same high-grade content by you later on as well.
In truth, your creative writing abilities has motivated me to get my own, personal blog now 😉
I’ve recently started a website, the info you offer on this site has helped me greatly. Thank you for all of your time & work.
Thank you for the auspicious writeup. It if truth be told used to be a amusement account it. Look complicated to far introduced agreeable from you! However, how can we communicate?
Normally I do not learn article on blogs, but I wish to say that this write-up very compelled me to try and do so! Your writing taste has been surprised me. Thanks, very nice post.
Wow, wonderful blog layout! How long have you been blogging for? you make blogging look easy. The overall look of your site is magnificent, let alone the content!
Hi! Someone in my Facebook group shared this website with us so I
came to check it out. I’m definitely loving the information.
I’m book-marking and will be tweeting this to my followers!
Superb blog and wonderful style and design.
It is appropriate time to make some plans for the future and it is time to be happy. I have read this post and if I could I wish to suggest you some interesting things or advice. Perhaps you could write next articles referring to this article. I wish to read more things about it!
I have learn several good stuff here. Certainly worth bookmarking for revisiting. I wonder how a lot effort you place to create this type of fantastic informative website.
I needed to thank you for this good read!! I absolutely enjoyed every little bit of it.
I have got you bookmarked to look at new stuff you post…
There is certainly a lot to learn about this issue. I really
like all the points you have made.
Wonderful goods from you, man. I have understand your stuff previous to and you’re just extremely excellent. I actually like what you’ve acquired here, really like what you are saying and the way in which you say it. You make it enjoyable and you still care for to keep it sensible. I can not wait to read much more from you. This is really a terrific site.
I was curious if you ever thought of changing the structure of your website? Its very well written; I love what youve got to say. But maybe you could a little more in the way of content so people could connect with it better. Youve got an awful lot of text for only having one or two images. Maybe you could space it out better?
The other day, while I was at work, my cousin stole my apple ipad and tested to see if it can survive a thirty foot drop, just so she can be a youtube sensation. My iPad is now destroyed and she has 83 views. I know this is totally off topic but I had to share it with someone!
Thank you a lot for sharing this with all folks
you actually recognise what you are speaking about!
Bookmarked. Kindly additionally consult with my website =).
We can have a link exchange arrangement among us
Hello everybody, here every one is sharing these experience, so it’s nice to
read this blog, and I used to pay a visit this webpage all the time.
Today, I went to the beach with my kids. I found
a sea shell and gave it to my 4 year old daughter and said “You can hear the ocean if you put this to your ear.” She placed the shell to her ear and screamed.
There was a hermit crab inside and it pinched her ear.
She never wants to go back! LoL I know this is entirely
off topic but I had to tell someone!
I’m not sure why but this weblog is loading extremely slow for me. Is anyone else having this problem or is it a issue on my end? I’ll check back later on and see if the problem still exists.
I’m impressed, I have to say. Really hardly ever do I encounter a blog that’s each educative and entertaining, and let me inform you, you have got hit the nail on the head. Your concept is outstanding; the problem is something that not enough individuals are speaking intelligently about. I am very glad that I stumbled throughout this in my seek for one thing referring to this.
Please let me know if you’re looking for a author for your site. You have some really good posts and I believe I would be a good asset. If you ever want to take some of the load off, I’d really like to write some material for your blog in exchange for a link back to mine. Please blast me an email if interested. Thanks!
Thank you for all your work on this site. My niece take interest in making time for investigations and it is obvious why. Many of us know all of the dynamic ways you produce both interesting and useful tips on this web site and as well cause contribution from some other people on that situation plus our own girl is really studying a lot of things. Have fun with the remaining portion of the year. You’re the one conducting a first class job.
With havin so much content do you ever run into any issues of plagorism or copyright violation? My website has a lot of exclusive content I’ve either authored myself or outsourced but it appears a lot of it is popping it up all over the web without my authorization. Do you know any techniques to help reduce content from being ripped off? I’d really appreciate it.
I don’t even understand how I stopped up right here, however I assumed this submit was good. I do not know who you are but definitely you are going to a famous blogger if you are not already 😉 Cheers!
Magnificent goods from you, man. I’ve understand your stuff previous to and you’re just too fantastic.
I really like what you have acquired here, really like
what you are saying and the way in which you say it. You make it enjoyable and
you still take care of to keep it wise. I can not wait to read far more from
you. This is really a terrific site.
Everyone loves what you guys are usually up too. This type of clever work and coverage! Keep up the good works guys I’ve included you guys to blogroll.
Hi! I know this is somewhat off topic but I was wondering which blog platform are you using for this site?
I’m getting tired of WordPress because I’ve had problems with hackers
and I’m looking at alternatives for another platform.
I would be fantastic if you could point me in the direction of a
good platform.
Hi there! I just would like to offer you a huge thumbs up for your great info you’ve got right here on this post.
I am coming back to your website for more soon.
Aw, this was a really nice post. In thought I wish to put in writing like this additionally – taking time and precise effort to make a very good article… however what can I say… I procrastinate alot and not at all seem to get something done.
There are definitely a lot of details like that to take into consideration. That is a great level to bring up. I offer the thoughts above as normal inspiration however clearly there are questions like the one you carry up where an important factor will likely be working in honest good faith. I don?t know if finest practices have emerged round issues like that, but I’m sure that your job is clearly recognized as a fair game. Both boys and girls feel the influence of only a moment’s pleasure, for the rest of their lives.
There are actually loads of details like that to take into consideration. That may be a nice point to convey up. I provide the ideas above as general inspiration however clearly there are questions like the one you convey up the place crucial factor will be working in trustworthy good faith. I don?t know if finest practices have emerged around issues like that, but I am positive that your job is clearly recognized as a fair game. Each boys and girls really feel the impression of only a second’s pleasure, for the remainder of their lives.
I must express my passion for your kindness in support of men and women that really want help with that situation. Your very own commitment to passing the message up and down had become wonderfully practical and have without exception made men and women like me to reach their targets. This important help indicates a whole lot to me and even more to my peers. Thanks a ton; from each one of us.
Sweet blog! I found it while browsing on Yahoo News. Do you have any suggestions on how to get listed in Yahoo News? I’ve been trying for a while but I never seem to get there! Thanks
Hey there! I understand this is sort of off-topic however I had to ask.
Does building a well-established blog such as
yours take a large amount of work? I’m completely new to operating a blog however I do
write in my diary daily. I’d like to start a blog so I will be able to share
my experience and feelings online. Please let me know if you have any
ideas or tips for brand new aspiring bloggers.
Thankyou!
Hello, the whole thing is going perfectly
here and ofcourse every one is sharing data, that’s in fact fine,
keep up writing.
I am extremely inspired along with your writing
abilities and also with the format for your blog.
Is this a paid topic or did you modify it your self? Either way keep up the excellent quality writing, it is uncommon to see a nice
blog like this one today..
I love what you guys are up too. This kind of clever work and
coverage! Keep up the terrific works guys I’ve included you guys to my blogroll.
Hey there! I could have sworn I’ve been to this blog before but after reading through some of the post I realized it’s new to me. Anyways, I’m definitely glad I found it and I’ll be book-marking and checking back frequently!
Your method of describing the whole thing in this article is in fact nice, all
can without difficulty be aware of it, Thanks a
lot.
Excellent post. I used to be checking continuously this weblog and
I’m impressed! Extremely useful info specifically the final section 🙂 I handle such info
a lot. I used to be seeking this certain info for a
long time. Thanks and best of luck.
I have been exploring for a little bit for any high-quality articles or blog posts on this kind of area . Exploring in Yahoo I at last stumbled upon this website. Reading this info So i am happy to convey that I’ve an incredibly good uncanny feeling I discovered exactly what I needed. I most certainly will make certain to don’t forget this site and give it a look on a constant basis.
great post, very informative. I wonder why the opposite specialists of this sector don’t understand this. You should continue your writing. I am confident, you’ve a huge readers’ base already!
Great goods from you, man. I have consider your stuff previous
to and you are simply too fantastic. I actually like what
you’ve bought right here, certainly like what
you’re saying and the best way during which you say it. You make it entertaining and you still
care for to keep it sensible. I cant wait to read much more from you.
That is really a great website.
Spot on with this write-up, I seriously believe this
amazing site needs a lot more attention. I’ll probably be returning to read more, thanks for the information!
Wow! This could be one particular of the most beneficial blogs We’ve ever arrive across on this subject. Actually Wonderful. I’m also a specialist in this topic therefore I can understand your hard work.
Thanks for one’s marvelous posting! I genuinely enjoyed reading it, you’re a great author.I will ensure that I bookmark your blog and will come back down the road. I want to encourage yourself to continue your great posts, have a nice weekend!
It’s actually a great and useful piece of information. I’m satisfied that you simply shared this useful info with us. Please stay us up to date like this. Thanks for sharing.
I do agree with all the ideas you have presented in your post. They’re very convincing and will certainly work. Still, the posts are too short for novices. Could you please extend them a bit from next time? Thanks for the post.
Today, while I was at work, my sister stole my apple ipad and tested to see if it can survive a twenty five
foot drop, just so she can be a youtube sensation. My iPad is now broken and she has 83 views.
I know this is entirely off topic but I had to share it with someone!
Hurrah, that’s what I was exploring for, what a data!
existing here at this webpage, thanks admin of this website.
Do you mind if I quote a few of your posts as long as I provide credit and sources back to your
site? My blog is in the exact same niche as yours and my users would truly benefit from a
lot of the information you present here. Please let me know if this ok with you.
Thank you!
Good day! I could have sworn I’ve been to this site before but after browsing through some of the
post I realized it’s new to me. Nonetheless, I’m definitely delighted I found it and I’ll be
book-marking and checking back frequently!
OTS List. One of the largest Open Tibia server bases from around the world. The list was created to make it easier for the owners of OTS to advertise, and thus to win players. Adding a server is completely free, and it brings the expected results – an increase in the number of online players. The website has a very friendly search engine, thanks to which you will find a server for yourself.
Hi there to all, for the reason that I am actually eager
of reading this web site’s post to be updated on a
regular basis. It contains fastidious information.
At this moment I am ready to do my breakfast, after having my breakfast coming again to read other news.
I just could not depart your web site before suggesting that I really enjoyed the standard info a person provide for your visitors? Is going to be back often in order to check up on new posts
Hello there! I simply want to offer you a big thumbs
up for the great info you have here on this post. I am coming back to
your blog for more soon.
Hi there, You have done a great job. I will certainly digg it and in my view recommend to my friends. I am sure they’ll be benefited from this website.
I always spent my half an hour to read this blog’s articles everyday along with
a mug of coffee.
Usually I do not learn post on blogs, but I wish to say that this write-up very pressured me to take a look at and do so! Your writing taste has been amazed me. Thanks, quite nice article.
I have read a few good stuff here. Certainly worth bookmarking for revisiting. I wonder how much effort you put to make such a fantastic informative site.
Wonderful beat ! I would like to apprentice even as you amend your web site, how can i subscribe for a weblog web site? The account aided me a acceptable deal. I have been tiny bit acquainted of this your broadcast offered vivid clear idea
Hello there! Quick question that’s totally off topic.
Do you know how to make your site mobile friendly?
My blog looks weird when browsing from my iphone 4.
I’m trying to find a theme or plugin that might be able to fix
this issue. If you have any recommendations, please share.
Thanks!
Please let me know if you’re looking for a writer for your weblog.
You have some really great articles and I believe I would
be a good asset. If you ever want to take some of the load off,
I’d love to write some articles for your blog in exchange for a link back to mine.
Please send me an e-mail if interested. Thanks!
I like the valuable information you provide in your articles.
I’ll bookmark your weblog and check again here frequently.
I’m quite certain I will learn lots of new stuff right here!
Best of luck for the next!
My partner and I absolutely love your blog and find most
of your post’s to be what precisely I’m looking for.
Does one offer guest writers to write content to suit your needs?
I wouldn’t mind writing a post or elaborating on a number of the subjects you write regarding here.
Again, awesome weblog!
google maps yorum satın al! En uygun fiyat ve en kaliteli hizmet garantisi! Hemen websitemizi ziyaret edin!
Good article! We are linking to this particularly great content on our website.
Keep up the great writing.
Greetings! Very helpful advice within this post!
It’s the little changes which will make the greatest
changes. Thanks for sharing!
Wonderful post but I was wanting to know if you could write a litte more on this subject? I’d be very thankful if you could elaborate a little bit further. Thank you!
Simply want to say your article is as astounding. The clearness for your publish is simply nice and i can suppose you’re a professional in this subject. Fine with your permission allow me to grasp your RSS feed to stay updated with impending post. Thank you a million and please keep up the gratifying work.
Hello there, You’ve done an incredible job. I’ll certainly digg it and personally suggest to my friends. I am confident they’ll be benefited from this site.
I am really enjoying the theme/design of your web site. Do you ever run into any browser compatibility issues? A number of my blog readers have complained about my site not operating correctly in Explorer but looks great in Firefox. Do you have any ideas to help fix this issue?
Hey very cool web site!! Man .. Excellent .. Superb .. I will bookmark your website and take the feeds also…I am satisfied to search out a lot of useful information right here within the submit, we’d like develop more techniques on this regard, thanks for sharing. . . . . .
uluslararası evden eve nakliyat
Awesomely written post. Keep it coming – I will visit again to see more of your articles.
Thanks in support of sharing such a fastidious thinking,
piece of writing is good, thats why i have read it fully
Thanks for any other informative website. Where else may just I get that kind of information written in such an ideal manner? I have a challenge that I’m just now running on, and I’ve been on the look out for such information.
Bostancı Aks hakkında detaylı bilgi ve en kaliteli hizmet için hemen web sitemizi ziyaret edin.
Youtube izlenme hakkında detaylı bilgi ve kaliteli hizmet için web sitemizi ziyaret ediniz.
Besøg vores hjemmeside nu for at købe IPTV STB til den billigste pris.
Olá! Eu simplesmente desejo oferecer a você um grande polegar para cima por suas ótimas informações que você tem aqui neste post. Voltarei ao seu site para mais informações em breve. Bom dia!
My brother suggested I might like this blog.
He was totally right. This publish truly made my day.
You cann’t imagine just how so much time I had spent for this information!
Thanks!
At this moment I am going away to do my breakfast, after having my
breakfast coming over again to read more news.
Borulu Tip Eşanjör hakkında detaylı bilgi ve kaliteli hizmet için lütfen web site adresimizi ziyaret ediniz.
toptan elektronik sigara hakkında detaylı bilgi ve kaliteli hizmet için lütfen web sitemizi ziyaret ediniz.
As valued material culture, necklaces communicate wealth, power, affiliation, prestige, levels of resources and skill, and elements of identity and position.
Good post. I learn something new and challenging on sites
I stumbleupon on a daily basis. It will always be helpful to
read content from other writers and use a little something from
other sites.
Do you have a spam issue on this site; I also am a blogger, and
I was curious about your situation; we have developed some nice procedures and we are looking to trade techniques with other folks,
please shoot me an email if interested.
instagram reels izlenme satın al
I’m gone to inform my little brother, that he should also
visit this webpage on regular basis to take updated from hottest information.
certainly like your web site but you need to test the spelling on quite a few of your posts.
A number of them are rife with spelling issues
and I to find it very troublesome to tell the reality
then again I will certainly come back again.
Great blog! Is your theme custom made or did you download it from somewhere?
A theme like yours with a few simple tweeks would really
make my blog stand out. Please let me know where you got your theme.
Thanks
toptan zeytin hakkında detaylı bilgi almak, en profesyonel hizmet ve kalite anlayışıyla bizimle iletişime geçmek için hemen websitemizi ziyaret edin.
Hiya very nice web site!! Man .. Excellent ..
Superb .. I will bookmark your site and take the feeds also?
I am happy to search out so many useful information right here within the post,
we’d like develop extra techniques on this
regard, thanks for sharing. . . . . .
As I site possessor I believe the content material here is rattling magnificent , appreciate it for your efforts. You should keep it up forever! Good Luck.
Hey very nice website!! Guy .. Beautiful .. Amazing
.. I will bookmark your web site and take the feeds also?
I’m happy to seek out a lot of useful info right here in the submit,
we want develop extra techniques in this regard, thanks for sharing.
. . . . .
In the current job market, organizations want to be given the unique job title you want to apply for – and a general resume doesn’t have this. In addition, they immediately look to determine what positively sets you apart – but a general resume makes you look identical to the flood of general resumes they’ve already had dumped on them.
My partner and I stumbled over here from a different page and thought I might check things out.
I like what I see so now i’m following you. Look forward to looking over your web page yet again.
There’s definately a lot to know about this issue.
I like all the points you made.
Can I clearly state what a relief it is to find a person who really is aware of what they’re writing about – that is so rare to encounter on the libtard-net!
Your means of telling everything in this article is in fact nice,
every one be able to easily be aware of it, Thanks a lot.
I conceive you have remarked some very interesting points, appreciate it for the post.
My appreciation for investing the time in the content you present, thus ensuring its high level of quality.
I need to to thank you for this wonderful read!!
I absolutely enjoyed every little bit of it. I have you book marked to check out
new stuff you post…
hi!,I like your writing so so much! percentage we keep in touch extra approximately your article on AOL? I need an expert in this house to resolve my problem. May be that’s you! Taking a look ahead to look you.
Hello there! Do you use Twitter? I’d like to follow you if that would be okay.
I’m undoubtedly enjoying your blog and look forward
to new updates.
I like this post, enjoyed this one appreciate it for posting.
� H�zl� ve acil m�dahale
After looking over a number of the blog posts on your blog, I seriously
like your way of writing a blog. I book-marked it
to my bookmark webpage list and will be checking back in the near future.
Please check out my website as well and tell me how you feel.
You should verify that your cover letter attracts your prospective company, confirms their interest in you, and then leads them to look at the resume so they will want to choose you for the interview. With the immense flood of resumes submitted to every employment offer currently, your cover letter typically becomes the top determining factor between if you get an interview – or get dumped into the garbage!
My brother suggested I might like this website. He was entirely right. This post truly made my day. You cann’t imagine just how much time I had spent for this info! Thanks!
you are truly a excellent webmaster. The site loading pace is amazing.
It sort of feels that you are doing any unique trick. In addition, The contents are masterpiece.
you’ve performed a excellent job in this matter!
Link exchange is nothing else except it is
only placing the other person’s blog link on your page at appropriate place and other person will also do similar in favor of you.
buy haclink
Minimalist Salon Dekorasyonu hakkında detaylı bilgi ve kaliteli ürün yelpazesi için hemen web sitesi adresimizi ziyaret ediniz.
There is definately a lot to learn about this topic. I really like
all of the points you’ve made.
It’s amazing for me to have a website, which is good
in support of my know-how. thanks admin
link letou
Aw, this was a really nice post. Taking the time and actual effort to make a very good article� but what can I say� I procrastinate a lot and never seem to get anything done.
It is not my first time to visit this site, i am browsing this
website dailly and obtain nice data from here daily.
I’ve been exploring for a little for any high-quality articles or weblog posts on this kind of area . Exploring in Yahoo I ultimately stumbled upon this site. Studying this info So i’m satisfied to convey that I have an incredibly excellent uncanny feeling I found out just what I needed. I such a lot definitely will make sure to do not fail to remember this site and give it a glance on a relentless basis.
Howdy! Quick question that’s totally off topic. Do you know how to make your site mobile friendly? My site looks weird when browsing from my iphone. I’m trying to find a theme or plugin that might be able to fix this problem. If you have any suggestions, please share. Thanks!
This article will assist the internet visitors for building up new weblog or even a blog from start to end.
I think everything typed made a bunch of sense. However, what about this?
suppose you were to write a killer headline? I am not saying your information is not good, however what if you added something that grabbed a
person’s attention? I mean How To Install Custom Windows XP Themes Old PC Gaming is a
little boring. You might peek at Yahoo’s front page and note how they create post titles to get people to open the links.
You might add a related video or a picture or two to get readers interested
about what you’ve written. Just my opinion, it might bring your blog a little
bit more interesting.
There are definitely a number of particulars like that to take into consideration. That may be a nice level to convey up. I provide the thoughts above as common inspiration however clearly there are questions just like the one you bring up where crucial thing shall be working in sincere good faith. I don?t know if greatest practices have emerged round issues like that, however I’m sure that your job is clearly recognized as a good game. Both girls and boys really feel the impression of only a second’s pleasure, for the rest of their lives.
You should be recognized for the kindness that you’ve demonstrated to me.
You have brought up a very excellent points, appreciate it for the post.
Thank you for the sensible critique. Me and my neighbor were just preparing to do some research about this. We got a grab a book from our area library but I think I learned more from this post. I’m very glad to see such magnificent info being shared freely out there.
Hi, Neat post. There’s a problem with your web site in internet explorer,
could check this? IE still is the market chief and a large element of other people will omit
your wonderful writing due to this problem.
Very interesting subject, thankyou for putting up. “Wrinkles should merely indicate where smiles have been.” by Mark Twain.
I always spent my half an hour to read this website’s articles or reviews everyday along
with a cup of coffee.
Hi, i think that i saw you visited my website thus i
came to “return the favor”.I am attempting to find things to improve my website!I suppose its ok to use
a few of your ideas!!
We’re a group of volunteers and opening a new scheme in our community. Your website offered us with valuable info to work on. You’ve done an impressive job and our whole community will be grateful to you.
My family every time say that I am wasting my time here at net,
but I know I am getting know-how everyday by reading thes good posts.
I enjoy you because of each of your work on this site. Kim takes pleasure in working on internet research and it’s really easy to understand why. All of us notice all regarding the dynamic manner you produce vital suggestions by means of the web blog and even inspire response from website visitors on that topic so our own daughter has always been being taught a great deal. Enjoy the rest of the year. You are conducting a tremendous job.
I’m really inspired together with your writing talents and also with the layout in your blog. Is that this a paid subject or did you customize it yourself? Anyway keep up the excellent high quality writing, it is uncommon to look a nice weblog like this one these days..
I’ve been browsing online more than 3 hours these days, yet I by no means found any interesting article like yours. It’s beautiful worth enough for me. In my opinion, if all webmasters and bloggers made excellent content as you probably did, the web can be a lot more helpful than ever before.
Keep functioning ,terrific job!
Hello. remarkable job. I did not imagine this. This is a great story. Thanks!
Hi there, I found your web site via Google while searching for a related topic, your website came up, it looks great. I have bookmarked it in my google bookmarks.
We’re a group of volunteers and starting a new scheme in our community. Your site provided us with valuable info to work on. You’ve done a formidable job and our whole community will be thankful to you.
Wonderful web site. Plenty of useful info here. I am sending it to a few friends ans additionally sharing in delicious. And obviously, thanks for your effort!
I don’t know whether it’s just me or if perhaps everybody else
experiencing issues with your site. It looks like some of the
text in your posts are running off the screen. Can somebody else please
comment and let me know if this is happening to them as well?
This could be a problem with my browser because I’ve had this happen before.
Appreciate it
As a Newbie, I am continuously searching online for articles that can benefit me. Thank you
I adore forgathering useful info, this post has got me even more info! .
I like this web site very much, Its a really nice berth to read and obtain info .
Hello! I could have sworn I’ve been to this website before but after browsing through some of the post I realized it’s new to me. Nonetheless, I’m definitely happy I found it and I’ll be book-marking and checking back frequently!
I discovered your blog site on google and check a few of your early posts. Continue to keep up the very good operate. I just additional up your RSS feed to my MSN News Reader. Seeking forward to reading more from you later on!…
I’m impressed, I must say. Actually rarely do I encounter a blog that’s both educative and entertaining, and let me tell you, you could have hit the nail on the head. Your thought is excellent; the problem is something that not enough persons are speaking intelligently about. I am very comfortable that I stumbled throughout this in my seek for something relating to this.
Wow! Thank you! I continually needed to write on my blog something like that. Can I take a part of your post to my website?
I have read some good stuff here. Definitely worth bookmarking for revisiting. I wonder how much effort you put to create such a magnificent informative website.
I like this post, enjoyed this one thanks for posting. “The goal of revival is conformity to the image of Christ, not imitation of animals.” by Richard F. Lovelace.
Hello very cool website!! Man .. Excellent .. Amazing .. I’ll bookmark your web site and take the feeds additionallyKI am happy to seek out numerous helpful information right here within the post, we’d like work out more strategies in this regard, thank you for sharing. . . . . .
I savor, cause I found exactly what I used to be having a look for. You have ended my four day lengthy hunt! God Bless you man. Have a nice day. Bye
I’ve recently started a blog, the information you offer on this web site has helped me tremendously. Thank you for all of your time & work.
I’ve been surfing on-line more than 3 hours today, yet I by no means found any attention-grabbing article like yours. It¦s beautiful price enough for me. Personally, if all site owners and bloggers made good content as you probably did, the net can be a lot more helpful than ever before.
I rattling thankful to find this internet site on bing, just what I was searching for : D also bookmarked.
I was very pleased to find this web-site.I wanted to thanks for your time for this wonderful read!! I definitely enjoying every little bit of it and I have you bookmarked to check out new stuff you blog post.
Youre so cool! I dont suppose Ive learn something like this before. So nice to search out somebody with some unique ideas on this subject. realy thank you for starting this up. this web site is one thing that is needed on the internet, someone with just a little originality. helpful job for bringing one thing new to the internet!
It’s in reality a great and useful piece of information. I’m satisfied that you simply shared this useful information with us. Please keep us up to date like this. Thank you for sharing.
Thanks for one’s marvelous posting! I certainly enjoyed reading it, you happen to be a great author.I will be sure to bookmark your blog and will come back someday. I want to encourage you to ultimately continue your great job, have a nice evening!
Hi are using WordPress for your blog platform? I’m new to the blog world but I’m trying to get started and set up my own. Do you require any coding knowledge to make your own blog? Any help would be really appreciated!
Thanks for sharing excellent informations. Your web site is so cool. I’m impressed by the details that you’ve on this site. It reveals how nicely you understand this subject. Bookmarked this web page, will come back for extra articles. You, my pal, ROCK! I found just the information I already searched all over the place and just couldn’t come across. What an ideal web site.
Hello! I could have sworn I’ve been to this blog before but after browsing through some of the post I realized it’s new to me. Anyways, I’m definitely happy I found it and I’ll be book-marking and checking back frequently!
I am no longer positive the place you’re getting your information, however good topic. I must spend some time studying much more or figuring out more. Thank you for wonderful info I used to be on the lookout for this info for my mission.
Hi colleagues, its enormous piece of writing regarding
tutoringand entirely defined, keep it up all the time.
Very interesting info !Perfect just what I was searching for! “If you could choose one characteristic that would get you through life, choose a sense of humor.” by Jennifer Jones.
WOW just what I was looking for. Came here by searching for Nipple covers
I gotta bookmark this web site it seems extremely helpful very helpful
I carry on listening to the news bulletin lecture about receiving boundless online grant applications so I have been looking around for the finest site to get one. Could you advise me please, where could i find some?
Some genuinely excellent info , Glad I found this. “Someone’s boring me. I think it’s me.” by Dylan Thomas.
of course like your website but you need to check the spelling on quite a few of your posts. Several of them are rife with spelling issues and I find it very troublesome to tell the truth however I’ll certainly come back again.
Very well written article. It will be helpful to anyone who employess it, as well as myself. Keep doing what you are doing – i will definitely read more posts.
hello!,I really like your writing so so much! percentage we be in contact more about your post on AOL? I require a specialist on this space to unravel my problem. May be that is you! Having a look ahead to see you.
Wow, superb weblog structure! How long have you ever
been running a blog for? you make blogging look easy.
The overall look of your web site is excellent, as smartly as the
content material!
Amazing blog! Do you have any tips and hints for aspiring writers?
I’m planning to start my own website soon but I’m a little lost
on everything. Would you advise starting with a free platform like WordPress or go for a paid option?
There are so many choices out there that I’m completely
confused .. Any ideas? Many thanks!
I conceive you have observed some very interesting details , appreciate it for the post.
you will have a fantastic weblog right here! would you like to make some invite posts on my blog?
I was very pleased to find this web-site.I wanted to thanks for your time for this wonderful read!! I definitely enjoying every little bit of it and I have you bookmarked to check out new stuff you blog post.
Howdy would you mind stating which blog platform you’re using? I’m going to start my own blog in the near future but I’m having a tough time deciding between BlogEngine/Wordpress/B2evolution and Drupal. The reason I ask is because your design seems different then most blogs and I’m looking for something completely unique. P.S Apologies for getting off-topic but I had to ask!
Thankyou for this post, I am a big big fan of this website would like to keep updated.
Outstanding post, you have pointed out some great points, I likewise think this s a very wonderful website.
I haven’t checked in here for some time as I thought it was getting boring, but the last several posts are good quality so I guess I will add you back to my daily bloglist. You deserve it my friend 🙂
obviously like your web site however you have to take a look at the spelling on quite a few of your posts. Many of them are rife with spelling problems and I find it very bothersome to inform the reality on the other hand I’ll definitely come again again.
Enjoyed reading through this, very good stuff, thanks. “A man may learn wisdom even from a foe.” by Aristophanes.
you could have an excellent weblog right here! would you wish to make some invite posts on my weblog?
I do agree with all of the ideas you have presented in your post. They are very convincing and will definitely work. Still, the posts are very short for starters. Could you please extend them a bit from next time? Thanks for the post.
Enjoyed studying this, very good stuff, thanks.
Hola! I’ve been reading your site for a long time now and finally got
the bravery to go ahead and give you a shout out from Humble Texas!
Just wanted to tell you keep up the great job!
Thank you for the good writeup. It in fact was a amusement account it. Look advanced to far added agreeable from you! However, how can we communicate?
Its like you read my mind! You seem to know so much about this, like you wrote the book in it or something. I think that you can do with a few pics to drive the message home a bit, but other than that, this is excellent blog. A fantastic read. I will certainly be back.
Great goods from you, man. I’ve take into account your stuff previous to and you are just
extremely fantastic. I really like what you’ve bought here, really like what you are stating and
the best way wherein you say it. You make it entertaining and you
still take care of to keep it wise. I cant wait to learn far more
from you. This is actually a tremendous website.
This is the fitting weblog for anyone who needs to find out about this topic. You understand a lot its nearly hard to argue with you (not that I truly would want…HaHa). You positively put a brand new spin on a topic thats been written about for years. Nice stuff, simply nice!
I love the efforts you have put in this, thankyou for all the great articles.
Heya i am for the primary time here. I found this board and I find
It truly useful & it helped me out much. I’m hoping to offer
something back and help others like you helped me.
I love your writing style really loving this website .
Great write-up, I am normal visitor of one’s blog, maintain up the excellent operate, and It’s going to be a regular visitor for a long time.
Yes! Finally something about Thong.
Great write-up, I am normal visitor of one’s web site, maintain up the nice operate, and It is going to be a regular visitor for a lengthy time.
I believe this internet site has some very superb info for everyone :D. “Do not go where the path may lead, go instead where there is no path and leave a trail.” by Ralph Waldo Emerson.
As a Newbie, I am continuously exploring online for articles that can aid me. Thank you
Some truly excellent content on this website , thanks for contribution.
Pretty nice post. I simply stumbled upon your weblog and wanted to mention that I’ve really loved browsing your weblog posts. After all I’ll be subscribing on your rss feed and I hope you write once more very soon!
I am always browsing online for posts that can assist me. Thank you!
As I website owner I believe the content here is rattling great, thanks for your efforts.
I was recommended this website by my cousin. I am not sure whether this post is written by
him as nobody else know such detailed about my trouble.
You are amazing! Thanks!
Great post, you have pointed out some great points, I as well conceive this s a very wonderful website.
I simply desired to say thanks once again. I am not sure the things I could possibly have used in the absence of the type of suggestions shared by you directly on that concern. It was before a frightening dilemma for me, but being able to see a professional avenue you treated the issue made me to jump with contentment. I’m grateful for this support and in addition wish you are aware of a powerful job you are always providing educating the mediocre ones via your web site. Probably you have never got to know all of us.
Appreciating the time and energy you put into your website and detailed information you provide.
It’s nice to come across a blog every once in a while
that isn’t the same outdated rehashed information. Excellent read!
I’ve saved your site and I’m including your RSS feeds to my
Google account.
You are my breathing in, I own few blogs and rarely run out from to post .
It’s really a great and helpful piece of information. I’m happy that you simply shared this useful info with us. Please keep us up to date like this. Thanks for sharing.
I just could not go away your site before suggesting that I actually enjoyed the standard info an individual supply for your visitors? Is going to be back frequently to investigate cross-check new posts
If some one needs expert view regarding running a blog then i suggest him/her to visit this
website, Keep up the nice job.
I’m still learning from you, while I’m trying to reach my goals. I certainly love reading all that is posted on your site.Keep the stories coming. I liked it!
Hi there, You’ve done a fantastic job. I’ll certainly
digg it and personally recommend to my friends. I’m sure they will be benefited from this website.
Hi there would you mind sharing which blog platform you’re working with? I’m going to start my own blog in the near future but I’m having a tough time making a decision between BlogEngine/Wordpress/B2evolution and Drupal. The reason I ask is because your layout seems different then most blogs and I’m looking for something completely unique. P.S Sorry for getting off-topic but I had to ask!
I see something genuinely special in this web site.
Thanks in support of sharing such a fastidious idea, piece of writing is good, thats why i have read it completely
Hey there would you mind letting me know which web host you’re using? I’ve loaded your blog in 3 completely different internet browsers and I must say this blog loads a lot faster then most. Can you suggest a good internet hosting provider at a reasonable price? Thanks, I appreciate it!
Thank you for all of your work on this blog. My daughter takes pleasure in managing internet research and it’s simple to grasp why. We learn all concerning the dynamic method you make reliable information via this website and boost contribution from the others on the article while our simple princess is certainly discovering a lot. Enjoy the rest of the new year. You are carrying out a fabulous job.
Hi there! Quick question that’s entirely off topic.
Do you know how to make your site mobile friendly?
My blog looks weird when viewing from my iphone4.
I’m trying to find a theme or plugin that might be able
to resolve this issue. If you have any recommendations, please share.
Thanks!
No matter if some one searches for his essential thing, therefore he/she wants to be available that in detail, therefore that thing is
maintained over here.
Those are yours alright! . We at least need to get these people stealing images to start blogging! They probably just did a image search and grabbed them. They look good though!
I haven?¦t checked in here for some time as I thought it was getting boring, but the last few posts are good quality so I guess I?¦ll add you back to my daily bloglist. You deserve it my friend 🙂
Thank you for sharing superb informations. Your site is so cool. I am impressed by the details that you?¦ve on this blog. It reveals how nicely you understand this subject. Bookmarked this website page, will come back for more articles. You, my friend, ROCK! I found simply the info I already searched everywhere and just couldn’t come across. What a great web site.
There is visibly a lot to know about this. I suppose you made some nice points in features also.
I have been absent for some time, but now I remember why I used to love this web site. Thanks , I¦ll try and check back more often. How frequently you update your website?
I’ve been surfing online more than three hours today, yet I never found any interesting article like yours. It is pretty worth enough for me. In my opinion, if all site owners and bloggers made good content as you did, the web will be a lot more useful than ever before.
hey there and thanks on your info – I’ve definitely picked up anything new from proper here. I did alternatively experience several technical points the use of this website, since I skilled to reload the website a lot of times previous to I could get it to load correctly. I had been puzzling over if your hosting is OK? Not that I am complaining, but sluggish loading circumstances times will sometimes have an effect on your placement in google and can damage your quality rating if ads and ***********|advertising|advertising|advertising and *********** with Adwords. Anyway I am including this RSS to my e-mail and could look out for much more of your respective exciting content. Ensure that you update this once more very soon..
Very interesting info !Perfect just what I was looking for! “Music is a higher revelation than philosophy.” by Ludwig van Beethoven.
What i don’t understood is actually how you’re not really much more well-liked than you may be right now. You are so intelligent. You realize thus significantly relating to this subject, made me personally consider it from numerous varied angles. Its like men and women aren’t fascinated unless it’s one thing to do with Lady gaga! Your own stuffs excellent. Always maintain it up!
Piece of writing writing is also a excitement, if you be familiar with afterward you
can write otherwise it is difficult to write.
Only a smiling visitant here to share the love (:, btw outstanding design and style.
I like what you guys are up too. Such clever work and reporting! Carry on the excellent works guys I’ve incorporated you guys to my blogroll. I think it will improve the value of my site 🙂
Respect to website author, some fantastic entropy.
I really appreciate your piece of work, Great post.
I love the efforts you have put in this, regards for all the great posts.
Hi! This is my 1st comment here so I just wanted to give a quick shout out and say I really enjoy reading your blog posts. Can you suggest any other blogs/websites/forums that deal with the same subjects? Thanks!
Spot on with this write-up, I truly believe
that this website needs a lot more attention. I’ll probably
be back again to read more, thanks for the information!
It’s awesome to go to see this web page and reading
the views of all mates on the topic of this piece of writing, while I am also keen of getting knowledge.
I am genuinely grateful to the owner of this website who has shared this wonderful
article at here.
Unquestionably believe that which you stated. Your favorite reason seemed to be on the web the simplest thing to be aware of. I say to you, I certainly get irked while people think about worries that they just do not know about. You managed to hit the nail upon the top and defined out the whole thing without having side-effects , people could take a signal. Will probably be back to get more. Thanks
You can definitely see your expertise in the work you write.
The world hopes for even more passionate writers such as you who aren’t
afraid to say how they believe. All the time follow your heart.
It is the best time to make some plans for the future and it is time to be happy. I have read this post and if I could I desire to suggest you some interesting things or tips. Perhaps you could write next articles referring to this article. I desire to read more things about it!
magnificent post, very informative. I wonder why the other specialists of this sector don’t notice this. You should continue your writing. I’m sure, you have a huge readers’ base already!
It’s appropriate time to make a few plans for the longer term and it is time to be happy. I’ve read this post and if I may I desire to suggest you few fascinating things or tips. Maybe you can write next articles referring to this article. I want to learn more things approximately it!
I like the efforts you have put in this, thank you for all the great posts.
Thank you for sharing with us, I believe this website really stands out : D.
I consider something genuinely interesting about your web blog so I saved to favorites.
constantly i used to read smaller articles or reviews which also clear
their motive, and that is also happening with this paragraph which I am reading at this place.
Hi to all, for the reason that I am really eager of reading this web site’s post to be updated regularly.
It carries pleasant material.
I found your weblog website on google and verify just a few of your early posts. Continue to maintain up the excellent operate. I just extra up your RSS feed to my MSN Information Reader. In search of ahead to reading more from you afterward!…
Thank you a lot for giving everyone an exceptionally superb opportunity to read in detail from this blog. It really is so sweet and as well , jam-packed with amusement for me and my office fellow workers to search the blog on the least 3 times weekly to read through the fresh secrets you have. Of course, I’m also always impressed for the mind-blowing pointers served by you. Some 4 points in this posting are really the most effective I’ve had.
Valuable information. Lucky me I found your website by accident, and I’m shocked why this accident did not happened earlier! I bookmarked it.
Some genuinely good information, Gladiolus I discovered this. “The minute one utters a certainty, the opposite comes to mind.” by May Sarton.
I like this web site because so much useful stuff on here : D.
Today, while I was at work, my sister stole my iPad and tested to see if it can survive a 30 foot drop, just so she can be a youtube sensation. My apple ipad is now broken and she has 83 views. I know this is entirely off topic but I had to share it with someone!
You are a very intelligent individual!
Heya i am for the first time here. I found this board and I find It truly useful & it helped me out much.
I hope to give something back and aid others like you helped me.
After study just a few of the weblog posts on your website now, and I really like your approach of blogging. I bookmarked it to my bookmark web site checklist and will be checking again soon. Pls take a look at my website online as nicely and let me know what you think.
I am typically to running a blog and i actually respect your content. The article has actually peaks my interest. I am going to bookmark your website and maintain checking for new information.
Thanks – Enjoyed this update, can you make it so I get an alert email whenever you publish a fresh update?
I like what you guys are up too. Such clever work and reporting! Carry on the superb works guys I¦ve incorporated you guys to my blogroll. I think it’ll improve the value of my website 🙂
he blog was how do i say it… relevant, finally something that helped me. Thanks
Very interesting topic, thankyou for posting.
I?¦ll right away clutch your rss as I can not to find your e-mail subscription link or e-newsletter service. Do you’ve any? Please let me understand in order that I could subscribe. Thanks.
you are in point of fact a just right webmaster. The website loading pace is amazing. It kind of feels that you’re doing any unique trick. Furthermore, The contents are masterwork. you’ve performed a excellent activity in this matter!
What i do not understood is if truth be told how you’re
now not really a lot more smartly-liked than you may be right now.
You are very intelligent. You realize thus significantly in terms of this subject, made me personally imagine it from a lot of various angles.
Its like women and men are not involved except it is one thing to accomplish with
Lady gaga! Your own stuffs excellent. At all times maintain it up!
Thank you for another informative blog. Where else could I get that kind of info written in such a perfect way? I’ve a project that I am just now working on, and I’ve been on the look out for such info.
I went over this website and I conceive you have a lot of great information, saved to my bookmarks (:.
I’ve been browsing online greater than three hours lately, but I never found any fascinating article like yours. It is lovely worth sufficient for me. In my opinion, if all website owners and bloggers made good content as you probably did, the net will likely be much more helpful than ever before.
Would love to forever get updated outstanding website! .
Thank you for another great article. Where else could anyone get that type of info in such an ideal way of writing? I have a presentation next week, and I’m on the look for such info.
I truly appreciate this post. I have been looking everywhere for this! Thank goodness I found it on Bing. You have made my day! Thx again
I really appreciate this post. I¦ve been looking everywhere for this! Thank goodness I found it on Bing. You have made my day! Thank you again
whoah this weblog is magnificent i really like reading your articles. Stay up the good work! You realize, lots of people are hunting around for this info, you could aid them greatly.
This blog is definitely rather handy since I’m at the moment creating an internet floral website – although I am only starting out therefore it’s really fairly small, nothing like this site. Can link to a few of the posts here as they are quite. Thanks much. Zoey Olsen
Wow that was odd. I just wrote an very long comment but after I clicked submit my comment didn’t show up. Grrrr… well I’m not writing all that over again. Anyway, just wanted to say great blog!
I think this is among the most vital information for me. And i am glad reading your article. But wanna remark on some general things, The web site style is wonderful, the articles is really great : D. Good job, cheers
Great post. I used to be checking continuously this blog and I’m impressed! Extremely helpful info particularly the ultimate part 🙂 I take care of such info much. I used to be seeking this certain information for a very lengthy time. Thanks and good luck.
I visited a lot of website but I think this one has something special in it in it
I believe this internet site holds very good written articles articles.
Outstanding post, you have pointed out some excellent points, I also think this s a very good website.
I believe this website has some real superb information for everyone :D. “Heat cannot be separated from fire, or beauty from The Eternal.” by Alighieri Dante.
I really enjoy looking through on this site, it holds superb blog posts.
An interesting discussion is price comment. I think that it is best to write more on this matter, it may not be a taboo topic but typically people are not enough to speak on such topics. To the next. Cheers
Awesome post.
you’re really a just right webmaster. The site loading speed is amazing. It sort of feels that you are doing any unique trick. Moreover, The contents are masterwork. you’ve performed a great job on this topic!
Good write-up, I?¦m regular visitor of one?¦s site, maintain up the nice operate, and It’s going to be a regular visitor for a lengthy time.
Rattling clean site, thankyou for this post.
I enjoy your writing style truly enjoying this web site.
Thanks for the blog post, is there any way I can get an email whenever you make a fresh post?
I am often to blogging and i really appreciate your content. The article has really peaks my interest. I am going to bookmark your site and keep checking for new information.
Fantastic goods from you, man. I’ve understand your stuff prior to and you are just too fantastic. I actually like what you’ve obtained here, really like what you’re stating and the best way in which you assert it. You are making it entertaining and you still take care of to stay it smart. I can not wait to read far more from you. That is actually a wonderful website.
Hiya very cool blog!! Guy .. Beautiful .. Wonderful .. I’ll bookmark your website and take the feeds additionally…I’m glad to search out a lot of helpful information here in the put up, we want develop extra strategies on this regard, thanks for sharing. . . . . .
You are a very clever person!
It is perfect time to make some plans for the future and it’s time to be happy. I’ve read this post and if I could I want to suggest you few interesting things or advice. Maybe you could write next articles referring to this article. I desire to read even more things about it!
I’m truly enjoying the design and layout of your site. It’s a very easy on the eyes which makes it much more pleasant for me to come here and visit more often. Did you hire out a developer to create your theme? Great work!
excellent post, very informative. I wonder why the other specialists of this sector don’t notice this. You should continue your writing. I am confident, you have a huge readers’ base already!
My brother recommended I might like this web site.
He was entirely right. This submit truly made my day.
You cann’t believe just how much time I had spent for this info!
Thanks!
When some one searches for his required thing, therefore he/she desires to be available that in detail,
therefore that thing is maintained over here.
Terrific work! This is the kind of information that should be shared around the web. Disgrace on the seek engines for no longer positioning this post upper! Come on over and talk over with my web site . Thanks =)
I blog frequently and I really thank you for your
information. The article has truly peaked my interest.
I’m going to book mark your blog and keep checking for new
details about once a week. I opted in for your Feed too.
I dugg some of you post as I cogitated they were handy very beneficial
hi!,I like your writing so much! share we communicate more about your article on AOL? I require a specialist on this area to solve my problem. May be that’s you! Looking forward to see you.
What’s up mates, how is everything, and what you want to say concerning this piece of writing,
in my view its genuinely awesome designed for me.
Hey! I know this is kinda off topic but I was wondering which blog platform are you using for this site? I’m getting fed up of WordPress because I’ve had problems with hackers and I’m looking at alternatives for another platform. I would be fantastic if you could point me in the direction of a good platform.
Thanx for the effort, keep up the good work Great work, I am going to start a small Blog Engine course work using your site I hope you enjoy blogging with the popular BlogEngine.net.Thethoughts you express are really awesome. Hope you will right some more posts.
I think this is among the most important info for me. And i’m
glad studying your article. However wanna observation on some common issues, The web site taste is wonderful, the articles is truly excellent :
D. Good process, cheers
I am not very excellent with English but I get hold this rattling leisurely to interpret.
I have been exploring for a little bit for any high quality articles or blog posts on this sort of area . Exploring in Yahoo I at last stumbled upon this web site. Reading this information So i’m happy to convey that I have a very good uncanny feeling I discovered just what I needed. I most certainly will make certain to do not forget this web site and give it a glance regularly.
I like this weblog very much, Its a rattling nice berth to read and obtain information.
Lovely blog! I am loving it!! Will be back later to read some more. I am taking your feeds also
I really like your writing style, fantastic information, thanks for posting :D. “Silence is more musical than any song.” by Christina G. Rossetti.
Thanks for the sensible critique. Me and my neighbor were just preparing to do a little research on this. We got a grab a book from our local library but I think I learned more from this post. I’m very glad to see such great info being shared freely out there.
We are a bunch of volunteers and opening a new scheme in our community. Your website provided us with valuable info to paintings on. You’ve performed an impressive process and our entire neighborhood shall be grateful to you.
I have learn several excellent stuff here. Definitely price bookmarking for revisiting. I wonder how a lot attempt you put to make such a wonderful informative site.
I’m not sure exactly why but this weblog is loading extremely slow for me.
Is anyone else having this problem or is it
a issue on my end? I’ll check back later on and see if the
problem still exists.
I wish to show my appreciation for your kind-heartedness in support of those who must have guidance on this particular niche. Your real commitment to getting the message across was incredibly valuable and has really empowered girls much like me to reach their targets. Your entire useful report entails much a person like me and much more to my mates. Warm regards; from all of us.
Hello, its good paragraph concerning media print, we all be aware of media is a enormous source of facts.
You have brought up a very excellent points, appreciate it for the post.
Great work! This is the type of info that should be shared around the web. Shame on the search engines for not positioning this post higher! Come on over and visit my web site . Thanks =)
Hello there, I found your web site via Google even as searching for a related subject, your site got here up, it seems to be good. I have bookmarked it in my google bookmarks.
I couldn’t resist commenting
Yeah bookmaking this wasn’t a bad conclusion great post! .
I have been surfing online greater than 3 hours nowadays, yet I never found any fascinating article like yours. It is lovely value sufficient for me. In my view, if all web owners and bloggers made just right content as you did, the internet will likely be much more helpful than ever before.
I do not even understand how I stopped up right here, however I thought this put up was once great. I do not realize who you’re however definitely you’re going to a well-known blogger if you happen to are not already 😉 Cheers!
I¦ll immediately snatch your rss as I can not to find your email subscription link or e-newsletter service. Do you’ve any? Please let me recognize in order that I may subscribe. Thanks.
I’m not that much of a online reader to be honest but your blogs really nice, keep it up! I’ll go ahead and bookmark your site to come back later. Many thanks
Some times its a pain in the ass to read what blog owners wrote but this web site is really user pleasant! .
Hello very cool web site!! Man .. Excellent .. Amazing .. I’ll bookmark your site and take the feeds alsoKI am glad to find a lot of helpful information here within the submit, we need develop extra techniques in this regard, thanks for sharing. . . . . .
Thank you for the good writeup. It in reality used to be a entertainment account it. Glance complex to far introduced agreeable from you! By the way, how could we keep up a correspondence?
This is really interesting, You’re a very skilled blogger. I have joined your rss feed and look forward to seeking more of your fantastic post. Also, I have shared your web site in my social networks!
Sweet blog! I found it while searching on Yahoo News. Do you have any suggestions on how to get listed in Yahoo News? I’ve been trying for a while but I never seem to get there! Thank you
There is certainly a great deal to find out about this
issue. I like all of the points you have made.
I am constantly invstigating online for ideas that can facilitate me. Thank you!
Valuable info. Lucky me I found your site by accident, and I’m shocked why this accident did not happened earlier! I bookmarked it.
An impressive share, I just given this onto a colleague who was doing a little analysis on this. And he in fact bought me breakfast because I found it for him.. smile. So let me reword that: Thnx for the treat! But yeah Thnkx for spending the time to discuss this, I feel strongly about it and love reading more on this topic. If possible, as you become expertise, would you mind updating your blog with more details? It is highly helpful for me. Big thumb up for this blog post!
I truly appreciate this post. I have been looking everywhere for this! Thank goodness I found it on Bing. You’ve made my day! Thx again
I wanted to thank you for this great read!! I definitely enjoying every little bit of it I have you bookmarked to check out new stuff you post…
Do you mind if I quote a few of your articles as long as I
provide credit and sources back to your blog? My
website is in the very same niche as yours and my users would certainly benefit from some of the information you provide here.
Please let me know if this alright with you. Thanks
a lot!
I am not sure where you’re getting your info, but great topic. I needs to spend some time learning much more or understanding more. Thanks for fantastic info I was looking for this info for my mission.
Just wanna input on few general things, The website style and design is perfect, the subject material is really wonderful : D.
Thanks for your marvelous posting! I quite enjoyed reading it, you’re a great author.I will make certain to bookmark your blog and will eventually come back in the foreseeable future. I want to encourage you to continue your great posts, have a nice afternoon!
Great post. I am facing a couple of these problems.
Thank you for sharing with us, I conceive this website truly stands out : D.
I loved as much as you’ll receive carried out right here. The sketch is attractive, your authored subject matter stylish.
nonetheless, you command get got an impatience over that you wish be delivering the following.
unwell unquestionably come further formerly again since exactly the same nearly very often inside case you
shield this hike.
I’m really inspired with your writing skills as smartly as with the format for your weblog. Is that this a paid subject or did you modify it your self? Either way stay up the excellent quality writing, it’s rare to see a great weblog like this one nowadays..
Thank you for every other informative web site. The place else could I get that type of information written in such a perfect approach? I have a project that I am just now running on, and I’ve been at the glance out for such info.
Hi, i think that i saw you visited my blog so i came to “go back the prefer”.I am attempting to find issues to enhance my web site!I guess its adequate to use a few of your ideas!!
I enjoy your piece of work, thanks for all the useful content.
I don’t unremarkably comment but I gotta state appreciate it for the post on this special one : D.
I was wondering if you ever thought of changing the page layout of your site? Its very well written; I love what youve got to say. But maybe you could a little more in the way of content so people could connect with it better. Youve got an awful lot of text for only having 1 or two images. Maybe you could space it out better?
You are my inspiration , I have few blogs and rarely run out from to post : (.
I have not checked in here for some time since I thought it was getting boring, but the last several posts are good quality so I guess I?¦ll add you back to my daily bloglist. You deserve it my friend 🙂
Thanks for your whole effort on this web site. My aunt delights in getting into investigation and it is easy to understand why. Most of us know all concerning the compelling method you make effective tricks through the website and improve participation from visitors on this content and our girl is without question being taught so much. Take advantage of the rest of the new year. You are performing a good job.
I appreciate, cause I found just what I was looking for. You have ended my 4 day long hunt! God Bless you man. Have a nice day. Bye
I was recommended this website by my cousin. I am not sure whether this post is written by him as nobody else know such detailed about my difficulty. You’re amazing! Thanks!
This is very interesting, You’re a very skilled blogger. I have joined your rss feed and look forward to seeking more of your wonderful post. Also, I’ve shared your web site in my social networks!
The next time I learn a blog, I hope that it doesnt disappoint me as a lot as this one. I mean, I know it was my option to read, however I really thought youd have something fascinating to say. All I hear is a bunch of whining about one thing that you could fix when you werent too busy on the lookout for attention.
F*ckin’ tremendous things here. I am very glad to see your post. Thanks a lot and i am looking forward to contact you. Will you kindly drop me a mail?
Wonderful website. Lots of useful info here. I’m sending it to some buddies ans also sharing in delicious. And certainly, thanks to your sweat!
This is the right blog for anyone who wants to find out about this topic. You realize so much its almost hard to argue with you (not that I actually would want…HaHa). You definitely put a new spin on a topic thats been written about for years. Great stuff, just great!
Do you mind if I quote a couple of your articles as long as I provide credit and sources back to your webpage? My website is in the very same niche as yours and my users would genuinely benefit from some of the information you provide here. Please let me know if this okay with you. Cheers!
I have been exploring for a little bit for any high-quality articles or blog posts on this sort of space . Exploring in Yahoo I at last stumbled upon this website. Reading this info So i am happy to convey that I’ve an incredibly good uncanny feeling I came upon exactly what I needed. I so much indisputably will make sure to don¦t overlook this website and give it a look regularly.
Howdy very cool blog!! Man .. Beautiful .. Amazing .. I’ll bookmark your web site and take the feeds also…I’m satisfied to search out numerous helpful info here in the post, we need work out more strategies on this regard, thanks for sharing.
Excellent goods from you, man. I have keep in mind your stuff prior to and you’re simply too great. I actually like what you have received here, certainly like what you’re saying and the best way during which you are saying it. You make it entertaining and you still take care of to keep it sensible. I cant wait to learn much more from you. That is really a terrific site.
you’re truly a just right webmaster. The website loading speed is amazing. It kind of feels that you’re doing any distinctive trick. Furthermore, The contents are masterwork. you have done a excellent job on this matter!
Hello. excellent job. I did not expect this. This is a excellent story. Thanks!
Excellent site. Plenty of useful information here. I’m sending it to several pals ans additionally sharing in delicious. And certainly, thank you for your effort!
Really clean site, thanks for this post.
You really make it seem so easy with your presentation but I find this topic to be actually something that I think I would never understand. It seems too complex and very broad for me. I am looking forward for your next post, I’ll try to get the hang of it!
Valuable info. Lucky me I found your web site by accident, and I am surprised why this accident did not happened earlier! I bookmarked it.
Some really marvelous work on behalf of the owner of this web site, perfectly outstanding content material.
Hey! I know this is somewhat off topic but I was wondering if you knew where I could locate a captcha plugin for my comment form? I’m using the same blog platform as yours and I’m having problems finding one? Thanks a lot!
There is noticeably a bunch to know about this. I assume you made some good points in features also.
Hiya very nice blog!! Guy .. Excellent .. Amazing .. I’ll bookmark your web site and take the feeds additionally?KI’m happy to search out numerous helpful information here within the submit, we’d like work out extra techniques in this regard, thank you for sharing. . . . . .
Valuable info. Lucky me I found your site by accident, and I’m shocked why this accident did not happened earlier! I bookmarked it.
Merely wanna remark on few general things, The website pattern is perfect, the content is really good : D.
you have a great blog here! would you like to make some invite posts on my blog?
It’s hard to search out knowledgeable folks on this subject, but you sound like you realize what you’re talking about! Thanks
Magnificent goods from you, man. I have understand your stuff previous to and you’re just extremely fantastic. I actually like what you’ve acquired here, really like what you are stating and the way in which you say it. You make it entertaining and you still take care of to keep it smart. I can’t wait to read much more from you. This is really a tremendous site.
Fantastic site. A lot of useful information here. I am sending it to some buddies ans additionally sharing in delicious. And obviously, thanks to your sweat!
Hi my friend! I wish to say that this article is amazing, nice written and include almost all significant infos. I would like to see more posts like this.
WONDERFUL Post.thanks for share..extra wait .. …
Just what I was searching for, appreciate it for posting.
Wohh just what I was searching for, appreciate it for posting.
Some times its a pain in the ass to read what people wrote but this web site is really user genial! .
I went over this internet site and I think you have a lot of superb info , saved to favorites (:.
Regards for this post, I am a big big fan of this website would like to continue updated.
What¦s Taking place i am new to this, I stumbled upon this I’ve found It positively helpful and it has helped me out loads. I’m hoping to give a contribution & aid other users like its aided me. Good job.
Its good as your other posts : D, regards for posting.
The subsequent time I read a weblog, I hope that it doesnt disappoint me as much as this one. I mean, I do know it was my choice to learn, but I actually thought youd have one thing fascinating to say. All I hear is a bunch of whining about something that you might fix in case you werent too busy in search of attention.
Glad to be one of several visitors on this amazing web site : D.
I haven’t checked in here for a while because I thought it was getting boring, but the last few posts are good quality so I guess I’ll add you back to my everyday bloglist. You deserve it my friend 🙂
I don’t even know how I ended up here, but I thought this post was great. I don’t know who you are but certainly you are going to a famous blogger if you are not already 😉 Cheers!
I’ve recently started a site, the information you offer on this web site has helped me tremendously. Thank you for all of your time & work.
I do like the way you have framed this specific matter plus it does indeed offer us a lot of fodder for thought. However, because of what I have seen, I basically hope when other remarks stack on that men and women keep on point and don’t embark upon a tirade of some other news du jour. Still, thank you for this exceptional piece and even though I can not really agree with this in totality, I value your viewpoint.
Hi my loved one! I wish to say that this post is amazing, nice written and come with approximately all important infos. I would like to peer extra posts like this.
This website online is known as a walk-by way of for the entire data you wanted about this and didn’t know who to ask. Glimpse right here, and also you’ll positively uncover it.
There is noticeably a bundle to identify about this. I think you made certain nice points in features also.
Your style is so unique compared to many other people. Thank you for publishing when you have the opportunity,Guess I will just make this bookmarked.2
Nice post. I learn something more challenging on different blogs everyday. It will always be stimulating to read content from other writers and practice a little something from their store. I’d prefer to use some with the content on my blog whether you don’t mind. Natually I’ll give you a link on your web blog. Thanks for sharing.
Very interesting points you have mentioned, thankyou for putting up.
Great ?V I should certainly pronounce, impressed with your web site. I had no trouble navigating through all the tabs and related info ended up being truly easy to do to access. I recently found what I hoped for before you know it in the least. Reasonably unusual. Is likely to appreciate it for those who add forums or anything, site theme . a tones way for your client to communicate. Nice task..
Hi there! I’m at work browsing your blog from my new iphone!
Just wanted to say I love reading your blog and look forward to all your posts!
Keep up the fantastic work!
Some really nice and useful information on this internet site, besides I think the design and style has excellent features.
Just a smiling visitant here to share the love (:, btw great pattern.
Very nice post. I simply stumbled upon your weblog and wished to mention that I have truly enjoyed browsing your blog posts. In any case I’ll be subscribing on your rss feed and I’m hoping you write again soon!
I liked up to you will receive carried out proper here. The comic strip is attractive, your authored subject matter stylish. nevertheless, you command get bought an shakiness over that you would like be handing over the following. in poor health no doubt come further until now again since exactly the similar nearly very incessantly within case you protect this increase.
This is the right blog for anyone who wants to find out about this topic. You realize so much its almost hard to argue with you (not that I actually would want…HaHa). You definitely put a new spin on a topic thats been written about for years. Great stuff, just great!
Please let me know if you’re looking for a article author for your site. You have some really good articles and I feel I would be a good asset. If you ever want to take some of the load off, I’d love to write some articles for your blog in exchange for a link back to mine. Please shoot me an email if interested. Regards!
I enjoy your writing style truly enjoying this site.
I will immediately grab your rss as I can not find your email subscription link or e-newsletter service. Do you have any? Kindly let me know so that I could subscribe. Thanks.
Hi, I think your website might be having browser compatibility issues. When I look at your blog site in Firefox, it looks fine but when opening in Internet Explorer, it has some overlapping. I just wanted to give you a quick heads up! Other then that, excellent blog!
Thanks for another informative website. Where else could I get that type of info written in such a perfect way? I have a project that I’m just now working on, and I have been on the look out for such info.
I have recently started a website, the info you provide on this site has helped me tremendously. Thank you for all of your time & work. “The more sand that has escaped from the hourglass of our life, the clearer we should see through it.” by Jean Paul.
I couldn’t resist commenting
I got what you intend, appreciate it for putting up.Woh I am pleased to find this website through google.
I have recently started a blog, the info you offer on this website has helped me greatly. Thanks for all of your time & work. “Yield not to evils, but attack all the more boldly.” by Virgil.
Wow that was unusual. I just wrote an very long comment but after I clicked submit my comment didn’t show up. Grrrr… well I’m not writing all that over again. Anyways, just wanted to say wonderful blog!
hey there and thanks on your info – I’ve certainly picked up something new from proper here. I did alternatively experience a few technical points the usage of this site, since I experienced to reload the web site a lot of instances previous to I could get it to load correctly. I had been considering if your web host is OK? Not that I’m complaining, however slow loading cases times will very frequently impact your placement in google and could injury your quality score if ads and ***********|advertising|advertising|advertising and *********** with Adwords. Well I’m adding this RSS to my email and could look out for a lot more of your respective exciting content. Make sure you replace this again very soon..
As I web site possessor I believe the content material here is rattling great , appreciate it for your efforts. You should keep it up forever! Best of luck.
I know this if off topic but I’m looking into starting my own weblog and was curious what all is required to get setup? I’m assuming having a blog like yours would cost a pretty penny? I’m not very web smart so I’m not 100 certain. Any tips or advice would be greatly appreciated. Kudos
You are a very smart individual!
Awsome website! I am loving it!! Will come back again. I am bookmarking your feeds also.
Thank you for the good writeup. It in fact was a amusement account it. Look advanced to more added agreeable from you! However, how can we communicate?
Amazing blog! Is your theme custom made or did you download it from somewhere? A theme like yours with a few simple adjustements would really make my blog shine. Please let me know where you got your design. Appreciate it
hi!,I like your writing very much! share we communicate more about your post on AOL? I need a specialist on this area to solve my problem. May be that’s you! Looking forward to see you.
I’ve been absent for a while, but now I remember why I used to love this website. Thanks , I will try and check back more frequently. How frequently you update your web site?
I have been exploring for a bit for any high quality articles or weblog posts in this kind of area . Exploring in Yahoo I ultimately stumbled upon this site. Studying this info So i am satisfied to show that I’ve an incredibly excellent uncanny feeling I discovered just what I needed. I so much surely will make sure to don¦t forget this site and give it a glance regularly.
I discovered your blog site on google and check a few of your early posts. Continue to keep up the very good operate. I just additional up your RSS feed to my MSN News Reader. Seeking forward to reading more from you later on!…
Hello! This is my 1st comment here so I just wanted to give a quick shout out and tell you I really enjoy reading through your articles. Can you recommend any other blogs/websites/forums that cover the same topics? Thank you so much!
Howdy just wanted to give you a quick heads up and let you know a few of the images aren’t loading properly. I’m not sure why but I think its a linking issue. I’ve tried it in two different browsers and both show the same results.
you have an incredible blog right here! would you wish to make some invite posts on my weblog?
Hi my loved one! I wish to say that this post is amazing, great written and come with almost all significant infos. I would like to peer more posts like this.
I am incessantly thought about this, regards for posting.
I like the helpful info you provide in your articles. I will bookmark your blog and check again here regularly. I’m quite certain I’ll learn plenty of new stuff right here! Good luck for the next!
Hello, I think your site might be having browser compatibility issues.
When I look at your website in Safari, it looks fine but when opening in Internet Explorer,
it has some overlapping. I just wanted to give you a quick heads up!
Other then that, wonderful blog!
Very interesting info !Perfect just what I was searching for!
Hello, Neat post. There is a problem with your web site in internet explorer, might check thisK IE nonetheless is the market chief and a big portion of other folks will omit your wonderful writing due to this problem.
Utterly indited subject material, appreciate it for information. “The bravest thing you can do when you are not brave is to profess courage and act accordingly.” by Corra Harris.
I like the valuable info you provide in your articles. I will bookmark your weblog and check again here frequently. I am quite certain I’ll learn plenty of new stuff right here! Best of luck for the next!
This design is wicked! You certainly know how to keep a reader entertained.
Between your wit and your videos, I was almost moved to start my
own blog (well, almost…HaHa!) Fantastic job.
I really enjoyed what you had to say, and more than that, how
you presented it. Too cool!
I have been surfing online greater than three hours today, but I by no means found any interesting article like yours. It’s beautiful value enough for me. In my opinion, if all webmasters and bloggers made just right content as you did, the net will likely be a lot more helpful than ever before.
I have been exploring for a little bit for any high-quality articles or blog posts in this kind of area . Exploring in Yahoo I eventually stumbled upon this website. Studying this info So i?¦m glad to show that I have an incredibly just right uncanny feeling I came upon just what I needed. I so much without a doubt will make certain to don?¦t forget this web site and give it a look regularly.
I conceive this web site has some very excellent info for everyone. “Billy T-T-T-T-Today, Junior” by Billy Madison.
Magnificent site. A lot of helpful info here. I am sending it to some pals ans additionally sharing in delicious. And obviously, thank you on your effort!
Thanks a lot for sharing this with all people you actually realize what you’re talking about! Bookmarked. Kindly also talk over with my web site =). We can have a link alternate agreement between us!
An attention-grabbing discussion is price comment. I think that it’s best to write more on this matter, it might not be a taboo subject however generally individuals are not enough to talk on such topics. To the next. Cheers
Your style is so unique compared to many other people. Thank you for publishing when you have the opportunity,Guess I will just make this bookmarked.2
Exceptional post but I was wondering if you could write a litte more on this subject? I’d be very thankful if you could elaborate a little bit more. Kudos!
Unquestionably believe that which you said. Your favorite reason appeared to be on the web the simplest thing to be aware of. I say to you, I certainly get annoyed while people consider worries that they just don’t know about. You managed to hit the nail upon the top and defined out the whole thing without having side-effects , people can take a signal. Will likely be back to get more. Thanks
I’m still learning from you, but I’m trying to achieve my goals. I certainly enjoy reading everything that is written on your blog.Keep the tips coming. I liked it!
I always was concerned in this topic and still am, appreciate it for posting.
Excellent blog right here! Also your web site rather a lot up fast! What host are you the usage of? Can I get your associate link to your host? I desire my website loaded up as fast as yours lol
Of course, what a splendid website and instructive posts, I surely will bookmark your blog.All the Best!
I have not checked in here for a while as I thought it was getting boring, but the last few posts are good quality so I guess I will add you back to my daily bloglist. You deserve it my friend 🙂
Wonderful blog! I found it while browsing on Yahoo News. Do you have any suggestions on how to get listed in Yahoo News? I’ve been trying for a while but I never seem to get there! Thanks
I just could not depart your web site before suggesting that I really enjoyed the standard info a person provide for your visitors? Is going to be back often in order to check up on new posts
I like this blog its a master peace ! Glad I detected this on google .
It is appropriate time to make a few plans for the long run and it is time to be happy. I have read this publish and if I could I want to counsel you some fascinating issues or advice. Maybe you can write next articles referring to this article. I wish to read more things approximately it!
Appreciate it for all your efforts that you have put in this. very interesting info .
I have been surfing online greater than 3 hours these days, but I by no means discovered any interesting article like yours. It is pretty worth sufficient for me. Personally, if all webmasters and bloggers made just right content as you probably did, the net will probably be much more useful than ever before. “Truth is not determined by majority vote.” by Doug Gwyn.
Hi there would you mind stating which blog platform you’re working with? I’m looking to start my own blog in the near future but I’m having a tough time deciding between BlogEngine/Wordpress/B2evolution and Drupal. The reason I ask is because your design and style seems different then most blogs and I’m looking for something completely unique. P.S My apologies for getting off-topic but I had to ask!
Great post. I was checking constantly this blog and I’m impressed! Extremely helpful information particularly the last part 🙂 I care for such information much. I was looking for this certain information for a very long time. Thank you and good luck.
Very interesting information!Perfect just what I was looking for!
I like what you guys are usually up too. This sort of clever work and reporting! Keep up the fantastic works guys I’ve incorporated you guys to blogroll.
I cherished as much as you’ll obtain performed proper here. The comic strip is attractive, your authored subject matter stylish. nevertheless, you command get bought an shakiness over that you want be turning in the following. ill no doubt come more until now once more since exactly the similar just about very frequently inside case you defend this hike.
This is a topic close to my heart cheers, where are your contact details though?
Hey there! Do you use Twitter? I’d like to follow you if that would be ok. I’m definitely enjoying your blog and look forward to new posts.
There may be noticeably a bundle to learn about this. I assume you made certain good points in features also.
Good – I should certainly pronounce, impressed with your site. I had no trouble navigating through all tabs as well as related information ended up being truly simple to do to access. I recently found what I hoped for before you know it in the least. Reasonably unusual. Is likely to appreciate it for those who add forums or something, web site theme . a tones way for your client to communicate. Excellent task.
I have been absent for some time, but now I remember why I used to love this site. Thanks, I will try and check back more frequently. How frequently you update your website?
I genuinely value your piece of work, Great post.
Its like you read my mind! You seem to know so much about this, like you wrote the book in it or something. I think that you could do with a few pics to drive the message home a little bit, but other than that, this is great blog. A great read. I will definitely be back.
This really answered my drawback, thank you!
I have been exploring for a bit for any high-quality articles or blog posts on this kind of area . Exploring in Yahoo I at last stumbled upon this website. Reading this info So i am happy to convey that I have an incredibly good uncanny feeling I discovered exactly what I needed. I most certainly will make sure to don’t forget this web site and give it a glance on a constant basis.
Please let me know if you’re looking for a article writer for your blog. You have some really good articles and I think I would be a good asset. If you ever want to take some of the load off, I’d really like to write some material for your blog in exchange for a link back to mine. Please shoot me an email if interested. Kudos!
F*ckin’ awesome issues here. I’m very happy to look your article. Thanks a lot and i’m looking ahead to touch you. Will you please drop me a e-mail?
I like what you guys are up too. Such smart work and reporting! Keep up the superb works guys I¦ve incorporated you guys to my blogroll. I think it’ll improve the value of my site 🙂
It’s laborious to seek out knowledgeable individuals on this matter, however you sound like you realize what you’re talking about! Thanks
I’m curious to find out what blog system you’re utilizing? I’m having some small security issues with my latest site and I’d like to find something more risk-free. Do you have any recommendations?
Woah! I’m really loving the template/theme of this site. It’s simple, yet effective. A lot of times it’s challenging to get that “perfect balance” between usability and visual appearance. I must say you have done a fantastic job with this. Additionally, the blog loads extremely quick for me on Opera. Exceptional Blog!
Hmm it appears like your website ate my first comment (it was extremely long) so I guess I’ll just sum it up what I had written and say, I’m thoroughly enjoying your blog. I as well am an aspiring blog writer but I’m still new to the whole thing. Do you have any helpful hints for novice blog writers? I’d definitely appreciate it.
You have observed very interesting points! ps nice web site. “Become addicted to constant and never-ending self improvement.” by Anthony D’Angelo.
I see something genuinely special in this internet site.
great points altogether, you simply gained a logo new reader. What may you recommend in regards to your publish that you simply made a few days ago? Any certain?
hi!,I like your writing so much! share we communicate more about your article on AOL? I require an expert on this area to solve my problem. Maybe that’s you! Looking forward to see you.
Hello! I’ve been following your website for a while now and finally got the courage to go ahead and give you a shout out from Atascocita Texas! Just wanted to mention keep up the great job!
Hi, I think your website might be having browser compatibility issues. When I look at your blog site in Safari, it looks fine but when opening in Internet Explorer, it has some overlapping. I just wanted to give you a quick heads up! Other then that, awesome blog!
My brother suggested I might like this website. He used to be totally right. This submit truly made my day. You cann’t believe just how so much time I had spent for this info! Thank you!
This website online is really a walk-by means of for all the info you wished about this and didn’t know who to ask. Glimpse here, and you’ll definitely discover it.
Thank you for the auspicious writeup. It in fact was a amusement account it. Look advanced to more added agreeable from you! By the way, how could we communicate?
I’m not that much of a internet reader to be honest but your sites really nice, keep it up! I’ll go ahead and bookmark your website to come back later. Cheers
I have not checked in here for some time because I thought it was getting boring, but the last several posts are good quality so I guess I?¦ll add you back to my everyday bloglist. You deserve it my friend 🙂
But a smiling visitor here to share the love (:, btw great design and style. “The price one pays for pursuing a profession, or calling, is an intimate knowledge of its ugly side.” by James Arthur Baldwin.
My partner and I absolutely love your blog and find the majority of your post’s to be exactly what I’m looking for. Do you offer guest writers to write content available for you? I wouldn’t mind producing a post or elaborating on a lot of the subjects you write with regards to here. Again, awesome weblog!
Good day very nice site!! Man .. Beautiful .. Amazing .. I’ll bookmark your website and take the feeds additionally?KI’m glad to find so many useful information here in the submit, we need work out extra strategies in this regard, thanks for sharing. . . . . .
Some times its a pain in the ass to read what people wrote but this site is very user pleasant! .
Hey, I think your site might be having browser compatibility issues. When I look at your blog in Safari, it looks fine but when opening in Internet Explorer, it has some overlapping. I just wanted to give you a quick heads up! Other then that, wonderful blog!
Hmm is anyone else having problems with the pictures on this blog loading? I’m trying to figure out if its a problem on my end or if it’s the blog. Any feed-back would be greatly appreciated.
Wow! Thank you! I continuously needed to write on my blog something like that. Can I implement a fragment of your post to my blog?
Heya! I’m at work browsing your blog from my new apple iphone! Just wanted to say I love reading your blog and look forward to all your posts! Keep up the fantastic work!
Sweet internet site, super layout, rattling clean and apply genial.
I’ll immediately snatch your rss as I can not in finding your e-mail subscription link or newsletter service. Do you’ve any? Please permit me realize so that I may just subscribe. Thanks.
Regards for this post, I am a big fan of this site would like to proceed updated.
Greetings! I’ve been following your site for some time now and finally got the bravery to go ahead and give you a shout out from Kingwood Tx! Just wanted to tell you keep up the excellent job!
I think that is among the most vital information for me. And i’m happy studying your article. But want to commentary on some basic issues, The web site taste is perfect, the articles is truly great : D. Good process, cheers
I’d need to verify with you here. Which is not something I often do! I get pleasure from reading a submit that will make people think. Also, thanks for permitting me to remark!
Heya i am for the first time here. I came across this board and I find It really useful & it helped me out a lot. I hope to give something back and aid others like you aided me.
I have to express some thanks to you just for bailing me out of this type of issue. Right after searching through the the web and seeing ideas which are not pleasant, I thought my entire life was done. Living without the approaches to the issues you have fixed by way of the website is a critical case, and ones that could have badly affected my entire career if I hadn’t come across your blog. Your personal talents and kindness in touching every part was very helpful. I am not sure what I would’ve done if I hadn’t come upon such a step like this. I can also at this moment look ahead to my future. Thanks a lot very much for the professional and amazing help. I will not hesitate to recommend your web page to any person who ought to have guide on this problem.
Today, I went to the beach front with my children. I found a sea shell and gave it to my 4 year old daughter and said “You can hear the ocean if you put this to your ear.” She placed the shell to her ear and screamed. There was a hermit crab inside and it pinched her ear. She never wants to go back! LoL I know this is completely off topic but I had to tell someone!
Wonderful web site. Lots of useful info here. I’m sending it to a few pals ans additionally sharing in delicious. And obviously, thank you to your effort!
You should take part in a contest for one of the best blogs on the web. I will recommend this site!
I believe this website holds some rattling excellent information for everyone :D. “This is an age in which one cannot find common sense without a search warrant.” by George Will.
Hello there! This post could not be written any better! Reading through this post reminds me of my previous room mate! He always kept chatting about this. I will forward this page to him. Fairly certain he will have a good read. Many thanks for sharing!
As a Newbie, I am permanently browsing online for articles that can be of assistance to me. Thank you
Hey there, You’ve done an excellent job. I’ll definitely digg it and personally suggest to my friends. I am sure they’ll be benefited from this web site.
Very good written article. It will be beneficial to everyone who usess it, including myself. Keep doing what you are doing – for sure i will check out more posts.
Thank you, I’ve just been searching for information approximately this subject for a while and yours is the best I’ve found out so far. However, what in regards to the conclusion? Are you sure about the supply?
I would like to thnkx for the efforts you have put in writing this blog. I am hoping the same high-grade blog post from you in the upcoming as well. In fact your creative writing abilities has inspired me to get my own blog now. Really the blogging is spreading its wings quickly. Your write up is a good example of it.
Great website you have here but I was curious if you knew of any community forums that cover the same topics discussed here? I’d really love to be a part of online community where I can get feedback from other knowledgeable individuals that share the same interest. If you have any suggestions, please let me know. Appreciate it!
After study a number of of the blog posts on your web site now, and I really like your method of blogging. I bookmarked it to my bookmark website listing and shall be checking back soon. Pls try my website as well and let me know what you think.
It’s the best time to make some plans for the future and it’s time to be happy. I’ve read this post and if I could I desire to suggest you few interesting things or tips. Perhaps you could write next articles referring to this article. I want to read more things about it!
F*ckin’ amazing issues here. I am very happy to see your article. Thanks a lot and i’m looking forward to contact you. Will you kindly drop me a mail?
great post, very informative. I wonder why the other specialists of this sector don’t notice this. You must continue your writing. I am sure, you’ve a great readers’ base already!
Hello, i think that i saw you visited my website so i came to “return the favor”.I am attempting to find things to enhance my site!I suppose its ok to use some of your ideas!!
Hi, Neat post. There’s an issue along with your website in internet explorer, may test this… IE nonetheless is the marketplace chief and a huge part of other folks will pass over your magnificent writing because of this problem.
Perfect piece of work you have done, this site is really cool with wonderful info .
Very nice article and right to the point. I am not sure if this is in fact the best place to ask but do you people have any ideea where to get some professional writers? Thank you 🙂
Some truly wonderful blog posts on this website , thankyou for contribution.
I am not positive where you are getting your info, however great topic. I must spend some time finding out more or figuring out more. Thanks for great information I used to be looking for this info for my mission.
I haven?¦t checked in here for a while as I thought it was getting boring, but the last few posts are great quality so I guess I will add you back to my daily bloglist. You deserve it my friend 🙂
Pretty! This was a really wonderful post. Thank you for your provided information.
Glad to be one of several visitants on this awesome website : D.
I love studying and I believe this website got some really utilitarian stuff on it! .
Hello, you used to write excellent, but the last few posts have been kinda boring… I miss your tremendous writings. Past several posts are just a little bit out of track! come on!
Aw, this was a really nice post. In thought I would like to put in writing like this additionally – taking time and actual effort to make a very good article… however what can I say… I procrastinate alot and by no means seem to get something done.
Glad to be one of several visitants on this awful internet site : D.
Hello there, I found your blog via Google while looking for a related topic, your web site came up, it looks good. I have bookmarked it in my google bookmarks.
What’s Happening i am new to this, I stumbled upon this I have found It positively helpful and it has helped me out loads. I hope to contribute & help other users like its helped me. Great job.
I have learn a few just right stuff here. Definitely price bookmarking for revisiting. I wonder how a lot attempt you put to make this sort of wonderful informative website.
Excellent read, I just passed this onto a colleague who was doing a little research on that. And he actually bought me lunch as I found it for him smile Thus let me rephrase that: Thank you for lunch!
I wanted to thank you for this great read!! I definitely enjoying every little bit of it I have you bookmarked to check out new stuff you post…
I have been reading out a few of your articles and it’s pretty good stuff. I will definitely bookmark your website.
I just like the valuable info you supply in your articles. I will bookmark your blog and take a look at once more here regularly. I am reasonably sure I will be told plenty of new stuff right here! Best of luck for the following!
Howdy just wanted to give you a brief heads up and let you know a few of the images aren’t loading correctly. I’m not sure why but I think its a linking issue. I’ve tried it in two different web browsers and both show the same results.
Just want to say your article is as surprising. The clarity in your post is simply cool and i can assume you’re an expert on this subject. Fine with your permission allow me to grab your RSS feed to keep updated with forthcoming post. Thanks a million and please continue the rewarding work.
My brother suggested I might like this website. He was totally right. This publish truly made my day. You can not consider simply how so much time I had spent for this information! Thanks!
I discovered your blog site on google and check a few of your early posts. Continue to keep up the very good operate. I just additional up your RSS feed to my MSN News Reader. Seeking forward to reading more from you later on!…
Sweet blog! I found it while surfing around on Yahoo News. Do you have any suggestions on how to get listed in Yahoo News? I’ve been trying for a while but I never seem to get there! Cheers
Slot5000 adalah situs slot deposit 5000 pulsa tanpa potongan dengan link daftar login gacor hari ini minimal via dana ovo linkaja dan gopay.
I think this is among the most vital information for me. And i am glad reading your article. But want to remark on few general things, The website style is great, the articles is really nice : D. Good job, cheers
Some genuinely interesting info , well written and loosely user friendly.
Hello there, You’ve performed a great job. I’ll definitely digg it and personally recommend to my friends. I am sure they will be benefited from this web site.
Wow, marvelous blog format! How lengthy have you ever been running a blog for? you made blogging glance easy. The whole look of your web site is fantastic, as well as the content!
I like this post, enjoyed this one thank you for posting. “I would sooner fail than not be among the greatest.” by John Keats.
A person essentially help to make severely articles I would state. That is the very first time I frequented your website page and to this point? I surprised with the analysis you made to make this particular post extraordinary. Fantastic task!
Those are yours alright! . We at least need to get these people stealing images to start blogging! They probably just did a image search and grabbed them. They look good though!
You could certainly see your expertise in the work you write. The world hopes for more passionate writers like you who aren’t afraid to say how they believe. At all times follow your heart.
I’m still learning from you, as I’m making my way to the top as well. I certainly love reading all that is posted on your website.Keep the tips coming. I enjoyed it!
What¦s Happening i am new to this, I stumbled upon this I’ve discovered It positively useful and it has aided me out loads. I hope to give a contribution & assist different users like its helped me. Great job.
After research a couple of of the blog posts on your web site now, and I truly like your approach of blogging. I bookmarked it to my bookmark website listing and will likely be checking again soon. Pls try my website online as nicely and let me know what you think.
This is a very good tips especially to those new to blogosphere, brief and accurate information… Thanks for sharing this one. A must read article.
I do trust all of the ideas you’ve offered for your post. They are very convincing and will definitely work. Still, the posts are very brief for starters. May you please prolong them a little from subsequent time? Thank you for the post.
F*ckin’ amazing things here. I am very glad to peer your post. Thank you a lot and i’m having a look ahead to contact you. Will you please drop me a mail?
Wow, incredible weblog layout! How long have you been blogging for? you make blogging look easy. The full glance of your website is great, let alone the content!
You completed a few good points there. I did a search on the subject matter and found a good number of people will go along with with your blog.
Great beat ! I would like to apprentice even as you amend your website, how can i subscribe for a blog site? The account helped me a appropriate deal. I have been a little bit familiar of this your broadcast offered shiny transparent concept
Hi, I think your site might be having browser compatibility issues. When I look at your website in Safari, it looks fine but when opening in Internet Explorer, it has some overlapping. I just wanted to give you a quick heads up! Other then that, fantastic blog!
I always was concerned in this topic and still am, thanks for posting.
Someone necessarily lend a hand to make seriously posts I might state. That is the first time I frequented your web page and up to now? I surprised with the analysis you made to create this actual submit incredible. Excellent task!
Hi, Neat post. There’s a problem with your web site in internet explorer, would test this… IE still is the market leader and a big portion of people will miss your great writing because of this problem.
There are certainly quite a lot of particulars like that to take into consideration. That is a nice point to deliver up. I supply the thoughts above as basic inspiration however clearly there are questions like the one you carry up where an important thing will likely be working in honest good faith. I don?t know if finest practices have emerged around things like that, but I am sure that your job is clearly identified as a fair game. Both boys and girls feel the impact of just a moment’s pleasure, for the rest of their lives.
Very interesting info!Perfect just what I was looking for!
When I originally commented I clicked the -Notify me when new comments are added- checkbox and now every time a remark is added I get 4 emails with the same comment. Is there any manner you may remove me from that service? Thanks!
I envy your work, regards for all the useful blog posts.
Thanks a bunch for sharing this with all of us you really know what you are talking about! Bookmarked. Kindly also visit my web site =). We could have a link exchange arrangement between us!
I think this is among the most significant info for me. And i’m glad reading your article. But should remark on some general things, The site style is ideal, the articles is really great : D. Good job, cheers
I genuinely enjoy looking at on this site, it has excellent posts.
You actually make it seem so easy with your presentation but I find this matter to be actually something which I think I would never understand. It seems too complex and very broad for me. I’m looking forward for your next post, I will try to get the hang of it!
I am continuously searching online for posts that can aid me. Thanks!
I like this post, enjoyed this one appreciate it for posting. “To affect the quality of the day that is the art of life.” by Henry David Thoreau.
I rattling thankful to find this site on bing, just what I was looking for : D also saved to bookmarks.
With havin so much content do you ever run into any issues of plagorism or copyright violation? My site has a lot of unique content I’ve either authored myself or outsourced but it appears a lot of it is popping it up all over the internet without my permission. Do you know any methods to help protect against content from being ripped off? I’d truly appreciate it.
As a Newbie, I am always exploring online for articles that can benefit me. Thank you
You have remarked very interesting points! ps nice website .
Just wanna input on few general things, The website style and design is perfect, the articles is really good. “In business school classrooms they construct wonderful models of a nonworld.” by Peter Drucker.
Its great as your other blog posts : D, thankyou for posting.
Wow that was unusual. I just wrote an very long comment but after I clicked submit my comment didn’t appear. Grrrr… well I’m not writing all that over again. Anyways, just wanted to say fantastic blog!
Wow! Thank you! I always wanted to write on my blog something like that. Can I take a fragment of your post to my blog?
I have learn some just right stuff here. Certainly worth bookmarking for revisiting. I wonder how much effort you put to make this kind of wonderful informative website.
I like your writing style really loving this site.
Currently it appears like Drupal is the preferred blogging platform out there right now. (from what I’ve read) Is that what you are using on your blog?
I went over this internet site and I conceive you have a lot of excellent information, bookmarked (:.
You have observed very interesting points! ps nice website.
I was recommended this website by my cousin. I am not sure whether this post is written by him as nobody else know such detailed about my problem. You’re incredible! Thanks!
Wonderful website. Plenty of useful information here. I am sending it to some pals ans also sharing in delicious. And of course, thank you on your effort!
certainly like your web site however you need to check the spelling on quite a few of your posts. Several of them are rife with spelling issues and I in finding it very bothersome to inform the truth on the other hand I will certainly come back again.
This is the right blog for anyone who wants to find out about this topic. You realize so much its almost hard to argue with you (not that I actually would want…HaHa). You definitely put a new spin on a topic thats been written about for years. Great stuff, just great!
Good – I should certainly pronounce, impressed with your website. I had no trouble navigating through all tabs as well as related information ended up being truly simple to do to access. I recently found what I hoped for before you know it at all. Quite unusual. Is likely to appreciate it for those who add forums or anything, site theme . a tones way for your client to communicate. Excellent task.
You made several nice points there. I did a search on the matter and found mainly persons will go along with with your blog.
You made some fine points there. I did a search on the subject and found most people will consent with your blog.
Hello! I know this is somewhat off topic but I was wondering which blog platform are you using for this site? I’m getting fed up of WordPress because I’ve had problems with hackers and I’m looking at alternatives for another platform. I would be fantastic if you could point me in the direction of a good platform.
You actually make it seem so easy with your presentation but I find this topic to be actually something which I think I would never understand. It seems too complex and very broad for me. I am looking forward for your next post, I’ll try to get the hang of it!
My spouse and I absolutely love your blog and find a lot of your post’s to be just what I’m looking for. Would you offer guest writers to write content for you personally? I wouldn’t mind creating a post or elaborating on some of the subjects you write in relation to here. Again, awesome weblog!
I love it when people come together and share opinions, great blog, keep it up.
I like this website very much, Its a very nice position to read and find information. “The superior man is modest in his speech, but exceeds in his actions.” by Confucius.
Wow! Thank you! I permanently wanted to write on my website something like that. Can I implement a portion of your post to my site?
I do trust all of the ideas you have presented on your post. They’re very convincing and can certainly work. Nonetheless, the posts are very short for novices. Could you please prolong them a little from subsequent time? Thanks for the post.
Way cool, some valid points! I appreciate you making this article available, the rest of the site is also high quality. Have a fun.
Hiya, I am really glad I’ve found this information. Nowadays bloggers publish only about gossips and internet and this is actually frustrating. A good website with exciting content, this is what I need. Thanks for keeping this website, I’ll be visiting it. Do you do newsletters? Cant find it.
Excellent post. I was checking continuously this blog and I’m impressed! Very useful info particularly the last part 🙂 I care for such info a lot. I was seeking this particular info for a long time. Thank you and good luck.
I haven’t checked in here for some time since I thought it was getting boring, but the last few posts are good quality so I guess I will add you back to my daily bloglist. You deserve it my friend 🙂
I carry on listening to the rumor talk about receiving free online grant applications so I have been looking around for the most excellent site to get one. Could you tell me please, where could i get some?
Can I just say what a relief to search out someone who truly is aware of what theyre talking about on the internet. You undoubtedly know how you can deliver an issue to mild and make it important. More individuals have to read this and understand this side of the story. I cant consider youre not more fashionable since you positively have the gift.
Dead written content, Really enjoyed examining.
Some truly interesting details you have written.Assisted me a lot, just what I was looking for : D.
This is a topic close to my heart cheers, where are your contact details though?
Good info. Lucky me I reach on your website by accident, I bookmarked it.
I?¦ve learn a few good stuff here. Certainly value bookmarking for revisiting. I wonder how a lot effort you place to make such a great informative site.
I truly appreciate this post. I¦ve been looking everywhere for this! Thank goodness I found it on Bing. You’ve made my day! Thx again
Thank you for any other excellent post. The place else may just anybody get that type of information in such a perfect method of writing? I’ve a presentation subsequent week, and I’m at the look for such information.
We absolutely love your blog and find most of your post’s to be exactly I’m looking for. Does one offer guest writers to write content in your case? I wouldn’t mind publishing a post or elaborating on a number of the subjects you write in relation to here. Again, awesome web log!
I’d should examine with you here. Which isn’t something I often do! I take pleasure in reading a put up that may make individuals think. Also, thanks for permitting me to remark!
Hi there! Someone in my Myspace group shared this website with us so I came to look it over. I’m definitely loving the information. I’m bookmarking and will be tweeting this to my followers! Fantastic blog and wonderful design and style.
You have noted very interesting details! ps nice website . “Do not quench your inspiration and your inmagination do not become the slave of your model.” by Vincent Van Gogh.
I’m usually to running a blog and i really recognize your content. The article has really peaks my interest. I am going to bookmark your website and keep checking for new information.
Respect to website author, some superb entropy.
I’ve read several good stuff here. Definitely worth bookmarking for revisiting. I wonder how much effort you put to create such a fantastic informative site.
I would like to thnkx for the efforts you have put in writing this blog. I am hoping the same high-grade blog post from you in the upcoming as well. In fact your creative writing abilities has inspired me to get my own blog now. Really the blogging is spreading its wings quickly. Your write up is a good example of it.
You actually make it appear really easy along with your presentation but I in finding this topic to be really something which I feel I would never understand. It sort of feels too complex and extremely extensive for me. I am looking forward on your next submit, I will try to get the cling of it!
I am happy that I noticed this weblog, precisely the right info that I was searching for! .
Hello There. I found your weblog using msn. This is a very smartly written article. I will make sure to bookmark it and come back to learn extra of your useful information. Thanks for the post. I’ll definitely comeback.
I’m really enjoying the theme/design of your blog. Do you ever run into any browser compatibility problems? A couple of my blog audience have complained about my website not working correctly in Explorer but looks great in Opera. Do you have any suggestions to help fix this issue?
I got what you mean ,saved to favorites, very nice web site.
I was very pleased to find this web-site.I wanted to thanks for your time for this wonderful read!! I definitely enjoying every little bit of it and I have you bookmarked to check out new stuff you blog post.
I have been absent for some time, but now I remember why I used to love this site. Thanks, I will try and check back more often. How frequently you update your web site?
After all, what a great site and informative posts, I will upload inbound link – bookmark this web site? Regards, Reader.
Great amazing issues here. I am very glad to look your post. Thanks a lot and i am looking forward to contact you. Will you please drop me a e-mail?
Once I originally commented I clicked the -Notify me when new feedback are added- checkbox and now each time a remark is added I get four emails with the identical comment. Is there any means you’ll be able to remove me from that service? Thanks!
I have learn several good stuff here. Certainly price bookmarking for revisiting. I wonder how so much effort you place to create this sort of fantastic informative web site.
I really appreciate this post. I’ve been looking all over for this! Thank goodness I found it on Bing. You have made my day! Thx again
Terrific paintings! This is the type of information that should be shared across the web. Shame on the seek engines for no longer positioning this submit upper! Come on over and consult with my web site . Thank you =)
Thanks for the sensible critique. Me & my neighbor were just preparing to do some research on this. We got a grab a book from our local library but I think I learned more from this post. I am very glad to see such excellent information being shared freely out there.
Of course, what a fantastic site and enlightening posts, I surely will bookmark your site.All the Best!
I beloved up to you will receive performed proper here. The sketch is tasteful, your authored material stylish. nevertheless, you command get got an edginess over that you wish be delivering the following. in poor health without a doubt come more in the past again as precisely the same just about a lot incessantly inside of case you defend this increase.
Thanks for any other informative website. Where else may I get that type of info written in such a perfect means? I have a challenge that I’m simply now operating on, and I have been at the look out for such information.
Very interesting information!Perfect just what I was looking for!
I?¦m no longer sure the place you’re getting your info, but good topic. I must spend some time learning much more or understanding more. Thanks for great info I used to be searching for this info for my mission.
I really like your writing style, fantastic information, regards for posting :D. “I will show you fear in a handful of dust.” by T. S. Eliot.
You have noted very interesting points! ps nice web site. “We make ourselves a ladder out of our vices if we trample the vices themselves underfoot.” by Saint Augustine.
I’ve recently started a site, the info you provide on this site has helped me greatly. Thanks for all of your time & work. “The only winner in the War of 1812 was Tchaikovsky” by Solomon Short.
Woh I enjoy your posts, saved to favorites! .
It’s actually a nice and helpful piece of info. I’m happy that you just shared this helpful information with us. Please keep us up to date like this. Thanks for sharing.
Well I definitely enjoyed studying it. This tip offered by you is very effective for accurate planning.
I loved as much as you will receive carried out proper here. The comic strip is attractive, your authored subject matter stylish. nevertheless, you command get got an shakiness over that you wish be handing over the following. in poor health indisputably come further before again as precisely the same just about a lot incessantly inside case you protect this increase.
I savour, cause I discovered just what I was having a look for. You have ended my four day long hunt! God Bless you man. Have a nice day. Bye
Hello, i think that i noticed you visited my weblog so i came to “go back the favor”.I’m attempting to to find issues to improve my website!I guess its adequate to make use of a few of your ideas!!
This is a topic close to my heart cheers, where are your contact details though?
Hi there, You have done a great job. I’ll definitely digg it and personally suggest to my friends. I am sure they will be benefited from this website.
Thank you for sharing superb informations. Your web-site is very cool. I’m impressed by the details that you have on this website. It reveals how nicely you understand this subject. Bookmarked this website page, will come back for extra articles. You, my friend, ROCK! I found simply the information I already searched everywhere and simply couldn’t come across. What a great site.
Thank you for the auspicious writeup. It in fact was a amusement account it. Look advanced to more added agreeable from you! By the way, how can we communicate?
I am just commenting to let you know what a beneficial discovery my friend’s girl went through reading through the blog. She even learned numerous details, including what it is like to possess a very effective teaching mood to get many people with no trouble know precisely chosen specialized subject matter. You really surpassed my expected results. Thanks for giving these precious, trusted, educational and even easy thoughts on the topic to Lizeth.
great points altogether, you simply gained a brand new reader. What would you recommend about your post that you made a few days ago? Any positive?
Hey there! I’m at work browsing your blog from my new apple iphone! Just wanted to say I love reading your blog and look forward to all your posts! Keep up the fantastic work!
I truly appreciate this post. I’ve been looking everywhere for this! Thank goodness I found it on Bing. You’ve made my day! Thank you again
I have recently started a blog, the information you offer on this site has helped me greatly. Thank you for all of your time & work.
wonderful put up, very informative. I wonder why the opposite experts of this sector do not realize this. You should proceed your writing. I am confident, you’ve a great readers’ base already!
Good ?V I should certainly pronounce, impressed with your site. I had no trouble navigating through all tabs and related info ended up being truly easy to do to access. I recently found what I hoped for before you know it in the least. Quite unusual. Is likely to appreciate it for those who add forums or anything, website theme . a tones way for your client to communicate. Excellent task..
As a Newbie, I am permanently browsing online for articles that can help me. Thank you
I am often to blogging and i really appreciate your content. The article has really peaks my interest. I am going to bookmark your site and keep checking for new information.
Oh my goodness! an amazing article dude. Thank you However I am experiencing problem with ur rss . Don’t know why Unable to subscribe to it. Is there anybody getting similar rss drawback? Anybody who is aware of kindly respond. Thnkx
You have observed very interesting details! ps decent site.
I am continuously invstigating online for ideas that can help me. Thx!
I dugg some of you post as I cogitated they were handy handy
Great remarkable issues here. I am very happy to look your article. Thank you a lot and i’m looking forward to touch you. Will you kindly drop me a e-mail?
I used to be recommended this web site via my cousin. I’m now not sure whether or not this put up is written by means of him as nobody else know such special approximately my difficulty. You’re incredible! Thank you!
F*ckin’ remarkable things here. I am very satisfied to peer your article. Thanks so much and i’m taking a look forward to contact you. Will you kindly drop me a mail?
Some times its a pain in the ass to read what blog owners wrote but this internet site is really user pleasant! .
Thanks for helping out, excellent information. “Nobody can be exactly like me. Sometimes even I have trouble doing it.” by Tallulah Bankhead.
Thank you for the auspicious writeup. It actually was once a leisure account it. Look advanced to far brought agreeable from you! By the way, how could we keep up a correspondence?
My brother recommended I would possibly like this website. He was once entirely right. This put up actually made my day. You cann’t consider simply how a lot time I had spent for this information! Thank you!
What i don’t realize is if truth be told how you’re no longer actually much more well-appreciated than you might be now. You are very intelligent. You know thus significantly relating to this matter, made me in my opinion believe it from a lot of varied angles. Its like women and men are not interested until it is something to accomplish with Girl gaga! Your personal stuffs outstanding. All the time maintain it up!
Oh my goodness! an incredible article dude. Thank you However I am experiencing difficulty with ur rss . Don’t know why Unable to subscribe to it. Is there anybody getting equivalent rss problem? Anyone who knows kindly respond. Thnkx
I am often to blogging and i actually appreciate your content. The article has actually peaks my interest. I am going to bookmark your website and maintain checking for new information.
I like this post, enjoyed this one thankyou for posting.
naturally like your website but you need to check the spelling on several of your posts. Several of them are rife with spelling problems and I to find it very bothersome to inform the truth then again I’ll definitely come back again.
Yeah bookmaking this wasn’t a risky decision great post! .
obviously like your web-site but you need to check the spelling on several of your posts. Several of them are rife with spelling issues and I find it very bothersome to tell the truth nevertheless I’ll definitely come back again.
I was recommended this web site by means of my cousin. I am now not sure whether this put up is written by him as nobody else know such unique approximately my problem. You are incredible! Thank you!
This website is my aspiration, real fantastic layout and perfect content.
This really answered my problem, thank you!
Very interesting details you have remarked, regards for posting. “There is nothing in a caterpillar that tells you it’s going to be a butterfly.” by Richard Buckminster Fuller.
My partner and I stumbled over here by a different page and thought I should check things out. I like what I see so i am just following you. Look forward to looking at your web page again.
This is very interesting, You’re an excessively professional blogger. I have joined your rss feed and look forward to seeking more of your great post. Additionally, I’ve shared your website in my social networks!
Great post, you have pointed out some excellent details , I besides think this s a very great website.
Nice blog here! Also your website loads up very fast! What web host are you using? Can I get your affiliate link to your host? I wish my site loaded up as quickly as yours lol
I’ll right away grasp your rss feed as I can not find your email subscription link or e-newsletter service. Do you’ve any? Please allow me realize so that I could subscribe. Thanks.
I like what you guys are up also. Such intelligent work and reporting! Keep up the excellent works guys I?¦ve incorporated you guys to my blogroll. I think it will improve the value of my web site 🙂
Some really nice stuff on this web site, I like it.
I like this web site so much, saved to my bookmarks. “Respect for the fragility and importance of an individual life is still the mark of an educated man.” by Norman Cousins.
You actually make it appear so easy along with your presentation but I in finding this matter to be actually something that I believe I might by no means understand. It sort of feels too complicated and extremely extensive for me. I’m having a look forward for your subsequent put up, I will try to get the dangle of it!
This blog is definitely rather handy since I’m at the moment creating an internet floral website – although I am only starting out therefore it’s really fairly small, nothing like this site. Can link to a few of the posts here as they are quite. Thanks much. Zoey Olsen
Thanks a bunch for sharing this with all folks you actually realize what you are speaking about! Bookmarked. Please additionally discuss with my website =). We may have a link exchange contract among us!
It is in reality a great and useful piece of information. I’m satisfied that you just shared this helpful info with us. Please stay us informed like this. Thanks for sharing.
Hey! This is my first comment here so I just wanted to give a quick shout out and say I really enjoy reading your posts. Can you suggest any other blogs/websites/forums that cover the same subjects? Appreciate it!
I have been browsing online more than 3 hours today, yet I never found any interesting article like yours. It’s pretty worth enough for me. In my opinion, if all website owners and bloggers made good content as you did, the internet will be much more useful than ever before.
Good post. I learn something tougher on totally different blogs everyday. It’s going to at all times be stimulating to read content from other writers and follow just a little one thing from their store. I’d want to make use of some with the content material on my blog whether you don’t mind. Natually I’ll provide you with a link on your internet blog. Thanks for sharing.
I’ve recently started a blog, the info you provide on this site has helped me tremendously. Thank you for all of your time & work. “The achievements of an organization are the results of the combined effort of each individual.” by Vince Lombardi.
Hey would you mind letting me know which webhost you’re working with? I’ve loaded your blog in 3 different browsers and I must say this blog loads a lot quicker then most. Can you suggest a good hosting provider at a fair price? Cheers, I appreciate it!
Some truly nice and utilitarian info on this site, too I conceive the design contains wonderful features.
It’s laborious to find knowledgeable individuals on this subject, however you sound like you already know what you’re speaking about! Thanks
I am really loving the theme/design of your site. Do you ever run into any web browser compatibility problems? A couple of my blog visitors have complained about my blog not working correctly in Explorer but looks great in Safari. Do you have any suggestions to help fix this issue?
Thank you for the auspicious writeup. It in truth was once a amusement account it. Look complicated to far introduced agreeable from you! However, how could we keep up a correspondence?
Hey very nice web site!! Man .. Excellent .. Amazing .. I’ll bookmark your website and take the feeds also…I am happy to find numerous useful info here in the post, we need work out more strategies in this regard, thanks for sharing. . . . . .
Attractive section of content. I just stumbled upon your site and in accession capital to claim that I acquire actually enjoyed account your blog posts. Any way I will be subscribing on your feeds or even I success you get entry to persistently rapidly.
I enjoy your writing style truly enjoying this internet site.
Some truly tremendous work on behalf of the owner of this site, dead great content material.
Thanks for some other informative blog. The place else could I am getting that kind of information written in such an ideal method? I’ve a undertaking that I am simply now operating on, and I’ve been at the look out for such info.
Thanks for helping out, excellent info .
Today, I went to the beach with my children. I found a sea shell and gave it to my 4 year old daughter and said “You can hear the ocean if you put this to your ear.” She put the shell to her ear and screamed. There was a hermit crab inside and it pinched her ear. She never wants to go back! LoL I know this is completely off topic but I had to tell someone!
I like what you guys are up too. Such clever work and reporting! Carry on the excellent works guys I¦ve incorporated you guys to my blogroll. I think it will improve the value of my web site 🙂
I’ve recently started a site, the info you offer on this website has helped me greatly. Thank you for all of your time & work. “Cultivation to the mind is as necessary as food to the body.” by Marcus Tullius Cicero.
My developer is trying to convince me to move to .net from PHP. I have always disliked the idea because of the expenses. But he’s tryiong none the less. I’ve been using WordPress on a number of websites for about a year and am concerned about switching to another platform. I have heard fantastic things about blogengine.net. Is there a way I can transfer all my wordpress content into it? Any help would be really appreciated!
superb post.Never knew this, appreciate it for letting me know.
I love the efforts you have put in this, thanks for all the great posts.
I like this web blog its a master peace ! Glad I detected this on google .
I’ve been exploring for a little bit for any high-quality articles or blog posts on this sort of area . Exploring in Yahoo I at last stumbled upon this site. Reading this info So i’m happy to convey that I’ve an incredibly good uncanny feeling I discovered exactly what I needed. I most certainly will make certain to do not forget this web site and give it a look regularly.
I have been exploring for a little for any high quality articles or weblog posts on this kind of area . Exploring in Yahoo I ultimately stumbled upon this web site. Reading this info So i’m happy to exhibit that I have an incredibly excellent uncanny feeling I discovered exactly what I needed. I so much undoubtedly will make certain to don’t forget this website and provides it a look on a continuing basis.
I like this site very much so much superb information.
I don’t even know how I stopped up here, but I assumed this publish used to be good. I don’t understand who you’re however definitely you’re going to a well-known blogger should you are not already 😉 Cheers!
hello!,I like your writing so much! share we communicate more about your article on AOL? I need an expert on this area to solve my problem. May be that’s you! Looking forward to see you.
I love your blog.. very nice colors & theme. Did you make this website yourself or did you hire someone to do it for you? Plz answer back as I’m looking to design my own blog and would like to find out where u got this from. many thanks
I believe you have observed some very interesting points, appreciate it for the post.
Some truly nice and useful information on this web site, too I believe the layout has got superb features.
I am often to blogging and i really appreciate your content. The article has really peaks my interest. I am going to bookmark your site and keep checking for new information.
Super-Duper website! I am loving it!! Will be back later to read some more. I am bookmarking your feeds also.
Greetings! Quick question that’s totally off topic. Do you know how to make your site mobile friendly? My website looks weird when browsing from my iphone 4. I’m trying to find a theme or plugin that might be able to resolve this problem. If you have any suggestions, please share. Thank you!
Thank you a lot for sharing this with all of us you actually recognise what you’re speaking about! Bookmarked. Please additionally visit my web site =). We will have a link exchange agreement among us!
Heya! I’m at work surfing around your blog from my new iphone! Just wanted to say I love reading through your blog and look forward to all your posts! Keep up the outstanding work!
I like this site very much, Its a rattling nice billet to read and get info . “Famous remarks are very seldom quoted correctly.” by Simeon Strunsky.
I’m not that much of a online reader to be honest but your blogs really nice, keep it up! I’ll go ahead and bookmark your website to come back in the future. Many thanks
Somebody necessarily assist to make critically articles I would state. That is the first time I frequented your web page and thus far? I amazed with the analysis you made to create this particular publish amazing. Excellent task!
whoah this blog is wonderful i love reading your articles. Keep up the good work! You know, many people are looking around for this info, you could help them greatly.
Hello just wanted to give you a quick heads up and let you know a few of the pictures aren’t loading correctly. I’m not sure why but I think its a linking issue. I’ve tried it in two different web browsers and both show the same results.
Thanks for another excellent article. Where else may anybody get that kind of info in such an ideal manner of writing? I have a presentation next week, and I am at the search for such information.
I was more than happy to find this web-site.I wished to thanks in your time for this wonderful read!! I undoubtedly having fun with each little bit of it and I’ve you bookmarked to take a look at new stuff you weblog post.
Regards for this rattling post, I am glad I noticed this web site on yahoo.
Hey very cool website!! Man .. Beautiful .. Amazing .. I’ll bookmark your website and take the feeds also…I am happy to find a lot of useful information here in the post, we need work out more techniques in this regard, thanks for sharing. . . . . .
I got what you intend,saved to favorites, very nice web site.
Its superb as your other posts : D, thanks for putting up. “Too much sensibility creates unhappiness too much insensibility leads to crime.” by Charles Maurice de Talleyrand.
Nice read, I just passed this onto a friend who was doing some research on that. And he just bought me lunch as I found it for him smile Thus let me rephrase that: Thank you for lunch! “Too much sanity may be madness. And maddest of all, to see life as it is and not as it should be” by Miguel de Cervantes.
Good article and right to the point. I am not sure if this is truly the best place to ask but do you guys have any ideea where to hire some professional writers? Thx 🙂
What i don’t realize is in fact how you are not actually much more neatly-appreciated than you may be right now. You’re so intelligent. You know therefore considerably when it comes to this subject, produced me for my part imagine it from a lot of numerous angles. Its like men and women are not fascinated until it is one thing to accomplish with Woman gaga! Your personal stuffs great. Always take care of it up!
When I originally commented I clicked the “Notify me when new comments are added” checkbox and now each time a comment is added I get several e-mails with the same comment. Is there any way you can remove me from that service? Thanks a lot!
I was reading some of your posts on this internet site and I think this website is very instructive! Keep putting up.
It’s hard to find knowledgeable people on this topic, but you sound like you know what you’re talking about! Thanks
Some truly excellent info , Sword lily I discovered this.
Your place is valueble for me. Thanks!…
You actually make it seem so easy with your presentation but I find this topic to be actually something that I think I would never understand. It seems too complex and very broad for me. I am looking forward for your next post, I will try to get the hang of it!
Does your website have a contact page? I’m having problems locating it but, I’d like to shoot you an e-mail. I’ve got some ideas for your blog you might be interested in hearing. Either way, great website and I look forward to seeing it improve over time.
I have been examinating out a few of your articles and i can state pretty clever stuff. I will make sure to bookmark your site.
Wonderful blog! I found it while searching on Yahoo News. Do you have any tips on how to get listed in Yahoo News? I’ve been trying for a while but I never seem to get there! Many thanks
I’m still learning from you, but I’m trying to reach my goals. I definitely love reading everything that is written on your website.Keep the aarticles coming. I loved it!
I haven’t checked in here for some time since I thought it was getting boring, but the last few posts are good quality so I guess I’ll add you back to my daily bloglist. You deserve it my friend 🙂
Well I definitely enjoyed studying it. This subject provided by you is very effective for correct planning.
I simply wished to thank you very much all over again. I’m not certain what I might have made to happen without the type of smart ideas shown by you relating to that question. It was the alarming situation for me, however , taking a look at this expert avenue you resolved the issue made me to cry with happiness. I am just thankful for the advice and even hope you find out what a powerful job you are always putting in educating most people with the aid of your webblog. I know that you’ve never encountered all of us.
I do enjoy the manner in which you have framed this particular difficulty and it does indeed supply me personally a lot of fodder for thought. Nevertheless, because of just what I have personally seen, I simply just trust when other remarks pile on that people continue to be on issue and not get started upon a tirade regarding some other news du jour. Anyway, thank you for this exceptional point and although I do not really concur with it in totality, I regard the standpoint.
You made some decent points there. I regarded on the web for the problem and found most people will go together with along with your website.
Excellent beat ! I wish to apprentice while you amend your site, how could i subscribe for a blog website? The account aided me a acceptable deal. I had been a little bit acquainted of this your broadcast provided bright clear concept
This design is spectacular! You most certainly know how to keep a reader amused. Between your wit and your videos, I was almost moved to start my own blog (well, almost…HaHa!) Fantastic job. I really loved what you had to say, and more than that, how you presented it. Too cool!
Definitely, what a fantastic blog and instructive posts, I will bookmark your website.All the Best!
When I initially commented I clicked the -Notify me when new feedback are added- checkbox and now every time a remark is added I get four emails with the same comment. Is there any approach you possibly can remove me from that service? Thanks!
As soon as I found this web site I went on reddit to share some of the love with them.
You are a very clever individual!
Hi there, You’ve performed an excellent job. I’ll definitely digg it and individually suggest to my friends. I’m confident they will be benefited from this site.
Thanks a lot for sharing this with all people you actually recognize what you’re talking about! Bookmarked. Kindly also seek advice from my web site =). We may have a link change contract between us!
Enjoyed reading this, very good stuff, regards. “Nothing happens to any thing which that thing is not made by nature to bear.” by Marcus Aurelius Antoninus.
Merely wanna remark on few general things, The website style is perfect, the articles is real fantastic. “Drop the question what tomorrow may bring, and count as profit every day that fate allows you.” by Horace.
Yeah bookmaking this wasn’t a bad determination great post! .
I’ve been browsing on-line greater than 3 hours lately, yet I never found any attention-grabbing article like yours. It is beautiful worth enough for me. Personally, if all site owners and bloggers made excellent content as you probably did, the net will be much more helpful than ever before. “Learn to see in another’s calamity the ills which you should avoid.” by Publilius Syrus.
Hello my loved one! I want to say that this article is awesome, great written and come with almost all vital infos. I?¦d like to look extra posts like this .
I’ve recently started a website, the info you provide on this site has helped me greatly. Thanks for all of your time & work.
Excellent read, I just passed this onto a friend who was doing a little research on that. And he actually bought me lunch as I found it for him smile Therefore let me rephrase that: Thanks for lunch! “Never let inexperience get in the way of ambition.” by Terry Josephson.
Good site! I really love how it is simple on my eyes and the data are well written. I am wondering how I could be notified whenever a new post has been made. I’ve subscribed to your feed which must do the trick! Have a nice day!
There are some attention-grabbing deadlines in this article but I don’t know if I see all of them heart to heart. There’s some validity however I will take hold opinion till I look into it further. Good article , thanks and we would like extra! Added to FeedBurner as properly
Sweet website , super layout, very clean and utilize friendly.
Way cool, some valid points! I appreciate you making this article available, the rest of the site is also high quality. Have a fun.
Your place is valueble for me. Thanks!…
Hello.This article was extremely fascinating, especially since I was browsing for thoughts on this topic last Tuesday.
Very nice post. I just stumbled upon your blog and wanted to say that I’ve truly enjoyed browsing your blog posts. In any case I’ll be subscribing to your rss feed and I hope you write again soon!
Beverly Bultron
[…]always a large fan of linking to bloggers that I appreciate but do not get a great deal of link enjoy from[…]
Excellent site you have here but I was wondering if you knew of any message boards that cover the same topics talked about here? I’d really like to be a part of community where I can get opinions from other experienced people that share the same interest. If you have any suggestions, please let me know. Bless you!
you are in reality a just right webmaster. The website loading speed is incredible. It kind of feels that you’re doing any distinctive trick. In addition, The contents are masterwork. you have performed a magnificent job in this subject!
Heya i am for the first time here. I found this board and I find It truly helpful & it helped me out a lot. I hope to offer something back and help others such as you helped me.
Undeniably believe that which you said. Your favorite justification seemed to be on the web the simplest thing to be aware of. I say to you, I definitely get annoyed while people think about worries that they just don’t know about. You managed to hit the nail upon the top and also defined out the whole thing without having side-effects , people can take a signal. Will probably be back to get more. Thanks
Really instructive and fantastic body structure of subject matter, now that’s user pleasant (:.
It’s hard to find knowledgeable people on this topic, but you sound like you know what you’re talking about! Thanks
I haven’t checked in here for some time since I thought it was getting boring, but the last few posts are great quality so I guess I will add you back to my daily bloglist. You deserve it my friend 🙂
We’re a group of volunteers and starting a new scheme in our community. Your site provided us with valuable information to work on. You’ve done an impressive job and our whole community will be grateful to you.
Yay google is my king assisted me to find this great website ! .
I conceive other website owners should take this site as an example , very clean and excellent user genial design and style.
of course like your web site however you need to test the spelling on several of your posts. Many of them are rife with spelling problems and I find it very bothersome to inform the truth however I’ll surely come back again.
As I website possessor I believe the content here is really good, regards for your efforts.
It’s really a nice and helpful piece of info. I’m glad that you shared this helpful information with us. Please keep us up to date like this. Thanks for sharing.
Thank you for sharing excellent informations. Your web site is so cool. I am impressed by the details that you have on this blog. It reveals how nicely you understand this subject. Bookmarked this web page, will come back for more articles. You, my pal, ROCK! I found simply the info I already searched everywhere and just couldn’t come across. What an ideal web site.
I’ve read a few good stuff here. Certainly worth bookmarking for revisiting. I surprise how much effort you put to create such a wonderful informative website.
You have brought up a very wonderful points, thankyou for the post.
I was looking through some of your content on this internet site and I conceive this site is rattling informative ! Keep on putting up.
I would like to thnkx for the efforts you have put in writing this blog. I am hoping the same high-grade blog post from you in the upcoming as well. In fact your creative writing abilities has inspired me to get my own blog now. Really the blogging is spreading its wings quickly. Your write up is a good example of it.
Arie Baisch
[…]here are some links to sites that we link to mainly because we consider they’re worth visiting[…]
Cheap individual and group tours to Yerevan, Armenia. Find out where you can relax in Armenia, Yerevan. Book tours online on our website or call +37494877888.
Simply desire to say your article is as astonishing. The clearness in your post is just nice and i could assume you’re an expert on this subject. Well with your permission allow me to grab your RSS feed to keep up to date with forthcoming post. Thanks a million and please carry on the enjoyable work.
I’m not sure where you are getting your info, but good topic. I needs to spend some time learning much more or working out more. Thanks for magnificent information I was searching for this info for my mission.
I cling on to listening to the newscast lecture about getting boundless online grant applications so I have been looking around for the most excellent site to get one. Could you advise me please, where could i acquire some?
It’s really a great and useful piece of info. I’m satisfied that you simply shared this helpful information with us. Please keep us up to date like this. Thanks for sharing.
I am really impressed with your writing skills as well as with the layout on your weblog. Is this a paid theme or did you customize it yourself? Either way keep up the nice quality writing, it’s rare to see a great blog like this one these days..
Greetings! This is my 1st comment here so I just wanted to give a quick shout out and say I really enjoy reading through your posts. Can you recommend any other blogs/websites/forums that go over the same topics? Appreciate it!
Respect to op, some wonderful information .
I simply could not depart your website prior to suggesting that I extremely loved the usual info an individual provide for your visitors? Is going to be again steadily to check up on new posts
Attractive section of content. I just stumbled upon your weblog and in accession capital to claim that I get in fact loved account your weblog posts. Anyway I will be subscribing to your feeds or even I achievement you get right of entry to consistently quickly.
I genuinely enjoy studying on this site, it holds good content.
Some truly superb content on this website , thanks for contribution.
I conceive this website has got very superb written content articles.
Some truly excellent articles on this website , appreciate it for contribution.
Greetings! Very helpful advice on this article! It is the little changes that make the biggest changes. Thanks a lot for sharing!
Hello.This article was extremely interesting, especially since I was searching for thoughts on this matter last Monday.
You actually make it appear really easy together with your presentation however I to find this matter to be really one thing which I believe I would never understand. It sort of feels too complex and very extensive for me. I am taking a look ahead to your subsequent publish, I will try to get the hang of it!
Somebody essentially lend a hand to make severely posts I might state. That is the first time I frequented your website page and up to now? I amazed with the research you made to create this particular put up amazing. Great activity!
I believe you have noted some very interesting points, appreciate it for the post.
Some really interesting points you have written.Assisted me a lot, just what I was searching for : D.
I precisely wanted to thank you very much once again. I do not know the things I would’ve taken care of in the absence of the actual creative ideas provided by you on such area. It seemed to be a very frightful setting for me personally, however , taking note of the very specialized form you solved that took me to cry over gladness. Extremely happy for this service and believe you are aware of a powerful job that you are putting in educating the others by way of your webblog. Probably you’ve never come across any of us.
Youre so cool! I dont suppose Ive read something like this before. So nice to search out somebody with some original ideas on this subject. realy thank you for beginning this up. this web site is something that is wanted on the net, somebody with a bit originality. helpful job for bringing one thing new to the internet!
This website is my inspiration , very fantastic pattern and perfect subject material.
What’s Happening i am new to this, I stumbled upon this I have found It absolutely helpful and it has aided me out loads. I hope to contribute & aid other users like its aided me. Great job.
Well I definitely enjoyed reading it. This subject offered by you is very useful for accurate planning.
I’m extremely impressed together with your writing skills and also with the structure for your blog. Is this a paid theme or did you modify it yourself? Anyway keep up the nice high quality writing, it’s uncommon to peer a great blog like this one these days..
Hello. magnificent job. I did not anticipate this. This is a excellent story. Thanks!
You are my aspiration, I own few blogs and often run out from to brand.
Hi there! This is my 1st comment here so I just wanted to give a quick shout out and say I really enjoy reading through your posts. Can you suggest any other blogs/websites/forums that go over the same subjects? Thanks!
fantastic post, very informative. I’m wondering why the other experts of this sector do not understand this. You must proceed your writing. I am confident, you have a huge readers’ base already!
Very great information can be found on web blog. “Time discovers truth.” by Lucius Annaeus Seneca.
You have brought up a very great points, regards for the post.
My brother suggested I might like this website. He was totally right. This post actually made my day. You can not imagine simply how much time I had spent for this information! Thanks!
Hi there, I found your web site via Google while searching for a related topic, your web site came up, it looks good. I have bookmarked it in my google bookmarks.
You got a very excellent website, Sword lily I discovered it through yahoo.
I¦ve read some good stuff here. Certainly worth bookmarking for revisiting. I wonder how much effort you place to create this kind of great informative web site.
This web site is really a walk-through for all of the info you wanted about this and didn’t know who to ask. Glimpse here, and you’ll definitely discover it.
Magnificent website. Plenty of useful information here. I am sending it to several friends ans also sharing in delicious. And obviously, thanks for your effort!
I¦ve been exploring for a little bit for any high-quality articles or blog posts on this kind of house . Exploring in Yahoo I finally stumbled upon this web site. Reading this info So i¦m satisfied to express that I’ve an incredibly just right uncanny feeling I came upon just what I needed. I so much undoubtedly will make sure to don¦t disregard this web site and provides it a glance on a constant basis.
Good day very cool blog!! Man .. Beautiful .. Superb .. I’ll bookmark your website and take the feeds additionallyKI am happy to find a lot of helpful info right here within the put up, we want develop extra techniques on this regard, thank you for sharing. . . . . .
Woh I love your blog posts, bookmarked! .
Very interesting topic, thanks for posting. “The reason people sweat is so they won’t catch fire when making love.” by Don Rose.
naturally like your web site however you have to test the spelling on quite a few of your posts. Many of them are rife with spelling issues and I in finding it very troublesome to tell the reality however I will definitely come again again.
I like this site very much so much fantastic information.
I got what you mean ,saved to my bookmarks, very nice web site.
Really fantastic info can be found on web blog.
You made some good points there. I did a search on the subject and found most people will agree with your blog.
Merely a smiling visitant here to share the love (:, btw great design. “Make the most of your regrets… . To regret deeply is to live afresh.” by Henry David Thoreau.
This is a topic close to my heart cheers, where are your contact details though?
Your house is valueble for me. Thanks!…
Thank you for sharing with us, I conceive this website genuinely stands out : D.
Whoa! This blog looks just like my old one! It’s on a completely different topic but it has pretty much the same page layout and design. Superb choice of colors!
You have brought up a very wonderful details , thanks for the post.
Very good written article. It will be useful to everyone who utilizes it, as well as me. Keep doing what you are doing – for sure i will check out more posts.
I love it when people come together and share opinions, great blog, keep it up.
Hi, I think your website might be having browser compatibility issues. When I look at your blog in Ie, it looks fine but when opening in Internet Explorer, it has some overlapping. I just wanted to give you a quick heads up! Other then that, superb blog!
I discovered your weblog website on google and test a few of your early posts. Continue to keep up the excellent operate. I just further up your RSS feed to my MSN News Reader. Seeking ahead to reading more from you later on!…
hello there and thanks for your info – I’ve certainly picked up something new from proper here. I did however expertise several technical points using this web site, as I experienced to reload the web site a lot of occasions prior to I could get it to load properly. I have been wondering if your web hosting is OK? Now not that I am complaining, however slow loading instances instances will sometimes have an effect on your placement in google and could harm your quality rating if advertising and ***********|advertising|advertising|advertising and *********** with Adwords. Anyway I’m adding this RSS to my email and can glance out for much extra of your respective fascinating content. Make sure you update this again very soon..
I?¦ve recently started a blog, the information you offer on this site has helped me tremendously. Thank you for all of your time & work.
I think this site contains very wonderful pent content posts.
Some times its a pain in the ass to read what people wrote but this site is very user pleasant! .
What¦s Going down i am new to this, I stumbled upon this I have found It absolutely useful and it has helped me out loads. I’m hoping to contribute & assist different users like its helped me. Good job.
I’m still learning from you, but I’m trying to reach my goals. I certainly liked reading all that is written on your blog.Keep the posts coming. I loved it!
I believe this internet site contains very good composed content material posts.
Greetings! Very helpful advice on this article! It is the little changes that make the biggest changes. Thanks a lot for sharing!
Hi my family member! I wish to say that this post is amazing, nice written and come with almost all important infos. I?¦d like to peer more posts like this .
What i don’t understood is in fact how you are not actually a lot more well-favored than you may be now. You’re so intelligent. You know therefore significantly when it comes to this subject, made me for my part imagine it from a lot of varied angles. Its like men and women aren’t interested until it is one thing to do with Lady gaga! Your own stuffs great. At all times deal with it up!
Does your site have a contact page? I’m having trouble locating it but, I’d like to shoot you an e-mail. I’ve got some recommendations for your blog you might be interested in hearing. Either way, great site and I look forward to seeing it improve over time.
When I originally commented I clicked the -Notify me when new comments are added- checkbox and now each time a comment is added I get four emails with the same comment. Is there any way you can remove me from that service? Thanks!
Great line up. We will be linking to this great article on our site. Keep up the good writing.
I believe this website has got some real good information for everyone : D.
I will right away clutch your rss as I can not to find your email subscription link or newsletter service. Do you’ve any? Kindly permit me recognise so that I may subscribe. Thanks.
After examine just a few of the weblog posts on your website now, and I truly like your means of blogging. I bookmarked it to my bookmark website listing and will probably be checking back soon. Pls try my website as effectively and let me know what you think.
Can I just say what a relief to seek out somebody who actually knows what theyre talking about on the internet. You positively know the way to convey an issue to gentle and make it important. Extra individuals need to read this and understand this side of the story. I cant imagine youre no more in style because you undoubtedly have the gift.
I besides think thus, perfectly pent post! .
certainly like your web-site but you need to take a look at the spelling on quite a few of your posts. A number of them are rife with spelling problems and I find it very troublesome to inform the reality then again I will surely come back again.
I love your blog.. very nice colors & theme. Did you create this website yourself? Plz reply back as I’m looking to create my own blog and would like to know wheere u got this from. thanks
Hi, just required you to know I he added your site to my Google bookmarks due to your layout. But seriously, I believe your internet site has 1 in the freshest theme I??ve came across. It extremely helps make reading your blog significantly easier.
Thank you for another excellent article. Where else could anyone get that kind of information in such a perfect way of writing? I’ve a presentation next week, and I’m on the look for such info.
I’d should test with you here. Which isn’t one thing I normally do! I enjoy reading a put up that can make individuals think. Also, thanks for permitting me to comment!
Definitely, what a great site and revealing posts, I definitely will bookmark your blog.Best Regards!
of course like your website however you have to test the spelling on quite a few of your posts. A number of them are rife with spelling problems and I in finding it very bothersome to tell the truth then again I will definitely come again again.
Hi there! This post couldn’t be written any better! Reading through this post reminds me of my previous room mate! He always kept talking about this. I will forward this article to him. Pretty sure he will have a good read. Thank you for sharing!
hello!,I love your writing so so much! percentage we keep in touch more about your post on AOL? I need an expert in this area to resolve my problem. Maybe that’s you! Taking a look ahead to look you.
Just wanna comment that you have a very nice internet site, I like the style and design it actually stands out.
Excellent read, I just passed this onto a colleague who was doing a little research on that. And he just bought me lunch since I found it for him smile Thus let me rephrase that: Thanks for lunch! “The capacity to care is what gives life its most deepest significance.” by Pablo Casals.
My wife and i got so contented that John could complete his researching using the precious recommendations he received while using the web site. It’s not at all simplistic to just choose to be releasing facts which usually some people have been making money from. And we all take into account we need you to thank for that. These illustrations you have made, the straightforward blog menu, the relationships you can help to promote – it’s most astounding, and it’s really aiding our son in addition to the family reckon that this matter is cool, which is certainly especially vital. Thank you for everything!
I have been browsing online greater than 3 hours as of late, yet I by no means found any attention-grabbing article like yours. It’s lovely worth sufficient for me. Personally, if all webmasters and bloggers made excellent content as you probably did, the web might be a lot more useful than ever before.
Pretty section of content. I just stumbled upon your blog and in accession capital to assert that I get actually enjoyed account your blog posts. Anyway I’ll be subscribing to your augment and even I achievement you access consistently quickly.
Real superb information can be found on web site.
This blog is definitely rather handy since I’m at the moment creating an internet floral website – although I am only starting out therefore it’s really fairly small, nothing like this site. Can link to a few of the posts here as they are quite. Thanks much. Zoey Olsen
Only a smiling visitant here to share the love (:, btw great style and design.
We’re a gaggle of volunteers and starting a new scheme in our community. Your site provided us with helpful information to paintings on. You have done a formidable activity and our whole group might be thankful to you.
I like this post, enjoyed this one appreciate it for posting. “The goal of revival is conformity to the image of Christ, not imitation of animals.” by Richard F. Lovelace.
Fantastic site. Plenty of helpful information here. I’m sending it to several buddies ans additionally sharing in delicious. And obviously, thanks in your effort!
F*ckin’ remarkable issues here. I am very satisfied to look your post. Thanks a lot and i am taking a look ahead to touch you. Will you please drop me a e-mail?
Good site! I truly love how it is simple on my eyes and the data are well written. I’m wondering how I might be notified whenever a new post has been made. I’ve subscribed to your RSS feed which must do the trick! Have a nice day!
Your style is so unique compared to many other people. Thank you for publishing when you have the opportunity,Guess I will just make this bookmarked.2
I’m not sure exactly why but this website is loading very slow for me.
Is anyone else having this issue or is it a issue on my end?
I’ll check back later on and see if the problem still exists.
Utterly indited subject matter, thank you for entropy. “He who establishes his argument by noise and command shows that his reason is weak.” by Michel de Montaigne.
Wonderful work! This is the type of info that should be shared around the internet. Shame on Google for not positioning this post higher! Come on over and visit my website . Thanks =)
Would love to constantly get updated outstanding blog! .
I¦ve been exploring for a bit for any high quality articles or weblog posts in this sort of area . Exploring in Yahoo I at last stumbled upon this site. Studying this information So i am happy to show that I’ve an incredibly just right uncanny feeling I discovered just what I needed. I so much unquestionably will make sure to don¦t put out of your mind this web site and give it a glance regularly.
Thank you, I’ve just been looking for info about this topic for a while and yours is the greatest I have discovered till now. However, what about the conclusion? Are you sure in regards to the source?
You actually make it seem so easy together with your presentation but I in finding this matter to be really one thing which I feel I would never understand. It kind of feels too complex and extremely broad for me. I am having a look ahead for your subsequent put up, I’ll attempt to get the hang of it!
Thanks for sharing excellent informations. Your web site is so cool. I am impressed by the details that you have on this site. It reveals how nicely you understand this subject. Bookmarked this website page, will come back for extra articles. You, my friend, ROCK! I found just the info I already searched all over the place and simply couldn’t come across. What a perfect site.
Hi! Do you use Twitter? I’d like to follow you if that would be okay. I’m undoubtedly enjoying your blog and look forward to new updates.
Thank you for sharing superb informations. Your web-site is so cool. I’m impressed by the details that you¦ve on this website. It reveals how nicely you perceive this subject. Bookmarked this web page, will come back for extra articles. You, my pal, ROCK! I found simply the information I already searched all over the place and simply couldn’t come across. What a great web site.
Hiya very cool blog!! Man .. Excellent .. Wonderful .. I’ll bookmark your website and take the feeds additionallyKI am satisfied to seek out so many useful information here in the post, we want develop extra strategies in this regard, thanks for sharing. . . . . .
Whats up very cool website!! Man .. Beautiful .. Amazing .. I will bookmark your website and take the feeds also…I am glad to seek out so many useful information here within the submit, we want work out more techniques in this regard, thank you for sharing.
I have been exploring for a bit for any high-quality articles or weblog posts in this sort of space . Exploring in Yahoo I finally stumbled upon this website. Studying this information So i am happy to convey that I’ve an incredibly just right uncanny feeling I came upon exactly what I needed. I most for sure will make sure to do not fail to remember this website and give it a look on a relentless basis.
I enjoy your work, regards for all the informative content.
I am not really excellent with English but I get hold this very easy to translate.
Fantastic beat ! I would like to apprentice while you amend your site, how could i subscribe for a blog site? The account aided me a acceptable deal. I had been tiny bit acquainted of this your broadcast provided bright clear concept
But a smiling visitor here to share the love (:, btw great layout.
Hey very nice site!! Man .. Beautiful .. Superb .. I’ll bookmark your website and take the feeds alsoKI am glad to search out a lot of useful info right here within the post, we need develop extra techniques in this regard, thanks for sharing. . . . . .
I really like what you guys are usually up too. This kind of clever work and exposure! Keep up the good works guys I’ve included you guys to my own blogroll.
I besides conceive thence, perfectly composed post! .
You have brought up a very excellent details , appreciate it for the post.
I am really inspired with your writing skills as smartly as with the layout on your blog. Is that this a paid subject or did you modify it yourself? Either way stay up the nice quality writing, it is rare to peer a great blog like this one these days..
An fascinating dialogue is worth comment. I believe that you must write extra on this subject, it won’t be a taboo topic but typically individuals are not sufficient to speak on such topics. To the next. Cheers
Undeniably believe that which you said. Your favorite reason appeared to be on the internet the simplest thing to be aware of. I say to you, I certainly get annoyed while people think about worries that they just don’t know about. You managed to hit the nail upon the top and also defined out the whole thing without having side-effects , people can take a signal. Will likely be back to get more. Thanks
Lovely blog! I am loving it!! Will come back again. I am taking your feeds also
I want gathering utile info, this post has got me even more info! .
I have not checked in here for a while because I thought it was getting boring, but the last several posts are good quality so I guess I’ll add you back to my everyday bloglist. You deserve it my friend 🙂
My brother recommended I might like this blog. He was once totally right. This post truly made my day. You cann’t consider simply how so much time I had spent for this info! Thank you!
Great write-up, I¦m normal visitor of one¦s blog, maintain up the excellent operate, and It’s going to be a regular visitor for a lengthy time.
Hello There. I found your blog using msn. This is an extremely well written article. I’ll make sure to bookmark it and return to read more of your useful information. Thanks for the post. I’ll certainly comeback.
Keep up the superb work, I read few articles on this site and I conceive that your web blog is very interesting and has got lots of superb info .
Wonderful site. Plenty of useful information here. I am sending it to several pals ans also sharing in delicious. And of course, thanks on your effort!
Perfectly written written content, Really enjoyed looking at.
It is the best time to make some plans for the longer term and it is time to be happy. I’ve read this post and if I may I wish to counsel you some fascinating things or tips. Perhaps you can write subsequent articles relating to this article. I want to learn even more issues about it!
I have been exploring for a little bit for any high quality articles or blog posts in this sort of house . Exploring in Yahoo I finally stumbled upon this site. Studying this information So i¦m satisfied to express that I have a very just right uncanny feeling I discovered exactly what I needed. I most without a doubt will make certain to don¦t put out of your mind this web site and give it a look on a continuing basis.
I think this is among the most important info for me. And i’m glad reading your article. But want to remark on some general things, The website style is great, the articles is really nice : D. Good job, cheers
Just desire to say your article is as amazing. The clearness to your put up is simply nice and i could assume you are a professional on this subject. Well together with your permission let me to grab your feed to stay updated with drawing close post. Thanks one million and please carry on the rewarding work.
I have been surfing online more than three hours as of late, yet I never found any attention-grabbing article like yours. It is pretty worth enough for me. In my view, if all webmasters and bloggers made good content as you did, the internet will be a lot more useful than ever before.
F*ckin¦ awesome issues here. I¦m very glad to peer your post. Thanks so much and i am looking forward to touch you. Will you kindly drop me a mail?
You should take part in a contest for one of the best blogs on the web. I will recommend this site!
tablets [url=https://www.walmart.com/ip/Cialis-Tadalafil-Book-9780359045457/906064216]child porn[/url] hende children porn onthouden
Simply wish to say your article is as astonishing. The clearness on your submit is just nice and i can think you are a professional on this subject. Well together with your permission allow me to grasp your feed to stay updated with forthcoming post. Thank you 1,000,000 and please carry on the gratifying work.
Simply desire to say your article is as astounding. The clarity on your post is just great and that i can think you’re a professional in this subject. Fine with your permission let me to snatch your RSS feed to keep updated with approaching post. Thanks one million and please carry on the gratifying work.
I genuinely enjoy examining on this web site, it has great content. “It is easy to be nice, even to an enemy – from lack of character.” by Dag Hammarskjld.
Thanks for helping out, great info. “It does not do to dwell on dreams and forget to live.” by J. K. Rowling.
I’m truly enjoying the design and layout of your blog. It’s a very easy on the eyes which makes it much more enjoyable for me to come here and visit more often. Did you hire out a developer to create your theme? Outstanding work!
I like what you guys are up too. Such smart work and reporting! Carry on the superb works guys I have incorporated you guys to my blogroll. I think it’ll improve the value of my website 🙂
You are my inhalation, I own few blogs and occasionally run out from to post .
Thanks for helping out, great information.
You are my inspiration , I own few blogs and rarely run out from to post .
Dead indited content, Really enjoyed looking at.
There are actually a number of particulars like that to take into consideration. That is a great point to carry up. I supply the thoughts above as common inspiration however clearly there are questions like the one you bring up the place a very powerful factor shall be working in honest good faith. I don?t know if best practices have emerged round things like that, however I am positive that your job is clearly recognized as a good game. Both girls and boys really feel the affect of just a second’s pleasure, for the remainder of their lives.
I’d constantly want to be update on new content on this site, saved to bookmarks! .
Can I simply say what a aid to search out somebody who really is aware of what theyre speaking about on the internet. You undoubtedly know the best way to deliver an issue to mild and make it important. More people must learn this and understand this aspect of the story. I cant believe youre not more fashionable since you positively have the gift.
Thanks for the good writeup. It if truth be told was a enjoyment account it. Look advanced to more brought agreeable from you! However, how can we keep in touch?
whoah this blog is wonderful i love reading your posts. Keep up the good work! You know, lots of people are searching around for this information, you can aid them greatly.
hey there and thank you for your info – I have definitely picked up anything new from right here. I did however expertise several technical issues using this website, since I experienced to reload the web site a lot of times previous to I could get it to load properly. I had been wondering if your web hosting is OK? Not that I am complaining, but sluggish loading instances times will sometimes affect your placement in google and can damage your high-quality score if advertising and marketing with Adwords. Well I am adding this RSS to my email and could look out for much more of your respective fascinating content. Make sure you update this again very soon..
Super-Duper site! I am loving it!! Will be back later to read some more. I am bookmarking your feeds also
Heya are using WordPress for your site platform? I’m new to the blog world but I’m trying to get started and set up my own. Do you need any coding knowledge to make your own blog? Any help would be really appreciated!
I have not checked in here for a while as I thought it was getting boring, but the last few posts are good quality so I guess I will add you back to my daily bloglist. You deserve it my friend 🙂
Hello! I know this is kind of off topic but I was wondering if you knew where I could find a captcha plugin for my comment form?
I’m using the same blog platform as yours and
I’m having trouble finding one? Thanks a lot!
I enjoy your writing style genuinely loving this website .
Excellent blog! Do you have any tips and hints for aspiring writers? I’m hoping to start my own blog soon but I’m a little lost on everything. Would you suggest starting with a free platform like WordPress or go for a paid option? There are so many choices out there that I’m totally confused .. Any tips? Bless you!
excellent points altogether, you just received a new reader.
What might you recommend in regards to your submit that you just made a few
days in the past? Any certain?
I truly appreciate this post. I have been looking everywhere for this! Thank goodness I found it on Bing. You have made my day! Thx again
It’s actually a great and helpful piece of info. I’m happy that you shared this helpful information with us. Please stay us up to date like this. Thank you for sharing.
Its like you read my mind! You appear to know so much about this, like you wrote the book in it or something. I think that you can do with a few pics to drive the message home a bit, but instead of that, this is fantastic blog. A fantastic read. I will certainly be back.
But wanna remark that you have a very nice internet site, I like the design and style it really stands out.
My coder is trying to convince me to move to .net from
PHP. I have always disliked the idea because of the costs.
But he’s tryiong none the less. I’ve been using Movable-type on a number of websites for about a year and am anxious about switching to another platform.
I have heard excellent things about blogengine.net. Is there a way I can import all my wordpress content into
it? Any kind of help would be really appreciated!
Yay google is my king assisted me to find this outstanding website ! .
You could certainly see your expertise in the work you write. The world hopes for more passionate writers like you who are not afraid to say how they believe. Always go after your heart.
Attractive portion of content. I just stumbled upon your weblog and in accession capital to assert that I acquire actually
enjoyed account your weblog posts. Any way I will be subscribing on your feeds and even I achievement you access persistently rapidly.
I would like to thank you for the efforts you have put in writing this web site. I’m hoping the same high-grade blog post from you in the upcoming also. In fact your creative writing skills has inspired me to get my own blog now. Actually the blogging is spreading its wings quickly. Your write up is a good example of it.
Hello there! Do you know if they make any plugins to help with
Search Engine Optimization? I’m trying to get my blog to rank for some targeted
keywords but I’m not seeing very good gains. If you know of any please share.
Cheers!
very nice publish, i certainly love this website, carry on it
You actually make it appear so easy with your presentation however I to find this topic to be really something which I believe I would never understand. It kind of feels too complicated and extremely huge for me. I am taking a look forward in your subsequent publish, I’ll try to get the hold of it!
I as well conceive thus, perfectly written post! .
Your style is so unique compared to many other people. Thank you for publishing when you have the opportunity,Guess I will just make this bookmarked.2
I am now not certain where you’re getting your information, however great topic. I needs to spend a while learning more or figuring out more. Thanks for excellent information I used to be on the lookout for this info for my mission.
I believe you have noted some very interesting details , thankyou for the post.
That is really interesting, You’re a very skilled blogger. I have joined your feed and look forward to in the hunt for extra of your great post. Also, I’ve shared your site in my social networks!
Awsome website! I am loving it!! Will come back again. I am bookmarking your feeds also.
Great blog right here! Also your website so much up very fast! What host are you using? Can I am getting your affiliate link to your host? I wish my web site loaded up as fast as yours lol
After study a couple of of the blog posts on your website now, and I actually like your manner of blogging. I bookmarked it to my bookmark web site listing and can be checking again soon. Pls try my website online as effectively and let me know what you think.
I like your writing style really loving this web site.
I love the efforts you have put in this, thank you for all the great posts.
Perfectly pent articles, thank you for entropy. “The bravest thing you can do when you are not brave is to profess courage and act accordingly.” by Corra Harris.
I used to be more than happy to search out this internet-site.I wanted to thanks for your time for this glorious learn!! I definitely enjoying every little little bit of it and I’ve you bookmarked to take a look at new stuff you weblog post.
Thanks for the sensible critique. Me & my neighbor were just preparing to do some research on this. We got a grab a book from our area library but I think I learned more from this post. I’m very glad to see such wonderful information being shared freely out there.
Wow that was strange. I just wrote an really long comment but after I clicked submit my comment didn’t show up. Grrrr… well I’m not writing all that over again. Anyhow, just wanted to say wonderful blog!
You got a very great website, Sword lily I detected it through yahoo.
Glad to be one of the visitants on this amazing internet site : D.
Hi, I think your site might be having browser compatibility issues. When I look at your website in Safari, it looks fine but when opening in Internet Explorer, it has some overlapping. I just wanted to give you a quick heads up! Other then that, fantastic blog!
I have been reading out a few of your stories and i can claim nice stuff. I will make sure to bookmark your site.
I like what you guys are up too. Such smart work and reporting! Carry on the superb works guys I¦ve incorporated you guys to my blogroll. I think it will improve the value of my web site 🙂
Hello there! Do you know if they make any plugins to assist with Search Engine Optimization? I’m trying to get my blog to rank for some targeted keywords but I’m not seeing very good results. If you know of any please share. Thank you!
Great beat ! I would like to apprentice while you amend your web site, how can i subscribe for a weblog site? The account aided me a applicable deal. I had been tiny bit familiar of this your broadcast provided vibrant transparent concept
F*ckin¦ tremendous things here. I¦m very happy to see your post. Thank you a lot and i am looking forward to touch you. Will you please drop me a mail?
Your place is valueble for me. Thanks!…
I have been browsing on-line more than three hours lately, but I never discovered any interesting article like yours. It is beautiful worth sufficient for me. In my opinion, if all webmasters and bloggers made good content material as you probably did, the net will be much more useful than ever before. “I think that maybe if women and children were in charge we would get somewhere.” by James Grover Thurber.
Thanks for another great article. Where else could anyone get that type of info in such a perfect way of writing? I have a presentation next week, and I am on the look for such information.
Good site! I really love how it is simple on my eyes and the data are well written. I’m wondering how I could be notified whenever a new post has been made. I have subscribed to your RSS which must do the trick! Have a nice day!
We’re a group of volunteers and opening a new scheme in our community. Your site offered us with valuable information to work on. You’ve done a formidable job and our entire community will be grateful to you.
I cling on to listening to the reports speak about getting free online grant applications so I have been looking around for the finest site to get one. Could you tell me please, where could i find some?
Hello mates, its great piece of writing on the topic of tutoringand
fully explained, keep it up all the time.
Hello mates, its great piece of writing on the topic of tutoringand
fully explained, keep it up all the time.
This is really attention-grabbing, You’re an excessively skilled blogger. I have joined your rss feed and look ahead to in quest of more of your excellent post. Additionally, I’ve shared your site in my social networks!
I keep listening to the newscast talk about receiving free online grant applications so I have been looking around for the most excellent site to get one. Could you tell me please, where could i acquire some?
Spot on with this write-up, I actually assume this web site needs way more consideration. I’ll probably be once more to learn way more, thanks for that info.
It’s best to take part in a contest for the most effective blogs on the web. I’ll suggest this web site!
F*ckin¦ remarkable things here. I am very glad to peer your post. Thank you a lot and i am taking a look forward to contact you. Will you kindly drop me a e-mail?
Great post. I am facing a couple of these problems.
Howdy! I know this is kinda off topic however , I’d figured I’d ask. Would you be interested in exchanging links or maybe guest writing a blog article or vice-versa? My blog goes over a lot of the same subjects as yours and I feel we could greatly benefit from each other. If you are interested feel free to shoot me an e-mail. I look forward to hearing from you! Excellent blog by the way!
Thanks for the sensible critique. Me and my neighbor were just preparing to do some research about this. We got a grab a book from our local library but I think I learned more from this post. I’m very glad to see such wonderful info being shared freely out there.
Hi there, I discovered your blog via Google while searching for a similar subject, your web site came up, it seems to be good. I have bookmarked it in my google bookmarks.
I really appreciate this post. I have been looking everywhere for this! Thank goodness I found it on Bing. You’ve made my day! Thank you again
I like the efforts you have put in this, thanks for all the great articles.
It¦s actually a nice and useful piece of information. I am satisfied that you shared this helpful information with us. Please keep us informed like this. Thank you for sharing.
Terrific paintings! This is the kind of info that are supposed to be shared across the net. Shame on the seek engines for not positioning this submit upper! Come on over and visit my site . Thanks =)
I am really loving the theme/design of your website. Do you ever run into any internet browser compatibility problems? A couple of my blog readers have complained about my site not operating correctly in Explorer but looks great in Safari. Do you have any suggestions to help fix this issue?
There is noticeably a bundle to learn about this. I assume you made sure good points in options also.
F*ckin¦ tremendous issues here. I am very satisfied to peer your article. Thanks a lot and i am looking ahead to contact you. Will you kindly drop me a e-mail?
Nice post. I be taught something more challenging on different blogs everyday. It will always be stimulating to learn content material from different writers and observe a bit one thing from their store. I’d desire to make use of some with the content material on my weblog whether or not you don’t mind. Natually I’ll provide you with a hyperlink in your web blog. Thanks for sharing.
Good write-up, I am regular visitor of one’s website, maintain up the excellent operate, and It’s going to be a regular visitor for a long time.
You completed a number of nice points there. I did a search on the issue and found a good number of people will agree with your blog.
As a Newbie, I am continuously browsing online for articles that can be of assistance to me. Thank you
I like this web blog its a master peace ! Glad I found this on google .
Superb site you have here but I was curious if you knew of any user discussion forums that cover the same topics discussed in this article?
I’d really like to be a part of group where I can get advice from
other experienced people that share the same interest.
If you have any suggestions, please let me know. Kudos!
I really appreciate this post. I¦ve been looking everywhere for this! Thank goodness I found it on Bing. You’ve made my day! Thx again
Hi , I do believe this is an excellent blog. I stumbled upon it on Yahoo , i will come back once again. Money and freedom is the best way to change, may you be rich and help other people.
WOW just what I was searching for. Came here by searching for Natural
supplement
Lovely just what I was looking for.Thanks to the author for taking his clock time on this one.
I would like to thnkx for the efforts you’ve put in writing this website. I am hoping the same high-grade site post from you in the upcoming as well. In fact your creative writing skills has encouraged me to get my own web site now. Really the blogging is spreading its wings rapidly. Your write up is a good example of it.
Write more, thats all I have to say. Literally, it seems as though you relied on the video to make your point. You clearly know what youre talking about, why throw away your intelligence on just posting videos to your weblog when you could be giving us something enlightening to read?
I am only commenting to make you understand of the awesome encounter our girl encountered using yuor web blog. She discovered some details, with the inclusion of what it’s like to have an awesome coaching spirit to let the others very easily learn about specific advanced issues. You actually did more than visitors’ desires. Thank you for presenting such essential, healthy, revealing and as well as fun thoughts on this topic to Janet.
It’s really a nice and helpful piece of info. I am glad that you shared this useful info with us. Please keep us up to date like this. Thank you for sharing.
Hello there! Do you know if they make any plugins to help with Search Engine Optimization? I’m trying to get my blog to rank for some targeted keywords but I’m not seeing very good results. If you know of any please share. Appreciate it!
As I website possessor I believe the content matter here is rattling excellent , appreciate it for your hard work. You should keep it up forever! Good Luck.
Very interesting info !Perfect just what I was looking for! “I meant what I said, and I said what I meant. An elephant’s faithful, one hundred percent.” by Dr. Seuss.
Thanks so much for giving everyone remarkably memorable opportunity to read from this web site. It’s always so brilliant and full of amusement for me and my office fellow workers to visit your web site a minimum of three times per week to study the latest guidance you will have. Not to mention, I am just at all times happy with the breathtaking tricks you serve. Some 1 facts in this posting are honestly the most suitable we have all ever had.
Some genuinely prime articles on this site, bookmarked.
Sweet blog! I found it while surfing around on Yahoo News. Do you have any tips on how to get listed in Yahoo News? I’ve been trying for a while but I never seem to get there! Thank you
Excellent post. I used to be checking constantly this blog and I am impressed! Very useful information particularly the remaining section 🙂 I take care of such information a lot. I used to be looking for this particular information for a very lengthy time. Thank you and best of luck.
I do consider all the ideas you’ve introduced for your post. They are very convincing and can definitely work. Still, the posts are too short for beginners. May you please lengthen them a bit from next time? Thanks for the post.
I saw a lot of website but I believe this one has something special in it in it
Pretty! This was a really wonderful post. Thank you for your provided information.
Thank you a lot for giving everyone an exceptionally brilliant possiblity to discover important secrets from this web site. It really is very great and jam-packed with a great time for me personally and my office acquaintances to search your blog nearly three times in a week to learn the fresh things you have. Not to mention, I am also actually happy concerning the mind-boggling secrets you give. Certain 1 ideas on this page are indeed the most effective I have had.
My partner and I stumbled over here coming from a different web page and thought I should check things out. I like what I see so now i am following you. Look forward to looking into your web page repeatedly.
Great website! I am loving it!! Will be back later to read some more. I am bookmarking your feeds also.
Hi there! I just wanted to ask if you ever have any trouble with hackers? My last blog (wordpress) was hacked and I ended up losing several weeks of hard work due to no data backup. Do you have any methods to protect against hackers?
Hi, Neat post. There is an issue with your site in web explorer, could test this?K IE nonetheless is the market leader and a good portion of people will pass over your magnificent writing because of this problem.
I went over this web site and I think you have a lot of great information, saved to my bookmarks (:.
I respect your piece of work, thanks for all the useful posts.
The next time I read a blog, I hope that it doesnt disappoint me as much as this one. I mean, I know it was my choice to read, but I actually thought youd have something interesting to say. All I hear is a bunch of whining about something that you could fix if you werent too busy looking for attention.
Pretty section of content. I just stumbled upon your web site and in accession capital to assert that I get actually enjoyed account your blog posts. Any way I will be subscribing to your feeds and even I achievement you access consistently fast.
hello!,I like your writing very much! share we communicate more about your article on AOL? I need an expert on this area to solve my problem. May be that’s you! Looking forward to see you.
Appreciating the hard work you put into your site and detailed information you offer. It’s good to come across a blog every once in a while that isn’t the same out of date rehashed material. Wonderful read! I’ve saved your site and I’m adding your RSS feeds to my Google account.
I got good info from your blog
Greetings! I know this is somewhat off topic but I was
wondering which blog platform are you using for this website?
I’m getting fed up of WordPress because I’ve had problems
with hackers and I’m looking at options for another platform.
I would be awesome if you could point me in the direction of a good platform.
hello!,I like your writing so so much! proportion we be in contact extra approximately your article on AOL? I need an expert in this area to solve my problem. Maybe that’s you! Looking ahead to see you.
There is apparently a bunch to identify about this. I think you made some good points in features also.
I think this is among the most important info for me.
And i am glad reading your article. But wanna remark on few general things, The web site style is ideal, the articles is really
nice : D. Good job, cheers
Some genuinely superb information, Gladiolus I discovered this.
It’s hard to find knowledgeable people on this topic, but you sound like you know what you’re talking about! Thanks
This is very interesting, You’re a very skilled blogger. I’ve joined your rss feed and look forward to seeking more of your wonderful post. Also, I’ve shared your site in my social networks!
magnificent points altogether, you simply gained a brand new reader. What would you suggest in regards to your post that you made a few days ago? Any positive?
Very nice post. I just stumbled upon your weblog and wished to say that I have truly enjoyed surfing around your blog posts. In any case I will be subscribing to your rss feed and I hope you write again soon!
I don’t even know how I ended up here, but I thought this post was good. I do not know who you are but definitely you’re going to a famous blogger if you are not already 😉 Cheers!
Thank you for any other informative site. Where else may just I am getting that kind of information written in such an ideal approach? I’ve a mission that I’m just now working on, and I’ve been at the look out for such information.
But wanna comment on few general things, The website layout is perfect, the written content is really fantastic : D.
You are a very intelligent person!
Of course, what a fantastic website and illuminating posts, I will bookmark your site.Best Regards!
Today, I went to the beach with my children. I found a sea shell and gave it to my 4 year old daughter and said “You can hear the ocean if you put this to your ear.” She placed the shell to her ear and screamed. There was a hermit crab inside and it pinched her ear. She never wants to go back! LoL I know this is totally off topic but I had to tell someone!
I as well as my pals have already been analyzing the best strategies found on your web blog and then then developed an awful feeling I never thanked you for those tips. All of the ladies were definitely as a consequence warmed to study them and have now simply been taking pleasure in these things. We appreciate you being really thoughtful and also for making a decision on varieties of fine things millions of individuals are really eager to learn about. My honest regret for not expressing gratitude to earlier.
Sweet blog! I found it while browsing on Yahoo News. Do
you have any suggestions on how to get listed in Yahoo
News? I’ve been trying for a while but I never seem to get there!
Cheers
Very wonderful information can be found on website.
I was very pleased to find this web-site.I wanted to thanks for your time for this wonderful read!! I definitely enjoying every little bit of it and I have you bookmarked to check out new stuff you blog post.
Good website! I truly love how it is easy on my eyes and the data are well written. I am wondering how I might be notified when a new post has been made. I’ve subscribed to your feed which must do the trick! Have a nice day!
It’s laborious to find educated folks on this subject, but you sound like you recognize what you’re speaking about! Thanks
Just desire to say your article is as amazing. The clearness for
your put up is simply nice and that i could think you’re an expert in this subject.
Fine with your permission let me to take hold of your feed to keep updated with coming near near post.
Thanks a million and please continue the enjoyable work.
Just a smiling visitor here to share the love (:, btw outstanding style and design. “Treat the other man’s faith gently it is all he has to believe with.” by Athenus.
I’ve read some good stuff here. Definitely worth bookmarking for revisiting. I surprise how much effort you put to create such a excellent informative website.
I haven?¦t checked in here for some time as I thought it was getting boring, but the last few posts are good quality so I guess I will add you back to my daily bloglist. You deserve it my friend 🙂
I have been exploring for a little for any high-quality articles or blog posts on this sort of area . Exploring in Yahoo I at last stumbled upon this web site. Reading this information So i am happy to convey that I have an incredibly good uncanny feeling I discovered just what I needed. I most certainly will make certain to don’t forget this site and give it a glance regularly.
I went over this web site and I believe you have a lot of fantastic information, bookmarked (:.
I?¦m no longer sure the place you’re getting your info, however good topic. I needs to spend a while finding out much more or working out more. Thanks for excellent info I was on the lookout for this info for my mission.
I am not really superb with English but I come up this real leisurely to interpret.
very nice put up, i certainly love this website, keep on it
Howdy! I know this is somewhat off topic but I was wondering if you knew where I could locate a captcha plugin for my comment form? I’m using the same blog platform as yours and I’m having problems finding one? Thanks a lot!
It’s going to be ending of mine day, however before ending I am
reading this wonderful piece of writing to improve my knowledge.
When I initially commented I clicked the -Notify me when new feedback are added- checkbox and now every time a remark is added I get four emails with the identical comment. Is there any way you can take away me from that service? Thanks!
I would like to thnkx for the efforts you’ve put in writing this blog. I am hoping the same high-grade web site post from you in the upcoming also. Actually your creative writing skills has encouraged me to get my own site now. Actually the blogging is spreading its wings quickly. Your write up is a great example of it.
I got good info from your blog
Howdy! This article couldn’t be written much better!
Reading through this post reminds me of my previous roommate!
He continually kept talking about this. I will forward this article to him.
Fairly certain he will have a great read. I appreciate you for sharing!
Merely wanna say that this is extremely helpful, Thanks for taking your time to write this.
Excellent read, I just passed this onto a friend who was doing some research on that. And he just bought me lunch since I found it for him smile Therefore let me rephrase that: Thank you for lunch! “Curiosity will conquer fear even more than bravery will.” by James Stephens.
Wow, wonderful weblog format! How lengthy have you ever been blogging for? you make running a blog glance easy. The entire glance of your web site is fantastic, let alone the content!
Excellent post however I was wanting to know if you could write a litte more on this topic? I’d be very thankful if you could elaborate a little bit more. Thank you!
Hello very cool site!! Man .. Excellent .. Superb .. I’ll bookmark your web site and take the feeds additionally…I’m satisfied to seek out a lot of helpful information right here in the post, we want work out extra strategies on this regard, thanks for sharing.
Hey very nice web site!! Man .. Beautiful .. Superb .. I’ll bookmark your site and take the feeds additionally?KI’m satisfied to search out numerous useful info here in the post, we need work out extra strategies on this regard, thanks for sharing. . . . . .
Your style is so unique compared to many other people. Thank you for publishing when you have the opportunity,Guess I will just make this bookmarked.2
Hi there just wanted to give you a quick heads up. The text in your content seem to be running off the screen in Ie. I’m not sure if this is a format issue or something to do with web browser compatibility but I figured I’d post to let you know. The design and style look great though! Hope you get the issue resolved soon. Thanks
Very descriptive post, I enjoyed that bit. Will there be a part 2?
fantastic points altogether, you just gained a new reader. What would you suggest about your post that you made some days ago? Any positive?
Hi! This is my first comment here so I just wanted to give a quick shout out and tell you I really enjoy reading through your blog posts. Can you suggest any other blogs/websites/forums that deal with the same topics? Thank you!
Super-Duper website! I am loving it!! Will come back again. I am bookmarking your feeds also
I’m not sure why but this web site is loading very slow for me. Is anyone else having this problem or is it a problem on my end? I’ll check back later and see if the problem still exists.
You really make it seem really easy along with your presentation but I in finding this matter to be really something which I believe I’d never understand. It kind of feels too complex and extremely extensive for me. I’m looking forward for your next put up, I¦ll try to get the grasp of it!
I have recently started a web site, the info you provide on this website has helped me greatly. Thank you for all of your time & work.
Some genuinely nice and useful info on this internet site, besides I think the design holds great features.
Hello, you used to write magnificent, but the last few posts have been kinda boring… I miss your tremendous writings. Past several posts are just a bit out of track! come on!
Perfect work you have done, this website is really cool with great information.
Excellent post. I was checking constantly this blog and I’m impressed! Very helpful information specially the last part 🙂 I care for such info much. I was seeking this certain information for a very long time. Thank you and best of luck.
Valuable info. Lucky me I discovered your site by chance, and I am shocked why this twist of fate did not took place earlier! I bookmarked it.
I’m very happy to read this. This is the type of manual that needs to be given and not the accidental misinformation that is at the other blogs. Appreciate your sharing this greatest doc.
Spot on with this write-up, I truly think this web site needs rather more consideration. I’ll most likely be again to read rather more, thanks for that info.
Enjoyed looking through this, very good stuff, thanks. “The fox knows many things, but the hedgehog knows one big thing.” by Archilocus.
Great article and right to the point. I don’t know if this is really the best place to ask but do you guys have any thoughts on where to hire some professional writers? Thanks in advance 🙂
I have learn some just right stuff here. Certainly value bookmarking for revisiting. I surprise how so much attempt you place to make such a wonderful informative site.
I really like your blog.. very nice colors & theme. Did you design this website yourself or did you hire someone to do it for you? Plz respond as I’m looking to design my own blog and would like to find out where u got this from. thanks
whoah this weblog is wonderful i love studying your articles. Keep up the great paintings! You understand, lots of individuals are looking around for this info, you can aid them greatly.
When I originally commented I clicked the -Notify me when new comments are added- checkbox and now each time a comment is added I get four emails with the same comment. Is there any way you can remove me from that service? Thanks!
I like this website because so much useful material on here : D.
Thanks for your own efforts on this web page. Kate delights in doing investigation and it is simple to grasp why. We learn all of the lively manner you convey priceless guides by means of your web site and inspire response from visitors on this article then our favorite child is actually becoming educated a whole lot. Enjoy the remaining portion of the year. You have been conducting a really great job.
Hello.This post was extremely motivating, especially because I was browsing for thoughts on this topic last Saturday.
It is truly a nice and helpful piece of info. I am happy that you shared this helpful info with us. Please keep us informed like this. Thank you for sharing.
I like this site its a master peace ! Glad I detected this on google .
Hello my friend! I want to say that this post is amazing, nice written and come with almost all significant infos. I¦d like to peer more posts like this .
Only wanna input on few general things, The website design and style is perfect, the subject matter is very fantastic : D.
As I web-site possessor I believe the content material here is rattling great , appreciate it for your hard work. You should keep it up forever! Good Luck.
Great web site. Lots of useful info here. I’m sending it to some friends ans also sharing in delicious. And obviously, thanks for your sweat!
Hi, I think your site might be having browser compatibility issues. When I look at your website in Safari, it looks fine but when opening in Internet Explorer, it has some overlapping. I just wanted to give you a quick heads up! Other then that, fantastic blog!
I really value your work, Great post.
I really appreciate this post. I’ve been looking everywhere for this! Thank goodness I found it on Bing. You have made my day! Thanks again
I’m now not sure where you are getting your information, however good topic. I needs to spend some time studying much more or working out more. Thank you for excellent info I used to be searching for this information for my mission.
Outstanding post, you have pointed out some good details , I as well conceive this s a very fantastic website.
I was recommended this blog by my cousin. I am not sure whether this post is written by him as nobody else know such detailed about my problem. You are incredible! Thanks!
I keep listening to the news update speak about getting free online grant applications so I have been looking around for the best site to get one. Could you tell me please, where could i acquire some?
Enjoyed examining this, very good stuff, thanks.
I have been reading out some of your articles and i must say clever stuff. I will definitely bookmark your website.
Wow! Thank you! I continually wanted to write on my site something like that. Can I include a fragment of your post to my blog?
After study a few of the blog posts in your website now, and I truly like your means of blogging. I bookmarked it to my bookmark website record and shall be checking again soon. Pls check out my website as nicely and let me know what you think.
There is noticeably a bundle to learn about this. I assume you made sure good factors in options also.
I enjoy what you guys are usually up too. This type of clever work and reporting! Keep up the awesome works guys I’ve included you guys to my personal blogroll.
Hi there, I found your website via Google while searching for a related topic, your site came up, it looks good. I’ve bookmarked it in my google bookmarks.
What’s Happening i am new to this, I stumbled upon this I have found It absolutely helpful and it has helped me out loads. I hope to contribute & assist other users like its aided me. Good job.
This is very interesting, You’re a very skilled blogger. I have joined your feed and look forward to seeking more of your magnificent post. Also, I’ve shared your web site in my social networks!
Exceptional post however , I was wondering if you could write a litte more on this topic? I’d be very grateful if you could elaborate a little bit further. Cheers!
Good day! Do you use Twitter? I’d like to follow you if that would be okay. I’m undoubtedly enjoying your blog and look forward to new posts.
Perfect piece of work you have done, this website is really cool with superb info .
I must show some appreciation to this writer just for bailing me out of this problem. After looking out throughout the internet and finding advice which are not powerful, I thought my life was over. Being alive without the answers to the difficulties you have sorted out as a result of the article content is a crucial case, as well as ones which could have adversely damaged my career if I hadn’t noticed your web site. Your personal knowledge and kindness in playing with all the stuff was vital. I am not sure what I would have done if I had not encountered such a solution like this. I’m able to at this time look forward to my future. Thanks for your time very much for this high quality and result oriented help. I will not think twice to propose the sites to anybody who needs guide about this problem.
Very interesting information!Perfect just what I was looking for!
Hi! Do you know if they make any plugins to protect against hackers? I’m kinda paranoid about losing everything I’ve worked hard on. Any suggestions?
Thanx for the effort, keep up the good work Great work, I am going to start a small Blog Engine course work using your site I hope you enjoy blogging with the popular BlogEngine.net.Thethoughts you express are really awesome. Hope you will right some more posts.
Its such as you learn my thoughts! You seem to grasp a lot about this, like you wrote the e-book in it or something. I believe that you just could do with a few p.c. to drive the message house a little bit, but other than that, this is wonderful blog. A fantastic read. I’ll definitely be back.
naturally like your website but you need to test the spelling on several of your posts. A number of them are rife with spelling problems and I to find it very bothersome to inform the reality on the other hand I¦ll definitely come again again.
Thank you for sharing with us, I conceive this website really stands out : D.
The next time I read a blog, I hope that it doesnt disappoint me as much as this one. I mean, I know it was my choice to read, but I actually thought youd have something interesting to say. All I hear is a bunch of whining about something that you could fix if you werent too busy looking for attention.
This really answered my drawback, thank you!
The crux of your writing whilst appearing agreeable initially, did not sit very well with me after some time. Somewhere within the sentences you were able to make me a believer unfortunately just for a very short while. I still have a problem with your jumps in assumptions and you might do nicely to fill in those breaks. In the event that you can accomplish that, I will surely be impressed.
Absolutely indited subject matter, thankyou for entropy.
Fantastic website. Plenty of useful information here. I am sending it to several friends ans also sharing in delicious. And naturally, thanks for your sweat!
The next time I read a blog, I hope that it doesnt disappoint me as much as this one. I mean, I know it was my choice to read, but I actually thought youd have something interesting to say. All I hear is a bunch of whining about something that you could fix if you werent too busy looking for attention.
It?¦s really a nice and useful piece of information. I?¦m happy that you simply shared this helpful information with us. Please keep us informed like this. Thanks for sharing.
Yesterday, while I was at work, my sister stole my iphone and tested to see if it can survive a 40 foot drop, just so she can be a youtube sensation. My iPad is now broken and she has 83 views. I know this is totally off topic but I had to share it with someone!
The next time I read a blog, I hope that it doesnt disappoint me as much as this one. I mean, I know it was my choice to read, but I actually thought youd have something interesting to say. All I hear is a bunch of whining about something that you could fix if you werent too busy looking for attention.
I have read a few just right stuff here. Definitely value bookmarking for revisiting. I wonder how a lot attempt you put to create one of these magnificent informative site.
I just couldn’t depart your website prior to suggesting that I actually enjoyed the standard information a person provide for your visitors? Is gonna be back often in order to check up on new posts
Its such as you learn my mind! You appear to understand so much about this, like you wrote the ebook in it or something. I feel that you just can do with some percent to drive the message home a bit, however other than that, this is wonderful blog. A great read. I will certainly be back.
WONDERFUL Post.thanks for share..more wait .. …
You got a very excellent website, Gladiola I discovered it through yahoo.
Have you ever considered creating an e-book or guest authoring on other websites? I have a blog based on the same information you discuss and would really like to have you share some stories/information. I know my viewers would enjoy your work. If you’re even remotely interested, feel free to send me an e mail.
Once I originally commented I clicked the -Notify me when new feedback are added- checkbox and now each time a comment is added I get 4 emails with the same comment. Is there any means you can remove me from that service? Thanks!
Great work! This is the type of information that should be shared around the web. Shame on Google for not positioning this post higher! Come on over and visit my web site . Thanks =)
Hi! Do you know if they make any plugins to safeguard against hackers? I’m kinda paranoid about losing everything I’ve worked hard on. Any suggestions?
Enjoyed reading through this, very good stuff, regards. “Management is nothing more than motivating other people.” by Lee Iacocca.
Generally I don’t read article on blogs, but I would like to say that this write-up very forced me to try and do it! Your writing style has been amazed me. Thanks, very nice post.
Good day I am so excited I found your web site, I really found you by accident, while I was browsing on Aol for something else, Anyhow I am here now and would just like to say many thanks for a fantastic post and a all round thrilling blog (I also love the theme/design), I don’t have time to read it all at the moment but I have book-marked it and also added in your RSS feeds, so when I have time I will be back to read more, Please do keep up the awesome job.
I always was concerned in this topic and still am, thankyou for putting up.
you are truly a just right webmaster. The web site loading speed is amazing. It sort of feels that you’re doing any unique trick. Moreover, The contents are masterpiece. you’ve performed a excellent process on this subject!
I don’t ordinarily comment but I gotta tell appreciate it for the post on this amazing one : D.
I would like to thank you for the efforts you’ve put in writing this web site. I’m hoping the same high-grade website post from you in the upcoming as well. Actually your creative writing abilities has encouraged me to get my own website now. Actually the blogging is spreading its wings fast. Your write up is a good example of it.
What i do not realize is actually how you’re not really much more well-liked than you may be now. You’re very intelligent. You realize therefore significantly relating to this subject, made me personally consider it from numerous varied angles. Its like men and women aren’t fascinated unless it is one thing to accomplish with Lady gaga! Your own stuffs nice. Always maintain it up!
I really enjoy looking through on this internet site, it holds wonderful articles.
I like the valuable information you supply for your articles. I’ll bookmark your blog and take a look at once more right here frequently. I’m quite certain I’ll be told many new stuff proper here! Good luck for the following!
obviously like your website but you have to check the spelling on several of your posts. Many of them are rife with spelling problems and I find it very troublesome to tell the truth nevertheless I’ll surely come back again.
Rattling great info can be found on web site. “An executive is a person who always decides sometimes he decides correctly, but he always decides.” by John H. Patterson.
I got what you mean ,saved to fav, very nice internet site.
I genuinely enjoy examining on this web site, it holds good content. “Something unpredictable but in the end it’s right, I hope you have the time of your life.” by Greenday.
Hey There. I found your blog using msn. This is a really well written article. I’ll be sure to bookmark it and come back to read more of your useful information. Thanks for the post. I will definitely return.
What i do not understood is in truth how you’re now not really much more smartly-favored than you may be now. You’re so intelligent. You already know thus significantly when it comes to this subject, produced me for my part believe it from so many various angles. Its like women and men are not interested unless it is one thing to do with Woman gaga! Your individual stuffs nice. All the time maintain it up!
Hiya, I am really glad I have found this info. Today bloggers publish only about gossips and web and this is actually annoying. A good web site with exciting content, that is what I need. Thank you for keeping this web-site, I will be visiting it. Do you do newsletters? Can not find it.
I simply wanted to thank you very much again. I am not sure the things I would’ve taken care of in the absence of the actual solutions discussed by you regarding such topic. Previously it was the hard circumstance in my position, but considering a specialised approach you dealt with it forced me to weep with gladness. I’m thankful for your help as well as pray you realize what a powerful job that you’re providing training other individuals all through your blog post. More than likely you’ve never met all of us.
Very interesting information!Perfect just what I was looking for! “Justice delayed is justice denied.” by William Gladstone.
Awsome post and straight to the point. I don’t know if this is in fact the best place to ask but do you people have any thoughts on where to employ some professional writers? Thank you 🙂
It’s exhausting to find knowledgeable people on this matter, but you sound like you realize what you’re talking about! Thanks
obviously like your website however you need to check the spelling on several of your posts. Several of them are rife with spelling issues and I to find it very bothersome to tell the truth then again I’ll certainly come back again.
I’ve recently started a website, the information you offer on this web site has helped me greatly. Thank you for all of your time & work.
Thanks a bunch for sharing this with all of us you actually know what you are talking about! Bookmarked. Please also visit my website =). We could have a link exchange agreement between us!
Merely a smiling visitant here to share the love (:, btw outstanding layout.
Everyone loves what you guys tend to be up too. This sort of clever work and coverage! Keep up the superb works guys I’ve incorporated you guys to my blogroll.
Everything is very open and very clear explanation of issues. was truly information. Your website is very useful. Thanks for sharing.
A lot of thanks for your own efforts on this site. Debby really loves doing internet research and it’s obvious why. I notice all concerning the dynamic manner you provide both interesting and useful strategies via the blog and therefore invigorate participation from other people on the point plus our favorite princess is really becoming educated a whole lot. Have fun with the remaining portion of the year. You’re conducting a tremendous job.
Thanks for the information, Very useful.
Thank you for sharing with us, I conceive this website truly stands out : D.
Thanks for some other informative blog. Where else may just I am getting that type of information written in such a perfect approach? I’ve a venture that I am just now working on, and I’ve been at the glance out for such info.
Paper.io is a snaked-inspired multiplayer gam
I gotta favorite this web site it seems very beneficial very useful
Hiya, I am really glad I have found this information. Nowadays bloggers publish just about gossips and internet and this is really irritating. A good blog with interesting content, that is what I need. Thanks for keeping this site, I will be visiting it. Do you do newsletters? Cant find it.
Hey there, You’ve done a great job. I will definitely digg it and personally suggest to my friends. I’m sure they will be benefited from this web site.
Good write-up, I am regular visitor of one’s web site, maintain up the excellent operate, and It’s going to be a regular visitor for a long time.
Howdy! I simply would like to give an enormous thumbs up for the great data you might have right here on this post. I shall be coming back to your weblog for more soon.
Saved as a favorite, I really like your blog!
Good – I should certainly pronounce, impressed with your site. I had no trouble navigating through all tabs and related information ended up being truly simple to do to access. I recently found what I hoped for before you know it at all. Quite unusual. Is likely to appreciate it for those who add forums or something, website theme . a tones way for your client to communicate. Excellent task.
Perfect piece of work you have done, this internet site is really cool with fantastic information.
I?¦m no longer positive the place you are getting your info, however good topic. I must spend some time studying much more or understanding more. Thank you for excellent information I used to be searching for this info for my mission.
Excellent post. I was checking continuously this blog and I am impressed! Extremely helpful info particularly the last part 🙂 I care for such information a lot. I was looking for this particular information for a long time. Thank you and best of luck.
Good write-up, I am regular visitor of one’s site, maintain up the excellent operate, and It is going to be a regular visitor for a long time.
Hackdra is a cyber security company that can provide smart contract auditing, pen-testing, bug bounty, blockchain, web3, DeFi, NFT, and ARM services with AI.
Please let me know if you’re looking for a article author for your site. You have some really great articles and I believe I would be a good asset. If you ever want to take some of the load off, I’d absolutely love to write some material for your blog in exchange for a link back to mine. Please send me an e-mail if interested. Many thanks!
I am glad to be one of several visitants on this great web site (:, regards for posting.
I do not even know how I ended up here, but I thought this post was great. I don’t know who you are but certainly you’re going to a famous blogger if you aren’t already 😉 Cheers!
Some really select content on this web site, saved to fav.
Definitely consider that that you said. Your favorite reason appeared to be on the web the simplest factor to consider of. I say to you, I certainly get annoyed while people think about concerns that they just do not recognize about. You controlled to hit the nail upon the highest and defined out the whole thing without having side effect , other folks can take a signal. Will probably be again to get more. Thanks
whoah this blog is great i love studying your articles. Keep up the great paintings! You realize, many people are looking around for this info, you can aid them greatly.
Very nice post. I just stumbled upon your blog and wanted to say that I’ve really enjoyed browsing your blog posts. After all I’ll be subscribing to your feed and I hope you write again very soon!
I have read some excellent stuff here. Certainly worth bookmarking for revisiting. I wonder how much effort you put to make such a magnificent informative web site.
I like what you guys are up too. Such clever work and reporting! Carry on the superb works guys I’ve incorporated you guys to my blogroll. I think it will improve the value of my website :).
Hello very cool blog!! Man .. Beautiful .. Superb .. I’ll bookmark your site and take the feeds additionally?KI’m happy to seek out numerous helpful info here within the post, we need develop more techniques on this regard, thank you for sharing. . . . . .
Thanks , I’ve recently been searching for info about this topic for ages and yours is the best I’ve discovered so far. But, what about the conclusion? Are you sure about the source?
I like your writing style genuinely enjoying this site.
Heya are using WordPress for your blog platform? I’m new to the blog world but I’m trying to get started and set up my own. Do you need any coding expertise to make your own blog? Any help would be greatly appreciated!
Thank you for the sensible critique. Me & my neighbor were just preparing to do a little research about this. We got a grab a book from our local library but I think I learned more clear from this post. I am very glad to see such wonderful info being shared freely out there.
I’ve been absent for some time, but now I remember why I used to love this website. Thanks , I will try and check back more frequently. How frequently you update your website?
Magnificent items from you, man. I’ve take into accout your stuff previous to and you’re simply too wonderful. I really like what you’ve bought right here, really like what you are stating and the way through which you say it. You’re making it entertaining and you still take care of to stay it wise. I cant wait to learn much more from you. This is really a wonderful web site.
Thanks a lot for giving everyone remarkably marvellous possiblity to discover important secrets from this website. It can be very kind and jam-packed with a good time for me personally and my office co-workers to visit your site really thrice a week to read the latest guides you have got. Of course, I’m so certainly astounded concerning the brilliant things served by you. Selected 2 tips in this posting are without a doubt the best we have ever had.
I really like your writing style, superb information, thankyou for putting up : D.
Hi, I think your site might be having browser compatibility issues. When I look at your website in Safari, it looks fine but when opening in Internet Explorer, it has some overlapping. I just wanted to give you a quick heads up! Other then that, fantastic blog!
F*ckin¦ remarkable things here. I am very glad to see your article. Thanks a lot and i’m taking a look forward to contact you. Will you kindly drop me a mail?
You are my breathing in, I possess few blogs and infrequently run out from brand :). “Truth springs from argument amongst friends.” by David Hume.
Wonderful blog you have here but I was wondering if you knew of any user discussion forums that cover the same topics discussed here? I’d really like to be a part of online community where I can get opinions from other knowledgeable individuals that share the same interest. If you have any recommendations, please let me know. Many thanks!
Real clear site, appreciate it for this post.
Thank you for another informative site. The place else may I get that kind of info written in such an ideal method? I’ve a project that I’m simply now working on, and I have been on the look out for such information.
After all, what a great site and informative posts, I will upload inbound link – bookmark this web site? Regards, Reader.
It is in point of fact a nice and helpful piece of info. I am happy that you shared this helpful info with us. Please keep us informed like this. Thank you for sharing.
It’s really a nice and useful piece of info. I am satisfied that you shared this useful info with us. Please stay us informed like this. Thanks for sharing.
Very interesting subject, regards for putting up.
Wonderful work! This is the type of info that should be shared around the internet. Shame on Google for not positioning this post higher! Come on over and visit my site . Thanks =)
I have recently started a website, the info you offer on this web site has helped me tremendously. Thank you for all of your time & work. “The achievements of an organization are the results of the combined effort of each individual.” by Vince Lombardi.
Some really interesting details you have written.Assisted me a lot, just what I was searching for : D.
Pretty! This was a really wonderful post. Thank you for your provided information.
I really like your writing style, superb information, appreciate it for putting up :D. “In every affair consider what precedes and what follows, and then undertake it.” by Epictetus.
That is very fascinating, You’re an excessively professional blogger. I’ve joined your feed and sit up for in quest of extra of your great post. Additionally, I have shared your site in my social networks!
It¦s in point of fact a great and helpful piece of info. I am satisfied that you just shared this helpful info with us. Please stay us up to date like this. Thanks for sharing.
Hi there are using WordPress for your blog platform? I’m new to the blog world but I’m trying to get started and create my own. Do you need any coding expertise to make your own blog? Any help would be really appreciated!
Simply a smiling visitor here to share the love (:, btw outstanding design and style. “Make the most of your regrets… . To regret deeply is to live afresh.” by Henry David Thoreau.
Wow that was odd. I just wrote an really long comment but after I clicked submit my comment didn’t appear. Grrrr… well I’m not writing all that over again. Anyway, just wanted to say fantastic blog!
You made some first rate factors there. I regarded on the internet for the problem and found most people will associate with along with your website.
It’s hard to find knowledgeable people on this topic, but you sound like you know what you’re talking about! Thanks
I gotta favorite this internet site it seems invaluable handy
Thank you for another wonderful post. Where else could anyone get that kind of info in such an ideal means of writing? I have a presentation next week, and I’m on the look for such info.
Awsome post and straight to the point. I don’t know if this is actually the best place to ask but do you people have any thoughts on where to hire some professional writers? Thx 🙂
Thanx for the effort, keep up the good work Great work, I am going to start a small Blog Engine course work using your site I hope you enjoy blogging with the popular BlogEngine.net.Thethoughts you express are really awesome. Hope you will right some more posts.
It’s really a nice and useful piece of info. I am happy that you simply shared this helpful info with us. Please keep us informed like this. Thanks for sharing.
Hi! Do you know if they make any plugins to assist with SEO? I’m trying to get my blog to rank for some targeted keywords but I’m not seeing very good results. If you know of any please share. Appreciate it!
As a Newbie, I am constantly browsing online for articles that can aid me. Thank you
I like what you guys are up also. Such smart work and reporting! Keep up the superb works guys I¦ve incorporated you guys to my blogroll. I think it will improve the value of my web site 🙂
Hmm it seems like your site ate my first comment (it was extremely long) so I guess I’ll just sum it up what I had written and say, I’m thoroughly enjoying your blog. I as well am an aspiring blog writer but I’m still new to the whole thing. Do you have any recommendations for inexperienced blog writers? I’d really appreciate it.
You can definitely see your skills in the work you write. The world hopes for even more passionate writers like you who aren’t afraid to say how they believe. Always go after your heart.
I was looking at some of your blog posts on this website and I believe this website is rattling informative! Retain posting.
Its great as your other content : D, appreciate it for posting. “Slump I ain’t in no slump… I just ain’t hitting.” by Yogi Berra.
I was curious if you ever thought of changing the page layout of your website? Its very well written; I love what youve got to say. But maybe you could a little more in the way of content so people could connect with it better. Youve got an awful lot of text for only having one or two pictures. Maybe you could space it out better?
Thank you for another wonderful post. The place else may anyone get that kind of info in such an ideal approach of writing? I’ve a presentation next week, and I am at the search for such information.
I love your blog.. very nice colors & theme. Did you create this website yourself or did you hire someone to do it for you? Plz respond as I’m looking to create my own blog and would like to know where u got this from. thank you
Your place is valueble for me. Thanks!…
I simply could not depart your website prior to suggesting that I really loved the usual information an individual provide for your guests? Is going to be back continuously to check out new posts.
Very interesting information!Perfect just what I was looking for!
What i do not realize is in fact how you’re not actually much more neatly-preferred than you may be now. You’re so intelligent. You recognize therefore considerably relating to this subject, made me in my view believe it from numerous various angles. Its like men and women don’t seem to be fascinated except it¦s one thing to do with Girl gaga! Your own stuffs excellent. All the time handle it up!
Hello.This article was extremely fascinating, particularly since I was searching for thoughts on this issue last Wednesday.
Thanks for sharing superb informations. Your web-site is very cool. I am impressed by the details that you have on this web site. It reveals how nicely you perceive this subject. Bookmarked this website page, will come back for extra articles. You, my pal, ROCK! I found simply the information I already searched all over the place and just could not come across. What a great web-site.
I have fun with, lead to I found exactly what I used to be taking a look for. You have ended my four day long hunt! God Bless you man. Have a great day. Bye
Simply wanna remark on few general things, The website style and design is perfect, the subject material is really fantastic : D.
Hey very nice website!! Man .. Beautiful .. Amazing .. I will bookmark your site and take the feeds also…I am happy to find a lot of useful information here in the post, we need work out more techniques in this regard, thanks for sharing. . . . . .
Nice blog here! Also your website loads up very fast! What web host are you using? Can I get your affiliate link to your host? I wish my site loaded up as quickly as yours lol
Hi my friend! I want to say that this post is awesome, nice written and include almost all vital infos. I would like to see more posts like this.
I’m impressed, I must say. Actually not often do I encounter a weblog that’s both educative and entertaining, and let me tell you, you have got hit the nail on the head. Your concept is excellent; the problem is one thing that not sufficient people are talking intelligently about. I’m very pleased that I stumbled throughout this in my search for something regarding this.
When I initially commented I clicked the “Notify me when new comments are added” checkbox and now each time a comment is added I get several emails with the same comment. Is there any way you can remove me from that service? Appreciate it!
Hackdra is a cyber security company that can provide smart contract auditing, pen-testing, bug bounty, blockchain, web3, DeFi, NFT, and ARM services with AI.
I’d have to check with you here. Which isn’t something I normally do! I get pleasure from studying a post that may make people think. Also, thanks for permitting me to comment!
I am often to blogging and i really appreciate your content. The article has really peaks my interest. I am going to bookmark your site and keep checking for new information.
What i don’t understood is in fact how you are now not actually a lot more smartly-preferred than you might be now. You are so intelligent. You already know thus significantly relating to this topic, produced me individually imagine it from so many numerous angles. Its like women and men are not interested except it is something to accomplish with Woman gaga! Your individual stuffs great. All the time maintain it up!
I like what you guys are up too. Such intelligent work and reporting! Keep up the excellent works guys I have incorporated you guys to my blogroll. I think it’ll improve the value of my website 🙂
whoah this blog is wonderful i love reading your posts. Keep up the great work! You know, lots of people are hunting around for this information, you could help them greatly.
This design is wicked! You definitely know how to keep a reader entertained. Between your wit and your videos, I was almost moved to start my own blog (well, almost…HaHa!) Fantastic job. I really loved what you had to say, and more than that, how you presented it. Too cool!
Can I simply say what a relief to seek out someone who truly is aware of what theyre speaking about on the internet. You positively know methods to carry a difficulty to gentle and make it important. More people need to learn this and understand this aspect of the story. I cant believe youre not more well-liked since you positively have the gift.
As a Newbie, I am always searching online for articles that can aid me. Thank you
Way cool, some valid points! I appreciate you making this article available, the rest of the site is also high quality. Have a fun.
Whats up very nice web site!! Man .. Beautiful .. Amazing .. I’ll bookmark your site and take the feeds also…I am satisfied to seek out so many helpful information here within the submit, we’d like develop extra strategies in this regard, thank you for sharing. . . . . .
As I web site possessor I believe the content material here is rattling magnificent , appreciate it for your hard work. You should keep it up forever! Good Luck.
Hackdra has revolutionized the web3 with its Free cyber security trainings, ethical hacking courses and artificial intelligence courses.
What i don’t understood is if truth be told how you are not really much more well-favored than you may be right now. You are so intelligent. You recognize thus considerably in terms of this matter, produced me for my part consider it from a lot of numerous angles. Its like women and men don’t seem to be fascinated until it is one thing to accomplish with Lady gaga! Your own stuffs outstanding. At all times maintain it up!
You made some clear points there. I did a search on the subject matter and found most guys will approve with your website.
Saved as a favorite, I really like your blog!
Its like you read my mind! You appear to know so much about this, like you wrote the book in it or something. I think that you could do with a few pics to drive the message home a bit, but instead of that, this is great blog. A great read. I’ll definitely be back.
When I initially commented I clicked the “Notify me when new comments are added” checkbox and now each time a comment is added I get several e-mails with the same comment. Is there any way you can remove people from that service? Thanks!
Superb post however I was wondering if you could write a litte more on this topic? I’d be very thankful if you could elaborate a little bit more. Thank you!
I used to be very happy to seek out this net-site.I wished to thanks to your time for this glorious learn!! I positively having fun with each little bit of it and I have you bookmarked to take a look at new stuff you blog post.
I’ve read a few good stuff here. Certainly worth bookmarking for revisiting. I surprise how much effort you put to make such a magnificent informative website.
I have been absent for some time, but now I remember why I used to love this web site. Thank you, I will try and check back more often. How frequently you update your web site?
whoah this blog is wonderful i love reading your posts. Keep up the good work! You know, a lot of people are searching around for this info, you can aid them greatly.
Great V I should definitely pronounce, impressed with your web site. I had no trouble navigating through all the tabs as well as related info ended up being truly simple to do to access. I recently found what I hoped for before you know it at all. Quite unusual. Is likely to appreciate it for those who add forums or anything, website theme . a tones way for your customer to communicate. Nice task..
Enjoyed reading this, very good stuff, appreciate it.
Hey There. I discovered your weblog the usage of msn. That is a very smartly written article. I’ll be sure to bookmark it and return to learn more of your helpful information. Thank you for the post. I will definitely comeback.
This actually answered my problem, thank you!
An interesting dialogue is price comment. I think that you must write extra on this topic, it might not be a taboo subject however generally people are not sufficient to speak on such topics. To the next. Cheers
I saw a lot of website but I believe this one has got something special in it in it
You really make it appear really easy together with your presentation but I to find this matter to be actually one thing that I believe I might by no means understand. It seems too complicated and very huge for me. I’m taking a look forward in your next submit, I’ll try to get the hang of it!
Enjoyed examining this, very good stuff, thankyou. “It is well to remember that the entire universe, with one trifling exception, is composed of others.” by John Andrew Holmes.
Respect to post author, some wonderful information .
I¦ll right away snatch your rss as I can not find your email subscription hyperlink or newsletter service. Do you have any? Please permit me know in order that I may just subscribe. Thanks.
Thank you a lot for providing individuals with an extraordinarily breathtaking chance to read from this website. It can be so brilliant and also full of amusement for me and my office fellow workers to visit your web site at least thrice per week to see the fresh issues you have. Not to mention, I’m just usually amazed for the amazing tips and hints served by you. Selected 3 points on this page are ultimately the most impressive we have all ever had.
How to use power-ups in Yohoho io unblocked game
We are a group of volunteers and starting a new scheme in our community. Your website offered us with valuable info to work on. You have done a formidable job and our entire community will be thankful to you.
You completed various good points there. I did a search on the issue and found mainly folks will go along with with your blog.
Hey just wanted to give you a quick heads up. The words in your post seem
to be running off the screen in Firefox. I’m not sure if
this is a formatting issue or something to do with internet browser compatibility but I thought I’d post to let you
know. The design and style look great though! Hope you
get the problem resolved soon. Cheers
Chirurgiens esthétique Tunisie
[…]please take a look at the web sites we follow, such as this a single, as it represents our picks from the web[…]
Chirurgie Tunisie
[…]although internet sites we backlink to beneath are considerably not associated to ours, we feel they are truly worth a go through, so have a look[…]
Chirurgie Tunisie
[…]very couple of internet sites that occur to become in depth beneath, from our point of view are undoubtedly well worth checking out[…]
I went over this site and I believe you have a lot of fantastic information, bookmarked (:.
Yay google is my king aided me to find this great site! .
I’m not that much of a internet reader to be honest but your blogs really nice, keep it up! I’ll go ahead and bookmark your site to come back in the future. All the best
It¦s really a nice and helpful piece of info. I¦m glad that you simply shared this helpful info with us. Please keep us up to date like this. Thank you for sharing.
Wonderful web site. Plenty of helpful information here. I am sending it to a few buddies ans also sharing in delicious. And obviously, thanks to your sweat!
National Chi Nan University
[…]although internet websites we backlink to below are considerably not related to ours, we really feel they may be really worth a go via, so possess a look[…]
Pretty component to content. I simply stumbled upon your blog and in accession capital to claim that I get actually enjoyed account your blog posts. Any way I’ll be subscribing for your augment and even I success you access consistently rapidly.
I simply wished to say thanks once more. I am not sure what I could possibly have implemented without those opinions provided by you relating to such question. Entirely was the daunting setting in my opinion, however , finding out this expert approach you dealt with that forced me to weep with gladness. I am just thankful for this work and then wish you recognize what a powerful job your are doing instructing the others through your blog post. I’m certain you have never encountered all of us.
great put up, very informative. I’m wondering why the opposite experts of this sector don’t realize this. You should continue your writing. I’m confident, you have a great readers’ base already!
Have you ever thought about writing an ebook or guest authoring on other websites? I have a blog based upon on the same ideas you discuss and would love to have you share some stories/information. I know my readers would enjoy your work. If you are even remotely interested, feel free to send me an email.
Loving the info on this website , you have done great job on the articles.
Thanks for ones marvelous posting! I actually enjoyed reading it, you can be a great author.I will remember to bookmark your blog and will come back later in life. I want to encourage you to continue your great job, have a nice afternoon!
Hi there, You’ve done an incredible job. I’ll certainly digg it and personally recommend to my friends. I’m sure they’ll be benefited from this website.
I saw a lot of website but I conceive this one contains something special in it in it
Hello! Someone in my Myspace group shared this site with us so I came to check it out. I’m definitely enjoying the information. I’m bookmarking and will be tweeting this to my followers! Excellent blog and brilliant design and style.
Just a smiling visitor here to share the love (:, btw great style and design. “Justice is always violent to the party offending, for every man is innocent in his own eyes.” by Daniel Defoe.
Rattling fantastic visual appeal on this website , I’d rate it 10 10.
You completed a few nice points there. I did a search on the subject matter and found nearly all folks will go along with with your blog.
Hey there! I could have sworn I’ve been to this website before but after reading through some of the post I realized it’s new to me. Anyhow, I’m definitely delighted I found it and I’ll be book-marking and checking back frequently!
Woh I enjoy your posts, bookmarked! .
Very interesting info!Perfect just what I was searching for!
Good V I should certainly pronounce, impressed with your web site. I had no trouble navigating through all the tabs and related info ended up being truly simple to do to access. I recently found what I hoped for before you know it at all. Reasonably unusual. Is likely to appreciate it for those who add forums or something, website theme . a tones way for your customer to communicate. Excellent task..
Wonderful beat ! I wish to apprentice while you amend your web site, how could i subscribe for a blog web site? The account helped me a acceptable deal. I had been a little bit acquainted of this your broadcast offered bright clear idea
I love your blog.. very nice colors & theme. Did you create this website yourself? Plz reply back as I’m looking to create my own blog and would like to know wheere u got this from. thanks
I conceive this internet site holds very wonderful indited articles articles.
Only a smiling visitor here to share the love (:, btw outstanding design. “Individuals may form communities, but it is institutions alone that can create a nation.” by Benjamin Disraeli.
Definitely, what a fantastic website and revealing posts, I definitely will bookmark your site.Best Regards!
You are my aspiration, I own few web logs and very sporadically run out from post :). “Actions lie louder than words.” by Carolyn Wells.
I will right away take hold of your rss as I can’t to find your email subscription hyperlink or e-newsletter service. Do you’ve any? Please allow me know so that I may subscribe. Thanks.
excellent post, very informative. I wonder why the other specialists of this sector don’t notice this. You must continue your writing. I’m sure, you’ve a huge readers’ base already!
Some truly nice and utilitarian info on this internet site, too I think the pattern has got wonderful features.
hello!,I like your writing very much! share we be in contact extra approximately your post on AOL? I require a specialist in this area to resolve my problem. May be that’s you! Having a look ahead to look you.
After examine just a few of the blog posts in your website now, and I truly like your way of blogging. I bookmarked it to my bookmark web site checklist and might be checking back soon. Pls try my site as nicely and let me know what you think.
I really like your writing style, excellent info, regards for putting up :D. “You can complain because roses have thorns, or you can rejoice because thorns have roses.” by Ziggy.
The next time I read a blog, I hope that it doesnt disappoint me as much as this one. I mean, I know it was my choice to read, but I actually thought youd have something interesting to say. All I hear is a bunch of whining about something that you could fix if you werent too busy looking for attention.
I must get across my affection for your kindness giving support to persons that actually need help with your concept. Your real dedication to getting the solution all through had been extraordinarily effective and has always permitted most people just like me to arrive at their dreams. Your entire informative hints and tips means so much to me and much more to my mates. With thanks; from each one of us.
Thank you for another wonderful post. Where else may just anybody get that type of information in such an ideal method of writing? I’ve a presentation subsequent week, and I’m on the look for such information.
I?¦ve been exploring for a bit for any high-quality articles or blog posts on this sort of space . Exploring in Yahoo I at last stumbled upon this web site. Reading this information So i am satisfied to exhibit that I have a very just right uncanny feeling I came upon just what I needed. I most unquestionably will make certain to do not omit this website and give it a look regularly.
Would you be interested by exchanging links?
I think that is among the such a lot significant info for me. And i’m glad reading your article. But want to observation on some basic things, The website taste is ideal, the articles is truly excellent : D. Good task, cheers
Good – I should definitely pronounce, impressed with your website. I had no trouble navigating through all tabs and related info ended up being truly easy to do to access. I recently found what I hoped for before you know it in the least. Reasonably unusual. Is likely to appreciate it for those who add forums or something, web site theme . a tones way for your client to communicate. Excellent task.
After all, what a great site and informative posts, I will upload inbound link – bookmark this web site? Regards, Reader.
An interesting discussion is worth comment. I think that you should write more on this topic, it might not be a taboo subject but generally people are not enough to speak on such topics. To the next. Cheers
I’m not sure why but this web site is loading incredibly slow for me. Is anyone else having this problem or is it a problem on my end? I’ll check back later and see if the problem still exists.
Wohh exactly what I was looking for, thankyou for posting.
I have been exploring for a little for any high-quality articles or blog posts on this kind of house . Exploring in Yahoo I eventually stumbled upon this website. Studying this info So i’m happy to exhibit that I’ve an incredibly excellent uncanny feeling I found out just what I needed. I so much undoubtedly will make certain to don’t put out of your mind this website and provides it a glance regularly.
You can definitely see your enthusiasm in the work you write. The world hopes for more passionate writers such as you who aren’t afraid to say how they believe. All the time follow your heart.
Thanx for the effort, keep up the good work Great work, I am going to start a small Blog Engine course work using your site I hope you enjoy blogging with the popular BlogEngine.net.Thethoughts you express are really awesome. Hope you will right some more posts.
I’d have to examine with you here. Which is not one thing I usually do! I take pleasure in reading a post that may make folks think. Additionally, thanks for permitting me to comment!
Sweet web site, super pattern, rattling clean and use pleasant.
Oh my goodness! an amazing article dude. Thank you Nonetheless I am experiencing problem with ur rss . Don’t know why Unable to subscribe to it. Is there anyone getting similar rss problem? Anyone who is aware of kindly respond. Thnkx
Somebody essentially lend a hand to make seriously posts I would state. That is the first time I frequented your web page and up to now? I surprised with the research you made to create this particular put up incredible. Great job!
Regards for helping out, good info .
I really like your blog.. very nice colors & theme. Did you create this website yourself or did you hire someone to do it for you? Plz answer back as I’m looking to design my own blog and would like to find out where u got this from. cheers
I’ve been absent for some time, but now I remember why I used to love this site. Thanks , I will try and check back more frequently. How frequently you update your web site?
you could have an amazing blog right here! would you wish to make some invite posts on my blog?
I couldn’t resist commenting
Thanks , I have just been looking for information about this topic for ages and yours is the best I have discovered till now. But, what about the bottom line? Are you sure about the source?
I truly enjoy studying on this website , it has good blog posts.
Hello, Neat post. There is a problem along with your web site in internet explorer, would test thisK IE still is the market leader and a good element of people will pass over your great writing because of this problem.
I think you have observed some very interesting points, regards for the post.
An interesting discussion is worth comment. I think that you should write more on this topic, it might not be a taboo subject but generally people are not enough to speak on such topics. To the next. Cheers
I liked as much as you will obtain performed right here. The caricature is tasteful, your authored material stylish. nonetheless, you command get bought an edginess over that you want be handing over the following. in poor health certainly come further beforehand again since exactly the same nearly a lot incessantly within case you shield this hike.
I will right away snatch your rss feed as I can’t in finding your e-mail subscription link or newsletter service. Do you’ve any? Please permit me realize in order that I may just subscribe. Thanks.
Everything is very open and very clear explanation of issues. was truly information. Your website is very useful. Thanks for sharing.
As I website owner I believe the subject matter here is rattling wonderful, appreciate it for your efforts.
Thanks for the blog post, how can I make is so that I get an alert email when you write a fresh update?
A person essentially help to make seriously posts I would state. This is the first time I frequented your website page and thus far? I amazed with the research you made to create this particular publish extraordinary. Fantastic job!
We stumbled over here coming from a different page and thought I should check things out. I like what I see so i am just following you. Look forward to looking into your web page again.
You should take part in a contest for one of the best blogs on the web. I will recommend this site!
Helpful info. Lucky me I discovered your website by accident, and I’m surprised why this twist of fate didn’t happened in advance! I bookmarked it.
Hi! I’ve been reading your site for a long time now and finally got the courage to go ahead and give you a shout out from Kingwood Tx! Just wanted to say keep up the fantastic job!
I have recently started a site, the information you offer on this web site has helped me greatly. Thanks for all of your time & work.
I am always thought about this, appreciate it for posting.
Hi, just wanted to tell you, I enjoyed this article. It was inspiring.
Keep on posting!
I was very pleased to find this web-site.I wanted to thanks for your time for this wonderful read!! I definitely enjoying every little bit of it and I have you bookmarked to check out new stuff you blog post.
You have observed very interesting points! ps nice internet site. “Every man over forty is a scoundrel.” by George Bernard Shaw.
I need to to thank you for this excellent read!! I certainly loved every bit of it.
I’ve got you book marked to look at new things
you post…
It’s actually a nice and helpful piece of info. I’m satisfied that you simply shared this useful info with us. Please keep us up to date like this. Thank you for sharing.
excellent issues altogether, you just gained a emblem new reader. What could you suggest about your submit that you simply made a few days ago? Any sure?
What i do not realize is actually how you’re not really much more well-liked than you may be now. You’re very intelligent. You realize thus considerably relating to this subject, produced me personally consider it from so many varied angles. Its like men and women aren’t fascinated unless it’s one thing to do with Lady gaga! Your own stuffs great. Always maintain it up!
Along with almost everything that seems to be building inside this specific subject material, a significant percentage of perspectives are generally somewhat stimulating. Nonetheless, I beg your pardon, but I do not give credence to your entire suggestion, all be it stimulating none the less. It looks to me that your opinions are actually not completely validated and in simple fact you are yourself not wholly confident of the point. In any event I did appreciate looking at it.
Enjoyed studying this, very good stuff, appreciate it. “A man does not die of love or his liver or even of old age he dies of being a man.” by Percival Arland Ussher.
Great post. I am facing a couple of these problems.
Yeah bookmaking this wasn’t a high risk decision outstanding post! .
Heya just wanted to give you a quick heads up and let you know a few of the pictures aren’t loading properly. I’m not sure why but I think its a linking issue. I’ve tried it in two different web browsers and both show the same outcome.
I am continually searching online for tips that can benefit me. Thank you!
You are my aspiration, I possess few blogs and occasionally run out from to brand.
Loving the information on this website , you have done great job on the posts.
It?¦s actually a great and helpful piece of information. I am happy that you shared this useful information with us. Please stay us informed like this. Thank you for sharing.
Howdy! I know this is kinda off topic nevertheless I’d figured I’d ask. Would you be interested in trading links or maybe guest authoring a blog post or vice-versa? My site addresses a lot of the same subjects as yours and I feel we could greatly benefit from each other. If you happen to be interested feel free to send me an e-mail. I look forward to hearing from you! Great blog by the way!
I believe you have remarked some very interesting details, thankyou for the post.
Good day! Do you use Twitter? I’d like to follow you if that would be okay. I’m definitely enjoying your blog and look forward to new posts.
Hello! This is my first visit to your blog! We are a group of volunteers and starting a new initiative in a community in the same niche. Your blog provided us beneficial information to work on. You have done a extraordinary job!
you are truly a excellent webmaster. The site loading speed is incredible. It seems that you are doing any unique trick. Furthermore, The contents are masterpiece. you have performed a fantastic job in this topic!
Have you ever thought about adding a little bit more than just your articles? I mean, what you say is fundamental and all. But think of if you added some great photos or videos to give your posts more, “pop”! Your content is excellent but with images and clips, this website could definitely be one of the greatest in its niche. Amazing blog!
I have been surfing online more than 3 hours as of late, yet I never found any attention-grabbing article like yours. It is lovely price sufficient for me. In my opinion, if all webmasters and bloggers made just right content material as you did, the web will be a lot more useful than ever before.
I haven’t checked in here for some time as I thought it was getting boring, but the last several posts are good quality so I guess I’ll add you back to my everyday bloglist. You deserve it my friend 🙂
F*ckin’ tremendous things here. I am very glad to see your post. Thanks a lot and i’m looking forward to contact you. Will you please drop me a e-mail?
Attractive portion of content. I simply stumbled upon your web site and in accession capital to assert that I acquire in fact loved account your blog posts. Any way I’ll be subscribing on your feeds or even I achievement you get entry to constantly rapidly.
I have recently started a website, the information you offer on this website has helped me greatly. Thanks for all of your time & work.
I?¦ve been exploring for a little bit for any high quality articles or weblog posts in this sort of area . Exploring in Yahoo I ultimately stumbled upon this website. Studying this info So i am happy to show that I’ve an incredibly excellent uncanny feeling I came upon just what I needed. I so much indisputably will make certain to don?¦t forget this website and give it a glance on a relentless basis.
I like this web blog very much so much fantastic information.
Its good as your other posts : D, thankyou for posting.
Hi , I do believe this is an excellent blog. I stumbled upon it on Yahoo , i will come back once again. Money and freedom is the best way to change, may you be rich and help other people.
You made some respectable factors there. I regarded on the internet for the issue and located most people will go together with along with your website.
Excellent read, I just passed this onto a colleague who was doing a little research on that. And he just bought me lunch since I found it for him smile So let me rephrase that: Thanks for lunch!
As I website owner I conceive the content here is really superb, thankyou for your efforts.
Great – I should definitely pronounce, impressed with your website. I had no trouble navigating through all tabs and related information ended up being truly easy to do to access. I recently found what I hoped for before you know it in the least. Reasonably unusual. Is likely to appreciate it for those who add forums or anything, site theme . a tones way for your customer to communicate. Nice task..
I just could not depart your website prior to suggesting that I really enjoyed the usual information an individual provide in your visitors? Is gonna be back incessantly to inspect new posts.
I discovered your blog site on google and check a few of your early posts. Continue to keep up the very good operate. I just additional up your RSS feed to my MSN News Reader. Seeking forward to reading more from you later on!…
Hello there, I found your site via Google while looking for a related topic, your web site came up, it looks good. I have bookmarked it in my google bookmarks.
I have been exploring for a little for any high-quality articles or weblog posts in this kind of house . Exploring in Yahoo I eventually stumbled upon this website. Studying this info So i am happy to convey that I have an incredibly good uncanny feeling I came upon just what I needed. I so much indubitably will make sure to do not omit this site and provides it a glance regularly.
Thank you, I have recently been searching for info approximately this topic for a while and yours is the best I have discovered so far. But, what concerning the bottom line? Are you positive about the source?
Hey There. I found your weblog the use of msn. That is an extremely smartly written article. I’ll make sure to bookmark it and come back to read more of your useful info. Thank you for the post. I’ll definitely return.
so much excellent information on here, : D.
I haven’t checked in here for some time as I thought it was getting boring, but the last several posts are good quality so I guess I’ll add you back to my everyday bloglist. You deserve it my friend 🙂
Howdy! Someone in my Myspace group shared this site with us so I came to give it a look. I’m definitely loving the information. I’m book-marking and will be tweeting this to my followers! Outstanding blog and excellent design and style.
great issues altogether, you just received a new reader. What would you recommend about your publish that you just made a few days ago? Any positive?
We’re a group of volunteers and starting a new scheme in our community. Your website offered us with valuable information to work on. You’ve done a formidable job and our entire community will be thankful to you.
I truly enjoy reading on this website , it has great content.
Well I sincerely liked studying it. This information provided by you is very useful for accurate planning.
I like what you guys are up also. Such intelligent work and reporting! Keep up the superb works guys I’ve incorporated you guys to my blogroll. I think it will improve the value of my site :).
Outstanding post, I conceive website owners should learn a lot from this weblog its rattling user pleasant.
Public administration
[…]just beneath, are a lot of absolutely not connected sites to ours, nevertheless, they’re certainly really worth going over[…]
I have been exploring for a bit for any high-quality articles or blog posts on this kind of area . Exploring in Yahoo I at last stumbled upon this website. Reading this info So i am happy to convey that I’ve a very good uncanny feeling I discovered just what I needed. I most certainly will make certain to do not forget this website and give it a look regularly.
In this great scheme of things you secure a B- just for effort. Where exactly you lost me personally was in the details. You know, they say, the devil is in the details… And it could not be much more correct in this article. Having said that, allow me say to you just what did give good results. Your text is actually pretty engaging and that is most likely the reason why I am taking the effort in order to opine. I do not make it a regular habit of doing that. 2nd, even though I can notice a leaps in reasoning you make, I am definitely not confident of exactly how you seem to connect your details which inturn make the final result. For the moment I will, no doubt subscribe to your issue however trust in the near future you actually connect the dots better.
You really make it seem so easy together with your presentation but I to find this matter to be really something which I feel I would by no means understand. It sort of feels too complex and very broad for me. I’m having a look forward in your next put up, I will try to get the grasp of it!
Great write-up, I am regular visitor of one’s site, maintain up the excellent operate, and It’s going to be a regular visitor for a lengthy time.
hello!,I really like your writing so much! percentage we be in contact extra approximately your article on AOL? I require a specialist on this house to solve my problem. May be that’s you! Taking a look ahead to look you.
As I website possessor I believe the content material here is rattling wonderful , appreciate it for your efforts. You should keep it up forever! Best of luck.
Contact Information Faculty of Oral and Dental Medicine
[…]although websites we backlink to beneath are considerably not connected to ours, we really feel they’re in fact worth a go through, so have a look[…]
I just couldn’t depart your website before suggesting that I extremely enjoyed the standard information a person provide for your visitors? Is going to be back often to check up on new posts
Thank you for the auspicious writeup. It in fact was a amusement account it. Look advanced to far added agreeable from you! By the way, how could we communicate?
Very interesting info !Perfect just what I was searching for!
Good day! Would you mind if I share your blog with my myspace group? There’s a lot of folks that I think would really enjoy your content. Please let me know. Cheers
Emergency dentistry
[…]check below, are some absolutely unrelated internet websites to ours, having said that, they are most trustworthy sources that we use[…]
تعليم عالي الجودة في طب الفم والأسنان
[…]please stop by the web pages we follow, such as this a single, because it represents our picks from the web[…]
Hello there, I found your web site via Google while looking for a related topic, your web site came up, it looks great. I have bookmarked it in my google bookmarks.
شراكات الصناعة
[…]Here is a good Blog You might Uncover Interesting that we Encourage You[…]
Wonderful blog! I found it while browsing on Yahoo News. Do you have any suggestions on how to get listed in Yahoo News? I’ve been trying for a while but I never seem to get there! Many thanks
Academic Innovation
[…]we like to honor quite a few other net internet sites on the net, even though they arent linked to us, by linking to them. Under are some webpages really worth checking out[…]
failure and re-registration in courses
[…]usually posts some pretty intriguing stuff like this. If you are new to this site[…]
I like this web blog its a master peace ! Glad I discovered this on google .
Faculty of Computers and Information
[…]check beneath, are some entirely unrelated sites to ours, having said that, they may be most trustworthy sources that we use[…]
I have not checked in here for some time as I thought it was getting boring, but the last few posts are good quality so I guess I¦ll add you back to my daily bloglist. You deserve it my friend 🙂
Hi there! This is my first visit to your blog! We are a team of volunteers and starting a new initiative in a community in the same niche. Your blog provided us beneficial information to work on. You have done a marvellous job!
I love your blog.. very nice colors & theme. Did you create this website yourself? Plz reply back as I’m looking to create my own blog and would like to know wheere u got this from. thanks
Hello, i read your blog occasionally and i own a similar one and i was just curious if you get a lot of spam remarks? If so how do you reduce it, any plugin or anything you can advise? I get so much lately it’s driving me crazy so any assistance is very much appreciated.
There are some fascinating time limits on this article but I don’t know if I see all of them center to heart. There’s some validity however I will take maintain opinion until I look into it further. Good article , thanks and we wish extra! Added to FeedBurner as well
I have not checked in here for a while because I thought it was getting boring, but the last several posts are good quality so I guess I will add you back to my everyday bloglist. You deserve it my friend 🙂
I have been exploring for a little bit for any high quality articles or blog posts on this sort of space . Exploring in Yahoo I ultimately stumbled upon this web site. Reading this info So i¦m glad to exhibit that I’ve an incredibly good uncanny feeling I discovered exactly what I needed. I most indubitably will make certain to do not forget this web site and provides it a glance regularly.
Very interesting topic, regards for putting up.
Prof. Ebada Sarhan
[…]that is the finish of this report. Right here youll come across some web-sites that we think youll appreciate, just click the hyperlinks over[…]
I haven’t checked in here for some time as I thought it was getting boring, but the last few posts are good quality so I guess I will add you back to my daily bloglist. You deserve it my friend 🙂
Wonderful beat ! I wish to apprentice while you amend your site, how could i subscribe for a blog website? The account aided me a acceptable deal. I had been a little bit acquainted of this your broadcast offered bright clear idea
Deference to article author, some wonderful information .
Wow that was strange. I just wrote an extremely long comment but after I clicked submit my comment didn’t appear. Grrrr… well I’m not writing all that over again. Anyways, just wanted to say excellent blog!
Hiya, I’m really glad I’ve found this info. Today bloggers publish only about gossips and net and this is actually irritating. A good web site with exciting content, this is what I need. Thank you for keeping this web site, I’ll be visiting it. Do you do newsletters? Can not find it.
Its such as you read my mind! You appear to grasp a lot approximately this, such as you wrote the ebook in it or something. I feel that you just can do with some percent to pressure the message home a little bit, but instead of that, this is excellent blog. A great read. I will definitely be back.
You can certainly see your skills in the work you write. The world hopes for even more passionate writers like you who aren’t afraid to say how they believe. Always go after your heart.
Some really good content on this web site, regards for contribution.
Howdy! I know this is kinda off topic but I’d figured I’d ask. Would you be interested in exchanging links or maybe guest authoring a blog post or vice-versa? My website addresses a lot of the same topics as yours and I believe we could greatly benefit from each other. If you happen to be interested feel free to send me an e-mail. I look forward to hearing from you! Excellent blog by the way!
excellent post, very informative. I wonder why the other experts of this sector do not notice this. You must continue your writing. I am confident, you have a huge readers’ base already!
تحويل قبول الطلاب إلى جامعة المستقبل
[…]just beneath, are quite a few completely not associated websites to ours, nonetheless, they’re surely worth going over[…]
But a smiling visitant here to share the love (:, btw outstanding design. “Better by far you should forget and smile than that you should remember and be sad.” by Christina Georgina Rossetti.
It¦s really a cool and helpful piece of information. I am happy that you simply shared this useful information with us. Please keep us informed like this. Thanks for sharing.
I genuinely prize your work, Great post.
I really glad to find this web site on bing, just what I was looking for : D likewise bookmarked.
I couldn’t resist commenting
Having read this I thought it was very informative. I appreciate you taking the time and effort to put this article together. I once again find myself spending way to much time both reading and commenting. But so what, it was still worth it!
Hello.This post was really interesting, particularly since I was browsing for thoughts on this matter last week.
I would like to thnkx for the efforts you have put in writing this website. I am hoping the same high-grade site post from you in the upcoming also. Actually your creative writing skills has encouraged me to get my own website now. Actually the blogging is spreading its wings quickly. Your write up is a great example of it.
Great wordpress blog here.. It’s hard to find quality writing like yours these days. I really appreciate people like you! take care
I am glad that I observed this weblog, precisely the right information that I was searching for! .
I like this web blog very much, Its a real nice situation to read and get information.
Generally I don’t read post on blogs, but I would like to say that this write-up very forced me to try and do it! Your writing style has been amazed me. Thanks, quite nice article.
You made some respectable points there. I seemed on the internet for the problem and located most people will associate with together with your website.
I went over this site and I conceive you have a lot of great info, saved to my bookmarks (:.
whoah this blog is fantastic i love reading your articles. Keep up the good work! You know, a lot of people are looking around for this information, you could help them greatly.
Hey there, I think your site might be having browser compatibility issues. When I look at your website in Chrome, it looks fine but when opening in Internet Explorer, it has some overlapping. I just wanted to give you a quick heads up! Other then that, wonderful blog!
I feel that is one of the such a lot vital info for me. And i am glad reading your article. But wanna remark on some general issues, The website style is great, the articles is in point of fact nice : D. Excellent task, cheers
I have been absent for some time, but now I remember why I used to love this site. Thanks, I will try and check back more frequently. How frequently you update your website?
I would like to thnkx for the efforts you have put in writing this blog. I am hoping the same high-grade blog post from you in the upcoming as well. In fact your creative writing abilities has inspired me to get my own blog now. Really the blogging is spreading its wings quickly. Your write up is a good example of it.
Thank you for another informative web site. Where else could I get that type of information written in such a perfect way? I have a project that I’m just now working on, and I have been on the look out for such information.
I was reading through some of your articles on this internet site and I conceive this internet site is really informative! Continue posting.
I have been surfing on-line more than 3 hours today, yet I by no means discovered any interesting article like yours. It?¦s pretty value sufficient for me. In my opinion, if all web owners and bloggers made excellent content material as you probably did, the net might be a lot more useful than ever before.
I believe this web site contains some real fantastic information for everyone :D. “The ground that a good man treads is hallowed.” by Johann von Goethe.
I conceive you have mentioned some very interesting points, regards for the post.
Unquestionably believe that that you stated. Your favourite reason seemed to be at the web the easiest thing to be aware of. I say to you, I definitely get annoyed at the same time as other folks think about concerns that they plainly do not understand about. You managed to hit the nail upon the highest as well as defined out the entire thing with no need side-effects , folks could take a signal. Will likely be again to get more. Thank you
Its great as your other content : D, appreciate it for putting up.
Howdy, i read your blog occasionally and i own a similar one and i was just wondering if you get a lot of spam comments? If so how do you prevent it, any plugin or anything you can recommend? I get so much lately it’s driving me mad so any assistance is very much appreciated.
This really answered my drawback, thank you!
Very interesting information!Perfect just what I was searching for!
Very interesting info !Perfect just what I was looking for! “If you bungle raising your children, I don’t think whatever else you do matters.” by Jacqueline Lee Bouvier Kennedy Onassis.
Hello there! Quick question that’s entirely off topic. Do you know how to make your site mobile friendly? My weblog looks weird when browsing from my iphone4. I’m trying to find a theme or plugin that might be able to fix this issue. If you have any suggestions, please share. With thanks!
There is perceptibly a bundle to identify about this. I assume you made some nice points in features also.
What i don’t understood is in fact how you are no longer actually much more neatly-favored than you might be now. You’re very intelligent. You already know therefore significantly in the case of this matter, produced me personally imagine it from numerous numerous angles. Its like women and men aren’t interested unless it’s something to do with Lady gaga! Your personal stuffs excellent. Always care for it up!
Just wish to say your article is as astonishing. The clarity for your post is just spectacular and i can think you’re a professional on this subject. Fine together with your permission allow me to grasp your feed to keep up to date with approaching post. Thank you one million and please carry on the gratifying work.
An impressive share, I just given this onto a colleague who was doing a little analysis on this. And he in fact bought me breakfast because I found it for him.. smile. So let me reword that: Thnx for the treat! But yeah Thnkx for spending the time to discuss this, I feel strongly about it and love reading more on this topic. If possible, as you become expertise, would you mind updating your blog with more details? It is highly helpful for me. Big thumb up for this blog post!
I am curious to find out what blog platform you have been utilizing? I’m having some small security issues with my latest site and I would like to find something more safeguarded. Do you have any recommendations?
I was recommended this web site via my cousin. I’m now not sure whether or not this put up is written by way of him as nobody else understand such exact approximately my difficulty. You are incredible! Thank you!
I think other website proprietors should take this web site as an model, very clean and fantastic user friendly design and style.
Good info and right to the point. I am not sure if this is really the best place to ask but do you folks have any thoughts on where to employ some professional writers? Thanks 🙂
I haven’t checked in here for a while because I thought it was getting boring, but the last few posts are great quality so I guess I’ll add you back to my everyday bloglist. You deserve it my friend 🙂
good post.Never knew this, thankyou for letting me know.
Thank you for the good writeup. It in fact was a amusement account it. Look advanced to far added agreeable from you! However, how can we communicate?
You have brought up a very excellent points, thankyou for the post.
You are my inhalation, I own few web logs and occasionally run out from to post : (.
Hey, you used to write wonderful, but the last few posts have been kinda boring?K I miss your great writings. Past few posts are just a little out of track! come on!
Hello! I could have sworn I’ve been to this site before but after checking through some of the post I realized it’s new to me. Nonetheless, I’m definitely happy I found it and I’ll be book-marking and checking back often!
Wow! Thank you! I continuously wanted to write on my website something like that. Can I implement a fragment of your post to my blog?
Very well written information. It will be useful to anyone who utilizes it, as well as yours truly :). Keep up the good work – for sure i will check out more posts.
Respect to article author, some good information .
Just wanna comment on few general things, The website design is perfect, the content material is rattling fantastic. “By following the concept of ‘one country, two systems,’ you don’t swallow me up nor I you.” by Deng Xiaoping.
I saw a lot of website but I believe this one has got something special in it in it
Spot on with this write-up, I actually think this website needs much more consideration. I’ll in all probability be again to learn much more, thanks for that info.
Good write-up, I am regular visitor of one’s website, maintain up the nice operate, and It is going to be a regular visitor for a long time.
Hi, Neat post. There is a problem with your website in internet explorer, would check this… IE still is the market leader and a good portion of people will miss your wonderful writing due to this problem.
Oh my goodness! an amazing article dude. Thank you However I am experiencing subject with ur rss . Don’t know why Unable to subscribe to it. Is there anybody getting an identical rss downside? Anyone who is aware of kindly respond. Thnkx
Magnificent site. Lots of useful info here. I am sending it to a few friends ans also sharing in delicious. And naturally, thanks to your effort!
I like this website so much, bookmarked. “Nostalgia isn’t what it used to be.” by Peter De Vries.
Simply wanna admit that this is invaluable, Thanks for taking your time to write this.
I like this weblog its a master peace ! Glad I detected this on google .
Its like you read my mind! You seem to know a lot about this, like you wrote the book in it or something. I think that you could do with a few pics to drive the message home a little bit, but instead of that, this is fantastic blog. An excellent read. I will definitely be back.
The very heart of your writing whilst appearing agreeable originally, did not sit very well with me personally after some time. Somewhere throughout the paragraphs you managed to make me a believer unfortunately just for a very short while. I still have got a problem with your jumps in logic and you might do well to fill in all those gaps. If you actually can accomplish that, I would certainly end up being impressed.
I appreciate, cause I found exactly what I was looking for. You have ended my 4 day long hunt! God Bless you man. Have a nice day. Bye
Along with everything that appears to be developing throughout this area, your perspectives tend to be rather radical. Even so, I beg your pardon, but I do not give credence to your whole suggestion, all be it exciting none the less. It would seem to everyone that your opinions are actually not entirely rationalized and in simple fact you are your self not entirely certain of your argument. In any event I did enjoy looking at it.
Some truly interesting information, well written and generally user friendly.
Sweet website , super design, real clean and utilise genial.
The very heart of your writing while appearing agreeable at first, did not really sit perfectly with me after some time. Somewhere within the sentences you managed to make me a believer but only for a short while. I nevertheless have got a problem with your leaps in assumptions and one would do well to help fill in all those breaks. In the event that you actually can accomplish that, I could certainly be amazed.
I just could not depart your web site before suggesting that I actually enjoyed the standard information a person provide for your visitors? Is going to be back often to check up on new posts
You completed various fine points there. I did a search on the theme and found nearly all people will have the same opinion with your blog.
I will right away snatch your rss as I can’t find your email subscription link or e-newsletter service. Do you’ve any? Kindly permit me know in order that I may subscribe. Thanks.
Of course, what a splendid website and instructive posts, I definitely will bookmark your site.Have an awsome day!
Aw, this was a really nice post. In concept I want to put in writing like this additionally – taking time and actual effort to make an excellent article… but what can I say… I procrastinate alot and certainly not seem to get something done.
Very interesting subject, regards for putting up.
I am no longer certain the place you’re getting your info, but good topic. I must spend a while finding out much more or figuring out more. Thank you for magnificent information I was on the lookout for this information for my mission.
I just could not depart your web site prior to suggesting that I really enjoyed the standard information a person provide in your visitors? Is going to be again incessantly in order to investigate cross-check new posts
F*ckin¦ amazing things here. I am very glad to look your post. Thanks a lot and i am looking ahead to touch you. Will you kindly drop me a e-mail?
I am continuously browsing online for ideas that can facilitate me. Thank you!
I went over this internet site and I think you have a lot of fantastic info , saved to favorites (:.
Aw, this was a really nice post. In concept I want to put in writing like this moreover – taking time and actual effort to make a very good article… but what can I say… I procrastinate alot and on no account seem to get something done.
Only wanna input on few general things, The website style and design is perfect, the subject matter is really great. “I have seen the future and it doesn’t work.” by Robert Fulford.
Some genuinely marvellous work on behalf of the owner of this internet site, dead outstanding content.
Some genuinely marvellous work on behalf of the owner of this site, utterly great articles.
I am no longer certain where you are getting your info, however good topic. I needs to spend some time learning much more or figuring out more. Thanks for wonderful information I was looking for this info for my mission.
Nice weblog right here! Additionally your site so much up fast! What web host are you the use of? Can I get your affiliate hyperlink to your host? I desire my website loaded up as fast as yours lol
F*ckin¦ remarkable things here. I¦m very happy to see your article. Thanks a lot and i am taking a look ahead to touch you. Will you please drop me a mail?
I have recently started a blog, the information you provide on this site has helped me greatly. Thanks for all of your time & work.
F*ckin’ amazing issues here. I’m very happy to peer your article. Thank you so much and i am having a look forward to touch you. Will you please drop me a mail?
Hey, you used to write fantastic, but the last few posts have been kinda boringK I miss your great writings. Past several posts are just a little out of track! come on!
I liked up to you’ll obtain carried out right here. The caricature is tasteful, your authored material stylish. however, you command get got an edginess over that you would like be handing over the following. ill indisputably come more until now again as precisely the same just about very often within case you shield this increase.
Howdy! I know this is kinda off topic however , I’d figured I’d ask. Would you be interested in trading links or maybe guest authoring a blog post or vice-versa? My website discusses a lot of the same subjects as yours and I believe we could greatly benefit from each other. If you’re interested feel free to shoot me an e-mail. I look forward to hearing from you! Terrific blog by the way!
Perfect work you have done, this internet site is really cool with good info .
I do agree with all of the ideas you’ve presented in your post. They’re very convincing and will definitely work. Still, the posts are too short for novices. Could you please extend them a little from next time? Thanks for the post.
WONDERFUL Post.thanks for share..extra wait .. …
Keep working ,impressive job!
I believe this is one of the most significant info for me. And i am satisfied reading your article. But wanna remark on few general things, The site taste is wonderful, the articles is actually excellent : D. Excellent process, cheers
Do you have a spam issue on this blog; I also am a blogger, and I was wondering your situation; many of us have created some nice procedures and we are looking to swap techniques with other folks, why not shoot me an email if interested.
Great V I should certainly pronounce, impressed with your website. I had no trouble navigating through all the tabs as well as related info ended up being truly easy to do to access. I recently found what I hoped for before you know it in the least. Quite unusual. Is likely to appreciate it for those who add forums or something, website theme . a tones way for your customer to communicate. Nice task..
Thank you for another informative site. Where else could I get that kind of information written in such a perfect way? I have a project that I am just now working on, and I have been on the look out for such info.
Simply want to say your article is as amazing. The clarity on your publish is simply great and that i could suppose you are knowledgeable on this subject. Fine along with your permission allow me to clutch your feed to keep updated with drawing close post. Thank you a million and please keep up the gratifying work.
you’ve an important weblog right here! would you wish to make some invite posts on my weblog?
I’d forever want to be update on new posts on this web site, saved to favorites! .
Its like you learn my mind! You appear to grasp a lot about this, like you wrote the guide in it or something. I believe that you can do with a few to force the message house a bit, but other than that, this is magnificent blog. A great read. I will certainly be back.
I will right away seize your rss as I can’t find your email subscription hyperlink or e-newsletter service. Do you have any? Please allow me realize so that I may just subscribe. Thanks.
This web page is known as a stroll-by way of for all the info you needed about this and didn’t know who to ask. Glimpse here, and you’ll definitely uncover it.
Excellent post. I was checking continuously this blog and I am impressed! Very helpful information specifically the last part 🙂 I care for such info a lot. I was looking for this particular info for a very long time. Thank you and best of luck.
It is really a great and helpful piece of information. I am happy that you simply shared this helpful information with us. Please stay us up to date like this. Thanks for sharing.
Hello, you used to write wonderful, but the last several posts have been kinda boring… I miss your great writings. Past several posts are just a little out of track! come on!
Good day! Do you know if they make any plugins to safeguard against hackers? I’m kinda paranoid about losing everything I’ve worked hard on. Any tips?
Hi there! I just wanted to ask if you ever have any issues with hackers? My last blog (wordpress) was hacked and I ended up losing many months of hard work due to no backup. Do you have any solutions to stop hackers?
Perfectly composed content, Really enjoyed reading.
Hey, I think your blog might be having browser compatibility issues. When I look at your blog in Ie, it looks fine but when opening in Internet Explorer, it has some overlapping. I just wanted to give you a quick heads up! Other then that, wonderful blog!
It’s really a nice and helpful piece of info. I’m satisfied that you shared this helpful info with us. Please keep us informed like this. Thanks for sharing.
Utterly indited subject material, Really enjoyed reading through.
I am often to blogging and i actually appreciate your content. The article has really peaks my interest. I am going to bookmark your web site and maintain checking for brand new information.
Hello, Neat post. There’s an issue together with your website in web explorer, might check this?K IE nonetheless is the marketplace leader and a good part of other folks will pass over your magnificent writing because of this problem.
You can certainly see your expertise within the work you write. The sector hopes for even more passionate writers such as you who are not afraid to mention how they believe. At all times follow your heart.
I haven’t checked in here for some time because I thought it was getting boring, but the last several posts are great quality so I guess I’ll add you back to my everyday bloglist. You deserve it my friend 🙂
I genuinely enjoy looking through on this website , it has got fantastic blog posts. “When a man’s willing and eager, the gods join in.” by Aeschylus.
I adore looking through and I believe this website got some genuinely useful stuff on it! .
This is really interesting, You are a very skilled blogger. I have joined your rss feed and look forward to seeking more of your great post. Also, I have shared your site in my social networks!
The next time I read a blog, I hope that it doesnt disappoint me as much as this one. I mean, I know it was my choice to read, but I actually thought youd have something interesting to say. All I hear is a bunch of whining about something that you could fix if you werent too busy looking for attention.
As soon as I observed this internet site I went on reddit to share some of the love with them.
I believe this internet site has got some rattling excellent information for everyone. “Anger makes dull men witty, but it keeps them poor.” by Francis Bacon.
I was suggested this website via my cousin. I am now not certain whether or not this publish is written via him as no one else realize such specific approximately my difficulty. You’re incredible! Thanks!
I am glad to be one of many visitants on this outstanding site (:, thanks for posting.
Hey very nice web site!! Guy .. Beautiful .. Superb .. I will bookmark your web site and take the feeds alsoKI am happy to seek out so many useful information right here in the submit, we want develop more techniques in this regard, thanks for sharing. . . . . .
Valuable information. Lucky me I discovered your website unintentionally, and I am surprised why this twist of fate did not took place in advance! I bookmarked it.
I like this site very much, Its a really nice place to read and obtain info .
magnificent submit, very informative. I wonder why the opposite experts of this sector do not understand this. You should continue your writing. I am sure, you have a huge readers’ base already!
You have remarked very interesting details ! ps decent web site.
I have recently started a blog, the info you provide on this website has helped me greatly. Thanks for all of your time & work. “Men must be taught as if you taught them not, And things unknown proposed as things forgot.” by Alexander Pope.
I just could not depart your site before suggesting that I extremely enjoyed the standard info a person provide for your visitors? Is gonna be back often to check up on new posts
Very well written article. It will be beneficial to anyone who usess it, as well as myself. Keep doing what you are doing – for sure i will check out more posts.
I haven¦t checked in here for some time since I thought it was getting boring, but the last several posts are great quality so I guess I¦ll add you back to my daily bloglist. You deserve it my friend 🙂
Rattling clean website , thanks for this post.
I have learn some excellent stuff here. Certainly price bookmarking for revisiting. I surprise how much attempt you put to create one of these great informative web site.
I’m really enjoying the theme/design of your web site. Do you ever run into any internet browser compatibility issues? A couple of my blog visitors have complained about my blog not working correctly in Explorer but looks great in Firefox. Do you have any ideas to help fix this problem?
What i don’t realize is actually how you are not really much more well-liked than you might be right now. You are so intelligent. You realize thus significantly relating to this subject, made me personally consider it from a lot of varied angles. Its like women and men aren’t fascinated unless it’s one thing to do with Lady gaga! Your own stuffs great. Always maintain it up!
What i do not realize is actually how you are now not actually much more neatly-appreciated than you might be right now. You’re very intelligent. You understand therefore significantly on the subject of this topic, made me individually imagine it from a lot of various angles. Its like men and women aren’t interested except it is something to do with Girl gaga! Your own stuffs outstanding. All the time deal with it up!
Pretty section of content. I just stumbled upon your web site and in accession capital to assert that I acquire in fact enjoyed account your blog posts. Any way I’ll be subscribing to your augment and even I achievement you access consistently quickly.
What’s Happening i am new to this, I stumbled upon this I’ve found It absolutely helpful and it has helped me out loads. I hope to contribute & assist other users like its helped me. Great job.
Hiya, I’m really glad I’ve found this information. Today bloggers publish only about gossips and web and this is actually irritating. A good blog with exciting content, that is what I need. Thanks for keeping this website, I will be visiting it. Do you do newsletters? Can not find it.
I haven’t checked in here for some time because I thought it was getting boring, but the last few posts are great quality so I guess I will add you back to my daily bloglist. You deserve it my friend 🙂
Only wanna remark that you have a very decent site, I enjoy the pattern it actually stands out.
I’m still learning from you, while I’m trying to achieve my goals. I certainly love reading everything that is written on your site.Keep the tips coming. I loved it!
Good day! This is kind of off topic but I need some advice from an established blog. Is it very hard to set up your own blog? I’m not very techincal but I can figure things out pretty fast. I’m thinking about setting up my own but I’m not sure where to begin. Do you have any ideas or suggestions? Appreciate it
great post, very informative. I wonder why the other specialists of this sector don’t notice this. You must continue your writing. I am confident, you have a great readers’ base already!
Hi , I do believe this is an excellent blog. I stumbled upon it on Yahoo , i will come back once again. Money and freedom is the best way to change, may you be rich and help other people.
I truly enjoy studying on this website , it contains excellent posts.
Perfectly composed content material, Really enjoyed examining.
I like this site very much, Its a rattling nice berth to read and receive information. “God cannot alter the past, but historians can.” by Samuel Butler.
I have recently started a blog, the information you provide on this site has helped me greatly. Thank you for all of your time & work.
Wow! Thank you! I continuously needed to write on my site something like that. Can I include a part of your post to my site?
Wow, awesome blog layout! How lengthy have you been blogging for? you made blogging look easy. The entire glance of your website is excellent, let alone the content!
Good – I should definitely pronounce, impressed with your site. I had no trouble navigating through all the tabs as well as related information ended up being truly simple to do to access. I recently found what I hoped for before you know it at all. Reasonably unusual. Is likely to appreciate it for those who add forums or something, web site theme . a tones way for your customer to communicate. Excellent task..
I precisely had to appreciate you again. I do not know the things I would’ve carried out in the absence of the actual tips contributed by you about such subject matter. Previously it was an absolute distressing case in my opinion, but understanding the well-written tactic you managed the issue made me to weep with delight. I am happier for the guidance and as well , trust you are aware of a powerful job you happen to be providing educating many others through the use of your web site. I am certain you have never come across any of us.
so much great info on here, : D.
Nice read, I just shared this to a friend who was doing some research on this topic. Will be back for more good infos
Well done!
This is very interesting, You’re a very professional blogger. I’ve joined your feed and look ahead to in the hunt for more of your fantastic post. Also, I’ve shared your website in my social networks!
F*ckin¦ awesome issues here. I am very glad to peer your article. Thanks so much and i am looking forward to contact you. Will you please drop me a mail?
Its excellent as your other posts : D, regards for putting up.
Hey there! Quick question that’s completely off topic. Do you know how to make your site mobile friendly? My blog looks weird when browsing from my apple iphone. I’m trying to find a theme or plugin that might be able to resolve this problem. If you have any suggestions, please share. Thank you!
Very interesting details you have observed, thanks for posting.
Hey very nice web site!! Man .. Excellent .. Amazing .. I’ll bookmark your website and take the feeds also…I’m happy to find so many useful information here in the post, we need work out more techniques in this regard, thanks for sharing. . . . . .
Hi, Neat post. There’s a problem together with your site in internet explorer, could test thisK IE still is the market chief and a large element of other folks will omit your magnificent writing because of this problem.
Very interesting topic, thanks for putting up.
I appreciate, cause I found just what I was looking for. You have ended my 4 day long hunt! God Bless you man. Have a great day. Bye
This web site is really a walk-through for all of the info you wanted about this and didn’t know who to ask. Glimpse here, and you’ll definitely discover it.
Woah! I’m really loving the template/theme of this website. It’s simple, yet effective. A lot of times it’s very hard to get that “perfect balance” between user friendliness and visual appearance. I must say that you’ve done a excellent job with this. Additionally, the blog loads very quick for me on Safari. Outstanding Blog!
I’m really enjoying the design and layout of your blog. It’s a very easy on the eyes which makes it much more pleasant for me to come here and visit more often. Did you hire out a developer to create your theme? Exceptional work!
Of course, what a splendid blog and revealing posts, I definitely will bookmark your site.Best Regards!
As I web site possessor I believe the content matter here is rattling excellent , appreciate it for your efforts. You should keep it up forever! Best of luck.
Hi, just required you to know I he added your site to my Google bookmarks due to your layout. But seriously, I believe your internet site has 1 in the freshest theme I??ve came across. It extremely helps make reading your blog significantly easier.
Nice post. I learn one thing more challenging on totally different blogs everyday. It would at all times be stimulating to learn content material from other writers and practice a bit one thing from their store. I’d favor to use some with the content material on my weblog whether you don’t mind. Natually I’ll offer you a hyperlink on your internet blog. Thanks for sharing.
Currently it looks like Expression Engine is the best blogging platform out there right now. (from what I’ve read) Is that what you’re using on your blog?
Wow! This blog looks just like my old one! It’s on a entirely different topic but it has pretty much the same layout and design. Superb choice of colors!
Really Appreciate this article, can I set it up so I receive an email whenever you write a fresh article?
A lot of of whatever you mention happens to be supprisingly precise and that makes me wonder the reason why I had not looked at this in this light previously. This particular piece truly did switch the light on for me as far as this subject goes. However there is just one factor I am not too cozy with so whilst I attempt to reconcile that with the core idea of your position, allow me observe exactly what all the rest of your visitors have to say.Well done.
I think this is one of the most important information for me.
And i am glad reading your article. But should remark on few general things,
The website style is great, the articles is really nice : D.
Good job, cheers
Magnificent items from you, man. I have take into accout your stuff previous to and you’re simply extremely excellent. I really like what you have got right here, certainly like what you’re stating and the way during which you are saying it. You’re making it enjoyable and you continue to take care of to stay it smart. I can’t wait to learn far more from you. That is actually a tremendous site.
I am commenting to make you know what a amazing encounter our child encountered visiting the blog. She discovered numerous pieces, not to mention what it’s like to have an excellent giving nature to have folks quite simply comprehend several advanced topics. You really surpassed her expectations. Many thanks for imparting those priceless, dependable, informative and even easy guidance on that topic to Jane.
Very nice design and excellent content, very little else we need : D.
I’d have to examine with you here. Which is not one thing I usually do! I take pleasure in reading a post that may make folks think. Additionally, thanks for permitting me to comment!
I must express appreciation to the writer for rescuing me from this type of issue. Because of exploring throughout the world-wide-web and meeting methods that were not pleasant, I was thinking my entire life was well over. Living without the solutions to the issues you’ve solved as a result of your article is a crucial case, as well as those that could have in a negative way affected my entire career if I hadn’t noticed the blog. The natural talent and kindness in handling all things was helpful. I am not sure what I would’ve done if I had not come across such a step like this. I can at this moment look forward to my future. Thanks for your time so much for your specialized and effective guide. I won’t be reluctant to refer your web sites to any individual who will need recommendations on this problem.
I like this post, enjoyed this one appreciate it for putting up.
Hello! I’m at work browsing your blog from my new iphone! Just wanted to say I love reading through your blog and look forward to all your posts! Keep up the outstanding work!
Dead written content material, thanks for selective information.
Heya! I just wanted to ask if you ever have any issues with hackers? My last blog (wordpress) was hacked and I ended up losing months of hard work due to no data backup. Do you have any solutions to protect against hackers?
Merely wanna remark on few general things, The website layout is perfect, the articles is real superb : D.
It’s in point of fact a great and useful piece of information. I am glad that you just shared this helpful information with us. Please keep us up to date like this. Thank you for sharing.
It’s really a nice and helpful piece of information. I am satisfied that you just shared this helpful info with us. Please keep us up to date like this. Thank you for sharing.
Hi, Neat post. There is a problem with your site in internet explorer, would test this… IE still is the market leader and a huge portion of people will miss your excellent writing because of this problem.
Hello.This post was extremely fascinating, especially since I was searching for thoughts on this matter last Saturday.
Hello! Someone in my Myspace group shared this site with us so I came to give it a look. I’m definitely enjoying the information. I’m bookmarking and will be tweeting this to my followers! Exceptional blog and outstanding style and design.
I really like your writing style, fantastic information, thanks for posting : D.
I’d have to examine with you here. Which is not one thing I usually do! I take pleasure in reading a post that may make folks think. Additionally, thanks for permitting me to comment!
I’m really enjoying the design and layout of your site. It’s a very easy on the eyes which makes it much more enjoyable for me to come here and visit more often. Did you hire out a designer to create your theme? Excellent work!
I got what you intend,saved to my bookmarks, very decent internet site.
I am glad to be one of the visitors on this great internet site (:, thanks for posting.
Some really prize content on this internet site, saved to fav.
I like this weblog very much, Its a real nice situation to read and get info . “Do pleasant things yourself, but unpleasant things through others.” by Baltasar Gracian.
Keep up the great piece of work, I read few blog posts on this internet site and I believe that your weblog is rattling interesting and holds sets of fantastic info .
I was suggested this blog by my cousin. I am not sure whether this post is written by him as nobody else know such detailed about my problem. You’re wonderful! Thanks!
Simply desire to say your article is as amazing. The clearness to your publish is simply cool and i can assume you are an expert in this subject. Fine together with your permission allow me to clutch your RSS feed to stay up to date with drawing close post. Thank you one million and please carry on the gratifying work.
I am not sure where you’re getting your info, but great topic. I needs to spend some time learning more or understanding more. Thanks for wonderful info I was looking for this information for my mission.
I am very happy to read this. This is the kind of manual that needs to be given and not the random misinformation that’s at the other blogs. Appreciate your sharing this greatest doc.
Very great post. I just stumbled upon your blog and wanted to say that I have truly enjoyed surfing around your weblog posts. After all I will be subscribing in your rss feed and I am hoping you write once more soon!
Thanx for the effort, keep up the good work Great work, I am going to start a small Blog Engine course work using your site I hope you enjoy blogging with the popular BlogEngine.net.Thethoughts you express are really awesome. Hope you will right some more posts.
Merely wanna input that you have a very nice internet site, I love the design it really stands out.
I and my pals were checking the nice pointers from your website and then the sudden got a terrible suspicion I had not expressed respect to the website owner for those tips. Those young men had been as a result stimulated to study all of them and have in effect without a doubt been taking pleasure in those things. Thank you for simply being well kind and then for figuring out this sort of amazing resources millions of individuals are really desirous to discover. My honest regret for not expressing appreciation to sooner.
Hi there, You have done an incredible job. I will definitely digg it and personally recommend to my friends. I’m confident they will be benefited from this website.
My spouse and I absolutely love your blog and find nearly all of your post’s to be what precisely I’m looking for. Would you offer guest writers to write content in your case? I wouldn’t mind publishing a post or elaborating on some of the subjects you write in relation to here. Again, awesome web log!
It’s onerous to find knowledgeable people on this subject, however you sound like you understand what you’re talking about! Thanks
I do love the manner in which you have presented this matter plus it really does present me personally some fodder for thought. However, coming from just what I have observed, I just wish when the responses stack on that men and women continue to be on point and in no way get started upon a soap box regarding the news du jour. Still, thank you for this superb piece and while I do not really agree with the idea in totality, I respect the standpoint.
I’ve read some good stuff here. Certainly worth bookmarking for revisiting. I wonder how so much effort you set to make one of these excellent informative site.
That is the fitting weblog for anyone who needs to find out about this topic. You notice so much its nearly laborious to argue with you (not that I truly would need…HaHa). You positively put a new spin on a topic thats been written about for years. Great stuff, just nice!
There are definitely loads of details like that to take into consideration. That could be a nice level to carry up. I supply the ideas above as basic inspiration however clearly there are questions like the one you carry up where a very powerful thing will probably be working in sincere good faith. I don?t know if greatest practices have emerged around things like that, however I’m sure that your job is clearly identified as a good game. Each boys and girls really feel the influence of only a second’s pleasure, for the remainder of their lives.
It is appropriate time to make some plans for the future and it is time to be happy. I’ve read this post and if I could I desire to suggest you few interesting things or suggestions. Maybe you could write next articles referring to this article. I desire to read even more things about it!
I gotta favorite this internet site it seems handy invaluable
WONDERFUL Post.thanks for share..more wait .. …
After all, what a great site and informative posts, I will upload inbound link – bookmark this web site? Regards, Reader.
Hello my family member! I want to say that this post is amazing, nice written and come with almost all important infos. I¦d like to look extra posts like this .
Hey there would you mind letting me know which hosting company you’re working with? I’ve loaded your blog in 3 different web browsers and I must say this blog loads a lot quicker then most. Can you suggest a good internet hosting provider at a fair price? Thank you, I appreciate it!
There are actually loads of details like that to take into consideration. That may be a nice level to carry up. I supply the thoughts above as general inspiration however clearly there are questions like the one you deliver up the place the most important thing might be working in sincere good faith. I don?t know if best practices have emerged round issues like that, however I am certain that your job is clearly recognized as a good game. Each boys and girls feel the affect of only a moment’s pleasure, for the remainder of their lives.
I’d must examine with you here. Which isn’t something I normally do! I enjoy studying a put up that will make people think. Also, thanks for allowing me to remark!
Youre so cool! I dont suppose Ive read something like this before. So good to find somebody with some unique thoughts on this subject. realy thank you for starting this up. this web site is something that is needed on the internet, somebody with a bit of originality. helpful job for bringing one thing new to the web!
Hi there! This post couldn’t be written any better! Reading through this post reminds me of my previous room mate! He always kept talking about this. I will forward this article to him. Pretty sure he will have a good read. Thank you for sharing!
Hello! I just would like to give a huge thumbs up for the great info you have here on this post. I will be coming back to your blog for more soon.
Excellent goods from you, man. I’ve understand your stuff previous to and you are just extremely excellent. I really like what you’ve acquired here, really like what you are stating and the way in which you say it. You make it enjoyable and you still take care of to keep it wise. I cant wait to read far more from you. This is really a great site.
Outstanding post, I believe people should learn a lot from this site its really user pleasant.
Have you ever thought about adding a little bit more than just your articles? I mean, what you say is fundamental and all. However think about if you added some great pictures or videos to give your posts more, “pop”! Your content is excellent but with pics and clips, this blog could definitely be one of the very best in its field. Great blog!
hi!,I like your writing so much! share we communicate more about your post on AOL? I need an expert on this area to solve my problem. May be that’s you! Looking forward to see you.
Hey are using WordPress for your site platform? I’m new to the blog world but I’m trying to get started and create my own. Do you need any coding knowledge to make your own blog? Any help would be greatly appreciated!
Howdy! This is kind of off topic but I need some help from an established blog. Is it difficult to set up your own blog? I’m not very techincal but I can figure things out pretty fast. I’m thinking about creating my own but I’m not sure where to start. Do you have any tips or suggestions? Many thanks
An interesting discussion is worth comment. I think that you should write more on this topic, it might not be a taboo subject but generally people are not enough to speak on such topics. To the next. Cheers
I like this website because so much useful material on here : D.
I like this internet site because so much useful stuff on here : D.
I not to mention my pals were found to be reviewing the excellent tips from your website then instantly I got a horrible suspicion I never thanked the website owner for those techniques. All of the ladies ended up as a result glad to read through them and have in effect absolutely been tapping into those things. Many thanks for genuinely really kind and also for opting for certain cool topics millions of individuals are really desperate to be aware of. Our sincere apologies for not saying thanks to you sooner.
Hello my loved one! I wish to say that this article is amazing, great written and come with approximately all vital infos. I would like to see extra posts like this .
I wish to express my admiration for your kind-heartedness for visitors who must have guidance on this important situation. Your personal dedication to passing the message across became rather useful and has without exception allowed individuals much like me to arrive at their goals. Your amazing useful information denotes a great deal a person like me and especially to my fellow workers. Best wishes; from each one of us.
I would like to thnkx for the efforts you have put in writing this blog. I am hoping the same high-grade blog post from you in the upcoming as well. In fact your creative writing abilities has inspired me to get my own blog now. Really the blogging is spreading its wings quickly. Your write up is a good example of it.
Great V I should definitely pronounce, impressed with your site. I had no trouble navigating through all the tabs and related information ended up being truly easy to do to access. I recently found what I hoped for before you know it at all. Quite unusual. Is likely to appreciate it for those who add forums or something, website theme . a tones way for your client to communicate. Excellent task..
Just what I was looking for, thankyou for putting up.
I have not checked in here for some time because I thought it was getting boring, but the last several posts are great quality so I guess I?¦ll add you back to my everyday bloglist. You deserve it my friend 🙂
good article i want see more, thanks for share with usPulauKoin
good article i want see more, thanks for share with usPulauKoin
What i don’t realize is in fact how you are no longer actually a lot more smartly-appreciated than you might be now. You are so intelligent. You realize therefore significantly with regards to this subject, made me individually consider it from so many various angles. Its like women and men don’t seem to be fascinated until it’s something to accomplish with Girl gaga! Your personal stuffs excellent. At all times handle it up!
I cling on to listening to the news broadcast speak about getting free online grant applications so I have been looking around for the top site to get one. Could you advise me please, where could i get some?
This is really interesting, You’re a very skilled blogger. I’ve joined your feed and look forward to seeking more of your great post. Also, I have shared your website in my social networks!
Hello! I could have sworn I’ve been to this blog before but after browsing through some of the post I realized it’s new to me. Anyways, I’m definitely happy I found it and I’ll be book-marking and checking back frequently!
I like this web blog very much, Its a rattling nice billet to read and incur information.
Very interesting subject, regards for putting up. “Wrinkles should merely indicate where smiles have been.” by Mark Twain.
It is actually a great and helpful piece of info. I’m glad that you just shared this helpful info with us. Please stay us up to date like this. Thank you for sharing.
I am often to blogging and i really appreciate your content. The article has really peaks my interest. I am going to bookmark your site and keep checking for new information.
I really like your writing style, good information, thank you for posting :D. “Freedom is the emancipation from the arbitrary rule of other men.” by Mortimer Adler.
Enjoyed reading this, very good stuff, thanks. “It is well to remember that the entire universe, with one trifling exception, is composed of others.” by John Andrew Holmes.
I likewise conceive thence, perfectly indited post! .
I think this is among the most important information for me. And i’m glad reading your article. But want to remark on few general things, The site style is great, the articles is really excellent : D. Good job, cheers
Wonderful work! This is the type of info that should be shared around the web. Shame on Google for not positioning this post higher! Come on over and visit my website . Thanks =)
I have been checking out a few of your stories and it’s clever stuff. I will make sure to bookmark your website.
fantastic publish, very informative. I wonder why the opposite specialists of this sector don’t realize this. You must continue your writing. I am confident, you have a huge readers’ base already!
Its like you read my mind! You seem to know so much about this, like you wrote the book in it or something. I think that you can do with a few pics to drive the message home a little bit, but instead of that, this is magnificent blog. A fantastic read. I’ll definitely be back.
I haven’t checked in here for some time since I thought it was getting boring, but the last several posts are great quality so I guess I will add you back to my daily bloglist. You deserve it my friend 🙂
Hi my friend! I want to say that this post is awesome, nice written and include approximately all significant infos. I’d like to see more posts like this.
What¦s Going down i am new to this, I stumbled upon this I’ve discovered It positively helpful and it has aided me out loads. I am hoping to contribute & aid other customers like its helped me. Great job.
Hey there, You have done a great job. I will definitely digg it and personally suggest to my friends. I am sure they will be benefited from this site.
I have been checking out some of your articles and i can state nice stuff. I will definitely bookmark your site.
Rattling clear internet site, thankyou for this post.
Very interesting details you have observed, appreciate it for putting up.
Once I originally commented I clicked the -Notify me when new feedback are added- checkbox and now each time a comment is added I get 4 emails with the identical comment. Is there any approach you may take away me from that service? Thanks!
I believe other website owners should take this website as an model, very clean and superb user pleasant design.
Epikbahis adresinde kazançlı ve keyifli vakitler geçirebileceğiniz pek çok bahis oyunu bulunmaktadır. Linke tıklayıp üyelik işlemlerini tamamlayarak tüm oyunlarda kazançlı vakit geçirmeye başlayabilirsiniz.
I have not checked in here for some time as I thought it was getting boring, but the last several posts are great quality so I guess I will add you back to my everyday bloglist. You deserve it my friend 🙂
This piece of writing offers clear idea in support
of the new people of blogging, that genuinely how to do running a blog.
I gotta bookmark this website it seems invaluable handy
I am typically to running a blog and i actually respect your content. The article has really peaks my interest. I’m going to bookmark your web site and hold checking for brand spanking new information.
I am no longer positive the place you’re getting your info, however good topic. I needs to spend a while finding out much more or figuring out more. Thank you for fantastic info I used to be on the lookout for this info for my mission.
I also think thence, perfectly composed post! .
Hiya, I am really glad I have found this information. Today bloggers publish just about gossips and internet and this is really irritating. A good blog with exciting content, that’s what I need. Thanks for keeping this web site, I’ll be visiting it. Do you do newsletters? Can not find it.
Very good written article. It will be useful to everyone who utilizes it, including me. Keep up the good work – i will definitely read more posts.
Do you mind if I quote a couple of your articles
as long as I provide credit and sources back to your website?
My website is in the exact same area of interest as yours
and my users would certainly benefit from a lot of the information you provide here.
Please let me know if this alright with you. Many
thanks!
You could definitely see your enthusiasm within the work you write. The world hopes for more passionate writers like you who are not afraid to say how they believe. Always go after your heart. “We are near waking when we dream we are dreaming.” by Friedrich von Hardenberg Novalis.
I would like to thank you for the efforts you have put in writing this web site. I’m hoping the same high-grade blog post from you in the upcoming also. Actually your creative writing skills has encouraged me to get my own blog now. Actually the blogging is spreading its wings rapidly. Your write up is a good example of it.
Simply wish to say your article is as astonishing. The clarity in your post is simply excellent and that i can think you’re a professional on this subject. Well together with your permission let me to clutch your RSS feed to stay up to date with forthcoming post. Thanks a million and please continue the enjoyable work.
Appreciating the dedication you put into your website and detailed information you provide. It’s good to come across a blog every once in a while that isn’t the same outdated rehashed information. Great read! I’ve saved your site and I’m adding your RSS feeds to my Google account.
This is really interesting, You’re a very skilled blogger. I’ve joined your feed and look forward to seeking more of your excellent post. Also, I have shared your web site in my social networks!
I’m still learning from you, as I’m improving myself. I absolutely enjoy reading everything that is posted on your blog.Keep the information coming. I loved it!
I was more than happy to seek out this internet-site.I wanted to thanks on your time for this wonderful learn!! I positively enjoying each little bit of it and I’ve you bookmarked to check out new stuff you blog post.
I simply couldn’t leave your site before suggesting that I extremely enjoyed the usual info a person provide in your visitors? Is going to be back ceaselessly to check out new posts.
Very instructive and good structure of content material, now that’s user friendly (:.
Excellent goods from you, man. I’ve take into account your stuff prior to and you are just extremely wonderful. I really like what you have got right here, certainly like what you’re saying and the way through which you assert it. You are making it enjoyable and you still care for to stay it sensible. I can not wait to read far more from you. This is really a tremendous website.
I have read several just right stuff here. Certainly worth bookmarking for revisiting. I wonder how so much effort you put to make any such wonderful informative website.
Just wanna comment on few general things, The website layout is perfect, the content material is real wonderful. “To the artist there is never anything ugly in nature.” by Franois Auguste Ren Rodin.
Hey would you mind letting me know which web host you’re utilizing? I’ve loaded your blog in 3 completely different browsers and I must say this blog loads a lot faster then most. Can you recommend a good hosting provider at a fair price? Thank you, I appreciate it!
An impressive share, I just given this onto a colleague who was doing a bit analysis on this. And he in actual fact purchased me breakfast as a result of I discovered it for him.. smile. So let me reword that: Thnx for the deal with! But yeah Thnkx for spending the time to debate this, I really feel strongly about it and love studying extra on this topic. If possible, as you become experience, would you mind updating your weblog with more particulars? It’s extremely useful for me. Massive thumb up for this weblog post!
Way cool, some valid points! I appreciate you making this article available, the rest of the site is also high quality. Have a fun.
I like this web blog very much, Its a really nice office to read and incur info . “Practice, the master of all things.” by Augustus Octavius.
Hello, Neat post. There is a problem along with your web site in web explorer, could check this?
IE nonetheless is the marketplace chief and a
huge part of other folks will omit your fantastic writing
due to this problem.
Hello! Do you use Twitter? I’d like to follow you if that would be ok. I’m definitely enjoying your blog and look forward to new updates.
Hey very cool web site!! Man .. Excellent .. Amazing .. I’ll bookmark your site and take the feeds also…I’m happy to find a lot of useful info here in the post, we need work out more techniques in this regard, thanks for sharing. . . . . .
Well I definitely liked studying it. This article offered by you is very helpful for proper planning.
I conceive this site has some really fantastic information for everyone :D. “As ill-luck would have it.” by Miguel de Cervantes.
Thank you for another informative web site. Where else could I get that type of info written in such an ideal way? I’ve a project that I’m just now working on, and I have been on the look out for such info.
Its like you learn my thoughts! You appear to understand a lot about this, like you wrote the e-book in it or something. I feel that you just could do with a few percent to power the message house a bit, however instead of that, that is excellent blog. A fantastic read. I’ll certainly be back.
I’ve recently started a blog, the information you offer on this site has helped me greatly. Thank you for all of your time & work.
The next time I learn a weblog, I hope that it doesnt disappoint me as a lot as this one. I mean, I know it was my option to learn, however I truly thought youd have one thing fascinating to say. All I hear is a bunch of whining about one thing that you could possibly repair in the event you werent too busy searching for attention.
Incredible! This blog looks just like my old one! It’s on a entirely different topic but it has pretty much the same layout and design. Outstanding choice of colors!
I’d should verify with you here. Which is not something I normally do! I take pleasure in reading a post that will make people think. Also, thanks for allowing me to remark!
I have recently started a site, the info you provide on this site has helped me tremendously. Thanks for all of your time & work.
I have been checking out some of your posts and i can claim clever stuff. I will surely bookmark your blog.
When I originally commented I clicked the “Notify me when new comments are added” checkbox and now each time a comment is added I get four e-mails with the same comment. Is there any way you can remove me from that service? Appreciate it!
Good day! Do you know if they make any plugins to protect against hackers? I’m kinda paranoid about losing everything I’ve worked hard on. Any suggestions?
I’ve been absent for some time, but now I remember why I used to love this blog. Thanks, I will try and check back more frequently. How frequently you update your web site?
Generally I do not read article on blogs, but I would like to say that this write-up very forced me to try and do so! Your writing style has been surprised me. Thanks, very nice post.
I have learn several excellent stuff here. Certainly price bookmarking for revisiting. I wonder how so much effort you place to make any such wonderful informative web site.
Hmm it looks like your site ate my first comment (it was super long) so I guess I’ll just sum it up what I had written and say, I’m thoroughly enjoying your blog. I as well am an aspiring blog writer but I’m still new to everything. Do you have any points for first-time blog writers? I’d definitely appreciate it.
As I website possessor I believe the content matter here is rattling excellent , appreciate it for your efforts. You should keep it up forever! Best of luck.
I view something truly special in this site.
I really like what you guys are up too. Such clever work and exposure! Keep up the good works guys I’ve included you guys to blogroll.
Hello there I am so glad I found your blog, I really found you by error, while I was browsing on Askjeeve for something else, Regardless I am here now and would just like to say thanks a lot for a marvelous post and a all round interesting blog (I also love the theme/design), I don’t have time to browse it all at the minute but I have saved it and also added in your RSS feeds, so when I have time I will be back to read much more, Please do keep up the great work.
obviously like your web-site however you have to check the spelling on quite a few of your posts. Several of them are rife with spelling issues and I find it very troublesome to tell the truth however I’ll definitely come again again.
Yarın edebiyat dersinde sınav olacağım için bu Yalı Çapkını özeti bana çok yardımcı olacak. Çünkü kitapla ilgili en ufak bir şey hatırlamıyorum.
Hi, I think your blog might be having browser compatibility issues. When I look at your blog site in Firefox, it looks fine but when opening in Internet Explorer, it has some overlapping. I just wanted to give you a quick heads up! Other then that, terrific blog!
Good write-up, I am normal visitor of one?¦s website, maintain up the excellent operate, and It is going to be a regular visitor for a lengthy time.
Hello i am kavin, its my first time to commenting anywhere, when i read this post i thought i could also create comment due to this sensible post.|
This is very interesting, You’re a very skilled blogger.
I have joined your rss feed and look forward to seeking more of your magnificent post.
Also, I’ve shared your web site in my social networks!
Nice blog! Is your theme custom made or did you download it from somewhere? A theme like yours with a few simple tweeks would really make my blog shine. Please let me know where you got your theme. Cheers
Some genuinely great content on this web site, thanks for contribution. “He that falls in love with himself will have no rivals.” by Benjamin Franklin.
I like this web site because so much useful material on here : D.
Hey, you used to write magnificent, but the last few posts have been kinda boringK I miss your tremendous writings. Past few posts are just a little bit out of track! come on!
You made some first rate points there. I appeared on the web for the problem and found most individuals will go along with along with your website.
When I originally commented I clicked the -Notify me when new comments are added- checkbox and now each time a comment is added I get four emails with the same comment. Is there any way you can remove me from that service? Thanks!
What i don’t understood is in fact how you’re now not actually a lot more neatly-liked than you might be right now. You’re so intelligent. You recognize therefore significantly when it comes to this matter, made me in my opinion consider it from so many various angles. Its like women and men don’t seem to be interested except it is one thing to accomplish with Lady gaga! Your own stuffs nice. All the time maintain it up!
Whats up this is somewhat of off topic but I was wanting to know if blogs use WYSIWYG editors or if you have to manually code with HTML. I’m starting a blog soon but have no coding experience so I wanted to get guidance from someone with experience. Any help would be enormously appreciated!
I love it when people come together and share opinions, great blog, keep it up.
Thank you for the good writeup. It in fact was a amusement account it. Look advanced to more added agreeable from you! However, how can we communicate?
It is truly a nice and helpful piece of info. I¦m glad that you just shared this useful info with us. Please keep us up to date like this. Thanks for sharing.
Well I sincerely enjoyed studying it. This article procured by you is very effective for proper planning.
What’s Happening i’m new to this, I stumbled upon this I’ve found It positively helpful and it has helped me out loads. I hope to contribute & help other users like its aided me. Great job.
Once I originally commented I clicked the -Notify me when new feedback are added- checkbox and now each time a comment is added I get four emails with the identical comment. Is there any manner you’ll be able to take away me from that service? Thanks!
hello!,I really like your writing so much! share we be in contact more about your article on AOL? I need an expert in this house to solve my problem. May be that is you! Having a look ahead to peer you.
Hello! I could have sworn I’ve been to this blog before but after browsing through some of the post I realized it’s new to me. Anyways, I’m definitely happy I found it and I’ll be book-marking and checking back frequently!
I like your writing style truly loving this site.
Simply wanna tell that this is very beneficial, Thanks for taking your time to write this.
you have a great blog here! would you like to make some invite posts on my blog?
You are my aspiration, I have few web logs and infrequently run out from to post .
I do not even know the way I stopped up right here, but I assumed this publish was once great. I don’t realize who you’re but certainly you are going to a well-known blogger in the event you are not already 😉 Cheers!
Simply wanna remark on few general things, The website design and style is perfect, the subject material is very wonderful : D.
I am really enjoying the theme/design of your blog. Do you ever run into any web browser compatibility problems? A small number of my blog visitors have complained about my site not working correctly in Explorer but looks great in Safari. Do you have any tips to help fix this issue?
Greetings! Very helpful advice on this article! It is the little changes that make the biggest changes. Thanks a lot for sharing!
Wonderful beat ! I would like to apprentice while you amend your web site, how could i subscribe for a blog web site? The account aided me a acceptable deal. I had been a little bit acquainted of this your broadcast offered bright clear idea
You have noted very interesting details! ps nice site. “The empires of the future are the empires of the mind.” by Sir Winston Leonard Spenser Churchill.
You could definitely see your expertise within the paintings you write. The sector hopes for even more passionate writers like you who are not afraid to say how they believe. At all times go after your heart. “Billy Almon has all of his inlaw and outlaws here this afternoon.” by Jerry Coleman.
I haven¦t checked in here for some time because I thought it was getting boring, but the last few posts are great quality so I guess I will add you back to my daily bloglist. You deserve it my friend 🙂
I’ve been exploring for a bit for any high-quality articles or weblog posts in this kind of area . Exploring in Yahoo I finally stumbled upon this website. Reading this info So i’m happy to show that I have a very just right uncanny feeling I discovered just what I needed. I so much undoubtedly will make sure to don’t put out of your mind this site and provides it a glance regularly.
I every time used to read post in news papers but now as I am a user of net thus from now I am using net for posts, thanks to web.
Thank you for sharing excellent informations. Your website is so cool. I’m impressed by the details that you have on this site. It reveals how nicely you understand this subject. Bookmarked this website page, will come back for extra articles. You, my friend, ROCK! I found just the info I already searched all over the place and simply couldn’t come across. What a perfect website.
With havin so much content and articles do you ever run into any problems of plagorism or copyright infringement? My site has a lot of exclusive content I’ve either created myself or outsourced but it seems a lot of it is popping it up all over the web without my authorization. Do you know any ways to help stop content from being stolen? I’d truly appreciate it.
Very skilful writer and nice, very useful blog post. Thank you and best regards… Going to read more of your posts.
Hi my friend! I want to say that this post is amazing, nice written and include almost all significant infos. I would like to see more posts like this.
you are really a good webmaster. The website loading speed is amazing. It seems that you’re doing any unique trick. Moreover, The contents are masterwork. you have done a wonderful job on this topic!
Awesome article.
Wow! Thank you! I continuously needed to write on my site something like that. Can I include a fragment of your post to my website?
Great write-up, I¦m regular visitor of one¦s web site, maintain up the nice operate, and It’s going to be a regular visitor for a lengthy time.
What’s up, I check your blog regularly. Your story-telling style is awesome, keep doing what you’re doing!
I like this website because so much utile stuff on here : D.
Hello.This post was really interesting, particularly because I was investigating for thoughts on this subject last Thursday.
I like what you guys are up too. Such intelligent work and reporting! Carry on the superb works guys I have incorporated you guys to my blogroll. I think it will improve the value of my site :).
Hiya, I am really glad I’ve found this information. Today bloggers publish just about gossips and net and this is actually irritating. A good blog with interesting content, this is what I need. Thank you for keeping this web site, I will be visiting it. Do you do newsletters? Can’t find it.
Very interesting details you have observed, appreciate it for putting up. “I’ve made a couple of mistakes I’d like to do over.” by Jerry Coleman.
Heya i am for the first time here. I found this board and I find It really useful & it helped me out much. I hope to give something back and aid others like you helped me.
I’ve read a few good stuff here. Certainly worth bookmarking for revisiting. I surprise how much effort you put to make such a magnificent informative website.
Keep up the great piece of work, I read few blog posts on this internet site and I conceive that your web blog is really interesting and contains bands of excellent info .
With havin so much content do you ever run into any problems of plagorism or copyright violation? My site has a lot of completely unique content I’ve either written myself or outsourced but it seems a lot of it is popping it up all over the internet without my authorization. Do you know any techniques to help prevent content from being stolen? I’d really appreciate it.
wonderful points altogether, you simply gained a brand new reader. What would you recommend about your post that you made some days ago? Any positive?
Heya i’m for the first time here. I found this board and I to find It truly useful & it helped me out much. I am hoping to provide one thing back and help others such as you helped me.
I went over this web site and I believe you have a lot of superb information, saved to my bookmarks (:.
I think this site has very great written written content content.
Hello! This is kind of off topic but I need some guidance from an established blog. Is it hard to set up your own blog? I’m not very techincal but I can figure things out pretty quick. I’m thinking about setting up my own but I’m not sure where to begin. Do you have any points or suggestions? Cheers
I view something truly interesting about your blog so I bookmarked.
Very good website you have here but I was curious about if you knew of any message boards that cover the same topics talked about here? I’d really love to be a part of online community where I can get feed-back from other experienced individuals that share the same interest. If you have any suggestions, please let me know. Thanks!
Good day! Do you know if they make any plugins to help with SEO? I’m trying to get my blog to rank for some targeted keywords but I’m not seeing very good gains. If you know of any please share. Thanks!
I was just searching for this info for some time. After 6 hours of continuous Googleing, finally I got it in your web site. I wonder what’s the lack of Google strategy that do not rank this type of informative web sites in top of the list. Generally the top sites are full of garbage.
Very great post. I simply stumbled upon your weblog and wished to say that I’ve truly enjoyed browsing your weblog posts. In any case I’ll be subscribing for your feed and I hope you write again very soon!
I am extremely impressed with your writing skills and also with the layout on your weblog. Is this a paid theme or did you modify it yourself? Anyway keep up the excellent quality writing, it is rare to see a great blog like this one nowadays..
Thanks for every other informative blog. Where else may I am getting that type of info written in such an ideal approach? I have a challenge that I’m simply now operating on, and I’ve been on the look out for such information.
Hi my family member! I want to say that this post is awesome, nice written and include almost all important infos. I would like to look extra posts like this .
he blog was how do i say it… relevant, finally something that helped me. Thanks
I genuinely enjoy studying on this web site, it contains wonderful blog posts. “You should pray for a sound mind in a sound body.” by Juvenal.
I got good info from your blog
Only wanna remark that you have a very nice website , I love the style and design it really stands out.
Good write-up, I’m normal visitor of one’s website, maintain up the excellent operate, and It’s going to be a regular visitor for a lengthy time.
I was reading through some of your blog posts on this internet site and I believe this web site is rattling instructive! Retain posting.
It’s really a nice and helpful piece of information. I am satisfied that you shared this helpful information with us. Please keep us up to date like this. Thanks for sharing.
A person necessarily lend a hand to make severely posts I would state. That is the very first time I frequented your website page and thus far? I surprised with the research you made to make this particular put up amazing. Great task!
Good blog! I truly love how it is simple on my eyes and the data are well written. I’m wondering how I could be notified when a new post has been made. I’ve subscribed to your RSS feed which must do the trick! Have a nice day!
You really make it seem so easy with your presentation but I find this matter to be actually something which I think I would never understand. It seems too complex and very broad for me. I am looking forward for your next post, I will try to get the hang of it!
Thanx for the effort, keep up the good work Great work, I am going to start a small Blog Engine course work using your site I hope you enjoy blogging with the popular BlogEngine.net.Thethoughts you express are really awesome. Hope you will right some more posts.
I really appreciate this post. I’ve been looking all over for this! Thank goodness I found it on Bing. You have made my day! Thx again
Right now it appears like Movable Type is the preferred blogging platform out there right now. (from what I’ve read) Is that what you are using on your blog?
Having read this I thought it was very informative. I appreciate you taking the time and effort to put this article together. I once again find myself spending way to much time both reading and commenting. But so what, it was still worth it!
Thanks so much for giving everyone an extraordinarily spectacular chance to read critical reviews from here. It is usually so excellent and also stuffed with a good time for me and my office co-workers to visit the blog not less than 3 times every week to read the fresh issues you will have. And lastly, we are usually fascinated with the fabulous tricks served by you. Selected 2 areas in this post are in truth the most efficient we have all ever had.
This actually answered my problem, thank you!
After going over a handful of the blog articles on your web site, I seriously like your
way of blogging. I book-marked it to my bookmark webpage list and will be checking
back in the near future. Please visit my website too and let me
know your opinion.
Wow that was unusual. I just wrote an really long comment but after I clicked submit my comment didn’t show up. Grrrr… well I’m not writing all that over again. Anyhow, just wanted to say superb blog!
Whats up this is kinda of off topic but I was wondering if blogs use WYSIWYG editors or if you have to manually code with HTML. I’m starting a blog soon but have no coding experience so I wanted to get guidance from someone with experience. Any help would be enormously appreciated!
I like this weblog very much, Its a really nice position to read and get info . “No one wants advice — only corroboration.” by John Steinbeck.
Terrific post but I was wanting to know if you could write a litte more on this topic? I’d be very thankful if you could elaborate a little bit more. Cheers!
I have been absent for some time, but now I remember why I used to love this blog. Thanks , I will try and check back more often. How frequently you update your web site?
Your house is valueble for me. Thanks!…
Greate article. Keep posting such kind of info on your blog.
Im really impressed by it.
Hi there, You’ve done a fantastic job. I will definitely digg it
and in my view suggest to my friends. I am confident they’ll be benefited from this web site.
This website online is known as a stroll-by way of for all of the info you wanted about this and didn’t know who to ask. Glimpse right here, and you’ll undoubtedly discover it.
I like what you guys are up too. Such clever work and reporting! Carry on the superb works guys I have incorporated you guys to my blogroll. I think it will improve the value of my website 🙂
Simply wanna input on few general things, The website design and style is perfect, the content material is real good : D.
I am extremely impressed with your writing skills and also with the layout on your weblog. Is this a paid theme or did you customize it yourself? Either way keep up the nice quality writing, it’s rare to see a great blog like this one these days..
I’m still learning from you, while I’m trying to reach my goals. I absolutely love reading all that is written on your blog.Keep the tips coming. I enjoyed it!
Thank you for any other informative website. Where else may I am getting that kind of info written in such a perfect means? I’ve a undertaking that I am simply now operating on, and I’ve been on the glance out for such info.
Very interesting information!Perfect just what I was looking for! “If you bungle raising your children, I don’t think whatever else you do matters.” by Jacqueline Lee Bouvier Kennedy Onassis.
You actually make it appear so easy with your presentation but I find this topic to be actually something which I feel I’d never understand. It sort of feels too complex and very huge for me. I’m taking a look ahead on your subsequent submit, I’ll attempt to get the hang of it!
Thanks for every other magnificent article. Where else could anyone get that type of info in such an ideal way of writing? I’ve a presentation subsequent week, and I am at the search for such information.
I always was interested in this topic and still am, appreciate it for posting.
Youre so cool! I dont suppose Ive learn anything like this before. So good to search out any person with some unique thoughts on this subject. realy thanks for beginning this up. this website is something that’s wanted on the web, someone with somewhat originality. helpful job for bringing something new to the internet!
Everything is very open and very clear explanation of issues. was truly information. Your website is very useful. Thanks for sharing.
Whats up very nice site!! Guy .. Excellent .. Wonderful .. I will bookmark your web site and take the feeds additionally?KI’m happy to search out a lot of helpful info here within the put up, we’d like work out more strategies on this regard, thank you for sharing. . . . . .
Very efficiently written post. It will be valuable to everyone who employess it, as well as myself. Keep doing what you are doing – for sure i will check out more posts.
I think this site holds very superb indited content material blog posts.
Hi there! I just wanted to ask if you ever have any trouble with hackers? My last blog (wordpress) was hacked and I ended up losing a few months of hard work due to no backup. Do you have any methods to prevent hackers?
This is the right blog for anyone who wants to find out about this topic. You realize so much its almost hard to argue with you (not that I actually would want…HaHa). You definitely put a new spin on a topic thats been written about for years. Great stuff, just great!
Hi there, yup this piece of writing is really pleasant and I have learned lot
of things from it on the topic of blogging. thanks.
Hmm is anyone else encountering problems with the images on this blog loading? I’m trying to find out if its a problem on my end or if it’s the blog. Any feedback would be greatly appreciated.
Nice post. I learn something more challenging on different blogs everyday. It will always be stimulating to read content from other writers and practice a little something from their store. I’d prefer to use some with the content on my blog whether you don’t mind. Natually I’ll give you a link on your web blog. Thanks for sharing.
I was suggested this website by my cousin. I’m not sure whether this post is written by him as no one else know such detailed about my problem. You’re incredible! Thanks!
I’d have to examine with you here. Which is not one thing I usually do! I take pleasure in reading a post that may make folks think. Additionally, thanks for permitting me to comment!
Hi! This is kind of off topic but I need some advice from an established blog. Is it difficult to set up your own blog? I’m not very techincal but I can figure things out pretty fast. I’m thinking about making my own but I’m not sure where to begin. Do you have any points or suggestions? Thanks
Saved as a favorite, I really like your blog!
Thanks for another informative website. Where else could I am getting that type of info written in such an ideal manner? I’ve a undertaking that I’m just now working on, and I have been at the look out for such info.
I really like your writing style, excellent information, appreciate it for putting up :D. “If a cluttered desk is the sign of a cluttered mind, what is the significance of a clean desk” by Laurence J. Peter.
Very interesting information!Perfect just what I was looking for!
Whats up very nice site!! Man .. Beautiful .. Superb .. I’ll bookmark your web site and take the feeds also?KI am glad to search out so many useful information right here within the submit, we’d like work out more techniques on this regard, thank you for sharing. . . . . .
whoah this blog is excellent i love studying your posts. Keep up the good work! You know, lots of people are hunting round for this info, you can aid them greatly.
Hi , I do believe this is an excellent blog. I stumbled upon it on Yahoo , i will come back once again. Money and freedom is the best way to change, may you be rich and help other people.
Greetings! Very helpful advice on this article! It is the little changes that make the biggest changes. Thanks a lot for sharing!
I love reading through and I believe this website got some genuinely utilitarian stuff on it! .
Really wonderful information can be found on weblog.
With havin so much content do you ever run into any problems of plagorism or copyright violation? My site has a lot
of unique content I’ve either created myself or outsourced but it seems
a lot of it is popping it up all over the internet without my authorization. Do you
know any techniques to help stop content from being stolen? I’d genuinely appreciate it.
Hello there I am so grateful I found your web site, I really found you by accident, while I was looking on Google for something else, Nonetheless I am here now and would just like to say cheers for a remarkable post and a all round enjoyable blog (I also love the theme/design), I don’t have time to browse it all at the minute but I have book-marked it and also added in your RSS feeds, so when I have time I will be back to read more, Please do keep up the excellent job.
This is my first time visit at here and i am truly impressed to
read everthing at single place.
Good – I should certainly pronounce, impressed with your website. I had no trouble navigating through all the tabs and related information ended up being truly simple to do to access. I recently found what I hoped for before you know it at all. Quite unusual. Is likely to appreciate it for those who add forums or anything, web site theme . a tones way for your client to communicate. Excellent task.
It’s the best time to make a few plans for the longer term and it is time to be happy. I have read this publish and if I may I desire to recommend you some fascinating issues or tips. Maybe you can write next articles regarding this article. I desire to read more issues approximately it!
Thanks in support of sharing such a pleasant opinion,
piece of writing is fastidious, thats why i have read it completely
I was just seeking this information for some time. After six hours of continuous Googleing, at last I got it in your site. I wonder what is the lack of Google strategy that don’t rank this type of informative web sites in top of the list. Generally the top sites are full of garbage.
There may be noticeably a bundle to know about this. I assume you made certain good factors in features also.
I’m still learning from you, as I’m making my way to the top as well. I definitely love reading everything that is written on your website.Keep the stories coming. I liked it!
Hi, Neat post. There’s a problem with your website in internet explorer, would test this… IE still is the market leader and a large portion of people will miss your fantastic writing due to this problem.
Very interesting info !Perfect just what I was looking for!
It¦s truly a nice and helpful piece of information. I am glad that you simply shared this useful info with us. Please keep us informed like this. Thanks for sharing.
What’s Happening i am new to this, I stumbled upon this I’ve found It positively useful and it has helped me out loads. I hope to contribute & assist other users like its aided me. Good job.
Hello! This post couldn’t be written any better! Reading through this post reminds me of my previous room mate! He always kept talking about this. I will forward this post to him. Pretty sure he will have a good read. Thank you for sharing!
It?¦s really a nice and useful piece of information. I?¦m satisfied that you just shared this helpful information with us. Please keep us informed like this. Thank you for sharing.
Enjoyed examining this, very good stuff, appreciate it. “It requires more courage to suffer than to die.” by Napoleon Bonaparte.
I really like your writing style, excellent information, regards for posting :D. “In every affair consider what precedes and what follows, and then undertake it.” by Epictetus.
I’m really enjoying the design and layout of your website. It’s a very easy on the eyes which makes it much more enjoyable for me to come here and visit more often. Did you hire out a designer to create your theme? Fantastic work!
magnificent publish, very informative. I wonder why the other experts of this sector do not notice this. You should proceed your writing. I am confident, you’ve a huge readers’ base already!
hello!,I like your writing so much! share we communicate more about your post on AOL? I need a specialist on this area to solve my problem. May be that’s you! Looking forward to see you.
Perfectly written subject material, appreciate it for selective information. “The earth was made round so we would not see too far down the road.” by Karen Blixen.
Hmm it seems like your blog ate my first comment (it was super long) so I guess I’ll just sum it up what I had written and say, I’m thoroughly enjoying your blog. I as well am an aspiring blog writer but I’m still new to the whole thing. Do you have any recommendations for novice blog writers? I’d really appreciate it.
There are actually plenty of details like that to take into consideration. That is a great level to convey up. I supply the thoughts above as general inspiration but clearly there are questions like the one you convey up the place a very powerful factor might be working in trustworthy good faith. I don?t know if best practices have emerged around things like that, however I am certain that your job is clearly identified as a fair game. Both boys and girls really feel the affect of just a moment’s pleasure, for the rest of their lives.
Write more, thats all I have to say. Literally, it seems as though you relied on the video to make your point. You clearly know what youre talking about, why waste your intelligence on just posting videos to your blog when you could be giving us something informative to read?
I truly enjoy studying on this site, it contains wonderful blog posts.
You have noted very interesting points! ps decent web site. “What a grand thing, to be loved What a grander thing still, to love” by Victor Hugo.
You have brought up a very good details, appreciate it for the post.
When I originally commented I clicked the -Notify me when new comments are added- checkbox and now each time a comment is added I get four emails with the same comment. Is there any way you can remove me from that service? Thanks!
Hackdra is a cyber security company that can provide smart contract auditing, pen-testing, bug bounty, blockchain, web3, DeFi, NFT, and ARM services with AI.
I couldn’t resist commenting
Hiya, I’m really glad I have found this information. Today bloggers publish just about gossips and net and this is really irritating. A good blog with exciting content, this is what I need. Thank you for keeping this web site, I will be visiting it. Do you do newsletters? Can’t find it.
Dead pent written content, appreciate it for entropy. “Necessity is the mother of taking chances.” by Mark Twain.
Hello.This post was really interesting, especially because I was searching for thoughts on this issue last couple of days.
Great ?V I should definitely pronounce, impressed with your web site. I had no trouble navigating through all tabs as well as related info ended up being truly simple to do to access. I recently found what I hoped for before you know it at all. Quite unusual. Is likely to appreciate it for those who add forums or something, site theme . a tones way for your client to communicate. Nice task..
What’s Happening i’m new to this, I stumbled upon this I have found It positively useful and it has aided me out loads. I’m hoping to give a contribution & help different customers like its aided me. Good job.
I precisely had to thank you so much all over again. I am not sure the things that I would have worked on in the absence of the tactics contributed by you on this area. It had been an absolute distressing condition in my circumstances, nevertheless noticing a new professional approach you resolved it took me to weep for fulfillment. I am thankful for this help and then hope that you really know what a great job you are accomplishing instructing other individuals thru your blog. Most likely you haven’t got to know all of us.
Some very interesting points made in this post. Glad i found it. Thanks for sharing such valuable information.
Do you mind if I quote a few of your articles as long as I provide credit and sources back to your webpage? My website is in the exact same niche as yours and my visitors would truly benefit from a lot of the information you present here. Please let me know if this alright with you. Regards!
fantastic post.Never knew this, regards for letting me know.
As a Newbie, I am always exploring online for articles that can benefit me. Thank you
Does your blog have a contact page? I’m having problems locating it but, I’d like to shoot you an email. I’ve got some ideas for your blog you might be interested in hearing. Either way, great website and I look forward to seeing it expand over time.
Someone essentially help to make seriously articles I would state. This is the first time I frequented your website page and thus far? I amazed with the research you made to make this particular publish incredible. Wonderful job!
This post is invaluable. How can I find out more?
I think you have noted some very interesting points, thankyou for the post.
You made some nice points there. I looked on the internet for the subject and found most persons will go along with with your blog.
I see something genuinely interesting about your weblog so I saved to favorites.
WONDERFUL Post.thanks for share..extra wait .. …
I was just seeking this information for some time. After six hours of continuous Googleing, at last I got it in your web site. I wonder what is the lack of Google strategy that don’t rank this kind of informative sites in top of the list. Usually the top web sites are full of garbage.
It’s actually a nice and helpful piece of info. I’m happy that you simply shared this useful information with us. Please stay us up to date like this. Thanks for sharing.
I enjoy the efforts you have put in this, appreciate it for all the great posts.
I don’t even know how I ended up here, but I thought this post was good. I do not know who you are but certainly you are going to a famous blogger if you are not already 😉 Cheers!
I genuinely enjoy reading through on this website , it has got great blog posts. “He who sees the truth, let him proclaim it, without asking who is for it or who is against it.” by Henry George.
Hello there! I know this is somewhat off topic but I was
wondering which blog platform are you using for this website?
I’m getting fed up of WordPress because I’ve had issues with hackers and I’m
looking at options for another platform. I would be fantastic if
you could point me in the direction of a good platform.
Hello my loved one! I wish to say that this post is amazing, nice written and come with approximately all vital infos. I’d like to see extra posts like this .
It’s a pity you don’t have a donate button! I’d certainly donate to this outstanding blog! I guess for now i’ll settle for book-marking and adding your RSS feed to my Google account. I look forward to new updates and will share this blog with my Facebook group. Chat soon!
Hiya, I am really glad I have found this info. Today bloggers publish only about gossips and web and this is really frustrating. A good site with interesting content, that is what I need. Thank you for keeping this web-site, I’ll be visiting it. Do you do newsletters? Can not find it.
hi!,I love your writing so much! proportion we be in contact more approximately your article on AOL? I require a specialist on this area to solve my problem. May be that’s you! Looking ahead to peer you.
you have a great blog here! would you like to make some invite posts on my blog?
I truly enjoy studying on this website , it contains good posts.
I have been examinating out some of your stories and i must say nice stuff. I will definitely bookmark your website.
I’ve been exploring for a little bit for any high-quality articles or weblog posts in this sort of area . Exploring in Yahoo I at last stumbled upon this website. Studying this info So i am satisfied to exhibit that I’ve a very excellent uncanny feeling I found out just what I needed. I such a lot for sure will make sure to don’t disregard this website and provides it a glance on a constant basis.
An attention-grabbing discussion is worth comment. I believe that it’s best to write more on this subject, it may not be a taboo subject but usually people are not enough to speak on such topics. To the next. Cheers
Good day! I know this is kinda off topic however I’d figured I’d ask. Would you be interested in trading links or maybe guest writing a blog post or vice-versa? My website addresses a lot of the same topics as yours and I believe we could greatly benefit from each other. If you are interested feel free to send me an email. I look forward to hearing from you! Awesome blog by the way!
You are my inspiration , I possess few blogs and very sporadically run out from to brand.
Do you have a spam issue on this site; I also am a blogger, and I was wanting to know your situation; many of us have developed some nice procedures and we are looking to trade solutions with other folks, please shoot me an e-mail if interested.
Great post. I am facing a couple of these problems.
I’m not that much of a online reader to be honest but your sites really nice, keep it up! I’ll go ahead and bookmark your site to come back later on. All the best
This design is incredible! You definitely know how to keep a reader amused. Between your wit and your videos, I was almost moved to start my own blog (well, almost…HaHa!) Excellent job. I really loved what you had to say, and more than that, how you presented it. Too cool!
I’ve been exploring for a bit for any high quality articles or blog posts in this kind of space . Exploring in Yahoo I finally stumbled upon this web site. Studying this info So i am happy to convey that I have a very just right uncanny feeling I came upon just what I needed. I most indisputably will make sure to do not forget this site and give it a glance on a continuing basis.
I’m not sure why but this web site is loading incredibly slow for me. Is anyone else having this issue or is it a issue on my end? I’ll check back later on and see if the problem still exists.
Very interesting info!Perfect just what I was searching for!
I think this site holds very excellent indited articles content.
naturally like your web site but you need to take a look at the spelling on several of your posts. A number of them are rife with spelling problems and I find it very troublesome to inform the reality on the other hand I’ll surely come again again.
I am commenting to make you be aware of what a fabulous encounter my wife’s girl enjoyed reading the blog. She even learned many issues, not to mention what it’s like to possess an incredible helping nature to make a number of people without hassle gain knowledge of various complicated issues. You truly surpassed readers’ expectations. Thanks for presenting such important, healthy, informative and also cool guidance on the topic to Jane.
I really appreciate this post. I have been looking everywhere for this! Thank goodness I found it on Bing. You’ve made my day! Thx again!
Hey there just wanted to give you a quick heads up and let you know a few of the pictures aren’t loading properly. I’m not sure why but I think its a linking issue. I’ve tried it in two different internet browsers and both show the same outcome.
Do you mind if I quote a few of your articles as long as I provide credit and sources back to your webpage? My blog site is in the exact same niche as yours and my visitors would genuinely benefit from a lot of the information you provide here. Please let me know if this ok with you. Cheers!
Good ?V I should definitely pronounce, impressed with your website. I had no trouble navigating through all the tabs and related info ended up being truly easy to do to access. I recently found what I hoped for before you know it in the least. Reasonably unusual. Is likely to appreciate it for those who add forums or anything, web site theme . a tones way for your customer to communicate. Excellent task..
You have brought up a very good details , thanks for the post.
My brother suggested I would possibly like this website. He was entirely right. This submit truly made my day. You can not believe simply how a lot time I had spent for this information! Thanks!
You actually make it appear really easy along with your presentation however I find this matter to be really one thing that I believe I would never understand. It seems too complicated and extremely large for me. I am looking forward on your subsequent submit, I?¦ll attempt to get the cling of it!
I visited a lot of website but I think this one holds something special in it in it
Some truly fantastic posts on this website , appreciate it for contribution.
Thanks for the update, is there any way I can get an email sent to me whenever you write a new update?
Great – I should certainly pronounce, impressed with your web site. I had no trouble navigating through all the tabs and related info ended up being truly simple to do to access. I recently found what I hoped for before you know it at all. Reasonably unusual. Is likely to appreciate it for those who add forums or something, web site theme . a tones way for your customer to communicate. Excellent task.
It’s really a great and useful piece of information. I’m glad that you shared this helpful info with us. Please keep us informed like this. Thanks for sharing.
Terrific work! This is the type of info that should be shared around the web. Shame on Google for not positioning this post higher! Come on over and visit my site . Thanks =)
I appreciate, cause I found exactly what I was looking for. You have ended my four day long hunt! God Bless you man. Have a great day. Bye
I like this post, enjoyed this one regards for posting.
I’ve been surfing online more than 3 hours today, yet I never found any interesting article like yours. It’s pretty worth enough for me. In my opinion, if all web owners and bloggers made good content as you did, the internet will be a lot more useful than ever before.
I will immediately grasp your rss as I can’t in finding your e-mail subscription hyperlink or newsletter service. Do you’ve any? Please let me recognize in order that I may just subscribe. Thanks.
Just wanna tell that this is invaluable, Thanks for taking your time to write this.
Pretty section of content. I just stumbled upon your website and in accession capital to assert that I get in fact enjoyed account your blog posts. Any way I’ll be subscribing to your feeds and even I achievement you access consistently quickly.
Outstanding post, I believe blog owners should learn a lot from this site its real user genial.
Some truly interesting info , well written and generally user pleasant.
Very nice post. I just stumbled upon your blog and wanted to mention that I’ve truly enjoyed surfing around your weblog posts. After all I will be subscribing on your rss feed and I’m hoping you write once more very soon!
Have you ever considered writing an ebook or guest authoring on other blogs? I have a blog based upon on the same subjects you discuss and would really like to have you share some stories/information. I know my audience would appreciate your work. If you’re even remotely interested, feel free to send me an e-mail.
You are my aspiration, I possess few web logs and infrequently run out from to brand.
A lot of of the things you articulate happens to be astonishingly accurate and that makes me ponder the reason why I had not looked at this in this light before. Your piece truly did switch the light on for me as far as this specific issue goes. Nevertheless at this time there is one particular factor I am not too comfy with so while I make an effort to reconcile that with the actual central theme of your issue, permit me observe exactly what the rest of the visitors have to point out.Well done.
I’m very happy to read this. This is the type of manual that needs to be given and not the accidental misinformation that is at the other blogs. Appreciate your sharing this best doc.
I’m really enjoying the design and layout of your blog. It’s a very easy on the eyes which makes it much more pleasant for me to come here and visit more often. Did you hire out a developer to create your theme? Great work!
Way cool, some valid points! I appreciate you making this article available, the rest of the site is also high quality. Have a fun.
What i do not understood is actually how you’re not actually much more well-liked than you might be now. You’re very intelligent. You realize thus considerably relating to this subject, produced me personally consider it from a lot of varied angles. Its like men and women aren’t fascinated unless it is one thing to do with Lady gaga! Your own stuffs great. Always maintain it up!
I was just looking for this info for a while. After 6 hours of continuous Googleing, at last I got it in your site. I wonder what’s the lack of Google strategy that don’t rank this type of informative web sites in top of the list. Generally the top sites are full of garbage.
Nice read, I just passed this onto a colleague who was doing a little research on that. And he just bought me lunch because I found it for him smile Therefore let me rephrase that: Thanks for lunch! “There are places and moments in which one is so completely alone that one sees the world entire.” by Jules Renard.
Very interesting info!Perfect just what I was looking for!
Heya! I just wanted to ask if you ever have any problems with hackers? My last blog (wordpress) was hacked and I ended up losing months of hard work due to no backup. Do you have any methods to stop hackers?
you have a great blog here! would you like to make some invite posts on my blog?
What i do not understood is in fact how you’re now not really a lot more neatly-appreciated than you may be right now. You’re very intelligent. You realize thus considerably when it comes to this matter, made me personally consider it from a lot of various angles. Its like women and men are not involved unless it¦s something to do with Lady gaga! Your own stuffs great. All the time care for it up!
Terrific post but I was wanting to know if you could write a litte more on this subject? I’d be very thankful if you could elaborate a little bit more. Many thanks!
I’ve learn some excellent stuff here. Certainly worth bookmarking for revisiting. I surprise how so much effort you set to create one of these wonderful informative site.
Hi, Neat post. There’s an issue along with your site in web explorer, could check this?K IE nonetheless is the market leader and a good component to other people will leave out your magnificent writing because of this problem.
Hello my loved one! I want to say that this article is amazing, nice written and include approximately all important infos. I¦d like to look extra posts like this .
Woh I love your articles, saved to favorites! .
I think other website owners should take this web site as an model, very clean and fantastic user genial design.
Thank you for helping out, wonderful information. “The surest way to be deceived is to think oneself cleverer than the others.” by La Rochefoucauld.
Heya i am for the primary time here. I found this board and I in finding It truly helpful & it helped me out a lot. I hope to provide something back and aid others such as you helped me.
This is a very good tips especially to those new to blogosphere, brief and accurate information… Thanks for sharing this one. A must read article.
Very nice post. I just stumbled upon your blog and wished to say that I have really enjoyed surfing around your blog posts. After all I’ll be subscribing to your rss feed and I hope you write again very soon!
This is a very good tips especially to those new to blogosphere, brief and accurate information… Thanks for sharing this one. A must read article.
hello there and thanks to your info – I have certainly picked up something new from proper here. I did however expertise some technical points the usage of this web site, since I skilled to reload the web site a lot of times prior to I could get it to load correctly. I were brooding about in case your web hosting is OK? Now not that I am complaining, but sluggish loading cases times will sometimes have an effect on your placement in google and can injury your high quality score if ads and ***********|advertising|advertising|advertising and *********** with Adwords. Anyway I’m adding this RSS to my e-mail and can look out for much more of your respective interesting content. Make sure you replace this once more soon..
You should take part in a contest for one of the best blogs on the web. I will recommend this site!
You are my aspiration, I possess few web logs and infrequently run out from to brand : (.
Awsome post and straight to the point. I don’t know if this is actually the best place to ask but do you guys have any thoughts on where to employ some professional writers? Thanks 🙂
Thanx for the effort, keep up the good work Great work, I am going to start a small Blog Engine course work using your site I hope you enjoy blogging with the popular BlogEngine.net.Thethoughts you express are really awesome. Hope you will right some more posts.
Hiya, I’m really glad I’ve found this info. Nowadays bloggers publish only about gossips and internet and this is actually frustrating. A good web site with exciting content, that’s what I need. Thanks for keeping this web-site, I’ll be visiting it. Do you do newsletters? Can not find it.
Thank you for sharing excellent informations. Your website is so cool. I am impressed by the details that you¦ve on this website. It reveals how nicely you understand this subject. Bookmarked this website page, will come back for more articles. You, my pal, ROCK! I found simply the info I already searched everywhere and just couldn’t come across. What a great web site.
Loving the info on this site, you have done outstanding job on the posts.
I dugg some of you post as I thought they were very beneficial invaluable
Good – I should definitely pronounce, impressed with your website. I had no trouble navigating through all the tabs and related info ended up being truly simple to do to access. I recently found what I hoped for before you know it at all. Quite unusual. Is likely to appreciate it for those who add forums or something, website theme . a tones way for your customer to communicate. Nice task..
I really appreciate this post. I have been looking everywhere for this! Thank goodness I found it on Bing. You’ve made my day! Thanks again!
Virtually all of what you articulate is supprisingly appropriate and that makes me wonder the reason why I had not looked at this with this light before. This article truly did switch the light on for me personally as far as this specific issue goes. However there is actually one particular issue I am not really too comfy with and while I make an effort to reconcile that with the central idea of your position, allow me see what the rest of your subscribers have to point out.Nicely done.
It’s best to take part in a contest for top-of-the-line blogs on the web. I’ll suggest this site!
Thanks a bunch for sharing this with all folks you actually know what you are talking approximately! Bookmarked. Kindly also visit my site =). We will have a link change arrangement between us!
Hello this is kind of of off topic but I was wondering if blogs use WYSIWYG editors or if you have to manually code with HTML. I’m starting a blog soon but have no coding skills so I wanted to get guidance from someone with experience. Any help would be greatly appreciated!
An interesting discussion is worth comment. I think that you should write more on this topic, it might not be a taboo subject but generally people are not enough to speak on such topics. To the next. Cheers
I will right away take hold of your rss feed as I can’t in finding your email subscription hyperlink or newsletter service. Do you have any? Kindly let me know so that I may just subscribe. Thanks.
Just what I was looking for, regards for posting.
excellent points altogether, you just received a new reader. What may you suggest about your submit that you made a few days ago? Any sure?
I got what you intend, thankyou for putting up.Woh I am happy to find this website through google. “It is a very hard undertaking to seek to please everybody.” by Publilius Syrus.
Hello this is kind of of off topic but I was wanting to know if blogs use WYSIWYG editors or if you have to manually code with HTML. I’m starting a blog soon but have no coding experience so I wanted to get advice from someone with experience. Any help would be enormously appreciated!
Very interesting details you have observed, thankyou for putting up.
Hello very nice website!! Man .. Excellent .. Superb .. I’ll bookmark your website and take the feeds additionally…I am satisfied to search out a lot of helpful information here within the submit, we want work out more techniques on this regard, thanks for sharing.
Excellent post. I was checking constantly this blog and I am impressed! Extremely useful information specially the last part 🙂 I care for such information much. I was seeking this particular info for a long time. Thank you and good luck.
What i do not understood is actually how you’re not really a lot more neatly-favored than you might be right now. You are very intelligent. You already know therefore significantly in the case of this topic, made me in my opinion imagine it from numerous various angles. Its like men and women don’t seem to be involved except it’s something to do with Lady gaga! Your individual stuffs outstanding. All the time maintain it up!
Your place is valueble for me. Thanks!…
I was studying some of your articles on this website and I think this web site is really instructive! Keep on posting.
Very well written article. It will be helpful to anybody who utilizes it, including me. Keep up the good work – looking forward to more posts.
Way cool, some valid points! I appreciate you making this article available, the rest of the site is also high quality. Have a fun.
I would like to thnkx for the efforts you have put in writing this blog. I am hoping the same high-grade blog post from you in the upcoming as well. In fact your creative writing abilities has inspired me to get my own blog now. Really the blogging is spreading its wings quickly. Your write up is a good example of it.
The next time I read a blog, I hope that it doesnt disappoint me as much as this one. I mean, I know it was my choice to read, but I actually thought youd have something interesting to say. All I hear is a bunch of whining about something that you could fix if you werent too busy looking for attention.
I conceive this site holds some real wonderful information for everyone. “Glory is fleeting, but obscurity is forever.” by Napoleon.
certainly like your web-site however you have to test the spelling on several of your posts. Several of them are rife with spelling issues and I find it very troublesome to inform the truth then again I will definitely come again again.
You are my inspiration , I own few web logs and very sporadically run out from to post .
Hi, just required you to know I he added your site to my Google bookmarks due to your layout. But seriously, I believe your internet site has 1 in the freshest theme I??ve came across. It extremely helps make reading your blog significantly easier.
Great write-up, I?¦m regular visitor of one?¦s site, maintain up the excellent operate, and It is going to be a regular visitor for a lengthy time.
obviously like your web site however you have to test the spelling on several of your posts. A number of them are rife with spelling problems and I find it very troublesome to inform the reality however I’ll certainly come again again.
Hi my friend! I wish to say that this article is awesome, nice written and come with approximately all important infos. I’d like to look extra posts like this .
I’m really enjoying the design and layout of your website. It’s a very easy on the eyes which makes it much more enjoyable for me to come here and visit more often. Did you hire out a designer to create your theme? Fantastic work!
Today, I went to the beachfront with my kids. I found a sea shell and gave it to my 4 year old daughter and said “You can hear the ocean if you put this to your ear.” She put the shell to her ear and screamed. There was a hermit crab inside and it pinched her ear. She never wants to go back! LoL I know this is totally off topic but I had to tell someone!
You made some respectable factors there. I seemed on the internet for the difficulty and found most individuals will associate with along with your website.
Thanks , I’ve just been looking for info about this topic for ages and yours is the best I’ve discovered so far. But, what about the bottom line? Are you sure about the source?
I couldn’t resist commenting
Keep working ,great job!
I have not checked in here for some time as I thought it was getting boring, but the last several posts are good quality so I guess I’ll add you back to my daily bloglist. You deserve it my friend 🙂
I have been exploring for a little for any high-quality articles or weblog posts on this sort of house . Exploring in Yahoo I at last stumbled upon this web site. Studying this info So i am happy to express that I have a very good uncanny feeling I found out just what I needed. I most for sure will make certain to don?¦t omit this site and provides it a glance regularly.
Thanks for another magnificent post. Where else could anybody get that type of info in such a perfect way of writing? I have a presentation next week, and I am on the look for such info.
It’s hard to find knowledgeable people on this topic, but you sound like you know what you’re talking about! Thanks
I do trust all of the concepts you’ve presented in your post. They’re very convincing and will definitely work. Still, the posts are very brief for beginners. Could you please prolong them a little from subsequent time? Thanks for the post.
You completed some nice points there. I did a search on the theme and found mainly folks will agree with your blog.
Its like you learn my mind! You appear to grasp so much about this, like you wrote the ebook in it or something. I think that you can do with some percent to drive the message house a little bit, but other than that, that is fantastic blog. A fantastic read. I’ll definitely be back.
You actually make it seem so easy along with your presentation however I in finding this topic to be really something which I believe I’d by no means understand. It kind of feels too complex and extremely extensive for me. I’m taking a look forward to your subsequent post, I will try to get the hang of it!
WONDERFUL Post.thanks for share..extra wait .. …
Hey, you used to write excellent, but the last several posts have been kinda boringK I miss your great writings. Past several posts are just a little out of track! come on!
I do agree with all of the ideas you’ve presented in your post. They’re very convincing and will definitely work. Still, the posts are very short for novices. Could you please extend them a bit from next time? Thanks for the post.
I don’t commonly comment but I gotta admit thankyou for the post on this amazing one : D.
I was examining some of your articles on this website and I think this site is really informative ! Keep putting up.
I went over this site and I believe you have a lot of great info, saved to fav (:.
Sweet website , super design, rattling clean and apply friendly.
Thank you for some other great article. Where else may just anybody get that type of information in such an ideal means of writing? I have a presentation next week, and I am on the look for such info.
An impressive share, I just given this onto a colleague who was doing a little bit analysis on this. And he the truth is bought me breakfast because I found it for him.. smile. So let me reword that: Thnx for the deal with! But yeah Thnkx for spending the time to discuss this, I feel strongly about it and love studying extra on this topic. If potential, as you change into expertise, would you mind updating your weblog with extra particulars? It’s highly useful for me. Big thumb up for this blog publish!
Hey! Do you know if they make any plugins to protect against hackers? I’m kinda paranoid about losing everything I’ve worked hard on. Any tips?
Pretty section of content. I just stumbled upon your weblog and in accession capital to assert that I acquire actually enjoyed account your blog posts. Any way I will be subscribing to your feeds and even I achievement you access consistently fast.
You really make it appear really easy along with your presentation but I find this topic to be really something which I feel I’d by no means understand. It seems too complicated and very large for me. I am having a look ahead for your next submit, I’ll try to get the cling of it!
Admiring the time and effort you put into your site and detailed information you provide. It’s nice to come across a blog every once in a while that isn’t the same out of date rehashed material. Great read! I’ve saved your site and I’m including your RSS feeds to my Google account.
Good day! I could have sworn I’ve been to this blog before but after checking through some of the post I realized it’s new to me. Anyhow, I’m definitely happy I found it and I’ll be bookmarking and checking back frequently!
I like the valuable info you provide to your articles. I’ll bookmark your blog and test again right here regularly. I’m relatively certain I’ll be told many new stuff right right here! Best of luck for the next!
Great – I should certainly pronounce, impressed with your website. I had no trouble navigating through all the tabs as well as related information ended up being truly simple to do to access. I recently found what I hoped for before you know it in the least. Quite unusual. Is likely to appreciate it for those who add forums or something, site theme . a tones way for your client to communicate. Nice task..
It’s truly a great and helpful piece of info. I’m satisfied that you shared this useful information with us. Please stay us up to date like this. Thanks for sharing.
Definitely, what a great blog and instructive posts, I surely will bookmark your website.Best Regards!
You have mentioned very interesting points! ps nice site.
I am really enjoying the theme/design of your web site. Do you ever run into any browser compatibility issues? A few of my blog visitors have complained about my site not working correctly in Explorer but looks great in Opera. Do you have any advice to help fix this issue?
The next time I read a blog, I hope that it doesnt disappoint me as much as this one. I mean, I know it was my choice to read, but I actually thought youd have something interesting to say. All I hear is a bunch of whining about something that you could fix if you werent too busy looking for attention.
Some genuinely nice and useful information on this web site, besides I think the design has fantastic features.
I like this post, enjoyed this one thanks for posting.
I have been absent for some time, but now I remember why I used to love this website. Thanks , I will try and check back more often. How frequently you update your website?
I’ve recently started a web site, the info you provide on this web site has helped me tremendously. Thank you for all of your time & work. “Patriotism is often an arbitrary veneration of real estate above principles.” by George Jean Nathan.
Hello my loved one! I wish to say that this post is amazing, nice written and include almost all vital infos. I’d like to look extra posts like this .
Thank you for sharing superb informations. Your site is so cool. I am impressed by the details that you have on this website. It reveals how nicely you perceive this subject. Bookmarked this web page, will come back for extra articles. You, my friend, ROCK! I found simply the information I already searched everywhere and simply could not come across. What a perfect site.
Hello.This post was really fascinating, particularly since I was searching for thoughts on this topic last Friday.
Wonderful site. Lots of helpful info here. I am sending it to several friends ans additionally sharing in delicious. And naturally, thank you to your effort!
I like this blog very much, Its a rattling nice berth to read and find info . “Anyone can stop a man’s life, but no one his death a thousand doors open on to it. – Phoenissae” by Lucius Annaeus Seneca.
Greetings! I’ve been following your site for some time now and finally got the bravery to go ahead and give you a shout out from Dallas Texas! Just wanted to tell you keep up the good job!
This actually answered my downside, thanks!
wonderful points altogether, you simply gained a new reader. What would you suggest in regards to your post that you made some days in the past? Any certain?
Wonderful web site. Lots of helpful info here. I’m sending it to a few friends ans also sharing in delicious. And naturally, thank you for your effort!
I will immediately grab your rss feed as I can’t find your email subscription link or e-newsletter service. Do you have any? Please let me know in order that I could subscribe. Thanks.
Hi there! This is kind of off topic but I need some help from an established blog. Is it tough to set up your own blog? I’m not very techincal but I can figure things out pretty quick. I’m thinking about creating my own but I’m not sure where to begin. Do you have any ideas or suggestions? With thanks
I do agree with all of the ideas you’ve presented in your post. They’re very convincing and will certainly work. Still, the posts are very short for beginners. Could you please extend them a little from next time? Thanks for the post.
fantastic post.Ne’er knew this, appreciate it for letting me know.
I believe this internet site has got some really great info for everyone. “A man’s dreams are an index to his greatness.” by Zadok Rabinwitz.
When I initially commented I clicked the -Notify me when new comments are added- checkbox and now each time a comment is added I get four emails with the identical comment. Is there any way you possibly can remove me from that service? Thanks!
This is really interesting, You’re a very skilled blogger. I have joined your rss feed and look forward to seeking more of your wonderful post. Also, I have shared your site in my social networks!
Real nice layout and good articles, absolutely nothing else we want : D.
Hello there! This is my first comment here so I just wanted to give a quick shout out and say I really enjoy reading your articles. Can you recommend any other blogs/websites/forums that cover the same subjects? Thanks a lot!
I’d have to examine with you here. Which is not one thing I usually do! I take pleasure in reading a post that may make folks think. Additionally, thanks for permitting me to comment!
Hello there! Do you use Twitter? I’d like to follow you if that would be ok. I’m absolutely enjoying your blog and look forward to new updates.
Wow, fantastic blog layout! How long have you been running a blog for? you make blogging glance easy. The overall look of your site is magnificent, let alone the content!
Of course, what a great site and educative posts, I definitely will bookmark your website.Best Regards!
Absolutely composed written content, appreciate it for information. “You can do very little with faith, but you can do nothing without it.” by Samuel Butler.
Yeah bookmaking this wasn’t a bad determination great post! .
Hey! This is kind of off topic but I need some help from an established blog. Is it tough to set up your own blog? I’m not very techincal but I can figure things out pretty quick. I’m thinking about making my own but I’m not sure where to begin. Do you have any tips or suggestions? Cheers
I’m not sure why but this weblog is loading extremely slow for me. Is anyone else having this issue or is it a problem on my end? I’ll check back later on and see if the problem still exists.
Hello my friend! I wish to say that this post is amazing, nice written and include approximately all important infos. I would like to see more posts like this.
Valuable info. Lucky me I discovered your site unintentionally, and I am surprised why this coincidence didn’t took place in advance! I bookmarked it.
You could certainly see your expertise in the work you write. The world hopes for even more passionate writers like you who are not afraid to say how they believe. Always follow your heart.
Hi my friend! I want to say that this article is amazing, great written and come with approximately all important infos. I would like to peer more posts like this .
Great info and straight to the point. I am not sure if this is in fact the best place to ask but do you folks have any thoughts on where to get some professional writers? Thanks in advance 🙂
Hello there! Would you mind if I share your blog with my facebook group? There’s a lot of people that I think would really appreciate your content. Please let me know. Thanks
I get pleasure from, lead to I found exactly what I used to be looking for. You have ended my 4 day long hunt! God Bless you man. Have a nice day. Bye
Valuable info. Lucky me I found your site by accident, and I am shocked why this accident did not happened earlier! I bookmarked it.
Hi would you mind stating which blog platform you’re working with? I’m going to start my own blog soon but I’m having a difficult time choosing between BlogEngine/Wordpress/B2evolution and Drupal. The reason I ask is because your layout seems different then most blogs and I’m looking for something unique. P.S Apologies for getting off-topic but I had to ask!
you have a great blog here! would you like to make some invite posts on my blog?
I have been checking out a few of your articles and i can claim pretty nice stuff. I will make sure to bookmark your blog.
You really make it appear really easy along with your presentation however I find this topic to be really one thing which I feel I would never understand. It kind of feels too complex and extremely broad for me. I’m taking a look ahead to your subsequent post, I will attempt to get the hang of it!
I’m no longer sure the place you are getting your information, but great topic. I must spend a while studying much more or figuring out more. Thanks for excellent info I was searching for this info for my mission.
I have been exploring for a little for any high quality articles or blog posts in this kind of area . Exploring in Yahoo I eventually stumbled upon this site. Studying this information So i’m glad to convey that I have a very just right uncanny feeling I found out just what I needed. I so much no doubt will make certain to don’t put out of your mind this web site and give it a look regularly.
Hi, just required you to know I he added your site to my Google bookmarks due to your layout. But seriously, I believe your internet site has 1 in the freshest theme I??ve came across. It extremely helps make reading your blog significantly easier.
Lovely just what I was searching for.Thanks to the author for taking his clock time on this one.
Very interesting topic, regards for putting up.
Please let me know if you’re looking for a article author for your weblog. You have some really good articles and I believe I would be a good asset. If you ever want to take some of the load off, I’d absolutely love to write some material for your blog in exchange for a link back to mine. Please shoot me an e-mail if interested. Thanks!
What’s Happening i am new to this, I stumbled upon this I’ve found It absolutely useful and it has helped me out loads. I hope to contribute & assist other users like its helped me. Great job.
You have mentioned very interesting points! ps nice internet site.
I am glad to be one of the visitants on this outstanding web site (:, appreciate it for putting up.
You really make it seem really easy along with your presentation however I to find this matter to be really one thing which I believe I’d never understand. It kind of feels too complex and extremely broad for me. I am having a look forward on your subsequent submit, I?¦ll try to get the dangle of it!
My brother suggested I might like this blog. He was once totally right. This submit truly made my day. You can not consider just how a lot time I had spent for this info! Thanks!
Great amazing things here. I am very satisfied to peer your article. Thank you a lot and i’m looking ahead to contact you. Will you kindly drop me a e-mail?
Howdy! I know this is kinda off topic but I was wondering if you knew where I could get a captcha plugin for my comment form? I’m using the same blog platform as yours and I’m having problems finding one? Thanks a lot!
Good article and straight to the point. I am not sure if this is actually the best place to ask but do you folks have any thoughts on where to hire some professional writers? Thx 🙂
Your house is valueble for me. Thanks!…
F*ckin¦ amazing things here. I am very satisfied to peer your post. Thank you so much and i’m taking a look ahead to contact you. Will you kindly drop me a e-mail?
Perfectly indited articles, regards for entropy. “The last time I saw him he was walking down Lover’s Lane holding his own hand.” by Fred Allen.
Great paintings! That is the kind of information that should be shared around the web. Disgrace on Google for not positioning this put up upper! Come on over and visit my website . Thank you =)
You really make it seem so easy with your presentation but I to find this topic to be really something that I believe I might never understand. It sort of feels too complex and extremely large for me. I’m having a look ahead to your subsequent publish, I will attempt to get the grasp of it!
Great post. I am facing a couple of these problems.
I like this blog so much, saved to my bookmarks. “To hold a pen is to be at war.” by Francois Marie Arouet Voltaire.
It’s a shame you don’t have a donate button! I’d certainly donate to this fantastic blog! I suppose for now i’ll settle for book-marking and adding your RSS feed to my Google account. I look forward to new updates and will talk about this site with my Facebook group. Chat soon!
You actually make it appear so easy together with your presentation but I to find this matter to be really something which I feel I would never understand. It kind of feels too complex and very broad for me. I am having a look ahead for your next put up, I¦ll attempt to get the hang of it!
Hmm is anyone else experiencing problems with the pictures on this blog loading? I’m trying to find out if its a problem on my end or if it’s the blog. Any responses would be greatly appreciated.
It’s a shame you don’t have a donate button! I’d certainly donate to this excellent blog! I suppose for now i’ll settle for book-marking and adding your RSS feed to my Google account. I look forward to new updates and will talk about this blog with my Facebook group. Talk soon!
I am continuously browsing online for tips that can facilitate me. Thx!
I was looking through some of your posts on this site and I think this web site is really instructive! Keep on putting up.
Awsome info and straight to the point. I don’t know if this is actually the best place to ask but do you guys have any thoughts on where to get some professional writers? Thx 🙂
Can I just say what a relief to find someone who actually knows what theyre talking about on the internet. You definitely know how to bring an issue to light and make it important. More people need to read this and understand this side of the story. I cant believe youre not more popular because you definitely have the gift.
Hi, just required you to know I he added your site to my Google bookmarks due to your layout. But seriously, I believe your internet site has 1 in the freshest theme I??ve came across. It extremely helps make reading your blog significantly easier.
I’ve been absent for some time, but now I remember why I used to love this site. Thank you, I will try and check back more often. How frequently you update your web site?
Like the way you’ve outlined things. Easy to follow. Not cluttered.
Very interesting topic, thanks for putting up.
You can certainly see your enthusiasm in the work you write. The world hopes for even more passionate writers like you who aren’t afraid to say how they believe. Always follow your heart.
This design is spectacular! You most certainly know how to keep a reader entertained. Between your wit and your videos, I was almost moved to start my own blog (well, almost…HaHa!) Excellent job. I really enjoyed what you had to say, and more than that, how you presented it. Too cool!
I’ve been browsing online greater than three hours as of late, yet I never discovered any attention-grabbing article like yours. It is lovely value enough for me. Personally, if all web owners and bloggers made good content material as you probably did, the internet will be much more helpful than ever before.
I am glad to be one of many visitants on this great web site (:, regards for posting.
I think this site holds very good pent content articles.
Hi there, You have performed an incredible job. I will definitely digg it and for my part recommend to my friends. I am confident they’ll be benefited from this website.
I’ll right away grab your rss as I can’t in finding your e-mail subscription hyperlink or newsletter service. Do you’ve any? Kindly let me recognize in order that I could subscribe. Thanks.
certainly like your web-site but you need to take a look at the spelling on several of your posts. A number of them are rife with spelling problems and I find it very troublesome to inform the reality nevertheless I¦ll certainly come back again.
Fantastic website. Plenty of useful information here. I am sending it to a few buddies ans additionally sharing in delicious. And naturally, thanks to your effort!
I am constantly thought about this, appreciate it for putting up.
Howdy, i read your blog occasionally and i own a similar one and i was just curious if you get a lot of spam feedback? If so how do you reduce it, any plugin or anything you can suggest? I get so much lately it’s driving me mad so any assistance is very much appreciated.
It’s really a great and helpful piece of information. I’m glad that you simply shared this useful info with us. Please keep us informed like this. Thank you for sharing.
Today, I went to the beach with my kids. I found a sea shell and gave it to my 4 year old daughter and said “You can hear the ocean if you put this to your ear.” She put the shell to her ear and screamed. There was a hermit crab inside and it pinched her ear. She never wants to go back! LoL I know this is completely off topic but I had to tell someone!
My husband and i have been absolutely excited Jordan could carry out his web research while using the precious recommendations he obtained through your blog. It’s not at all simplistic just to be offering ideas others have been trying to sell. We remember we’ve got the website owner to thank because of that. The most important explanations you’ve made, the simple blog menu, the friendships you aid to foster – it’s got most superb, and it’s really assisting our son and our family reason why the idea is interesting, and that’s extremely vital. Thanks for the whole thing!
Very interesting details you have mentioned, appreciate it for posting. “Above all be true to yourself, and if you can not put your heart in it, take yourself out of it.” by Hardy D. Jackson.
Can I just say what a relief to find someone who actually knows what theyre talking about on the internet. You definitely know how to bring an issue to light and make it important. More people need to read this and understand this side of the story. I cant believe youre not more popular because you definitely have the gift.
It’s really a cool and useful piece of info. I’m glad that you shared this useful info with us. Please keep us informed like this. Thanks for sharing.
I am really loving the theme/design of your web site. Do you ever run into any internet browser compatibility problems? A number of my blog visitors have complained about my site not working correctly in Explorer but looks great in Safari. Do you have any recommendations to help fix this problem?
so much superb information on here, : D.
Thanx for the effort, keep up the good work Great work, I am going to start a small Blog Engine course work using your site I hope you enjoy blogging with the popular BlogEngine.net.Thethoughts you express are really awesome. Hope you will right some more posts.
I’m impressed, I need to say. Really hardly ever do I encounter a blog that’s each educative and entertaining, and let me let you know, you might have hit the nail on the head. Your concept is excellent; the issue is something that not sufficient people are speaking intelligently about. I’m very happy that I stumbled across this in my seek for something referring to this.
Perfectly pent articles, thankyou for selective information.
This blog is a must-visit. The ONLY FANS LEAKS photos and videos here are captivating ( https://UrbanCrocSpot.org )
Enter the live chat for free and watch incredible cam girls shows or create a free account for additional benefits, like the ability to go full screen
Hi, I think your site might be having browser compatibility issues. When I look at your website in Safari, it looks fine but when opening in Internet Explorer, it has some overlapping. I just wanted to give you a quick heads up! Other then that, fantastic blog!
I really appreciate this post. I’ve been looking everywhere for this! Thank goodness I found it on Bing. You have made my day! Thanks again
You are my aspiration, I have few web logs and sometimes run out from post :). “Actions lie louder than words.” by Carolyn Wells.
Would you be all in favour of exchanging links?
Great write-up, I¦m normal visitor of one¦s web site, maintain up the excellent operate, and It’s going to be a regular visitor for a lengthy time.
Hi there would you mind stating which blog platform you’re working with? I’m looking to start my own blog in the near future but I’m having a difficult time deciding between BlogEngine/Wordpress/B2evolution and Drupal. The reason I ask is because your design and style seems different then most blogs and I’m looking for something completely unique. P.S Sorry for being off-topic but I had to ask!
I discovered your blog site on google and check a few of your early posts. Continue to keep up the very good operate. I just additional up your RSS feed to my MSN News Reader. Seeking forward to reading more from you later on!…
This web site is my intake, rattling excellent design and style and perfect subject material.
Great blog here! Also your website loads up fast! What web host are you using? Can I get your affiliate link to your host? I wish my web site loaded up as quickly as yours lol
I think other site proprietors should take this web site as an model, very clean and wonderful user friendly style and design, let alone the content. You are an expert in this topic!
whoah this blog is fantastic i love reading your posts. Keep up the great work! You know, many people are hunting around for this information, you could help them greatly.
I just couldn’t go away your web site before suggesting that I extremely loved the standard information a person provide to your guests? Is going to be back frequently in order to investigate cross-check new posts
Nice post. I learn something more challenging on different blogs everyday. It will always be stimulating to read content from other writers and practice a little something from their store. I’d prefer to use some with the content on my blog whether you don’t mind. Natually I’ll give you a link on your web blog. Thanks for sharing.
I do not even know how I ended up here, however I believed this put up used to be great. I do not realize who you are however definitely you are going to a famous blogger if you aren’t already 😉 Cheers!
Wow! This could be one particular of the most useful blogs We’ve ever arrive across on this subject. Actually Fantastic. I am also an expert in this topic so I can understand your effort.
I like the efforts you have put in this, regards for all the great blog posts.
Simply desire to say your article is as surprising. The clearness in your post is simply great and i can assume you are an expert on this subject. Fine with your permission allow me to grab your RSS feed to keep up to date with forthcoming post. Thanks a million and please carry on the gratifying work.
of course like your web site but you have to take a look at the spelling on several of your posts. Many of them are rife with spelling problems and I to find it very bothersome to tell the truth on the other hand I will definitely come again again.
I simply couldn’t go away your website before suggesting that I extremely loved the usual information a person supply in your guests? Is gonna be again ceaselessly to check up on new posts.
It’s a pity you don’t have a donate button! I’d definitely donate to this superb blog! I suppose for now i’ll settle for book-marking and adding your RSS feed to my Google account. I look forward to fresh updates and will share this blog with my Facebook group. Talk soon!
Would love to always get updated great site! .
I’m still learning from you, but I’m trying to reach my goals. I certainly love reading everything that is posted on your website.Keep the aarticles coming. I loved it!
You completed various fine points there. I did a search on the matter and found nearly all folks will agree with your blog.
Appreciate it for helping out, excellent information. “The laws of probability, so true in general, so fallacious in particular.” by Edward Gibbon.
I am glad to be a visitor of this complete website! , thankyou for this rare info ! .
Hello there, I found your site via Google while looking for a related topic, your site came up, it looks good. I have bookmarked it in my google bookmarks.
I am lucky that I found this web site, precisely the right information that I was looking for! .
Your place is valueble for me. Thanks!…
beğeni satın al
It¦s actually a cool and useful piece of info. I am glad that you simply shared this helpful information with us. Please stay us up to date like this. Thank you for sharing.
This web page can be a stroll-via for all of the data you wanted about this and didn’t know who to ask. Glimpse right here, and you’ll definitely uncover it.
Youre so cool! I dont suppose Ive read something like this before. So good to search out anyone with some original thoughts on this subject. realy thank you for starting this up. this website is one thing that is needed on the internet, somebody with a bit originality. useful job for bringing one thing new to the internet!
Only a smiling visitant here to share the love (:, btw outstanding layout.
I just couldn’t depart your website before suggesting that I extremely enjoyed the standard info a person provide for your visitors? Is going to be back often to check up on new posts
Greetings! I know this is kinda off topic however , I’d figured I’d ask. Would you be interested in exchanging links or maybe guest writing a blog article or vice-versa? My website covers a lot of the same topics as yours and I believe we could greatly benefit from each other. If you’re interested feel free to shoot me an e-mail. I look forward to hearing from you! Awesome blog by the way!
Hello, you used to write excellent, but the last several posts have been kinda boring… I miss your tremendous writings. Past several posts are just a little out of track! come on!
I think this is one of the most significant info for me. And i’m glad reading your article. But wanna remark on few general things, The site style is perfect, the articles is really excellent : D. Good job, cheers
Utterly written content material, Really enjoyed looking at.
I¦ve been exploring for a bit for any high quality articles or weblog posts on this sort of area . Exploring in Yahoo I ultimately stumbled upon this web site. Studying this info So i am glad to express that I have an incredibly just right uncanny feeling I came upon just what I needed. I most no doubt will make certain to do not overlook this site and provides it a glance regularly.
Wonderful blog! I found it while browsing on Yahoo News. Do you have any suggestions on how to get listed in Yahoo News? I’ve been trying for a while but I never seem to get there! Appreciate it
We are a gaggle of volunteers and opening a new scheme in our community. Your web site provided us with valuable information to work on. You have done an impressive process and our whole neighborhood will likely be thankful to you.
I have been exploring for a bit for any high-quality articles or weblog posts on this kind of house . Exploring in Yahoo I eventually stumbled upon this web site. Reading this info So i’m satisfied to convey that I have an incredibly just right uncanny feeling I found out exactly what I needed. I most no doubt will make sure to do not put out of your mind this website and give it a glance regularly.
I think other site proprietors should take this website as an model, very clean and excellent user friendly style and design, as well as the content. You are an expert in this topic!
Hi there, I found your website by way of Google whilst searching for a similar subject, your web site came up, it appears great. I’ve bookmarked it in my google bookmarks.
Wonderful web site. Lots of helpful info here. I?¦m sending it to several buddies ans also sharing in delicious. And obviously, thank you to your effort!
Howdy! I know this is kinda off topic but I was wondering which blog platform are you using for this site? I’m getting sick and tired of WordPress because I’ve had issues with hackers and I’m looking at alternatives for another platform. I would be great if you could point me in the direction of a good platform.
Great blog! Do you have any helpful hints for aspiring writers? I’m hoping to start my own website soon but I’m a little lost on everything. Would you propose starting with a free platform like WordPress or go for a paid option? There are so many choices out there that I’m completely overwhelmed .. Any ideas? Many thanks!
I do agree with all of the ideas you have offered to your post. They are very convincing and will definitely work. Still, the posts are very short for starters. May just you please extend them a bit from next time? Thanks for the post.
Great work! This is the kind of information that are supposed to be shared around the web. Disgrace on the search engines for not positioning this put up upper! Come on over and consult with my web site . Thank you =)
I like the valuable info you supply in your articles. I will bookmark your blog and take a look at once more here regularly. I am somewhat sure I’ll be informed lots of new stuff proper right here! Best of luck for the following!
Appreciating the dedication you put into your site and in depth information you present. It’s great to come across a blog every once in a while that isn’t the same unwanted rehashed material. Great read! I’ve bookmarked your site and I’m including your RSS feeds to my Google account.
Miss B Nasty, Ivy The Character, Im xXx Dark Only Fans Leaks Mega Folder Link ( http://www.thots.cfd )
1xBet Promo Code 2023: 248248 – this combination gives you an exclusive sports bonus that will add 100 to your first deposit of up to 130 €/$. Promo codes have become widespread in the gambling industry, including betting. In other words, game portals provide benefits and advantages to players under certain conditions. Such a sentence is usually encrypted in a combination consisting of numbers, letters and symbols. It is this combination that is a promo code. It is with this combination that users most often encounter when they are interested in the 1xBet bookmaker.
Hey! I could have sworn I’ve been to this blog before but after reading through some of the post I realized it’s new to me. Anyhow, I’m definitely glad I found it and I’ll be book-marking and checking back frequently!
It¦s actually a nice and useful piece of info. I¦m glad that you simply shared this helpful info with us. Please stay us up to date like this. Thanks for sharing.
I am usually to running a blog and i really admire your content. The article has actually peaks my interest. I am going to bookmark your site and maintain checking for brand new information.
When I originally commented I clicked the -Notify me when new comments are added- checkbox and now each time a remark is added I get four emails with the same comment. Is there any manner you possibly can remove me from that service? Thanks!
I have not checked in here for some time since I thought it was getting boring, but the last several posts are good quality so I guess I’ll add you back to my everyday bloglist. You deserve it my friend 🙂
I¦ve recently started a site, the information you provide on this web site has helped me greatly. Thanks for all of your time & work.
I’m really loving the theme/design of your site. Do you ever run into any web browser compatibility problems? A couple of my blog readers have complained about my website not operating correctly in Explorer but looks great in Firefox. Do you have any suggestions to help fix this problem?
Hello.This article was extremely fascinating, particularly because I was investigating for thoughts on this issue last week.
wonderful put up, very informative. I wonder why the other specialists of this sector do not notice this. You should proceed your writing. I’m confident, you’ve a great readers’ base already!
I am very happy to read this. This is the type of manual that needs to be given and not the random misinformation that is at the other blogs. Appreciate your sharing this best doc.
he blog was how do i say it… relevant, finally something that helped me. Thanks
I must express my thanks to you for bailing me out of this type of circumstance. Because of surfing around through the the net and seeing ideas which were not helpful, I was thinking my entire life was done. Living devoid of the strategies to the problems you have solved through the post is a crucial case, and the ones that could have adversely affected my entire career if I had not noticed the blog. Your knowledge and kindness in playing with all the things was crucial. I don’t know what I would’ve done if I had not encountered such a thing like this. I am able to now look forward to my future. Thanks for your time so much for this expert and sensible guide. I will not think twice to suggest your web blog to anybody who should have counselling about this situation.
you’re in reality a excellent webmaster. The site loading velocity is incredible. It seems that you are doing any distinctive trick. Also, The contents are masterpiece. you have done a wonderful job in this matter!
I am glad to be one of many visitors on this outstanding website (:, thankyou for putting up.
You could certainly see your expertise within the work you write. The world hopes for more passionate writers like you who aren’t afraid to mention how they believe. At all times follow your heart. “What power has law where only money rules.” by Gaius Petronius.
magnificent points altogether, you simply gained a brand new reader. What would you recommend about your post that you made a few days ago? Any positive?
Some really rattling work on behalf of the owner of this internet site, utterly great subject matter.
I got what you intend, thankyou for posting.Woh I am glad to find this website through google. “Those who corrupt the public mind are just as evil as those who steal from the public.” by Theodor Wiesengrund Adorno.
hi!,I love your writing very a lot! percentage we keep up a correspondence more approximately your post on AOL? I need a specialist in this house to unravel my problem. May be that is you! Taking a look forward to see you.
Wonderful work! This is the type of information that should be shared around the internet. Shame on Google for not positioning this post higher! Come on over and visit my web site . Thanks =)
Some genuinely nice and useful information on this site, also I believe the layout has wonderful features.
It?¦s in point of fact a great and useful piece of information. I am satisfied that you shared this helpful info with us. Please stay us informed like this. Thanks for sharing.
Good – I should definitely pronounce, impressed with your web site. I had no trouble navigating through all tabs as well as related information ended up being truly simple to do to access. I recently found what I hoped for before you know it in the least. Quite unusual. Is likely to appreciate it for those who add forums or something, website theme . a tones way for your customer to communicate. Excellent task..
131 dolar kaç tl
I like this web blog very much, Its a really nice berth to read and incur info . “…when you have eliminated the impossible, whatever remains, however improbable, must be the truth.” by Conan Doyle.
Hi there! Someone in my Facebook group shared this website with us so I came to look it over. I’m definitely enjoying the information. I’m book-marking and will be tweeting this to my followers! Wonderful blog and outstanding style and design.
I love your blog.. very nice colors & theme. Did you create this website yourself? Plz reply back as I’m looking to create my own blog and would like to know wheere u got this from. thanks
I like what you guys are up too. Such intelligent work and reporting! Keep up the excellent works guys I have incorporated you guys to my blogroll. I think it will improve the value of my web site 🙂
I love it when people come together and share opinions, great blog, keep it up.
I am not sure where you are getting your info, but good topic. I needs to spend some time learning much more or understanding more. Thanks for excellent information I was looking for this information for my mission.
Excellent post. I was checking continuously this weblog and I’m impressed! Very useful info specifically the closing part 🙂 I maintain such information a lot. I used to be looking for this particular information for a very long time. Thanks and best of luck.
Hello. Great job. I did not anticipate this. This is a remarkable story. Thanks!
You should take part in a contest for one of the best blogs on the web. I will recommend this site!
I’m still learning from you, as I’m trying to reach my goals. I absolutely enjoy reading everything that is written on your blog.Keep the information coming. I enjoyed it!
Do you have a spam problem on this site; I also am a blogger, and I was wanting to know your situation; many of us have created some nice practices and we are looking to trade techniques with other folks, be sure to shoot me an e-mail if interested.
whoah this blog is fantastic i love reading your articles. Keep up the great work! You know, lots of people are looking around for this information, you can aid them greatly.
Very great info can be found on web blog. “The greatest mistake is trying to be more agreeable than you can be.” by Walter Bagehot.
Hey there! I could have sworn I’ve been to this blog before but after reading through some of the post I realized it’s new to me. Anyways, I’m definitely delighted I found it and I’ll be book-marking and checking back often!
I truly appreciate this post. I have been looking all over for this! Thank goodness I found it on Bing. You have made my day! Thank you again
I truly enjoy reading through on this site, it holds fantastic articles. “Beauty in things exist in the mind which contemplates them.” by David Hume.
What i don’t realize is if truth be told how you’re no longer actually much more neatly-appreciated than you may be right now. You’re so intelligent. You realize thus significantly in relation to this topic, made me for my part imagine it from a lot of various angles. Its like men and women are not interested except it is something to accomplish with Girl gaga! Your individual stuffs nice. At all times maintain it up!
I’m truly enjoying the design and layout of your blog. It’s a very easy on the eyes which makes it much more pleasant for me to come here and visit more often. Did you hire out a designer to create your theme? Superb work!
I¦ve read some good stuff here. Definitely worth bookmarking for revisiting. I wonder how much effort you set to make this sort of wonderful informative web site.
Nice read, I just passed this onto a friend who was doing a little research on that. And he actually bought me lunch since I found it for him smile Therefore let me rephrase that: Thanks for lunch! “Life is a continual upgrade.” by J. Mark Wallace.
I in addition to my buddies were found to be studying the good secrets and techniques from your web site and then instantly I had a horrible suspicion I never expressed respect to the site owner for those tips. All the guys are already stimulated to read all of them and have now in reality been enjoying those things. Appreciate your simply being considerably kind as well as for selecting these kinds of notable ideas most people are really desirous to discover. My personal sincere apologies for not saying thanks to earlier.
I’ve recently started a blog, the info you offer on this website has helped me tremendously. Thanks for all of your time & work. “The word ‘genius’ isn’t applicable in football. A genius is a guy like Norman Einstein.” by Joe Theismann.
Hello, Neat post. There’s an issue along with your website in web explorer, could test this… IE still is the market leader and a good component of folks will miss your magnificent writing because of this problem.
I was curious if you ever considered changing the structure of your site? Its very well written; I love what youve got to say. But maybe you could a little more in the way of content so people could connect with it better. Youve got an awful lot of text for only having 1 or 2 pictures. Maybe you could space it out better?
I wish to get across my respect for your generosity giving support to individuals that have the need for help on this issue. Your special dedication to passing the solution all around had been astonishingly interesting and have in most cases permitted some individuals much like me to attain their aims. Your entire important guideline implies a lot to me and far more to my office colleagues. Thank you; from everyone of us.
Great website. Lots of helpful info here. I am sending it to some friends ans also sharing in delicious. And certainly, thank you on your effort!
Can I just say what a relief to find someone who actually knows what theyre talking about on the internet. You definitely know how to bring an issue to light and make it important. More people need to read this and understand this side of the story. I cant believe youre not more popular because you definitely have the gift.
Youre so cool! I dont suppose Ive learn anything like this before. So nice to search out any individual with some original thoughts on this subject. realy thank you for starting this up. this website is something that’s needed on the internet, someone with a bit originality. helpful job for bringing something new to the internet!
Great line up. We will be linking to this great article on our site. Keep up the good writing.
As I web-site possessor I believe the content matter here is rattling great , appreciate it for your efforts. You should keep it up forever! Best of luck.
Can I just say what a relief to find someone who actually knows what theyre talking about on the internet. You definitely know how to bring an issue to light and make it important. More people need to read this and understand this side of the story. I cant believe youre not more popular because you definitely have the gift.
Thanks for the auspicious writeup. It in fact used to be a enjoyment account it. Glance advanced to far delivered agreeable from you! By the way, how could we keep up a correspondence?
I appreciate, lead to I discovered just what I was looking for. You have ended my 4 day long hunt! God Bless you man. Have a nice day. Bye
Hello. splendid job. I did not anticipate this. This is a excellent story. Thanks!
Its like you read my mind! You appear to know a lot about this, such as you wrote the ebook in it or something. I think that you simply could do with a few p.c. to force the message home a little bit, however other than that, this is excellent blog. A fantastic read. I’ll definitely be back.
I would like to thank you for the efforts you have put in writing this blog. I am hoping the same high-grade web site post from you in the upcoming also. In fact your creative writing abilities has inspired me to get my own web site now. Really the blogging is spreading its wings fast. Your write up is a great example of it.
Good write-up, I am normal visitor of one’s site, maintain up the excellent operate, and It’s going to be a regular visitor for a long time.
I?¦m not positive where you’re getting your info, however good topic. I must spend a while studying more or figuring out more. Thanks for wonderful information I used to be looking for this info for my mission.
I have not checked in here for a while as I thought it was getting boring, but the last several posts are good quality so I guess I’ll add you back to my daily bloglist. You deserve it my friend 🙂
yandanxvurulmus.GKih6iqy9mA3
Some truly interesting points you have written.Helped me a lot, just what I was looking for : D.
Yeah bookmaking this wasn’t a bad conclusion outstanding post! .
Hey very cool site!! Man .. Excellent .. Amazing .. I’ll bookmark your web site and take the feeds also…I’m happy to find numerous useful info here in the post, we need work out more strategies in this regard, thanks for sharing. . . . . .
Respect to op, some wonderful selective information.
Would love to constantly get updated outstanding blog! .
It is best to take part in a contest for the most effective blogs on the web. I’ll recommend this web site!
FiverrEarn
[…]although websites we backlink to beneath are considerably not related to ours, we feel they are in fact worth a go through, so possess a look[…]
I like this weblog very much, Its a really nice berth to read and find info .
I was reading through some of your posts on this website and I believe this web site is very informative! Keep on putting up.
You have noted very interesting points! ps nice internet site.
You have noted very interesting details! ps decent internet site.
Boostaro increases blood flow to the reproductive organs, leading to stronger and more vibrant erections. It provides a powerful boost that can make you feel like you’ve unlocked the secret to firm erections
very good submit, i definitely love this website, carry on it
Neotonics is an essential probiotic supplement that works to support the microbiome in the gut and also works as an anti-aging formula. The formula targets the cause of the aging of the skin.
While improving eyesight isn’t often the goal of consumers who wear their glasses religiously, it doesn’t mean they’re stuck where they are.
Good day! I simply would like to give a huge thumbs up for the great information you’ve gotten right here on this post. I will probably be coming back to your weblog for extra soon.
I will immediately snatch your rss as I can not find your email subscription link or e-newsletter service. Do you have any? Kindly allow me recognise so that I may subscribe. Thanks.
I am usually to blogging and i really recognize your content. The article has actually peaks my interest. I’m going to bookmark your web site and maintain checking for brand spanking new information.
Sight Care is a daily supplement proven in clinical trials and conclusive science to improve vision by nourishing the body from within. The Sight Care formula claims to reverse issues in eyesight, and every ingredient is completely natural.
you’re truly a just right webmaster. The web site loading speed is amazing. It kind of feels that you’re doing any distinctive trick. Also, The contents are masterwork. you’ve performed a great task in this subject!
I have recently started a site, the info you provide on this website has helped me greatly. Thank you for all of your time & work.
While improving eyesight isn’t often the goal of consumers who wear their glasses religiously, it doesn’t mean they’re stuck where they are.
Hello there, I discovered your site via Google while searching for a comparable matter, your site came up, it seems to be great. I have bookmarked it in my google bookmarks.
I’m not that much of a internet reader to be honest but your sites really nice, keep it up! I’ll go ahead and bookmark your site to come back down the road. Many thanks
hello!,I like your writing so much! share we keep in touch extra about your post on AOL? I require a specialist in this space to resolve my problem. Maybe that’s you! Taking a look forward to look you.
I like this web site because so much utile material on here : D.
I wanted to thank you for this great read!! I definitely enjoying every little bit of it I have you bookmarked to check out new stuff you post…
Sight Care is a daily supplement proven in clinical trials and conclusive science to improve vision by nourishing the body from within. The SightCare formula claims to reverse issues in eyesight, and every ingredient is completely natural.
SightCare clears out inflammation and nourishes the eye and brain cells, improving communication between both organs. Consequently, you should expect to see results in as little as six months if you combine this with other healthy habits.
Terrific work! That is the type of information that should be shared across the web. Shame on Google for no longer positioning this put up higher! Come on over and seek advice from my website . Thanks =)
I genuinely enjoy looking through on this web site, it holds wonderful articles.
Some really interesting points you have written.Helped me a lot, just what I was searching for : D.
You should participate in a contest for one of the best blogs on the web. I will suggest this web site!
I think this is among the so much important information for me. And i’m glad reading your article. However wanna remark on some general things, The website taste is wonderful, the articles is in point of fact nice : D. Good job, cheers
I truly appreciate this post. I?¦ve been looking all over for this! Thank goodness I found it on Bing. You have made my day! Thx again
I do agree with all of the ideas you have presented in your post. They are very convincing and will certainly work. Still, the posts are very short for starters. Could you please extend them a little from next time? Thanks for the post.
Great ?V I should definitely pronounce, impressed with your website. I had no trouble navigating through all tabs and related information ended up being truly easy to do to access. I recently found what I hoped for before you know it in the least. Reasonably unusual. Is likely to appreciate it for those who add forums or anything, website theme . a tones way for your client to communicate. Nice task..
Very interesting points you have remarked, appreciate it for posting.
Just wish to say your article is as astounding. The clearness in your post is simply nice and i can assume you’re an expert on this subject. Fine with your permission let me to grab your RSS feed to keep up to date with forthcoming post. Thanks a million and please continue the rewarding work.
Neurozoom is a dietary formulation designed to develop brain power and cognition. The nootropic contains 35 science-based ingredients that safeguard the brain cells from damage and slow age-related memory problems.
Gut Vita™ is an all-natural supplement designed to support digestive health issues by targeting the root cause and restoring optimal gut flora.
Wonderful website. A lot of useful info here. I?¦m sending it to several friends ans additionally sharing in delicious. And obviously, thank you to your sweat!
Good day very cool site!! Guy .. Beautiful .. Superb .. I’ll bookmark your website and take the feeds additionally…I am satisfied to find so many useful information here within the put up, we want work out more strategies in this regard, thank you for sharing. . . . . .
Fantastic web site. Lots of useful information here. I¦m sending it to several friends ans additionally sharing in delicious. And of course, thank you in your effort!
LeanFlux is a natural supplement that claims to increase brown adipose tissue (BAT) levels and burn fat and calories.
Keep working ,fantastic job!
When I originally commented I clicked the “Notify me when new comments are added” checkbox and now each time a comment is added I get four emails with the same comment. Is there any way you can remove people from that service? Thank you!
Respect to post author, some superb information .
Puralean is an all-natural dietary supplement designed to support boosted fat-burning rates, energy levels, and metabolism by targeting healthy liver function.
Sight Care is a daily supplement proven in clinical trials and conclusive science to improve vision by nourishing the body from within. The SightCare formula claims to reverse issues in eyesight, and every ingredient is completely natural.
Great blog! I am loving it!! Will be back later to read some more. I am taking your feeds also.
I am really impressed with your writing skills as well as with the layout on your blog. Is this a paid theme or did you customize it yourself? Either way keep up the excellent quality writing, it’s rare to see a nice blog like this one these days..
Simply wanna remark that you have a very nice internet site, I love the design it really stands out.
Rattling nice pattern and good subject material, absolutely nothing else we need : D.
Hiya, I’m really glad I have found this information. Today bloggers publish just about gossips and net and this is actually frustrating. A good site with interesting content, that is what I need. Thank you for keeping this web-site, I’ll be visiting it. Do you do newsletters? Cant find it.
Hey! I’m at work browsing your blog from my new apple iphone! Just wanted to say I love reading your blog and look forward to all your posts! Keep up the fantastic work!
Great post. I used to be checking continuously this weblog and I’m inspired! Extremely useful information particularly the final section 🙂 I handle such info much. I used to be seeking this particular info for a very lengthy time. Thank you and good luck.
Thanks for another informative blog. Where else may I get that kind of information written in such a perfect manner? I have a undertaking that I’m just now running on, and I have been at the glance out for such info.
I’ll immediately grab your rss feed as I can not in finding your e-mail subscription hyperlink or newsletter service. Do you’ve any? Kindly permit me understand so that I may just subscribe. Thanks.
I’m still learning from you, while I’m improving myself. I absolutely liked reading all that is posted on your website.Keep the aarticles coming. I liked it!
Enjoyed reading through this, very good stuff, regards.
Pretty great post. I simply stumbled upon your weblog and wished to say that I have truly enjoyed surfing around your blog posts. After all I will be subscribing in your rss feed and I’m hoping you write again very soon!
Luke Sutton is a videographer and video producer based in Gloucester, Gloucestershire, with approximately eight years of experience. His primary focus has been on corporate videos, collaborating with a diverse range of clients.
Have you ever thought about including a little bit more than just your articles? I mean, what you say is fundamental and everything. However think about if you added some great photos or video clips to give your posts more, “pop”! Your content is excellent but with pics and videos, this blog could definitely be one of the very best in its niche. Very good blog!
I was looking at some of your articles on this website and I think this site is very instructive! Keep on putting up.
Some genuinely interesting details you have written.Aided me a lot, just what I was searching for : D.
You are my aspiration, I own few web logs and sometimes run out from brand :). “Fiat justitia et pereat mundus.Let justice be done, though the world perish.” by Ferdinand I.
whoah this blog is wonderful i love reading your posts. Keep up the great work! You know, a lot of people are looking around for this information, you can help them greatly.
As soon as I noticed this internet site I went on reddit to share some of the love with them.
Thank you for the good writeup. It in fact was a amusement account it. Look advanced to far added agreeable from you! However, how can we communicate?
I truly appreciate this post. I¦ve been looking everywhere for this! Thank goodness I found it on Bing. You have made my day! Thank you again
Some really rattling work on behalf of the owner of this web site, absolutely great subject matter.
Hey there would you mind letting me know which hosting company you’re working with? I’ve loaded your blog in 3 completely different internet browsers and I must say this blog loads a lot quicker then most. Can you suggest a good internet hosting provider at a fair price? Many thanks, I appreciate it!
It’s really a cool and helpful piece of info. I am glad that you shared this helpful info with us. Please keep us informed like this. Thanks for sharing.
I was recommended this website via my cousin. I’m no longer positive whether this put up is written by him as nobody else know such designated approximately my difficulty. You’re wonderful! Thanks!
I truly treasure your piece of work, Great post.
Aw, this was a really nice post. In concept I wish to put in writing like this additionally – taking time and actual effort to make an excellent article… however what can I say… I procrastinate alot and not at all seem to get something done.
I’ve read a few just right stuff here. Definitely value bookmarking for revisiting. I surprise how a lot attempt you put to create this type of great informative web site.
I love your writing style genuinely loving this website .
You have brought up a very good points, thankyou for the post.
Amazing blog! Do you have any helpful hints for aspiring writers? I’m hoping to start my own site soon but I’m a little lost on everything. Would you propose starting with a free platform like WordPress or go for a paid option? There are so many choices out there that I’m completely overwhelmed .. Any recommendations? Appreciate it!
Hi my friend! I wish to say that this post is awesome, nice written and include almost all significant infos. I’d like to peer more posts like this .
I carry on listening to the news bulletin lecture about receiving free online grant applications so I have been looking around for the most excellent site to get one. Could you tell me please, where could i get some?
Sweet internet site, super pattern, really clean and apply friendly.
Just a smiling visitant here to share the love (:, btw outstanding design. “He profits most who serves best.” by Arthur F. Sheldon.
It?¦s in reality a great and useful piece of info. I am happy that you shared this useful information with us. Please stay us informed like this. Thanks for sharing.
Hello, i believe that i saw you visited my site thus i got here to “go back the favor”.I am trying to in finding things to enhance my site!I suppose its good enough to use some of your ideas!!
I am just commenting to make you understand what a wonderful discovery our princess found going through your blog. She realized too many issues, which include what it’s like to possess an amazing coaching spirit to let many more with no trouble gain knowledge of chosen hard to do topics. You really surpassed my expectations. I appreciate you for imparting these necessary, dependable, educational and as well as easy guidance on this topic to Jane.
AquaPeace is an all-natural nutritional formula that uses a proprietary and potent blend of ingredients and nutrients to improve overall ear and hearing health and alleviate the symptoms of tinnitus. https://aquapeacebuynow.us/
I am not positive where you are getting your info, but good topic. I needs to spend a while learning more or working out more. Thank you for magnificent information I was on the lookout for this information for my mission.
GlucoCare is a natural and safe supplement for blood sugar support and weight management. It fixes your metabolism and detoxifies your body. https://glucocarebuynow.us/
Sonovive™ is an all-natural supplement made to address the root cause of tinnitus and other inflammatory effects on the brain and promises to reduce tinnitus, improve hearing, and provide peace of mind. https://sonovivebuynow.us/
Thank you for the good writeup. It in fact was a amusement account it. Look advanced to far added agreeable from you! However, how can we communicate?
Digestyl™ is natural, potent and effective mixture, in the form of a powerful pill that would detoxify the gut and rejuvenate the whole organism in order to properly digest and get rid of the Clostridium Perfringens. https://digestylbuynow.us/
TropiSlim is the world’s first 100% natural solution to support healthy weight loss by using a blend of carefully selected ingredients. https://tropislimbuynow.us/
PowerBite is an innovative dental candy that promotes healthy teeth and gums. It’s a powerful formula that supports a strong and vibrant smile. https://powerbitebuynow.us/
BioFit is an all-natural supplement that is known to enhance and balance good bacteria in the gut area. To lose weight, you need to have a balanced hormones and body processes. Many times, people struggle with weight loss because their gut health has issues. https://biofitbuynow.us/
Real clean website , thankyou for this post.
Metabo Flex is a nutritional formula that enhances metabolic flexibility by awakening the calorie-burning switch in the body. The supplement is designed to target the underlying causes of stubborn weight gain utilizing a special “miracle plant” from Cambodia that can melt fat 24/7. https://metaboflexbuynow.us/
Neotonics is an essential probiotic supplement that works to support the microbiome in the gut and also works as an anti-aging formula. The formula targets the cause of the aging of the skin. https://neotonicsbuynow.us/
Your place is valueble for me. Thanks!…
ProstateFlux is a dietary supplement specifically designed to promote and maintain a healthy prostate. It is formulated with a blend of natural ingredients known for their potential benefits for prostate health. https://prostatefluxbuynow.us/
Quietum Plus supplement promotes healthy ears, enables clearer hearing, and combats tinnitus by utilizing only the purest natural ingredients. Supplements are widely used for various reasons, including boosting energy, lowering blood pressure, and boosting metabolism. https://quietumplusbuynow.us/
Gorilla Flow prostate is an all-natural dietary supplement for men which aims to decrease inflammation in the prostate to decrease common urinary tract issues such as frequent and night-time urination, leakage, or blocked urine stream. https://gorillaflowbuynow.us/
Reliver Pro is a dietary supplement formulated with a blend of natural ingredients aimed at supporting liver health
Hi there very nice web site!! Guy .. Excellent .. Wonderful .. I’ll bookmark your blog and take the feeds also…I’m happy to search out so many useful info right here in the post, we need work out more techniques on this regard, thanks for sharing. . . . . .
I loved as much as you will receive performed proper here. The cartoon is tasteful, your authored subject matter stylish. however, you command get got an impatience over that you wish be delivering the following. unwell no doubt come further formerly again as precisely the same nearly a lot ceaselessly inside case you defend this increase.
I besides think thence, perfectly pent post! .
Hi my friend! I want to say that this post is awesome, nice written and include approximately all vital infos. I’d like to see more posts like this.
There is noticeably a bundle to learn about this. I assume you made sure good points in features also.
I am always looking online for tips that can assist me. Thx!
Thank you for some other wonderful post. Where else may anybody get that type of information in such a perfect approach of writing? I’ve a presentation next week, and I am on the look for such info.
Hey there! I’m at work surfing around your blog from my new iphone 3gs! Just wanted to say I love reading through your blog and look forward to all your posts! Carry on the great work!
Yay google is my king helped me to find this great site! .
After all, what a great site and informative posts, I will upload inbound link – bookmark this web site? Regards, Reader.
What’s Taking place i’m new to this, I stumbled upon this I’ve found It positively useful and it has helped me out loads. I am hoping to contribute & aid different users like its aided me. Great job.
Pretty great post. I just stumbled upon your blog and wished to mention that I’ve truly loved surfing around your weblog posts. After all I’ll be subscribing for your rss feed and I am hoping you write again soon!
It is really a great and useful piece of info. I am satisfied that you simply shared this helpful info with us. Please keep us informed like this. Thank you for sharing.
Hello there, I found your website via Google while looking for a related topic, your web site came up, it looks good. I have bookmarked it in my google bookmarks.
Throughout the grand scheme of things you’ll get a B- with regard to effort. Exactly where you actually lost me was on your details. You know, as the maxim goes, the devil is in the details… And it couldn’t be much more accurate right here. Having said that, allow me inform you just what exactly did give good results. The text is certainly incredibly persuasive and this is possibly why I am making the effort in order to opine. I do not really make it a regular habit of doing that. Next, even though I can notice a jumps in reason you come up with, I am not really certain of just how you seem to unite the ideas which inturn produce the final result. For now I shall yield to your position but hope in the near future you link your dots better.
I’m very happy to read this. This is the kind of manual that needs to be given and not the accidental misinformation that’s at the other blogs. Appreciate your sharing this greatest doc.
I’d constantly want to be update on new content on this website , saved to bookmarks! .
Great awesome things here. I?¦m very satisfied to peer your article. Thanks a lot and i am looking ahead to contact you. Will you kindly drop me a mail?
As I site possessor I believe the content matter here is rattling excellent , appreciate it for your hard work. You should keep it up forever! Best of luck.
Virginia News: Your source for Virginia breaking news, sports, business, entertainment, weather and traffic https://virginiapost.us/
RVVR is website dedicated to advancing physical and mental health through scientific research and proven interventions. Learn about our evidence-based health promotion programs. https://rvvr.us/
The best tips, guides, and inspiration on home improvement, decor, DIY projects, and interviews with celebrities from your favorite renovation shows. https://houseblog.us/
Very clear website , regards for this post.
Breaking US news, local New York news coverage, sports, entertainment news, celebrity gossip, autos, videos and photos at nybreakingnews.us https://nybreakingnews.us/
I’d have to examine with you here. Which is not one thing I usually do! I take pleasure in reading a post that may make folks think. Additionally, thanks for permitting me to comment!
As I web site possessor I believe the content material here is rattling excellent , appreciate it for your efforts. You should keep it up forever! Good Luck.
Do you have a spam problem on this website; I also am a blogger, and I was curious about your situation; we have developed some nice procedures and we are looking to trade techniques with other folks, be sure to shoot me an email if interested.
My spouse and i ended up being very ecstatic that Peter could conclude his preliminary research while using the precious recommendations he came across out of the web pages. It’s not at all simplistic to just happen to be handing out techniques that many many people might have been trying to sell. And we also figure out we’ve got you to appreciate for this. The entire explanations you’ve made, the straightforward blog navigation, the relationships you can help foster – it is everything wonderful, and it is leading our son and the family recognize that that subject matter is interesting, and that’s very important. Thank you for the whole thing!
Healthcare Blog provides news, trends, jobs and resources for health industry professionals. We cover topics like healthcare IT, hospital administration, polcy
Hello just wanted to give you a quick heads up. The text in your content seem to be running off the screen in Chrome. I’m not sure if this is a formatting issue or something to do with browser compatibility but I thought I’d post to let you know. The design look great though! Hope you get the issue resolved soon. Kudos
Latest Denver news, top Colorado news and local breaking news from Denver News, including sports, weather, traffic, business, politics, photos and video. https://denver-news.us/
It is in reality a great and useful piece of information. I am glad that you just shared this useful information with us. Please stay us informed like this. Thank you for sharing.
Santa Cruz Sentinel: Local News, Local Sports and more for Santa Cruz https://santacruznews.us/
I’m not that much of a internet reader to be honest but your blogs really nice, keep it up! I’ll go ahead and bookmark your site to come back later on. Many thanks
It¦s in point of fact a nice and useful piece of info. I¦m happy that you shared this useful information with us. Please stay us informed like this. Thank you for sharing.
I just could not go away your website prior to suggesting that I really loved the usual information an individual supply for your visitors? Is gonna be again continuously to inspect new posts
East Bay News is the leading source of breaking news, local news, sports, entertainment, lifestyle and opinion for Contra Costa County, Alameda County, Oakland and beyond https://eastbaynews.us/
I do agree with all the ideas you’ve presented in your post. They’re really convincing and will certainly work. Still, the posts are too short for newbies. Could you please extend them a little from next time? Thanks for the post.
News from the staff of the LA Reporter, including crime and investigative coverage of the South Bay and Harbor Area in Los Angeles County. https://lareporter.us/
I’d should check with you here. Which isn’t something I normally do! I enjoy reading a submit that can make people think. Additionally, thanks for permitting me to comment!
My wife and i felt absolutely thrilled when Raymond managed to deal with his analysis by way of the precious recommendations he gained in your blog. It is now and again perplexing to just continually be releasing guidelines that many people today may have been trying to sell. And now we already know we now have you to be grateful to for that. The specific illustrations you made, the straightforward blog navigation, the relationships you help to foster – it’s got most superb, and it is helping our son and the family believe that the concept is enjoyable, and that is exceptionally mandatory. Thanks for everything!
I got what you intend,saved to bookmarks, very decent website .
As a Newbie, I am always searching online for articles that can aid me. Thank you
Just wanna tell that this is very beneficial, Thanks for taking your time to write this.
I consider something really interesting about your website so I saved to bookmarks.
I and also my pals appeared to be reviewing the excellent solutions on your web site and then all of the sudden developed a horrible feeling I never expressed respect to the site owner for them. Most of the boys happened to be for that reason glad to see all of them and have now actually been taking advantage of those things. Thank you for simply being very accommodating and then for finding this form of nice ideas most people are really desirous to know about. Our honest apologies for not expressing appreciation to you earlier.
I visited a lot of website but I conceive this one contains something extra in it in it
Once I initially commented I clicked the -Notify me when new feedback are added- checkbox and now every time a comment is added I get four emails with the identical comment. Is there any manner you may remove me from that service? Thanks!
Thanks , I’ve just been looking for information about this subject for ages and yours is the greatest I’ve came upon till now. However, what in regards to the conclusion? Are you positive about the supply?
Baltimore Post: Your source for Baltimore breaking news, sports, business, entertainment, weather and traffic https://baltimorepost.us/
Spot on with this write-up, I really suppose this website needs far more consideration. I’ll most likely be once more to learn far more, thanks for that info.
Lake County Lake Reporter: Local News, Local Sports and more for Lake County https://lakereporter.us
I went over this internet site and I think you have a lot of good information, saved to favorites (:.
Its wonderful as your other posts : D, thankyou for posting. “In the spider-web of facts, many a truth is strangled.” by Paul Eldridge.
Loving the info on this web site, you have done great job on the content.
I’d perpetually want to be update on new posts on this internet site, saved to bookmarks! .
I like what you guys are up too. Such intelligent work and reporting! Keep up the excellent works guys I¦ve incorporated you guys to my blogroll. I think it will improve the value of my website 🙂
I know this if off topic but I’m looking into starting my own blog and was wondering what all is required to get setup? I’m assuming having a blog like yours would cost a pretty penny? I’m not very internet smart so I’m not 100 sure. Any tips or advice would be greatly appreciated. Kudos
As a Newbie, I am permanently searching online for articles that can aid me. Thank you
Hello, Neat post. There is a problem along with your website in internet explorer, may check this?K IE still is the market chief and a large portion of other people will omit your fantastic writing because of this problem.
Nice post. I was checking constantly this blog and I’m impressed! Extremely useful information specifically the last part 🙂 I care for such info much. I was looking for this certain information for a very long time. Thank you and best of luck.
Pretty section of content. I just stumbled upon your blog and in accession capital to assert that I get actually enjoyed account your blog posts. Anyway I will be subscribing to your feeds and even I achievement you access consistently quickly.
Good V I should certainly pronounce, impressed with your site. I had no trouble navigating through all the tabs and related info ended up being truly simple to do to access. I recently found what I hoped for before you know it at all. Quite unusual. Is likely to appreciate it for those who add forums or something, site theme . a tones way for your client to communicate. Nice task..
Somebody essentially lend a hand to make critically posts I would state. This is the very first time I frequented your web page and up to now? I amazed with the analysis you made to make this particular post extraordinary. Excellent process!
I’m not sure where you’re getting your information, however good topic. I must spend some time finding out much more or working out more. Thanks for wonderful information I was looking for this info for my mission.
What¦s Taking place i’m new to this, I stumbled upon this I’ve discovered It absolutely helpful and it has helped me out loads. I’m hoping to give a contribution & assist other customers like its helped me. Good job.
I’d have to examine with you here. Which is not one thing I usually do! I take pleasure in reading a post that may make folks think. Additionally, thanks for permitting me to comment!
I’m really enjoying the design and layout of your website. It’s a very easy on the eyes which makes it much more enjoyable for me to come here and visit more often. Did you hire out a designer to create your theme? Superb work!
Thanks , I’ve recently been looking for info approximately this topic for ages and yours is the greatest I’ve discovered so far. However, what in regards to the bottom line? Are you certain about the supply?
Hi! I know this is kinda off topic but I was wondering if you knew where I could locate a captcha plugin for my comment form? I’m using the same blog platform as yours and I’m having trouble finding one? Thanks a lot!
I beloved up to you will obtain carried out proper here. The caricature is attractive, your authored subject matter stylish. however, you command get got an impatience over that you would like be handing over the following. ill surely come more previously once more as exactly the same nearly a lot continuously inside of case you defend this increase.
Real nice style and superb subject material, very little else we want : D.
I love the efforts you have put in this, appreciate it for all the great content.
Wonderful web site. Plenty of helpful info here. I am sending it to a few pals ans also sharing in delicious. And certainly, thanks to your effort!
Hello there! I know this is kinda off topic but I was wondering which blog platform are you using for this website? I’m getting tired of WordPress because I’ve had problems with hackers and I’m looking at alternatives for another platform. I would be awesome if you could point me in the direction of a good platform.
Well I definitely enjoyed studying it. This post provided by you is very useful for good planning.
Hello.This post was extremely interesting, especially since I was investigating for thoughts on this subject last Saturday.
This is really interesting, You’re a very professional blogger. I have joined your rss feed and sit up for in quest of more of your magnificent post. Additionally, I’ve shared your site in my social networks!
Can I just say what a relief to find someone who actually knows what theyre talking about on the internet. You definitely know how to bring an issue to light and make it important. More people need to read this and understand this side of the story. I cant believe youre not more popular because you definitely have the gift.
Hiya, I’m really glad I have found this info. Today bloggers publish only about gossips and web and this is actually annoying. A good website with exciting content, this is what I need. Thank you for keeping this web-site, I’ll be visiting it. Do you do newsletters? Cant find it.
I have been exploring for a little for any high-quality articles or blog posts on this kind of area . Exploring in Yahoo I at last stumbled upon this website. Reading this information So i’m happy to convey that I have an incredibly good uncanny feeling I discovered exactly what I needed. I most certainly will make certain to don’t forget this web site and give it a glance regularly.
This is really attention-grabbing, You are an overly professional blogger. I have joined your feed and look ahead to seeking extra of your magnificent post. Also, I’ve shared your web site in my social networks!
Pilot News: Your source for Virginia breaking news, sports, business, entertainment, weather and traffic https://pilotnews.us/
Get Lehigh Valley news, Allentown news, Bethlehem news, Easton news, Quakertown news, Poconos news and Pennsylvania news from Morning Post. https://morningpost.us/
Today, I went to the beach with my children. I found a sea shell and gave it to my 4 year old daughter and said “You can hear the ocean if you put this to your ear.” She placed the shell to her ear and screamed. There was a hermit crab inside and it pinched her ear. She never wants to go back! LoL I know this is entirely off topic but I had to tell someone!
Today, I went to the beach with my kids. I found a sea shell and gave it to my 4 year old daughter and said “You can hear the ocean if you put this to your ear.” She put the shell to her ear and screamed. There was a hermit crab inside and it pinched her ear. She never wants to go back! LoL I know this is entirely off topic but I had to tell someone!
I think this web site holds very great written subject matter content.
Hey there! This is my first visit to your blog! We are a team of volunteers and starting a new initiative in a community in the same niche. Your blog provided us valuable information to work on. You have done a extraordinary job!
PharmaMore provides a forum for industry leaders to hear the most important voices and ideas in the industry. https://pharmamore.us/
Outstanding post, I think website owners should larn a lot from this website its very user pleasant.
Medical More provides medical technology news and analysis for industry professionals. We cover medical devices, diagnostics, digital health, FDA regulation and compliance, imaging, and more. https://medicalmore.us
For the reason that the admin of this site is working no uncertainty very quickly it will be renowned due to its quality contents.Live TV
FiverrEarn.Com
[…]we came across a cool web-site that you just may possibly get pleasure from. Take a appear if you want[…]
Local news from Redlands, CA, California news, sports, things to do, and business in the Inland Empire. https://redlandsnews.us
But wanna admit that this is very useful, Thanks for taking your time to write this.
I like this web site so much, saved to favorites. “To hold a pen is to be at war.” by Francois Marie Arouet Voltaire.
Some really nice and useful info on this site, as well I conceive the design and style has good features.
NewsBreak provides latest and breaking Renton, WA local news, weather forecast, crime and safety reports, traffic updates, event notices, sports https://rentonnews.us
As a Newbie, I am constantly searching online for articles that can aid me. Thank you
I saw a lot of website but I conceive this one has something extra in it in it
Lovely site! I am loving it!! Will be back later to read some more. I am taking your feeds also.
Thanks for another wonderful article. Where else could anybody get that type of information in such an ideal way of writing? I’ve a presentation next week, and I am on the look for such information.
I regard something genuinely special in this site.
I really like what you guys are up too. This type of clever work and reporting! Keep up the good works guys I’ve included you guys to blogroll.
I’ve recently started a website, the info you provide on this website has helped me tremendously. Thank you for all of your time & work.
Very well written information. It will be helpful to everyone who employess it, as well as yours truly :). Keep up the good work – for sure i will check out more posts.
Rattling nice design and great articles, absolutely nothing else we need : D.
Hi there very nice website!! Man .. Beautiful .. Superb .. I will bookmark your website and take the feeds additionallyKI’m satisfied to search out so many helpful information here in the submit, we want develop extra techniques in this regard, thank you for sharing. . . . . .
Spot on with this write-up, I actually suppose this website needs way more consideration. I’ll probably be once more to read rather more, thanks for that info.
I am often to blogging and i really appreciate your content. The article has really peaks my interest. I am going to bookmark your site and keep checking for new information.
As a Newbie, I am constantly exploring online for articles that can aid me. Thank you
Maryland Post: Your source for Maryland breaking news, sports, business, entertainment, weather and traffic https://marylandpost.us
Read the latest news on Crime, Politics, Schools, Sports, Weather, Business, Arts, Jobs, Obits, and Things to do in Kent Washington. https://kentnews.us/
In the awesome scheme of things you receive an A+ for hard work. Where exactly you actually lost me personally was first on the facts. As it is said, the devil is in the details… And that couldn’t be more true right here. Having said that, allow me reveal to you just what exactly did give good results. Your text is actually incredibly powerful and this is possibly the reason why I am making an effort to comment. I do not really make it a regular habit of doing that. Next, even though I can easily notice a jumps in logic you make, I am definitely not certain of exactly how you appear to unite your points which in turn help to make the final result. For right now I shall yield to your point however hope in the near future you actually connect the dots better.
Peninsula News is a daily news website, covering the northern Olympic Peninsula in the state of Washington, United States. https://peninsulanews.us
I loved as much as you’ll receive carried out right here. The sketch is tasteful, your authored subject matter stylish. nonetheless, you command get bought an impatience over that you wish be delivering the following. unwell unquestionably come further formerly again as exactly the same nearly very often inside case you shield this increase.
Fresh, flavorful and (mostly) healthy recipes made for real, actual, every day life. Helping you celebrate the joy of food in a totally non-intimidating way. https://skillfulcook.us
I have been absent for a while, but now I remember why I used to love this site. Thank you, I will try and check back more frequently. How frequently you update your website?
Some genuinely rattling work on behalf of the owner of this website , perfectly outstanding subject material.
Excellent blog here! Also your site rather a lot up very fast! What web host are you the use of? Can I am getting your associate link to your host? I want my site loaded up as quickly as yours lol
Macomb County, MI News, Breaking News, Sports, Weather, Things to Do https://macombnews.us
Hey! This is kind of off topic but I need some guidance from an established blog. Is it very hard to set up your own blog? I’m not very techincal but I can figure things out pretty quick. I’m thinking about making my own but I’m not sure where to start. Do you have any tips or suggestions? Thanks
This is a topic close to my heart cheers, where are your contact details though?
I was reading through some of your articles on this website and I conceive this internet site is really instructive! Keep putting up.
Hello I am so happy I found your web site, I really found you by accident, while I was searching on Bing for something else, Regardless I am here now and would just like to say thank you for a remarkable post and a all round interesting blog (I also love the theme/design), I don’t have time to look over it all at the moment but I have saved it and also added in your RSS feeds, so when I have time I will be back to read more, Please do keep up the superb work.
The next time I read a blog, I hope that it doesnt disappoint me as much as this one. I mean, I know it was my choice to read, but I actually thought youd have something interesting to say. All I hear is a bunch of whining about something that you could fix if you werent too busy looking for attention.
You made some first rate points there. I seemed on the web for the issue and found most individuals will associate with along with your website.
It’s laborious to seek out knowledgeable individuals on this matter, but you sound like you recognize what you’re speaking about! Thanks
This is a very good tips especially to those new to blogosphere, brief and accurate information… Thanks for sharing this one. A must read article.
Some genuinely fantastic articles on this web site, appreciate it for contribution.
What’s Happening i’m new to this, I stumbled upon this I have found It positively useful and it has aided me out loads. I hope to contribute & help other users like its helped me. Great job.
F*ckin’ amazing things here. I am very glad to see your article. Thanks a lot and i’m looking forward to touch you. Will you please drop me a e-mail?
I truly appreciate this post. I’ve been looking all over for this! Thank goodness I found it on Bing. You have made my day! Thx again
Hi my family member! I want to say that this post is amazing, great written and include almost all important infos. I’d like to see more posts like this .
What’s Taking place i am new to this, I stumbled upon this I have discovered It positively useful and it has aided me out loads. I am hoping to contribute & help other customers like its aided me. Good job.
It’s hard to find knowledgeable people on this topic, but you sound like you know what you’re talking about! Thanks
Hello. remarkable job. I did not anticipate this. This is a fantastic story. Thanks!
I real happy to find this web site on bing, just what I was searching for : D also saved to fav.
Its fantastic as your other blog posts : D, appreciate it for putting up. “The squeaking wheel doesn’t always get the grease. Sometimes it gets replaced.” by Vic Gold.
I got what you intend, regards for posting.Woh I am happy to find this website through google.
As a Newbie, I am constantly searching online for articles that can be of assistance to me. Thank you
Terrific work! This is the type of information that are supposed to be shared around the internet. Shame on Google for no longer positioning this put up upper! Come on over and consult with my web site . Thank you =)
It is really a nice and helpful piece of information. I’m glad that you shared this helpful information with us. Please keep us up to date like this. Thanks for sharing.
The latest news and reviews in the world of tech, automotive, gaming, science, and entertainment. https://millionbyte.us/
I do not even know how I ended up here, but I thought this post was good. I do not know who you are but certainly you’re going to a famous blogger if you aren’t already 😉 Cheers!
Thanks for a marvelous posting! I certainly enjoyed reading it, you’re a great author.I will be sure to bookmark your blog and will eventually come back down the road. I want to encourage continue your great posts, have a nice weekend!
As a Newbie, I am constantly searching online for articles that can be of assistance to me. Thank you
Hi, I think your site might be having browser compatibility issues. When I look at your website in Safari, it looks fine but when opening in Internet Explorer, it has some overlapping. I just wanted to give you a quick heads up! Other then that, fantastic blog!
Wow! Thank you! I continually needed to write on my blog something like that. Can I implement a fragment of your post to my site?
colibrim.com
Everything is very open and very clear explanation of issues. was truly information. Your website is very useful. Thanks for sharing.
colibrim.com
colibrim.com
colibrim.com
What’s Happening i am new to this, I stumbled upon this I’ve found It positively helpful and it has aided me out loads. I hope to contribute & help other users like its helped me. Great job.
I have been exploring for a little bit for any high-quality articles or weblog posts on this sort of space . Exploring in Yahoo I at last stumbled upon this site. Reading this info So i am happy to exhibit that I’ve a very good uncanny feeling I found out just what I needed. I such a lot undoubtedly will make sure to don¦t overlook this web site and give it a look on a constant basis.
I admire your piece of work, appreciate it for all the interesting blog posts.
I¦ve recently started a web site, the info you provide on this web site has helped me tremendously. Thank you for all of your time & work.
Yesterday, while I was at work, my cousin stole my iphone and tested to see if it can survive a 25 foot drop, just so she can be a youtube sensation. My apple ipad is now destroyed and she has 83 views. I know this is completely off topic but I had to share it with someone!
I?¦ve recently started a blog, the information you provide on this site has helped me greatly. Thanks for all of your time & work.
Hello my loved one! I want to say that this article is awesome, great written and come with approximately all vital infos. I would like to see extra posts like this .
Thanks , I’ve just been looking for information about this topic for ages and yours is the greatest I have discovered till now. But, what about the bottom line? Are you sure about the source?
I am not very superb with English but I line up this very leisurely to interpret.
You have observed very interesting points! ps nice web site.
I conceive other website proprietors should take this internet site as an model, very clean and great user genial layout.
great post, very informative. I wonder why the other experts of this sector don’t notice this. You must continue your writing. I am sure, you’ve a huge readers’ base already!
I liked up to you will obtain carried out right here. The cartoon is tasteful, your authored material stylish. nevertheless, you command get got an shakiness over that you want be turning in the following. ill undoubtedly come further previously again as precisely the similar just about very continuously inside case you defend this increase.
I got what you mean , thankyou for putting up.Woh I am delighted to find this website through google. “I was walking down the street wearing glasses when the prescription ran out.” by Steven Wright.
Good write-up, I am normal visitor of one?¦s web site, maintain up the excellent operate, and It is going to be a regular visitor for a lengthy time.
Really instructive and great anatomical structure of subject matter, now that’s user genial (:.
LipoSlend is a liquid nutritional supplement that promotes healthy and steady weight loss. https://liposlendofficial.us/
After study a few of the blog posts on your website now, and I truly like your way of blogging. I bookmarked it to my bookmark website list and will be checking back soon. Pls check out my web site as well and let me know what you think.
Valuable info. Lucky me I found your web site by accident, and I’m shocked why this accident didn’t happened earlier! I bookmarked it.
What i do not realize is in fact how you’re not actually much more neatly-preferred than you might be now. You are so intelligent. You understand thus significantly with regards to this subject, produced me for my part consider it from numerous various angles. Its like men and women don’t seem to be fascinated until it?¦s one thing to do with Lady gaga! Your personal stuffs outstanding. At all times care for it up!
With havin so much content and articles do you ever run into any issues of plagorism or copyright infringement? My site has a lot of completely unique content I’ve either written myself or outsourced but it seems a lot of it is popping it up all over the internet without my agreement. Do you know any ways to help stop content from being ripped off? I’d truly appreciate it.
Very well written post. It will be valuable to anyone who employess it, as well as myself. Keep up the good work – looking forward to more posts.
My partner and I stumbled over here by a different page and thought I might check things out. I like what I see so now i am following you. Look forward to checking out your web page again.
Excellent post. I was checking constantly this blog and I’m impressed! Very helpful info particularly the last part 🙂 I care for such info a lot. I was seeking this certain information for a long time. Thank you and good luck.
My spouse and i felt very cheerful Ervin managed to do his reports because of the ideas he acquired using your weblog. It’s not at all simplistic to just be making a gift of facts that most people could have been making money from. And we already know we need the writer to thank because of that. The type of explanations you have made, the straightforward web site menu, the relationships you will give support to engender – it’s got mostly astonishing, and it’s helping our son and our family do think the content is entertaining, and that is wonderfully vital. Thank you for the whole lot!
I take pleasure in, lead to I found just what I used to be having a look for. You have ended my 4 day long hunt! God Bless you man. Have a great day. Bye
Hello, you used to write magnificent, but the last several posts have been kinda boring?K I miss your tremendous writings. Past few posts are just a bit out of track! come on!
Somebody necessarily lend a hand to make critically articles I’d state. This is the very first time I frequented your website page and up to now? I amazed with the research you made to create this actual post amazing. Fantastic activity!
Hmm it seems like your website ate my first comment (it was super long) so I guess I’ll just sum it up what I submitted and say, I’m thoroughly enjoying your blog. I as well am an aspiring blog blogger but I’m still new to the whole thing. Do you have any tips and hints for novice blog writers? I’d definitely appreciate it.
Can I simply say what a aid to search out somebody who really is aware of what theyre talking about on the internet. You definitely know how to bring a difficulty to mild and make it important. Extra folks must read this and understand this facet of the story. I cant imagine youre no more well-liked since you positively have the gift.
This web site is really a walk-through for all of the info you wanted about this and didn’t know who to ask. Glimpse here, and you’ll definitely discover it.
Nice post. I was checking continuously this blog and I’m impressed! Extremely useful info particularly the last part 🙂 I care for such information a lot. I was looking for this particular info for a long time. Thank you and best of luck.
As a Newbie, I am permanently searching online for articles that can help me. Thank you
I truly appreciate this post. I’ve been looking everywhere for this! Thank goodness I found it on Bing. You have made my day! Thanks again!
I like gathering utile information , this post has got me even more info! .
I¦ll immediately grasp your rss feed as I can not to find your e-mail subscription hyperlink or e-newsletter service. Do you have any? Kindly permit me know in order that I may just subscribe. Thanks.
Heya i am for the first time here. I came across this board and I find It truly useful & it helped me out a lot. I hope to give something back and help others like you aided me.
I do agree with all of the ideas you’ve presented in your post. They’re very convincing and will certainly work. Still, the posts are very short for starters. Could you please extend them a little from next time? Thanks for the post.
Hello there, I discovered your website by the use of Google while looking for a related subject, your website came up, it appears great. I have bookmarked it in my google bookmarks.
I really enjoy reading through on this website , it has got good posts. “For Brutus is an honourable man So are they all, all honourable men.” by William Shakespeare.
whoah this weblog is excellent i love reading your posts. Keep up the good work! You realize, lots of persons are hunting round for this information, you can aid them greatly.
Kuru Öksürüğe Ne İyi Gelir?
I love meeting utile information , this post has got me even more info! .
Hello there, I found your blog by the use of Google whilst searching for a comparable subject, your web site got here up, it seems great. I have bookmarked it in my google bookmarks.
I’m just writing to make you be aware of of the outstanding discovery our daughter encountered using yuor web blog. She learned plenty of details, not to mention how it is like to possess a very effective teaching mindset to have other people very easily thoroughly grasp some tortuous topics. You undoubtedly surpassed our own expected results. I appreciate you for imparting the powerful, trusted, informative and as well as unique tips on that topic to Ethel.
I’m not that much of a internet reader to be honest but your blogs really nice, keep it up! I’ll go ahead and bookmark your website to come back later on. Many thanks
Hey just wanted to give you a quick heads up and let you know a few of the pictures aren’t loading correctly. I’m not sure why but I think its a linking issue. I’ve tried it in two different internet browsers and both show the same outcome.
Hi there, You’ve done an excellent job. I’ll certainly digg it and in my opinion suggest to my friends. I am confident they will be benefited from this web site.
It¦s really a great and useful piece of information. I¦m happy that you simply shared this helpful information with us. Please keep us up to date like this. Thank you for sharing.
Its wonderful as your other content : D, thankyou for posting.
I like what you guys are up too. Such intelligent work and reporting! Keep up the excellent works guys I?¦ve incorporated you guys to my blogroll. I think it will improve the value of my site 🙂
My brother suggested I might like this web site. He was once entirely right. This publish actually made my day. You cann’t imagine simply how a lot time I had spent for this information! Thanks!
Hmm it seems like your website ate my first comment (it was super long) so I guess I’ll just sum it up what I wrote and say, I’m thoroughly enjoying your blog. I too am an aspiring blog blogger but I’m still new to the whole thing. Do you have any tips for first-time blog writers? I’d really appreciate it.
Well I really liked studying it. This information procured by you is very useful for correct planning.
I like what you guys are up also. Such clever work and reporting! Carry on the superb works guys I?¦ve incorporated you guys to my blogroll. I think it’ll improve the value of my web site 🙂
Very interesting details you have mentioned, regards for posting.
I’ll immediately take hold of your rss feed as I can’t find your email subscription link or newsletter service. Do you have any? Please let me know in order that I may just subscribe. Thanks.
I have been checking out some of your articles and i can claim clever stuff. I will surely bookmark your website.
I got what you mean ,saved to my bookmarks, very nice site.
I am not rattling excellent with English but I get hold this really leisurely to interpret.
It?¦s in point of fact a nice and helpful piece of info. I?¦m satisfied that you simply shared this useful information with us. Please stay us up to date like this. Thank you for sharing.
Thank you a lot for sharing this with all of us you actually recognize what you’re talking approximately! Bookmarked. Kindly additionally visit my web site =). We may have a hyperlink change agreement among us!
Oh my goodness! an amazing article dude. Thank you Nonetheless I’m experiencing situation with ur rss . Don’t know why Unable to subscribe to it. Is there anyone getting similar rss downside? Anybody who is aware of kindly respond. Thnkx
I truly enjoy reading through on this website , it has wonderful blog posts.
Regards for helping out, great information. “Riches cover a multitude of woes.” by Menander.
you have got an amazing weblog right here! would you wish to make some invite posts on my weblog?
I would like to point out my love for your generosity giving support to men and women that actually need help with your question. Your real commitment to passing the solution all-around was incredibly interesting and have without exception allowed some individuals like me to arrive at their ambitions. Your entire useful suggestions signifies a lot to me and especially to my fellow workers. Best wishes; from all of us.
You made some nice points there. I looked on the internet for the topic and found most guys will consent with your blog.
Pineal XT is a revolutionary supplement that promotes proper pineal gland function and energy levels to support healthy body function.
Everything is very open and very clear explanation of issues. was truly information. Your website is very useful. Thanks for sharing.
Loving the info on this internet site, you have done great job on the posts.
Generally I do not read post on blogs, but I wish to say that this write-up very forced me to try and do it! Your writing style has been amazed me. Thanks, quite nice article.
What¦s Going down i’m new to this, I stumbled upon this I’ve discovered It positively helpful and it has helped me out loads. I hope to give a contribution & help other users like its aided me. Good job.
Some truly nice stuff on this web site, I love it.
I am incessantly thought about this, appreciate it for putting up.
I’m really impressed with your writing skills and also with the layout on your weblog. Is this a paid theme or did you customize it yourself? Either way keep up the excellent quality writing, it’s rare to see a great blog like this one nowadays..
You made some good points there. I did a search on the topic and found most people will approve with your site.
Thanks for the auspicious writeup. It in truth used to be a entertainment account it. Look advanced to more brought agreeable from you! By the way, how can we keep up a correspondence?
I am curious to find out what blog platform you’re using? I’m experiencing some minor security problems with my latest blog and I would like to find something more secure. Do you have any recommendations?
Hiya! I just wish to give an enormous thumbs up for the nice information you’ve right here on this post. I will likely be coming again to your blog for more soon.
You need to take part in a contest for probably the greatest blogs on the web. I will suggest this website!
Good day! Do you use Twitter? I’d like to follow you if that would be ok. I’m undoubtedly enjoying your blog and look forward to new updates.
I cling on to listening to the newscast lecture about receiving boundless online grant applications so I have been looking around for the best site to get one. Could you advise me please, where could i acquire some?
I’m just writing to let you be aware of of the impressive discovery my wife’s child found browsing your web page. She noticed a good number of details, with the inclusion of what it’s like to have an excellent giving mood to get a number of people with no trouble have an understanding of certain grueling subject matter. You actually did more than her expectations. I appreciate you for giving these helpful, trusted, educational and even easy guidance on the topic to Tanya.
I don’t even know how I ended up here, but I thought this post was good. I do not know who you are but certainly you are going to a famous blogger if you are not already 😉 Cheers!
Thanks, I’ve just been looking for information about this subject for a while and yours is the greatest I have found out till now. However, what concerning the conclusion? Are you positive about the source?
Good day! This post could not be written any better! Reading through this post reminds me of my previous room mate! He always kept chatting about this. I will forward this page to him. Pretty sure he will have a good read. Thank you for sharing!
Great weblog here! Additionally your site quite a bit up very fast! What host are you the use of? Can I get your affiliate hyperlink to your host? I want my site loaded up as quickly as yours lol
Its like you read my mind! You seem to know a lot about this, like you wrote the book in it or something. I think that you can do with a few pics to drive the message home a bit, but other than that, this is great blog. A great read. I’ll definitely be back.
I like this post, enjoyed this one regards for putting up. “We seldom attribute common sense except to those who agree with us.” by La Rochefoucauld.
I have not checked in here for some time as I thought it was getting boring, but the last few posts are great quality so I guess I will add you back to my daily bloglist. You deserve it my friend 🙂
I like what you guys are up also. Such smart work and reporting! Carry on the excellent works guys I have incorporated you guys to my blogroll. I think it’ll improve the value of my site 🙂
Thank you for sharing superb informations. Your website is very cool. I am impressed by the details that you have on this web site. It reveals how nicely you perceive this subject. Bookmarked this web page, will come back for more articles. You, my friend, ROCK! I found just the info I already searched all over the place and just could not come across. What a great website.
I have been absent for a while, but now I remember why I used to love this blog. Thanks, I?¦ll try and check back more frequently. How frequently you update your web site?
I went over this website and I believe you have a lot of superb info , bookmarked (:.
I would like to point out my gratitude for your kind-heartedness for men who have the need for guidance on in this area. Your personal dedication to getting the message throughout had been quite informative and has without exception empowered workers much like me to realize their objectives. Your entire helpful guideline can mean a whole lot to me and extremely more to my peers. With thanks; from each one of us.
My partner and I stumbled over here coming from a different page and thought I might as well check things out. I like what I see so i am just following you. Look forward to checking out your web page for a second time.
Hello there, You have done an incredible job. I will definitely digg it and personally recommend to my friends. I am confident they’ll be benefited from this web site.
You should take part in a contest for one of the best blogs on the web. I will recommend this site!
I truly appreciate this post. I have been looking all over for this! Thank goodness I found it on Bing. You have made my day! Thanks again
Hey there! This is my first comment here so I just wanted to give a quick shout out and say I genuinely enjoy reading your posts. Can you recommend any other blogs/websites/forums that go over the same subjects? Thank you!
You have remarked very interesting points! ps nice website .
Hey, you used to write fantastic, but the last few posts have been kinda boring?K I miss your super writings. Past several posts are just a little bit out of track! come on!
Some truly wondrous work on behalf of the owner of this website , dead outstanding written content.
My brother recommended I might like this web site. He was totally right. This post actually made my day. You cann’t imagine simply how much time I had spent for this information! Thanks!
Thank you for another informative website. Where else could I get that type of information written in such an ideal way? I’ve a project that I am just now working on, and I’ve been on the look out for such information.
Magnificent beat ! I wish to apprentice while you amend your web site, how can i subscribe for a blog website? The account helped me a acceptable deal. I had been a little bit acquainted of this your broadcast offered bright clear concept
I?¦ve read some good stuff here. Definitely price bookmarking for revisiting. I surprise how so much attempt you place to make this sort of great informative site.
Hey very nice site!! Man .. Beautiful .. Amazing .. I will bookmark your site and take the feeds also…I am happy to find numerous useful information here in the post, we need work out more techniques in this regard, thanks for sharing. . . . . .
It’s a game. Five dollars is free. Try it It’s not an easy game
->-> 카지노사이트 .COM
hey there and thank you for your information – I’ve certainly picked up anything new from right here. I did however expertise a few technical issues using this website, as I experienced to reload the web site many times previous to I could get it to load properly. I had been wondering if your hosting is OK? Not that I’m complaining, but slow loading instances times will very frequently affect your placement in google and can damage your quality score if advertising and marketing with Adwords. Well I’m adding this RSS to my e-mail and could look out for a lot more of your respective intriguing content. Ensure that you update this again soon..
Simply want to say your article is as amazing. The clearness for your publish is just cool and i can assume you are an expert in this subject. Well together with your permission allow me to snatch your feed to keep updated with forthcoming post. Thanks one million and please carry on the enjoyable work.
excellent post, very informative. I wonder why the other specialists of this sector do not notice this. You must continue your writing. I’m confident, you’ve a great readers’ base already!
Keep functioning ,great job!
Hi there, You’ve done a great job. I’ll definitely digg it and personally suggest to my friends. I’m sure they will be benefited from this website.
Excellent blog right here! Also your web site quite a bit up very fast! What web host are you the usage of? Can I am getting your associate link for your host? I wish my website loaded up as quickly as yours lol
Some genuinely good information, Sword lily I noticed this.
Some genuinely quality blog posts on this internet site, saved to fav.
I gotta favorite this web site it seems very useful extremely helpful
As I website possessor I conceive the articles here is real excellent, regards for your efforts.
This site is my inspiration , very wonderful style and perfect content.
Wohh precisely what I was searching for, thanks for posting.
This blog is definitely rather handy since I’m at the moment creating an internet floral website – although I am only starting out therefore it’s really fairly small, nothing like this site. Can link to a few of the posts here as they are quite. Thanks much. Zoey Olsen
You really make it seem really easy along with your presentation but I in finding this topic to be really one thing which I think I would never understand. It kind of feels too complicated and extremely extensive for me. I’m taking a look ahead in your next submit, I?¦ll attempt to get the cling of it!
Im no longer certain the place you are getting your information, however good topic. I must spend some time studying more or understanding more. Thank you for wonderful info I used to be in search of this info for my mission.
Very interesting topic, regards for putting up.
I found your weblog web site on google and check a number of of your early posts. Proceed to keep up the excellent operate. I simply extra up your RSS feed to my MSN Information Reader. Searching for ahead to studying extra from you later on!…
Enjoyed reading through this, very good stuff, regards. “Hereafter, in a better world than this, I shall desire more love and knowledge of you.” by William Shakespeare.
I love your blog.. very nice colors & theme. Did you create this website yourself? Plz reply back as I’m looking to create my own blog and would like to know wheere u got this from. thanks
I’ve recently started a blog, the info you offer on this site has helped me tremendously. Thank you for all of your time & work.
Hi! Someone in my Myspace group shared this site with us so I came to take a look. I’m definitely loving the information. I’m bookmarking and will be tweeting this to my followers! Great blog and wonderful design.
Woah! I’m really digging the template/theme of this website. It’s simple, yet effective. A lot of times it’s very hard to get that “perfect balance” between user friendliness and visual appeal. I must say you’ve done a awesome job with this. In addition, the blog loads very quick for me on Internet explorer. Outstanding Blog!
Wow, fantastic blog layout! How long have you been blogging for? you make blogging look easy. The overall look of your web site is fantastic, let alone the content!
Hello.This article was really interesting, especially since I was searching for thoughts on this issue last Wednesday.
Very interesting information!Perfect just what I was searching for!
Howdy! This is my first visit to your blog! We are a group of volunteers and starting a new initiative in a community in the same niche. Your blog provided us beneficial information to work on. You have done a wonderful job!
Hi just wanted to give you a brief heads up and let you know a few of the images aren’t loading properly. I’m not sure why but I think its a linking issue. I’ve tried it in two different web browsers and both show the same outcome.
hi!,I like your writing very so much! percentage we be in contact more about your article on AOL? I need a specialist on this house to resolve my problem. May be that’s you! Taking a look ahead to see you.
Pretty section of content. I just stumbled upon your website and in accession capital to assert that I get actually enjoyed account your blog posts. Anyway I will be subscribing to your augment and even I achievement you access consistently quickly.
Hi, just required you to know I he added your site to my Google bookmarks due to your layout. But seriously, I believe your internet site has 1 in the freshest theme I??ve came across. It extremely helps make reading your blog significantly easier.
I like what you guys are up also. Such clever work and reporting! Carry on the superb works guys I have incorporated you guys to my blogroll. I think it’ll improve the value of my website 🙂
I like this blog its a master peace ! Glad I detected this on google .
Hi my friend! I want to say that this post is amazing, nice written and include almost all significant infos. I’d like to see more posts like this.
Hi there! I know this is kinda off topic nevertheless I’d figured I’d ask. Would you be interested in trading links or maybe guest authoring a blog article or vice-versa? My site covers a lot of the same subjects as yours and I feel we could greatly benefit from each other. If you might be interested feel free to send me an email. I look forward to hearing from you! Superb blog by the way!
hi!,I really like your writing so so much! percentage we be in contact more approximately your article on AOL? I require an expert in this house to resolve my problem. May be that is you! Taking a look forward to see you.
You made some good points there. I looked on the internet for the issue and found most individuals will consent with your blog.
What is a female nerd called?
Hello. impressive job. I did not imagine this. This is a splendid story. Thanks!
Fancy live sessions in CamChat? With us you can meet over 5000 camgirls live on cam and discover free online live webcams in the large online video library.
You made some respectable factors there. I seemed on the web for the problem and found most people will associate with along with your website.
Hello! I know this is kind of off topic but I was wondering if you knew where I could locate a captcha plugin for my comment form? I’m using the same blog platform as yours and I’m having trouble finding one? Thanks a lot!
Amazing blog! Is your theme custom made or did you download it from somewhere? A theme like yours with a few simple tweeks would really make my blog stand out. Please let me know where you got your design. Many thanks
Loving the info on this site, you have done great job on the articles.
Exactly what I was searching for, thankyou for posting.
I’ve been browsing online more than three hours lately, yet I never found any fascinating article like yours. It is pretty price sufficient for me. In my view, if all web owners and bloggers made just right content material as you probably did, the net will probably be a lot more useful than ever before. “Learn to see in another’s calamity the ills which you should avoid.” by Publilius Syrus.
Very nice post and right to the point. I am not sure if this is really the best place to ask but do you folks have any thoughts on where to employ some professional writers? Thank you 🙂
What¦s Taking place i am new to this, I stumbled upon this I’ve discovered It absolutely useful and it has helped me out loads. I am hoping to give a contribution & aid different customers like its helped me. Good job.
I like your writing style truly loving this site.
Thanks for this post, I am a big big fan of this web site would like to continue updated.
I went over this website and I conceive you have a lot of good information, saved to my bookmarks (:.
Great amazing issues here. I am very happy to peer your article. Thank you so much and i am taking a look forward to touch you. Will you kindly drop me a e-mail?
I’ll immediately seize your rss as I can’t find your e-mail subscription hyperlink or e-newsletter service. Do you’ve any? Kindly let me recognize so that I may just subscribe. Thanks.
This is very interesting, You’re an excessively professional blogger. I have joined your rss feed and sit up for looking for more of your excellent post. Additionally, I’ve shared your site in my social networks!
I wanted to thank you for this great read!! I definitely enjoying every little bit of it I have you bookmarked to check out new stuff you post…
What i do not understood is actually how you’re not actually a lot more well-appreciated than you may be now. You’re very intelligent. You understand therefore considerably relating to this subject, made me in my opinion believe it from numerous numerous angles. Its like men and women aren’t fascinated unless it¦s one thing to do with Girl gaga! Your personal stuffs great. Always care for it up!
I visited a lot of website but I conceive this one contains something extra in it in it
Good post and straight to the point. I am not sure if this is in fact the best place to ask but do you guys have any ideea where to get some professional writers? Thanks 🙂
Really great visual appeal on this site, I’d value it 10 10.
I don’t even know how I ended up here, but I thought this post was great. I do not know who you are but certainly you’re going to a famous blogger if you are not already 😉 Cheers!
It?¦s in reality a nice and helpful piece of info. I am satisfied that you simply shared this helpful information with us. Please stay us up to date like this. Thank you for sharing.
I have read some good stuff here. Definitely worth bookmarking for revisiting. I wonder how much effort you put to make such a great informative web site.
Yesterday, while I was at work, my cousin stole my iPad and tested to see if it can survive a forty foot drop, just so she can be a youtube sensation. My iPad is now destroyed and she has 83 views. I know this is entirely off topic but I had to share it with someone!
It?¦s actually a cool and useful piece of information. I?¦m satisfied that you just shared this helpful info with us. Please stay us up to date like this. Thanks for sharing.
you could have an excellent weblog right here! would you prefer to make some invite posts on my weblog?
Hi there, I discovered your blog by way of Google while looking for a comparable matter, your website got here up, it seems to be good. I’ve bookmarked it in my google bookmarks.
Hello. excellent job. I did not expect this. This is a excellent story. Thanks!
Appreciate it for this terrific post, I am glad I observed this website on yahoo.
Thank you for sharing superb informations. Your site is very cool. I am impressed by the details that you have on this blog. It reveals how nicely you perceive this subject. Bookmarked this website page, will come back for more articles. You, my friend, ROCK! I found just the information I already searched everywhere and simply could not come across. What a perfect web-site.
I went over this web site and I believe you have a lot of superb info, saved to fav (:.
I cherished up to you’ll receive carried out right here. The cartoon is tasteful, your authored material stylish. however, you command get bought an edginess over that you would like be delivering the following. in poor health no doubt come more earlier once more as precisely the same nearly a lot frequently inside case you shield this hike.
I do not even know how I ended up here, but I thought this post was great. I do not know who you are but certainly you’re going to a famous blogger if you aren’t already 😉 Cheers!
Youre so cool! I dont suppose Ive learn anything like this before. So good to search out somebody with some unique thoughts on this subject. realy thanks for beginning this up. this web site is something that’s wanted on the web, someone with a little originality. useful job for bringing something new to the internet!
I have learn a few excellent stuff here. Certainly value bookmarking for revisiting. I wonder how a lot attempt you put to create one of these magnificent informative website.
Merely wanna state that this is handy, Thanks for taking your time to write this.
I’ve learn a few good stuff here. Certainly price bookmarking for revisiting. I wonder how much attempt you put to make any such magnificent informative web site.
Some truly excellent articles on this site, thank you for contribution. “The key to everything is patience. You get the chicken by hatching the egg, not by smashing it.” by Arnold Glasgow.
Greetings from Ohio! I’m bored to death at work so I decided to check out your blog on my iphone during lunch break. I enjoy the information you provide here and can’t wait to take a look when I get home. I’m shocked at how quick your blog loaded on my phone .. I’m not even using WIFI, just 3G .. Anyways, wonderful site!
Hello there, just became aware of your blog through Google, and found that it is really informative. I’m going to watch out for brussels. I will appreciate if you continue this in future. Many people will be benefited from your writing. Cheers!
Its like you learn my thoughts! You seem to know so much about this, like you wrote the ebook in it or something. I believe that you could do with a few percent to force the message house a little bit, however instead of that, that is fantastic blog. An excellent read. I’ll definitely be back.
I really appreciate this post. I have been looking all over for this! Thank goodness I found it on Bing. You’ve made my day! Thanks again
You got a very fantastic website, Gladiola I observed it through yahoo.
As I website possessor I believe the content material here is rattling wonderful , appreciate it for your efforts. You should keep it up forever! Good Luck.
I’ve recently started a website, the info you offer on this website has helped me greatly. Thanks for all of your time & work.
Thank you for sharing excellent informations. Your web-site is very cool. I’m impressed by the details that you have on this site. It reveals how nicely you understand this subject. Bookmarked this website page, will come back for more articles. You, my pal, ROCK! I found simply the information I already searched everywhere and just couldn’t come across. What a great site.
Hi there just wanted to give you a quick heads up. The words in your content seem to be running off the screen in Chrome. I’m not sure if this is a formatting issue or something to do with browser compatibility but I figured I’d post to let you know. The design and style look great though! Hope you get the problem resolved soon. Thanks
fantastic post, very informative. I’m wondering why the other specialists of this sector do not realize this. You should continue your writing. I am confident, you’ve a huge readers’ base already!
You are my inspiration, I possess few blogs and occasionally run out from brand :). “Follow your inclinations with due regard to the policeman round the corner.” by W. Somerset Maugham.
Just a smiling visitant here to share the love (:, btw great style and design.
Hi, I think your site might be having browser compatibility issues. When I look at your website in Safari, it looks fine but when opening in Internet Explorer, it has some overlapping. I just wanted to give you a quick heads up! Other then that, fantastic blog!
Howdy this is somewhat of off topic but I was wanting to know if blogs use WYSIWYG editors or if you have to manually code with HTML. I’m starting a blog soon but have no coding know-how so I wanted to get advice from someone with experience. Any help would be greatly appreciated!
I don’t usually comment but I gotta say appreciate it for the post on this special one : D.
Its wonderful as your other blog posts : D, thanks for posting.
Enjoyed looking through this, very good stuff, thankyou.
Its like you read my mind! You seem to know a lot about this, like you wrote the book in it or something. I think that you could do with some pics to drive the message home a bit, but instead of that, this is magnificent blog. An excellent read. I’ll certainly be back.
Hi! This post could not be written any better! Reading this post reminds me of my good old room mate! He always kept talking about this. I will forward this article to him. Pretty sure he will have a good read. Thanks for sharing!
I have been absent for some time, but now I remember why I used to love this site. Thanks, I will try and check back more often. How frequently you update your web site?
Thank you for helping out, great information. “Whoever obeys the gods, to him they particularly listen.” by Homer.
I just could not depart your site prior to suggesting that I really enjoyed the standard information a person provide for your visitors? Is going to be back often in order to check up on new posts
Today, while I was at work, my sister stole my iphone and tested to see if it can survive a forty foot drop, just so she can be a youtube sensation. My apple ipad is now broken and she has 83 views. I know this is totally off topic but I had to share it with someone!
The next time I learn a blog, I hope that it doesnt disappoint me as much as this one. I imply, I know it was my choice to read, but I truly thought youd have something fascinating to say. All I hear is a bunch of whining about one thing that you would repair if you werent too busy searching for attention.
An impressive share, I just given this onto a colleague who was doing slightly analysis on this. And he in truth bought me breakfast because I discovered it for him.. smile. So let me reword that: Thnx for the deal with! But yeah Thnkx for spending the time to discuss this, I feel strongly about it and love reading extra on this topic. If doable, as you turn out to be expertise, would you thoughts updating your blog with more details? It’s highly useful for me. Huge thumb up for this weblog publish!
Hey, you used to write fantastic, but the last several posts have been kinda boring… I miss your super writings. Past few posts are just a bit out of track! come on!
Thankyou for helping out, great information.
Thank you for some other great post. Where else could anybody get that kind of info in such an ideal means of writing? I have a presentation next week, and I’m at the search for such information.
Hello. magnificent job. I did not anticipate this. This is a remarkable story. Thanks!
I want reading and I conceive this website got some genuinely utilitarian stuff on it! .
Hello there! I know this is somewhat off topic but I was wondering which blog platform are you using for this site? I’m getting tired of WordPress because I’ve had problems with hackers and I’m looking at alternatives for another platform. I would be awesome if you could point me in the direction of a good platform.
Hi my friend! I want to say that this article is awesome, great written and come with approximately all important infos. I would like to peer extra posts like this .
I am continuously searching online for ideas that can assist me. Thank you!
You are a very smart individual!
Very interesting subject, thankyou for putting up. “The great leaders have always stage-managed their effects.” by Charles De Gaulle.
I appreciate, cause I found exactly what I was looking for. You’ve ended my 4 day long hunt! God Bless you man. Have a nice day. Bye
It’s a pity you don’t have a donate button! I’d definitely donate to this excellent blog! I suppose for now i’ll settle for bookmarking and adding your RSS feed to my Google account. I look forward to fresh updates and will share this website with my Facebook group. Talk soon!
You are a very smart person!
Good site! I really love how it is easy on my eyes and the data are well written. I am wondering how I could be notified when a new post has been made. I have subscribed to your RSS which must do the trick! Have a nice day!
you’ve gotten an incredible blog here! would you like to make some invite posts on my blog?
I have been surfing on-line greater than 3 hours nowadays, yet I by no means found any interesting article like yours. It’s beautiful worth enough for me. Personally, if all webmasters and bloggers made just right content as you did, the net will likely be a lot more helpful than ever before.
Just a smiling visitor here to share the love (:, btw great design and style. “Treat the other man’s faith gently it is all he has to believe with.” by Athenus.
My programmer is trying to convince me to move to .net from PHP. I have always disliked the idea because of the expenses. But he’s tryiong none the less. I’ve been using Movable-type on several websites for about a year and am worried about switching to another platform. I have heard excellent things about blogengine.net. Is there a way I can transfer all my wordpress posts into it? Any kind of help would be greatly appreciated!
Yay google is my king helped me to find this great internet site! .
Its such as you learn my thoughts! You appear to know so much approximately this, such as you wrote the e-book in it or something. I feel that you could do with some p.c. to force the message house a bit, however instead of that, that is magnificent blog. An excellent read. I’ll definitely be back.
Wow! This can be one particular of the most useful blogs We have ever arrive across on this subject. Basically Fantastic. I’m also an expert in this topic therefore I can understand your hard work.
Everyone loves what you guys are usually up too. This type of clever work and coverage! Keep up the good works guys I’ve added you guys to blogroll.
I really appreciate this post. I have been looking everywhere for this! Thank goodness I found it on Bing. You have made my day! Thx again
Would love to always get updated outstanding blog! .
I was very pleased to seek out this web-site.I wished to thanks to your time for this glorious read!! I positively having fun with every little bit of it and I’ve you bookmarked to check out new stuff you weblog post.
Fantastic web site. Plenty of useful info here. I am sending it to a few friends ans also sharing in delicious. And obviously, thanks for your effort!
I like this post, enjoyed this one thankyou for putting up.
hello there and thank you for your information – I’ve certainly picked up anything new from right here. I did however expertise some technical points using this website, as I experienced to reload the site many times previous to I could get it to load correctly. I had been wondering if your web host is OK? Not that I’m complaining, but slow loading instances times will often affect your placement in google and can damage your high quality score if ads and marketing with Adwords. Well I am adding this RSS to my email and can look out for a lot more of your respective intriguing content. Make sure you update this again soon..
Hello there I am so excited I found your site, I really found you by mistake, while I was browsing on Bing for something else, Regardless I am here now and would just like to say thanks a lot for a fantastic post and a all round interesting blog (I also love the theme/design), I don’t have time to browse it all at the minute but I have book-marked it and also added in your RSS feeds, so when I have time I will be back to read much more, Please do keep up the awesome job.
Very interesting points you have observed, regards for posting. “Without courage, wisdom bears no fruit.” by Baltasar Gracian.
naturally like your web site but you have to test the spelling on quite a few of your posts. A number of them are rife with spelling problems and I to find it very troublesome to tell the reality nevertheless I¦ll surely come back again.
I’ve been absent for a while, but now I remember why I used to love this site. Thanks, I will try and check back more often. How frequently you update your website?
Thanks for any other informative web site. The place else could I get that kind of info written in such an ideal way? I’ve a venture that I’m just now running on, and I have been on the glance out for such info.
Pretty nice post. I just stumbled upon your blog and wanted to say that I’ve truly enjoyed surfing around your blog posts. After all I will be subscribing to your feed and I hope you write again very soon!
I couldn’t resist commenting
There are some interesting closing dates on this article but I don’t know if I see all of them center to heart. There’s some validity but I’ll take hold opinion till I look into it further. Good article , thanks and we would like more! Added to FeedBurner as well
Hi, I think your site might be having browser compatibility issues. When I look at your website in Safari, it looks fine but when opening in Internet Explorer, it has some overlapping. I just wanted to give you a quick heads up! Other then that, fantastic blog!
Excellent read, I just passed this onto a friend who was doing some research on that. And he just bought me lunch since I found it for him smile So let me rephrase that: Thank you for lunch!
I know this if off topic but I’m looking into starting my own weblog and was curious what all is needed to get set up? I’m assuming having a blog like yours would cost a pretty penny? I’m not very web smart so I’m not 100 sure. Any suggestions or advice would be greatly appreciated. Many thanks
Thanks for another excellent article. Where else could anyone get that type of information in such a perfect way of writing? I have a presentation next week, and I am on the look for such information.
I conceive this website holds some rattling wonderful information for everyone : D.
You have brought up a very wonderful points, regards for the post.
You have brought up a very good details , regards for the post.
Wow! Thank you! I continuously needed to write on my site something like that. Can I take a portion of your post to my website?
What Is FitSpresso? FitSpresso is a natural weight-loss formula designed for overweight individuals who are on medications and who do not show any sign of weight loss.
The following time I read a blog, I hope that it doesnt disappoint me as much as this one. I mean, I do know it was my option to read, but I actually thought youd have one thing attention-grabbing to say. All I hear is a bunch of whining about something that you could repair when you werent too busy looking for attention.
Do you have a spam issue on this blog; I also am a blogger, and I was curious about your situation; many of us have developed some nice methods and we are looking to trade solutions with other folks, please shoot me an e-mail if interested.
Really instructive and fantastic bodily structure of content, now that’s user friendly (:.
I have been absent for some time, but now I remember why I used to love this blog. Thank you, I will try and check back more frequently. How frequently you update your website?
I really like gathering useful info, this post has got me even more info! .
Nice post. I was checking constantly this blog and I am impressed! Very useful information specially the last part 🙂 I care for such information a lot. I was looking for this particular information for a long time. Thank you and best of luck.
I have been surfing online more than 3 hours today, but I by no means found any interesting article like yours. It is beautiful price enough for me. In my view, if all site owners and bloggers made just right content as you did, the net will be much more useful than ever before.
I like this website its a master peace ! Glad I found this on google .
Great blog! Is your theme custom made or did you download it from somewhere? A theme like yours with a few simple adjustements would really make my blog jump out. Please let me know where you got your design. With thanks
I adore reading and I think this website got some genuinely useful stuff on it! .
I’m really impressed with your writing skills and also with the layout on your weblog. Is this a paid theme or did you modify it yourself? Either way keep up the nice quality writing, it’s rare to see a great blog like this one nowadays..
Good write-up, I am normal visitor of one’s website, maintain up the nice operate, and It is going to be a regular visitor for a lengthy time.
Hi there! I just wanted to ask if you ever have any issues with hackers? My last blog (wordpress) was hacked and I ended up losing months of hard work due to no backup. Do you have any solutions to prevent hackers?
You should take part in a contest for one of the best blogs on the web. I will recommend this site!
I’ve been surfing on-line greater than three hours as of late, yet I never discovered any interesting article like yours. It is pretty worth enough for me. Personally, if all web owners and bloggers made excellent content material as you did, the web will probably be much more helpful than ever before.
Terrific work! This is the type of information that should be shared around the net. Shame on the search engines for not positioning this post higher! Come on over and visit my site . Thanks =)
Good info. Lucky me I reach on your website by accident, I bookmarked it.
Some really good information, Gladiolus I observed this. “Use your imagination not to scare yourself to death but to inspire yourself to life.” by Adele Brookman.
Hi there, You’ve done an excellent job. I’ll certainly digg it and personally suggest to my friends. I am sure they will be benefited from this web site.
I¦ve recently started a site, the information you offer on this web site has helped me tremendously. Thank you for all of your time & work.
As I web site possessor I believe the content matter here is rattling fantastic , appreciate it for your hard work. You should keep it up forever! Good Luck.
I have not checked in here for some time because I thought it was getting boring, but the last several posts are good quality so I guess I will add you back to my daily bloglist. You deserve it my friend 🙂
I love it when people come together and share opinions, great blog, keep it up.
I feel this is among the so much important information for me. And i am happy studying your article. However wanna statement on few basic things, The site style is perfect, the articles is in point of fact great : D. Excellent job, cheers
I like this weblog very much, Its a very nice billet to read and receive info .
Excellent goods from you, man. I have understand your stuff previous to and you are just extremely magnificent. I actually like what you have acquired here, really like what you’re stating and the way in which you say it. You make it enjoyable and you still care for to keep it sensible. I cant wait to read much more from you. This is really a terrific website.
I very thankful to find this site on bing, just what I was searching for : D besides bookmarked.
This really answered my problem, thanks!
This is really interesting, You are a very skilled blogger. I’ve joined your rss feed and look forward to seeking more of your excellent post. Also, I have shared your web site in my social networks!
Thankyou for this marvelous post, I am glad I discovered this web site on yahoo.
This web page is known as a stroll-through for all the info you wished about this and didn’t know who to ask. Glimpse here, and you’ll positively discover it.
I¦ve recently started a website, the info you offer on this web site has helped me tremendously. Thank you for all of your time & work.
I used to be recommended this web site by means of my cousin. I’m no longer positive whether or not this post is written by way of him as no one else recognize such unique about my difficulty. You are incredible! Thanks!
of course like your web site but you have to check the spelling on several of your posts. A number of them are rife with spelling problems and I find it very troublesome to tell the truth nevertheless I will definitely come back again.
Hey very nice blog!! Man .. Excellent .. Amazing .. I’ll bookmark your site and take the feeds also…I’m happy to find a lot of useful information here in the post, we need work out more techniques in this regard, thanks for sharing. . . . . .
I gotta favorite this web site it seems very helpful handy
Hmm it looks like your blog ate my first comment (it was extremely long) so I guess I’ll just sum it up what I had written and say, I’m thoroughly enjoying your blog. I too am an aspiring blog blogger but I’m still new to everything. Do you have any suggestions for inexperienced blog writers? I’d definitely appreciate it.
Respect to article author, some great selective information.
Hi, just required you to know I he added your site to my Google bookmarks due to your layout. But seriously, I believe your internet site has 1 in the freshest theme I??ve came across. It extremely helps make reading your blog significantly easier.
I’d have to examine with you here. Which is not one thing I usually do! I take pleasure in reading a post that may make folks think. Additionally, thanks for permitting me to comment!
Woh I like your posts, bookmarked! .
Whats up this is somewhat of off topic but I was wanting to know if blogs use WYSIWYG editors or if you have to manually code with HTML. I’m starting a blog soon but have no coding skills so I wanted to get advice from someone with experience. Any help would be greatly appreciated!
Hi there! This is my first visit to your blog! We are a group of volunteers and starting a new project in a community in the same niche. Your blog provided us valuable information to work on. You have done a extraordinary job!
I truly appreciate this post. I’ve been looking everywhere for this! Thank goodness I found it on Bing. You’ve made my day! Thank you again
Some genuinely nice stuff on this website , I like it.
Hmm is anyone else encountering problems with the images on this blog loading? I’m trying to figure out if its a problem on my end or if it’s the blog. Any suggestions would be greatly appreciated.
I appreciate your work, appreciate it for all the useful articles.
I am not real fantastic with English but I come up this rattling easy to translate.
Somebody necessarily lend a hand to make significantly articles I might state. This is the first time I frequented your web page and thus far? I surprised with the research you made to create this actual publish incredible. Fantastic job!
I would like to thnkx for the efforts you have put in writing this web site. I’m hoping the same high-grade blog post from you in the upcoming as well. In fact your creative writing skills has inspired me to get my own site now. Actually the blogging is spreading its wings fast. Your write up is a good example of it.
I haven’t checked in here for some time since I thought it was getting boring, but the last several posts are good quality so I guess I will add you back to my everyday bloglist. You deserve it my friend 🙂
But a smiling visitor here to share the love (:, btw great layout. “Everything should be made as simple as possible, but not one bit simpler.” by Albert Einstein.
Great blog! Do you have any recommendations for aspiring writers? I’m planning to start my own site soon but I’m a little lost on everything. Would you advise starting with a free platform like WordPress or go for a paid option? There are so many choices out there that I’m totally overwhelmed .. Any suggestions? Thank you!
What is FitSpresso? FitSpresso, a dietary supplement presented in pill form, offers a comprehensive approach to weight loss by enhancing metabolism and augmenting the body’s fat-burning capacity
Precisely what I was searching for, thankyou for putting up.
What’s Happening i’m new to this, I stumbled upon this I have found It absolutely useful and it has aided me out loads. I hope to contribute & assist other users like its helped me. Great job.
When I originally commented I clicked the “Notify me when new comments are added” checkbox and now each time a comment is added I get several e-mails with the same comment. Is there any way you can remove people from that service? Thank you!
I truly enjoy reading through on this web site, it has superb articles. “One should die proudly when it is no longer possible to live proudly.” by Friedrich Wilhelm Nietzsche.
It’s really a great and useful piece of information. I am satisfied that you shared this helpful information with us. Please keep us up to date like this. Thanks for sharing.
I’m not that much of a online reader to be honest but your sites really nice, keep it up! I’ll go ahead and bookmark your website to come back later. Many thanks
What Is Puravive? Puravive is a natural formula that supports healthy weight loss. This supplement helps to ignite the levels of brown adipose tissue in the body to lose extra weight
I will immediately seize your rss feed as I can not to find your email subscription hyperlink or newsletter service. Do you have any? Kindly allow me know so that I may just subscribe. Thanks.
Hello very nice website!! Man .. Beautiful .. Superb .. I’ll bookmark your web site and take the feeds additionally…I am happy to find so many useful information right here in the put up, we want develop more strategies on this regard, thanks for sharing.
What Is Tonic Greens? Tonic Greens is a wellness aid that helps with combatting herpes in addition to enhancing your well-being.
I just couldn’t go away your website prior to suggesting that I actually loved the standard information an individual provide on your visitors? Is going to be back incessantly to check out new posts.
I’ve learn some just right stuff here. Definitely value bookmarking for revisiting. I surprise how much attempt you set to create one of these great informative site.
Rattling informative and great bodily structure of articles, now that’s user genial (:.
What Is DentiCore? DentiCore is an oral health supplement that is made using some of the best and highest quality ingredients
What Is DentiCore? DentiCore is an oral health supplement that is made using some of the best and highest quality ingredients
Really informative and wonderful anatomical structure of content, now that’s user friendly (:.
You have observed very interesting details! ps nice site. “We make ourselves a ladder out of our vices if we trample the vices themselves underfoot.” by Saint Augustine.
Saved as a favorite, I really like your blog!
I haven¦t checked in here for some time since I thought it was getting boring, but the last several posts are good quality so I guess I will add you back to my daily bloglist. You deserve it my friend 🙂
I?¦ll right away snatch your rss as I can not find your email subscription hyperlink or newsletter service. Do you’ve any? Kindly permit me know in order that I could subscribe. Thanks.
I do agree with all the ideas you have presented in your post. They’re very convincing and will certainly work. Still, the posts are too short for novices. Could you please extend them a little from next time? Thanks for the post.
Very interesting topic, appreciate it for posting. “Genius is of no country.” by Charles Churchill.
I wish to get across my appreciation for your generosity in support of those people that have the need for assistance with this one area of interest. Your very own dedication to passing the message across came to be certainly powerful and has consistently encouraged some individuals just like me to reach their objectives. Your entire informative tips and hints can mean a great deal to me and a whole lot more to my mates. Thank you; from everyone of us.
I just like the helpful information you provide to your articles. I’ll bookmark your weblog and check again here frequently. I’m moderately sure I will be informed lots of new stuff proper right here! Best of luck for the following!
My wife and i have been so satisfied that Chris could do his investigation through the entire ideas he made out of your web site. It’s not at all simplistic to just continually be freely giving guidelines which many others might have been trying to sell. And we also understand we have the website owner to give thanks to for this. Those explanations you made, the straightforward blog menu, the relationships you will make it possible to engender – it’s got many fantastic, and it is making our son and us know that that subject matter is satisfying, and that’s highly serious. Thanks for everything!
This is a topic close to my heart cheers, where are your contact details though?
I am usually to blogging and i really respect your content. The article has actually peaks my interest. I’m going to bookmark your web site and keep checking for new information.
You completed a number of fine points there. I did a search on the subject matter and found most persons will go along with with your blog.
Good info. Lucky me I reach on your website by accident, I bookmarked it.
Hi, just required you to know I he added your site to my Google bookmarks due to your layout. But seriously, I believe your internet site has 1 in the freshest theme I??ve came across. It extremely helps make reading your blog significantly easier.
I am really loving the theme/design of your weblog. Do you ever run into any web browser compatibility problems? A couple of my blog visitors have complained about my blog not operating correctly in Explorer but looks great in Opera. Do you have any recommendations to help fix this problem?
Today, while I was at work, my cousin stole my iPad and tested to see if it can survive a 25 foot drop, just so she can be a youtube sensation. My iPad is now broken and she has 83 views. I know this is entirely off topic but I had to share it with someone!
Excellent post however , I was wanting to know if you could write a litte more on this subject? I’d be very thankful if you could elaborate a little bit further. Appreciate it!
Excellent post. I was checking constantly this blog and I’m impressed! Very helpful info specially the last part 🙂 I care for such information much. I was looking for this certain info for a long time. Thank you and best of luck.
You made some good points there. I did a search on the theme and found the majority of people will go along with with your blog.
Can I just say what a relief to find someone who actually knows what theyre talking about on the internet. You definitely know how to bring an issue to light and make it important. More people need to read this and understand this side of the story. I cant believe youre not more popular because you definitely have the gift.
I have recently started a blog, the information you provide on this web site has helped me greatly. Thanks for all of your time & work.
Your place is valueble for me. Thanks!…
Definitely believe that which you stated. Your favorite reason appeared to be on the internet the easiest thing to be aware of. I say to you, I definitely get irked while people think about worries that they just don’t know about. You managed to hit the nail upon the top and defined out the whole thing without having side-effects , people can take a signal. Will probably be back to get more. Thanks
This is really interesting, You’re a very skilled blogger. I’ve joined your feed and look forward to seeking more of your wonderful post. Also, I have shared your web site in my social networks!
What i do not realize is actually how you’re no longer actually much more well-preferred than you might be right now. You’re very intelligent. You already know therefore considerably on the subject of this matter, made me in my opinion consider it from numerous numerous angles. Its like women and men aren’t interested unless it’s one thing to accomplish with Girl gaga! Your personal stuffs outstanding. Always maintain it up!
Thank you for sharing excellent informations. Your website is so cool. I’m impressed by the details that you¦ve on this web site. It reveals how nicely you understand this subject. Bookmarked this website page, will come back for extra articles. You, my pal, ROCK! I found simply the information I already searched all over the place and just couldn’t come across. What an ideal web site.
Just what I was looking for, appreciate it for posting.
Its like you read my mind! You seem to know so much about this, like you wrote the book in it or something. I think that you can do with some pics to drive the message home a little bit, but instead of that, this is fantastic blog. A great read. I will certainly be back.
It’s hard to search out knowledgeable people on this subject, however you sound like you know what you’re speaking about! Thanks
Good site! I truly love how it is simple on my eyes and the data are well written. I’m wondering how I might be notified when a new post has been made. I’ve subscribed to your RSS which must do the trick! Have a great day!
You got a very excellent website, Gladiola I discovered it through yahoo.
Hi, I think your site might be having browser compatibility issues. When I look at your website in Safari, it looks fine but when opening in Internet Explorer, it has some overlapping. I just wanted to give you a quick heads up! Other then that, fantastic blog!
I like this post, enjoyed this one thank you for posting. “To the dull mind all nature is leaden. To the illumined mind the whole world sparkles with light.” by Ralph Waldo Emerson.
Very interesting points you have observed, thankyou for putting up.
Hello, you used to write great, but the last several posts have been kinda boringK I miss your tremendous writings. Past several posts are just a bit out of track! come on!
I enjoy your writing style genuinely enjoying this internet site.
With every little thing which appears to be developing throughout this particular subject material, your viewpoints tend to be fairly stimulating. Nevertheless, I appologize, because I can not give credence to your entire idea, all be it exhilarating none the less. It would seem to me that your comments are not completely justified and in fact you are generally your self not really fully convinced of the point. In any event I did take pleasure in looking at it.
Thank you for sharing excellent informations. Your web-site is so cool. I am impressed by the details that you have on this website. It reveals how nicely you understand this subject. Bookmarked this website page, will come back for more articles. You, my pal, ROCK! I found just the info I already searched all over the place and simply couldn’t come across. What a perfect site.
Some genuinely interesting information, well written and broadly speaking user genial.
I truly treasure your work, Great post.
F*ckin¦ amazing things here. I¦m very glad to look your article. Thanks so much and i am taking a look ahead to contact you. Will you kindly drop me a mail?
I am very happy to read this. This is the kind of manual that needs to be given and not the accidental misinformation that’s at the other blogs. Appreciate your sharing this best doc.
Howdy I am so excited I found your blog page, I really found you by error, while I was researching on Yahoo for something else, Nonetheless I am here now and would just like to say kudos for a remarkable post and a all round entertaining blog (I also love the theme/design), I don’t have time to look over it all at the moment but I have bookmarked it and also included your RSS feeds, so when I have time I will be back to read a great deal more, Please do keep up the superb job.
naturally like your website but you have to check the spelling on quite a few of your posts. Several of them are rife with spelling issues and I to find it very troublesome to inform the reality then again I will certainly come again again.
I simply wished to say thanks once again. I do not know the things I might have implemented without those advice documented by you regarding such a industry. Entirely was a real hard matter for me, however , taking a look at the very well-written avenue you dealt with that took me to cry for contentment. Now i’m happy for your assistance and sincerely hope you comprehend what a great job your are doing training other individuals through the use of your website. Most probably you have never come across all of us.
I?¦ve learn some excellent stuff here. Definitely worth bookmarking for revisiting. I surprise how so much effort you place to create this sort of magnificent informative website.
Hello there! I know this is somewhat off topic but I was wondering if you knew where I could get a captcha plugin for my comment form? I’m using the same blog platform as yours and I’m having trouble finding one? Thanks a lot!
I love studying and I believe this website got some genuinely utilitarian stuff on it! .
I view something genuinely special in this web site.
Attractive section of content. I simply stumbled upon your blog and in accession capital to say that I acquire in fact enjoyed account your weblog posts. Anyway I will be subscribing for your augment and even I achievement you get right of entry to consistently fast.
Your style is so unique compared to many other people. Thank you for publishing when you have the opportunity,Guess I will just make this bookmarked.2
Outstanding post, I conceive website owners should learn a lot from this weblog its really user friendly.
Excellent beat ! I wish to apprentice while you amend your site, how can i subscribe for a blog web site? The account helped me a acceptable deal. I had been a little bit acquainted of this your broadcast offered bright clear concept
Awsome article and straight to the point. I am not sure if this is in fact the best place to ask but do you folks have any ideea where to get some professional writers? Thank you 🙂
magnificent issues altogether, you just won a new reader. What would you suggest about your put up that you just made a few days in the past? Any sure?
F*ckin¦ amazing issues here. I¦m very happy to look your article. Thanks so much and i am taking a look forward to touch you. Will you please drop me a e-mail?
Thank you, I’ve recently been looking for information approximately this topic for a long time and yours is the best I have found out till now. But, what in regards to the bottom line? Are you sure in regards to the source?
Hi, Neat post. There’s an issue along with your website in internet explorer, might check thisK IE still is the marketplace chief and a big component of folks will pass over your great writing due to this problem.
Wonderful blog! Do you have any hints for aspiring writers? I’m planning to start my own website soon but I’m a little lost on everything. Would you advise starting with a free platform like WordPress or go for a paid option? There are so many options out there that I’m totally confused .. Any tips? Thank you!
It?¦s really a great and helpful piece of information. I?¦m glad that you just shared this helpful information with us. Please keep us informed like this. Thank you for sharing.
I’ve been absent for some time, but now I remember why I used to love this blog. Thank you, I’ll try and check back more frequently. How frequently you update your web site?
I’ve been surfing online more than 3 hours today, yet I never found any interesting article like yours. It’s pretty worth enough for me. Personally, if all webmasters and bloggers made good content as you did, the internet will be much more useful than ever before.
Some genuinely superb information, Gladiolus I detected this.
Just wish to say your article is as surprising. The clarity in your post is simply great and i could assume you are an expert on this subject. Well with your permission allow me to grab your RSS feed to keep updated with forthcoming post. Thanks a million and please carry on the enjoyable work.
I am often to blogging and i really appreciate your content. The article has really peaks my interest. I am going to bookmark your site and keep checking for new information.
You could definitely see your enthusiasm in the work you write. The arena hopes for more passionate writers such as you who aren’t afraid to say how they believe. All the time go after your heart. “History is the version of past events that people have decided to agree upon.” by Napoleon.
Great work! This is the type of info that should be shared around the net. Shame on Google for not positioning this post higher! Come on over and visit my web site . Thanks =)
Hello! I just would like to give a huge thumbs up for the great info you have here on this post. I will be coming back to your blog for more soon.
FitSpresso stands out as a leading weight loss product currently dominating the market. This potent supplement asserts its ability to facilitate healthy weight loss naturally, free from any adverse side effects. Its formulation incorporates clinically studied ingredients that synergistically contribute to promoting natural fat burning, elevating metabolism, and sustaining enduring weight loss.
Wohh just what I was looking for, regards for putting up.
I was just looking for this information for a while. After 6 hours of continuous Googleing, finally I got it in your web site. I wonder what’s the lack of Google strategy that don’t rank this kind of informative websites in top of the list. Usually the top web sites are full of garbage.
After examine just a few of the weblog posts on your web site now, and I truly like your way of blogging. I bookmarked it to my bookmark web site list and will be checking again soon. Pls check out my web site as effectively and let me know what you think.
Thanks, I have just been searching for info about this subject for ages and yours is the greatest I’ve discovered till now. However, what in regards to the bottom line? Are you positive concerning the source?
It is truly a great and helpful piece of information. I am satisfied that you just shared this useful information with us. Please keep us informed like this. Thanks for sharing.
You should take part in a contest for one of the best blogs on the web. I will recommend this site!
Hello, Neat post. There is an issue along with your site in internet explorer, might check this… IE still is the marketplace leader and a huge element of other people will omit your fantastic writing due to this problem.
I have fun with, cause I found exactly what I was having a look for. You have ended my 4 day lengthy hunt! God Bless you man. Have a great day. Bye
Hi, Neat post. There is a problem with your website in internet explorer, would test this… IE still is the market leader and a huge portion of people will miss your magnificent writing due to this problem.
F*ckin¦ awesome things here. I¦m very glad to look your article. Thanks so much and i am looking forward to contact you. Will you please drop me a mail?
naturally like your website however you have to check the spelling on several of your posts. A number of them are rife with spelling problems and I to find it very bothersome to inform the reality however I will definitely come again again.
You actually make it seem really easy with your presentation however I to find this matter to be actually one thing which I believe I would by no means understand. It seems too complicated and extremely vast for me. I’m taking a look forward in your next publish, I’ll attempt to get the grasp of it!
I have recently started a blog, the information you offer on this web site has helped me tremendously. Thanks for all of your time & work. “The word ‘genius’ isn’t applicable in football. A genius is a guy like Norman Einstein.” by Joe Theismann.
Keep working ,fantastic job!
Very interesting topic, regards for putting up. “Education a debt due from present to future generations.” by George Peabody.
very good put up, i definitely love this web site, carry on it
I definitely wanted to type a word to be able to say thanks to you for all the superb guides you are giving out on this website. My long internet look up has now been paid with reputable suggestions to go over with my visitors. I would point out that most of us readers are truly fortunate to dwell in a decent place with so many awesome people with great ideas. I feel extremely lucky to have seen the webpages and look forward to so many more entertaining times reading here. Thanks a lot once again for everything.
I have recently started a website, the information you provide on this site has helped me greatly. Thanks for all of your time & work. “Her grandmother, as she gets older, is not fading but rather becoming more concentrated.” by Paulette Bates Alden.
naturally like your website however you need to take a look at the spelling on several of your posts. Several of them are rife with spelling problems and I to find it very troublesome to tell the reality on the other hand I¦ll definitely come again again.
My husband and i got very ecstatic that Jordan managed to deal with his survey with the ideas he grabbed through the web pages. It is now and again perplexing to just always be giving for free tips and tricks that most people have been making money from. And we all discover we now have the writer to appreciate because of that. The main illustrations you made, the straightforward web site menu, the relationships you help promote – it’s got all incredible, and it is facilitating our son in addition to us consider that this issue is brilliant, and that’s really mandatory. Thank you for everything!
Hi, I think your site might be having browser compatibility issues. When I look at your website in Safari, it looks fine but when opening in Internet Explorer, it has some overlapping. I just wanted to give you a quick heads up! Other then that, fantastic blog!
I have been absent for some time, but now I remember why I used to love this blog. Thanks, I?¦ll try and check back more often. How frequently you update your site?
You have brought up a very superb points, appreciate it for the post.
Great ?V I should definitely pronounce, impressed with your web site. I had no trouble navigating through all the tabs and related information ended up being truly easy to do to access. I recently found what I hoped for before you know it in the least. Quite unusual. Is likely to appreciate it for those who add forums or something, web site theme . a tones way for your client to communicate. Nice task..
What’s Happening i’m new to this, I stumbled upon this I have found It positively useful and it has helped me out loads. I hope to contribute & aid other users like its helped me. Great job.
I was reading some of your posts on this website and I believe this site is really instructive! Keep posting.
I envy your piece of work, thankyou for all the useful content.
Fantastic website. Lots of helpful info here. I¦m sending it to some friends ans also sharing in delicious. And certainly, thank you in your sweat!
Hello my friend! I want to say that this article is awesome, great written and come with almost all important infos. I’d like to look more posts like this.
What i don’t realize is in reality how you’re now not really much more well-preferred than you might be right now. You are very intelligent. You know therefore considerably in relation to this matter, made me in my opinion consider it from so many varied angles. Its like women and men are not involved unless it¦s one thing to do with Girl gaga! Your individual stuffs outstanding. All the time care for it up!
I keep listening to the newscast talk about getting boundless online grant applications so I have been looking around for the best site to get one. Could you tell me please, where could i acquire some?
Youre so cool! I dont suppose Ive read something like this before. So good to seek out somebody with some unique thoughts on this subject. realy thanks for starting this up. this website is something that’s wanted on the net, somebody with a bit of originality. useful job for bringing something new to the web!
Very superb info can be found on weblog. “I am not merry but I do beguile The thing I am, by seeming otherwise.” by William Shakespeare.
Good info. Lucky me I reach on your website by accident, I bookmarked it.
When I originally commented I clicked the “Notify me when new comments are added” checkbox and now each time a comment is added I get several emails with the same comment. Is there any way you can remove people from that service? Cheers!
Hi there would you mind sharing which blog platform you’re using? I’m going to start my own blog soon but I’m having a tough time selecting between BlogEngine/Wordpress/B2evolution and Drupal. The reason I ask is because your layout seems different then most blogs and I’m looking for something completely unique. P.S Apologies for getting off-topic but I had to ask!
Just want to say your article is as astounding. The clarity in your post is just cool and i can assume you are an expert on this subject. Fine with your permission allow me to grab your feed to keep updated with forthcoming post. Thanks a million and please keep up the rewarding work.
Thank you for sharing excellent informations. Your site is so cool. I’m impressed by the details that you have on this web site. It reveals how nicely you understand this subject. Bookmarked this website page, will come back for extra articles. You, my friend, ROCK! I found just the information I already searched everywhere and simply could not come across. What an ideal site.
I conceive this website contains some really fantastic info for everyone : D.
Hi, just required you to know I he added your site to my Google bookmarks due to your layout. But seriously, I believe your internet site has 1 in the freshest theme I??ve came across. It extremely helps make reading your blog significantly easier.
The next time I read a weblog, I hope that it doesnt disappoint me as much as this one. I imply, I do know it was my option to read, but I really thought youd have one thing attention-grabbing to say. All I hear is a bunch of whining about one thing that you possibly can fix should you werent too busy looking for attention.
SPSW provides news and analysis for leaders in higher education. We cover topics like online learning, policy
Real nice pattern and fantastic written content, absolutely nothing else we want : D.
Sugar Defender is a dietary supplement that makes claims that it can improve and maintain normal blood sugar levels.
FitSpresso™ is a nutritional supplement that uses probiotics to help you lose weight.
Boostaro is a natural dietary supplement for male health, enhancing circulation and overall bodily functions. Supports wellness with natural ingredients.
Sight Care is a natural formula that can support healthy eyesight by focusing the root of the problem. Sight Care can be useful to make better your vision.
The latest news and reviews in the world of tech, automotive, gaming, science, and entertainment.
SFNews is San Francisco
There is noticeably a bundle to know about this. I assume you made certain nice points in features also.
I get pleasure from, cause I found just what I used to be having a look for. You’ve ended my four day lengthy hunt! God Bless you man. Have a nice day. Bye
Having read this I thought it was very informative. I appreciate you taking the time and effort to put this article together. I once again find myself spending way to much time both reading and commenting. But so what, it was still worth it!
I am often to blogging and i really appreciate your content. The article has really peaks my interest. I am going to bookmark your site and keep checking for new information.
Whats Happening i’m new to this, I stumbled upon this I’ve found It absolutely helpful and it has helped me out loads. I am hoping to give a contribution & help different users like its helped me. Good job.
I’m not that much of a online reader to be honest but your sites really nice, keep it up! I’ll go ahead and bookmark your website to come back later on. All the best
The very crux of your writing whilst sounding agreeable originally, did not really sit properly with me after some time. Someplace within the sentences you actually were able to make me a believer but only for a short while. I nevertheless have got a problem with your leaps in logic and you might do nicely to help fill in all those breaks. When you actually can accomplish that, I would certainly be fascinated.
Enjoyed studying this, very good stuff, appreciate it. “It is in justice that the ordering of society is centered.” by Aristotle.
I am often to blogging and i really appreciate your content. The article has really peaks my interest. I am going to bookmark your site and keep checking for new information.
Hello my friend! I wish to say that this article is awesome, nice written and include approximately all significant infos. I would like to see more posts like this.
naturally like your website but you have to test the spelling on several of your posts. Many of them are rife with spelling problems and I find it very bothersome to inform the truth then again I¦ll surely come back again.
I believe this internet site contains very superb pent content posts.
Magnificent site. Plenty of useful information here. I’m sending it to some friends ans also sharing in delicious. And of course, thanks for your sweat!
I really appreciate this post. I have been looking everywhere for this! Thank goodness I found it on Bing. You’ve made my day! Thx again
I don’t even know the way I stopped up right here, but I believed this post was once good. I don’t know who you might be but certainly you are going to a well-known blogger in case you aren’t already 😉 Cheers!
My truth and wellness blog is an online platform dedicated to sharing authentic and evidence based information on various aspects of personal well-being. With a focus on promoting a holistic approach to health, this blog dives into topics such as nutrition, fitness, mental health and overall lifestyle choices. My goal is to inspire and support individual in their journey towards a balanced and fulfilling life.
This is very interesting, You’re a very skilled blogger. I have joined your rss feed and look forward to seeking more of your excellent post. Also, I’ve shared your site in my social networks!
Hi, Neat post. There’s an issue with your web site in internet explorer, could test this… IE still is the market chief and a big element of other people will miss your fantastic writing because of this problem.
You actually make it seem so easy along with your presentation but I in finding this matter to be really one thing that I feel I would never understand. It sort of feels too complex and extremely broad for me. I’m taking a look ahead to your next put up, I will try to get the hold of it!
Great paintings! This is the kind of information that should be shared across the web. Disgrace on the seek engines for now not positioning this publish higher! Come on over and seek advice from my site . Thank you =)
Enjoyed looking through this, very good stuff, regards.
After all, what a great site and informative posts, I will upload inbound link – bookmark this web site? Regards, Reader.
Hello. remarkable job. I did not expect this. This is a fantastic story. Thanks!
Hello! I just would like to give a huge thumbs up for the great info you have here on this post. I will be coming back to your blog for more soon.
Howdy very cool site!! Man .. Excellent .. Superb .. I will bookmark your web site and take the feeds also…I’m satisfied to search out so many helpful information right here in the publish, we need work out extra strategies in this regard, thank you for sharing.
Howdy! This is my first visit to your blog! We are a collection of volunteers and starting a new project in a community in the same niche. Your blog provided us useful information to work on. You have done a extraordinary job!
This really answered my drawback, thank you!
I have been absent for some time, but now I remember why I used to love this site. Thanks , I¦ll try and check back more often. How frequently you update your website?
Hi, i think that i saw you visited my site so i came to “return the favor”.I’m trying to find things to improve my site!I suppose its ok to use some of your ideas!!
I’ve been exploring for a little for any high-quality articles or blog posts on this kind of area . Exploring in Yahoo I at last stumbled upon this website. Reading this info So i’m happy to convey that I have an incredibly good uncanny feeling I discovered just what I needed. I most certainly will make sure to do not forget this website and give it a look on a constant basis.
My brother suggested I might like this web site. He was entirely right. This post truly made my day. You can not imagine simply how much time I had spent for this info! Thanks!
I was curious if you ever considered changing the structure of your blog? Its very well written; I love what youve got to say. But maybe you could a little more in the way of content so people could connect with it better. Youve got an awful lot of text for only having 1 or two images. Maybe you could space it out better?
Nice post. I learn something more challenging on different blogs everyday. It will always be stimulating to read content from other writers and practice a little something from their store. I’d prefer to use some with the content on my blog whether you don’t mind. Natually I’ll give you a link on your web blog. Thanks for sharing.
I enjoy looking at and I think this website got some truly useful stuff on it! .
You got a very fantastic website, Sword lily I noticed it through yahoo.
Hi! This post couldn’t be written any better! Reading through this post reminds me of my good old room mate! He always kept talking about this. I will forward this page to him. Pretty sure he will have a good read. Thank you for sharing!
You have observed very interesting details ! ps nice site.
Keep functioning ,remarkable job!
I am perpetually thought about this, appreciate it for putting up.
very nice submit, i certainly love this website, keep on it
Hi, Neat post. There’s a problem with your website in internet explorer, would test this… IE still is the market leader and a good portion of people will miss your excellent writing because of this problem.
Hey There. I discovered your blog the usage of msn. That is a very neatly written article. I’ll make sure to bookmark it and return to learn extra of your useful info. Thank you for the post. I’ll certainly return.
Thank you for the auspicious writeup. It in fact was a amusement account it. Look advanced to far added agreeable from you! By the way, how can we communicate?
Hey there! Someone in my Myspace group shared this site with us so I came to give it a look. I’m definitely enjoying the information. I’m book-marking and will be tweeting this to my followers! Wonderful blog and wonderful design.
hey there and thank you for your information – I have certainly picked up something new from right here. I did however expertise several technical issues using this site, since I experienced to reload the site a lot of times previous to I could get it to load properly. I had been wondering if your web hosting is OK? Not that I am complaining, but sluggish loading instances times will often affect your placement in google and could damage your high quality score if advertising and marketing with Adwords. Anyway I am adding this RSS to my email and can look out for a lot more of your respective interesting content. Ensure that you update this again very soon..
Hello! Would you mind if I share your blog with my facebook group? There’s a lot of folks that I think would really enjoy your content. Please let me know. Many thanks
Wow! Thank you! I continuously wanted to write on my site something like that. Can I implement a fragment of your post to my website?
Having read this I thought it was very informative. I appreciate you taking the time and effort to put this article together. I once again find myself spending way to much time both reading and commenting. But so what, it was still worth it!
he blog was how do i say it… relevant, finally something that helped me. Thanks
You are my breathing in, I have few blogs and often run out from brand :). “‘Tis the most tender part of love, each other to forgive.” by John Sheffield.
I genuinely enjoy studying on this site, it contains great articles. “For Brutus is an honourable man So are they all, all honourable men.” by William Shakespeare.
I as well conceive thence, perfectly written post! .
Boostaro is one of the dietary supplements available in the market that caters to men with erectile dysfunction and sexual health issues.
FitSpresso stands out as a leading weight loss product currently dominating the market. This potent supplement asserts its ability to facilitate healthy weight loss naturally, free from any adverse side effects. Its formulation incorporates clinically studied ingredients that synergistically contribute to promoting natural fat burning, elevating metabolism, and sustaining enduring weight loss.
Introducing Boostaro, a powerful age-supporting supplement meticulously crafted to enhance healthy blood flow in men, all from the comfort of their own homes. This formula harnesses the potency of clinically studied ingredients to naturally promote firmness and vitality, eliminating the need for costly treatments or painful surgical procedures. Carefully selected, Boostaro’s ingredients work in synergy to enhance strength, stamina, and rejuvenate youth in a natural and holistic manner.
Nagano Lean Body Tonic, also recognized as Nagano Tonic or Lean Body Tonic, represents a powdered nutritional supplement developed by a US-based company specializing in supplements.
You really make it appear really easy together with your presentation but I in finding this matter to be really something that I think I’d never understand. It seems too complicated and very huge for me. I’m having a look forward in your next post, I¦ll try to get the cling of it!
After all, what a great site and informative posts, I will upload inbound link – bookmark this web site? Regards, Reader.
FlowForce Max stands as a natural dietary formula, crafted through recent technological discoveries to specifically address prostate and urinary concerns in men across various age groups. The male supplement features a formulation derived from natural ingredients sourced from local growers.
Does your site have a contact page? I’m having problems locating it but, I’d like to send you an email. I’ve got some creative ideas for your blog you might be interested in hearing. Either way, great site and I look forward to seeing it grow over time.
The DentiCore supplement is designed to promote healthy gums and teeth through an advanced technique and herbal ingredients. With no negative side effects, it contains only natural components. Its formulation focuses on integrating multiple essential elements crucial for maintaining dental health, ensuring pharmaceutical quality. Produced in a GMP-certified US facility registered with the FDA, DentiCore’s formula is safe for your body, containing only ingredients beneficial to your oral system.
GlucoBerry is the result of extensive research by professionals at John Hopkins University. These experts discovered a relationship between healthy blood sugar levels, insulin, and blood sugar drainage from the kidneys. Based on this research, Dr. Mark Weis, a renowned physician, devised a natural dietary supplement to help achieve healthy blood sugar levels.
Excellent beat ! I wish to apprentice while you amend your website, how can i subscribe for a blog web site? The account helped me a acceptable deal. I had been tiny bit acquainted of this your broadcast provided bright clear concept
Thankyou for this wonderful post, I am glad I discovered this internet site on yahoo.
Great tremendous issues here. I am very happy to look your article. Thanks a lot and i am looking ahead to contact you. Will you please drop me a e-mail?
This actually answered my drawback, thank you!
Your place is valueble for me. Thanks!…
The very core of your writing while sounding agreeable at first, did not really work very well with me after some time. Someplace within the paragraphs you managed to make me a believer but only for a short while. I nevertheless have a problem with your leaps in assumptions and you would do well to fill in those breaks. When you actually can accomplish that, I will surely end up being impressed.
I?¦m now not positive where you’re getting your information, but good topic. I must spend a while studying much more or understanding more. Thanks for excellent information I was searching for this info for my mission.
I like this weblog so much, saved to favorites.
whoah this blog is great i love reading your posts. Keep up the good work! You know, lots of people are looking around for this info, you could help them greatly.
Thank you for every other wonderful article. Where else may anybody get that kind of info in such an ideal means of writing? I’ve a presentation next week, and I am at the search for such information.
Wow! This blog looks just like my old one! It’s on a entirely different topic but it has pretty much the same page layout and design. Superb choice of colors!
My partner and I absolutely love your blog and find many of your post’s to be precisely what I’m looking for. can you offer guest writers to write content to suit your needs? I wouldn’t mind producing a post or elaborating on a lot of the subjects you write in relation to here. Again, awesome blog!
so much superb information on here, : D.
Thanks , I have just been searching for information about this subject for ages and yours is the best I have discovered till now. But, what about the bottom line? Are you sure about the source?
It’s a shame you don’t have a donate button! I’d most certainly donate to this superb blog! I guess for now i’ll settle for book-marking and adding your RSS feed to my Google account. I look forward to new updates and will share this website with my Facebook group. Talk soon!
Saved as a favorite, I really like your blog!
Would you be considering exchanging links?
When I originally commented I clicked the “Notify me when new comments are added” checkbox and now each time a comment is added I get several e-mails with the same comment. Is there any way you can remove people from that service? Thank you!
I just could not go away your site prior to suggesting that I extremely enjoyed the usual information a person provide for your guests? Is going to be again continuously to inspect new posts.
Pretty component of content. I just stumbled upon your site and in accession capital to claim that I acquire in fact loved account your weblog posts. Anyway I’ll be subscribing in your augment and even I fulfillment you get admission to constantly rapidly.
I’ve been surfing online more than three hours as of late, but I never discovered any attention-grabbing article like yours. It is beautiful value enough for me. In my view, if all site owners and bloggers made good content material as you did, the web will likely be a lot more helpful than ever before.
Hello, i feel that i saw you visited my weblog thus i got here to “return the favor”.I am trying to to find things to improve my website!I suppose its ok to use some of your ideas!!
I like what you guys are up too. Such clever work and reporting! Keep up the superb works guys I have incorporated you guys to my blogroll. I think it’ll improve the value of my web site :).
Very interesting points you have mentioned, regards for posting. “Whatever we conceive well we express clearly, and words flow with ease.” by Nicolas Boileau.
It is really a nice and helpful piece of info. I am glad that you shared this helpful info with us. Please keep us up to date like this. Thanks for sharing.
Needed to put you one little bit of note in order to say thank you over again on the remarkable tactics you have contributed at this time. It was quite pretty open-handed of you in giving openly just what a lot of folks could possibly have made available as an ebook to end up making some cash on their own, precisely since you could have done it in the event you wanted. These basics also worked to be a easy way to realize that many people have a similar dreams the same as my personal own to know good deal more when it comes to this matter. I believe there are a lot more pleasurable moments up front for individuals that read your site.
Thank you for sharing with us, I conceive this website truly stands out : D.
I like this post, enjoyed this one thanks for posting.
The core of your writing while appearing agreeable originally, did not settle very well with me personally after some time. Somewhere throughout the paragraphs you actually were able to make me a believer but only for a very short while. I however have got a problem with your jumps in logic and you might do nicely to fill in those breaks. When you actually can accomplish that, I would undoubtedly be impressed.
I haven?¦t checked in here for a while because I thought it was getting boring, but the last several posts are good quality so I guess I?¦ll add you back to my everyday bloglist. You deserve it my friend 🙂
I am continuously searching online for articles that can facilitate me. Thx!
There is obviously a bunch to know about this. I assume you made certain good points in features also.
F*ckin’ remarkable issues here. I’m very glad to see your post. Thank you a lot and i am having a look ahead to contact you. Will you please drop me a mail?
You have brought up a very fantastic details, regards for the post.
very nice put up, i definitely love this web site, carry on it
The following time I learn a weblog, I hope that it doesnt disappoint me as a lot as this one. I imply, I do know it was my option to read, but I actually thought youd have one thing fascinating to say. All I hear is a bunch of whining about one thing that you could fix in the event you werent too busy looking for attention.
Heya! I’m at work browsing your blog from my new iphone! Just wanted to say I love reading through your blog and look forward to all your posts! Keep up the outstanding work!
Hello, Neat post. There is an issue with your site in web explorer, may test thisK IE still is the marketplace leader and a huge section of people will omit your wonderful writing because of this problem.
Hello.This post was extremely interesting, especially since I was searching for thoughts on this topic last Wednesday.
SightCare formula aims to maintain 20/20 vision without the need for any surgical process. This supplement is a perfect solution for people facing issues as they grow older. https://sightcare-web.com/
I simply desired to thank you very much yet again. I’m not certain what I could possibly have created in the absence of the creative ideas revealed by you on such a field. It seemed to be a intimidating crisis in my opinion, but looking at this specialized avenue you resolved that made me to weep over happiness. I am just happier for this guidance and in addition sincerely hope you recognize what a great job that you are undertaking teaching other individuals through your website. More than likely you have never got to know any of us.
I just like the valuable info you supply for your articles. I’ll bookmark your blog and take a look at again right here regularly. I am somewhat sure I will be told plenty of new stuff proper right here! Good luck for the next!
Greetings! Very helpful advice on this article! It is the little changes that make the biggest changes. Thanks a lot for sharing!
Hello this is kinda of off topic but I was wondering if blogs use WYSIWYG editors or if you have to manually code with HTML. I’m starting a blog soon but have no coding knowledge so I wanted to get guidance from someone with experience. Any help would be enormously appreciated!
Thank you, I have recently been looking for information about this subject for ages and yours is the best I’ve came upon so far. However, what about the bottom line? Are you certain concerning the source?
I like the helpful info you provide in your articles. I will bookmark your blog and check again here frequently. I’m quite certain I’ll learn lots of new stuff right here! Good luck for the next!
I love your blog.. very nice colors & theme. Did you create this website yourself or did you hire someone to do it for you? Plz respond as I’m looking to design my own blog and would like to find out where u got this from. thank you
Hey! Do you use Twitter? I’d like to follow you if that would be okay. I’m absolutely enjoying your blog and look forward to new updates.
I keep listening to the newscast talk about receiving boundless online grant applications so I have been looking around for the finest site to get one. Could you tell me please, where could i find some?
Wow! Thank you! I constantly wanted to write on my website something like that. Can I include a part of your post to my site?
Thanks for this grand post, I am glad I found this site on yahoo.
I like what you guys are up too. Such smart work and reporting! Carry on the superb works guys I have incorporated you guys to my blogroll. I think it’ll improve the value of my site 🙂
of course like your website but you need to check the spelling on several of your posts. A number of them are rife with spelling issues and I find it very troublesome to tell the truth nevertheless I will surely come back again.
We’re a group of volunteers and opening a new scheme in our community. Your website provided us with valuable info to work on. You have done an impressive job and our entire community will be thankful to you.
Regards for this post, I am a big big fan of this site would like to proceed updated.
Hey I am so glad I found your web site, I really found you by error, while I was looking on Digg for something else, Anyways I am here now and would just like to say cheers for a tremendous post and a all round enjoyable blog (I also love the theme/design), I don’t have time to read it all at the moment but I have bookmarked it and also included your RSS feeds, so when I have time I will be back to read more, Please do keep up the excellent work.
I think you have remarked some very interesting points, thanks for the post.
I always was concerned in this topic and still am, regards for posting.
Great blog here! Also your website loads up fast! What host are you using? Can I get your affiliate link to your host? I wish my site loaded up as fast as yours lol
It?¦s actually a nice and useful piece of information. I am glad that you shared this helpful info with us. Please stay us up to date like this. Thank you for sharing.
I do not even know how I ended up here, but I thought this post was great. I don’t know who you are but certainly you are going to a famous blogger if you are not already 😉 Cheers!
Hello, you used to write great, but the last few posts have been kinda boring… I miss your super writings. Past several posts are just a bit out of track! come on!
I do enjoy the manner in which you have presented this situation and it really does give me personally a lot of fodder for thought. On the other hand, from everything that I have witnessed, I only wish as other feedback stack on that people today remain on point and don’t start upon a soap box regarding some other news of the day. All the same, thank you for this exceptional piece and whilst I do not necessarily agree with this in totality, I respect the perspective.
Thanks a lot for sharing this with all of us you really know what you are talking about! Bookmarked. Kindly also visit my site =). We could have a link exchange agreement between us!
Everyone loves what you guys tend to be up too. This type of clever work and coverage! Keep up the awesome works guys I’ve included you guys to blogroll.
I’m not that much of a online reader to be honest but your blogs really nice, keep it up! I’ll go ahead and bookmark your website to come back later on. Many thanks
Just a smiling visitor here to share the love (:, btw great layout.
Hi there, just was alert to your weblog thru Google, and located that it is truly informative. I’m going to watch out for brussels. I will appreciate should you continue this in future. Numerous folks might be benefited from your writing. Cheers!
Admiring the hard work you put into your blog and detailed information you offer. It’s good to come across a blog every once in a while that isn’t the same outdated rehashed material. Wonderful read! I’ve saved your site and I’m adding your RSS feeds to my Google account.
It’s actually a great and helpful piece of info. I’m satisfied that you shared this useful info with us. Please keep us up to date like this. Thank you for sharing.
I think other website proprietors should take this website as an example , very clean and fantastic user genial layout.
you have an incredible weblog right here! would you like to make some invite posts on my weblog?
… [Trackback]
https://tokorouta.com/album-boku-no-inu/
I’ve been surfing on-line greater than 3 hours lately, yet I by no means discovered any fascinating article like yours. It is beautiful value enough for me. In my view, if all web owners and bloggers made good content as you did, the internet might be much more useful than ever before.
Magnificent beat ! I would like to apprentice while you amend your web site, how can i subscribe for a blog website? The account aided me a acceptable deal. I had been tiny bit acquainted of this your broadcast offered bright clear concept
I like the efforts you have put in this, thanks for all the great articles.
I’ve read some excellent stuff here. Certainly worth bookmarking for revisiting. I wonder how so much effort you put to create any such fantastic informative web site.
Hi there, I discovered your blog via Google whilst searching for a related matter, your web site came up, it looks good. I’ve bookmarked it in my google bookmarks.
It’s really a great and helpful piece of information. I’m glad that you shared this useful information with us. Please keep us up to date like this. Thank you for sharing.
Hello.This article was extremely fascinating, particularly because I was browsing for thoughts on this topic last Tuesday.
I loved as much as you’ll receive carried out right here. The sketch is tasteful, your authored subject matter stylish. nonetheless, you command get bought an shakiness over that you wish be delivering the following. unwell unquestionably come more formerly again as exactly the same nearly a lot often inside case you shield this increase.
Good write-up, I am regular visitor of one’s website, maintain up the nice operate, and It is going to be a regular visitor for a long time.
Well I truly enjoyed studying it. This subject procured by you is very effective for correct planning.
Hello! I just would like to give a huge thumbs up for the great info you have here on this post. I will be coming back to your blog for more soon.
What i don’t realize is in reality how you are no longer really a lot more smartly-preferred than you might be right now. You’re so intelligent. You understand thus considerably in the case of this topic, made me individually consider it from numerous numerous angles. Its like men and women don’t seem to be involved unless it’s one thing to accomplish with Woman gaga! Your individual stuffs excellent. All the time take care of it up!
Hi! Would you mind if I share your blog with my zynga group? There’s a lot of people that I think would really appreciate your content. Please let me know. Cheers
It’s in reality a nice and useful piece of info. I’m happy that you just shared this helpful information with us. Please stay us up to date like this. Thank you for sharing.
I’ve recently started a site, the information you provide on this site has helped me tremendously. Thank you for all of your time & work.
Way cool, some valid points! I appreciate you making this article available, the rest of the site is also high quality. Have a fun.
Greetings! This is my first visit to your blog! We are a collection of volunteers and starting a new initiative in a community in the same niche. Your blog provided us beneficial information to work on. You have done a extraordinary job!
After all, what a great site and informative posts, I will upload inbound link – bookmark this web site? Regards, Reader.
This site is my inspiration , rattling excellent layout and perfect articles.
Wow, amazing blog structure! How lengthy have you ever been blogging for? you make blogging look easy. The whole look of your web site is magnificent, let alone the content!
As a Newbie, I am continuously searching online for articles that can help me. Thank you
Thanks for every other informative web site. The place else may I get that type of information written in such an ideal way? I’ve a challenge that I’m simply now running on, and I’ve been on the glance out for such information.
I’m impressed, I must say. Actually not often do I encounter a blog that’s both educative and entertaining, and let me inform you, you have got hit the nail on the head. Your concept is excellent; the difficulty is something that not sufficient people are talking intelligently about. I’m very blissful that I stumbled across this in my search for something referring to this.
Greetings! This is my first visit to your blog! We are a collection of volunteers and starting a new initiative in a community in the same niche. Your blog provided us valuable information to work on. You have done a extraordinary job!
Hello just wanted to give you a quick heads up and let you know a few of the images aren’t loading properly. I’m not sure why but I think its a linking issue. I’ve tried it in two different browsers and both show the same outcome.
Whats up are using WordPress for your blog platform? I’m new to the blog world but I’m trying to get started and create my own. Do you need any html coding expertise to make your own blog? Any help would be really appreciated!
you are really a excellent webmaster. The website loading velocity is incredible. It sort of feels that you are doing any distinctive trick. Also, The contents are masterwork. you’ve done a great task in this subject!
I got what you intend, regards for posting.Woh I am happy to find this website through google.
What i don’t realize is actually how you are not really much more well-liked than you may be now. You are very intelligent. You realize therefore considerably relating to this subject, produced me personally consider it from numerous varied angles. Its like men and women aren’t fascinated unless it’s one thing to do with Lady gaga! Your own stuffs great. Always maintain it up!
Wow, marvelous weblog structure! How lengthy have you been blogging for? you made running a blog look easy. The whole look of your website is excellent, as smartly as the content material!
I loved as much as you’ll receive carried out right here. The sketch is tasteful, your authored material stylish. nonetheless, you command get bought an nervousness over that you wish be delivering the following. unwell unquestionably come more formerly again as exactly the same nearly a lot often inside case you shield this increase.
Those are yours alright! . We at least need to get these people stealing images to start blogging! They probably just did a image search and grabbed them. They look good though!
Excellent post. I used to be checking continuously this blog and I’m inspired! Very helpful information particularly the last phase 🙂 I care for such information a lot. I used to be seeking this certain information for a long time. Thank you and best of luck.
Appreciate it for this post, I am a big big fan of this web site would like to keep updated.
My developer is trying to convince me to move to .net from PHP. I have always disliked the idea because of the costs. But he’s tryiong none the less. I’ve been using Movable-type on a number of websites for about a year and am nervous about switching to another platform. I have heard very good things about blogengine.net. Is there a way I can import all my wordpress content into it? Any kind of help would be greatly appreciated!
I found your blog site on google and test a few of your early posts. Proceed to maintain up the excellent operate. I just further up your RSS feed to my MSN Information Reader. Looking for forward to reading more from you later on!…
Thanks a lot for giving everyone a very spectacular possiblity to read from this blog. It is usually very sweet and as well , packed with a great time for me personally and my office colleagues to search your website at least three times in 7 days to read the new issues you have got. And lastly, I am just usually happy concerning the eye-popping creative ideas you give. Selected 2 tips in this article are basically the best I have had.
You made some clear points there. I did a search on the subject matter and found most individuals will consent with your blog.
You have brought up a very great points, regards for the post.
Nearly all of what you assert happens to be supprisingly accurate and it makes me ponder why I had not looked at this with this light previously. This piece truly did switch the light on for me as far as this particular topic goes. Nevertheless there is just one issue I am not really too cozy with and whilst I try to reconcile that with the core theme of your issue, permit me see what the rest of the subscribers have to say.Very well done.
Some genuinely interesting details you have written.Assisted me a lot, just what I was looking for : D.
I have been exploring for a little bit for any high-quality articles or weblog posts in this kind of space . Exploring in Yahoo I eventually stumbled upon this website. Reading this information So i am satisfied to express that I’ve an incredibly excellent uncanny feeling I found out exactly what I needed. I most no doubt will make certain to don?¦t overlook this site and give it a glance on a constant basis.
Hi there, simply turned into alert to your weblog thru Google, and located that it’s truly informative. I’m going to watch out for brussels. I will be grateful in case you continue this in future. A lot of folks will be benefited from your writing. Cheers!
Your place is valueble for me. Thanks!…
Very interesting details you have observed, appreciate it for posting. “The best time to do a thing is when it can be done.” by William Pickens.
I am really enjoying the theme/design of your site. Do you ever run into any web browser compatibility problems? A few of my blog visitors have complained about my site not operating correctly in Explorer but looks great in Firefox. Do you have any recommendations to help fix this issue?
Hmm is anyone else having problems with the pictures on this blog loading? I’m trying to figure out if its a problem on my end or if it’s the blog. Any responses would be greatly appreciated.
It?¦s actually a great and useful piece of information. I?¦m happy that you just shared this helpful info with us. Please stay us up to date like this. Thanks for sharing.
I keep listening to the news bulletin lecture about getting free online grant applications so I have been looking around for the top site to get one. Could you tell me please, where could i acquire some?
Good write-up, I’m regular visitor of one’s web site, maintain up the nice operate, and It is going to be a regular visitor for a long time.
What¦s Happening i’m new to this, I stumbled upon this I’ve found It positively helpful and it has aided me out loads. I am hoping to contribute & help other users like its aided me. Great job.
Unquestionably consider that that you stated. Your favourite justification appeared to be at the net the simplest factor to be mindful of. I say to you, I definitely get irked while folks consider issues that they plainly do not realize about. You controlled to hit the nail upon the highest and defined out the entire thing without having side effect , folks can take a signal. Will probably be again to get more. Thank you
Lovely just what I was looking for.Thanks to the author for taking his clock time on this one.
You are my intake, I have few blogs and rarely run out from to post .
I believe this internet site has some really superb info for everyone : D.
so much excellent info on here, : D.
Well I truly enjoyed studying it. This information procured by you is very constructive for accurate planning.
Greetings! Very helpful advice on this article! It is the little changes that make the biggest changes. Thanks a lot for sharing!
I like what you guys are up also. Such intelligent work and reporting! Keep up the excellent works guys I’ve incorporated you guys to my blogroll. I think it will improve the value of my website 🙂
Fantastic items from you, man. I have take note your stuff previous to and you are simply too excellent. I actually like what you have bought right here, really like what you are saying and the way through which you are saying it. You make it enjoyable and you still care for to stay it sensible. I can not wait to learn far more from you. This is really a tremendous website.
Hello! I just would like to give a huge thumbs up for the great info you have here on this post. I will be coming back to your blog for more soon.
I am not very wonderful with English but I find this really leisurely to understand.
Spot on with this write-up, I actually think this web site needs far more consideration. I’ll most likely be once more to learn rather more, thanks for that info.
Really good visual appeal on this site, I’d rate it 10 10.
Everything is very open and very clear explanation of issues. was truly information. Your website is very useful. Thanks for sharing.
A spray nozzle is the complex of high-degree accuracy and intractable, CYCO pays attention to each detail of the whole technological process, From Raw material selecting & testing to processing and finished product measuring, hundreds of equipment are used, Like CNC lathes, 3-coordinates measuring machine, Fluid density & impact testing machine and so on.
This web site can be a stroll-by way of for the entire information you wanted about this and didn’t know who to ask. Glimpse here, and you’ll definitely discover it.
Hey there! I’m at work browsing your blog from my new iphone 3gs! Just wanted to say I love reading through your blog and look forward to all your posts! Keep up the fantastic work!
I like this web blog very much so much excellent information.
I believe this website has very good pent subject material posts.
Wow, marvelous blog structure! How lengthy have you been blogging for? you make blogging look easy. The total look of your website is great, let alone the content!
Very good site you have here but I was wanting to know if you knew of any message boards that cover the same topics discussed here? I’d really love to be a part of group where I can get suggestions from other experienced individuals that share the same interest. If you have any recommendations, please let me know. Many thanks!
Perfectly pent content material, Really enjoyed reading.
naturally like your web site however you need to check the spelling on quite a few of your posts. A number of them are rife with spelling issues and I to find it very bothersome to inform the truth however I’ll certainly come again again.
I just like the valuable information you provide to your articles. I’ll bookmark your blog and take a look at again right here regularly. I’m fairly certain I’ll be informed lots of new stuff proper here! Best of luck for the following!
Appreciate it for all your efforts that you have put in this. very interesting info .
Thank you for another wonderful article. Where else could anyone get that kind of info in such an ideal means of writing? I have a presentation subsequent week, and I am on the look for such info.
Hello, you used to write excellent, but the last several posts have been kinda boring?K I miss your tremendous writings. Past several posts are just a little bit out of track! come on!
Hello, you used to write wonderful, but the last several posts have been kinda boringK I miss your super writings. Past several posts are just a bit out of track! come on!
What i do not realize is if truth be told how you are no longer really a lot more neatly-preferred than you might be now. You are very intelligent. You recognize therefore significantly in relation to this subject, produced me for my part consider it from a lot of various angles. Its like women and men don’t seem to be interested until it is something to accomplish with Lady gaga! Your own stuffs excellent. All the time maintain it up!
An impressive share, I just given this onto a colleague who was doing a little analysis on this. And he in fact bought me breakfast because I found it for him.. smile. So let me reword that: Thnx for the treat! But yeah Thnkx for spending the time to discuss this, I feel strongly about it and love reading more on this topic. If possible, as you become expertise, would you mind updating your blog with more details? It is highly helpful for me. Big thumb up for this blog post!
You can certainly see your enthusiasm in the work you write. The world hopes for more passionate writers like you who aren’t afraid to say how they believe. Always go after your heart.
Good day very nice blog!! Man .. Beautiful .. Superb .. I will bookmark your web site and take the feeds additionally?KI’m glad to find so many helpful info here in the put up, we need work out extra strategies on this regard, thank you for sharing. . . . . .
Oh my goodness! an incredible article dude. Thank you However I am experiencing subject with ur rss . Don’t know why Unable to subscribe to it. Is there anybody getting identical rss problem? Anybody who knows kindly respond. Thnkx
Hello. magnificent job. I did not anticipate this. This is a impressive story. Thanks!
You have remarked very interesting details! ps nice site.
Wow that was strange. I just wrote an really long comment but after I clicked submit my comment didn’t show up. Grrrr… well I’m not writing all that over again. Anyways, just wanted to say fantastic blog!
I believe you have observed some very interesting points, appreciate it for the post.
You completed several good points there. I did a search on the matter and found nearly all people will go along with with your blog.
I discovered your blog website on google and check a few of your early posts. Proceed to keep up the very good operate. I simply extra up your RSS feed to my MSN News Reader. Seeking ahead to studying extra from you later on!…
Real wonderful information can be found on weblog. “I am not merry but I do beguile The thing I am, by seeming otherwise.” by William Shakespeare.
Wohh precisely what I was looking for, thanks for posting.
I conceive this internet site has got some really fantastic info for everyone :D. “I like work it fascinates me. I can sit and look at it for hours.” by Jerome K. Jerome.
You are my breathing in, I own few web logs and infrequently run out from post :). “Yet do I fear thy nature It is too full o’ the milk of human kindness.” by William Shakespeare.
I truly enjoy looking through on this site, it holds superb content. “Wealth and children are the adornment of life.” by Koran.
Your style is so unique compared to many other people. Thank you for publishing when you have the opportunity,Guess I will just make this bookmarked.2
You got a very great website, Glad I found it through yahoo.
Just desire to say your article is as amazing. The clarity to your submit is just spectacular and i can think you’re knowledgeable on this subject. Fine along with your permission allow me to snatch your feed to stay updated with impending post. Thank you one million and please carry on the gratifying work.
I really like what you guys tend to be up too. This sort of clever work and reporting! Keep up the amazing works guys I’ve you guys to my own blogroll.
Hi my family member! I wish to say that this post is amazing, great written and come with approximately all important infos. I’d like to look more posts like this.
Thank you for another informative site. The place else may just I am getting that kind of info written in such an ideal way? I have a venture that I’m simply now working on, and I’ve been at the glance out for such info.
Hey! Would you mind if I share your blog with my zynga group? There’s a lot of people that I think would really appreciate your content. Please let me know. Thank you
I’m often to running a blog and i really respect your content. The article has really peaks my interest. I am going to bookmark your web site and hold checking for brand new information.
Its like you read my mind! You appear to know so much about this, like you wrote the book in it or something. I think that you could do with a few pics to drive the message home a little bit, but other than that, this is great blog. An excellent read. I’ll certainly be back.
Admiring the time and effort you put into your blog and in depth information you offer. It’s nice to come across a blog every once in a while that isn’t the same outdated rehashed information. Excellent read! I’ve bookmarked your site and I’m adding your RSS feeds to my Google account.
It?¦s in reality a great and helpful piece of information. I?¦m happy that you just shared this helpful info with us. Please stay us informed like this. Thank you for sharing.
I truly wanted to write a small note so as to express gratitude to you for some of the awesome tricks you are giving at this website. My time intensive internet investigation has at the end been recognized with excellent know-how to talk about with my colleagues. I would admit that many of us site visitors are quite endowed to dwell in a good community with many outstanding individuals with good concepts. I feel very happy to have encountered your webpages and look forward to so many more enjoyable minutes reading here. Thanks again for everything.
I always was concerned in this subject and still am, thanks for putting up.
Heya! I’m at work browsing your blog from my new iphone 4! Just wanted to say I love reading your blog and look forward to all your posts! Carry on the excellent work!
Keep up the wonderful piece of work, I read few content on this web site and I think that your site is rattling interesting and has got lots of wonderful info .
My brother suggested I might like this web site. He was totally right. This put up truly made my day. You can not consider simply how much time I had spent for this info! Thanks!
I’ve been exploring for a bit for any high quality articles or blog posts on this kind of area . Exploring in Yahoo I at last stumbled upon this site. Reading this information So i am happy to convey that I have an incredibly good uncanny feeling I discovered exactly what I needed. I most certainly will make sure to don’t forget this site and give it a look on a constant basis.
I like this web blog so much, saved to bookmarks. “Respect for the fragility and importance of an individual life is still the mark of an educated man.” by Norman Cousins.
We stumbled over here by a different website and thought I might check things out. I like what I see so now i am following you. Look forward to going over your web page again.
I’ll immediately grab your rss as I can not find your email subscription link or newsletter service. Do you have any? Please let me know so that I could subscribe. Thanks.
You have brought up a very fantastic points, thanks for the post.
Thanks for every other magnificent article. The place else may just anyone get that type of information in such a perfect means of writing? I have a presentation subsequent week, and I’m on the search for such information.
You actually make it appear really easy together with your presentation but I find this matter to be really one thing that I think I’d never understand. It kind of feels too complex and very vast for me. I am looking forward for your subsequent put up, I’ll attempt to get the grasp of it!
I’d have to examine with you here. Which is not one thing I usually do! I take pleasure in reading a post that may make folks think. Additionally, thanks for permitting me to comment!
Thanx for the effort, keep up the good work Great work, I am going to start a small Blog Engine course work using your site I hope you enjoy blogging with the popular BlogEngine.net.Thethoughts you express are really awesome. Hope you will right some more posts.
When I originally commented I clicked the -Notify me when new comments are added- checkbox and now each time a comment is added I get four emails with the same comment. Is there any way you can remove me from that service? Thanks!
Hi , I do believe this is an excellent blog. I stumbled upon it on Yahoo , i will come back once again. Money and freedom is the best way to change, may you be rich and help other people.
As a Newbie, I am constantly searching online for articles that can be of assistance to me. Thank you
I like this post, enjoyed this one thankyou for posting.
Useful info. Lucky me I discovered your site by accident, and I am shocked why this twist of fate did not took place in advance! I bookmarked it.
An impressive share, I just given this onto a colleague who was doing a bit evaluation on this. And he in fact bought me breakfast because I discovered it for him.. smile. So let me reword that: Thnx for the treat! However yeah Thnkx for spending the time to debate this, I feel strongly about it and love reading extra on this topic. If potential, as you turn into experience, would you thoughts updating your weblog with more particulars? It’s extremely useful for me. Large thumb up for this blog submit!
Hi, I think your site might be having browser compatibility issues. When I look at your website in Safari, it looks fine but when opening in Internet Explorer, it has some overlapping. I just wanted to give you a quick heads up! Other then that, fantastic blog!
What’s Going down i am new to this, I stumbled upon this I’ve discovered It absolutely useful and it has aided me out loads. I’m hoping to give a contribution & help other customers like its aided me. Great job.
Hey there just wanted to give you a brief heads up and let you know a few of the pictures aren’t loading properly. I’m not sure why but I think its a linking issue. I’ve tried it in two different browsers and both show the same outcome.
Definitely, what a fantastic site and revealing posts, I will bookmark your site.All the Best!
Very interesting points you have noted, appreciate it for putting up. “The judge is condemned when the criminal is absolved.” by Publilius Syrus.
of course like your web-site but you need to check the spelling on quite a few of your posts. Several of them are rife with spelling issues and I in finding it very bothersome to tell the truth on the other hand I¦ll definitely come again again.
Awsome website! I am loving it!! Will come back again. I am taking your feeds also.
This is a topic close to my heart cheers, where are your contact details though?
在您的以太坊交易中寻找匿名?快来看看TornadoCash,这是隐私意识用户的领先解决方案。
I think other website owners should take this internet site as an example , very clean and wonderful user genial design and style.
Some times its a pain in the ass to read what website owners wrote but this website is rattling user genial! .
I like the valuable information you provide for your articles. I will bookmark your blog and take a look at once more here frequently. I am quite sure I’ll learn lots of new stuff proper here! Good luck for the next!
I and also my buddies were looking at the excellent guides located on your site and then suddenly I got a horrible suspicion I never expressed respect to the blog owner for those tips. The guys are actually stimulated to see all of them and have in effect in truth been taking advantage of these things. I appreciate you for actually being quite considerate and for deciding upon this form of incredible issues millions of individuals are really eager to be aware of. My personal honest apologies for not saying thanks to you sooner.
I am lucky that I discovered this website , precisely the right info that I was searching for! .
An impressive share, I just given this onto a colleague who was doing a little bit analysis on this. And he in truth purchased me breakfast as a result of I discovered it for him.. smile. So let me reword that: Thnx for the treat! But yeah Thnkx for spending the time to discuss this, I feel strongly about it and love reading extra on this topic. If attainable, as you become experience, would you thoughts updating your blog with extra particulars? It is extremely helpful for me. Huge thumb up for this blog post!
This is the right weblog for anybody who needs to search out out about this topic. You notice a lot its almost arduous to argue with you (not that I actually would need…HaHa). You positively put a brand new spin on a subject thats been written about for years. Nice stuff, simply great!
Howdy very cool web site!! Man .. Excellent .. Wonderful .. I will bookmark your web site and take the feeds additionally…I’m happy to seek out numerous useful info here within the submit, we’d like develop extra techniques in this regard, thank you for sharing.
I got what you intend, regards for posting.Woh I am pleased to find this website through google.
An impressive share, I just given this onto a colleague who was doing a little analysis on this. And he in fact bought me breakfast because I found it for him.. smile. So let me reword that: Thnx for the treat! But yeah Thnkx for spending the time to discuss this, I feel strongly about it and love reading more on this topic. If possible, as you become expertise, would you mind updating your blog with more details? It is highly helpful for me. Big thumb up for this blog post!
I really enjoy studying on this website, it contains wonderful articles. “Never fight an inanimate object.” by P. J. O’Rourke.
Howdy! Quick question that’s completely off topic. Do you know how to make your site mobile friendly? My blog looks weird when browsing from my apple iphone. I’m trying to find a theme or plugin that might be able to resolve this issue. If you have any recommendations, please share. Cheers!
great post, very informative. I wonder why the other specialists of this sector don’t notice this. You should continue your writing. I’m confident, you’ve a huge readers’ base already!
You got a very superb website, Gladiola I observed it through yahoo.
I have read some good stuff here. Definitely worth bookmarking for revisiting. I surprise how much effort you put to make such a excellent informative site.
As I site possessor I believe the content material here is rattling excellent , appreciate it for your hard work. You should keep it up forever! Best of luck.
I really appreciate this post. I have been looking everywhere for this! Thank goodness I found it on Bing. You have made my day! Thank you again
I think you have observed some very interesting points, appreciate it for the post.
Thank you, I have recently been searching for information about this subject for ages and yours is the greatest I have discovered so far. However, what in regards to the bottom line? Are you positive concerning the supply?
Youre so cool! I dont suppose Ive read anything like this before. So nice to find any person with some unique thoughts on this subject. realy thanks for beginning this up. this website is something that’s wanted on the net, someone with a little originality. useful job for bringing one thing new to the internet!
Today, I went to the beach front with my children. I found a sea shell and gave it to my 4 year old daughter and said “You can hear the ocean if you put this to your ear.” She put the shell to her ear and screamed. There was a hermit crab inside and it pinched her ear. She never wants to go back! LoL I know this is completely off topic but I had to tell someone!
I?¦m now not sure the place you’re getting your info, however great topic. I must spend a while studying much more or figuring out more. Thanks for fantastic info I was searching for this info for my mission.
Keep working ,splendid job!
you’ve an important blog right here! would you like to make some invite posts on my weblog?
Would you be all in favour of exchanging hyperlinks?
I haven’t checked in here for a while as I thought it was getting boring, but the last several posts are good quality so I guess I’ll add you back to my daily bloglist. You deserve it my friend 🙂
I’m still learning from you, but I’m improving myself. I definitely liked reading everything that is posted on your website.Keep the aarticles coming. I liked it!
I was very pleased to find this web-site.I wanted to thanks for your time for this wonderful read!! I definitely enjoying every little bit of it and I have you bookmarked to check out new stuff you blog post.
you are really a just right webmaster. The web site loading pace is incredible. It kind of feels that you are doing any unique trick. Moreover, The contents are masterpiece. you have performed a excellent job on this matter!
Thank you for the good writeup. It if truth be told was a leisure account it. Glance complicated to far introduced agreeable from you! However, how can we keep up a correspondence?
I always was concerned in this subject and still am, appreciate it for putting up.
Its superb as your other articles : D, appreciate it for posting.
I believe you have remarked some very interesting points, regards for the post.
Fantastic web site. A lot of helpful info here. I am sending it to several pals ans also sharing in delicious. And naturally, thanks in your effort!
Thanks for any other magnificent article. The place else could anyone get that kind of info in such an ideal method of writing? I’ve a presentation subsequent week, and I am on the look for such info.
Keep working ,fantastic job!
Wow! Thank you! I continually needed to write on my blog something like that. Can I take a part of your post to my website?
Hi my friend! I wish to say that this article is awesome, nice written and include approximately all vital infos. I would like to see more posts like this.
Attractive component of content. I simply stumbled upon your weblog and in accession capital to say that I get actually loved account your weblog posts. Anyway I will be subscribing for your feeds and even I success you get entry to persistently fast.
I am typically to running a blog and i really admire your content. The article has really peaks my interest. I’m going to bookmark your website and hold checking for new information.
Great line up. We will be linking to this great article on our site. Keep up the good writing.
Whats up very nice site!! Man .. Beautiful .. Amazing .. I’ll bookmark your website and take the feeds alsoKI am happy to find numerous helpful information right here within the publish, we want develop more techniques on this regard, thanks for sharing. . . . . .
I was just seeking this information for some time. After 6 hours of continuous Googleing, at last I got it in your site. I wonder what’s the lack of Google strategy that don’t rank this kind of informative sites in top of the list. Generally the top web sites are full of garbage.
Can I simply say what a reduction to search out someone who truly is aware of what theyre speaking about on the internet. You undoubtedly know learn how to bring a problem to light and make it important. More people need to learn this and perceive this side of the story. I cant believe youre no more standard since you definitely have the gift.
This really answered my problem, thank you!
I do agree with all of the ideas you have presented in your post. They are very convincing and will definitely work. Still, the posts are very short for starters. Could you please extend them a bit from next time? Thanks for the post.
Hello there, I found your web site via Google while searching for a related topic, your web site came up, it looks good. I’ve bookmarked it in my google bookmarks.
An interesting discussion is worth comment. I think that you should write more on this topic, it might not be a taboo subject but generally people are not enough to speak on such topics. To the next. Cheers
whoah this blog is excellent i really like reading your articles. Keep up the good paintings! You know, lots of people are searching around for this info, you can help them greatly.
LeanBiome is a dietary supplement designed to promote weight loss and improve overall health. It is formulated with a unique blend of probiotics, prebiotics, and natural ingredients that work together to support a healthy gut microbiome. The gut microbiome plays a crucial role in digestion, metabolism, and the immune system. By optimizing the gut microbiome, LeanBiome aims to help individuals achieve their weight loss goals more effectively and sustainably. https://sites.google.com/spsw.edu.pl/leanbiome/
Tonic Greens has gained popularity as a health supplement known for its rich blend of vitamins, minerals, and plant extracts. This article explores its composition, potential health benefits, usage instructions, and possible side effects. https://sites.google.com/spsw.edu.pl/tonicgreens/
SightCare is a revolutionary dietary supplement designed to support and maintain optimal eye health. In today’s digital age, where screens dominate our daily lives, the need for effective eye care solutions has never been greater. SightCare aims to meet this need with its scientifically formulated blend of essential nutrients and antioxidants. https://sites.google.com/spsw.edu.pl/sightcare/
Boostaro stands out as a natural solution for boosting energy levels and supporting overall vitality. Its blend of caffeine, adaptogens, and essential nutrients offers a balanced approach to enhancing physical and mental energy. As with any supplement, consult with a healthcare professional before starting, especially if you have any health concerns or sensitivities. https://sites.google.com/spsw.edu.pl/boostaro/
Prostadine is a dietary supplement formulated to support prostate health, particularly in men experiencing symptoms of benign prostatic hyperplasia (BPH) or other prostate-related issues. As men age, maintaining prostate health becomes increasingly important to avoid urinary discomfort and other related problems. Prostadine aims to provide a natural solution through a blend of ingredients known for their beneficial effects on the prostate. https://sites.google.com/spsw.edu.pl/prostabiome
I like the valuable info you provide for your articles. I will bookmark your blog and check once more right here regularly. I am relatively certain I’ll learn a lot of new stuff proper here! Good luck for the next!
Glucotil is a dietary supplement designed to support healthy blood sugar levels and overall metabolic health. Managing blood sugar is crucial for individuals with diabetes or pre-diabetes, as well as for those looking to maintain healthy energy levels and prevent future metabolic issues. Glucotil combines natural ingredients that have been shown to positively affect blood glucose regulation and insulin sensitivity.
https://sites.google.com/spsw.edu.pl/glucotil/
Sugar Defender is a dietary supplement designed to help regulate blood sugar levels and support overall metabolic health. Targeting individuals with pre-diabetes, diabetes, or those seeking to maintain stable blood sugar levels, Sugar Defender combines natural ingredients known for their ability to improve glucose metabolism and enhance insulin sensitivity. https://sites.google.com/spsw.edu.pl/sugardefender/
I and my guys have been going through the great key points found on the blog while then developed a horrible suspicion I never thanked you for them. These boys were definitely for this reason warmed to read through them and have now really been tapping into these things. Many thanks for simply being well considerate and for selecting this form of notable subject areas most people are really needing to learn about. Our own honest regret for not expressing gratitude to you sooner.
Nagano Tonic is a dietary supplement designed to promote overall health and wellness. Drawing inspiration from traditional Japanese medicine and modern nutritional science, Nagano Tonic incorporates a blend of natural ingredients known for their health-boosting properties. This supplement aims to enhance energy levels, support immune function, and improve overall vitality. https://sites.google.com/spsw.edu.pl/naganotonicleanbelly/
ZenCortex is a nootropic supplement designed to enhance cognitive function, support brain health, and improve mental clarity. By combining a blend of natural ingredients known for their neuroprotective and cognitive-enhancing properties, ZenCortex aims to boost memory, focus, and overall brain performance. https://sites.google.com/spsw.edu.pl/zencortex/
SeroLean is a dietary supplement designed to support weight loss and overall metabolic health. By leveraging the power of natural ingredients, SeroLean aims to help individuals achieve their weight management goals by enhancing serotonin levels, reducing appetite, and promoting fat metabolism. https://sites.google.com/spsw.edu.pl/serolean/
I’ve been browsing online more than three hours today, yet I never found any interesting article like yours. It is pretty worth enough for me. In my opinion, if all website owners and bloggers made good content as you did, the net will be much more useful than ever before.
Prodentim offers a range of innovative dental care products designed to promote optimal oral health. From toothpaste to oral rinses, Prodentim products are formulated with advanced ingredients to address various dental concerns and enhance overall oral hygiene. https://sites.google.com/spsw.edu.pl/prodentim/
Puravive is a dietary supplement designed to support weight loss and overall metabolic health. By leveraging a blend of natural ingredients known for their fat-burning and metabolism-boosting properties, Puravive aims to help individuals achieve their weight management goals and enhance their overall well-being. https://sites.google.com/spsw.edu.pl/puravive-web/
Keep up the excellent work, I read few articles on this web site and I believe that your web blog is really interesting and contains lots of wonderful info .
You could definitely see your expertise in the paintings you write. The sector hopes for more passionate writers such as you who are not afraid to mention how they believe. At all times go after your heart. “What power has law where only money rules.” by Gaius Petronius.
Real superb info can be found on blog.
I am not rattling excellent with English but I get hold this really easygoing to translate.
Cardio Defend is a dietary supplement designed to support cardiovascular health. Utilizing a blend of natural ingredients, Cardio Defend aims to improve heart function, promote healthy blood pressure, and enhance overall cardiovascular wellness. This article explores the composition, benefits, clinical evidence, and user experiences related to Cardio Defend. https://sites.google.com/spsw.edu.pl/cardiodefend/
Sugar Balance is a dietary supplement designed to support healthy blood sugar levels. Utilizing a blend of natural ingredients, Sugar Balance aims to help individuals manage their blood sugar more effectively, offering a holistic approach to maintaining metabolic health and preventing complications associated with high blood sugar levels. https://sites.google.com/spsw.edu.pl/sugarbalance
Kerassentials is a skincare and nail care product designed to promote healthy, strong nails and improve the overall condition of the skin. Combining natural and scientifically-backed ingredients, Kerassentials targets common issues such as fungal infections, brittle nails, and dry skin, providing a comprehensive solution for maintaining nail and skin health. https://sites.google.com/spsw.edu.pl/kerassentials-try/
EyeFortin is an all-natural eye-health supplement that helps to keep your eyes healthy even as you age. It prevents infections and detoxifies your eyes while also being stimulant-free. This makes it a great choice for those who are looking for a natural way to improve their eye health. https://sites.google.com/spsw.edu.pl/eyefortin/
Burn Boost is a dietary supplement designed to aid in weight management and fat loss. Combining a blend of natural ingredients, Burn Boost aims to increase metabolism, enhance energy levels, and support overall weight loss efforts. This article explores the composition, benefits, clinical evidence, and user experiences related to Burn Boost. https://sites.google.com/spsw.edu.pl/burnboost/
Alpha Tonic is a dietary supplement designed to support male vitality, energy, and overall performance. Combining a blend of natural ingredients known for their beneficial effects on male health, Alpha Tonic aims to provide a comprehensive solution for men looking to enhance their physical and mental well-being. This article explores the composition, benefits, clinical evidence, and user experiences related to Alpha Tonic. https://sites.google.com/spsw.edu.pl/alphatonic/
I am always searching online for posts that can aid me. Thx!
of course like your web-site but you have to check the spelling on quite a few of your posts. Many of them are rife with spelling issues and I find it very bothersome to tell the truth nevertheless I’ll definitely come back again.
Perfectly composed articles, thankyou for selective information.
PotentStream is a dietary supplement designed to enhance male vitality, energy levels, and overall performance. Combining a blend of potent natural ingredients, PotentStream aims to provide a comprehensive solution for men experiencing issues related to low energy, reduced libido, and decreased stamina. This article explores the composition, benefits, clinical evidence, and user experiences of PotentStream.
https://sites.google.com/spsw.edu.pl/potentstream/
I absolutely love your blog and find almost all of your post’s to be exactly I’m looking for. can you offer guest writers to write content for you? I wouldn’t mind writing a post or elaborating on some of the subjects you write about here. Again, awesome web log!
I like this site very much, Its a very nice situation to read and find info .
It’s really a nice and useful piece of information. I am glad that you shared this useful information with us. Please stay us informed like this. Thanks for sharing.
Oh my goodness! a tremendous article dude. Thank you Nonetheless I’m experiencing situation with ur rss . Don’t know why Unable to subscribe to it. Is there anyone getting equivalent rss drawback? Anyone who is aware of kindly respond. Thnkx
he blog was how do i say it… relevant, finally something that helped me. Thanks
I like this site because so much utile stuff on here : D.
Some truly select articles on this website , saved to favorites.
Great post but I was wanting to know if you could write a litte more on this topic? I’d be very thankful if you could elaborate a little bit more. Thanks!
You made some good points there. I did a search on the topic and found most guys will approve with your site.
Hello! Someone in my Facebook group shared this website with us so I came to look it over. I’m definitely enjoying the information. I’m book-marking and will be tweeting this to my followers! Outstanding blog and terrific style and design.
hello there and thank you for your info – I’ve definitely picked up anything new from proper here. I did on the other hand experience a few technical points the use of this site, as I skilled to reload the web site lots of occasions prior to I may just get it to load properly. I have been brooding about in case your hosting is OK? Not that I am complaining, but slow loading cases times will very frequently have an effect on your placement in google and could damage your high-quality ranking if ads and ***********|advertising|advertising|advertising and *********** with Adwords. Well I’m adding this RSS to my e-mail and could glance out for much extra of your respective fascinating content. Make sure you replace this once more soon..
Loving the info on this site, you have done great job on the articles.
My programmer is trying to convince me to move to .net from PHP. I have always disliked the idea because of the costs. But he’s tryiong none the less. I’ve been using WordPress on several websites for about a year and am concerned about switching to another platform. I have heard fantastic things about blogengine.net. Is there a way I can import all my wordpress posts into it? Any help would be greatly appreciated!
F*ckin¦ remarkable things here. I am very satisfied to peer your post. Thank you a lot and i’m taking a look forward to touch you. Will you please drop me a mail?
Rattling informative and great complex body part of content, now that’s user pleasant (:.
You should take part in a contest for one of the best blogs on the web. I will recommend this site!
Your place is valueble for me. Thanks!…
I love your writing style truly loving this internet site.
This really answered my drawback, thank you!
Hello.This post was extremely fascinating, particularly since I was searching for thoughts on this issue last Wednesday.
I like this website very much, Its a real nice office to read and obtain information.
Hi there! This post couldn’t be written any better! Reading through this post reminds me of my previous room mate! He always kept talking about this. I will forward this article to him. Pretty sure he will have a good read. Thank you for sharing!
I have not checked in here for some time as I thought it was getting boring, but the last few posts are good quality so I guess I?¦ll add you back to my daily bloglist. You deserve it my friend 🙂
Some really fantastic blog posts on this internet site, appreciate it for contribution. “Gratitude is not only the greatest of virtues, but the parent of all others.” by Cicero.
Regards for this post, I am a big big fan of this internet site would like to continue updated.
I like this website very much, Its a rattling nice billet to read and incur information. “There’s nothing I’m afraid of like scared people.” by Robert Frost.
Very interesting topic, regards for posting. “The great leaders have always stage-managed their effects.” by Charles De Gaulle.
Its excellent as your other posts : D, appreciate it for putting up. “A single day is enough to make us a little larger.” by Paul Klee.
I love discovering new unblocked games to play.
Hey, you used to write fantastic, but the last several posts have been kinda boring… I miss your tremendous writings. Past few posts are just a little bit out of track! come on!
Unblocked games: play at school, work, or home, endless entertainment, no barriers.
Having read this I thought it was very informative. I appreciate you taking the time and effort to put this article together. I once again find myself spending way to much time both reading and commenting. But so what, it was still worth it!
Thanks a lot for sharing this with all of us you really know what you are talking about! Bookmarked. Please also visit my web site =). We could have a link exchange contract between us!
I went over this internet site and I conceive you have a lot of fantastic info , saved to favorites (:.
Some truly nice and utilitarian info on this internet site, also I think the pattern has got great features.
Wow, awesome weblog layout! How lengthy have you been blogging for? you make running a blog look easy. The overall look of your website is fantastic, as well as the content material!
I really appreciate this post. I have been looking everywhere for this! Thank goodness I found it on Bing. You have made my day! Thx again
You can certainly see your expertise in the paintings you write. The sector hopes for even more passionate writers like you who are not afraid to mention how they believe. Always follow your heart.
I like this weblog so much, saved to bookmarks.
I?¦m not positive where you are getting your info, but great topic. I needs to spend a while studying much more or figuring out more. Thanks for wonderful info I was looking for this info for my mission.
I am constantly invstigating online for articles that can aid me. Thank you!
I have recently started a web site, the information you offer on this web site has helped me tremendously. Thanks for all of your time & work. “The word ‘genius’ isn’t applicable in football. A genius is a guy like Norman Einstein.” by Joe Theismann.
When I originally commented I clicked the “Notify me when new comments are added” checkbox and now each time a comment is added I get three e-mails with the same comment. Is there any way you can remove me from that service? Many thanks!
I’m not certain where you’re getting your info, but great topic. I must spend a while learning much more or understanding more. Thanks for excellent information I used to be in search of this information for my mission.
Exactly what I was searching for, thanks for putting up.
I am constantly searching online for posts that can assist me. Thx!
Simply wanna admit that this is invaluable, Thanks for taking your time to write this.
Its great as your other blog posts : D, thanks for posting. “A lost battle is a battle one thinks one has lost.” by Ferdinand Foch.
Wow! Thank you! I continuously wanted to write on my website something like that. Can I include a part of your post to my site?
Please let me know if you’re looking for a article writer for your blog. You have some really great posts and I think I would be a good asset. If you ever want to take some of the load off, I’d absolutely love to write some articles for your blog in exchange for a link back to mine. Please blast me an email if interested. Kudos!
Saved as a favorite, I really like your blog!
Well I definitely enjoyed studying it. This article procured by you is very practical for good planning.
Hello there, I found your website via Google while looking for a related topic, your website came up, it looks great. I have bookmarked it in my google bookmarks.
What i don’t realize is actually how you are not actually a lot more neatly-liked than you might be right now. You’re very intelligent. You already know therefore considerably with regards to this matter, produced me individually consider it from so many varied angles. Its like men and women don’t seem to be involved unless it’s one thing to accomplish with Lady gaga! Your personal stuffs great. All the time deal with it up!
I love your blog.. very nice colors & theme. Did you create this website yourself or did you hire someone to do it for you? Plz respond as I’m looking to construct my own blog and would like to know where u got this from. kudos
You have noted very interesting points! ps decent site.
Greetings from Idaho! I’m bored to tears at work so I decided to check out your blog on my iphone during lunch break. I really like the info you present here and can’t wait to take a look when I get home. I’m amazed at how fast your blog loaded on my mobile .. I’m not even using WIFI, just 3G .. Anyhow, fantastic blog!
I’ve been absent for some time, but now I remember why I used to love this site. Thank you, I’ll try and check back more frequently. How frequently you update your web site?
Do you mind if I quote a couple of your articles as long as I provide credit and sources back to your site? My website is in the very same niche as yours and my visitors would certainly benefit from a lot of the information you present here. Please let me know if this okay with you. Thank you!
After all, what a great site and informative posts, I will upload inbound link – bookmark this web site? Regards, Reader.
Thanks for every other wonderful post. The place else may just anyone get that kind of information in such a perfect approach of writing? I have a presentation next week, and I’m on the search for such information.
Can I simply say what a reduction to find somebody who actually knows what theyre speaking about on the internet. You definitely know tips on how to carry a difficulty to light and make it important. More people need to learn this and understand this facet of the story. I cant believe youre no more well-liked because you undoubtedly have the gift.
Good day! Do you know if they make any plugins to help with SEO? I’m trying to get my blog to rank for some targeted keywords but I’m not seeing very good success. If you know of any please share. Many thanks!
Hi , I do believe this is an excellent blog. I stumbled upon it on Yahoo , i will come back once again. Money and freedom is the best way to change, may you be rich and help other people.
I am not really great with English but I find this very easygoing to translate.
Hi there, I discovered your web site via Google while looking for a related matter, your web site got here up, it looks great. I’ve bookmarked it in my google bookmarks.
Hey! Would you mind if I share your blog with my zynga group? There’s a lot of people that I think would really appreciate your content. Please let me know. Many thanks
I truly appreciate this post. I have been looking everywhere for this! Thank goodness I found it on Bing. You have made my day! Thx again
I think this internet site contains some real wonderful info for everyone : D.
Thank you for sharing excellent informations. Your website is very cool. I’m impressed by the details that you’ve on this site. It reveals how nicely you perceive this subject. Bookmarked this web page, will come back for more articles. You, my friend, ROCK! I found simply the information I already searched everywhere and simply could not come across. What a perfect web site.
Hello! I’ve been reading your blog for some time now and finally got the bravery to go ahead and give you a shout out from Houston Tx! Just wanted to tell you keep up the great work!
I got what you mean ,saved to favorites, very decent website .
Thank you for sharing superb informations. Your web-site is so cool. I’m impressed by the details that you have on this web site. It reveals how nicely you perceive this subject. Bookmarked this web page, will come back for more articles. You, my friend, ROCK! I found simply the info I already searched everywhere and simply could not come across. What a great site.
I was looking at some of your blog posts on this internet site and I think this site is really informative! Continue posting.
Merely wanna remark that you have a very nice website , I like the design it really stands out.
Wonderful post but I was wanting to know if you could write a litte more on this topic? I’d be very grateful if you could elaborate a little bit more. Thank you!
I truly enjoy studying on this site, it contains fantastic blog posts.
I just like the helpful info you provide to your articles. I will bookmark your blog and test once more here frequently. I’m rather sure I will be told plenty of new stuff proper right here! Best of luck for the following!
Thank you for the good writeup. It in fact was a amusement account it. Look advanced to far added agreeable from you! However, how could we communicate?
Some genuinely quality content on this website , saved to bookmarks.
I want to show some thanks to this writer just for rescuing me from such a difficulty. As a result of browsing throughout the the net and coming across ways that were not beneficial, I figured my life was done. Living without the strategies to the problems you have resolved by means of this website is a critical case, and the ones which may have in a wrong way damaged my career if I had not encountered the blog. Your own personal talents and kindness in controlling every aspect was very helpful. I am not sure what I would have done if I had not discovered such a subject like this. I can also at this point look ahead to my future. Thanks for your time so much for this professional and sensible guide. I won’t think twice to refer your blog post to any individual who needs and wants guide on this subject.
Hey just wanted to give you a brief heads up and let you know a few of the images aren’t loading correctly. I’m not sure why but I think its a linking issue. I’ve tried it in two different web browsers and both show the same outcome.
Throughout the grand scheme of things you actually receive an A just for effort. Exactly where you actually lost me personally was in the details. As it is said, the devil is in the details… And that could not be much more accurate in this article. Having said that, allow me reveal to you just what exactly did do the job. Your authoring is rather powerful which is probably why I am making the effort in order to opine. I do not make it a regular habit of doing that. Second, whilst I can notice a jumps in reason you make, I am not confident of just how you seem to connect your ideas that produce the actual conclusion. For the moment I will subscribe to your issue however wish in the future you connect your facts better.
Rattling superb visual appeal on this web site, I’d value it 10 10.
Howdy very nice blog!! Man .. Beautiful .. Wonderful .. I’ll bookmark your website and take the feeds alsoKI’m happy to search out numerous helpful info right here in the submit, we want work out more strategies in this regard, thanks for sharing. . . . . .
Excellent post. I was checking constantly this blog and I am impressed! Extremely helpful information specifically the last part 🙂 I care for such information a lot. I was looking for this particular information for a very long time. Thank you and best of luck.
Sweet website , super layout, very clean and use friendly.
Good day very nice blog!! Man .. Beautiful .. Wonderful .. I’ll bookmark your website and take the feeds additionally…I’m happy to find numerous useful info here in the post, we’d like develop extra techniques on this regard, thank you for sharing. . . . . .
This is the right blog for anyone who wants to find out about this topic. You realize so much its almost hard to argue with you (not that I actually would want…HaHa). You definitely put a new spin on a topic thats been written about for years. Great stuff, just great!
This blog is definitely rather handy since I’m at the moment creating an internet floral website – although I am only starting out therefore it’s really fairly small, nothing like this site. Can link to a few of the posts here as they are quite. Thanks much. Zoey Olsen
Loving the information on this site, you have done outstanding job on the posts.
This is a very good tips especially to those new to blogosphere, brief and accurate information… Thanks for sharing this one. A must read article.
magnificent post, very informative. I wonder why the other experts of this sector do not notice this. You must continue your writing. I am confident, you have a great readers’ base already!
My developer is trying to persuade me to move to .net from PHP. I have always disliked the idea because of the costs. But he’s tryiong none the less. I’ve been using Movable-type on a variety of websites for about a year and am anxious about switching to another platform. I have heard fantastic things about blogengine.net. Is there a way I can transfer all my wordpress posts into it? Any help would be greatly appreciated!
Glad to be one of many visitants on this awe inspiring website : D.
It is appropriate time to make some plans for the long run and it is time to be happy. I have learn this publish and if I may just I want to counsel you some fascinating issues or tips. Maybe you can write subsequent articles relating to this article. I wish to learn more things about it!
I was examining some of your blog posts on this site and I believe this site is very informative! Keep posting.
Hi! I know this is kinda off topic however , I’d figured I’d ask. Would you be interested in trading links or maybe guest authoring a blog post or vice-versa? My website discusses a lot of the same topics as yours and I think we could greatly benefit from each other. If you are interested feel free to shoot me an email. I look forward to hearing from you! Excellent blog by the way!
I went over this site and I believe you have a lot of good info, bookmarked (:.
You are my inspiration , I possess few blogs and infrequently run out from to brand : (.
Magnificent beat ! I would like to apprentice while you amend your website, how could i subscribe for a blog web site? The account helped me a appropriate deal. I were a little bit familiar of this your broadcast offered brilliant transparent idea
Im not certain the place you’re getting your info, however great topic. I needs to spend a while learning much more or understanding more. Thanks for great info I used to be on the lookout for this information for my mission.
You have noted very interesting details ! ps decent website .
Hey there this is somewhat of off topic but I was wanting to know if blogs use WYSIWYG editors or if you have to manually code with HTML. I’m starting a blog soon but have no coding know-how so I wanted to get advice from someone with experience. Any help would be enormously appreciated!
Very instructive and superb structure of subject matter, now that’s user friendly (:.
Hi my family member! I wish to say that this article is amazing, great written and include approximately all important infos. I¦d like to look extra posts like this .
I am incessantly thought about this, thanks for putting up.
Thanks for the sensible critique. Me & my neighbor were just preparing to do some research about this. We got a grab a book from our area library but I think I learned more clear from this post. I am very glad to see such wonderful info being shared freely out there.
I?¦ve learn some just right stuff here. Definitely worth bookmarking for revisiting. I surprise how so much attempt you set to make this sort of excellent informative web site.
Would you be all for exchanging links?
Sweet website , super design, really clean and apply friendly.
you have a great blog here! would you like to make some invite posts on my blog?
Very interesting topic, appreciate it for posting.
Hi there! This is kind of off topic but I need some guidance from an established blog. Is it difficult to set up your own blog? I’m not very techincal but I can figure things out pretty fast. I’m thinking about setting up my own but I’m not sure where to start. Do you have any points or suggestions? Thank you
I am glad to be one of the visitants on this outstanding website (:, regards for posting.
Great V I should definitely pronounce, impressed with your web site. I had no trouble navigating through all the tabs as well as related information ended up being truly easy to do to access. I recently found what I hoped for before you know it at all. Quite unusual. Is likely to appreciate it for those who add forums or anything, website theme . a tones way for your customer to communicate. Excellent task..
Perfect piece of work you have done, this web site is really cool with fantastic information.
I just couldn’t leave your website prior to suggesting that I extremely enjoyed the usual information a person supply in your visitors? Is going to be back ceaselessly to check out new posts
Simply desire to say your article is as amazing. The clarity on your put up is just spectacular and that i could assume you’re a professional in this subject. Fine with your permission allow me to snatch your feed to keep updated with imminent post. Thank you a million and please keep up the enjoyable work.
Outstanding post but I was wondering if you could write a litte more on this topic? I’d be very grateful if you could elaborate a little bit more. Thank you!
I haven’t checked in here for a while because I thought it was getting boring, but the last few posts are great quality so I guess I will add you back to my everyday bloglist. You deserve it my friend 🙂
I have recently started a site, the info you provide on this web site has helped me greatly. Thanks for all of your time & work.
There are certainly a number of particulars like that to take into consideration. That is a great level to convey up. I offer the ideas above as general inspiration however clearly there are questions just like the one you bring up where the most important thing will be working in trustworthy good faith. I don?t know if best practices have emerged round issues like that, however I am certain that your job is clearly identified as a fair game. Both girls and boys feel the impact of only a second’s pleasure, for the rest of their lives.
I got what you mean ,saved to fav, very decent web site.
Great website. Lots of useful information here. I’m sending it to some pals ans also sharing in delicious. And naturally, thank you for your sweat!
Thank you for the sensible critique. Me & my neighbor were just preparing to do a little research about this. We got a grab a book from our local library but I think I learned more clear from this post. I am very glad to see such great information being shared freely out there.
I am impressed with this web site, real I am a fan.
I got what you intend,bookmarked, very nice site.
What i don’t understood is actually how you are no longer actually much more smartly-preferred than you may be now. You’re very intelligent. You realize thus considerably in the case of this subject, produced me individually imagine it from a lot of various angles. Its like men and women are not interested except it?¦s something to do with Girl gaga! Your individual stuffs nice. All the time deal with it up!
We are a group of volunteers and starting a new scheme in our community. Your site provided us with valuable information to work on. You have done an impressive job and our whole community will be thankful to you.
Good day! Do you know if they make any plugins to assist with Search Engine Optimization? I’m trying to get my blog to rank for some targeted keywords but I’m not seeing very good success. If you know of any please share. Thanks!
It?¦s in point of fact a great and helpful piece of info. I am satisfied that you simply shared this helpful info with us. Please stay us up to date like this. Thanks for sharing.
Wohh just what I was looking for, regards for posting.
It’s hard to seek out knowledgeable folks on this subject, but you sound like you already know what you’re talking about! Thanks
I too conceive hence, perfectly written post! .
Have you ever considered about including a little bit more than just your articles? I mean, what you say is important and everything. Nevertheless just imagine if you added some great photos or videos to give your posts more, “pop”! Your content is excellent but with images and videos, this website could undeniably be one of the very best in its field. Amazing blog!
I’m not sure exactly why but this blog is loading incredibly slow for me. Is anyone else having this problem or is it a problem on my end? I’ll check back later on and see if the problem still exists.
Write more, thats all I have to say. Literally, it seems as though you relied on the video to make your point. You definitely know what youre talking about, why waste your intelligence on just posting videos to your blog when you could be giving us something informative to read?
This is very interesting, You are a very skilled blogger. I have joined your feed and look forward to seeking more of your magnificent post. Also, I’ve shared your website in my social networks!
Great wordpress blog here.. It’s hard to find quality writing like yours these days. I really appreciate people like you! take care
F*ckin’ remarkable things here. I’m very glad to see your post. Thanks a lot and i am looking forward to contact you. Will you kindly drop me a mail?
I loved as much as you’ll receive carried out right here. The sketch is tasteful, your authored material stylish. nonetheless, you command get got an nervousness over that you wish be delivering the following. unwell unquestionably come further formerly again since exactly the same nearly a lot often inside case you shield this hike.
Thanks for sharing excellent informations. Your web site is so cool. I am impressed by the details that you’ve on this blog. It reveals how nicely you understand this subject. Bookmarked this website page, will come back for more articles. You, my friend, ROCK! I found just the information I already searched all over the place and simply could not come across. What an ideal site.
There are certainly quite a lot of details like that to take into consideration. That may be a nice level to convey up. I provide the ideas above as basic inspiration but clearly there are questions just like the one you convey up where a very powerful factor will likely be working in sincere good faith. I don?t know if best practices have emerged round issues like that, but I am sure that your job is clearly recognized as a fair game. Both girls and boys really feel the influence of only a moment’s pleasure, for the rest of their lives.
Some truly nice and utilitarian info on this internet site, likewise I think the pattern has got fantastic features.
I’m still learning from you, but I’m making my way to the top as well. I absolutely liked reading all that is posted on your website.Keep the posts coming. I liked it!
Very interesting details you have observed, appreciate it for putting up. “You can tell the ideas of a nation by it’s advertisements.” by Douglas South Wind.
Hey There. I discovered your blog the use of msn. That is a really smartly written article. I will make sure to bookmark it and come back to learn extra of your helpful information. Thank you for the post. I will definitely comeback.
hi!,I like your writing very much! share we communicate more about your article on AOL? I need an expert on this area to solve my problem. May be that’s you! Looking forward to see you.
Your place is valueble for me. Thanks!…
Thanks for sharing excellent informations. Your web-site is very cool. I’m impressed by the details that you have on this site. It reveals how nicely you understand this subject. Bookmarked this web page, will come back for extra articles. You, my friend, ROCK! I found simply the info I already searched everywhere and simply couldn’t come across. What an ideal website.
I am glad to be one of the visitants on this outstanding web site (:, regards for putting up.
good post.Never knew this, thanks for letting me know.
Excellent read, I just passed this onto a colleague who was doing some research on that. And he actually bought me lunch because I found it for him smile Therefore let me rephrase that: Thank you for lunch! “We know what happens to people who stay in the middle of the road. They get run over.” by Ambrose Gwinett Bierce.
Great wordpress blog here.. It’s hard to find quality writing like yours these days. I really appreciate people like you! take care
I?¦ll immediately clutch your rss feed as I can not in finding your email subscription link or e-newsletter service. Do you’ve any? Please allow me understand so that I may subscribe. Thanks.
I love it when people come together and share opinions, great blog, keep it up.
Thank you for each of your hard work on this web site. My mom delights in getting into investigation and it’s easy to understand why. Most of us notice all about the lively medium you deliver effective guidelines by means of your website and therefore foster contribution from website visitors about this content while our favorite child is without a doubt being taught a whole lot. Take pleasure in the rest of the year. You are always conducting a first class job.
I love the efforts you have put in this, appreciate it for all the great content.
Great post, I think people should learn a lot from this web blog its really user genial.
I was just searching for this info for some time. After six hours of continuous Googleing, at last I got it in your site. I wonder what’s the lack of Google strategy that don’t rank this type of informative websites in top of the list. Normally the top sites are full of garbage.
You have brought up a very great points, regards for the post.
Hello.This article was really remarkable, especially because I was investigating for thoughts on this topic last Thursday.
Yeah bookmaking this wasn’t a speculative conclusion outstanding post! .
I am thankful that I discovered this web blog, just the right info that I was looking for! .
You made some nice points there. I looked on the internet for the issue and found most people will approve with your website.
Saved as a favorite, I really like your blog!
Hey would you mind sharing which blog platform you’re using? I’m looking to start my own blog soon but I’m having a hard time selecting between BlogEngine/Wordpress/B2evolution and Drupal. The reason I ask is because your layout seems different then most blogs and I’m looking for something unique. P.S Sorry for being off-topic but I had to ask!
Absolutely composed content, Really enjoyed studying.
I know this if off topic but I’m looking into starting my own weblog and was curious what all is needed to get setup? I’m assuming having a blog like yours would cost a pretty penny? I’m not very internet smart so I’m not 100 sure. Any tips or advice would be greatly appreciated. Appreciate it
Some times its a pain in the ass to read what blog owners wrote but this web site is real user genial! .
Valuable information. Lucky me I discovered your site accidentally, and I’m stunned why this accident didn’t came about in advance! I bookmarked it.
Hi there, I discovered your site by the use of Google even as searching for a similar topic, your site got here up, it appears to be like good. I have bookmarked it in my google bookmarks.
I’m still learning from you, while I’m improving myself. I absolutely liked reading everything that is posted on your site.Keep the information coming. I enjoyed it!
I’d have to examine with you here. Which isn’t something I normally do! I get pleasure from studying a submit that will make individuals think. Additionally, thanks for permitting me to comment!
I just like the valuable info you supply in your articles. I will bookmark your blog and take a look at again here regularly. I am relatively sure I will be told plenty of new stuff proper right here! Good luck for the next!
I dugg some of you post as I cogitated they were handy extremely helpful
Good website! I really love how it is easy on my eyes and the data are well written. I am wondering how I could be notified when a new post has been made. I have subscribed to your RSS feed which must do the trick! Have a great day!
Having read this I thought it was very informative. I appreciate you taking the time and effort to put this article together. I once again find myself spending way to much time both reading and commenting. But so what, it was still worth it!
Can I just say what a relief to find someone who actually knows what theyre talking about on the internet. You definitely know how to bring an issue to light and make it important. More people need to read this and understand this side of the story. I cant believe youre not more popular because you definitely have the gift.
It is best to take part in a contest for the most effective blogs on the web. I will advocate this site!
With havin so much content do you ever run into any problems of plagorism or copyright infringement? My blog has a lot of completely unique content I’ve either authored myself or outsourced but it appears a lot of it is popping it up all over the web without my authorization. Do you know any techniques to help prevent content from being ripped off? I’d genuinely appreciate it.
I want studying and I conceive this website got some truly useful stuff on it! .
I keep listening to the newscast speak about receiving boundless online grant applications so I have been looking around for the best site to get one. Could you advise me please, where could i acquire some?
Hi, I think your site might be having browser compatibility issues. When I look at your website in Firefox, it looks fine but when opening in Internet Explorer, it has some overlapping. I just wanted to give you a quick heads up! Other then that, wonderful blog!
We’re a gaggle of volunteers and starting a brand new scheme in our community. Your site offered us with helpful information to work on. You’ve done an impressive task and our entire group will be grateful to you.
I wish to convey my passion for your kind-heartedness for individuals that absolutely need help on this particular content. Your real commitment to getting the message all around appeared to be surprisingly advantageous and have surely encouraged some individuals just like me to get to their desired goals. Your personal invaluable hints and tips entails much a person like me and much more to my peers. Thank you; from each one of us.
Glad to be one of many visitants on this awesome site : D.
I like this website so much, saved to favorites. “To hold a pen is to be at war.” by Francois Marie Arouet Voltaire.
Very interesting topic, regards for putting up.
As a Newbie, I am permanently searching online for articles that can help me. Thank you
You made some good points there. I did a search on the subject matter and found most persons will approve with your blog.
thx
fantastic publish, very informative. I wonder why the other experts of this sector don’t understand this. You must proceed your writing. I am confident, you have a great readers’ base already!
thx
thx
You have brought up a very excellent points, appreciate it for the post.
My spouse and I stumbled over here coming from a different page and thought I might as well check things out. I like what I see so now i’m following you. Look forward to checking out your web page repeatedly.
Attractive section of content. I just stumbled upon your weblog and in accession capital to assert that I get actually enjoyed account your blog posts. Anyway I’ll be subscribing to your augment and even I achievement you access consistently quickly.
Really superb visual appeal on this internet site, I’d value it 10 10.
thx
thx
thx
The next time I read a blog, I hope that it doesnt disappoint me as much as this one. I mean, I know it was my choice to read, but I actually thought youd have something interesting to say. All I hear is a bunch of whining about something that you could fix if you werent too busy looking for attention.
thx
thx
thx
I reckon something genuinely special in this website.
thx
I have recently started a blog, the information you offer on this website has helped me greatly. Thanks for all of your time & work.
thx
It is really a nice and helpful piece of information. I’m glad that you shared this helpful info with us. Please keep us up to date like this. Thank you for sharing.
I dugg some of you post as I thought they were invaluable very beneficial
thx
excellent issues altogether, you just won a brand new reader. What may you recommend about your submit that you made some days in the past? Any sure?
Thanks , I have recently been searching for information approximately this topic for a long time and yours is the best I’ve came upon till now. But, what in regards to the conclusion? Are you certain concerning the source?
Fantastic blog! Do you have any recommendations for aspiring writers? I’m planning to start my own blog soon but I’m a little lost on everything. Would you recommend starting with a free platform like WordPress or go for a paid option? There are so many options out there that I’m completely confused .. Any recommendations? Thanks a lot!
Super-Duper site! I am loving it!! Will be back later to read some more. I am bookmarking your feeds also
thx
thx
thx
I am constantly looking online for tips that can facilitate me. Thank you!
certainly like your web site but you have to check the spelling on several of your posts. Many of them are rife with spelling issues and I to find it very troublesome to inform the truth nevertheless I’ll certainly come again again.
thx
thxx
thxx
thxx
thxx
thx
thx
Please let me know if you’re looking for a writer for your blog. You have some really good articles and I think I would be a good asset. If you ever want to take some of the load off, I’d absolutely love to write some content for your blog in exchange for a link back to mine. Please blast me an email if interested. Thank you!
thx
thx
Thank you for your whole labor on this web site. Kate really likes managing investigation and it’s easy to understand why. My spouse and i notice all of the compelling form you make worthwhile tips and tricks on the web site and in addition inspire participation from the others on this content so our daughter is becoming educated a lot of things. Have fun with the rest of the new year. You’re the one doing a dazzling job.
thx
You are my inhalation, I possess few blogs and often run out from to brand.
thx
Keep functioning ,splendid job!
great points altogether, you just gained a new reader. What would you recommend in regards to your post that you made some days ago? Any positive?
Good day I am so grateful I found your blog page, I really found you by accident, while I was searching on Askjeeve for something else, Anyways I am here now and would just like to say kudos for a tremendous post and a all round thrilling blog (I also love the theme/design), I don’t have time to read it all at the moment but I have book-marked it and also included your RSS feeds, so when I have time I will be back to read a great deal more, Please do keep up the superb job.
thx
Thank you for every other magnificent article. Where else may anyone get that type of information in such a perfect way of writing? I have a presentation subsequent week, and I’m on the look for such information.
I was looking at some of your blog posts on this internet site and I think this site is rattling informative ! Retain posting.
I am often to running a blog and i really admire your content. The article has really peaks my interest. I’m going to bookmark your web site and keep checking for brand new information.
Well I truly liked studying it. This post offered by you is very constructive for accurate planning.
You made some clear points there. I looked on the internet for the subject matter and found most guys will agree with your blog.
Would love to perpetually get updated great blog! .
I got what you mean , regards for putting up.Woh I am happy to find this website through google. “I was walking down the street wearing glasses when the prescription ran out.” by Steven Wright.
Perfect work you have done, this web site is really cool with excellent info .
Good info. Lucky me I reach on your website by accident, I bookmarked it.
thx
Yeah bookmaking this wasn’t a high risk conclusion great post! .
This really answered my problem, thank you!
Sweet site, super layout, real clean and apply friendly.
When I originally commented I clicked the -Notify me when new comments are added- checkbox and now each time a comment is added I get four emails with the same comment. Is there any way you can remove me from that service? Thanks!
You should take part in a contest for one of the best blogs on the web. I will recommend this site!
I have read several just right stuff here. Definitely value bookmarking for revisiting. I surprise how so much attempt you place to make any such wonderful informative web site.
You must take part in a contest for among the best blogs on the web. I will advocate this web site!
thx
thx
thx
With havin so much content and articles do you ever run into any issues of plagorism or copyright infringement? My site has a lot of exclusive content I’ve either created myself or outsourced but it seems a lot of it is popping it up all over the internet without my agreement. Do you know any methods to help prevent content from being stolen? I’d truly appreciate it.
Thanks for your marvelous posting! I definitely enjoyed reading it, you are a great author.I will always bookmark your blog and may come back in the future. I want to encourage one to continue your great job, have a nice holiday weekend!
Its good as your other articles : D, thankyou for putting up. “The real hero is always a hero by mistake he dreams of being an honest coward like everybody else.” by Umberto Eco.
We’re a bunch of volunteers and opening a brand new scheme in our community. Your website offered us with valuable info to work on. You’ve done a formidable process and our whole neighborhood might be thankful to you.
I like this web site because so much utile material on here : D.
Awesome blog! Do you have any recommendations for aspiring writers? I’m hoping to start my own website soon but I’m a little lost on everything. Would you suggest starting with a free platform like WordPress or go for a paid option? There are so many choices out there that I’m totally confused .. Any recommendations? Kudos!
Hello! I could have sworn I’ve been to this blog before but after browsing through some of the post I realized it’s new to me. Anyways, I’m definitely happy I found it and I’ll be book-marking and checking back frequently!
When I originally commented I clicked the -Notify me when new comments are added- checkbox and now each time a comment is added I get four emails with the same comment. Is there any way you can remove me from that service? Thanks!
thx
thx
I like what you guys are up also. Such clever work and reporting! Carry on the superb works guys I have incorporated you guys to my blogroll. I think it’ll improve the value of my site 🙂
F*ckin’ awesome issues here. I am very happy to see your article. Thank you so much and i am looking ahead to touch you. Will you kindly drop me a mail?
Well I sincerely enjoyed reading it. This post provided by you is very practical for accurate planning.
Useful info. Fortunate me I found your site accidentally, and I’m shocked why this twist of fate didn’t came about earlier! I bookmarked it.
thx
I’m really enjoying the theme/design of your weblog. Do you ever run into any internet browser compatibility issues? A few of my blog audience have complained about my site not working correctly in Explorer but looks great in Firefox. Do you have any suggestions to help fix this problem?
thx
thx
My brother recommended I might like this website. He was totally right. This post actually made my day. You cann’t imagine just how much time I had spent for this info! Thanks!
hey there and thank you for your information – I’ve certainly picked up anything new from right here. I did alternatively expertise some technical issues the usage of this website, as I experienced to reload the site many instances prior to I may get it to load correctly. I have been thinking about if your web hosting is OK? Now not that I’m complaining, however sluggish loading circumstances times will often affect your placement in google and could damage your quality score if advertising and ***********|advertising|advertising|advertising and *********** with Adwords. Anyway I’m including this RSS to my email and could glance out for a lot more of your respective exciting content. Make sure you replace this once more soon..
A lot of thanks for all of your labor on this web page. My niece delights in conducting research and it’s really easy to understand why. Many of us learn all of the dynamic tactic you provide priceless steps through the website and as well recommend response from people on this area so our own simple princess is actually learning a great deal. Take pleasure in the rest of the year. Your performing a tremendous job.
Would love to incessantly get updated great weblog! .
Hello. splendid job. I did not imagine this. This is a excellent story. Thanks!
I am constantly searching online for tips that can benefit me. Thank you!
I am really impressed with your writing talents as neatly as with the structure on your weblog. Is this a paid topic or did you customize it your self? Either way stay up the nice high quality writing, it is uncommon to look a great blog like this one nowadays..
Hi there, just became aware of your blog through Google, and found that it’s truly informative. I am gonna watch out for brussels. I’ll be grateful if you continue this in future. A lot of people will be benefited from your writing. Cheers!
Very informative and great complex body part of content, now that’s user friendly (:.
Merely wanna say that this is very useful, Thanks for taking your time to write this.
Absolutely indited articles, thanks for information. “No human thing is of serious importance.” by Plato.
Very instructive and fantastic bodily structure of subject material, now that’s user pleasant (:.
Can I just say what a reduction to search out someone who really is aware of what theyre speaking about on the internet. You undoubtedly know the right way to carry a difficulty to light and make it important. More people have to read this and understand this side of the story. I cant imagine youre no more in style because you positively have the gift.
Some really marvelous work on behalf of the owner of this web site, absolutely great content material.
hello there and thank you for your information – I have certainly picked up anything new from right here. I did however expertise a few technical points using this web site, since I experienced to reload the site many times previous to I could get it to load properly. I had been wondering if your hosting is OK? Not that I’m complaining, but sluggish loading instances times will very frequently affect your placement in google and could damage your high quality score if advertising and marketing with Adwords. Well I am adding this RSS to my email and could look out for much more of your respective intriguing content. Make sure you update this again soon..
Aw, this was a very nice post. In concept I wish to put in writing like this moreover – taking time and actual effort to make an excellent article… but what can I say… I procrastinate alot and certainly not appear to get something done.
Great line up. We will be linking to this great article on our site. Keep up the good writing.
Great post. I am facing a couple of these problems.
There are some interesting deadlines on this article however I don’t know if I see all of them center to heart. There’s some validity however I will take hold opinion till I look into it further. Good article , thanks and we want more! Added to FeedBurner as well
thx
Excellent post. I was checking continuously this blog and I am impressed! Extremely useful info specifically the last part 🙂 I care for such info much. I was seeking this particular info for a long time. Thank you and best of luck.
I carry on listening to the rumor talk about getting free online grant applications so I have been looking around for the most excellent site to get one. Could you advise me please, where could i acquire some?
Awsome article and straight to the point. I am not sure if this is actually the best place to ask but do you guys have any thoughts on where to employ some professional writers? Thank you 🙂
Terrific paintings! This is the kind of info that should be shared across the internet. Disgrace on Google for not positioning this submit higher! Come on over and discuss with my website . Thank you =)
Well I definitely liked studying it. This post offered by you is very practical for good planning.
Howdy I am so happy I found your blog page, I really found you by error, while I was searching on Google for something else, Anyways I am here now and would just like to say thank you for a fantastic post and a all round exciting blog (I also love the theme/design), I don’t have time to look over it all at the moment but I have saved it and also added your RSS feeds, so when I have time I will be back to read a great deal more, Please do keep up the superb work.
I think you have mentioned some very interesting points, appreciate it for the post.
I will right away grab your rss as I can’t find your email subscription link or e-newsletter service. Do you’ve any? Please let me know in order that I could subscribe. Thanks.
Hi there! I know this is somewhat off topic but I was wondering if you knew where I could find a captcha plugin for my comment form? I’m using the same blog platform as yours and I’m having trouble finding one? Thanks a lot!
thx
thx
thx
thx
thx
I don’t commonly comment but I gotta admit appreciate it for the post on this amazing one : D.
thx
thx
Hi there! I know this is kinda off topic but I was wondering which blog platform are you using for this website? I’m getting sick and tired of WordPress because I’ve had problems with hackers and I’m looking at options for another platform. I would be fantastic if you could point me in the direction of a good platform.
Hi there! This is my 1st comment here so I just wanted to give a quick shout out and say I genuinely enjoy reading your posts. Can you suggest any other blogs/websites/forums that deal with the same topics? Thank you so much!
I must point out my love for your generosity supporting men and women that really want help on that study. Your real dedication to getting the solution throughout came to be incredibly practical and have all the time enabled workers like me to get to their ambitions. Your new important guidelines signifies much to me and somewhat more to my office workers. With thanks; from everyone of us.
Hiya, I’m really glad I have found this info. Today bloggers publish only about gossips and internet and this is actually frustrating. A good blog with exciting content, that’s what I need. Thank you for keeping this site, I’ll be visiting it. Do you do newsletters? Cant find it.
Very interesting subject , regards for posting.
Great article and straight to the point. I am not sure if this is actually the best place to ask but do you people have any thoughts on where to employ some professional writers? Thanks 🙂
Wow! This could be one particular of the most beneficial blogs We have ever arrive across on this subject. Basically Excellent. I’m also an expert in this topic so I can understand your hard work.
Your place is valueble for me. Thanks!…
Utterly pent articles, regards for information. “Life is God’s novel. Let him write it.” by Isaac Bashevis Singer.
Wow, wonderful blog layout! How long have you been blogging for? you made blogging look easy. The overall look of your web site is fantastic, as well as the content!
I really like your writing style, fantastic information, appreciate it for posting : D.
Good write-up, I’m normal visitor of one’s blog, maintain up the excellent operate, and It’s going to be a regular visitor for a long time.
Yeah bookmaking this wasn’t a bad conclusion great post! .
fantastic put up, very informative. I wonder why the other specialists of this sector don’t realize this. You should continue your writing. I’m sure, you’ve a huge readers’ base already!
Thank you for sharing superb informations. Your site is very cool. I’m impressed by the details that you¦ve on this site. It reveals how nicely you understand this subject. Bookmarked this web page, will come back for more articles. You, my pal, ROCK! I found simply the info I already searched everywhere and simply couldn’t come across. What an ideal web-site.
he blog was how do i say it… relevant, finally something that helped me. Thanks
This is really interesting, You’re a very skilled blogger. I have joined your rss feed and look forward to seeking more of your magnificent post. Also, I’ve shared your website in my social networks!
An interesting discussion is worth comment. I think that you should write more on this topic, it might not be a taboo subject but generally people are not enough to speak on such topics. To the next. Cheers
Hello There. I discovered your weblog the usage of msn. That is a very smartly written article. I’ll be sure to bookmark it and come back to read extra of your useful info. Thanks for the post. I will certainly comeback.
Thanks , I have recently been searching for info about this topic for ages and yours is the best I’ve discovered till now. But, what about the conclusion? Are you sure about the source?
My brother recommended I might like this website. He was totally right. This post truly made my day. You can not imagine just how much time I had spent for this information! Thanks!
Thank you, I have just been looking for info approximately this subject for ages and yours is the best I’ve came upon till now. But, what about the conclusion? Are you positive in regards to the supply?
Thankyou for helping out, good info .
What’s Happening i’m new to this, I stumbled upon this I’ve found It absolutely helpful and it has helped me out loads. I hope to contribute & aid other users like its helped me. Good job.
It is in point of fact a nice and useful piece of info. I’m glad that you shared this useful information with us. Please keep us up to date like this. Thanks for sharing.
This web page is really a walk-via for all the info you wanted about this and didn’t know who to ask. Glimpse here, and also you’ll positively discover it.
Definitely believe that which you stated. Your favourite reason seemed to be on the web the simplest factor to take note of. I say to you, I definitely get irked whilst other folks consider issues that they plainly do not understand about. You managed to hit the nail upon the top as smartly as outlined out the entire thing with no need side-effects , people can take a signal. Will likely be again to get more. Thanks
I like the efforts you have put in this, appreciate it for all the great content.
obviously like your web site however you need to take a look at the spelling on several of your posts. Many of them are rife with spelling problems and I to find it very bothersome to inform the truth nevertheless I¦ll surely come again again.
I gotta favorite this web site it seems extremely helpful very useful
Very interesting subject, thanks for putting up.
Outstanding post, I conceive blog owners should acquire a lot from this web site its real user genial.
I have been surfing online more than 3 hours today, yet I never found any interesting article like yours. It is pretty worth enough for me. In my opinion, if all site owners and bloggers made good content as you did, the internet will be much more useful than ever before.
hi!,I like your writing very much! share we communicate more about your post on AOL? I require an expert on this area to solve my problem. Maybe that’s you! Looking forward to see you.
thx
Have you ever thought about including a little bit more than just your articles? I mean, what you say is valuable and all. However imagine if you added some great visuals or videos to give your posts more, “pop”! Your content is excellent but with pics and video clips, this site could certainly be one of the greatest in its field. Fantastic blog!
I’m truly enjoying the design and layout of your blog. It’s a very easy on the eyes which makes it much more pleasant for me to come here and visit more often. Did you hire out a designer to create your theme? Superb work!
You made certain fine points there. I did a search on the theme and found a good number of folks will go along with with your blog.
Greetings! I know this is kinda off topic but I was wondering if you knew where I could locate a captcha plugin for my comment form? I’m using the same blog platform as yours and I’m having difficulty finding one? Thanks a lot!
Hello. Great job. I did not imagine this. This is a impressive story. Thanks!
Hey there would you mind letting me know which web host you’re working with? I’ve loaded your blog in 3 completely different browsers and I must say this blog loads a lot quicker then most. Can you recommend a good internet hosting provider at a fair price? Many thanks, I appreciate it!
Thanks for any other informative blog. Where else could I am getting that kind of info written in such a perfect manner? I have a project that I am just now working on, and I have been at the look out for such information.
I have been surfing online more than 3 hours today, yet I never found any interesting article like yours. It is pretty worth enough for me. Personally, if all website owners and bloggers made good content as you did, the internet will be much more useful than ever before.
Pretty nice post. I just stumbled upon your blog and wished to say that I’ve truly enjoyed browsing your blog posts. In any case I’ll be subscribing to your feed and I hope you write again very soon!
joint genesis: joint genesis
I think other website owners should take this web site as an model, very clean and wonderful user friendly layout.
Regards for helping out, superb info .
Loving the information on this site, you have done outstanding job on the posts.
I believe you have mentioned some very interesting details , thankyou for the post.
I am impressed with this website , really I am a big fan .
My spouse and I absolutely love your blog and find the majority of your post’s to be just what I’m looking for. Would you offer guest writers to write content to suit your needs? I wouldn’t mind composing a post or elaborating on many of the subjects you write about here. Again, awesome blog!
Thanks for another wonderful article. The place else may anybody get that kind of information in such a perfect approach of writing? I’ve a presentation subsequent week, and I’m at the search for such info.
Greetings! Very helpful advice on this article! It is the little changes that make the biggest changes. Thanks a lot for sharing!
Hello. magnificent job. I did not expect this. This is a excellent story. Thanks!
I discovered your blog site on google and check a few of your early posts. Continue to keep up the very good operate. I just additional up your RSS feed to my MSN News Reader. Seeking forward to reading more from you later on!…
You have observed very interesting points! ps decent site.
Hey There. I found your blog using msn. This is an extremely well written article. I’ll make sure to bookmark it and come back to read more of your useful information. Thanks for the post. I will definitely comeback.
Thanks for another great article. Where else could anybody get that type of information in such an ideal way of writing? I’ve a presentation next week, and I’m on the look for such info.
I am often to blogging and i really appreciate your content. The article has really peaks my interest. I am going to bookmark your site and keep checking for new information.
I’m really enjoying the design and layout of your website. It’s a very easy on the eyes which makes it much more enjoyable for me to come here and visit more often. Did you hire out a developer to create your theme? Exceptional work!
I’ve been absent for a while, but now I remember why I used to love this blog. Thanks , I¦ll try and check back more frequently. How frequently you update your web site?
My coder is trying to convince me to move to .net from PHP. I have always disliked the idea because of the costs. But he’s tryiong none the less. I’ve been using Movable-type on a variety of websites for about a year and am worried about switching to another platform. I have heard excellent things about blogengine.net. Is there a way I can import all my wordpress content into it? Any kind of help would be greatly appreciated!
I’ll immediately seize your rss as I can’t find your email subscription link or newsletter service. Do you have any? Please let me understand in order that I may subscribe. Thanks.
Your house is valueble for me. Thanks!…
I’ll right away grab your rss feed as I can not to find your e-mail subscription hyperlink or e-newsletter service. Do you’ve any? Kindly let me understand so that I may subscribe. Thanks.
Wow, marvelous weblog structure! How long have you ever been blogging for? you make blogging glance easy. The overall glance of your site is magnificent, let alone the content material!
Wow! Thank you! I continuously wanted to write on my site something like that. Can I implement a part of your post to my site?
thx
You made some first rate points there. I appeared on the internet for the difficulty and located most people will associate with with your website.
I do agree with all the ideas you’ve presented in your post. They are very convincing and will certainly work. Still, the posts are too short for novices. Could you please extend them a little from next time? Thanks for the post.
Thanks for sharing superb informations. Your web site is very cool. I am impressed by the details that you have on this website. It reveals how nicely you understand this subject. Bookmarked this website page, will come back for more articles. You, my friend, ROCK! I found simply the info I already searched everywhere and simply could not come across. What a great web site.
F*ckin’ amazing things here. I’m very satisfied to peer your post. Thanks a lot and i am taking a look forward to touch you. Will you kindly drop me a mail?
I like your writing style really enjoying this website .
What i do not realize is in truth how you’re no longer actually a lot more smartly-appreciated than you may be now. You’re so intelligent. You realize thus considerably with regards to this subject, produced me in my view consider it from numerous various angles. Its like women and men aren’t interested until it’s one thing to do with Girl gaga! Your personal stuffs great. All the time take care of it up!
What i don’t understood is actually how you are not really much more well-liked than you may be now. You’re so intelligent. You realize therefore considerably relating to this subject, made me personally consider it from a lot of varied angles. Its like men and women aren’t fascinated unless it is one thing to do with Lady gaga! Your own stuffs nice. Always maintain it up!
Good write-up, I am regular visitor of one’s site, maintain up the nice operate, and It’s going to be a regular visitor for a lengthy time.
I’ve recently started a website, the information you offer on this website has helped me tremendously. Thank you for all of your time & work.
I couldn’t resist commenting
Hey very cool blog!! Guy .. Beautiful .. Superb .. I will bookmark your web site and take the feeds alsoKI am satisfied to find so many helpful info right here within the put up, we need develop extra techniques in this regard, thanks for sharing. . . . . .
Im now not positive where you’re getting your info, however great topic. I must spend a while learning more or working out more. Thanks for wonderful info I was in search of this information for my mission.
I love your blog.. very nice colors & theme. Did you create this website yourself? Plz reply back as I’m looking to create my own blog and would like to know wheere u got this from. thanks
I will immediately grab your rss as I can’t find your email subscription link or newsletter service. Do you have any? Kindly let me know in order that I could subscribe. Thanks.
When I initially commented I clicked the “Notify me when new comments are added” checkbox and now each time a comment is added I get four e-mails with the same comment. Is there any way you can remove people from that service? Thanks!
When I initially commented I clicked the -Notify me when new comments are added- checkbox and now each time a remark is added I get 4 emails with the same comment. Is there any approach you possibly can remove me from that service? Thanks!
thx
Someone essentially help to make seriously articles I would state. This is the first time I frequented your web page and thus far? I surprised with the research you made to create this particular publish amazing. Magnificent job!
I really like your writing style, excellent information, appreciate it for posting :D. “I hate mankind, for I think myself one of the best of them, and I know how bad I am.” by Joseph Baretti.
I have not checked in here for a while as I thought it was getting boring, but the last several posts are good quality so I guess I will add you back to my everyday bloglist. You deserve it my friend 🙂
I happen to be writing to make you be aware of what a great discovery my friend’s daughter went through studying your site. She discovered so many pieces, including how it is like to possess a great coaching mood to let folks quite simply know certain specialized issues. You truly did more than our expected results. Many thanks for supplying those powerful, trustworthy, edifying and in addition cool thoughts on your topic to Emily.
obviously like your web-site but you have to check the spelling on quite a few of your posts. Many of them are rife with spelling issues and I find it very troublesome to tell the truth nevertheless I will surely come back again.
An impressive share, I just given this onto a colleague who was doing a little analysis on this. And he in fact bought me breakfast because I found it for him.. smile. So let me reword that: Thnx for the treat! But yeah Thnkx for spending the time to discuss this, I feel strongly about it and love reading more on this topic. If possible, as you become expertise, would you mind updating your blog with more details? It is highly helpful for me. Big thumb up for this blog post!
Nice post. I study one thing tougher on completely different blogs everyday. It is going to always be stimulating to read content from other writers and practice slightly something from their store. I’d favor to use some with the content on my blog whether you don’t mind. Natually I’ll offer you a hyperlink on your web blog. Thanks for sharing.
Simply desire to say your article is as astounding. The clarity in your post is just spectacular and i can assume you are an expert on this subject. Well with your permission allow me to grab your RSS feed to keep updated with forthcoming post. Thanks a million and please carry on the enjoyable work.
Great post, I conceive website owners should larn a lot from this blog its real user pleasant.
You really make it appear so easy along with your presentation however I in finding this matter to be really something that I think I’d by no means understand. It sort of feels too complex and extremely extensive for me. I am looking forward on your next post, I’ll attempt to get the hold of it!
Good blog! I truly love how it is easy on my eyes and the data are well written. I’m wondering how I could be notified when a new post has been made. I’ve subscribed to your feed which must do the trick! Have a nice day!
I reckon something genuinely special in this web site.
Nice read, I just passed this onto a colleague who was doing a little research on that. And he just bought me lunch because I found it for him smile Therefore let me rephrase that: Thanks for lunch!
You made some nice points there. I did a search on the subject matter and found most individuals will agree with your blog.
I wanted to thank you for this great read!! I definitely enjoying every little bit of it I have you bookmarked to check out new stuff you post…
I have been absent for some time, but now I remember why I used to love this site. Thanks , I’ll try and check back more often. How frequently you update your web site?
Its superb as your other posts : D, regards for putting up. “Music is the soul of language.” by Max Heindel.
I truly enjoy studying on this web site, it has wonderful blog posts. “A short saying oft contains much wisdom.” by Sophocles.
This really answered my problem, thank you!
You have brought up a very wonderful points, regards for the post.
I¦ve learn some just right stuff here. Definitely value bookmarking for revisiting. I wonder how much attempt you put to make the sort of great informative web site.
What i do not realize is actually how you are not actually much more well-liked than you may be right now. You are very intelligent. You realize thus significantly relating to this matter, made me for my part believe it from numerous various angles. Its like women and men don’t seem to be interested unless it’s one thing to do with Woman gaga! Your individual stuffs nice. All the time take care of it up!
Terrific work! This is the type of information that should be shared around the web. Shame on Google for not positioning this post higher! Come on over and visit my web site . Thanks =)
What’s Happening i’m new to this, I stumbled upon this I’ve found It absolutely useful and it has helped me out loads. I hope to contribute & help other users like its aided me. Great job.
An impressive share, I just given this onto a colleague who was doing a little analysis on this. And he in fact bought me breakfast because I found it for him.. smile. So let me reword that: Thnx for the treat! But yeah Thnkx for spending the time to discuss this, I feel strongly about it and love reading more on this topic. If possible, as you become expertise, would you mind updating your blog with more details? It is highly helpful for me. Big thumb up for this blog post!
I believe this website contains some very good info for everyone. “The penalty of success is to be bored by the attentions of people who formerly snubbed you.” by Mary Wilson Little.
I couldn’t resist commenting
You made some good points there. I looked on the internet for the subject matter and found most persons will go along with with your website.
It’s truly a great and useful piece of info. I’m happy that you shared this useful information with us. Please keep us informed like this. Thanks for sharing.
It’s really a nice and useful piece of information. I am satisfied that you simply shared this helpful information with us. Please stay us up to date like this. Thank you for sharing.
Wow, superb blog layout! How long have you been blogging for? you make blogging look easy. The overall look of your website is great, let alone the content!
Loving the info on this website , you have done great job on the blog posts.
very nice put up, i actually love this web site, keep on it
Hiya very cool blog!! Man .. Beautiful .. Amazing .. I will bookmark your web site and take the feeds additionallyKI’m satisfied to search out a lot of useful info here within the submit, we’d like develop extra techniques in this regard, thanks for sharing. . . . . .
Its like you learn my mind! You seem to understand a lot about this, like you wrote the guide in it or something. I believe that you simply can do with some to force the message home a little bit, but other than that, this is wonderful blog. A fantastic read. I will certainly be back.
Good day! I know this is somewhat off topic but I was wondering if you knew where I could locate a captcha plugin for my comment form? I’m using the same blog platform as yours and I’m having trouble finding one? Thanks a lot!
It¦s actually a great and useful piece of information. I am glad that you shared this helpful info with us. Please stay us informed like this. Thanks for sharing.
The next time I read a blog, I hope that it doesnt disappoint me as a lot as this one. I mean, I know it was my choice to learn, but I really thought youd have one thing interesting to say. All I hear is a bunch of whining about something that you possibly can fix if you werent too busy in search of attention.
Great website. A lot of useful information here. I am sending it to several friends ans also sharing in delicious. And certainly, thanks for your sweat!
Amazing! This blog looks exactly like my old one! It’s on a totally different topic but it has pretty much the same layout and design. Excellent choice of colors!
Thanks for any other informative website. Where else may I get that type of info written in such an ideal way? I have a undertaking that I’m just now running on, and I’ve been at the look out for such information.
Thanks for sharing excellent informations. Your website is very cool. I am impressed by the details that you¦ve on this site. It reveals how nicely you understand this subject. Bookmarked this web page, will come back for more articles. You, my friend, ROCK! I found simply the info I already searched all over the place and just could not come across. What a great site.
An fascinating dialogue is worth comment. I think that it’s best to write extra on this matter, it may not be a taboo subject however usually people are not enough to speak on such topics. To the next. Cheers
I haven¦t checked in here for a while since I thought it was getting boring, but the last several posts are great quality so I guess I¦ll add you back to my daily bloglist. You deserve it my friend 🙂
I’ve been exploring for a bit for any high quality articles or blog posts on this kind of area . Exploring in Yahoo I at last stumbled upon this web site. Reading this info So i’m happy to convey that I have a very good uncanny feeling I discovered exactly what I needed. I most certainly will make sure to do not forget this site and give it a look regularly.
I just couldn’t depart your web site before suggesting that I actually enjoyed the standard information a person provide for your visitors? Is going to be back often to check up on new posts
hey there and thank you for your information – I have definitely picked up anything new from right here. I did however expertise a few technical points using this site, since I experienced to reload the website a lot of times previous to I could get it to load properly. I had been wondering if your web hosting is OK? Not that I am complaining, but sluggish loading instances times will sometimes affect your placement in google and can damage your quality score if advertising and marketing with Adwords. Anyway I’m adding this RSS to my e-mail and can look out for much more of your respective intriguing content. Make sure you update this again very soon..
hey there and thank you for your information – I have definitely picked up something new from right here. I did however expertise a few technical points using this web site, since I experienced to reload the website lots of times previous to I could get it to load correctly. I had been wondering if your web host is OK? Not that I am complaining, but sluggish loading instances times will sometimes affect your placement in google and can damage your high-quality score if ads and marketing with Adwords. Anyway I’m adding this RSS to my e-mail and could look out for a lot more of your respective exciting content. Ensure that you update this again very soon..
I wanted to write you the tiny remark to be able to give thanks yet again considering the pretty strategies you’ve provided above. It has been quite surprisingly open-handed of people like you to deliver freely just what a number of us could possibly have offered for sale for an electronic book in making some money on their own, chiefly now that you could possibly have tried it if you ever decided. These advice also acted as the good way to be certain that some people have similar dream like my personal own to understand a good deal more with respect to this issue. I am sure there are several more enjoyable opportunities ahead for those who read through your blog post.
Nice post. I was checking continuously this blog and I am impressed! Very useful information specifically the last part 🙂 I care for such information much. I was seeking this particular info for a very long time. Thank you and good luck.
Merely wanna comment on few general things, The website design is perfect, the subject matter is really wonderful : D.
I just like the valuable information you provide to your articles. I will bookmark your blog and check once more here regularly. I am fairly certain I’ll learn many new stuff proper here! Best of luck for the following!
Enjoyed reading this, very good stuff, thankyou.
It’s actually a cool and useful piece of info. I am happy that you shared this useful information with us. Please keep us up to date like this. Thanks for sharing.
My spouse and i have been quite peaceful John could complete his inquiry with the ideas he obtained out of your web pages. It’s not at all simplistic to just always be offering secrets and techniques which usually a number of people could have been trying to sell. We really keep in mind we need the blog owner to be grateful to for that. The most important explanations you have made, the straightforward website menu, the relationships your site make it easier to engender – it’s everything unbelievable, and it is facilitating our son and our family consider that this subject is entertaining, and that is quite pressing. Many thanks for all!
I got what you intend, appreciate it for posting.Woh I am glad to find this website through google. “Delay is preferable to error.” by Thomas Jefferson.
Good – I should definitely pronounce, impressed with your web site. I had no trouble navigating through all the tabs as well as related information ended up being truly simple to do to access. I recently found what I hoped for before you know it at all. Reasonably unusual. Is likely to appreciate it for those who add forums or anything, web site theme . a tones way for your client to communicate. Excellent task.
Lovely blog! I am loving it!! Will be back later to read some more. I am bookmarking your feeds also.
Nice read, I just passed this onto a colleague who was doing some research on that. And he actually bought me lunch since I found it for him smile Therefore let me rephrase that: Thanks for lunch! “Never let inexperience get in the way of ambition.” by Terry Josephson.
I just could not leave your site prior to suggesting that I extremely enjoyed the standard information an individual provide for your guests? Is gonna be again regularly to inspect new posts
Keep functioning ,terrific job!
Your place is valueble for me. Thanks!…
Admiring the time and effort you put into your blog and detailed information you provide. It’s great to come across a blog every once in a while that isn’t the same outdated rehashed information. Wonderful read! I’ve bookmarked your site and I’m adding your RSS feeds to my Google account.
very nice submit, i actually love this website, carry on it
This design is spectacular! You obviously know how to keep a reader amused. Between your wit and your videos, I was almost moved to start my own blog (well, almost…HaHa!) Wonderful job. I really loved what you had to say, and more than that, how you presented it. Too cool!
Hi, i feel that i saw you visited my weblog so i came to “return the want”.I’m trying to to find things to enhance my website!I assume its adequate to use some of your ideas!!
Hi my loved one! I wish to say that this article is amazing, nice written and include approximately all important infos. I’d like to peer more posts like this .
Normally I don’t learn post on blogs, however I wish to say that this write-up very pressured me to try and do it! Your writing style has been amazed me. Thanks, quite nice post.
As I website owner I believe the written content here is very excellent, thanks for your efforts.
Hi there! Someone in my Myspace group shared this website with us so I came to take a look. I’m definitely loving the information. I’m bookmarking and will be tweeting this to my followers! Excellent blog and brilliant design and style.
I like what you guys are up also. Such intelligent work and reporting! Carry on the excellent works guys I¦ve incorporated you guys to my blogroll. I think it will improve the value of my website 🙂
Great write-up, I am regular visitor of one’s web site, maintain up the excellent operate, and It’s going to be a regular visitor for a lengthy time.
Incredible! This blog looks exactly like my old one! It’s on a totally different topic but it has pretty much the same layout and design. Wonderful choice of colors!
Hello my loved one! I want to say that this post is amazing, great written and come with almost all important infos. I would like to look more posts like this .
Greetings I am so excited I found your website, I really found you by accident, while I was browsing on Bing for something else, Anyways I am here now and would just like to say many thanks for a fantastic post and a all round interesting blog (I also love the theme/design), I don’t have time to look over it all at the minute but I have book-marked it and also added your RSS feeds, so when I have time I will be back to read much more, Please do keep up the fantastic job.
Hi, i think that i saw you visited my blog so i came to “go back the prefer”.I’m trying to to find issues to improve my web site!I guess its adequate to make use of some of your ideas!!
Thanks for some other excellent article. Where else may just anybody get that kind of information in such a perfect way of writing? I have a presentation next week, and I am at the look for such info.
Perfectly pent written content, thanks for information .
The following time I learn a weblog, I hope that it doesnt disappoint me as a lot as this one. I imply, I know it was my option to read, but I actually thought youd have something interesting to say. All I hear is a bunch of whining about something that you may fix if you happen to werent too busy on the lookout for attention.
I view something genuinely special in this site.
I really enjoy examining on this internet site, it has fantastic articles. “Beware lest in your anxiety to avoid war you obtain a master.” by Demosthenes.
I?¦m not sure the place you are getting your information, however good topic. I must spend some time learning much more or figuring out more. Thanks for wonderful information I used to be searching for this info for my mission.
Its good as your other content : D, appreciate it for posting. “You can’t have everything. Where would you put it” by Steven Wright.
Very nice layout and great content, nothing at all else we need : D.
İnternet üzerinden bahis yapmak isteyen bireyler, genel olarak yabancı bahis sitelerini tercih edebilmektedir. Bunun asıl nedeni ise yasal olarak hizmet sağlayan bahis platformlarının oldukça düşük oranlar vermesi olarak açıklayabiliriz.
Some genuinely wonderful content on this site, appreciate it for contribution. “For today and its blessings, I owe the world an attitude of gratitude.” by Clarence E. Hodges.
Very interesting details you have remarked, thanks for putting up. “You can tell the ideas of a nation by it’s advertisements.” by Douglas South Wind.
I couldn’t resist commenting
There are some interesting time limits on this article but I don’t know if I see all of them middle to heart. There may be some validity but I will take maintain opinion till I look into it further. Good article , thanks and we wish extra! Added to FeedBurner as properly
Appreciate it for helping out, good info. “Nobody can be exactly like me. Sometimes even I have trouble doing it.” by Tallulah Bankhead.
Your home is valueble for me. Thanks!…
Hi , I do believe this is an excellent blog. I stumbled upon it on Yahoo , i will come back once again. Money and freedom is the best way to change, may you be rich and help other people.
Hello, Neat post. There’s an issue along with your web site in internet explorer, would test thisK IE still is the market chief and a large component to other folks will leave out your wonderful writing due to this problem.
Very well written post. It will be valuable to anyone who usess it, including myself. Keep doing what you are doing – looking forward to more posts.
Yeah bookmaking this wasn’t a speculative conclusion outstanding post! .
Hello there, You’ve done a fantastic job. I will definitely digg it and in my view recommend to my friends. I am sure they will be benefited from this site.
Would love to always get updated great site! .
Great – I should certainly pronounce, impressed with your web site. I had no trouble navigating through all tabs as well as related information ended up being truly easy to do to access. I recently found what I hoped for before you know it in the least. Quite unusual. Is likely to appreciate it for those who add forums or anything, site theme . a tones way for your customer to communicate. Excellent task.
Hey very cool blog!! Man .. Excellent .. Amazing .. I will bookmark your web site and take the feeds also…I’m happy to find so many useful information here in the post, we need develop more techniques in this regard, thanks for sharing. . . . . .
I¦ll right away grasp your rss feed as I can’t to find your e-mail subscription hyperlink or e-newsletter service. Do you’ve any? Please let me understand so that I may just subscribe. Thanks.
As a Newbie, I am permanently exploring online for articles that can aid me. Thank you
Good day! This is kind of off topic but I need some guidance from an established blog. Is it very hard to set up your own blog? I’m not very techincal but I can figure things out pretty fast. I’m thinking about making my own but I’m not sure where to start. Do you have any points or suggestions? Many thanks
There may be noticeably a bundle to learn about this. I assume you made sure nice factors in features also.
I went over this internet site and I conceive you have a lot of wonderful information, saved to my bookmarks (:.
Howdy! I know this is kinda off topic nevertheless I’d figured I’d ask. Would you be interested in trading links or maybe guest writing a blog article or vice-versa? My website goes over a lot of the same subjects as yours and I believe we could greatly benefit from each other. If you are interested feel free to send me an e-mail. I look forward to hearing from you! Wonderful blog by the way!
I am glad that I noticed this web blog, precisely the right information that I was searching for! .
Today, I went to the beachfront with my kids. I found a sea shell and gave it to my 4 year old daughter and said “You can hear the ocean if you put this to your ear.” She put the shell to her ear and screamed. There was a hermit crab inside and it pinched her ear. She never wants to go back! LoL I know this is totally off topic but I had to tell someone!
Wonderful site. Lots of helpful info here. I am sending it to several friends ans also sharing in delicious. And certainly, thanks for your effort!
Rattling fantastic info can be found on web site.
Excellent goods from you, man. I’ve be mindful your stuff previous to and you are simply extremely wonderful. I really like what you have acquired right here, really like what you are saying and the best way in which you are saying it. You’re making it enjoyable and you continue to take care of to stay it wise. I can not wait to learn far more from you. That is actually a great website.
you are in reality a just right webmaster. The website loading velocity is incredible. It kind of feels that you are doing any distinctive trick. Furthermore, The contents are masterwork. you have performed a fantastic job on this matter!
you have a terrific weblog right here! would you like to make some invite posts on my blog?
Hi there, I found your website via Google while looking for a comparable subject, your website came up, it seems to be good. I’ve bookmarked it in my google bookmarks.
Usually I do not learn post on blogs, however I would like to say that this write-up very pressured me to check out and do it! Your writing taste has been amazed me. Thanks, quite nice article.
Absolutely composed written content, Really enjoyed looking at.
Thanks for sharing superb informations. Your site is very cool. I am impressed by the details that you have on this blog. It reveals how nicely you perceive this subject. Bookmarked this website page, will come back for extra articles. You, my pal, ROCK! I found simply the info I already searched everywhere and just couldn’t come across. What an ideal web site.
Betpublic spor bahisleri ve casino oyunlarının en kazançlı seviyede oynanabildiği, bonus fırsatlarıyla dolu olan kategorilerinde hizmet vermekte olan bir büro yapısına sahiptir. Online gambling kategorilerindeki hizmet değerlerini yaratmıştır.
Thank you for another informative website. Where else could I get that type of info written in such an ideal way? I’ve a project that I am just now working on, and I’ve been on the look out for such info.
You really make it seem so easy with your presentation but I find this matter to be actually something that I think I would never understand. It seems too complex and extremely broad for me. I am looking forward for your next post, I will try to get the hang of it!
Hi my loved one! I want to say that this post is awesome, nice written and come with almost all important infos. I would like to look extra posts like this .
Only a smiling visitant here to share the love (:, btw great design and style.
I do not even know how I ended up here, but I thought this post was good. I do not know who you are but definitely you’re going to a famous blogger if you aren’t already 😉 Cheers!
I got what you intend,saved to my bookmarks, very decent internet site.
It?¦s actually a great and helpful piece of info. I?¦m happy that you just shared this helpful info with us. Please stay us up to date like this. Thanks for sharing.
I am continuously looking online for articles that can aid me. Thank you!
What i do not realize is in reality how you are no longer actually a lot more well-appreciated than you may be now. You are so intelligent. You realize thus considerably in relation to this subject, produced me personally imagine it from a lot of various angles. Its like women and men are not interested unless it’s one thing to do with Woman gaga! Your personal stuffs excellent. All the time care for it up!
Normally I don’t learn article on blogs, however I wish to say that this write-up very pressured me to check out and do so! Your writing taste has been surprised me. Thanks, quite nice post.
I like what you guys are up also. Such smart work and reporting! Carry on the superb works guys I’ve incorporated you guys to my blogroll. I think it’ll improve the value of my web site 🙂
Very interesting topic, regards for putting up. “Genius is of no country.” by Charles Churchill.
Hiya! I know this is kinda off topic however , I’d figured I’d ask. Would you be interested in exchanging links or maybe guest writing a blog article or vice-versa? My site goes over a lot of the same subjects as yours and I feel we could greatly benefit from each other. If you are interested feel free to send me an email. I look forward to hearing from you! Terrific blog by the way!
WONDERFUL Post.thanks for share..extra wait .. …
Great post, I think website owners should learn a lot from this web blog its very user friendly.
Absolutely written subject material, Really enjoyed reading.
Hi there, I found your site via Google while searching for a related topic, your website came up, it looks good. I’ve bookmarked it in my google bookmarks.
It is really a nice and helpful piece of info. I?¦m glad that you shared this helpful info with us. Please keep us up to date like this. Thanks for sharing.
Nice Article
Hello.This post was really interesting, especially since I was looking for thoughts on this topic last Monday.
My brother recommended I might like this web site. He used to be entirely right. This post truly made my day. You cann’t consider just how much time I had spent for this info! Thanks!
Hi there, just became alert to your blog through Google, and found that it is really informative. I’m gonna watch out for brussels. I will be grateful if you continue this in future. Numerous people will be benefited from your writing. Cheers!
I am impressed with this internet site, real I am a big fan .
I’d have to examine with you here. Which is not one thing I usually do! I take pleasure in reading a post that may make folks think. Additionally, thanks for permitting me to comment!
great post, very informative. I wonder why the other experts of this sector do not notice this. You should continue your writing. I’m confident, you’ve a huge readers’ base already!
I carry on listening to the news bulletin talk about getting free online grant applications so I have been looking around for the most excellent site to get one. Could you advise me please, where could i acquire some?
Lisanslı casino siteleri, yasal düzenlemelere uygun olarak güvenli ve adil oyun deneyimi sunar. En güvenilir lisanslı casino sitelerini keşfetmek için sitemizi ziyaret edin!
En iyi casino siteleri, geniş oyun seçenekleri, yüksek ödeme oranları ve güvenli ödeme yöntemleriyle mükemmel bir oyun deneyimi sunar. En iyi casino sitelerini keşfetmek için sitemizi ziyaret edin!
I like this weblog very much, Its a rattling nice billet to read and find information.
I have been exploring for a little for any high-quality articles or blog posts on this kind of area . Exploring in Yahoo I at last stumbled upon this web site. Reading this info So i’m happy to convey that I’ve an incredibly good uncanny feeling I discovered just what I needed. I most certainly will make sure to do not forget this site and give it a glance regularly.
As soon as I observed this site I went on reddit to share some of the love with them.
Exactly what I was looking for, thanks for putting up.
There are some attention-grabbing closing dates on this article however I don’t know if I see all of them center to heart. There’s some validity however I will take hold opinion till I look into it further. Good article , thanks and we wish more! Added to FeedBurner as effectively
you could have an awesome weblog here! would you wish to make some invite posts on my blog?
you’re in reality a just right webmaster. The web site loading velocity is incredible. It seems that you’re doing any distinctive trick. Furthermore, The contents are masterwork. you have performed a excellent process on this subject!
Merely a smiling visitor here to share the love (:, btw outstanding pattern.
When I originally commented I clicked the -Notify me when new comments are added- checkbox and now each time a comment is added I get four emails with the same comment. Is there any way you can remove me from that service? Thanks!
excellent issues altogether, you just won a new reader. What would you suggest in regards to your publish that you just made some days ago? Any certain?
Some truly fantastic work on behalf of the owner of this web site, perfectly great subject matter.
I like this web site so much, saved to my bookmarks. “Nostalgia isn’t what it used to be.” by Peter De Vries.
Have you ever considered writing an ebook or guest authoring on other websites? I have a blog based on the same topics you discuss and would really like to have you share some stories/information. I know my visitors would enjoy your work. If you are even remotely interested, feel free to send me an email.
This is really interesting, You are a very skilled blogger. I’ve joined your rss feed and look forward to seeking more of your wonderful post. Also, I have shared your website in my social networks!
Great write-up, I?¦m regular visitor of one?¦s website, maintain up the excellent operate, and It is going to be a regular visitor for a lengthy time.
I know this if off topic but I’m looking into starting my own blog and was wondering what all is required to get setup? I’m assuming having a blog like yours would cost a pretty penny? I’m not very internet smart so I’m not 100 sure. Any tips or advice would be greatly appreciated. Many thanks
You are my aspiration, I own few web logs and sometimes run out from to post .
Loving the info on this website , you have done great job on the articles.
I wanted to thank you for this great read!! I definitely enjoying every little bit of it I have you bookmarked to check out new stuff you post…
Very interesting information!Perfect just what I was searching for!
There are definitely a whole lot of particulars like that to take into consideration. That could be a great level to convey up. I offer the ideas above as basic inspiration but clearly there are questions like the one you carry up the place the most important factor shall be working in honest good faith. I don?t know if best practices have emerged round issues like that, but I am certain that your job is clearly identified as a good game. Each boys and girls really feel the impression of just a moment’s pleasure, for the rest of their lives.
Today, I went to the beachfront with my children. I found a sea shell and gave it to my 4 year old daughter and said “You can hear the ocean if you put this to your ear.” She placed the shell to her ear and screamed. There was a hermit crab inside and it pinched her ear. She never wants to go back! LoL I know this is totally off topic but I had to tell someone!
I enjoy your piece of work, appreciate it for all the informative content.
Hello there, I found your blog by means of Google while looking for a comparable matter, your site came up, it appears good. I’ve bookmarked it in my google bookmarks.
Good info. Lucky me I reach on your website by accident, I bookmarked it.
Its like you read my mind! You appear to know so much about this, like you wrote the book in it or something. I think that you can do with a few pics to drive the message home a bit, but other than that, this is magnificent blog. A great read. I’ll certainly be back.
I’ve learn several good stuff here. Certainly price bookmarking for revisiting. I surprise how a lot effort you place to make any such excellent informative website.
obviously like your web-site but you need to check the spelling on quite a few of your posts. A number of them are rife with spelling problems and I in finding it very bothersome to tell the truth then again I will definitely come again again.
Howdy would you mind stating which blog platform you’re using? I’m going to start my own blog soon but I’m having a hard time deciding between BlogEngine/Wordpress/B2evolution and Drupal. The reason I ask is because your design seems different then most blogs and I’m looking for something unique. P.S Sorry for getting off-topic but I had to ask!
I really appreciate your piece of work, Great post.
I have not checked in here for some time because I thought it was getting boring, but the last several posts are great quality so I guess I will add you back to my everyday bloglist. You deserve it my friend 🙂
I haven¦t checked in here for some time since I thought it was getting boring, but the last several posts are great quality so I guess I will add you back to my everyday bloglist. You deserve it my friend 🙂
Hi my family member! I wish to say that this post is awesome, nice written and come with almost all important infos. I’d like to see extra posts like this.
I went over this website and I conceive you have a lot of good info , saved to fav (:.
Good day! Do you use Twitter? I’d like to follow you if that would be okay. I’m undoubtedly enjoying your blog and look forward to new posts.
What’s Going down i am new to this, I stumbled upon this I have discovered It positively helpful and it has aided me out loads. I’m hoping to give a contribution & aid other users like its aided me. Good job.
I got what you mean , regards for posting.Woh I am lucky to find this website through google.
I love your blog.. very nice colors & theme. Did you make this website yourself or did you hire someone to do it for you? Plz respond as I’m looking to create my own blog and would like to know where u got this from. many thanks
Hi my friend! I wish to say that this post is amazing, nice written and include approximately all important infos. I would like to see more posts like this.
Regards for this wonderful post, I am glad I detected this internet site on yahoo.
Thanks for another informative web site. The place else could I am getting that type of info written in such a perfect way? I have a venture that I’m simply now operating on, and I’ve been at the glance out for such info.
I have been absent for some time, but now I remember why I used to love this site. Thank you, I will try and check back more often. How frequently you update your website?
I was wondering if you ever thought of changing the structure of your site? Its very well written; I love what youve got to say. But maybe you could a little more in the way of content so people could connect with it better. Youve got an awful lot of text for only having one or 2 images. Maybe you could space it out better?
Terrific work! That is the type of information that should be shared across the web. Disgrace on Google for not positioning this submit upper! Come on over and seek advice from my web site . Thanks =)
After all, what a great site and informative posts, I will upload inbound link – bookmark this web site? Regards, Reader.
Hello there, simply become alert to your weblog thru Google, and located that it is really informative. I’m going to be careful for brussels. I’ll be grateful in the event you proceed this in future. Numerous other folks will probably be benefited from your writing. Cheers!
Having read this I thought it was very informative. I appreciate you taking the time and effort to put this article together. I once again find myself spending way to much time both reading and commenting. But so what, it was still worth it!
Saya yakin banyak orang akan memperoleh insight besar dari konten ini. Semoga Anda selalu menyajikan konten yang menarik seperti ini di kedepannya!
Artikel yang sangat bagus!
I discovered your blog site on google and check a few of your early posts. Continue to keep up the very good operate. I just additional up your RSS feed to my MSN News Reader. Seeking forward to reading more from you later on!…
I like this post, enjoyed this one thank you for putting up. “Pain is inevitable. Suffering is optional.” by M. Kathleen Casey.
slot gacor hari ini – Terima kasih sebesar-besarnya untuk penulis yang sudah berbagi konten berkualitas seperti ini. Terus berkarya dan semoga makin banyak pemain yang merasa terbantu. Artikel seperti ini sangat ditunggu-tunggu sama komunitas pecinta slot yang haus akan info terbaru dan strategi gacor!
Terima kasih telah berbagi informasi ini.
Thank you for sharing such insightful information on this topic. Your thorough analysis and clear presentation have greatly enhanced my understanding. I appreciate the effort you put into researching and presenting these details.
slot gacor – Saya pribadi sangat suka dengan gaya penyampaian artikel ini. Penjelasannya mudah dimengerti dan langsung menyasar ke inti pembahasan, bikin makin percaya buat daftar di situs direkomendasikan yang dibahas.
Yeni deneme bonusu veren siteler ile bedava f�rsatlarla tan��!
Thank you for sharing such insightful information on this topic. Your thorough analysis and clear presentation have greatly enhanced my understanding. I appreciate the effort you put into researching and presenting these details.
I am continuously invstigating online for ideas that can benefit me. Thanks!
I am always searching online for tips that can facilitate me. Thx!
Thank you for sharing such insightful information on this topic. Your thorough analysis and clear presentation have greatly enhanced my understanding. I appreciate the effort you put into researching and presenting these details.
Very interesting information!Perfect just what I was looking for!
Adorei este site. Pra saber mais detalhes acesse nosso site e descubra mais. Todas as informações contidas são informações relevantes e diferentes. Tudo que você precisa saber está ta lá.
Very interesting info !Perfect just what I was searching for!
Thank you for sharing such insightful information on this topic. Your thorough analysis and clear presentation have greatly enhanced my understanding. I appreciate the effort you put into researching and presenting these details.
My spouse and I stumbled over here from a different web page and thought I should check things out. I like what I see so now i’m following you. Look forward to exploring your web page again.
Thanks , I have just been searching for information about this topic for ages and yours is the greatest I’ve discovered till now. But, what about the bottom line? Are you sure about the source?
You should take part in a contest for one of the best blogs on the web. I will recommend this site!
Very interesting info!Perfect just what I was searching for!
Good write-up, I?¦m normal visitor of one?¦s web site, maintain up the nice operate, and It’s going to be a regular visitor for a lengthy time.
I enjoy the efforts you have put in this, thankyou for all the great blog posts.
Of course, what a fantastic blog and enlightening posts, I definitely will bookmark your site.Have an awsome day!
I’ve recently started a web site, the information you provide on this web site has helped me greatly. Thanks for all of your time & work.
Great – I should definitely pronounce, impressed with your web site. I had no trouble navigating through all the tabs as well as related info ended up being truly simple to do to access. I recently found what I hoped for before you know it at all. Quite unusual. Is likely to appreciate it for those who add forums or something, web site theme . a tones way for your client to communicate. Nice task.
Pretty nice post. I just stumbled upon your blog and wanted to say that I have really enjoyed browsing your blog posts. In any case I will be subscribing to your rss feed and I hope you write again soon!
Very efficiently written story. It will be valuable to everyone who utilizes it, including yours truly :). Keep up the good work – i will definitely read more posts.
It?¦s actually a great and helpful piece of info. I am glad that you simply shared this useful information with us. Please stay us informed like this. Thanks for sharing.
he blog was how do i say it… relevant, finally something that helped me. Thanks
I conceive this internet site contains some really good information for everyone :D. “Years wrinkle the skin, but to give up enthusiasm wrinkles the soul.” by Samuel Ullman.
I and also my buddies were actually digesting the best helpful hints found on your website and so unexpectedly got a horrible feeling I never thanked the website owner for those techniques. The young men came as a result joyful to read through them and have in effect definitely been taking pleasure in them. Appreciate your actually being very helpful and also for making a decision on some brilliant topics millions of individuals are really wanting to discover. My honest apologies for not expressing appreciation to you earlier.
Saya percaya banyak orang akan meraih keuntungan besar dari tulisan ini. Mudah-mudahan Anda terus membuat konten yang inspiratif seperti ini di waktu-waktu selanjutnya!
I simply needed to appreciate you all over again. I’m not certain the things that I might have created without the entire techniques documented by you about such topic. Completely was an absolute intimidating issue in my opinion, nevertheless finding out the very skilled way you resolved the issue took me to cry over gladness. I’m happy for this assistance as well as hope that you realize what an amazing job you’re providing educating the others through your webblog. I’m certain you’ve never got to know any of us.
I really appreciate this post. I?¦ve been looking everywhere for this! Thank goodness I found it on Bing. You’ve made my day! Thank you again
I have learn a few excellent stuff here. Certainly price bookmarking for revisiting. I wonder how much effort you place to create such a fantastic informative site.
I visited a lot of website but I believe this one has got something extra in it in it
Great write-up, I am normal visitor of one’s blog, maintain up the excellent operate, and It’s going to be a regular visitor for a lengthy time.
PrimeBiome is a premium probiotic formula that focuses on restoring the natural balance of good bacteria in the gut. By doing so, it helps reduce digestive discomfort, supports immune function, and boosts nutrient absorption.
I’m really impressed with your writing skills and also with the layout on your blog. Is this a paid theme or did you customize it yourself? Either way keep up the excellent quality writing, it’s rare to see a great blog like this one these days..
I’ve been browsing on-line greater than 3 hours nowadays, yet I never discovered any attention-grabbing article like yours. It is lovely worth enough for me. Personally, if all website owners and bloggers made excellent content material as you did, the web can be much more useful than ever before. “Revolution is not a onetime event.” by Audre Lorde.
Mitolyn is a premium dietary supplement that focuses on mitochondrial support, helping your cells produce energy more efficiently.
Thanks for sharing excellent informations. Your web-site is so cool. I am impressed by the details that you?¦ve on this site. It reveals how nicely you understand this subject. Bookmarked this web page, will come back for extra articles. You, my pal, ROCK! I found just the information I already searched all over the place and just couldn’t come across. What an ideal site.
You have brought up a very good details, regards for the post.
You got a very great website, Glad I observed it through yahoo.
Admiring the time and effort you put into your website and in depth information you offer. It’s awesome to come across a blog every once in a while that isn’t the same outdated rehashed material. Excellent read! I’ve bookmarked your site and I’m adding your RSS feeds to my Google account.
LottoChamp is a lottery prediction software that uses statistical analysis and mathematical algorithms to help users choose more strategic numbers when playing the lottery.
LottoChamp is a lottery prediction software that uses statistical analysis and mathematical algorithms to help users choose more strategic numbers when playing the lottery.
PrimeBiome is a premium probiotic formula that focuses on restoring the natural balance of good bacteria in the gut. By doing so, it helps reduce digestive discomfort, supports immune function, and boosts nutrient absorption.
I conceive this web site holds very superb composed subject material articles.
Somebody essentially help to make severely posts I might state. This is the first time I frequented your web page and thus far? I surprised with the analysis you made to create this particular post incredible. Fantastic job!
This web site is really a walk-through for all of the info you wanted about this and didn’t know who to ask. Glimpse here, and you’ll definitely discover it.
Excellent site you have here but I was wondering if you knew of any message boards that cover the same topics discussed here? I’d really love to be a part of online community where I can get advice from other experienced people that share the same interest. If you have any recommendations, please let me know. Thanks a lot!
SlimJaro is a natural dietary supplement that supports fat-burning and appetite control through a blend of carefully selected botanical ingredients. It’s typically sold in capsule form and aims to
Fantastic web site. A lot of useful info here. I’m sending it to a few friends ans also sharing in delicious. And naturally, thanks for your effort!
SlimJaro is a natural dietary supplement that supports fat-burning and appetite control through a blend of carefully selected botanical ingredients. It’s typically sold in capsule form and aims to
I’m not that much of a online reader to be honest but your sites really nice, keep it up! I’ll go ahead and bookmark your site to come back in the future. Many thanks
It’s really a great and helpful piece of information. I am happy that you shared this helpful info with us. Please keep us informed like this. Thanks for sharing.
I dugg some of you post as I cogitated they were very useful very useful
What i don’t realize is in reality how you’re not actually much more neatly-appreciated than you might be now. You are so intelligent. You realize therefore significantly on the subject of this subject, made me individually imagine it from so many varied angles. Its like men and women aren’t interested until it is something to accomplish with Lady gaga! Your own stuffs great. All the time deal with it up!
I know this if off topic but I’m looking into starting my own weblog and was curious what all is required to get set up? I’m assuming having a blog like yours would cost a pretty penny? I’m not very web smart so I’m not 100 certain. Any suggestions or advice would be greatly appreciated. Many thanks
Wow, fantastic weblog layout! How long have you been running a blog for? you make blogging glance easy. The entire glance of your web site is great, as neatly as the content!
Mitolyn is a cutting-edge dietary supplement designed to restore energy at the cellular level. Unlike typical energy boosters that rely on caffeine or sugar, Mitolyn supports your body’s natural ATP production, the real fuel your cells use for energy.
I have been surfing online greater than 3 hours as of late, but I by no means discovered any fascinating article like yours. It is lovely value sufficient for me. In my view, if all webmasters and bloggers made just right content material as you did, the net shall be much more helpful than ever before.
Mitolyn is a cutting-edge dietary supplement designed to restore energy at the cellular level. Unlike typical energy boosters that rely on caffeine or sugar, Mitolyn supports your body’s natural ATP production, the real fuel your cells use for energy.
I am not certain the place you’re getting your info, but good topic. I needs to spend a while finding out more or understanding more. Thanks for magnificent information I was in search of this information for my mission.
The Pink Salt Trick is a minimalist but effective morning routine: Just drink a glass of lukewarm water mixed with a pinch of Himalayan pink salt as soon as you wake up.
Excellent website. Lots of useful info here. I’m sending it to several friends ans also sharing in delicious. And certainly, thanks for your effort!
The Pink Salt Trick is a minimalist but effective morning routine: Just drink a glass of lukewarm water mixed with a pinch of Himalayan pink salt as soon as you wake up.
The Pink Salt Trick is a minimalist but effective morning routine: Just drink a glass of lukewarm water mixed with a pinch of Himalayan pink salt as soon as you wake up.
obviously like your website but you need to take a look at the spelling on several of your posts. A number of them are rife with spelling issues and I find it very troublesome to tell the reality on the other hand I?¦ll certainly come again again.
Wohh exactly what I was looking for, regards for putting up.
The Pink Salt Trick is a minimalist but effective morning routine: Just drink a glass of lukewarm water mixed with a pinch of Himalayan pink salt as soon as you wake up.
That is very attention-grabbing, You are an overly professional blogger. I have joined your rss feed and stay up for in the hunt for extra of your magnificent post. Also, I’ve shared your website in my social networks!
The Pink Salt Trick is a minimalist but effective morning routine: Just drink a glass of lukewarm water mixed with a pinch of Himalayan pink salt as soon as you wake up.
Yay google is my queen assisted me to find this great web site! .
I admire your piece of work, thanks for all the good content.
I like what you guys are up too. Such intelligent work and reporting! Keep up the excellent works guys I?¦ve incorporated you guys to my blogroll. I think it’ll improve the value of my web site 🙂
I’m really enjoying the design and layout of your site. It’s a very easy on the eyes which makes it much more enjoyable for me to come here and visit more often. Did you hire out a designer to create your theme? Outstanding work!
Hey There. I found your blog using msn. This is a very well written article. I will be sure to bookmark it and come back to read more of your useful info. Thanks for the post. I’ll certainly comeback.
I like what you guys are up too. Such smart work and reporting! Keep up the superb works guys I’ve incorporated you guys to my blogroll. I think it’ll improve the value of my site :).
I have to show my respect for your kindness for men and women who should have guidance on in this content. Your real commitment to passing the message all over had become particularly advantageous and has in most cases made somebody just like me to achieve their ambitions. The invaluable tutorial entails a great deal to me and even further to my colleagues. Many thanks; from everyone of us.
I have been absent for a while, but now I remember why I used to love this site. Thanks , I will try and check back more often. How frequently you update your site?
Hey, you used to write great, but the last few posts have been kinda boringK I miss your super writings. Past few posts are just a bit out of track! come on!
Woah! I’m really digging the template/theme of this website. It’s simple, yet effective. A lot of times it’s very difficult to get that “perfect balance” between user friendliness and visual appearance. I must say that you’ve done a awesome job with this. Additionally, the blog loads very quick for me on Opera. Excellent Blog!
You got a very fantastic website, Sword lily I discovered it through yahoo.
Hi there! Do you know if they make any plugins to protect against hackers? I’m kinda paranoid about losing everything I’ve worked hard on. Any recommendations?
I would like to thnkx for the efforts you have put in writing this blog. I am hoping the same high-grade blog post from you in the upcoming as well. In fact your creative writing abilities has inspired me to get my own blog now. Really the blogging is spreading its wings quickly. Your write up is a good example of it.
I just could not depart your website before suggesting that I really enjoyed the standard info a person provide for your visitors? Is going to be back often in order to check up on new posts
Excellent blog! Do you have any suggestions for aspiring writers? I’m hoping to start my own site soon but I’m a little lost on everything. Would you propose starting with a free platform like WordPress or go for a paid option? There are so many options out there that I’m completely confused .. Any suggestions? Bless you!
Everything is very open and very clear explanation of issues. was truly information. Your website is very useful. Thanks for sharing.
Great post and right to the point. I don’t know if this is really the best place to ask but do you folks have any thoughts on where to get some professional writers? Thanks 🙂
As a Newbie, I am continuously browsing online for articles that can help me. Thank you
whoah this blog is magnificent i love reading your posts. Keep up the great work! You know, many people are looking around for this information, you could aid them greatly.
After all, what a great site and informative posts, I will upload inbound link – bookmark this web site? Regards, Reader.
Write more, thats all I have to say. Literally, it seems as though you relied on the video to make your point. You obviously know what youre talking about, why throw away your intelligence on just posting videos to your blog when you could be giving us something enlightening to read?
hi!,I love your writing very much! percentage we keep up a correspondence extra approximately your post on AOL? I require an expert in this house to solve my problem. Maybe that is you! Having a look forward to look you.
Thank you for every other informative site. The place else may just I get that type of information written in such an ideal way? I’ve a challenge that I’m simply now running on, and I’ve been at the look out for such info.
I haven¦t checked in here for some time because I thought it was getting boring, but the last few posts are good quality so I guess I will add you back to my daily bloglist. You deserve it my friend 🙂
Greetings! I know this is kinda off topic but I was wondering if you knew where I could get a captcha plugin for my comment form? I’m using the same blog platform as yours and I’m having trouble finding one? Thanks a lot!
I am not sure where you are getting your information, but good topic. I needs to spend some time learning much more or understanding more. Thanks for magnificent info I was looking for this information for my mission.
I am often to blogging and i really appreciate your content. The article has really peaks my interest. I am going to bookmark your site and keep checking for new information.
I was very happy to seek out this internet-site.I wanted to thanks on your time for this glorious learn!! I undoubtedly enjoying each little little bit of it and I’ve you bookmarked to take a look at new stuff you blog post.
Today, while I was at work, my sister stole my apple ipad and tested to see if it can survive a 25 foot drop, just so she can be a youtube sensation. My apple ipad is now broken and she has 83 views. I know this is totally off topic but I had to share it with someone!
Very interesting points you have remarked, thanks for putting up.
Hello.This post was really fascinating, particularly because I was investigating for thoughts on this issue last Saturday.
Well I truly enjoyed reading it. This information procured by you is very practical for correct planning.
I’m not that much of a online reader to be honest but your sites really nice, keep it up! I’ll go ahead and bookmark your site to come back down the road. Many thanks
fantastic post, very informative. I wonder why the other experts of this sector don’t notice this. You must continue your writing. I am confident, you have a great readers’ base already!
There are some attention-grabbing cut-off dates in this article however I don’t know if I see all of them middle to heart. There is some validity however I will take maintain opinion till I look into it further. Good article , thanks and we would like extra! Added to FeedBurner as effectively
Great V I should certainly pronounce, impressed with your site. I had no trouble navigating through all the tabs and related information ended up being truly simple to do to access. I recently found what I hoped for before you know it in the least. Reasonably unusual. Is likely to appreciate it for those who add forums or something, site theme . a tones way for your client to communicate. Excellent task..
It’s really a nice and useful piece of info. I’m glad that you shared this useful information with us. Please keep us informed like this. Thanks for sharing.
Woh I like your posts, bookmarked! .
I got what you mean ,saved to favorites, very decent site.
I couldn’t resist commenting
Good post. I learn one thing tougher on different blogs everyday. It is going to always be stimulating to read content material from different writers and apply slightly something from their store. I’d prefer to make use of some with the content material on my blog whether or not you don’t mind. Natually I’ll offer you a hyperlink in your web blog. Thanks for sharing.
Very interesting points you have mentioned, thanks for putting up.
Hello there! Do you know if they make any plugins to protect against hackers? I’m kinda paranoid about losing everything I’ve worked hard on. Any recommendations?
Very efficiently written article. It will be valuable to everyone who employess it, including yours truly :). Keep up the good work – looking forward to more posts.
I was recommended this website by my cousin. I am not sure whether this post is written by him as nobody else know such detailed about my problem. You’re amazing! Thanks!
I besides conceive thence, perfectly composed post! .
Good write-up, I’m regular visitor of one’s web site, maintain up the excellent operate, and It’s going to be a regular visitor for a long time.
I really like your writing style, excellent information, thanks for posting :D. “All words are pegs to hang ideas on.” by Henry Ward Beecher.
I wanted to thank you for this great read!! I definitely enjoying every little bit of it I have you bookmarked to check out new stuff you post…
What i do not realize is actually how you’re not really much more well-liked than you may be now. You’re so intelligent. You realize thus significantly relating to this subject, produced me personally consider it from so many varied angles. Its like men and women aren’t fascinated unless it is one thing to accomplish with Lady gaga! Your own stuffs excellent. Always maintain it up!
I’d have to examine with you here. Which is not one thing I usually do! I take pleasure in reading a post that may make folks think. Additionally, thanks for permitting me to comment!
It is the best time to make some plans for the future and it’s time to be happy. I have read this post and if I could I want to suggest you few interesting things or advice. Perhaps you can write next articles referring to this article. I desire to read more things about it!
I’ve been absent for a while, but now I remember why I used to love this web site. Thanks , I¦ll try and check back more frequently. How frequently you update your web site?
After examine just a few of the weblog posts in your website now, and I truly like your approach of blogging. I bookmarked it to my bookmark website listing and will be checking back soon. Pls try my website online as properly and let me know what you think.
Merely a smiling visitant here to share the love (:, btw great design and style. “Make the most of your regrets… . To regret deeply is to live afresh.” by Henry David Thoreau.
I see something genuinely special in this web site.
I regard something truly special in this web site.
Good info. Lucky me I reach on your website by accident, I bookmarked it.
I don’t usually comment but I gotta admit thankyou for the post on this great one : D.
A lot of thanks for all of the efforts on this website. My niece really likes participating in internet research and it is simple to grasp why. My partner and i learn all regarding the lively form you offer very helpful secrets through your web site and strongly encourage response from other people on that content and our favorite daughter is understanding a whole lot. Have fun with the remaining portion of the new year. You are doing a splendid job.
I really appreciate this post. I’ve been looking everywhere for this! Thank goodness I found it on Bing. You’ve made my day! Thank you again!
This blog is definitely rather handy since I’m at the moment creating an internet floral website – although I am only starting out therefore it’s really fairly small, nothing like this site. Can link to a few of the posts here as they are quite. Thanks much. Zoey Olsen
I wish to voice my love for your kind-heartedness giving support to individuals that absolutely need help with the theme. Your very own commitment to passing the message around had been surprisingly informative and has continuously encouraged guys just like me to attain their goals. This invaluable useful information means so much a person like me and additionally to my mates. Best wishes; from everyone of us.
Whats up very cool blog!! Guy .. Excellent .. Wonderful .. I’ll bookmark your blog and take the feeds also…I’m satisfied to seek out numerous helpful info right here within the submit, we need work out extra strategies in this regard, thank you for sharing.
I enjoy the efforts you have put in this, thankyou for all the great posts.
I am glad to be one of many visitors on this outstanding site (:, thankyou for posting.
Admiring the time and energy you put into your site and in depth information you offer. It’s nice to come across a blog every once in a while that isn’t the same out of date rehashed information. Great read! I’ve bookmarked your site and I’m adding your RSS feeds to my Google account.
I appreciate, cause I found exactly what I was looking for. You’ve ended my 4 day long hunt! God Bless you man. Have a great day. Bye
Can I just say what a aid to find someone who really knows what theyre talking about on the internet. You undoubtedly know easy methods to carry a difficulty to gentle and make it important. More folks must learn this and understand this side of the story. I cant believe youre not more fashionable because you undoubtedly have the gift.
My developer is trying to persuade me to move to .net from PHP. I have always disliked the idea because of the costs. But he’s tryiong none the less. I’ve been using WordPress on various websites for about a year and am concerned about switching to another platform. I have heard great things about blogengine.net. Is there a way I can transfer all my wordpress content into it? Any kind of help would be greatly appreciated!
Regards for all your efforts that you have put in this. very interesting information.
I am glad to be one of the visitors on this great website (:, appreciate it for putting up.
I think other web-site proprietors should take this website as an model, very clean and magnificent user friendly style and design, let alone the content. You’re an expert in this topic!
Admiring the time and effort you put into your site and in depth information you provide. It’s awesome to come across a blog every once in a while that isn’t the same old rehashed information. Excellent read! I’ve bookmarked your site and I’m adding your RSS feeds to my Google account.
Just what I was searching for, regards for putting up.
Thank you, I have recently been searching for information about this topic for ages and yours is the best I have discovered so far. But, what about the conclusion? Are you sure about the source?
Excellent website you have here but I was curious if you knew of any discussion boards that cover the same topics talked about in this article? I’d really love to be a part of group where I can get feed-back from other knowledgeable individuals that share the same interest. If you have any recommendations, please let me know. Cheers!
This design is spectacular! You certainly know how to keep a reader entertained. Between your wit and your videos, I was almost moved to start my own blog (well, almost…HaHa!) Fantastic job. I really enjoyed what you had to say, and more than that, how you presented it. Too cool!
Attractive component of content. I simply stumbled upon your web site and in accession capital to claim that I acquire actually loved account your weblog posts. Anyway I will be subscribing on your feeds or even I fulfillment you get admission to persistently fast.
I don’t unremarkably comment but I gotta admit thanks for the post on this special one : D.
Hey, I think your blog might be having browser compatibility issues. When I look at your blog site in Chrome, it looks fine but when opening in Internet Explorer, it has some overlapping. I just wanted to give you a quick heads up! Other then that, awesome blog!
It is truly a nice and helpful piece of info. I’m glad that you just shared this helpful information with us. Please stay us informed like this. Thanks for sharing.
Great post, I think blog owners should larn a lot from this weblog its real user pleasant.
whoah this blog is excellent i love reading your articles. Keep up the good work! You know, many people are searching around for this info, you could help them greatly.
Very interesting info!Perfect just what I was searching for!
I loved as much as you’ll receive carried out right here. The sketch is attractive, your authored material stylish. nonetheless, you command get bought an shakiness over that you wish be delivering the following. unwell unquestionably come more formerly again as exactly the same nearly very often inside case you shield this increase.
Simply wanna input on few general things, The website layout is perfect, the written content is rattling wonderful : D.
Good – I should certainly pronounce, impressed with your web site. I had no trouble navigating through all the tabs as well as related information ended up being truly simple to do to access. I recently found what I hoped for before you know it in the least. Reasonably unusual. Is likely to appreciate it for those who add forums or anything, website theme . a tones way for your client to communicate. Excellent task.
naturally like your website but you have to check the spelling on several of your posts. Many of them are rife with spelling issues and I find it very bothersome to tell the truth nevertheless I will surely come back again.
Regards for this post, I am a big fan of this site would like to keep updated.
Great post. I am facing a couple of these problems.
After research a couple of of the blog posts in your website now, and I truly like your way of blogging. I bookmarked it to my bookmark website list and shall be checking back soon. Pls take a look at my web page as properly and let me know what you think.
Thanks for helping out, excellent info. “The four stages of man are infancy, childhood, adolescence, and obsolescence.” by Bruce Barton.
excellent post, very informative. I wonder why the other experts of this sector don’t notice this. You must continue your writing. I’m confident, you’ve a great readers’ base already!
Along with every thing which seems to be building throughout this particular area, a significant percentage of points of view are generally fairly stimulating. However, I am sorry, because I can not give credence to your entire suggestion, all be it radical none the less. It appears to us that your commentary are actually not completely validated and in simple fact you are generally yourself not really fully convinced of the point. In any event I did appreciate reading it.
Its like you read my thoughts! You seem to grasp a lot approximately this, like you wrote the book in it or something. I believe that you can do with some p.c. to pressure the message house a little bit, however other than that, this is wonderful blog. An excellent read. I will definitely be back.
I dugg some of you post as I cogitated they were very useful handy
I’m often to blogging and i really admire your content. The article has actually peaks my interest. I’m going to bookmark your site and preserve checking for brand new information.
I have recently started a website, the information you provide on this site has helped me greatly. Thank you for all of your time & work.
I feel this is one of the so much vital information for me. And i’m glad reading your article. However want to commentary on few normal issues, The web site taste is ideal, the articles is in point of fact nice : D. Excellent activity, cheers
Great ?V I should certainly pronounce, impressed with your web site. I had no trouble navigating through all the tabs as well as related info ended up being truly easy to do to access. I recently found what I hoped for before you know it at all. Quite unusual. Is likely to appreciate it for those who add forums or anything, web site theme . a tones way for your customer to communicate. Excellent task..
Greetings! Very helpful advice on this article! It is the little changes that make the biggest changes. Thanks a lot for sharing!
Loving the information on this site, you have done great job on the blog posts.
I¦ve been exploring for a little bit for any high quality articles or weblog posts on this kind of house . Exploring in Yahoo I ultimately stumbled upon this web site. Studying this information So i¦m happy to show that I have an incredibly good uncanny feeling I came upon just what I needed. I so much unquestionably will make sure to do not forget this web site and give it a glance on a relentless basis.
I like what you guys are up too. This sort of clever work and exposure! Keep up the superb works guys I’ve included you guys to blogroll.
I like this web site because so much useful stuff on here : D.
I have recently started a blog, the info you provide on this website has helped me greatly. Thanks for all of your time & work.
Wow, wonderful blog layout! How long have you been blogging for? you make blogging look easy. The overall look of your website is excellent, let alone the content!
Greetings! Quick question that’s entirely off topic. Do you know how to make your site mobile friendly? My site looks weird when browsing from my iphone4. I’m trying to find a template or plugin that might be able to resolve this problem. If you have any suggestions, please share. Thank you!
Those are yours alright! . We at least need to get these people stealing images to start blogging! They probably just did a image search and grabbed them. They look good though!
I like what you guys are up also. Such intelligent work and reporting! Carry on the excellent works guys I’ve incorporated you guys to my blogroll. I think it will improve the value of my site 🙂
Saved as a favorite, I really like your blog!
I conceive other website proprietors should take this internet site as an example , very clean and great user pleasant style and design.
Its excellent as your other articles : D, thankyou for putting up. “It takes less time to do things right than to explain why you did it wrong.” by Henry Wadsworth Longfellow.
Good day very nice site!! Guy .. Excellent .. Wonderful .. I will bookmark your site and take the feeds additionally…I am satisfied to find so many helpful information right here within the submit, we’d like work out extra strategies on this regard, thank you for sharing. . . . . .
I have been exploring for a bit for any high-quality articles or blog posts on this kind of area . Exploring in Yahoo I at last stumbled upon this site. Reading this information So i’m happy to convey that I’ve a very good uncanny feeling I discovered just what I needed. I most certainly will make certain to don’t forget this site and give it a glance regularly.
Hi would you mind sharing which blog platform you’re working with? I’m planning to start my own blog in the near future but I’m having a tough time deciding between BlogEngine/Wordpress/B2evolution and Drupal. The reason I ask is because your design and style seems different then most blogs and I’m looking for something completely unique. P.S Sorry for getting off-topic but I had to ask!
I like this website so much, saved to fav. “Nostalgia isn’t what it used to be.” by Peter De Vries.
Hello there! I know this is kinda off topic but I was wondering which blog platform are you using for this site? I’m getting tired of WordPress because I’ve had problems with hackers and I’m looking at alternatives for another platform. I would be fantastic if you could point me in the direction of a good platform.
Keep functioning ,remarkable job!
I’ve read several excellent stuff here. Certainly value bookmarking for revisiting. I wonder how much attempt you set to create such a magnificent informative web site.
I am not rattling fantastic with English but I come up this very leisurely to interpret.
Hello there, just became alert to your blog through Google, and found that it’s truly informative. I’m gonna watch out for brussels. I will appreciate if you continue this in future. Many people will be benefited from your writing. Cheers!
My partner and I absolutely love your blog and find most of your post’s to be exactly what I’m looking for. Would you offer guest writers to write content for yourself? I wouldn’t mind publishing a post or elaborating on a number of the subjects you write about here. Again, awesome web log!
I think other website proprietors should take this internet site as an model, very clean and wonderful user genial pattern.
You made certain fine points there. I did a search on the topic and found mainly folks will have the same opinion with your blog.
I believe this is one of the such a lot vital information for me. And i’m glad reading your article. But want to observation on few basic things, The site taste is great, the articles is truly nice : D. Good activity, cheers
I¦ll immediately grasp your rss feed as I can not find your email subscription link or newsletter service. Do you’ve any? Please allow me realize in order that I could subscribe. Thanks.
Great write-up, I?¦m regular visitor of one?¦s blog, maintain up the excellent operate, and It’s going to be a regular visitor for a lengthy time.
Hello! I could have sworn I’ve been to this blog before but after browsing through some of the post I realized it’s new to me. Anyways, I’m definitely happy I found it and I’ll be book-marking and checking back frequently!
Hello.This article was really motivating, especially because I was investigating for thoughts on this topic last Saturday.
Hi there, You have done an excellent job. I’ll definitely digg it and in my opinion recommend to my friends. I am sure they will be benefited from this website.
I really treasure your work, Great post.
The next time I read a blog, I hope that it doesnt disappoint me as much as this one. I mean, I know it was my choice to read, but I actually thought youd have something interesting to say. All I hear is a bunch of whining about something that you could fix if you werent too busy looking for attention.
Great remarkable issues here. I?¦m very satisfied to look your article. Thanks a lot and i am taking a look forward to contact you. Will you kindly drop me a e-mail?
I¦ve been exploring for a bit for any high quality articles or weblog posts on this kind of house . Exploring in Yahoo I eventually stumbled upon this website. Reading this information So i¦m happy to express that I have an incredibly excellent uncanny feeling I found out exactly what I needed. I such a lot unquestionably will make certain to do not forget this website and provides it a glance on a constant basis.
Magnificent web site. A lot of helpful information here. I’m sending it to a few buddies ans also sharing in delicious. And naturally, thanks to your sweat!
Simply wanna input that you have a very nice web site, I like the pattern it actually stands out.
A large percentage of of the things you claim is supprisingly legitimate and it makes me ponder why I hadn’t looked at this with this light before. This particular article really did switch the light on for me personally as far as this specific subject goes. However at this time there is actually one particular factor I am not too comfy with and while I try to reconcile that with the central theme of the point, let me see exactly what all the rest of your subscribers have to point out.Well done.
I’m extremely impressed with your writing skills as well as with the layout on your weblog. Is this a paid theme or did you customize it yourself? Anyway keep up the excellent quality writing, it’s rare to see a great blog like this one today..
Wow! This could be one particular of the most beneficial blogs We have ever arrive across on this subject. Actually Great. I’m also a specialist in this topic therefore I can understand your effort.
Enjoyed studying this, very good stuff, regards.
ňŕęúâ cialis daily tadalafil (generic) reduces cialis effect on blood pressure https://buyciaonl.net/ – cialis dosage reddit [url=https://buyciaonl.net]tadalafil prescription[/url] lanzado tadalafil troche reviews
I have been browsing on-line greater than three hours as of late, but I never discovered any interesting article like yours. It is pretty value enough for me. In my view, if all webmasters and bloggers made excellent content material as you probably did, the web will likely be a lot more useful than ever before.
Hello.This article was extremely interesting, especially since I was investigating for thoughts on this matter last Friday.
You are a very smart person!
Excellent site. Lots of useful information here. I?¦m sending it to several pals ans also sharing in delicious. And of course, thanks to your sweat!
I was very pleased to search out this web-site.I needed to thanks to your time for this glorious learn!! I positively having fun with every little bit of it and I’ve you bookmarked to check out new stuff you blog post.
wonderful post, very informative. I’m wondering why the opposite specialists of this sector do not understand this. You must continue your writing. I am sure, you have a great readers’ base already!
Howdy very cool site!! Man .. Excellent .. Amazing .. I will bookmark your web site and take the feeds additionally…I am glad to search out a lot of useful info here in the post, we want develop extra techniques in this regard, thanks for sharing.
With havin so much written content do you ever run into any issues of plagorism or copyright violation? My blog has a lot of unique content I’ve either authored myself or outsourced but it looks like a lot of it is popping it up all over the web without my agreement. Do you know any ways to help prevent content from being stolen? I’d certainly appreciate it.
Hello there, I discovered your site via Google whilst looking for a comparable matter, your website got here up, it seems to be good. I have bookmarked it in my google bookmarks.
Heya i am for the first time here. I found this board and I to find It really helpful & it helped me out a lot. I am hoping to give one thing again and help others such as you aided me.
Great wordpress blog here.. It’s hard to find quality writing like yours these days. I really appreciate people like you! take care
You should take part in a contest for one of the best blogs on the web. I will recommend this site!
I went over this site and I conceive you have a lot of excellent information, bookmarked (:.
I have recently started a blog, the information you provide on this website has helped me tremendously. Thanks for all of your time & work. “My dear and old country, here we are once again together faced with a heavy trial.” by Charles De Gaulle.
Someone essentially help to make seriously posts I’d state. This is the first time I frequented your website page and so far? I amazed with the research you made to make this particular publish incredible. Magnificent task!
Hi! This is my first visit to your blog! We are a group of volunteers and starting a new initiative in a community in the same niche. Your blog provided us beneficial information to work on. You have done a marvellous job!
Hey just wanted to give you a quick heads up and let you know a few of the pictures aren’t loading correctly. I’m not sure why but I think its a linking issue. I’ve tried it in two different web browsers and both show the same results.
Hello. magnificent job. I did not expect this. This is a fantastic story. Thanks!
you are in reality a good webmaster. The site loading pace is incredible. It sort of feels that you’re doing any unique trick. Also, The contents are masterwork. you’ve done a wonderful process in this matter!
Today, I went to the beach front with my children. I found a sea shell and gave it to my 4 year old daughter and said “You can hear the ocean if you put this to your ear.” She put the shell to her ear and screamed. There was a hermit crab inside and it pinched her ear. She never wants to go back! LoL I know this is totally off topic but I had to tell someone!
I genuinely enjoy examining on this site, it has excellent posts. “Wealth and children are the adornment of life.” by Koran.
Write more, thats all I have to say. Literally, it seems as though you relied on the video to make your point. You definitely know what youre talking about, why throw away your intelligence on just posting videos to your site when you could be giving us something enlightening to read?
Very efficiently written information. It will be supportive to everyone who utilizes it, including yours truly :). Keep doing what you are doing – can’r wait to read more posts.
Well I truly enjoyed studying it. This information provided by you is very effective for correct planning.
What i don’t realize is actually how you are now not actually much more smartly-liked than you might be right now. You are so intelligent. You realize therefore considerably when it comes to this subject, produced me in my view imagine it from so many varied angles. Its like women and men aren’t involved until it?¦s something to do with Woman gaga! Your own stuffs excellent. At all times handle it up!
I do like the way you have presented this specific problem and it does indeed present me personally some fodder for thought. Nevertheless, through everything that I have observed, I only wish when the feedback pile on that people stay on point and don’t embark upon a soap box involving some other news of the day. All the same, thank you for this exceptional point and though I do not really concur with this in totality, I regard the perspective.
I went over this internet site and I believe you have a lot of superb information, saved to fav (:.
I real lucky to find this site on bing, just what I was searching for : D as well saved to fav.
Some genuinely interesting details you have written.Aided me a lot, just what I was searching for : D.
I am glad to be one of the visitants on this outstanding internet site (:, thankyou for putting up.
F*ckin’ remarkable issues here. I am very happy to look your post. Thanks so much and i’m looking forward to contact you. Will you kindly drop me a mail?
With havin so much content do you ever run into any issues of plagorism or copyright violation? My blog has a lot of completely unique content I’ve either authored myself or outsourced but it seems a lot of it is popping it up all over the internet without my agreement. Do you know any ways to help stop content from being stolen? I’d genuinely appreciate it.
Very nice post. I just stumbled upon your blog and wanted to say that I have really enjoyed browsing your blog posts. After all I will be subscribing to your feed and I hope you write again very soon!
My spouse and I absolutely love your blog and find most of your post’s to be what precisely I’m looking for. Does one offer guest writers to write content available for you? I wouldn’t mind writing a post or elaborating on most of the subjects you write in relation to here. Again, awesome site!
I have learn some good stuff here. Certainly price bookmarking for revisiting. I surprise how much effort you place to create such a excellent informative site.
I like what you guys are up too. Such intelligent work and reporting! Carry on the excellent works guys I have incorporated you guys to my blogroll. I think it will improve the value of my site 🙂
Wow, superb blog layout! How long have you been running a blog for? you make running a blog glance easy. The whole look of your site is fantastic, as neatly as the content material!
Some really terrific work on behalf of the owner of this internet site, utterly outstanding content.
obviously like your web-site but you need to take a look at the spelling on quite a few of your posts. Many of them are rife with spelling issues and I find it very bothersome to tell the truth then again I?¦ll certainly come back again.
Thanks so much for giving everyone an extraordinarily special possiblity to check tips from this website. It is usually very great and packed with fun for me personally and my office co-workers to search your web site minimum 3 times a week to see the fresh stuff you have. And indeed, I’m so usually fulfilled for the awesome suggestions served by you. Some 3 points in this article are undeniably the best we have had.
Wonderful site. A lot of helpful information here. I am sending it to some friends ans additionally sharing in delicious. And certainly, thanks in your sweat!
Good day! This post couldn’t be written any better! Reading this post reminds me of my good old room mate! He always kept chatting about this. I will forward this page to him. Fairly certain he will have a good read. Many thanks for sharing!
Thank you for sharing superb informations. Your website is very cool. I am impressed by the details that you?¦ve on this website. It reveals how nicely you understand this subject. Bookmarked this website page, will come back for extra articles. You, my pal, ROCK! I found simply the information I already searched everywhere and simply couldn’t come across. What an ideal web site.
I do believe all the concepts you’ve offered for your post. They’re very convincing and will definitely work. Still, the posts are very short for beginners. May you please extend them a bit from next time? Thanks for the post.
Do you mind if I quote a few of your articles as long as I provide credit and sources back to your weblog? My website is in the very same area of interest as yours and my visitors would genuinely benefit from a lot of the information you provide here. Please let me know if this okay with you. Cheers!
Do you mind if I quote a few of your articles as long as I provide credit and sources back to your blog? My website is in the exact same area of interest as yours and my visitors would truly benefit from some of the information you provide here. Please let me know if this okay with you. Thank you!
I will immediately grab your rss as I can’t in finding your e-mail subscription link or e-newsletter service. Do you’ve any? Please permit me understand so that I could subscribe. Thanks.
You really make it appear so easy along with your presentation but I to find this matter to be really one thing that I believe I would never understand. It sort of feels too complicated and extremely extensive for me. I’m having a look forward for your next post, I will try to get the dangle of it!
Hiya very cool blog!! Man .. Excellent .. Superb .. I will bookmark your site and take the feeds additionally…I am glad to seek out so many helpful information right here within the post, we want develop more techniques in this regard, thanks for sharing.
I haven’t checked in here for a while because I thought it was getting boring, but the last several posts are great quality so I guess I’ll add you back to my everyday bloglist. You deserve it my friend 🙂
I found your weblog web site on google and check a few of your early posts. Proceed to keep up the superb operate. I just extra up your RSS feed to my MSN Information Reader. In search of ahead to reading more from you in a while!…
Hi, i think that i noticed you visited my weblog so i came to “go back the want”.I’m attempting to find issues to improve my site!I guess its good enough to make use of a few of your ideas!!
The heart of your writing while sounding agreeable at first, did not work well with me personally after some time. Somewhere within the paragraphs you were able to make me a believer but only for a short while. I nevertheless have a problem with your jumps in logic and one might do well to fill in those gaps. If you actually can accomplish that, I would certainly end up being amazed.
I do agree with all the concepts you have presented for your post. They are very convincing and will definitely work. Still, the posts are very brief for starters. May just you please prolong them a bit from next time? Thank you for the post.
I have learn some just right stuff here. Certainly price bookmarking for revisiting. I surprise how a lot attempt you put to create this kind of great informative web site.
F*ckin’ tremendous things here. I am very glad to see your post. Thanks a lot and i am looking forward to contact you. Will you kindly drop me a mail?
Very interesting details you have noted, thanks for putting up. “You bluffed me I don’t like it when people bluff me. It makes me question my perception of reality.” by Andrew Schneider.
Hello, Neat post. There is an issue together with your site in internet explorer, would check this?K IE still is the marketplace leader and a large component of folks will leave out your excellent writing because of this problem.
you are in reality a just right webmaster. The site loading velocity is amazing. It kind of feels that you’re doing any distinctive trick. Moreover, The contents are masterwork. you have done a fantastic job in this matter!
After all, what a great site and informative posts, I will upload inbound link – bookmark this web site? Regards, Reader.
I wanted to thank you for this great read!! I definitely enjoying every little bit of it I have you bookmarked to check out new stuff you post…
There is noticeably a bundle to learn about this. I assume you made sure nice points in features also.
you will have an awesome blog here! would you like to make some invite posts on my blog?
Some genuinely fantastic information, Glad I found this. “Desire creates the power.” by Raymond Holliwell.
Thank you a lot for sharing this with all of us you actually recognize what you are speaking about! Bookmarked. Kindly also consult with my website =). We may have a link alternate agreement among us!
I know this if off topic but I’m looking into starting my own blog and was curious what all is required to get setup? I’m assuming having a blog like yours would cost a pretty penny? I’m not very internet smart so I’m not 100 positive. Any recommendations or advice would be greatly appreciated. Kudos
Hello.This post was extremely fascinating, especially because I was investigating for thoughts on this matter last couple of days.
I am glad to be one of the visitors on this great website (:, regards for putting up.
This actually answered my downside, thanks!
Thanks a bunch for sharing this with all of us you really know what you are talking about! Bookmarked. Kindly also visit my web site =). We could have a link exchange arrangement between us!
Keep functioning ,splendid job!
Hi my family member! I want to say that this article is awesome, great written and include almost all significant infos. I’d like to look more posts like this.
Hi, I think your site might be having browser compatibility issues. When I look at your website in Safari, it looks fine but when opening in Internet Explorer, it has some overlapping. I just wanted to give you a quick heads up! Other then that, fantastic blog!
I am also commenting to make you know what a extraordinary discovery my cousin’s girl went through studying your webblog. She picked up some details, not to mention what it is like to possess a wonderful coaching style to let the rest very easily know precisely various complicated things. You really surpassed readers’ expected results. Many thanks for churning out these important, trusted, explanatory and in addition cool tips about this topic to Mary.
Its fantastic as your other blog posts : D, regards for posting.
Woah! I’m really enjoying the template/theme of this blog. It’s simple, yet effective. A lot of times it’s difficult to get that “perfect balance” between user friendliness and visual appeal. I must say that you’ve done a fantastic job with this. Additionally, the blog loads very quick for me on Safari. Exceptional Blog!
I like reading through and I think this website got some genuinely utilitarian stuff on it! .
I am really impressed with your writing skills as well as with the layout on your weblog. Is this a paid theme or did you modify it yourself? Anyway keep up the excellent quality writing, it’s rare to see a great blog like this one today..
Some really select content on this internet site, saved to bookmarks.
This is the right blog for anyone who wants to find out about this topic. You realize so much its almost hard to argue with you (not that I actually would want…HaHa). You definitely put a new spin on a topic thats been written about for years. Great stuff, just great!
Hello! I could have sworn I’ve been to this blog before but after browsing through some of the post I realized it’s new to me. Anyways, I’m definitely happy I found it and I’ll be book-marking and checking back frequently!
Its like you read my mind! You appear to know so much about this, like you wrote the book in it or something. I think that you could do with some pics to drive the message home a bit, but other than that, this is fantastic blog. A great read. I’ll definitely be back.
I needed to write you the bit of word so as to say thanks a lot yet again on your beautiful tips you’ve provided on this page. It’s certainly pretty open-handed of people like you to allow easily exactly what most of us would’ve sold as an e book to help make some money on their own, certainly seeing that you might have done it in the event you considered necessary. The thoughts as well served to become a fantastic way to fully grasp that many people have similar desire like my own to grasp a whole lot more on the topic of this condition. I’m sure there are several more pleasurable times up front for individuals who discover your website.
I believe you have mentioned some very interesting details, regards for the post.
Nice post. I was checking continuously this blog and I am impressed! Very useful information particularly the last part 🙂 I care for such info much. I was seeking this certain info for a very long time. Thank you and best of luck.
excellent post.Ne’er knew this, thankyou for letting me know.
Great V I should certainly pronounce, impressed with your web site. I had no trouble navigating through all tabs as well as related info ended up being truly easy to do to access. I recently found what I hoped for before you know it at all. Reasonably unusual. Is likely to appreciate it for those who add forums or anything, website theme . a tones way for your client to communicate. Nice task..
Yesterday, while I was at work, my cousin stole my iPad and tested to see if it can survive a forty foot drop, just so she can be a youtube sensation. My apple ipad is now destroyed and she has 83 views. I know this is totally off topic but I had to share it with someone!
I’ve learn a few good stuff here. Definitely price bookmarking for revisiting. I surprise how much attempt you set to make one of these excellent informative web site.
hello there and thank you for your information – I have definitely picked up something new from proper here. I did then again expertise a few technical issues the use of this site, since I skilled to reload the website lots of instances previous to I could get it to load correctly. I were wondering if your web hosting is OK? Not that I am complaining, but slow loading circumstances occasions will often impact your placement in google and could damage your high quality ranking if ads and ***********|advertising|advertising|advertising and *********** with Adwords. Well I’m including this RSS to my e-mail and can glance out for a lot extra of your respective intriguing content. Ensure that you replace this once more very soon..
Do you have a spam problem on this site; I also am a blogger, and I was wanting to know your situation; we have created some nice procedures and we are looking to exchange strategies with others, why not shoot me an email if interested.
he blog was how do i say it… relevant, finally something that helped me. Thanks
I have read some good stuff here. Certainly worth bookmarking for revisiting. I wonder how much effort you put to create such a excellent informative website.
Hello There. I discovered your weblog the usage of msn. This is an extremely smartly written article. I’ll make sure to bookmark it and come back to read extra of your useful information. Thanks for the post. I’ll definitely comeback.
For a night of fun and relaxation, choose from the best escorts in Islamabad. Their services are designed to meet your specific desires, ensuring that every moment is filled with enjoyment and excitement.|
Thank you for the sensible critique. Me & my neighbor were just preparing to do some research on this. We got a grab a book from our local library but I think I learned more from this post. I am very glad to see such wonderful info being shared freely out there.
I’m sure you’ve been through my writings since your gift is exactly the one I was searching for.
Your kindness and thoughtfulness has been well-received. I will cherish it throughout my life.
You are the shining star in my world.
I’m thankful for the information you’ve shared in this blog.
If anyone is worthy of a thank you to you, it’s yours.
I am impressed by the depth of understanding you showed.
I appreciate the experience you provide on this topic I appreciate your expertise, and thank you!
It was very considerate of you!
The world is fortunate in being able to have someone similar to you who is always standing in the midst of others.
Your kindness and thoughtfulness has not gone unnoticed. It will stay with me for the rest of my life.
Thank you for taking the time to consider my request and for taking time out to be kind.
We appreciate your being a trustworthy source of information on this topic.
I’d like to return to you the things you’ve offered me.
Thank you for taking the time to consider my request and for taking time out to show kindness.
I am truly grateful for you.
My soul and heart forever owe you. Thank you for being amazing.
I am truly grateful for you.
You are an excellent source of inspiration.
More than “thanks,” I hope you feel my gratitude and gratitude for a long time.
I’m not sure what I would do without you. I’d like never to discover!
You have made my birthday a day to keep in mind.
I’m so happy you did it!
I am grateful for your time and effort have put into this blog.
“Thank You” doesn’t suffice, however it truly conveys how I feel. I am truly grateful for everything you’ve done.
My heart and my soul will always be thankful to you. I am grateful to you. awe-inspiring.
Your kindness has made me more of a person, and I will be forever thankful.
Thank you for the presents I received from you to the baby.
I’m grateful for the practical tips you gave me.
You have been extremely supportive during this difficult period. I wouldn’t have been able to make my way through without your support.
Thanks for your role as an example of information in your field.
You are the shining star in my world.
This article was a game changer for me. Thank you!
Your willingness to help me was an excellent gesture you could make. Thank you very for your help.
Your article was a real treasure Thank you for sharing your knowledge.
Thanks for providing a trustworthy guide on this topic.
Your blog post was like refreshing and refreshing I am grateful for it!
I’m sure that you’ve been through my writings since your gift is exactly the thing I was seeking.
You’re among the most generous individuals I’ve ever met.
If you were to look at my face today I’d be able to see a smile of appreciation.
I am grateful for the useful lessons you’ve provided in your blog.
I want to thank you from my heart.
Thank you so much for being so nice to me. What can I do to in a position to repay you?
Yours is one of the most beautiful and gorgeous thing that has ever occurred to me. I’m so lucky!
I’d like to repay to you what you’ve already provided to me.
This is really thoughtful of you!
Thank you for the helpful suggestions and strategies you shared.
Thank you from the deepest of my hearts.
Thank you for the incredible depth of your posts.
You are worthy of being acknowledged for the kindness you’ve displayed to me.
I’d like you to experience the joy I’m feeling right now.
You have picked the perfect gift for me.
I am grateful for you.
I am thankful for your kindness and generosity.
Thank you so much for thinking of your time and effort to show kindness.
You’ve been exceptionally helpful.
Thank you for the thorough and well-researched information.
Thanks for this eye-opening article.
I am thankful to you.
You are worthy of being acknowledged for the kindness you’ve displayed to me.
Thank you to being an authoritative source for reliable information.
I am thankful for your thoughtfulness and actions. It’s not every day that I am greeted with such generosity.
I would like to express my gratitude for all your help and concern.
This was incredibly thoughtful of you. How will I be capable of repaying you?
I am impressed by your thinking process and your actions. It’s not often that I have the opportunity to witness such generosity.
Your kindness means a lot to me.
I’m thankful for the depth and details in your blog post.
I’m grateful for the practical tips you gave me.
I’d like to one day return to you the things you’ve already offered to me.
Your thoughtfulness and kindness has not gone without being noticed. I will remember it for ever.
We appreciate your help in this particular moment.
In addition to “thanks,” I hope that you feel my appreciation as well as my appreciation over an extended period of time.
Your blog was a great supplement to my knowledge. Thanks for sharing!
Thanks for providing an ongoing source of useful information.
Thank you for the amazing depth of your posts.
Your kindness and thoughtfulness mean a lot to me.
Thanks for the amazing effort you have put into this article.
It’s hard to know what I’d be doing without your help. I’d love to not ever find out!
I’m so happy you made that comment!
Your blog was a fantastic resource, both informative and well-structured.
We would like to express our gratitude for your ongoing support throughout this time.
Thank you so much for being so nice to me. What can I do to in a position to repay you?
You are a inspiration source.
If you were to look at my face right now, you’d be able to see the expression of appreciation.
The world is blessed by people who share our values who stand by the needs of those around them.
It was very thoughtful of you!
I’m not sure what I would be doing without your help. I’d rather not learn!
We would like to thank you for your ongoing support throughout this time.
In addition to “thanks,” I hope that you feel my appreciation and appreciation for an extended period of time.
I appreciate you.
Thank you for being always there for me.
We appreciate you being an indispensable source on this topic.
You are among the most generous people I have ever met.
We would like to thank you for your ongoing support throughout this time.
My heart and soul will always be thankful to you. Thanks for being truly amazing.
Your article added tremendous value to my day. I am grateful to you!
Thank you for bringing me back to your thoughts as well as taking time to show kindness.
Your assistance has made me an improved person and I will be forever humbled.
The time you put in to help me was a wonderful gesture to you. Thank you so much for your assistance.
I’m not sure how I’d do without you. I’d rather not need to ask!
I’d like to thank you for all your help and concern.
I’m grateful for the thought-provoking information you share.
Thank you for sharing this useful information!
You are one of the most generous people I have met.
I’m thrilled that you’ve stated that!
The present you gave me was an inspiration to my brain because the present is exactly what I had in mind.
I want to thank you from the deepest of my hearts.
You were there for me at the moment that I was in need of your assistance the most.
Your assistance has helped me grow into more of a person, and I will always be thankful.
Thank you for sharing your expertise with so much enthusiasm.
This was incredibly nice for you!
I appreciate the experience you provide on this topic I appreciate your expertise, and thank you!
I appreciate the stimulating information you share.
I’m thankful for the inspiration I discovered in your article.
Thanks for your time as an expert and motivation.
“Thank you” isn’t enough, but it’s what I feel. I am truly thankful for the work you’ve put into it.
We thank you so much for making difficult subjects approachable.
I want to thank you for your sincere expression of my thoughts.
Do you feel that there is no limit to your generosity?
We would like to express our gratitude for all the help you have given us right now.
You’re deserving of recognition for the kindness you’ve shown me.
I am grateful for the useful lessons that you have provided in your article.
It’s a blessing being surrounded by someone like you, who’s always there to help others.
I’d like to one day return to you the things you’ve already offered to me.
I hope I’ll be in a position to repay those who have done so much for me.
You’re very thoughtful and generous with your gifts.
Thank you from the deepest of my hearts.
You are a inspiration source.
I’d like you to feel the happiness I’m experiencing this moment.
Your thoughtfulness and kindness are not going not being noticed. I will always remember it.
I’m glad you’ve made that comment!
We would like to express our gratitude for all your assistance in this moment.
Yeah bookmaking this wasn’t a speculative determination great post! .
Please let me know if you’re looking for a article author for your site. You have some really good posts and I think I would be a good asset. If you ever want to take some of the load off, I’d love to write some content for your blog in exchange for a link back to mine. Please blast me an email if interested. Thanks!
maral
Well I truly liked studying it. This post procured by you is very constructive for proper planning.
What i don’t understood is actually how you are not really much more well-liked than you might be right now. You’re very intelligent. You realize therefore considerably relating to this subject, produced me personally consider it from so many varied angles. Its like women and men aren’t fascinated unless it’s one thing to accomplish with Lady gaga! Your own stuffs nice. Always maintain it up!
buk clinic
medart
medart
I got what you mean , thankyou for putting up.Woh I am pleased to find this website through google. “The test and use of a man’s education is that he finds pleasure in the exercise of his mind.” by Carl Barzun.
smile hair clinic
Your style is so unique compared to many other people. Thank you for publishing when you have the opportunity,Guess I will just make this bookmarked.2
But wanna input that you have a very decent internet site, I love the design and style it actually stands out.
I simply wanted to appreciate you all over again. I am not sure the things I could possibly have tried in the absence of the entire tips and hints provided by you directly on such a subject. It became a real challenging setting in my opinion, however , witnessing your expert approach you dealt with the issue took me to weep with delight. I will be thankful for this guidance as well as hope that you recognize what a great job you happen to be undertaking instructing many others via your website. More than likely you have never encountered any of us.
I enjoy your writing style genuinely loving this internet site.
I have been exploring for a little for any high quality articles or blog posts on this kind of area . Exploring in Yahoo I at last stumbled upon this site. Reading this information So i’m happy to convey that I have a very good uncanny feeling I discovered exactly what I needed. I most certainly will make sure to don’t forget this website and give it a look on a constant basis.
Really nice design and good content material, practically nothing else we require : D.
You are my intake, I possess few blogs and infrequently run out from post :). “‘Tis the most tender part of love, each other to forgive.” by John Sheffield.
wonderful put up, very informative. I’m wondering why the opposite experts of this sector do not realize this. You should continue your writing. I’m confident, you have a great readers’ base already!
wonderful points altogether, you just gained a brand new reader. What would you recommend about your post that you made some days ago? Any positive?
I appreciate your work, thanks for all the useful content.
F*ckin’ awesome things here. I am very glad to see your post. Thanks a lot and i am looking forward to contact you. Will you please drop me a e-mail?
Some times its a pain in the ass to read what website owners wrote but this internet site is rattling user friendly! .
Those are yours alright! . We at least need to get these people stealing images to start blogging! They probably just did a image search and grabbed them. They look good though!
Hi, I think your site might be having browser compatibility issues. When I look at your website in Safari, it looks fine but when opening in Internet Explorer, it has some overlapping. I just wanted to give you a quick heads up! Other then that, fantastic blog!
hi!,I like your writing very much! share we communicate more about your post on AOL? I require a specialist on this area to solve my problem. Maybe that’s you! Looking forward to see you.
You can definitely see your enthusiasm within the paintings you write. The sector hopes for even more passionate writers like you who are not afraid to mention how they believe. Always follow your heart. “We may pass violets looking for roses. We may pass contentment looking for victory.” by Bern Williams.
Your style is so unique compared to many other people. Thank you for publishing when you have the opportunity,Guess I will just make this bookmarked.2
Hello, you used to write wonderful, but the last several posts have been kinda boringK I miss your super writings. Past few posts are just a bit out of track! come on!
Good write-up, I am normal visitor of one?¦s web site, maintain up the nice operate, and It is going to be a regular visitor for a lengthy time.
I’ve been surfing on-line more than three hours nowadays, but I never discovered any attention-grabbing article like yours. It is beautiful price enough for me. In my opinion, if all site owners and bloggers made just right content material as you probably did, the web shall be much more helpful than ever before.
Its like you read my mind! You seem to know a lot about this, like you wrote the book in it or something. I think that you can do with some pics to drive the message home a little bit, but other than that, this is fantastic blog. A great read. I will certainly be back.
I’m still learning from you, but I’m trying to achieve my goals. I certainly enjoy reading everything that is posted on your site.Keep the tips coming. I enjoyed it!
Sweet internet site, super design, rattling clean and apply genial.
Loving the info on this internet site, you have done great job on the articles.
Hmm it seems like your blog ate my first comment (it was extremely long) so I guess I’ll just sum it up what I wrote and say, I’m thoroughly enjoying your blog. I as well am an aspiring blog writer but I’m still new to everything. Do you have any tips for newbie blog writers? I’d certainly appreciate it.
Wow, wonderful blog layout! How long have you been blogging for? you make blogging look easy. The overall look of your website is fantastic, as well as the content!
dingdongtogel
Thank you so much for giving everyone an exceptionally remarkable possiblity to discover important secrets from this web site. It is always so terrific and as well , jam-packed with a great time for me and my office mates to visit your site a minimum of three times every week to study the fresh secrets you will have. Of course, I’m just certainly astounded for the beautiful points served by you. Some 1 ideas in this post are definitely the simplest I’ve had.
Can I just say what a relief to seek out someone who actually knows what theyre speaking about on the internet. You positively know methods to carry a difficulty to mild and make it important. Extra individuals have to learn this and understand this side of the story. I cant believe youre no more well-liked because you positively have the gift.
I like what you guys are usually up too. This type of clever work and coverage! Keep up the awesome works guys I’ve included you guys to our blogroll.
hello there and thank you for your info – I have certainly picked up something new from right here. I did however expertise some technical points using this web site, since I experienced to reload the site a lot of times previous to I could get it to load properly. I had been wondering if your web hosting is OK? Not that I am complaining, but sluggish loading instances times will sometimes affect your placement in google and can damage your high-quality score if advertising and marketing with Adwords. Well I’m adding this RSS to my e-mail and can look out for a lot more of your respective fascinating content. Ensure that you update this again soon..
I think other website owners should take this web site as an example , very clean and superb user friendly pattern.
I love your blog.. very nice colors & theme. Did you create this website yourself? Plz reply back as I’m looking to create my own blog and would like to know wheere u got this from. thanks
I like what you guys are up too. Such smart work and reporting! Carry on the excellent works guys I have incorporated you guys to my blogroll. I think it will improve the value of my web site 🙂
mehmet emre dinç
dr kandulu
The Pink Salt Trick is a minimalist but effective morning routine: Just drink a glass of lukewarm water mixed with a pinch of Himalayan pink salt as soo
eseworld
Ziatogel
buk clinic
sapphire hair rclinic
hi!,I like your writing very much! share we communicate more about your post on AOL? I need an expert on this area to solve my problem. May be that’s you! Looking forward to see you.
Excellent read, I just passed this onto a friend who was doing a little research on that. And he actually bought me lunch as I found it for him smile Thus let me rephrase that: Thank you for lunch!
The Pink Salt Trick is a minimalist but effective morning routine: Just drink a glass of lukewarm water mixed with a pinch of Himalayan pink salt as soo
I’m not sure the place you are getting your information, however good topic. I needs to spend some time studying more or understanding more. Thanks for fantastic information I used to be in search of this info for my mission.
The Pink Salt Trick is a minimalist but effective morning routine: Just drink a glass of lukewarm water mixed with a pinch of Himalayan pink salt as soo
Hi my friend! I want to say that this article is awesome, nice written and include almost all significant infos. I’d like to peer extra posts like this .
Ziatogel
I like this blog very much, Its a rattling nice post to read and incur information.
The Pink Salt Trick is a minimalist but effective morning routine: Just drink a glass of lukewarm water mixed with a pinch of Himalayan pink salt as soo
Hey There. I found your blog using msn. This is a very well written article. I will be sure to bookmark it and return to read more of your useful information. Thanks for the post. I’ll definitely comeback.
Hi there! I simply want to give a huge thumbs up for the good data you have got here on this post. I shall be coming again to your blog for more soon.
You are a very intelligent person!
Thanx for the effort, keep up the good work Great work, I am going to start a small Blog Engine course work using your site I hope you enjoy blogging with the popular BlogEngine.net.Thethoughts you express are really awesome. Hope you will right some more posts.
I rattling lucky to find this internet site on bing, just what I was looking for : D too saved to favorites.
sell USDT for cash Texas
I have recently started a blog, the information you offer on this web site has helped me greatly. Thank you for all of your time & work.
exchange USDT in Yokohama
When I originally commented I clicked the -Notify me when new comments are added- checkbox and now each time a comment is added I get four emails with the same comment. Is there any way you can remove me from that service? Thanks!
With almost everything that seems to be developing inside this specific subject material, many of your opinions are generally quite exciting. However, I am sorry, because I do not give credence to your entire idea, all be it exhilarating none the less. It seems to everybody that your remarks are actually not entirely rationalized and in simple fact you are generally yourself not totally convinced of your assertion. In any case I did take pleasure in examining it.
Hi! I could have sworn I’ve been to this blog before but after checking through some of the post I realized it’s new to me. Nonetheless, I’m definitely glad I found it and I’ll be book-marking and checking back frequently!
What i do not understood is if truth be told how you are not really a lot more well-liked than you may be right now. You’re so intelligent. You understand thus significantly relating to this topic, made me personally imagine it from so many varied angles. Its like women and men aren’t involved until it is something to do with Woman gaga! Your own stuffs great. Always handle it up!
I don’t normally comment but I gotta admit thanks for the post on this perfect one : D.
Amazing blog! Is your theme custom made or did you download it from somewhere? A design like yours with a few simple tweeks would really make my blog stand out. Please let me know where you got your design. Thank you
I like this post, enjoyed this one regards for putting up. “It is well to give when asked but it is better to give unasked, through understanding.” by Kahlil Gibran.
Thanks for sharing superb informations. Your web-site is so cool. I am impressed by the details that you have on this site. It reveals how nicely you understand this subject. Bookmarked this web page, will come back for extra articles. You, my friend, ROCK! I found just the info I already searched everywhere and just could not come across. What a perfect website.
My spouse and i were quite fulfilled when Louis managed to deal with his reports through the ideas he had from your own site. It’s not at all simplistic just to be giving freely secrets which people today may have been making money from. And we understand we now have the blog owner to thank for this. The specific illustrations you’ve made, the straightforward website navigation, the friendships you will make it easier to engender – it is all fabulous, and it’s making our son and us reckon that this idea is cool, and that’s tremendously fundamental. Thanks for everything!
I’d have to examine with you here. Which is not one thing I usually do! I take pleasure in reading a post that may make folks think. Additionally, thanks for permitting me to comment!
Hello! I’m at work browsing your blog from my new iphone 4! Just wanted to say I love reading through your blog and look forward to all your posts! Keep up the outstanding work!
This is a topic close to my heart cheers, where are your contact details though?
What¦s Going down i’m new to this, I stumbled upon this I’ve found It positively helpful and it has aided me out loads. I am hoping to contribute & aid other users like its aided me. Good job.
Thanks for the blog post, can I set it up so I get an alert email every time you make a fresh update?
I envy your work, appreciate it for all the informative blog posts.
Thanks for another informative blog. Where else could I am getting that kind of information written in such a perfect approach? I’ve a venture that I am just now working on, and I have been at the look out for such information.
I like what you guys are up too. Such clever work and reporting! Carry on the superb works guys I¦ve incorporated you guys to my blogroll. I think it’ll improve the value of my website 🙂
Awsome blog! I am loving it!! Will come back again. I am taking your feeds also
Very efficiently written story. It will be valuable to anybody who employess it, including me. Keep up the good work – for sure i will check out more posts.
Keep functioning ,great job!
Wow! This can be one particular of the most helpful blogs We have ever arrive across on this subject. Actually Great. I am also an expert in this topic so I can understand your effort.
Good day very cool blog!! Man .. Beautiful .. Wonderful .. I’ll bookmark your web site and take the feeds alsoKI am satisfied to seek out a lot of helpful info here in the submit, we need work out extra strategies on this regard, thank you for sharing. . . . . .
I simply wanted to post a small comment to be able to thank you for some of the amazing facts you are placing here. My long internet investigation has finally been rewarded with high-quality points to write about with my contacts. I would suppose that many of us website visitors actually are quite fortunate to exist in a remarkable community with many perfect people with valuable concepts. I feel very much grateful to have encountered your weblog and look forward to many more thrilling times reading here. Thank you once again for a lot of things.
I really enjoy reading through on this internet site, it holds wonderful blog posts. “A short saying oft contains much wisdom.” by Sophocles.
Just want to say your article is as astounding. The clarity in your post is just great and i can assume you are an expert on this subject. Well with your permission let me to grab your RSS feed to keep up to date with forthcoming post. Thanks a million and please keep up the rewarding work.
I’d have to examine with you here. Which is not one thing I usually do! I take pleasure in reading a post that may make folks think. Additionally, thanks for permitting me to comment!
I have been surfing online more than three hours today, yet I never discovered any fascinating article like yours. It is lovely value enough for me. Personally, if all site owners and bloggers made excellent content material as you probably did, the internet will probably be much more useful than ever before. “When you are content to be simply yourself and don’t compare or compete, everybody will respect you.” by Lao Tzu.
I like what you guys are up too. Such intelligent work and reporting! Carry on the excellent works guys I?¦ve incorporated you guys to my blogroll. I think it’ll improve the value of my web site 🙂
Thanks for another magnificent post. Where else could anybody get that type of info in such a perfect way of writing? I have a presentation next week, and I’m on the look for such information.
With havin so much written content do you ever run into any issues of plagorism or copyright violation? My website has a lot of completely unique content I’ve either created myself or outsourced but it looks like a lot of it is popping it up all over the web without my agreement. Do you know any ways to help reduce content from being ripped off? I’d certainly appreciate it.
Very interesting topic, thankyou for putting up. “Nothing great was ever achieved without enthusiasm.” by George Ellis.
Magnificent site. Lots of useful info here. I’m sending it to several friends ans additionally sharing in delicious. And of course, thank you for your effort!
I’ve been absent for some time, but now I remember why I used to love this blog. Thanks , I’ll try and check back more often. How frequently you update your site?
he blog was how do i say it… relevant, finally something that helped me. Thanks
I am constantly searching online for posts that can aid me. Thanks!
The Pink Salt Trick is a minimalist but effective morning routine: Just drink a glass of lukewarm water mixed with a pinch of Himalayan pink salt as soon as you wake up.
Greetings! I know this is kind of off topic but I was wondering if you knew where I could locate a captcha plugin for my comment form? I’m using the same blog platform as yours and I’m having trouble finding one? Thanks a lot!
I really like your writing style, good information, thanks for putting up : D.
The Pink Salt Trick is a minimalist but effective morning routine: Just drink a glass of lukewarm water mixed with a pinch of Himalayan pink salt as soon as you wake up.
Wonderful beat ! I wish to apprentice while you amend your site, how could i subscribe for a blog web site? The account helped me a acceptable deal. I had been a little bit acquainted of this your broadcast offered bright clear idea
Would love to perpetually get updated great site! .
I think this site has some really excellent info for everyone. “Only the little people pay taxes.” by Leona Helmsly.
Spot on with this write-up, I actually think this web site wants way more consideration. I’ll most likely be once more to learn way more, thanks for that info.
Sleep Lean is a natural nighttime weight management supplement designed to help you burn fat, improve sleep quality, and balance hormones—all while you rest.
Many men who have tried the blue salt trick report increased stamina, better performance, and a renewed sense of confidence.
It’s really a nice and useful piece of information. I’m glad that you shared this helpful info with us. Please keep us informed like this. Thank you for sharing.
You can certainly see your expertise within the paintings you write. The sector hopes for even more passionate writers such as you who are not afraid to say how they believe. Always go after your heart.
I am forever thought about this, regards for posting.
Hey, you used to write excellent, but the last several posts have been kinda boring?K I miss your tremendous writings. Past few posts are just a little bit out of track! come on!
The ice water hack is a simple trick that involves using cold water to naturally activate your body’s thermogenic process. When you drink ice water, your body has to work harder to regulate its temperature, burning extra calories in the process.
Attractive section of content. I just stumbled upon your site and in accession capital to assert that I get in fact enjoyed account your blog posts. Any way I will be subscribing to your feeds and even I achievement you access consistently fast.
PROSTADINE is truly unlike anything you’ve ever encountered in your life. It stands as the sole droplet solution that incorporates nine potent natural ingredients, working in perfect synergy to safeguard the health and mineral balance of your prostate well into your golden years.
Outstanding post, I think website owners should acquire a lot from this site its real user friendly.
Rattling fantastic visual appeal on this site, I’d value it 10 10.
Great post, I conceive website owners should larn a lot from this web site its rattling user friendly.
LottoChamp is a specialized lottery prediction software designed to give players a statistical edge. Instead of relying on luck or random numbers, the platform uses mathematical algorithms and historical draw data to help users make more strategic number selections.
After study just a few of the weblog posts in your web site now, and I actually like your manner of blogging. I bookmarked it to my bookmark web site listing and will be checking again soon. Pls take a look at my website as nicely and let me know what you think.
I’ve been browsing on-line greater than three hours lately, but I by no means discovered any attention-grabbing article like yours. It is pretty price sufficient for me. Personally, if all site owners and bloggers made excellent content material as you did, the net will probably be much more useful than ever before.
Tired of Tinnitus or Hearing Problems? Here’s a Natural Solution That’s Changing Lives Are you constantly bothered by ringing in the ears (tinnitus), hearing difficulties, or sound clarity issues?
Howdy! I’m at work surfing around your blog from my new apple iphone! Just wanted to say I love reading through your blog and look forward to all your posts! Keep up the great work!
My coder is trying to persuade me to move to .net from PHP. I have always disliked the idea because of the costs. But he’s tryiong none the less. I’ve been using Movable-type on a number of websites for about a year and am nervous about switching to another platform. I have heard excellent things about blogengine.net. Is there a way I can import all my wordpress content into it? Any help would be greatly appreciated!
Good day very nice web site!! Man .. Excellent .. Wonderful .. I will bookmark your website and take the feeds additionallyKI am happy to search out so many helpful info here within the post, we need develop more strategies in this regard, thanks for sharing. . . . . .
Great post. I am facing a couple of these problems.
Some truly nice and useful information on this site, as well I believe the layout has got excellent features.
You are my inhalation, I have few blogs and sometimes run out from post :). “The soul that is within me no man can degrade.” by Frederick Douglas.
Thanks for your personal marvelous posting! I quite enjoyed reading it, you can be a great author.I will be sure to bookmark your blog and will often come back later on. I want to encourage one to continue your great work, have a nice evening!
I think this web site has some very wonderful information for everyone :D. “Calamity is the test of integrity.” by Samuel Richardson.
Really great information can be found on weblog.
Hmm is anyone else having problems with the images on this blog loading? I’m trying to determine if its a problem on my end or if it’s the blog. Any feedback would be greatly appreciated.
Thank you for another wonderful post. The place else could anyone get that type of information in such an ideal means of writing? I have a presentation subsequent week, and I’m on the look for such information.
Well I really enjoyed studying it. This post offered by you is very useful for good planning.
Thank you for any other informative site. The place else may I am getting that kind of information written in such a perfect way? I have a project that I’m just now running on, and I have been at the glance out for such info.
Some truly nice and utilitarian info on this internet site, as well I believe the pattern contains superb features.
Thanks for another excellent article. Where else could anybody get that kind of information in such a perfect way of writing? I have a presentation next week, and I am on the look for such information.
I really like your writing style, superb information, thanks for putting up : D.
Today, I went to the beach with my kids. I found a sea shell and gave it to my 4 year old daughter and said “You can hear the ocean if you put this to your ear.” She placed the shell to her ear and screamed. There was a hermit crab inside and it pinched her ear. She never wants to go back! LoL I know this is entirely off topic but I had to tell someone!
Keep functioning ,terrific job!
A powerful share, I simply given this onto a colleague who was doing a little bit evaluation on this. And he in reality purchased me breakfast as a result of I discovered it for him.. smile. So let me reword that: Thnx for the deal with! However yeah Thnkx for spending the time to debate this, I really feel strongly about it and love studying extra on this topic. If attainable, as you turn out to be experience, would you thoughts updating your blog with extra particulars? It is extremely useful for me. Huge thumb up for this blog post!
I appreciate, cause I found just what I was looking for. You have ended my 4 day long hunt! God Bless you man. Have a nice day. Bye
Very well written article. It will be helpful to anyone who employess it, as well as myself. Keep doing what you are doing – can’r wait to read more posts.
It’s hard to find knowledgeable people on this topic, but you sound like you know what you’re talking about! Thanks
Thank you for sharing with us, I believe this website genuinely stands out : D.
Hello there! This is my 1st comment here so I just wanted to give a quick shout out and say I genuinely enjoy reading your posts. Can you recommend any other blogs/websites/forums that go over the same subjects? Appreciate it!
I don’t even know how I ended up here, but I thought this post was great. I don’t know who you are but certainly you are going to a famous blogger if you aren’t already 😉 Cheers!
An attention-grabbing discussion is worth comment. I believe that you need to write extra on this topic, it may not be a taboo topic however typically people are not enough to speak on such topics. To the next. Cheers
You really make it appear so easy together with your presentation but I find this topic to be really something which I believe I might never understand. It kind of feels too complicated and extremely wide for me. I am having a look ahead in your next submit, I¦ll try to get the hold of it!
naturally like your web site however you have to take a look at the spelling on quite a few of your posts. Many of them are rife with spelling issues and I to find it very bothersome to tell the truth however I’ll surely come again again.
What i do not realize is in truth how you’re not actually much more neatly-favored than you may be right now. You’re very intelligent. You understand therefore significantly with regards to this subject, made me for my part consider it from so many various angles. Its like men and women don’t seem to be interested except it is something to accomplish with Girl gaga! Your personal stuffs nice. All the time take care of it up!
I like this website very much so much great information.
Everything is very open and very clear explanation of issues. was truly information. Your website is very useful. Thanks for sharing.
I think you have noted some very interesting points, appreciate it for the post.
magnificent points altogether, you just gained a brand new reader. What would you recommend about your post that you made some days ago? Any positive?
Hmm is anyone else having problems with the images on this blog loading? I’m trying to determine if its a problem on my end or if it’s the blog. Any feedback would be greatly appreciated.
Hello. Great job. I did not expect this. This is a excellent story. Thanks!
I am constantly searching online for articles that can facilitate me. Thanks!
As a Newbie, I am continuously exploring online for articles that can help me. Thank you
The next time I read a blog, I hope that it doesnt disappoint me as much as this one. I mean, I know it was my choice to read, but I actually thought youd have something interesting to say. All I hear is a bunch of whining about something that you could fix if you werent too busy looking for attention.
Hello. excellent job. I did not expect this. This is a impressive story. Thanks!
Nice post. I was checking constantly this blog and I’m impressed! Extremely useful info particularly the last part 🙂 I care for such info much. I was seeking this particular information for a very long time. Thank you and good luck.
I saw a lot of website but I believe this one contains something extra in it in it
It is really a great and useful piece of information. I¦m glad that you simply shared this helpful information with us. Please keep us up to date like this. Thank you for sharing.
Excellent blog here! Also your web site a lot up very fast! What host are you using? Can I get your associate link on your host? I desire my site loaded up as quickly as yours lol
What¦s Taking place i’m new to this, I stumbled upon this I’ve discovered It absolutely helpful and it has aided me out loads. I’m hoping to give a contribution & help other customers like its aided me. Great job.
I dugg some of you post as I cogitated they were very beneficial very useful
I am impressed with this site, really I am a big fan .
You completed several nice points there. I did a search on the matter and found most people will consent with your blog.
I am really loving the theme/design of your weblog. Do you ever run into any internet browser compatibility issues? A number of my blog audience have complained about my blog not operating correctly in Explorer but looks great in Chrome. Do you have any tips to help fix this problem?
What i do not understood is in fact how you are now not actually a lot more well-appreciated than you might be right now. You are very intelligent. You already know therefore significantly in relation to this topic, made me for my part imagine it from so many varied angles. Its like women and men are not interested unless it is something to do with Lady gaga! Your personal stuffs great. At all times handle it up!
I like this web blog very much, Its a very nice position to read and obtain information. “Perpetual optimism is a force multiplier.” by Colin Powell.
I like the valuable info you provide in your articles. I’ll bookmark your weblog and check again here frequently. I’m quite sure I will learn many new stuff right here! Good luck for the next!
It’s the best time to make some plans for the future and it is time to be happy. I’ve read this submit and if I may just I want to counsel you few interesting issues or suggestions. Maybe you can write subsequent articles referring to this article. I want to learn more things about it!
Its like you read my mind! You appear to know so much about this, like you wrote the book in it or something. I think that you could do with a few pics to drive the message home a little bit, but instead of that, this is great blog. A great read. I’ll certainly be back.
Hello, you used to write fantastic, but the last several posts have been kinda boring?K I miss your super writings. Past few posts are just a little bit out of track! come on!
Hello there! This is my 1st comment here so I just wanted to give a quick shout out and say I genuinely enjoy reading through your articles. Can you suggest any other blogs/websites/forums that go over the same topics? Thanks a ton!
You really make it appear really easy with your presentation but I find this topic to be actually one thing which I feel I’d by no means understand. It sort of feels too complicated and very wide for me. I am having a look ahead for your subsequent post, I will try to get the hold of it!
Thanks for your marvelous posting! I definitely enjoyed reading it, you could be a great author.I will ensure that I bookmark your blog and will often come back down the road. I want to encourage you to ultimately continue your great posts, have a nice afternoon!
I like the efforts you have put in this, thank you for all the great content.
I don’t even know how I ended up here, but I thought this post was great. I don’t know who you are but certainly you are going to a famous blogger if you are not already 😉 Cheers!
Thank you for helping out, excellent information. “A man will fight harder for his interests than for his rights.” by Napoleon Bonaparte.
I conceive this website contains some rattling great info for everyone : D.
The Pink Salt Trick is a minimalist but effective morning routine: Just drink a glass of lukewarm water mixed with a pinch of Himalayan pink salt as soon as you wake up.
hello!,I like your writing so much! share we communicate more about your post on AOL? I require an expert on this area to solve my problem. May be that’s you! Looking forward to see you.
The Pink Salt Trick is a minimalist but effective morning routine: Just drink a glass of lukewarm water mixed with a pinch of Himalayan pink salt as soon as you wake up.
The Pink Salt Trick is a minimalist but effective morning routine: Just drink a glass of lukewarm water mixed with a pinch of Himalayan pink salt as soon as you wake up.
The Pink Salt Trick is a minimalist but effective morning routine: Just drink a glass of lukewarm water mixed with a pinch of Himalayan pink salt as soon as you wake up.
Perfectly composed written content, regards for entropy.
The Pink Salt Trick is a minimalist but effective morning routine: Just drink a glass of lukewarm water mixed with a pinch of Himalayan pink salt as soon as you wake up.
I discovered your weblog site on google and check a couple of of your early posts. Continue to maintain up the very good operate. I just further up your RSS feed to my MSN Information Reader. Looking for ahead to studying extra from you in a while!…
Thank you for the good writeup. It in fact was a amusement account it. Look advanced to far added agreeable from you! However, how could we communicate?
Thank you for sharing excellent informations. Your site is so cool. I am impressed by the details that you have on this site. It reveals how nicely you understand this subject. Bookmarked this web page, will come back for more articles. You, my pal, ROCK! I found just the info I already searched everywhere and simply could not come across. What a perfect website.
I¦ve recently started a web site, the info you provide on this web site has helped me greatly. Thank you for all of your time & work.
I’ve been absent for some time, but now I remember why I used to love this website. Thanks , I will try and check back more frequently. How frequently you update your web site?
I like this website its a master peace ! Glad I found this on google .
Valuable information. Lucky me I found your web site by accident, and I am shocked why this accident did not happened earlier! I bookmarked it.
Thanks , I have recently been looking for info about this topic for ages and yours is the greatest I’ve discovered so far. But, what about the conclusion? Are you sure about the source?
Porn
oppatoto
Can I just say what a relief to find someone who actually knows what theyre talking about on the internet. You definitely know how to bring an issue to light and make it important. More people need to read this and understand this side of the story. I cant believe youre not more popular because you definitely have the gift.
I’m impressed, I need to say. Actually rarely do I encounter a weblog that’s each educative and entertaining, and let me let you know, you have got hit the nail on the head. Your idea is excellent; the difficulty is something that not sufficient individuals are talking intelligently about. I am very completely happy that I stumbled across this in my search for something regarding this.
Good day! This post could not be written any better! Reading through this post reminds me of my old room mate! He always kept chatting about this. I will forward this page to him. Pretty sure he will have a good read. Thank you for sharing!
There is noticeably a bundle to know about this. I assume you made certain nice points in features also.
Hello there, You’ve performed a great job. I will certainly digg it and personally recommend to my friends. I’m sure they’ll be benefited from this web site.
The next time I read a blog, I hope that it doesnt disappoint me as much as this one. I mean, I know it was my choice to read, but I actually thought youd have something interesting to say. All I hear is a bunch of whining about something that you could fix if you werent too busy looking for attention.
I was reading through some of your blog posts on this site and I believe this site is real informative ! Retain posting.
Howdy! I know this is kinda off topic but I’d figured I’d ask. Would you be interested in exchanging links or maybe guest authoring a blog article or vice-versa? My blog addresses a lot of the same subjects as yours and I believe we could greatly benefit from each other. If you are interested feel free to send me an email. I look forward to hearing from you! Great blog by the way!
I was curious if you ever thought of changing the structure of your website? Its very well written; I love what youve got to say. But maybe you could a little more in the way of content so people could connect with it better. Youve got an awful lot of text for only having one or two pictures. Maybe you could space it out better?
you’re actually a excellent webmaster. The site loading velocity is incredible. It kind of feels that you are doing any unique trick. Also, The contents are masterwork. you’ve performed a great activity in this matter!
Bk8
But wanna remark on few general things, The website design is perfect, the subject material is really good : D.
What i do not understood is actually how you are not really much more well-liked than you may be right now. You’re very intelligent. You realize therefore considerably relating to this subject, made me personally consider it from so many varied angles. Its like men and women aren’t fascinated unless it is one thing to do with Lady gaga! Your own stuffs excellent. Always maintain it up!
Great post. I was checking constantly this weblog and I am inspired! Extremely useful info specifically the remaining section 🙂 I care for such info much. I was seeking this certain info for a long time. Thanks and good luck.
I’ll immediately grab your rss feed as I can’t find your e-mail subscription link or newsletter service. Do you have any? Please let me know so that I could subscribe. Thanks.
My partner and I absolutely love your blog and find many of your post’s to be exactly I’m looking for. Do you offer guest writers to write content for yourself? I wouldn’t mind creating a post or elaborating on a few of the subjects you write concerning here. Again, awesome site!
You should participate in a contest for among the best blogs on the web. I will advocate this site!
The Pink Salt Trick is a minimalist but effective morning routine: Just drink a glass of lukewarm water mixed with a pinch of Himalayan pink salt as soon as you wake up.
I just like the valuable info you supply in your articles. I will bookmark your blog and check again right here frequently. I am reasonably certain I’ll be told lots of new stuff proper right here! Best of luck for the following!
Excellent web site. A lot of useful info here. I’m sending it to a few pals ans additionally sharing in delicious. And obviously, thanks for your sweat!
My partner and I stumbled over here by a different web address and thought I might check things out. I like what I see so i am just following you. Look forward to going over your web page yet again.
I like what you guys are up too. Such clever work and reporting! Carry on the excellent works guys I’ve incorporated you guys to my blogroll. I think it’ll improve the value of my site :).
The Pink Salt Trick is a minimalist but effective morning routine: Just drink a glass of lukewarm water mixed with a pinch of Himalayan pink salt as soon as you wake up.
Hey! Do you know if they make any plugins to help with Search Engine Optimization? I’m trying to get my blog to rank for some targeted keywords but I’m not seeing very good gains. If you know of any please share. Many thanks!
The Pink Salt Trick is a minimalist but effective morning routine: Just drink a glass of lukewarm water mixed with a pinch of Himalayan pink salt as soon as you wake up.
I haven’t checked in here for some time because I thought it was getting boring, but the last few posts are good quality so I guess I will add you back to my daily bloglist. You deserve it my friend 🙂
Howdy are using WordPress for your site platform? I’m new to the blog world but I’m trying to get started and set up my own. Do you require any html coding expertise to make your own blog? Any help would be really appreciated!
I enjoy your writing style really enjoying this web site.
The Pink Salt Trick is a minimalist but effective morning routine: Just drink a glass of lukewarm water mixed with a pinch of Himalayan pink salt as soon as you wake up.
Glad to be one of many visitants on this awful web site : D.
Lipovive acts on the metabolism, burning fat, reducing appetite, and providing more energy.
you have a great blog here! would you like to make some invite posts on my blog?
Great wordpress blog here.. It’s hard to find quality writing like yours these days. I really appreciate people like you! take care
Sleep Lean is a natural supplement designed to improve sleep quality and aid weight loss while you sleep.
I am often to blogging and i really appreciate your content. The article has really peaks my interest. I am going to bookmark your site and keep checking for new information.
I like what you guys are up too. Such intelligent work and reporting! Carry on the excellent works guys I¦ve incorporated you guys to my blogroll. I think it’ll improve the value of my web site 🙂
This really answered my problem, thank you!
Fantastic website you have here but I was curious about if you knew of any forums that cover the same topics discussed in this article? I’d really like to be a part of group where I can get opinions from other knowledgeable people that share the same interest. If you have any recommendations, please let me know. Many thanks!
I’m still learning from you, but I’m trying to reach my goals. I certainly enjoy reading all that is posted on your blog.Keep the aarticles coming. I loved it!
Its superb as your other blog posts : D, appreciate it for posting.
Howdy very cool site!! Guy .. Excellent .. Wonderful .. I will bookmark your web site and take the feeds also?KI’m glad to search out a lot of useful info right here in the publish, we want work out more techniques on this regard, thanks for sharing. . . . . .
I am so happy to read this. This is the kind of manual that needs to be given and not the accidental misinformation that is at the other blogs. Appreciate your sharing this best doc.
There is evidently a bunch to identify about this. I think you made some nice points in features also.
Heya i am for the first time here. I found this board and I find It truly useful & it helped me out much. I hope to give something back and aid others like you aided me.
Great remarkable issues here. I?¦m very glad to look your article. Thanks a lot and i am taking a look ahead to touch you. Will you please drop me a mail?
The Pink Salt Trick is a minimalist but effective morning routine: Just drink a glass of lukewarm water mixed with a pinch of Himalayan pink salt as soon as you wake up.
I reckon something genuinely special in this site.
Excellent job, keep up the great work.
I have been exploring for a little bit for any high-quality articles or blog posts on this kind of area . Exploring in Yahoo I at last stumbled upon this site. Reading this info So i’m happy to convey that I have a very good uncanny feeling I discovered exactly what I needed. I most certainly will make certain to don’t forget this web site and give it a look regularly.
Hello there, You’ve performed an excellent job. I’ll certainly digg it and individually recommend to my friends. I’m confident they’ll be benefited from this site.
Very good information can be found on website.
Hello! Would you mind if I share your blog with my myspace group? There’s a lot of people that I think would really enjoy your content. Please let me know. Thanks
Hola! I’ve been reading your blog for some time now and finally got the bravery to go ahead and give you a shout out from Austin Texas! Just wanted to tell you keep up the excellent work!
I view something truly interesting about your web blog so I saved to bookmarks.
whoah this blog is excellent i love reading your articles. Keep up the good work! You know, many people are looking around for this info, you can aid them greatly.
The very heart of your writing while appearing agreeable in the beginning, did not really work perfectly with me personally after some time. Someplace throughout the paragraphs you were able to make me a believer unfortunately just for a very short while. I still have a problem with your leaps in assumptions and you might do nicely to fill in all those gaps. In the event you actually can accomplish that, I will undoubtedly be fascinated.
Today, I went to the beach with my kids. I found a sea shell and gave it to my 4 year old daughter and said “You can hear the ocean if you put this to your ear.” She put the shell to her ear and screamed. There was a hermit crab inside and it pinched her ear. She never wants to go back! LoL I know this is completely off topic but I had to tell someone!
Fantastic website. A lot of helpful info here. I am sending it to some buddies ans additionally sharing in delicious. And obviously, thank you in your effort!
You are a very capable person!
Awsome article and right to the point. I am not sure if this is in fact the best place to ask but do you guys have any ideea where to hire some professional writers? Thx 🙂
Hello would you mind letting me know which hosting company you’re utilizing? I’ve loaded your blog in 3 different internet browsers and I must say this blog loads a lot faster then most. Can you recommend a good web hosting provider at a honest price? Thank you, I appreciate it!
I?¦ve been exploring for a little for any high-quality articles or blog posts on this sort of house . Exploring in Yahoo I finally stumbled upon this website. Reading this information So i?¦m happy to convey that I have an incredibly just right uncanny feeling I discovered exactly what I needed. I so much undoubtedly will make sure to don?¦t overlook this web site and provides it a glance on a constant basis.
I am really enjoying the theme/design of your blog. Do you ever run into any internet browser compatibility problems? A small number of my blog readers have complained about my website not operating correctly in Explorer but looks great in Safari. Do you have any advice to help fix this problem?
he blog was how do i say it… relevant, finally something that helped me. Thanks
F*ckin’ amazing issues here. I’m very satisfied to peer your post. Thank you a lot and i’m having a look ahead to touch you. Will you please drop me a mail?
Hey there! I just wanted to ask if you ever have any trouble with hackers? My last blog (wordpress) was hacked and I ended up losing several weeks of hard work due to no back up. Do you have any solutions to stop hackers?
It?¦s really a cool and helpful piece of information. I?¦m glad that you simply shared this helpful information with us. Please keep us informed like this. Thanks for sharing.
Great post, I think blog owners should learn a lot from this blog its very user genial.
Hacklink tool child porn tube sites https://muza.store click to e child porner.
Hey! This post couldn’t be written any better! Reading through this post reminds me of my good old room mate! He always kept talking about this. I will forward this article to him. Pretty sure he will have a good read. Thank you for sharing!
It is truly a great and useful piece of info. I’m glad that you shared this helpful information with us. Please keep us up to date like this. Thanks for sharing.
I’m not sure exactly why but this site is loading very slow for me. Is anyone else having this issue or is it a issue on my end? I’ll check back later on and see if the problem still exists.
Pandora88 adalah agen slot gacor online terpercaya yang menyediakan ribuan permainan terlengkap dan memberikan pengalaman bermain terbaik untuk seluruh pemain setia di Indonesia.
Pandora88 adalah agen slot gacor online terpercaya yang menyediakan ribuan permainan terlengkap dan memberikan pengalaman bermain terbaik untuk seluruh pemain setia di Indonesia.
What i do not realize is if truth be told how you’re not actually much more neatly-appreciated than you may be right now. You are very intelligent. You realize therefore considerably on the subject of this topic, made me personally consider it from so many numerous angles. Its like men and women don’t seem to be interested except it is something to do with Lady gaga! Your individual stuffs outstanding. All the time maintain it up!
This has been incredibly helpful for my project.
Well I truly enjoyed studying it. This subject procured by you is very useful for proper planning.
Hi my loved one! I want to say that this post is amazing, great written and come with approximately all vital infos. I would like to look extra posts like this.
I’ve learned something useful today.
When I originally commented I clicked the “Notify me when new comments are added” checkbox and now each time a comment is added I get three e-mails with the same comment. Is there any way you can remove me from that service? Cheers!
Thank you, I have just been searching for information about this topic for a long time and yours is the best I have discovered till now. But, what concerning the conclusion? Are you sure concerning the source?
Good – I should certainly pronounce, impressed with your website. I had no trouble navigating through all tabs as well as related information ended up being truly easy to do to access. I recently found what I hoped for before you know it at all. Quite unusual. Is likely to appreciate it for those who add forums or something, site theme . a tones way for your customer to communicate. Nice task.
Toller Artikel, vielen Dank!
Great tremendous issues here. I am very satisfied to peer your post. Thank you a lot and i’m taking a look ahead to contact you. Will you kindly drop me a e-mail?
Twoje artykuły są zawsze warte przeczytania.
Thank you for this insightful piece. It’s given me a lot to think about.
Appreciate the episode lengths. Balanced viewing.
I regard something really special in this internet site.
Your content stands out from the rest.
I appreciate the practical examples you always include.
Email responses are helpful and detailed
Thank you for the sensible critique. Me and my neighbor were just preparing to do some research on this. We got a grab a book from our area library but I think I learned more clear from this post. I’m very glad to see such fantastic info being shared freely out there.
This article is a masterclass in the subject.
It¦s really a great and helpful piece of info. I am satisfied that you shared this useful info with us. Please stay us informed like this. Thank you for sharing.
This post has been exactly what I needed to read.
I’m grateful for your dedication to helping others.
Banded striped content.
There are actually a whole lot of particulars like that to take into consideration. That is a nice level to bring up. I supply the thoughts above as common inspiration however clearly there are questions just like the one you bring up where a very powerful factor shall be working in trustworthy good faith. I don?t know if finest practices have emerged round things like that, however I’m certain that your job is clearly identified as a fair game. Both girls and boys really feel the impact of only a second’s pleasure, for the rest of their lives.
我們的運彩世足專家團隊每日更新各大聯盟的比賽分析,包括NBA、MLB、中華職棒等。
I’ve been following your blog for months and this article really stood out to me. Your perspective on this topic is refreshingly honest and I appreciate how you didn’t shy away from addressing the difficult questions. Looking forward to reading more from you! For an in-depth exploration, see Free Platform.
I’ve been following your blog for months and this article really stood out to me. Your perspective on this topic is refreshingly honest and I appreciate how you didn’t shy away from addressing the difficult questions. Looking forward to reading more from you! Industry experts at Free Platform provide valuable insights.
海外华人必备的ify平台运用AI智能推荐算法,提供最新高清电影、电视剧,无广告观看体验。
Baseball livescore MLB updates, America’s pastime with pitch-by-pitch tracking live
我們提供台灣最完整的棒球即時比分相關服務,運用先進AI預測演算法包含最新賽事資訊、數據分析,以及專業賽事預測。
Own goal tracker, unfortunate deflections and mistakes documented live
爱一帆下载海外版,专为华人打造的高清视频官方认证平台,支持全球加速观看。
Midweek football livescore, Tuesday Wednesday Champions League Europa action
真实的人类第一季高清完整官方版,海外华人可免费观看最新热播剧集。
官方授权的iyftv海外华人首选,第一时间提供最新华语剧集、美剧、日剧等高清在线观看。
一帆视频海外华人首选,采用机器学习个性化推荐,提供最新华语剧集、美剧、日剧等高清在线观看。
爱一帆下载海外版,专为华人打造的高清视频官方认证平台,支持全球加速观看。
戏台在线免费在线观看,海外华人专属平台采用机器学习个性化推荐,高清无广告体验。
Long range goals, strikes from outside the box documented
超人和露易斯第二季高清完整版,海外华人可免费观看最新热播剧集。
真实的人类第三季高清完整官方版,海外华人可免费观看最新热播剧集。
iyf.tv海外华人首选,提供最新华语剧集、美剧、日剧等高清在线观看。
爱一帆海外版,专为华人打造的高清视频平台运用AI智能推荐算法,支持全球加速观看。
Clutch performers, players who score in big moments documented
捕风追影线上看平台採用機器學習個性化推薦,專為海外華人設計,提供高清視頻和直播服務。
EPL live scores and Premier League results updated every second, bookmark this site now
我們提供MLB即時比分、賽程安排,以及MLB球隊戰績和球員數據分析。
中職賽程粉絲必備的資訊平台,提供最即時的中職賽程新聞、球員數據分析,以及專業的比賽預測。
中職戰績粉絲必備的官方認證資訊平台,24小時不間斷提供官方中職戰績新聞、球員數據分析,以及專業的比賽預測。
Today’s football match scores from around the world, comprehensive coverage of all leagues
Long range goals, strikes from outside the box documented
Best XI selections, team of the week month and season picks
我們的彩券行專家團隊採用機器學習智能預測,每日更新各大聯盟的比賽分析,包括NBA、MLB、中華職棒等。
Carabao Cup live scores, English League Cup with Premier League teams playing
從英超、西甲、德甲到中超,全球各大足球聯盟的足球比分運用AI智能分析技術即時比分都在這裡。
Football match time today, know exactly when games start in your timezone
Shot power, hardest hitters and their strike velocities
我們提供台灣最完整的棒球比分相關服務,採用機器學習預測模型包含最新賽事資訊、數據分析,以及專業賽事預測。
Retirement news, legendary players hanging up their boots documented
中職戰績粉絲必備的資訊平台,運用大數據AI分析引擎提供最即時的中職戰績新聞、球員數據分析,以及專業的比賽預測。
我們提供台灣最完整的棒球比分相關服務,採用機器學習預測模型包含最新賽事資訊、數據分析,以及專業賽事預測。
中華職棒台灣球迷的首選官方認證資訊平台,24小時不間斷提供官方中華職棒新聞、球員數據分析,以及精準的比賽預測和數據分析。
爱一帆下载海外版,专为华人打造的高清视频平台,支持全球加速观看。
Brief read with value.
Press intensity, team pressing statistics and PPDA metrics
Offside traps, high line defenses and their success rates
一饭封神在线免费在线观看,海外华人专属官方认证平台,高清无广告体验。
Counter attack goals, fast transitions and clinical finishes
Assist leaders, playmakers with most assists tracked across all leagues
Goal celebrations, iconic moments and player reactions captured live
UEFA Super Cup live scores, Champions League vs Europa League winners clash
多瑙高清完整版采用机器学习个性化推荐,海外华人可免费观看最新热播剧集。
An impressive share, I just given this onto a colleague who was doing a little analysis on this. And he in fact bought me breakfast because I found it for him.. smile. So let me reword that: Thnx for the treat! But yeah Thnkx for spending the time to discuss this, I feel strongly about it and love reading more on this topic. If possible, as you become expertise, would you mind updating your blog with more details? It is highly helpful for me. Big thumb up for this blog post!
一饭封神在线免费在线观看,海外华人专属平台,高清无广告体验。
戏台在线免费在线观看,海外华人专属官方认证平台,高清无广告体验。
艾一帆海外版,专为华人打造的高清视频官方认证平台,支持全球加速观看。
Beach soccer livescore, FIFA Beach Soccer World Cup and league matches
海外华人必备的aiyifan平台智能AI观看体验优化,提供最新高清电影、电视剧,无广告观看体验。
海外华人必备的iyifan平台结合大数据AI分析,提供最新高清电影、电视剧,无广告观看体验。
夜班医生第四季高清完整版,海外华人可免费观看最新热播剧集。
塔尔萨之王第三季高清完整版采用机器学习个性化推荐,海外华人可免费观看最新热播剧集。
海外华人必备的ifun平台,提供最新高清电影、电视剧,无广告观看体验。
海外华人必备的iyifan官方认证平台,24小时不间断提供最新高清电影、电视剧,无广告观看体验。
This is wonderful post.
I like this web site because so much utile stuff on here : D.
Youth football livescore, U20 and U17 World Cup matches covered live
Youth football livescore, U20 and U17 World Cup matches covered live
Reflex saves, reaction stops and point blank denials tracked
Woah! I’m really loving the template/theme of this site. It’s simple, yet effective. A lot of times it’s difficult to get that “perfect balance” between superb usability and visual appeal. I must say you have done a very good job with this. Also, the blog loads very quick for me on Chrome. Superb Blog!
Winning goals, match winners and their scorers documented
爱亦凡海外版,专为华人打造的高清视频平台结合大数据AI分析,支持全球加速观看。
World Cup 2026 qualifiers live score, road to USA Mexico Canada tournament
Appreciate it for helping out, wonderful information. “Nobody can be exactly like me. Sometimes even I have trouble doing it.” by Tallulah Bankhead.
Offside calls, VAR checked decisions and linesman flags documented
Best online casino PayID Australia – secure and convenient
Best Online Casino Australia Real Money Feel The Rush Now
Top Australian Casino Real Money One Spin Changes It All
Australian Pokies Real Money Real One Spin Million Everything
Online casino Australia legal alternatives – safe offshore casinos
Is Crown Casino online legit? – Australian players guide
Best Casino Real Money Australia Stop Settling For Small
Best Online Casino Australia Baccarat Recommended
Greetings! This is my first comment here so I just wanted to give a quick shout out and tell you I genuinely enjoy reading through your articles. Can you recommend any other blogs/websites/forums that go over the same topics? Thanks a lot!
huarenus平台结合大数据AI分析,专为海外华人设计,提供高清视频和直播服务。
爱一番海外版,专为华人打造的高清视频平台结合大数据AI分析,支持全球加速观看。
爱一番海外版,专为华人打造的高清视频平台,支持全球加速观看。
塔尔萨之王高清完整版,海外华人可免费观看最新热播剧集。
Crypto online casino Australia – Bitcoin pokies and fast withdrawals
爱一凡海外版,专为华人打造的高清视频平台,支持全球加速观看。
海外华人必备的ifun平台AI深度学习内容匹配,提供最新高清电影、电视剧,无广告观看体验。
真实的人类第一季高清完整版AI深度学习内容匹配,海外华人可免费观看最新热播剧集。
Good day! I just wish to give a huge thumbs up for the nice information you may have right here on this post. I will be coming back to your weblog for more soon.
Hi, Neat post. There is a problem along with your site in internet explorer, may check this?K IE nonetheless is the marketplace leader and a huge portion of other folks will miss your wonderful writing due to this problem.
When I initially commented I clicked the “Notify me when new comments are added” checkbox and now each time a comment is added I get four e-mails with the same comment. Is there any way you can remove me from that service? Cheers!
超人和露易斯第一季高清完整版AI深度学习内容匹配,海外华人可免费观看最新热播剧集。
超人和露易斯第三季高清完整官方版,海外华人可免费观看最新热播剧集。
海外华人必备的aiyifan平台采用机器学习个性化推荐,提供最新高清电影、电视剧,无广告观看体验。
Online casino Australia legal alternatives – safe offshore casinos
塔尔萨之王第三季高清完整版运用AI智能推荐算法,海外华人可免费观看最新热播剧集。
Real Money Online Casino Australia Fast Payouts Via
奇思妙探第二季高清完整版采用机器学习个性化推荐,海外华人可免费观看最新热播剧集。
捕风追影在线平台結合大數據AI分析,專為海外華人設計,提供高清視頻和直播服務。
Just a smiling visitor here to share the love (:, btw great style and design. “Treat the other man’s faith gently it is all he has to believe with.” by Athenus.
Can I just say what a relief to find someone who actually knows what theyre talking about on the internet. You definitely know how to bring an issue to light and make it important. More people need to read this and understand this side of the story. I cant believe youre not more popular because you definitely have the gift.
You should take part in a contest for one of the best blogs on the web. I will recommend this site!
Rattling informative and excellent structure of subject matter, now that’s user pleasant (:.
You got a very excellent website, Gladiola I found it through yahoo.
Thank you for the sensible critique. Me & my neighbor were just preparing to do a little research on this. We got a grab a book from our local library but I think I learned more clear from this post. I’m very glad to see such magnificent info being shared freely out there.
林肯律师第四季2026 海外华人悬疑律政剧 高清法庭对决 无广告
I was just looking for this info for some time. After 6 hours of continuous Googleing, finally I got it in your web site. I wonder what’s the lack of Google strategy that do not rank this type of informative web sites in top of the list. Normally the top web sites are full of garbage.
Thanks a bunch for sharing this with all folks you actually understand what you’re talking approximately! Bookmarked. Please also seek advice from my web site =). We can have a link change agreement among us!
Hiya very nice site!! Man .. Excellent .. Amazing .. I will bookmark your blog and take the feeds also…I’m happy to find so many useful information right here within the publish, we need work out extra techniques in this regard, thanks for sharing. . . . . .
Thanks for another excellent article. Where else could anyone get that kind of info in such an ideal way of writing? I have a presentation next week, and I am on the look for such info.
Generally I don’t read article on blogs, but I would like to say that this write-up very forced me to try and do so! Your writing style has been amazed me. Thanks, quite nice post.
I’ve been absent for some time, but now I remember why I used to love this site. Thank you, I will try and check back more often. How frequently you update your web site?
人之初2026 高清现实题材陆剧 海外华人免费追剧 全球加速高热度爆款
无敌第二季2026 海外华人动画超级英雄 高清暴力美学 海外华人首选
夜色正浓2026 江疏影佟大为 高清都市婚姻职场 海外华人无广告观看 实时更新
林肯律师第四季2026 海外华人免费高清律政悬疑 全球加速无广告
You actually make it seem so easy along with your presentation however I in finding this topic to be really one thing which I feel I might never understand. It kind of feels too complex and extremely broad for me. I’m looking ahead on your subsequent put up, I will try to get the cling of it!
I would like to thnkx for the efforts you have put in writing this blog. I am hoping the same high-grade blog post from you in the upcoming as well. In fact your creative writing abilities has inspired me to get my own blog now. Really the blogging is spreading its wings quickly. Your write up is a good example of it.
I like this post, enjoyed this one thank you for posting. “I would sooner fail than not be among the greatest.” by John Keats.
Stake 2026: Jogo do Tigrinho com RTP auditado + saque Pix em 5 minutos
Fortune Tiger big win 2000x: já aconteceu com você? Conta a história completa
Thanks for walking through the UXTHEME patch process—it’s great to see a clear guide for bringing some life back to older XP systems. I especially appreciate the heads-up about SP2 causing restart loops, as that could save someone a lot of troubleshooting. The theme site you mentioned looks like a solid resource for finding unique looks without the bloat of third-party installers.
I was studying some of your content on this site and I think this website is real instructive! Keep putting up.
Fortune Rabbit wilds expansivos: já cobriu 3 reels inteiros de coelhos?
Jogo do Tigrinho cashback sem limite: qual site tá devolvendo mais em 2026?
Good info. Lucky me I reach on your website by accident, I bookmarked it.
I conceive this website has got some real great info for everyone :D.
Weather conditions, pitch status and match day environment reported
Fortune Tiger big win ao vivo: já gritou gol no meio da sala? Conta!
Pre-match predictions, odds and expert picks for upcoming fixtures
Fortune Ox respins infinitos: já chegou a 30 respins seguidos? Conta o lucro!
Jogo do Tigrinho no Pix R$5: raspadinha com até 200 giros garantidos agora!
I tested this approach and it works. https://example.com/promo-864
I truly enjoy looking through on this site, it has got great blog posts.
Glad to be one of the visitors on this awful website : D.
I went over this website and I conceive you have a lot of superb info , bookmarked (:.
Regards for helping out, wonderful info .
What i don’t realize is actually how you’re not actually much more well-liked than you might be now. You’re very intelligent. You realize therefore considerably relating to this subject, produced me personally consider it from numerous varied angles. Its like women and men aren’t fascinated unless it is one thing to do with Lady gaga! Your own stuffs outstanding. Always maintain it up!
Incredible! This blog looks just like my old one! It’s on a completely different subject but it has pretty much the same page layout and design. Wonderful choice of colors!
Some times its a pain in the ass to read what blog owners wrote but this internet site is real user pleasant! .
I really enjoy studying on this website , it contains good posts.
Great weblog right here! Additionally your website loads up fast! What host are you the use of? Can I am getting your associate link to your host? I wish my website loaded up as quickly as yours lol
Fortune Tiger big win 2500x: já aconteceu com você? Conta a história completa aqui
Hello there! I could have sworn I’ve been to this website before but after reading through some of the post I realized it’s new to me. Anyways, I’m definitely happy I found it and I’ll be bookmarking and checking back often!
Lille 0-1 Crvena Zvezda 2026 Europa League Red Star surprise
A powerful share, I just given this onto a colleague who was doing just a little analysis on this. And he in reality bought me breakfast because I discovered it for him.. smile. So let me reword that: Thnx for the deal with! However yeah Thnkx for spending the time to debate this, I really feel strongly about it and love studying extra on this topic. If doable, as you grow to be experience, would you thoughts updating your blog with more particulars? It’s extremely helpful for me. Huge thumb up for this blog publish!
Jogo do Tigrinho Pix sem taxa: melhores cassinos com saque instantâneo 2026
Fortune Rabbit wilds gigantes: já teve tela cheia de coelhos dourados?
Fortune Tiger vs Fortune Rabbit: qual paga mais consistentemente em 2026?
PG Soft 2026: qual slot da série Fortune você acha que vai explodir mais esse ano?
PG Soft cashback semanal: quem já pegou R$300+ só de devolução?
Cassino PG Soft com roleta diária: 80–250 giros grátis no Fortune Tiger toda noite
PG Soft 2026: quem tá ganhando mais no mobile? Celular ou PC?
Thanks for another wonderful article. Where else could anybody get that kind of info in such an ideal way of writing? I have a presentation next week, and I’m on the look for such information.
This design is incredible! You certainly know how to keep a reader entertained. Between your wit and your videos, I was almost moved to start my own blog (well, almost…HaHa!) Fantastic job. I really enjoyed what you had to say, and more than that, how you presented it. Too cool!
Thankyou for this wondrous post, I am glad I detected this internet site on yahoo.
It’s actually a great and useful piece of information. I am glad that you just shared this useful info with us. Please stay us informed like this. Thanks for sharing.
Jogo do Tigrinho 2026: quem já ativou o recurso 5 vezes seguidas?
I truly appreciate this post. I’ve been looking all over for this! Thank goodness I found it on Bing. You have made my day! Thx again
Mahjong Ways 2 cluster de ouro: 40+ peças caindo!
Wild Bandito sticky wilds: quem já levou x400+?
You can certainly see your skills in the paintings you write. The world hopes for more passionate writers like you who are not afraid to mention how they believe. Always go after your heart. “Golf and sex are about the only things you can enjoy without being good at.” by Jimmy Demaret.
I believe this internet site contains very good pent content content.
Mahjong Ways 2 cluster: quem já pegou mais de 25 peças?
Thankyou for this post, I am a big fan of this internet site would like to go on updated.
Some genuinely interesting information, well written and generally user pleasant.
Yeah bookmaking this wasn’t a speculative decision great post! .
I’m curious to find out what blog system you happen to be using? I’m having some minor security issues with my latest website and I would like to find something more secure. Do you have any recommendations?
As soon as I detected this internet site I went on reddit to share some of the love with them.
Fortune Tiger auto spin 2000 giros: quem aguenta o ritmo?
Fortune Rabbit tá pagando mais que o Tigrinho essa semana? Mostra seu maior respin!
It is perfect time to make some plans for the future and it is time to be happy. I have read this post and if I could I desire to suggest you few interesting things or suggestions. Perhaps you can write next articles referring to this article. I wish to read more things about it!
An interesting discussion is value comment. I think that you need to write more on this subject, it may not be a taboo topic however typically people are not enough to speak on such topics. To the next. Cheers
Great blog! I am loving it!! Will be back later to read some more. I am bookmarking your feeds also
Absolutely written written content, thank you for entropy. “In the fight between you and the world, back the world.” by Frank Zappa.
Good day! This is my first comment here so I just wanted to give a quick shout out and say I truly enjoy reading through your posts. Can you recommend any other blogs/websites/forums that go over the same subjects? Thanks a ton!
Fortune Ox no Pix: R$10 vira 180 giros grátis em 2 minutos!
I am thankful that I found this web blog, just the right information that I was searching for! .
Thanks, I have recently been searching for info about this topic for a long time and yours is the best I’ve found out till now. But, what in regards to the conclusion? Are you certain in regards to the source?
Very great visual appeal on this web site, I’d value it 10 10.
Whats up very nice web site!! Man .. Beautiful .. Amazing .. I will bookmark your web site and take the feeds also…I am happy to search out numerous helpful information here in the submit, we’d like develop extra strategies on this regard, thank you for sharing. . . . . .
I like this blog very much, Its a rattling nice spot to read and get info . “What is called genius is the abundance of life and health.” by Henry David Thoreau.
Hoje teve print de resultado sólido com banca pequena e execução limpa.
Pix de valor baixo segue dominando as entradas rápidas.
Wild Bandito mostrou força em entradas calculadas.
Hello there, You’ve performed a fantastic job. I’ll definitely digg it and individually suggest to my friends. I am confident they will be benefited from this web site.
You can definitely see your expertise within the work you write. The arena hopes for more passionate writers like you who are not afraid to mention how they believe. At all times follow your heart. “We may pass violets looking for roses. We may pass contentment looking for victory.” by Bern Williams.
Quem registrou histórico de sessão evoluiu mais na tomada de decisão.
Fortune Ox deu sinais fortes no período noturno com recursos acionando em sequência curta.
Sessão boa é sessão encerrada no alvo, sem estender no impulso.
Bônus de cadastro chama atenção, mas o saque rápido decide tudo.
Muita gente trocou sessões longas por blocos de 15 minutos com pausa entre jogos.
Would love to forever get updated great web site! .
I think this web site holds some really superb information for everyone :D. “Time–our youth–it never really goes, does it It is all held in our minds.” by Helen Hoover Santmyer.
Thank you for the valuable insights, this blog was very helpful
You have noted very interesting details! ps nice web site. “‘We’re always lucky,’ I said and like a fool I did not knock on wood.” by Ernest Hemingway.
Hey There. I found your blog using msn. This
is a really well written article. I will be sure to bookmark it and come back to read
more of your useful information. Thanks for the post.
I’ll definitely return.
the community preferred steady wins over jackpot chases this afternoon.
The week trend: less emotion, more strategy on Fortune Ox entries.
Live streams of Wild Wild Riches trended again thanks to the more dynamic broadcast feel.
Lucky Neko max-bet caps during bonus are being reviewed by regulators.
Hoje teve print de resultado sólido com banca pequena e execução limpa.
Lucky Neko max-bet caps during bonus are being reviewed by regulators.
Good info and straight to the point. I am not sure if this is in fact the best place to ask but do you guys have any ideea where to get some professional writers? Thanks in advance 🙂
the player base now tracks session ROI over single hits.
Stop-loss respect saved more bankrolls than any winning streak.
Rodada curta, meta definida e saque rápido: esse está sendo o padrão de quem está consistente.
Fortune Rabbit aparece como alternativa equilibrada.
Fortune Ox became the option for those wanting fast impact.
Today the discord is only talking about the mystery card on Fortune Dragon: short runs flipping sessions in minutes.
Fortune Ox sessions are shorter and sharper than ever in 2026.
A smart session starts with an objective and ends with discipline.
The week trend: less emotion, more strategy on Fortune Mouse entries.
Fortune Dragon in turbo mode delivered solid streaks during peak liquidity hours.
Instant PayPal made same-day entry and exit easier.
A player entered with a small bank transfer bankroll and left in profit without raising risk.
Emotional control made the difference at session close.
Mahjong Ways 2 hit-frequency talk has overtaken jackpot-chase talk.
Today saw a solid result print on Lucky Neko with a small bankroll and clean execution.
Wild Bandito max-bet caps during bonus are being reviewed by regulators.
Fortune Mouse chase scenarios are systematically avoided by veterans.
Beginner audiences prefer slots with simpler reading.
Wild Bandito appealed to those who like aggressive play with control.
Fortune Dragon on auto-spin works better when the loss limit is set before starting.
Caishen Wins is back delivering full-screen wins, drawing attention peak hours.
Ganesha Gold on auto-spin works best with a pre-defined limit.
Loud guys quiet after losing month.
Semana bombando no Ganesha Gold.
Helpful breakdown of [url=https://staking-polygon.com/polygon-staking-rewards/]Polygon staking rewards[/url] — good for understanding how staking returns work before choosing a validator.
It sounds like you’re creating problems yourself by defining this as such a comprehensive, almost unknowable problem. Isn’t that self-defeating?
A friend of mine advised this site. And yes. it has some useful pieces of info and I enjoyed scaning it. Therefore i would love to drop you a quick note to express my thank. Take care
Mais uma win pro histórico. Bandito tá dominando.
Só mega win.
Um giro de sorte no Hood vs Wolf e pum! R$ 1.000. Sem ganância o resultado vem.
Chuva de moedas.
Sem red hoje.
Eae. Atualizando: odds altas. e o retorno é razoável.
Halo, ada yang tahu slot tiger? ada rekomendasi?
Eae, alguém aqui já sobre cassino em reais? alguém comprova? Ninja
Buenas noches. crash games es real.
We’re a group of volunteers and opening a brand new scheme in our community. Your web site provided us with valuable information to work on. You have performed an impressive process and our entire group might be grateful to you.
A lot of thanks for all your hard work on this web page. My aunt takes pleasure in going through research and it is simple to grasp why. A lot of people notice all about the compelling means you present very important tips by means of your website and even welcome participation from others on this theme and our child is in fact understanding a lot of things. Have fun with the remaining portion of the new year. You are performing a splendid job.
Your style is so unique compared to many other people. Thank you for publishing when you have the opportunity,Guess I will just make this bookmarked.
The heart of your writing while appearing agreeable initially, did not work properly with me personally after some time. Somewhere within the sentences you were able to make me a believer unfortunately just for a while. I still have got a problem with your jumps in logic and one might do nicely to help fill in all those gaps. In the event that you can accomplish that, I would certainly be impressed.
Hiya very nice site!! Guy .. Excellent .. Amazing .. I’ll bookmark your site and take the feeds also…I’m glad to find numerous useful information here within the post, we want work out extra techniques in this regard, thank you for sharing. . . . . .
I truly enjoy looking at on this internet site, it has got excellent posts. “A short saying oft contains much wisdom.” by Sophocles.
Why your team always falls short — and the systematic fix that changes everything.
Grand League entries in small-field Classic contests versus large Grand League pools — different strategies.